


IDV60

Instructions for Installation and Use
Dishwasher
Model IDV60
T o the Installer:
Before installation please make a note of the product details specified on the back cover
of this book.
The information can be found on the rating plate.
T o the User:
Y ou must read the instructions prior to installing and using the appliance
and then retain them for future reference.

ISHWASHER
D
Contents
Electrical Connection
For Your Safety
Installation
Getting to know your Dishwasher
The Controls
How to use your Dishwasher
Programme Chart
Before Using your Dishwasher
Loading your Dishwasher
Care and Cleaning
Troubleshooting
Information for Test Labs
Key Contacts
3
4
5
6
6
7
8
9-10
11
12
13
14
Back Cover
Retention of this Instruction Book
This Instruction Book must be kept handy for reference as it contains important details on the safe and proper use of
the appliance.
If you sell or pass the appliance to someone else, or move house and leave it behind, make sure this Book is also
provided so the new owner can become familiar with the appliance and safety warnings.
If the Book is lost or damaged a copy may be obtained from:
GDA LTD., Morley Way, Peterborough, PE2 9JB
2

Electrical Connection
WARNING: This appliance must be earthed.
ISHWASHER
D
Fuses
Y our appliance comes fitted with a plug and a 13A fuse. If you need to replace
the fuse, only those rated at 13A and ASTA approved to BS1362 should be
used. If you lose the fuse cover, a replacement may be obtained from your
local authorised Service Centre or Electrical company. Correct replacement is
identified by colour coding or the marking on base of plug.
WARNING: DO NOT use the plug unless the fuse cover is fitted.
Safety Information
At the time of delivery...
All functions of your dishwasher have been thoroughly tested at the factory . A
small number of water marks may have been left as a result, they will
disappear when the appliance is used for the first time.
WARNING: The dishwasher must not be connected to the electricity
supply while installation is being carried out.
- This appliance should only be connected to a 230/240V AC source,
Changing the Plug
Cut off and dispose of the supplied plug if it does not fit your socket.
WARNING: T o avoid a shock hazard DO NOT insert the discarded plug
into a socket anywhere else.
IMPORTANT : WIRES IN THE MAINS LEAD ARE COLOURED IN
ACCORDANCE WITH THE FOLLOWING CODE:
Green/Yellow - Earth
Blue - Neutral
Brown - Live
If you change the plug, the colour of the wires in the mains lead may not
correspond with the terminal markings in the plug, which if not coloured, could
be:
E AR T H ‘E’ or
NEUTRAL ‘N’
LIVE ‘L’
- Use the dishwasher solely in a domestic environment.
- DO NOT stand or place heavy objects on the door when it is
If your family includes children...
- DO NOT allow children to play with the appliance or tamper
- Keep detergents and rinse aids away from children. Keep
via a properly installed earthed socket.
open, this could damage the door or cause the appliance to tip
forward.
with its controls.
children away from the open door of a dishwasher, there could
still be some detergent left inside.
Changing the Mains Lead
A lead can be ordered from Creda Service
UK: 08709 066 066 or
Republic of Ireland: 1850 302 220
If you have damaged the existing lead or require a longer one a charge will be
made. It is strongly advised that this work is carried out by a qualified
electrician.
If the domestic wiring includes a residual current-operated circuit breaker,
ensure that it conforms to the latest regulations.
CAUTION:
The dishwasher meets the requirements set out by the regulations in force
concerning safety and electrical equipment.
Any technical checks should be conducted exclusively by a trained and
authorised technician: Repairs carried out by unaithorised persons will
invalidate the guarantee, as well as posing a potential hazard to the user.
The manufacturer declines all responsibility for damage to persons or property
resulting from failure to observe the above precautions, from tampering with
even a single component or from the use of non-original spare parts.
3

ISHWASHER
D
For your Safety
This manual forms an integral part of the appliance. It must always be kept handy for reference. Read through all the instructions contained in this manual before using this
dishwasher.
Installation must be performed by a qualified technician, in compliance with the
regulations in force, including the prevention and elimination of radio frequency
interference.
The dishwasher is designed for washing and drying dishes, any other
use shall be considered improper. The manufacturer declines all
responsibility for uses other than those described above.
1 . Seperate the various packaging
materials and dispose of safely DO NOT leave discarded
packaging material around the
home.
2 . After removing the packaging,
check to make sure your appliance
is intact. If in doubt, contact a
qualified professional.
3. DO NOT use extension leads and
multiple plugs. If the electricity
supply wire is not long enough,
then have it replaced with one of
the correct length and remember
that it should be free of bends or
dangerous kinks.
4 . In the event of any damage to the
power cord have it replaced by a
qualified technician.
5 . The mains plug must be easily
accessible after installation.
6 . If the appliance is not operating
properly or if maintenance
operations are necessary,
disconnect the dishwasher from
the mains power supply (unplug
it!).
7. DO NOT install outdoors, not even
if the area is covered by a roof: it is
extremely dangerous to leave it
exposed to rain and
thunderstorms.
8. If installed on a carpeted or
covered floor, ensure that the
openings on the underside are not
obstructed.
9. Do not touch the heating element
during or straight after a wash
cycle.
10 . If the appliance malfunctions,
turn off the water inlet tap and
disconnect the plug from the wall
socket. Then read the section
entitled "Troubleshooting". If you
cannot resolve the problem, then
call Creda Service (see KEY
CONTACTS, back page).
The rating plate, featuring the
technical data, serial number and
markings, is visibly positioned
on the inner edge of the door.
DO NOT remove the rating plate.
The dishwasher is intended for use by adults. DO NOT allow children to come
near or play with the controls.
Keep children away from detergents and clear of the dishwasher door when
open.
Keep all packaging material away from children.
1 . DO NOT use solvents, such as alcohol or turpentine which may cause an
explosion.
2. DO NOT load dishes to wash that are soiled with ash, wax or paints.
3 . DO NOT lean, sit or stand on any part of the dishwasher - this could cause
injury and/or damage the appliance.
4. DO NOT drink any water residues from inside the dishwasher.
4
Installation
ISHWASHER
D
Choose where you want to install your
dishwasher, you can place it so that its
sides or back panel are side by side with
furniture or up against the wall. The
dishwasher is provided with water supply
and drain hoses, which can be directed
towards the left or right to facilitate
appropriate installation.
Levelling.
Once the appliance is positioned, adjust
the feet by screwing them in or out
depending on how high you want it and
to level it so that it is horizontal. Make
sure that it is not inclined more than 2
degrees. If the appliance is level, it will
help ensure its correct operation.
Height Adjustment
Insert the appliance into the cutout and
then adjust the height using the screws
located on the front bottom part of the
machine. Use a screwdriver to turn the
screws in the clockwise or anti-clockwise
direction to increase or decrease the
height respectively.
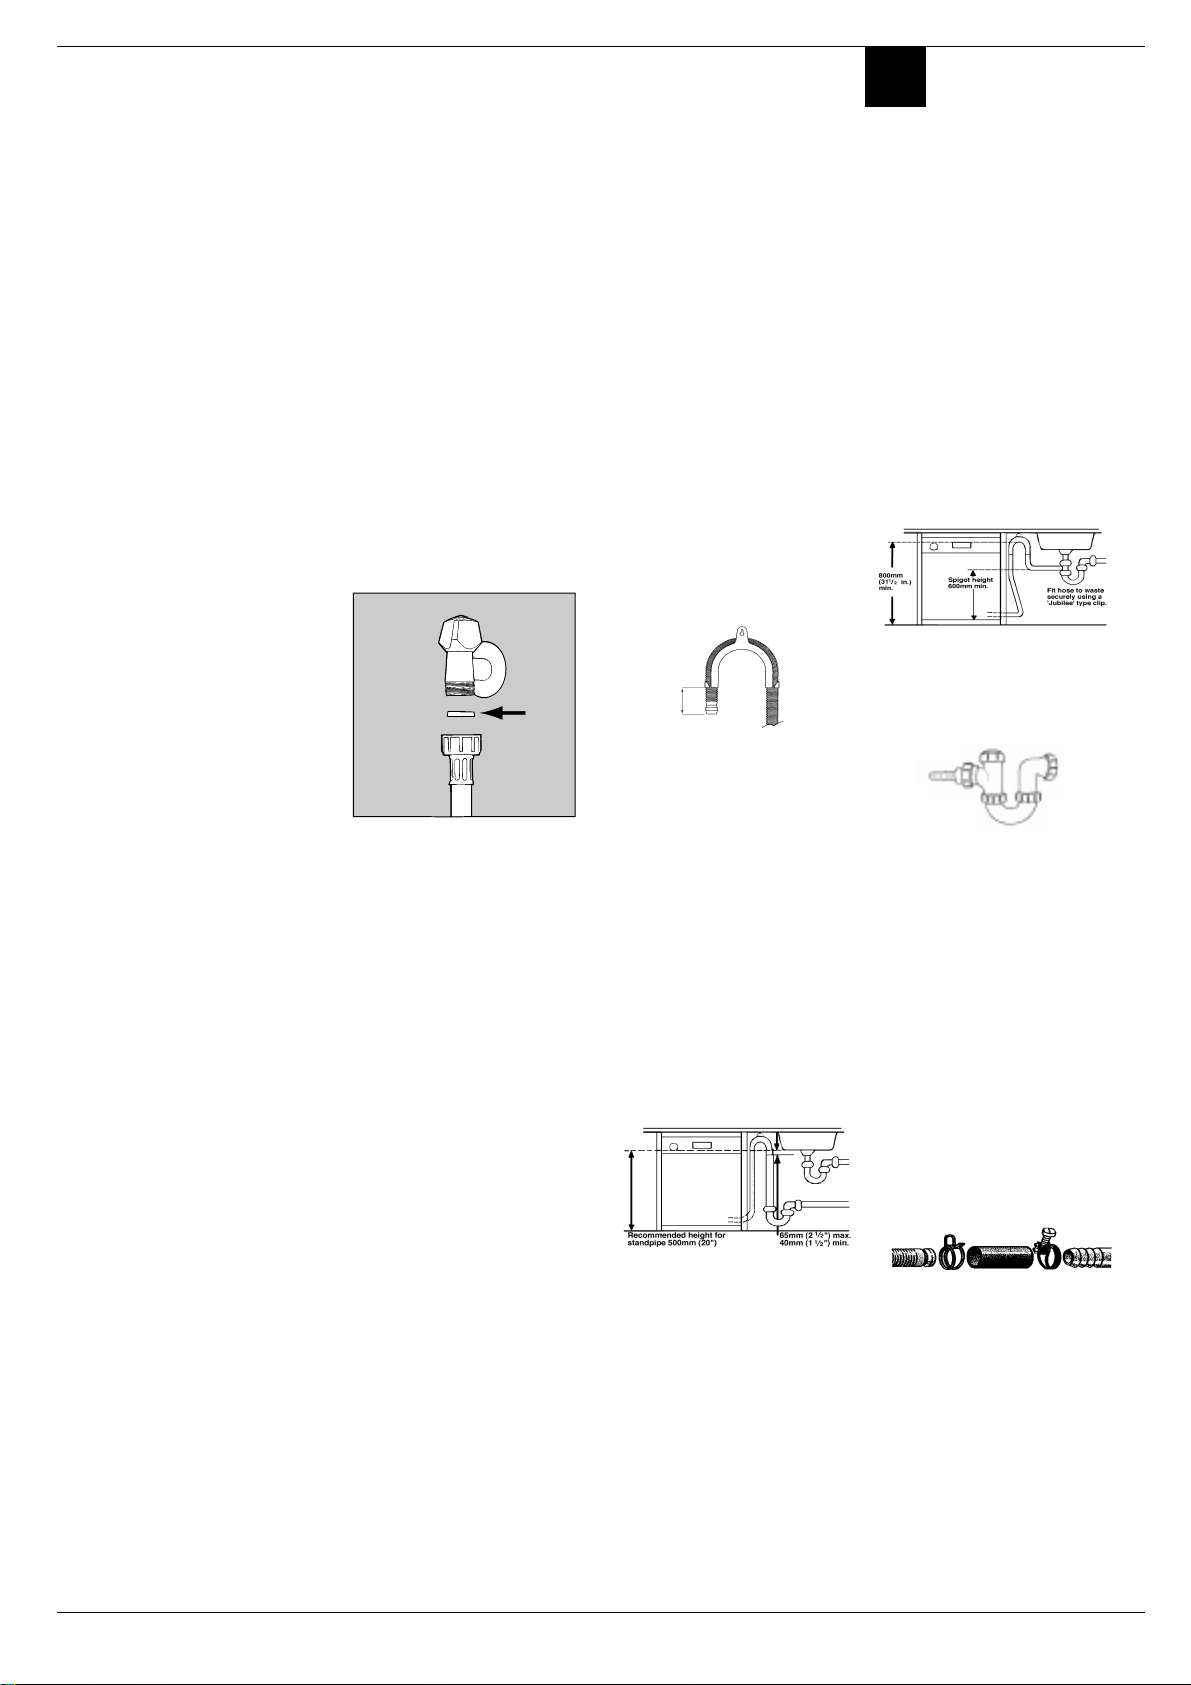
Cold water connection.
Connect the cold water supply hose,
inserting the small filter supplied with the
dishwasher and making sure that it is
fastened tightly in place (see figure 2). If
the water hoses are new or have been
out of use for an extended period of time,
let the water run to make sure it is clear
and free of impurities before making the
connection. If this precaution is not taken,
the water inlet could get blocked, causing
damage to your dishwasher.
A
Fig.2
Drain hose connection.
WARNING: Connect your dishwasher
drain hose to pipes which connect to the
foul drain system and not to surface
water drains.
IMPORT ANT: For the correct operation
of your dishwasher, it is essential to
comply with the following information:-
Standpipe:
Ensure that the hose is not pushed too
far down the standpipe.
If the end of your drain hose is fitted with
‘retaining flaps’, ensure they are inserted
fully into the standpipe. This will prevent
the pipe from jumping out during
installation and use.
DO NOT position the standpipe near an
electrical outlet.
ENSURE that the drain hose is not
kinked and it is routed as shown in the
diagram.
The standpipe should have a bore of at
least 38mm (11/2”). It should be installed
as shown, have a trap fitted and must
discharge into the same drain system
as your household sink.
It MUST NOT be connected to a surface
water drain.
Sink Waste System:
For under sink drainage:
Before connecting the drain hose,
remove any internal restrictions - This
will prevent a build up of debris which
could cause a blockage.
Remove any restrictions from the waste
spigot and ensure that the sealing bung
is removed. The hose should be routed,
such that it is raised to a minimum height
of 800mm (31/2”).
NOTE: Ensure the sink outlet pipe
has a minimum diamtere of 32mm.
1. Untie the end of the GREY
drainage hose from the rear of the
appliance.
2. Reposition the ‘Hooked End
Support’ as required along the GREY
drainage hose.
3. If fitting an under sink waste
disposal unit, cut out the membrane,
bung or blanking plug.
4. Attach the GREY drainage hose to
the under sink waste disposal unit
securely , using the clip and rubber
tube supplied.
Ensure the drain hose is
securely attached, to prevent it
coming away while the machine
is in use and causing a flood.
5
 Loading...