


DXJ112 Digital Guitar Amplifier
Welcome. Please, Read This:
We at Crate extend our sincere “welcome” into a whole new world: a world where the legendary performance of a musician-made Crate amplifier combines with the wonders of digital amp modeling and effects. We bring you the only amplifier you’ll ever need: the Crate DXJ112. The heart and soul of sixteen different amplifiers have been captured through the miracles of digital software engineering and placed into the DX amplifier. Not only does the amp sound like the originals, it performs like the originals, with the same tones and character of all your favorites – from vintage British grit to today’s heavy metal – with a wide variety in between.
Along with digital amp modeling comes sixteen digital effects, all designed to rock your world from here to Sunday. And, you can tweak each effect to your heart’s content!
Got your own favorite effects? Not to worry – the DX amps have stereo line in and line out jacks for use as a stereo effects loop, or for connecting to an external stereo power amp. It’s like having your cake and eating it, too – with extra icing!
The DX amplifier is programmable and can be controlled in a number of ways, including through the front panel keypad, with the optional Crate Foot Controller, or via MIDI.
Within the pages of this Operating Guide you will find all sorts of pertinent, useful and sometimes technical information which we at Crate felt you ought to have. Please indulge us a bit and take the time to actually read through this Guide at some point. Until then, for those of you who just can’t wait to plug in and go, we offer you:
Quick Start: Plug In and Go!
(page 1)
There you’ll find just enough information to get you started. If you run into any situation that isn’t covered in the Quick Start section, you might have to – guitar gods forbid – read this guide first.
We at Crate thank you for choosing the DXJ112 Digital Guitar Amplifier!
i
DXJ112 Digital Guitar Amplifier
Important Safeguards and Precautions:
All Crate products are designed for continuous safe operation, as long as common sense is used and steps are taken to help avoid certain problems. Abiding by the following rules can help prevent damage to your amplifier, yourself and others.
•The amplifier is equipped with a three-pronged AC power cord. To reduce the risk of electrical shock, NEVER remove or otherwise attempt to defeat the ground pin of the power cord.
• Connect the amplifier ONLY to a properly grounded AC outlet of the proper voltage for your amp.
•Avoid sudden temperature extremes, rain and moisture. Also, avoid sudden and intense impact. (If the unit has been subjected to any of the preceding abuses, have it looked at by an authorized service center.)
•NEVER set the amplifier on a support that might give out under its weight.
•Always keep the total speaker impedance at or above the rated load.
•Unplug the amplifier before cleaning it. NEVER spray liquid cleaners onto the amplifier. Wipe it with a slightly dampened, lint-free cloth to remove dirt and film.
•Do not use the amplifier if it has sustained damage to the chassis, controls, or power cord. Refer the unit to an authorized service center for inspection.
•Amplifiers capable of producing high volume levels are also capable of inflicting permanent hearing loss or damage, if the exposure to such levels is prolonged. Such damage is progressive and irreversible! Consider using quality hearing protection devices.
|
Declaration Of Conformity |
|
#37, Effective 01-01-2001 |
Manufacturer’s Name: |
SLM Electronics |
Production Facility: |
11880 Borman Drive, St. Louis, MO 63146, USA |
Production Facility: |
700 Hwy 202 W, Yellville, AR 72687, USA |
Shipping Facility: |
1400 Ferguson Ave., St. Louis, MO 63133, USA |
Office Facility: |
1400 Ferguson Ave., St. Louis, MO 63133, USA |
Product Type: |
Audio Amplifier |
Complies with Standards: |
|
LVD: |
92/31/EEC, 93/68/EEC, & 73/23/EWG |
Safety: |
EN60065 |
EMC: |
EN55013, EN55020, EN55022, EN61000-3-2, |
|
& EN61000-3-3 |
Supplementary information provided by your local Sales & Services Office or: SLM Electronics - R & D Engineering
1901 Congressional Drive, St Louis, MO 63146, USA
Tel.: 314-569-0141, Fax: 314-569-0175
CAUTION
RISK OF ELECTRIC SHOCK
DO NOT OPEN
WARNING: TO REDUCE THE RISK OF FIRE OR ELECTRIC SHOCK, DO NOT EXPOSE THIS APPARATUS TO RAIN OR MOISTURE. TO REDUCE THE RISK OF ELECTRIC SHOCK, DO NOT REMOVE COVER. NO USER-SERVICEABLE PARTS INSIDE. REFER SERVICING TO QUALIFIED SERVICE PERSONNEL.
PRECAUCION
RIESGO DE CORRIENTAZO
NO ABRA
PRECAUCION: PARA REDUCIR EL RIESGO DE INCENDIOS O DESCARGAS ELECTRICAS, NO PERMITA QUE ESTE APARATO QUEDE EXPUESTO A LA LLUVIA O LA HUMEDAD. PARA DISMINUOIR EL RIESGO DE CORRIENTAZO. NO ABRA LA CUBIERTA. NO HAY PIEZAS ADENTRO QUE EL USARIO PUEDO REPARAR DEJE TODO MANTENIMIENTO A LOS TECHNICOS CALIFICADOS.
ATTENTION
RISQUE D'ELECTROCUTION
NE PAS OUVRIR
ATTENTION: PROTÉGEZ CET APPAREIL DE LA PLUIE ET DE L'HUMIDITÉ AFIN D'ÉVITER TOUT RISQUE D'INCENDIE OU D'ÉLECTROCUTION. POUR REDUIRE D'ELECTROCUTION NE PAS ENLEVER LE COUVERCLE. AUCUNE PIECE INTERNE N'EST REPRABLE PAR L'UTILISATEUR. POUR TOUTE REPARATION, S'ADRESSER A UN TECHNICIEN QUALIFIE.
IMPORTANT SAFETY INSTRUCTIONS
•READ, FOLLOW, HEED, AND KEEP ALL INSTRUCTIONS AND WARNINGS.
•DO NOT OPERATE NEAR ANY HEAT SOURCE AND DO NOT BLOCK ANY VENTILATION OPENINGS ON THIS APPARATUS. FOR PROPER OPERATION, THIS UNIT REQUIRES 3” (75CM) OF WELL VENTILATED SPACE AROUND HEATSINKS AND OTHER AIR FLOW PROVISIONS IN THE CABINET.
•DO NOT USE THIS APPARATUS NEAR SPLASHING, FALLING, SPRAYING, OR STANDING LIQUIDS.
•CLEAN ONLY WITH LINT-FREE DAMP CLOTH AND DO NOT USE CLEANING AGENTS.
•ONLY CONNECT POWER CORD TO A POLARIZED, SAFETY GROUNDED OUTLET WIRED TO CURRENT ELECTRICAL CODES AND COMPATIBLE WITH VOLTAGE, POWER, AND FREQUENCY REQUIREMENTS STATED ON THE REAR PANEL OF THE APPARATUS.
•PROTECT THE POWER CORD FROM DAMAGE DUE TO BEING WALKED ON, PINCHED, OR STRAINED.
•UNPLUG THE APPARATUS DURING LIGHTNING STORMS OR WHEN UNUSED FOR LONG PERIODS OF TIME.
•ONLY USE ATTACHMENTS, ACCESSORIES, STANDS, OR BRACKETS SPECIFIED BY THE MANUFACTURER FOR SAFE OPERATION AND TO AVOID INJURY.
•THIS APPARATUS DOES NOT OPERATE NORMALLY AND REQUIRES SERVICE WITH ANY PHYSICAL DAMAGE FROM IMPACT OR ANY EXPOSURE TO MOISTURE.
•SERVICE MUST BE PERFORMED BY QUALIFIED PERSONNEL.
•OUR AMPLIFIERS ARE CAPABLE OF PRODUCING HIGH SOUND PRESSURE LEVELS. CONTINUED EXPOSURE TO HIGH SOUND PRESSURE LEVELS CAN CAUSE PERMANENT HEARING IMPAIRMENT OR LOSS. USER CAUTION IS ADVISED AND EAR PROTECTION IS RECOMMENDED IF UNIT IS OPERATED AT HIGH VOLUME.
EXPLANATION OF GRAPHICAL SYMBOLS: |
"DANGEROUS VOLTAGE" |
EXPLICACION DE SIMBOLOS GRAFICOS: |
= “VOLTAJE PELIGROSO” |
EXPLICATION DES SYMBÔLES GRAPHIQUES: |
"DANGER HAUTE TENSION" |
"IT IS NECESSARY FOR THE USER TO REFER TO THE INSTRUCTION MANUAL"
=“ES NECESARIO QUE EL USUARIO SE REFIERA AL MANUAL DE INSTRUCCIONES.” "REFERREZ-VOUS AU MANUAL D'UTILISATION"
ii
DXJ112 Digital Guitar Amplifier |
|
Contents |
|
Quick Start: Plug In and Go! |
|
Making Sound . . . . . . . . . . . . . . . . . . . . . . . . . . . . . . . . . . . . . . . . . . . . . . |
1 |
A Look at the Front Panel Controls . . . . . . . . . . . . . . . . . . . . . . . . . . . . . |
3 |
A Look at the Rear Panel . . . . . . . . . . . . . . . . . . . . . . . . . . . . . . . . . . . . . |
5 |
Making the Right Connections |
|
The Input Jacks . . . . . . . . . . . . . . . . . . . . . . . . . . . . . . . . . . . . . . . . . . . . . . |
7 |
The Stereo Line In and Line Out Jacks . . . . . . . . . . . . . . . . . . . . . . . . . . . |
7 |
Using a MIDI Footswitch . . . . . . . . . . . . . . . . . . . . . . . . . . . . . . . . . . . . . . |
9 |
Using the Crate Foot Controller . . . . . . . . . . . . . . . . . . . . . . . . . . . . . . . . |
9 |
The MIDI Out/Thru Jack . . . . . . . . . . . . . . . . . . . . . . . . . . . . . . . . . . . . . . |
9 |
The Stereo Headphones Jack . . . . . . . . . . . . . . . . . . . . . . . . . . . . . . . . . . |
9 |
The Amp Models
Descriptions of the Models . . . . . . . . . . . . . . . . . . . . . . . . . . . . . . . . . .11
Equalization and Channel Level . . . . . . . . . . . . . . . . . . . . . . . . . . . . . . .13
The Digital Effects
Descriptions of the Effects . . . . . . . . . . . . . . . . . . . . . . . . . . . . . . . . . . .15
Effects Selection and Adjustment . . . . . . . . . . . . . . . . . . . . . . . . . . . . .17
Bypassing the Effects . . . . . . . . . . . . . . . . . . . . . . . . . . . . . . . . . . . . . . . .17
The Keypad |
|
Recalling The Presets . . . . . . . . . . . . . . . . . . . . . . . . . . . . . . . . . . . . . . . . |
19 |
Saving New Presets . . . . . . . . . . . . . . . . . . . . . . . . . . . . . . . . . . . . . . . . . |
19 |
The Tap Button . . . . . . . . . . . . . . . . . . . . . . . . . . . . . . . . . . . . . . . . . . . . |
20 |
The Manual (“MAN”) Button . . . . . . . . . . . . . . . . . . . . . . . . . . . . . . . . . |
20 |
Restoring Factory Default Presets . . . . . . . . . . . . . . . . . . . . . . . . . . . . . . |
20 |
Playing Favorites
Factory Presets 1–10 . . . . . . . . . . . . . . . . . . . . . . . . . . . . . . . . . . . . . . .21
User Presets . . . . . . . . . . . . . . . . . . . . . . . . . . . . . . . . . . . . . . . . . . . . . . .23
Appendices |
|
|
A. |
Designer’s Note: Amplifier Modeling . . . . . . . . . . . . . . . . . . . . . . . |
25 |
|
Block Diagrams . . . . . . . . . . . . . . . . . . . . . . . . . . . . . . . . . . . . . . . . . |
26 |
B. |
MIDI Implementation Chart . . . . . . . . . . . . . . . . . . . . . . . . . . . . . . . |
27 |
C. |
Specifications . . . . . . . . . . . . . . . . . . . . . . . . . . . . . . . . . . . . . . . . . . |
28 |
iii
MODELS AMP CONNECTIONS START QUICK
EFFECTS
KEYPAD THE
FAVORITES
QUICK START
DXJ112 Digital Guitar Amplifier
Quick Start: Plug In and Go!
Making Sound:
|
|
|
Top Mount |
|
|
|
|
|
|
|
|
|
|
Touch Wah |
|
|
|
|
|
|
|
|
|
|
Clean |
High Power |
|
|
|
|
|
|
|
|
|
|
Comp/Echo |
Bypass/Comp |
|
|
|
|
|
|
|
|
|
Acoustic |
Studio Tweed |
|
|
|
|
|
|
|
|
|
|
Comp/Chorus |
Tremolo |
|
|
|
|
|
|
|
|
|
Blue Voodoo |
Black Face |
|
|
|
|
|
|
|
|
|
|
Cmp/Flg/Echo |
Vibrato |
|
|
|
|
|
|
|
|
|
Vintage Club |
Large Tweed |
|
|
|
|
|
|
|
|
|
|
Cmp/Cho/Echo |
Chorus |
|
|
|
|
|
|
|
|
|
Flexwave |
60s Era UK |
|
|
|
|
|
|
|
|
|
|
Cmp/Vib/Echo |
Flanger |
|
|
|
|
|
|
|
α |
Ω |
Ampeg VL |
70s Era UK |
α |
Ω |
α |
Ω |
α |
Ω |
α |
Ω |
α |
Ω |
Flange/Echo |
Delay |
α |
Ω |
α |
Ω |
α |
Ω |
|
Calif Mod |
Fuzzbox |
Chor/Echo |
Echo |
|||||||||||||||||||
|
|
|
|
|
|
|
|
|
|
|
|
|
|
|
|
|
|
|||||
|
|
Tube Rectifier |
|
|
|
|
|
|
|
|
|
|
Rotating Spkr |
|
|
|
|
|
|
|||
|
Start low, |
|
Adjust for |
|
Modify |
|
|
turn up |
|
more or |
Change the |
Change |
|
|
|
the chosen |
||||
|
as desired |
|
less gain |
tone and |
||
|
Try out the |
effect |
reverb amount |
|||
|
|
|
volume |
|||
|
|
different |
|
Choose a |
and depth |
|
Connect |
|
|
|
|||
|
amp models |
|
|
digital effect |
|
|
your |
|
|
|
|
|
|
guitar |
|
|
|
|
|
|
1
DXJ112 Digital Guitar Amplifier
Try out the factory presets (bank A,1 – 5; bank B, 6 – 10)
Making Sound:
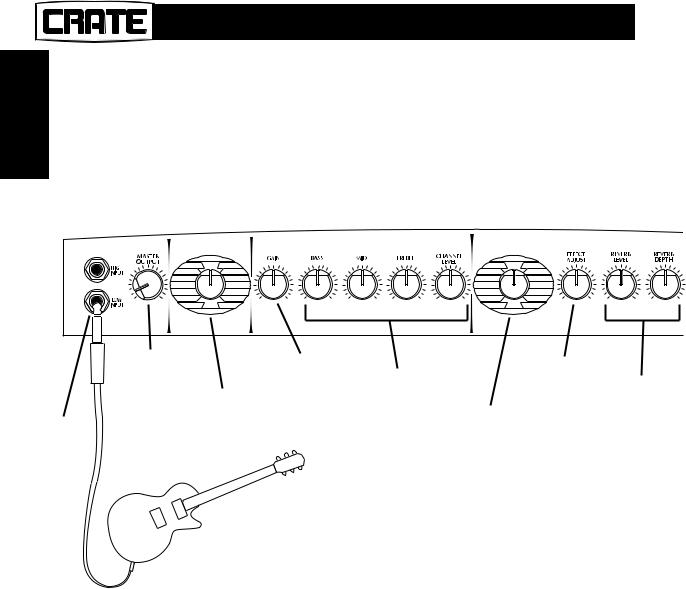
•You may want to start out with the Master control turned down low, since this amp can get LOUD.
•Connect your guitar, plug in the amp and turn it on. (The power cord and power switch are on the back of the amplifier.)
•Select the manual mode by pressing the MAN button on the keypad.
•Adjust the Gain control to get the amount of gain you want.
•Try out the amp models by turning the Amp Selector knob.
•Use the Bass, Mid, Treble and Channel Level controls to change the tone and volume. The EQ settings will vary depending on the amp model you choose.
•Choose a digital effect by turning the Effects Selector knob.
•Modify the chosen effect by turning the Effect Adjust control.
•Adjust the reverb by turning the Reverb Level and Depth controls.
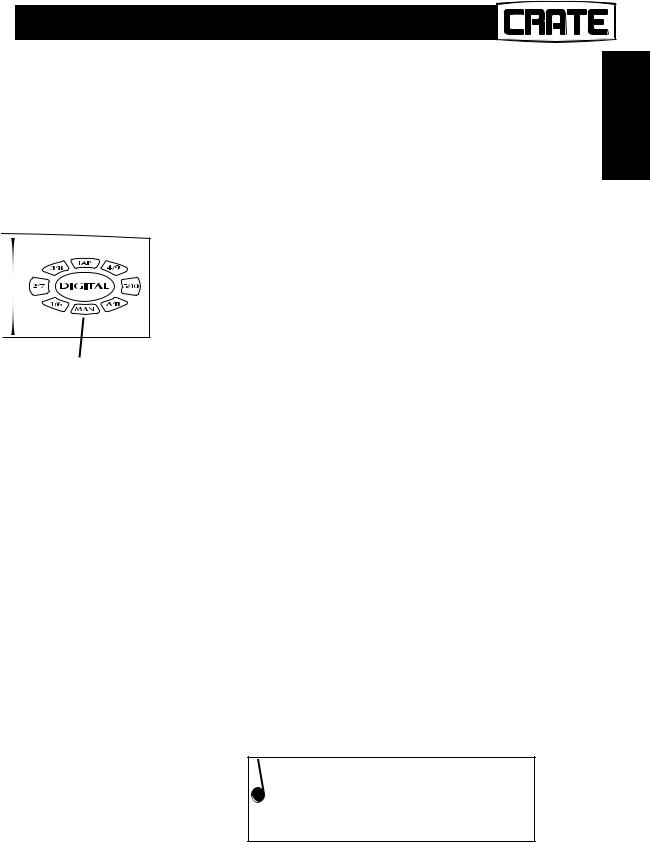
•Try out the factory presets by pressing the numbered buttons and the A/B button on the Keypad.
 When the amp is first turned on, the A/B button on the keypad is not illuminated, and the numbered buttons will
recall presets 1-5 (bank A). When you press the A/B button it illuminates, and the numbered buttons will recall
presets 6-10 (bank B).
START QUICK
2
QUICK START
DXJ112 Digital Guitar Amplifier
Quick Start: Plug In and Go!
A Look at the Front Panel Controls:
|
|
|
|
Top Mount |
|
|
|
|
|
|
|
|
|
|
|
|
|
|
|
Clean |
High Power |
|
|
|
|
|
|
|
|
|
|
|
|
|
|
Acoustic |
Studio Tweed |
|
|
|
|
|
|
|
|
|
|
|
|
|
|
Blue Voodoo |
Black Face |
|
|
|
|
|
|
|
|
|
|
|
|
|
|
Vintage Club |
Large Tweed |
|
|
|
|
|
|
|
|
|
|
|
|
|
|
Flexwave |
60s Era UK |
|
|
|
|
|
|
|
|
|
|
|
|
α |
Ω |
Ampeg VL |
70s Era UK |
α |
Ω |
α |
Ω |
α |
Ω |
α |
Ω |
α |
Ω |
|
|
Calif Mod |
Fuzzbox |
||||||||||||
|
|
|
|
|
|
|
|
|
|
|
|
|
|
||
|
|
|
|
Tube Rectifier |
|
|
|
|
|
|
|
|
|
|
|
1 |
2 |
3 |
|
4 |
|
|
5 |
|
6 |
|
7 |
|
8 |
|
9 |
Touch Wah
Comp/Echo |
Bypass/Comp |
Comp/Chorus |
Tremolo |
Cmp/Flg/Echo |
Vibrato |
Cmp/Cho/Echo |
Chorus |
Cmp/Vib/Echo |
Flanger |
Flange/Echo |
Delay |
α |
Ω |
α |
Ω |
α |
Ω |
|
|
|
|
|
|
||
Chor/Echo |
Echo |
|
|
|
|
|
|
Rotating Spkr |
|
|
|
|
|
|
|
10 |
11 |
12 |
13 |
14 |
3

DXJ112 Digital Guitar Amplifier
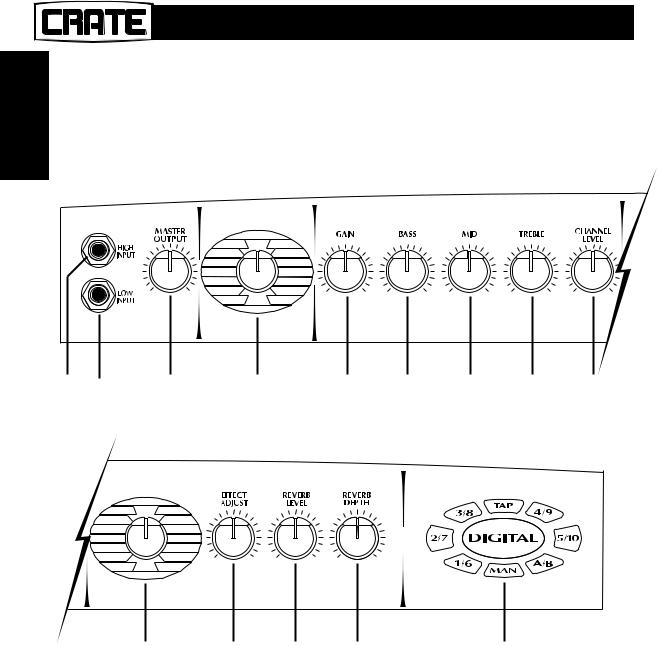
The Front Panel :
1, 2. High & Low In: Use High In for standard pickups, Low In for “hot” pickups and/or on-board active electronics.
3. Master: Sets the overall output level. The
Master volume is the only non-programma- ble setting on the amplifier.
4. Amp Model Selector: Chooses the desired amp model.
5. Gain: Adjusts the input gain.
6, 7, 8. Bass, Mid, Treble: Adjusts the signal tone.
9. Channel Level: Sets the output level of the current preset.
10. Effects Selector: Chooses the effect applied to the signal.
11. Effects Adjust: Changes one or more parameter of the current effect.
12. Reverb Level: Sets the amount of reverberation applied to the signal.
13. Reverb Depth: Changes the depth and high-frequency damping of reverberation, from a very small room (fully counter-clock- wise) to a very large hall (fully clockwise).
14. Keypad: Recalls and saves presets, using the numbered buttons and the A/B button.
Refer to Section / Page:
“The Input Jacks” – page 7,8
“Descriptions of the Models” – page 11,12
“Equalization and Channel Level” – page 13,14 “Equalization and Channel Level” – page 13,14
“Equalization and Channel Level” – page 13
“Descriptions of the Effects” – page 15,16
“Effects Selection and Adjustment” – page 17,18
“Description of the Effects” – page 15,16
“The Keypad” – page 19,20
START QUICK
(These are the barest of the bare-bones descriptions – enough to get you started. Please check out the sections and pages noted for more information – this goes for the rear panel, too.)
4
QUICK START
DXJ112 Digital Guitar Amplifier
Quick Start: Plug In and Go!
A Look at the Rear Panel:
POWER
MADE IN THE U.S.A. BY SLM ELECTRONICS 1400 FERGUSON AVENUE ST. LOUIS. MO 63133
DXJ112a
MODELAEIOU1269D-112/212
SERIAL# 
CAUTION
RISK OF ELECTRIC
SHOCK – DO NOT OPEN
AVIS:RISQUE DE CHOC ELECTRIQUE
NE PAS OUVRIR
TO REDUCE THE RISK OF ELECTRIC SHOCK, DO NOT EXPOSE THIS EQUIPMENT TO RAIN OR MOISTURE.
CAUTION:
CHASSIS
SURFACE HOT.
ATTENTION:
SUPERFACIE
DE CHASSIS EST
CHAUDE.
15 |
16 |
STEREO |
STEREO |
STEREO |
STANDARD |
MIDI |
MIDI IN/ |
HEAD |
LINE |
LINE |
MIDI |
THRU/ |
FOOT |
PHONES |
OUT |
IN |
|
OUT |
SWITCH |
CRATE
FOOT
CONTROLLER
17 |
18 |
19 |
20 |
21 |
22 |
5
DXJ112 Digital Guitar Amplifier
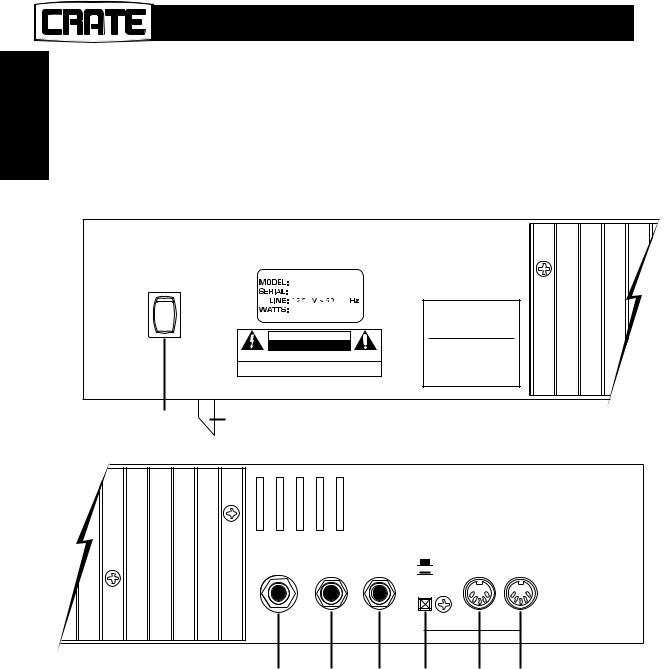
The Rear Panel :
15. Power Switch: Depress the top of this switch to turn the amplifier on. (Allow a few seconds for the amp to respond.)
16. AC Line Cord: Plug the male end of this cord into a properly grounded AC outlet of the correct voltage. DO NOT DEFEAT THE
GROUND PIN OF THE AC PLUG!
17. Stereo Headphones: For those private moments, plug a pair of stereo headphones into this jack. The internal speaker is muted when headphones are used. (Can also be used for recording.)
18.Stereo Line Out: Connect this output to a stereo amplifier or effects unit.
19.Stereo Line In: Connect the output of an external effects unit here.
20. Standard MIDI/Crate Footswitch Controller: This switch lets you choose how you control your DXJ112 – via MIDI or with the optional Crate Foot Controller.
21. MIDI Thru/Out: Connect to another MIDI device you wish to control with the foot controller.
22. MIDI In/Foot Switch: This jack either accepts a standard MIDI input or lets you use the Crate Foot Controller.
Refer to Section / Page:
“Stereo Headphones Jack” – page 9,10
“The Stereo Line In and Line Out Jacks” – page 7,8
“The Stereo Line In and Line Out Jacks” – page 7,8
“Using the Crate Foot Controller” – page 9,10
“The MIDI Thru/Out Jack” – page 9,10
“Using a MIDI Footswitch” – page 9,10
START QUICK
(That’s all we’re gonna give you for now! To learn a whole lot more, read the rest of this guide!)
6
DXJ112 Digital Guitar Amplifier
Making the Right Connections
The Input Jacks:
CONNECTIONS
|
|
|
Top Mount |
|
|
|
|
|
|
|
|
|
|
Touch Wah |
|
|
|
|
|
|
||
|
|
Clean |
High Power |
|
|
|
|
|
|
|
|
|
|
Comp/Echo |
Bypass/Comp |
|
|
|
|
|
|
|
|
|
Acoustic |
Studio Tweed |
|
|
|
|
|
|
|
|
|
|
Comp/Chorus |
Tremolo |
|
|
|
|
|
|
|
|
|
Blue Voodoo |
Black Face |
|
|
|
|
|
|
|
|
|
|
Cmp/Flg/Echo |
Vibrato |
|
|
|
|
|
|
|
|
|
Vintage Club |
Large Tweed |
|
|
|
|
|
|
|
|
|
|
Cmp/Cho/Echo |
Chorus |
|
|
|
|
|
|
|
|
|
Flexwave |
60s Era UK |
|
|
|
|
|
|
|
|
|
|
Cmp/Vib/Echo |
Flanger |
|
|
|
|
|
|
|
α |
Ω |
Ampeg VL |
70s Era UK |
α |
Ω |
α |
Ω |
α |
Ω |
α |
Ω |
α |
Ω |
Flange/Echo |
Delay |
α |
Ω |
α |
Ω |
α |
Ω |
|
Calif Mod |
Fuzzbox |
Chor/Echo |
Echo |
|||||||||||||||||||
|
|
|
|
|
|
|
|
|
|
|
|
|
|
|
|
|
|
|||||
|
|
Tube Rectifier |
|
|
|
|
|
|
|
|
|
|
Rotating Spkr |
|
|
|
|
|
|
|||
The Stereo Line In and Line Out Jacks:
POWER
MADE IN THE U.S.A. BY SLM ELECTRONICS 1400 FERGUSON AVENUE ST. LOUIS. MO 63133
DXJ112a
MODELAEIOU1269D-112/212
SERIAL# 
CAUTION
RISK OF ELECTRIC
SHOCK – DO NOT OPEN
AVIS:RISQUE DE CHOC ELECTRIQUE
NE PAS OUVRIR
TO REDUCE THE RISK OF ELECTRIC SHOCK, DO NOT EXPOSE THIS EQUIPMENT TO RAIN OR MOISTURE.
CAUTION:
CHASSIS
SURFACE HOT.
ATTENTION:
SUPERFACIE
DE CHASSIS EST
CHAUDE.
STEREO |
STEREO |
STEREO |
STANDARD |
MIDI |
MIDI IN/ |
HEAD |
LINE |
LINE |
MIDI |
THRU/ |
FOOT |
PHONES |
OUT |
IN |
|
OUT |
SWITCH |
CRATE
FOOT
CONTROLLER
7
 Loading...