


BFX25
BFX50
BASS AMPLIFIER
WITH
DIGITAL SIGNAL
PROCESSING
DSP
BFX50 
OWNER’S MANUAL
Congratulations!
You are now the proud owner of the compact but powerful Crate BFX25/50 Bass Amplifier with Digital Signal Processing. This offers you a wide selection of digital effects designed especially for the bass guitar, each of which are easily accessed with a simple turn of a control knob. (No programmers degree required!) A four-band rotary EQ combined with Crate’s variable Contour gives you complete control over a wide variety of sounds. In addition, the front panel headphone and extension speaker jacks make this amplifier equally suited for private practicing as well as performing in intimate surroundings.
Like all Crate products, your BFX25/50 is designed by musicians and built using only the best components. Extensive testing at the hands (and ears) of skilled technicians and musicians insures you that this amplifier is the absolute best it can be.
In order to get the most out of your new bass amp, we recommend that you read this manual before you begin playing.
And thank you for choosing 
BFX25/50 Bass Amplifier
INPUT |
CONTOUR |
EQUALIZATION |
MASTER |
DSP |
|
|
|
|
BFX50 |
|
|
ACTIVE |
|
|
1 |
2 |
3 |
4 |
5 |
6 |
7 |
8 |
9 |
10 |
11 |
12 |
13 |
14 |
15 |
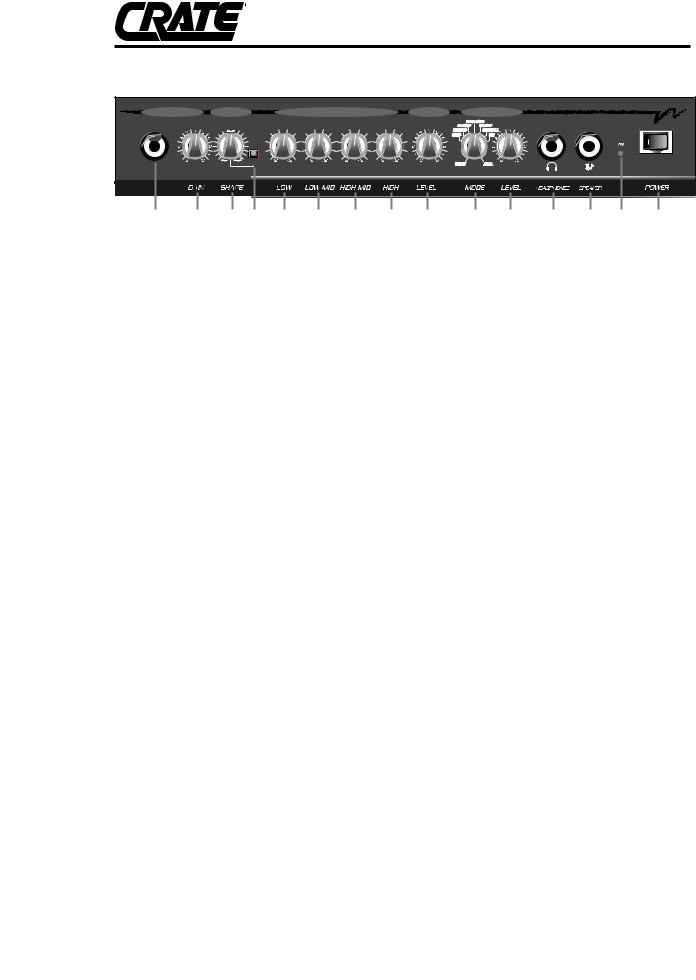
The Front Panel:
1.INPUT: The signal output from an instrument (active or passive) or a line level signal may be connected here by means of a shielded instrument cable.
2.GAIN: This serves as the input signal level control for the amplifier, allowing you to set the amplifier for the best signal to noise ratio.
3:CONTOUR SHAPE: This control is only active when the Contour Active switch (#4) is depressed. The setting of this control shifts the frequency where the contour effect is centered, giving you a wide variety of tonal variations, from a studio “V”-shaped tone to a more “live”, more present sound.
4:CONTOUR ACTIVE: This switch, when depressed, activates the Contour Shape control (#3).
5.LOW: This is the low frequency control which allows for a19dB range of cut or boost at 60Hz.
6.LOW MID: This is the lower-midrange frequency control which allows for a 25dB range of cut or boost at 200Hz.
7.HIGH MID: This is the upper-midrange frequency control which allows for a 19dB range of cut or boost at 1kHz.
8.HIGH: This is the high frequency control which allows for a 38dB range of cut or boost at 10kHz.
9.MASTER LEVEL: This is the overall output level control for the amplifier.
10.DSP MODE: Select the type of digital effect(s) applied to the signal with this control. Each effect and its central location is called out by the markings around the control. The effects are described as follows:
DELAY: Slapback delay effect
ECHO: Long delay effect with regeneration CHORUS: Chorus effect
FLANGE: Light flange effect
FUNK-WAH: Touch-sensitive wah-wah (“T-Wah”) effect OCTAVE: Adds secondary note one octave lower
than original note
CHO/HALL: Chorus effect with large hall reverb effect RM: Small room reverb effect
HALL: Large hall reverb effect
11.DSP LEVEL: This is the output level control for the selected DSP effect(s). For a dry signal (no effect), rotate the control full counter-clockwise. Rotating the control clockwise increases the magnitude of the DSP effect(s) applied to the signal.
12.HEADPHONES: For private listening, connect a pair of stereo headphones into this jack. The internal speaker is disconnected when headphones are plugged in. This jack may also be used to tap a line level signal from the amplifier, for connecting to a recording console, house sound board, amplifier, etc. (Remember that using this jack disconnects the internal speaker.)
13.SPEAKER: Use this jack to connect the amplifier to an external speaker cabinet with a minimum impedance rating of 4 ohms for the BFX25 and 8 ohms for the BFX50. The internal speaker is disconnected when this jack is used.
14.ON LED: This LED will illuminate when the amplifier is turned on.
15.POWER: This switch applies AC power to the amplifier. The amplifier is ON when the side of the switch with the indicator (“I”) is depressed.
16.AC LINE CORD (rear panel, not shown): Plug this cord into a properly wired, grounded, 120 volt, 60 cycle AC outlet. DO NOT attempt to defeat the ground connection of this power cord! If your amplifier was purchased outside of the United States, see the unit’s rear panel labeling for its power rating, and follow the above guidelines.
 Loading...