


Presario S0000

Compaq Presario
S0000 / 8000 Series Computers
User’s Guide
System Recovery
If you need to restore the original software on your PC, Compaq has
provided a convenient solution right on your hard drive.
We call this part of your hard drive the “recovery partition.” The recovery
partition takes up some space on your hard drive.
• No more hunting for lost CDs
• Easy to use — simple one-button launch — no need to wait by the PC
loading CDs
• Get up and running faster — your PC can recover the information
directly from the hard drive more quickly
If you want a set of recovery CDs, you can create them from this recovery
partition using the Recovery CD/DVD Creator application (select models
only).
See the chapter “Using Application Recovery and System Recovery” for
complete instructions.

user’s guide

The information in this document is subject to change without notice.
Hewlett-Packard
®
Company makes no warranty of any kind with regard to this material, including,
but not limited to, the implied warranties of merchantability and fitness for a particular purpose.
HP shall not be liable for errors contained herein or for incidental or consequential damages in
connection with the furnishing, performance, or use of this material.
THE WARRANTY TERMS CONTAINED IN THIS STATEMENT, EXCEPT TO THE EXTENT
LAWFULLY PERMITTED, DO NOT EXCLUDE, RESTRICT OR MODIFY AND ARE IN ADDITION
TO ANY MANDATORY STATUATORY RIGHTS APPLICABLE TO THE SALE OF THIS PRODUCT
OR SERVICE TO YOU.
HP assumes no responsibility for the use or reliability of its software on equipment that is not
furnished by HP.
This document contains proprietary information that is protected by copyright. All rights are
reserved. No part of this document may be photocopied, reproduced, or translated to another
language without the prior written consent of HP.
Hewlett-Packard Company
P.O. Box 4010
Cupertino, CA 95015-4010
USA
© 2000, 2003 Hewlett-Packard Development Company, L.P. All rights reserved.
Hewlett-Packard is a registered trademark of Hewlett-Packard Company in the United States of
America and other countries/regions.
This product incorporates copyright protection technology that is protected by method claims of
certain U.S. patents and other intellectual property rights owned by Macrovision Corporation
and other rights owners. Use of this copyright protection technology must be authorized by
Macrovision Corporation, and is intended for home and other limited viewing uses only unless
otherwise authorized by Macrovision Corporation. Reverse engineering or disassembly is prohibited.
Apparatus Claims of U.S. Patent Nos. 4,631,603, 4,577,216, 4,819,098, and 4,907,093 licensed for
limited viewing uses only.
Other brand or product names are trademarks of their respective holders.
HP supports lawful use of technology and does not endorse or encourage the use of our products for
purposes other than those permitted by national copyright law.

table of contents
iii
finding answers to commonly asked questions .............................. 1
safety information .........................................................................................2
setting up your pc .......................................................................... 3
putting your pc together ................................................................................3
safety and comfort ....................................................................................4
pc back ...................................................................................................5
pc front....................................................................................................7
connecting the modem ..................................................................................7
upgrading your 56k modem ......................................................................9
setting up the ethernet connection ...................................................................9
turning on your pc for the first time ...............................................................10
registering your pc......................................................................................11
turning off the pc ........................................................................................11
standby mode ........................................................................................12
hibernation mode ...................................................................................13
automatic standby or hibernation .............................................................13
making recovery cds/dvds ..........................................................................14
installing software and hardware devices ......................................................14
transferring your old pc information and files to your new pc .......................14
learning the basics ....................................................................... 15
beginning to use your software ....................................................................15
using the desktop........................................................................................16
using the start menu ................................................................................16
using compaq organize software..............................................................17
learning to use your pc............................................................................17
using the all programs menu ....................................................................18
organizing your all programs list ..............................................................18
using pc help & tools...............................................................................19
table of contents

iv user’s guide
using the mouse .........................................................................................19
scrolling ................................................................................................20
autoscrolling ..........................................................................................20
panning ................................................................................................20
switching mouse button functions ..............................................................21
changing mouse pointer speed................................................................. 21
using the keyboard ..................................................................................... 21
about your keyboard ..............................................................................21
wireless keyboard set.............................................................................. 23
standard keyboard features .....................................................................24
customizing the buttons ...........................................................................30
adjusting the monitor ..................................................................................30
using a printer............................................................................................ 31
using the internet ......................................................................... 33
about the internet .......................................................................................33
setting up your internet account ....................................................................35
signing up for a new or an existing isp account using
easy internet sign-up ...............................................................................36
using a browser .........................................................................................37
searching the internet.................................................................................. 37
restricting internet content ............................................................................ 38
sending and receiving e-mail .......................................................................39
if using outlook express ........................................................................... 39
if your isp provides the e-mail program .....................................................40
getting help.................................................................................. 41
help and support center .............................................................................. 41
instant support ........................................................................................... 41
using compaq connections ..........................................................................42
getting messages ....................................................................................42
turning off messages ...............................................................................42
re-enabling messages.............................................................................. 43
resolving problems .....................................................................................43
upgrading and servicing the pc................................................................43
warranty & support guide........................................................................ 43
online guides .........................................................................................44
web sites about your pc ..........................................................................44
microsoft windows xp operating system .................................................... 44
working with sound, pictures, and video ..................................... 45
using speakers ...........................................................................................45
adjusting speaker volume ........................................................................46
connecting a multi-channel speaker system to your pc ................................. 46

table of contents
v
using a microphone ....................................................................................48
adjusting microphone volume...................................................................49
using the microphone with multi-channel audio...........................................49
working with digital images .........................................................................50
about the 7-in-1 memory card reader........................................................50
using your cd, dvd, and diskette drives .........................................................52
handling cds/dvds..................................................................................52
inserting and removing cds and dvds ........................................................53
using the combo drive .............................................................................54
using the diskette (floppy) drive ................................................................55
playing cds and dvds..................................................................................55
playing music cds with musicmatch jukebox...............................................55
playing cds and dvds with windows media player......................................56
playing dvd movies with the intervideo windvd player ................................57
creating (burning) cds with recordnow! .........................................................59
creating (burning) music cds with windows media player ................................61
creating (burning) data cds using windows xp program ..................................62
creating (burning) dvds using the dvd writer drive ..........................................62
using a tv as a monitor................................................................................63
cables you may need ..............................................................................63
connecting to a tv set ..............................................................................63
viewing the pc image on your tv screen.....................................................65
disabling the tv option.............................................................................66
disconnecting the tv ................................................................................66
taking care of your pc .................................................................. 67
protecting your pc from power surges ...........................................................67
using virus protection programs....................................................................67
increasing available hard disk drive space ....................................................68
unavailable hard disk drive space ............................................................68
emptying the recycle bin..........................................................................69
uninstalling programs..............................................................................69
removing desktop icons ...........................................................................70
cleaning up your hard disk drive ..............................................................70
troubleshooting............................................................................ 71
using application recovery and system recovery .......................... 81
creating recovery cds/dvds .........................................................................84
using recovery cd-dvd creator ......................................................................85
using the recovery tools cd ..........................................................................86
system restore ............................................................................................86
application recovery ...................................................................................87

vi user’s guide
system recovery..........................................................................................87
starting system recovery if the pc is responding.......................................... 88
starting system recovery if the pc is not responding .................................... 88
system recovery using recovery discs ........................................................89
starting system recovery using recovery discs.............................................89
upgrading and servicing the pc .................................................... 91
preparing the pc ........................................................................................91
removing or upgrading a drive ....................................................................94
locating drive positions ...........................................................................95
removing a drive .................................................................................... 95
replacing or adding a drive..................................................................... 99
upgrading or replacing memory.................................................................102
removing a memory module ..................................................................102
replacing or adding a memory module ...................................................103
removing or installing an expansion card ....................................................104
reassembling the pc.................................................................................. 107
index ......................................................................................... 111

finding answers to commonly asked questions
1
In this User’s Guide, you can find answers to questions about the
following topics:
• Connecting to the Internet, page 35
• Registering your product, page 11
• Creating a CD, page 59
Saving documents, photos, and videos on a CD, page 61
Recording a music CD, page 60
Copying a CD, page 59
Backing up your files to a CD, page 61
• Watching movies on your PC, page 57
• Connecting to a TV, page 63
• Getting digital pictures onto your PC, page 50
• Connecting a printer, page 31
• Finding help if something doesn’t work, page 41
• Keeping your PC healthy, page 67
• Going back a day (System Restore), page 86
• Recovering your PC, page 81
• Adding memory, page 91
NOTE: This guide contains details on options that may not be included with
your PC. Your PC may look different from the illustrations in this guide. The
monitor and the speakers are sold separately. Speakers may be included with
the monitor (select models only).
finding answers to commonly asked
questions

2 user’s guide
safety information
This product has not been evaluated for connection to an “IT” power system
(an AC distribution system with no direct connection to earth, according to
IEC 60950).
ac power safety warnings
WARNING: Install the PC near an AC outlet. The AC power cord is
your PC’s main AC disconnecting device and must be easily
accessible at all times. For your safety, the power cord provided
with your system has a grounded plug. Always use the power
cord with a properly grounded wall outlet to avoid the risk of
electrical shock.
WARNING: To reduce the possibility of an electric shock from the
telephone network, plug your PC into the AC outlet before
connecting it to the telephone line. Also, disconnect the telephone
line before unplugging your PC from the AC power outlet.
WARNING: Your system is provided with a voltage select switch
for use in a 115 or 230 VAC power system. The voltage select
switch has been pre-set to the correct voltage setting for use in
the particular country/region where it was initially sold. Changing
the voltage select switch to the incorrect position can damage
your PC and void any implied warranty.
WARNING: Always disconnect the modem cord from the telephone
system before installing or removing your PC cover.
WARNING: Do not operate the PC with the cover removed.
WARNING: The power supply is not user-serviceable. To prevent
damage to the power supply, have a qualified person repair or
replace it. All other components are user-serviceable.
WARNING: Electrostatic discharge (ESD) can damage disk drives,
add-in cards, and other components. If an ESD station is not
available, wear a wrist strap attached to a metal part of the PC.
Place cards on a conductive foam pad or inside the card wrapper,
if possible, but never on the card wrapper.

setting up your pc
3
putting your pc together
Follow the quick setup poster to set up your PC.
Look in the PC box for printed details or updates regarding your model PC.
When placing your PC, consider an ergonomic arrangement of the PC and your
work area to maintain your comfort and productivity. Refer to “safety and
comfort“ on page 4.
WARNING: The power supply is pre-set for the country/region
in which you purchased your PC. If you move, please check
the voltage requirements before plugging your PC into an
AC power outlet.
NOTE: Refer to “protecting your pc from power surges” on page 67 for
information on protecting your PC.
Put your PC together in this order:
1 Position the PC chassis and connect the power cord to the chassis and to the
power outlet, but do not turn on the PC.
2 Position the monitor (sold separately) and connect the power cord to the
power outlet, but do not turn on the monitor. Connect the monitor cable
to the PC.
3 Position the keyboard and the mouse and connect each to the PC.
NOTE: Your PC uses active speakers only. Active speakers have a power cord
and connect to the green Audio Out connector on the back of the PC. Passive
speakers have no power cord or power switch.
4 Position speakers (select monitor models include speakers), connect them to
the PC, and then connect the speaker power cord to the power outlet, but do
not turn on the speakers.
setting up your pc
4 user’s guide
5 Connect the modem cable to the telephone line wall jack and to the modem
(select models only) on the back of the PC. Refer to “connecting the modem“
on page 7 for details.
6 Turn on the monitor. Turn on the PC. Turn on the speakers. Follow the
onscreen instructions and complete the initial windows until you see the
desktop. Refer to “turning on your pc for the first time“ on page 10 for details.
7 Restart the PC: Click the Start button on the taskbar, click Turn Off
Computer, and then click Restart. The PC turns off and then starts again.
This completes the initial startup process.
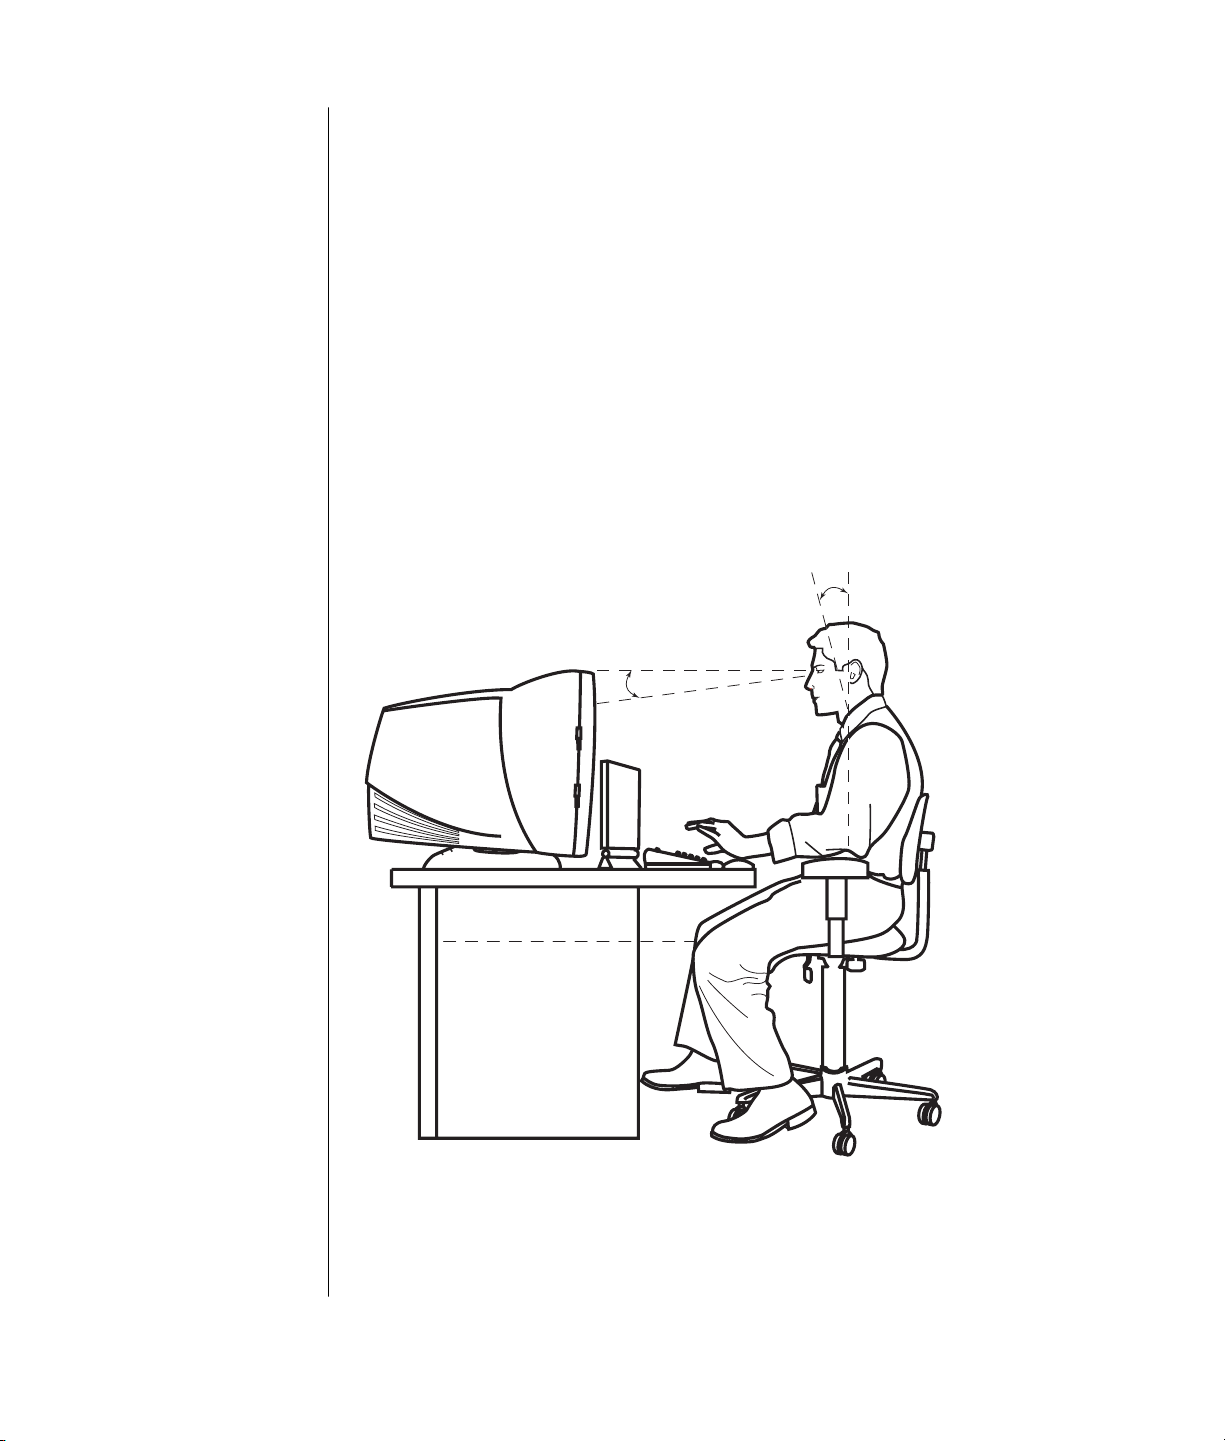
safety and comfort
After assembling your PC, but before you begin using it, arrange the PC and
your work area to maintain your comfort and productivity. Refer to the Safety &
Comfort Guide for important ergonomic information.
0–15˚
50–70 cm
(20–28 inches)
0–15˚

setting up your pc
5
computer safety warning
WARNING: To reduce the risk of serious injury, read the Safety &
Comfort Guide. It describes proper workstation setup, posture, and
health and work habits for computer users. It also provides
important electrical and mechanical safety information.
To view the Safety & Comfort Guide:
• Click Start, choose All Programs, choose PC Help & Tools, and then click
Safety & Comfort Guide.
Or
• Ty pe
http://www.compaq.com/ergo/
into your Web browser address box, and then press Enter on the keyboard.
pc back
Connect your main hardware devices like the monitor, keyboard, and mouse at
the back of the PC. Other peripheral devices like a printer, scanner, camera, or
other equipment also plug into connectors on the back of your computer. Some
PC models also have connectors on the front of the PC.
SERIAL
ETHERNET
OUT
IN
A
B
C
D
E
F
G
H
K
L
P
M
N
O
Your PC features and
connector positions
may vary.
A Keyboard
B Mouse
C USB
D FireWire
®
(IEEE 1394)
E Serial port
F Parallel port
G Monitor
H USB 2.0
K Ethernet
L Microphone
M Audio out
N Audio in
O Modem (to telephone
line wall jack)
P Tele p hon e
6 user’s guide
NOTE: PCs use software drivers to control peripheral devices. When you add a
Plug and Play (ready to use) peripheral, memory, or add-in card, the PC
automatically loads the correct driver for the device.
NOTE: For peripherals that are not Plug and Play, follow the instructions that
came with your peripheral device to load the appropriate driver.
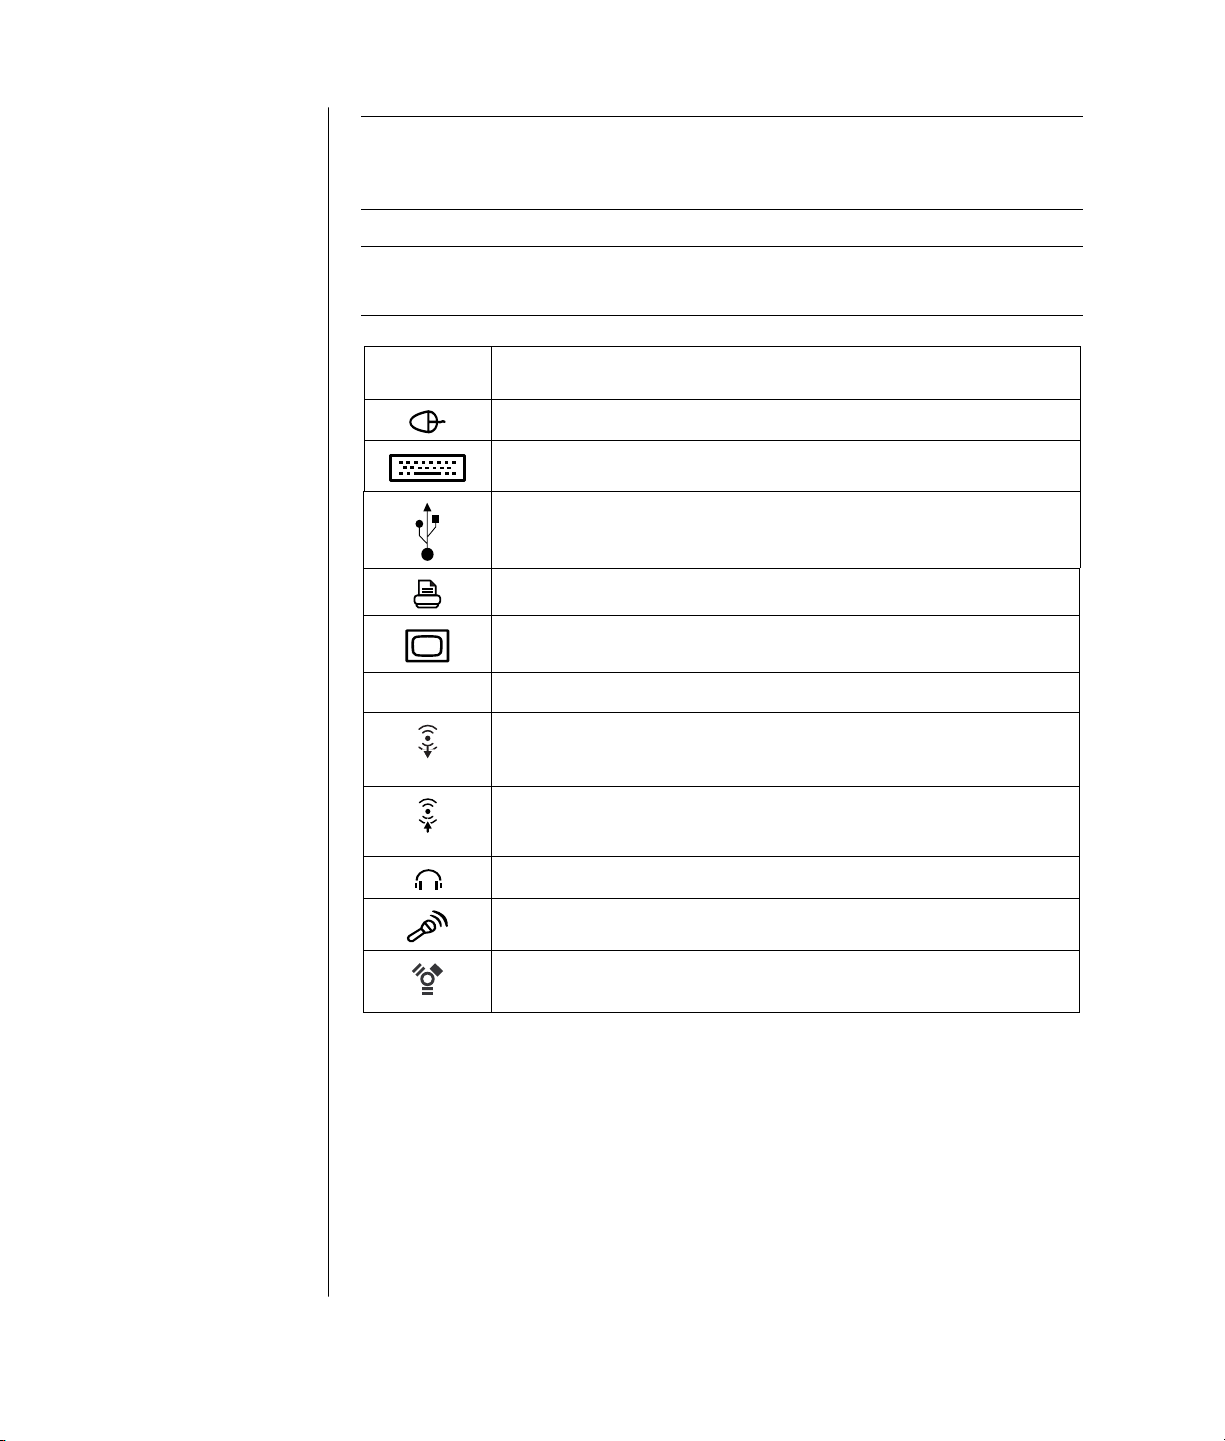
Connector
Symbol
Description
Mouse (PS/2)
Keyboard (PS/2)
Universal Serial Bus (USB) for mouse, keyboard, digital cameras, or
other devices with USB connectors
Printer (parallel)
Monitor
serial
Serial port for digital cameras or other serial devices
OUT
Audio Line Out (powered speakers)
IN
Audio Line In
Headphones
Microphone
FireWire
®
(IEEE 1394) for video cameras or other devices with very fast
transfer rates.
setting up your pc
7
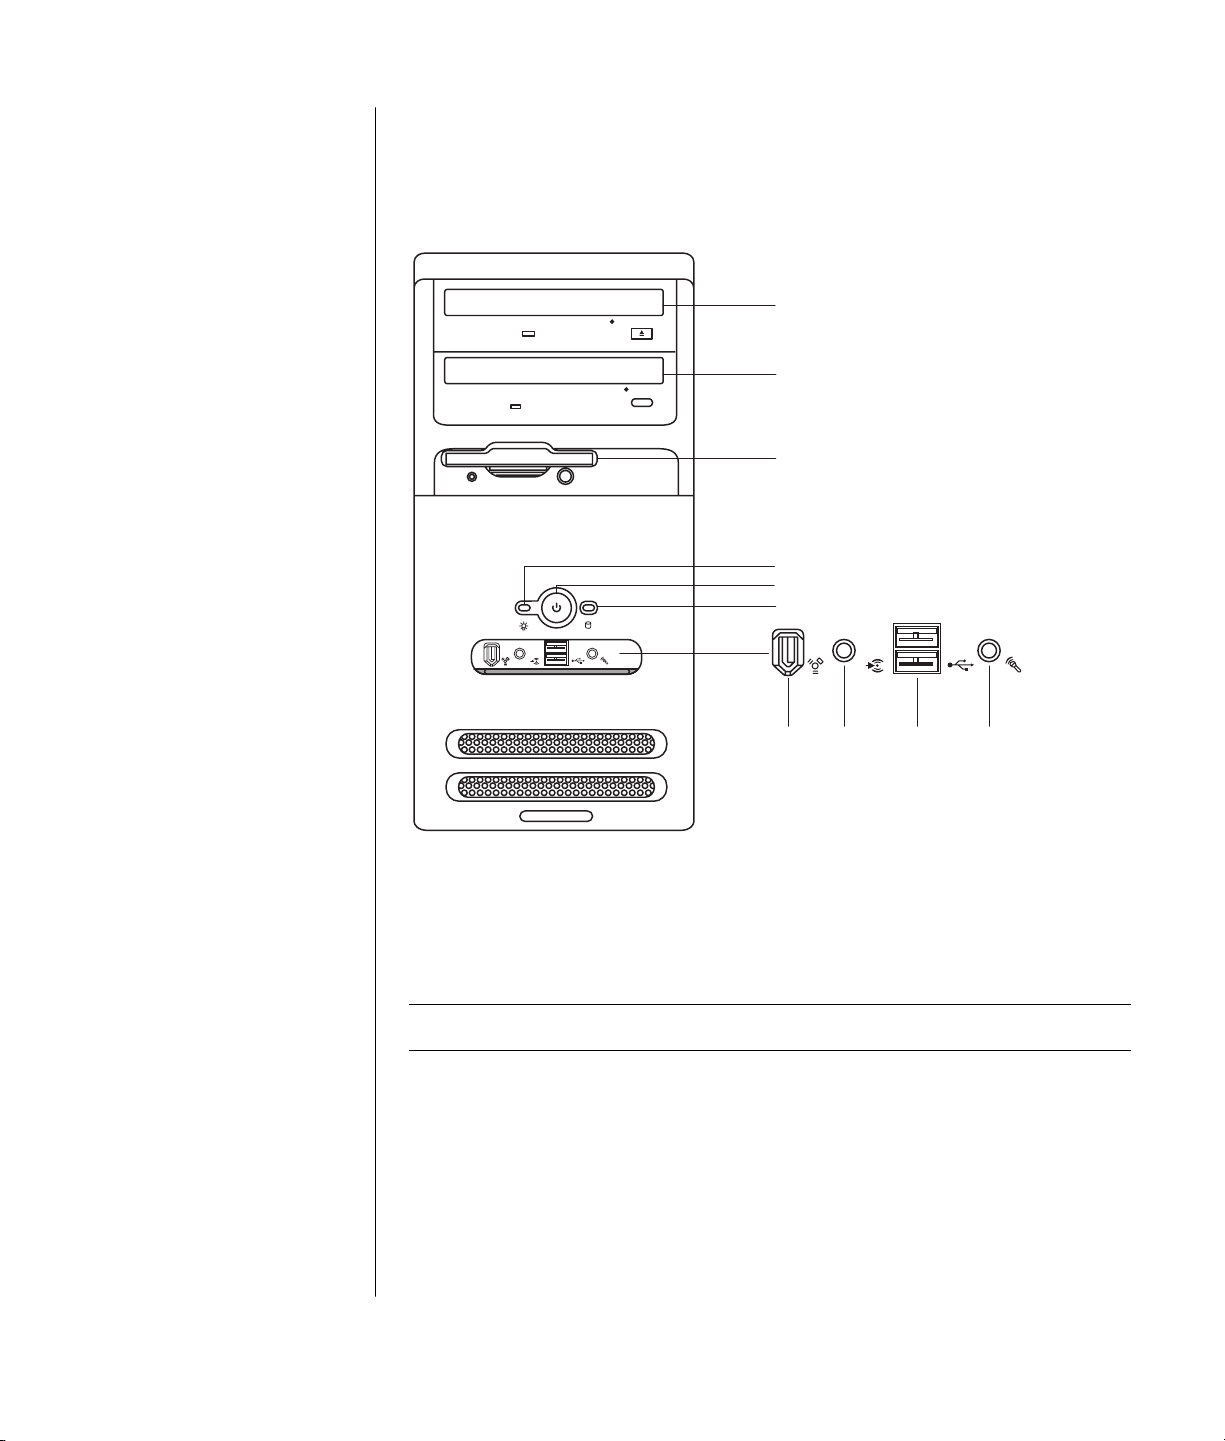
pc front
The front of your computer has the drives, the On button and hard disk
drive activity indicator light. Some PC models also have connectors on the
front of the PC.
IN
IN
G H K L
A
B
C
E
F
D
connecting the modem
The modem is used for connecting to an ISP that provides telephone dial-up
connection to the Internet.
NOTE: Your PC may not come with a modem.
Your PC features and
connector positions
may vary.
A Top optical drive
B Second optical drive
C Diskette (floppy) drive
D On light
E On button
F Hard disk drive
activity indicator light
G FireWire (IEEE 1394)
H Audio in
K USB 2.0 (two shown)
L Microphone
8 user’s guide
Check with your ISP for specifics on your connection.
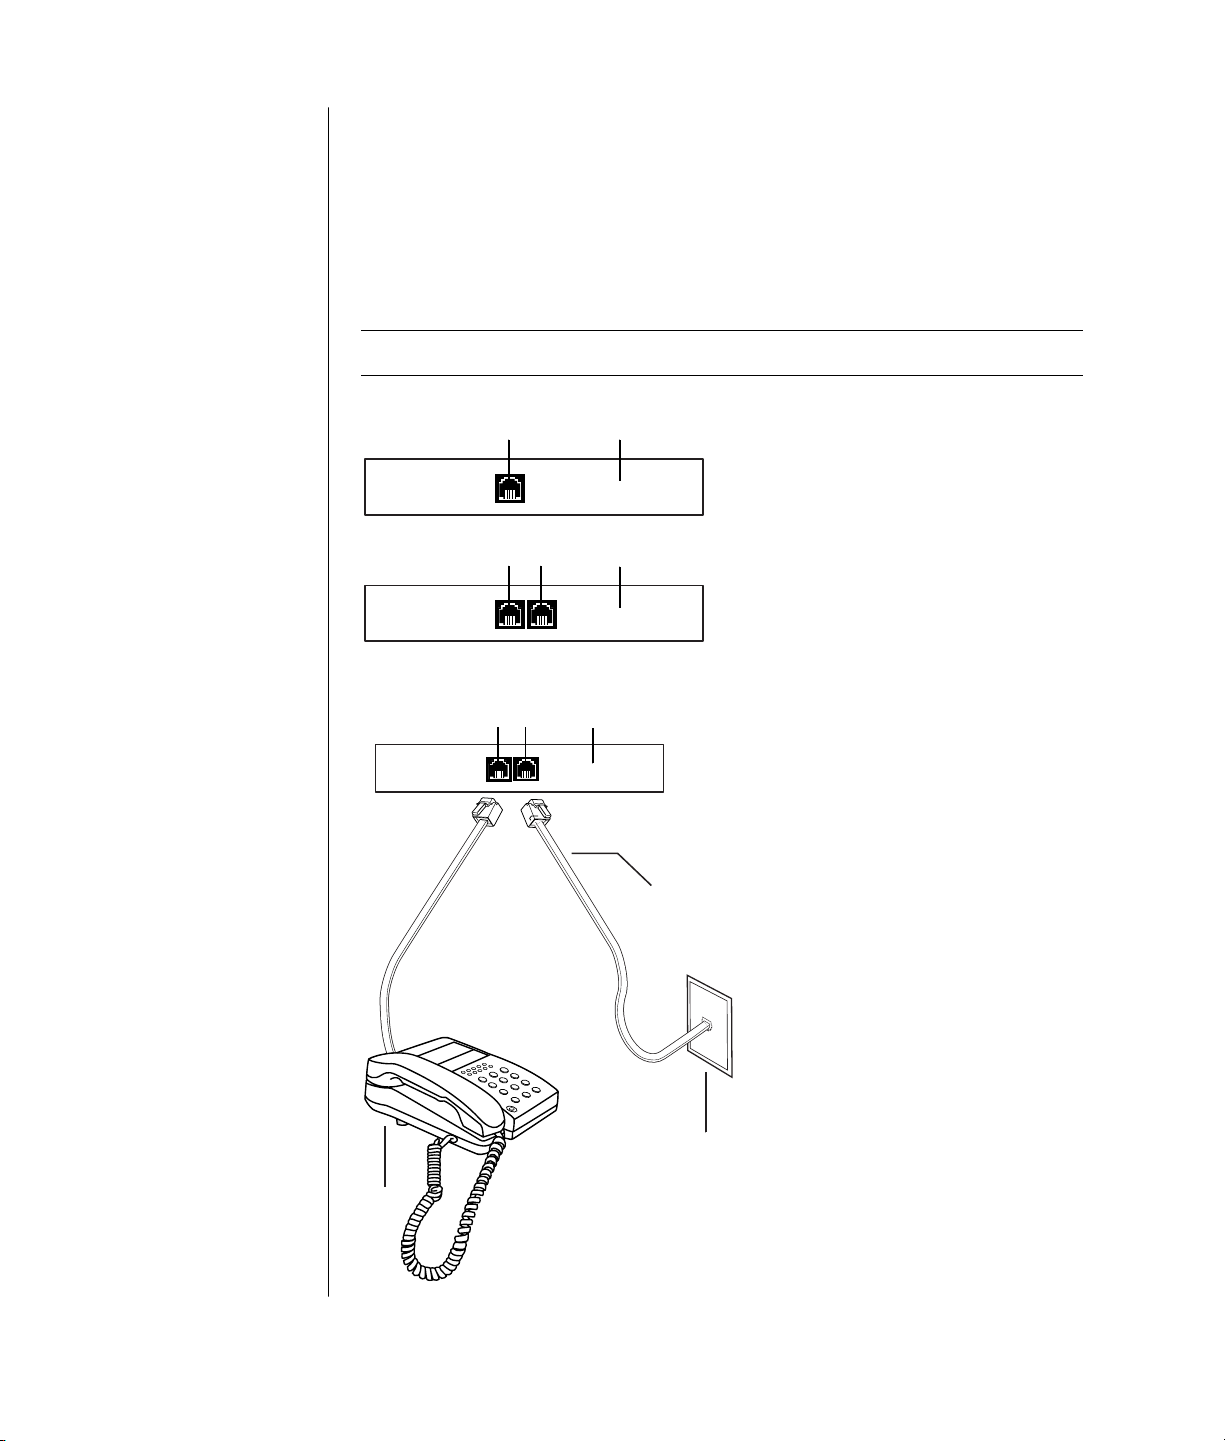
Before you can connect to the Internet and send or receive e-mail and faxes using
telephone dial-up, you must connect your telephone service line to the modem,
which is inside the PC. The quick setup poster shows you how to plug in a
modem/telephone cable to the PC modem connector and to your telephone
service line wall jack connector. To identify the modem connector, look at the
back panel of the PC. The modem connector looks similar to one of the following
illustrations.
NOTE: Your PC may have only one modem/telephone connection.
A
C
B
A
C
D
F
E
B
A
C
other ways to
connect
There are other ways to
connect to the ISP that
do not use the telephone
modem, such as a
LAN (Local Area
Network) or DSL (Digital
Subscriber Line). Check
with your ISP for
specifics on your
connection.
See “setting up the
ethernet connection“
on page 9 if you are
connecting through
a LAN.
A Modem connector
(select models only)
B Telephone connector
(select models only)
C Back of PC
D Modem/telephone
cable
E Wall jack
F Telephone (not
provided)
setting up your pc
9
To connect the cable between the modem and the telephone service line:
1 Plug one end of a modem cable (D) into the modem connector (A) on the back
of the PC (C). This connector may be labeled with either Line or a modem
connector symbol.
2 Plug the other end of the cable (D) into the telephone service line jack (E) on
the wall.
You can also connect a telephone (F) to the other connector (B) on the modem
(select models only). By connecting a telephone to the modem, you can make
regular (voice) telephone calls when you are not using the modem — even if the
PC is turned off.
upgrading your 56k modem
Your modem driver can be upgraded to enable certain V.92 features. For
information, go to the Support Web site listed in the Warranty & Support Guide,
click the support link, type modem upgrade into the Search box, and then click the
arrow to the right of the box. Follow the instructions provided.
NOTE: Your ISP must support the V.92 standard to use any of the V.92 features.
setting up the ethernet connection
The Ethernet connection (may be called a network interface adapter, a Network
Interface Card, or NIC) provides a high-speed, or broadband, connection to an
Ethernet (10BaseT) or Fast Ethernet (100BaseT) network. After this interface is
connected to a network such as a LAN (local area network), you can connect to
the Internet through the LAN. This network connection also allows you to share
printers, data, and other devices among your PCs.
NOTE: Your PC may not come with an Ethernet connector.
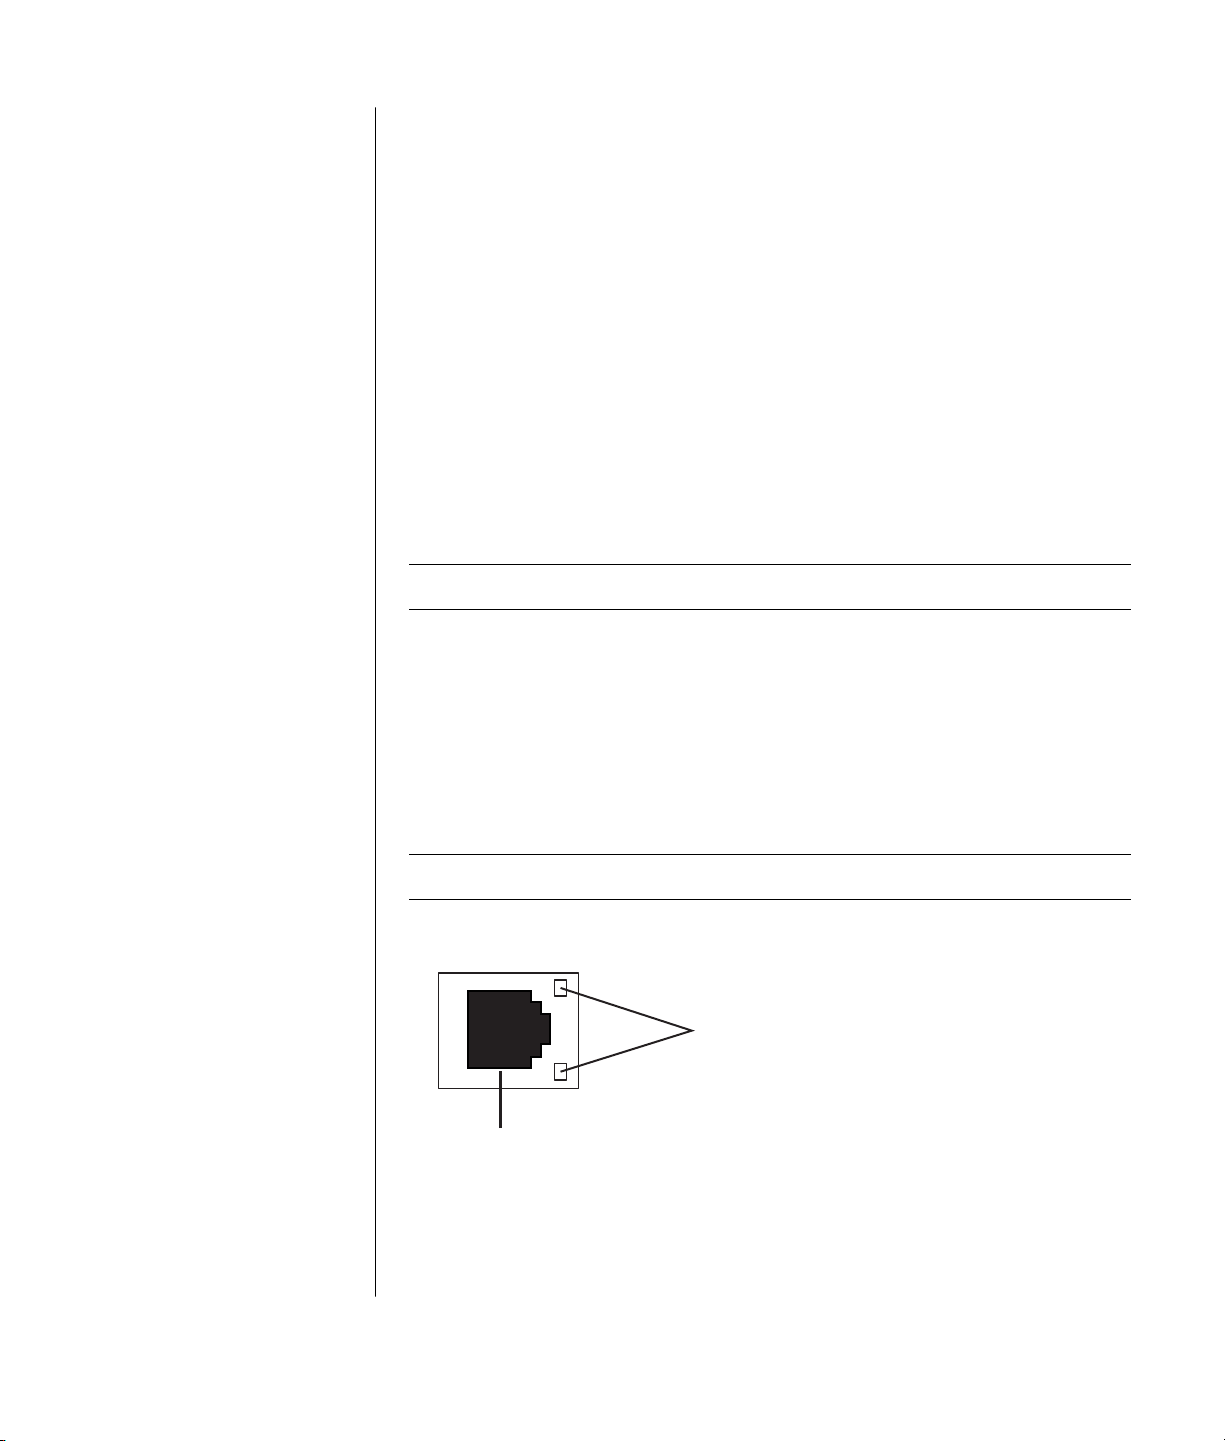
Locate the Ethernet connector (a RJ-45 port) on the back of the PC.
B
A
A Ethernet connector
(RJ-45 port)
B Ethernet indicator
lights
10 user’s guide
To connect the Ethernet connector to the network:
1 Plug the network cable into the Ethernet connector (A) on the back of the PC.
WARNING: Do not plug the telephone service line cable or modem
cable into the Ethernet connector. Although the plug looks similar to
the plug on the Ethernet cable, they are not the same.
2 Plug the other end of the Ethernet cable into a 10BaseT or a 100BaseT port on
the network hub.
NOTE: Hubs are devices that can connect PCs to a network.
3 With the PC turned on, check the lights next to the Ethernet connector
for status:
• ACTIVITY — Lit yellow during network data transfer activity
• LINK — Lit green with valid network connection
turning on your pc for the first time
After you have completed the steps on the quick setup poster, you are ready to
turn on your PC.
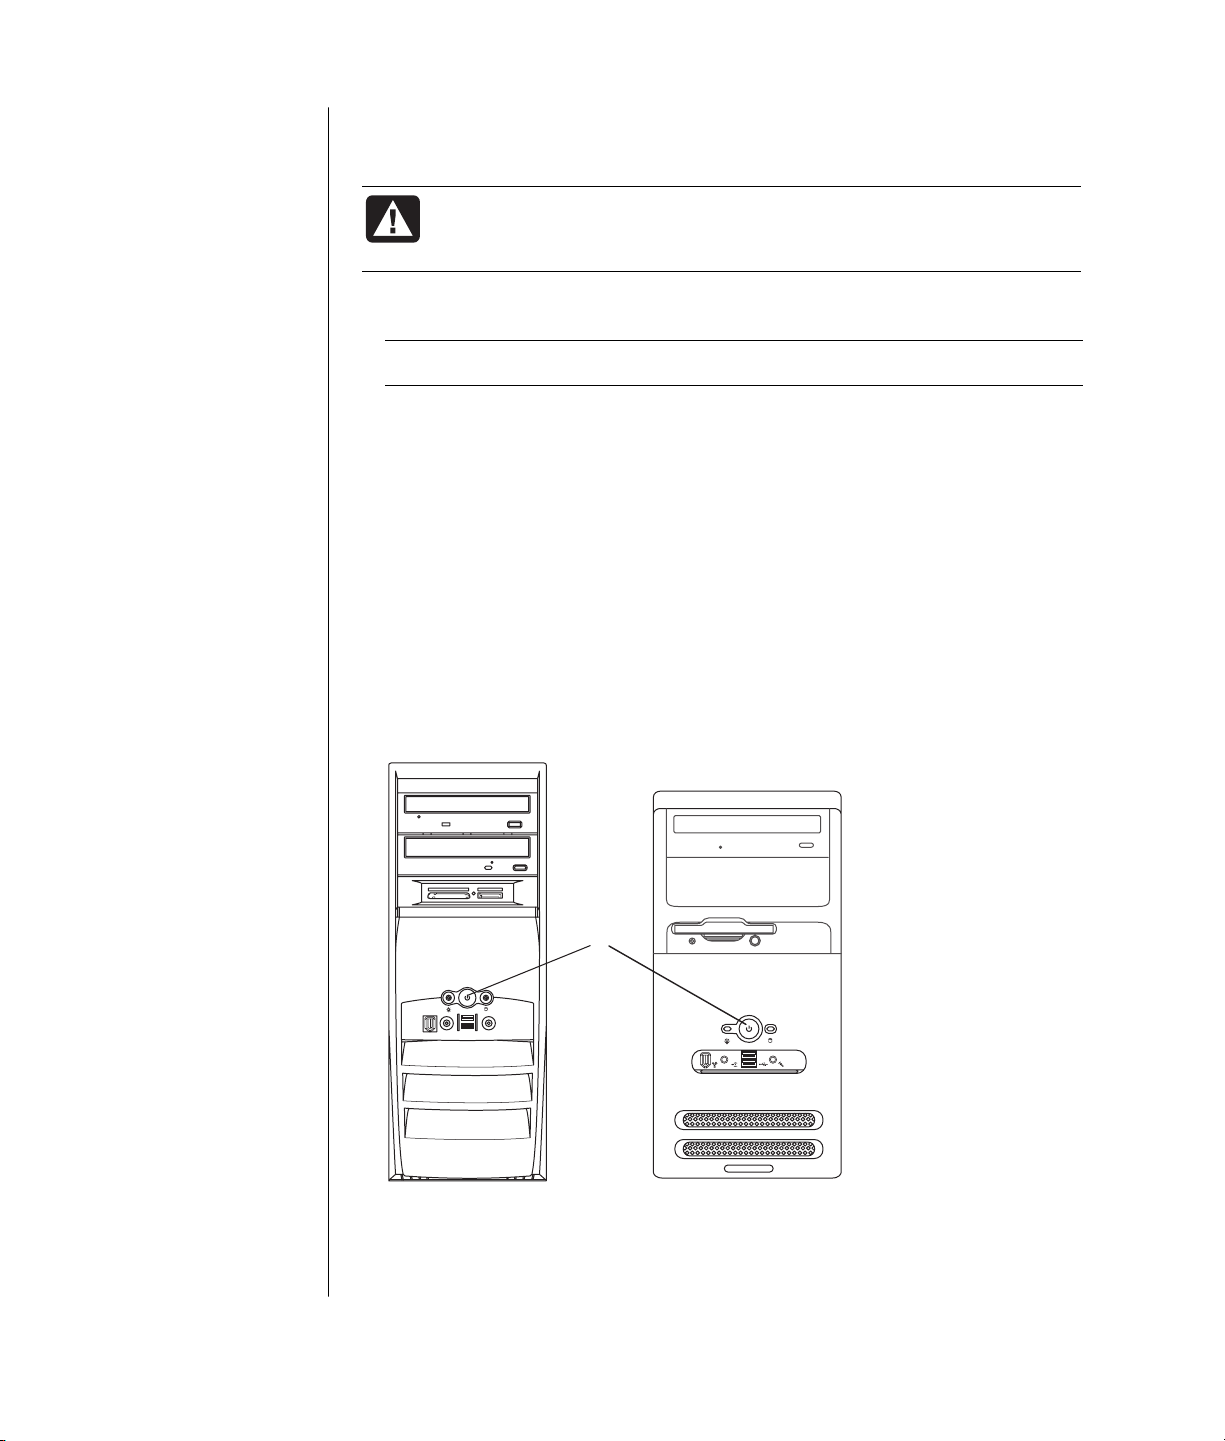
1 Press the Power button on the monitor.
2 Press the On button (A) on the front of the PC (see the following figure).
3 Press the Power button on the speakers, if they are present.
IN
A

setting up your pc
11
4 Click an option to select your language (if applicable for your model). Click
OK and then confirm your selection by clicking Ye s. Wait until the PC makes
preparations. (It may take up to 30 minutes to set up the language on the PC.)
5 Set up Microsoft
®
Windows
®
by following the onscreen instructions.
6 Refer to the following section, “registering your pc,” for information on
completing the registration process (select models only).
7 Double-click the large Internet Access icon on your desktop, if it is present.
Wait until the PC displays the Easy Internet Sign-up window, and then follow
the onscreen instructions.
8 Restart the PC: Click Start on the taskbar, click Turn Off Computer, and then
click Restart.
registering your pc
You may be prompted to register the PC (select models only). Register so you
can receive changes, updates, and support. You can register any of these ways:
• Double-click the registration icon on your desktop, and follow the onscreen
instructions.
• Register online at http://www.compaq.com/register
turning off the pc
For best results, turn off the PC without pressing any buttons on the PC chassis.
1 Close any open software programs. To close programs, click X in the
upper-right corner of each window.
2 Click Start on the taskbar.
3 Click Turn Off Computer, at the bottom of the menu.
4 Click Tu rn O ff .
5 Tu rn o f f th e mon ito r.
As an alternative to turning off the PC, you can put the PC in either standby or
hibernation mode. To conserve power, you can set the power management
timers to put the PC automatically into standby and then hibernation. See the
following sections for more information on putting your PC in standby or
hibernation mode.

12 user’s guide
standby mode
When the PC is in standby mode, it goes into a low-power state and the monitor
is blank as if it is turned off. The advantages of using standby mode include:
• You save time and electricity without having to wait for the PC to go through
the normal startup routine when you wake it again. The next time you use the
PC, any programs, folders, and documents that were open before you put the
PC in standby will be available.
• Your PC can receive faxes while in standby mode, if you set it to do so.
• Your PC can retrieve e-mail messages and download information from the
Internet automatically, if you set it to do so.
To put the PC in standby mode manually:
1 Press the Standby button on the keyboard, if it is present.
The screen goes dark, and the PC goes into standby mode.
2 When you want to use the PC again, press the Esc key on the keyboard, or
press the Standby button. The screen display reappears just as you left it.
Another way to put the PC into standby mode is to:
1 Click Start on the taskbar.
2 Click Turn Off Computer.
3 Click Stand By.
4 To wake the PC from standby, press the Standby button or press the Esc key
on the keyboard.
If the PC does not work properly when you wake it from standby, restart the PC:
1 Press and hold the On button on the front of the PC for approximately
5 seconds until the PC turns off.
NOTE: Using the On button to restart the PC is not recommended and should
be used only as a last resort. Instead, click Start, click Turn Off Computer,
and then click Restart.
2 Turn on the PC again.

setting up your pc
13
hibernation mode
When the PC is in hibernation mode, it saves everything that is in PC memory to
the hard disk drive, turns off the monitor and the hard disk drive, and then
turns itself off. When you turn on the PC again, your programs, folders, and
documents are restored to the screen.
To put the PC into hibernation manually:
1 Click Start on the taskbar.
2 Click Turn Off Computer.
3 Press and hold down the Shift key on the keyboard, and click Hibernate.
NOTE: If Hibernate is not present, you can set up your PC for hibernation;
refer to steps 1 through 6 of “automatic standby or hibernation“ on page 13.
4 When you want to use the PC again after hibernation, press the On button on
the front of the PC.
If the PC does not work properly when you wake it from hibernation, follow
these steps to restart the PC:
1 Click Start on the taskbar.
2 Click Turn Off Computer.
3 Click Restart.
automatic standby or hibernation
You can set your PC to go into standby or hibernation mode automatically when
it is idle for some number of minutes. To put the PC into standby or hibernation
mode automatically, modify the power management settings:
1 Click Start on the taskbar.
2 Click Control Panel.
3 Click Performance and Maintenance, if it is present.
4 Double-click Power Options.
5 Click the Hibernate tab and check the hibernation feature. If necessary,
enable the feature by clicking the Enable hibernation box so that a check mark
appears in it.
6 If you changed the Enable hibernation check box, click Apply.

14 user’s guide
7 Click the Power Schemes tab to set the timers for standby and hibernation. In
the Power Schemes box, select a power scheme from the drop-down list.
Choose the settings:
• To turn on automatic standby for the PC, click the time to elapse before
standby (such as After 20 mins) in the System standby list.
• To set the timer for automatic hibernation, click the time to elapse before
hibernation (such as After 1 hour) in the System hibernates list.
NOTE: If both standby and hibernation timers are set, the system hibernation
timer must be set for a longer time than the system standby timer.
8 Click OK.
making recovery cds/dvds
Now is a good time to make your recovery discs; see “creating recovery
cds/dvds“ on page 84.
installing software and hardware devices
After you turn on the PC the first time and restart it (see page 10), you can install
any software programs that came on CDs or DVDs included in the PC box
(select models only).
You may wish to install additional software programs or hardware devices on
your PC. Restart the PC after installation.
Choose software that is compatible with your PC — check the operating system,
memory, and other requirements listed for the new software for compatibility
with your PC.
Install the new software according to the directions provided by the software
manufacturer. Check the manufacturer’s documentation or customer service
information for help if you need it.
transferring your old pc information and files to
your new pc
See the built-in Microsoft Windows Help and Support Center, described on
page 41; search for transfer wizard, and select the overview article, Files and
Settings Transfer Wizard overview. This information describes a Microsoft solution
for moving your files onto your new PC.
Or, as an alternative, double-click the Protect My PC icon on your desktop and
review the products and services offered under Move My Data.

learning the basics
15
NOTE: To use your software, you must know how to use the mouse and
keyboard. If necessary, see “using the mouse” on page 19 or see “using the
keyboard” on page 21.
beginning to use your software
The operation of your PC is controlled by two kinds of software:
• The Microsoft Windows XP operating system, which displays the desktop on
the monitor and controls your PC’s hardware, peripherals, and software
applications.
• Software programs, such as a word processing program, which performs
specific functions.
Information about using software and about the Microsoft Windows XP
operating system is in the printed manuals and online Help. For Microsoft
Windows, you can also press the Help button, labeled with a question mark icon
on your keyboard (select models only), to open the built-in Help and Support
Center. For help with specific software, refer to the onscreen Help within the
program.
Software programs included with the PC may vary by model and by
country/region.
learning the basics
16 user’s guide
using the desktop
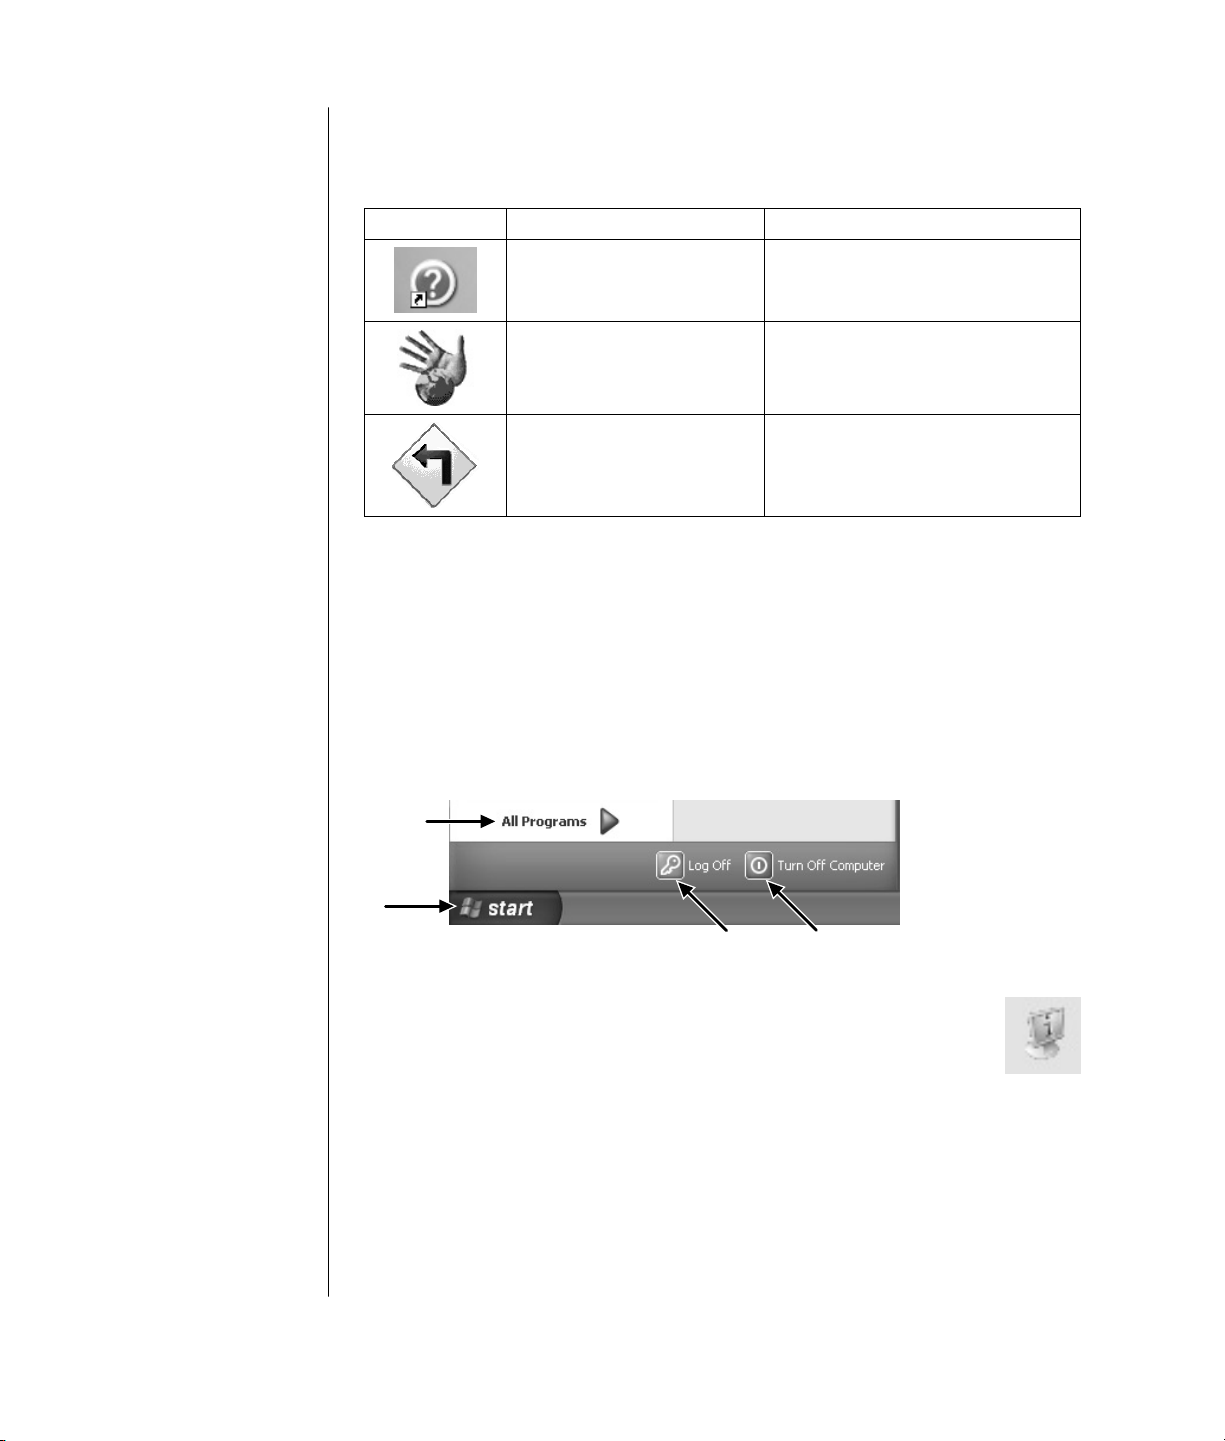
The desktop has shortcut icons that make it easy to find the things you need.
Icon Opens Use it to
Help and Support (select
models only)
View onscreen Help information
about your PC.
Easy Internet Sign-up Set up a new or an existing Internet
account.
Recovery Start Application or System Recovery.
using the start menu
Click the Start button to open the start menu and:
• Select programs or documents.
• Open the Help and Support Center.
• Start a search.
• Run a program.
• Open the Control Panel to view or change settings.
A
B
C
D
Click Presario Info Center to view information about your PC. (See
“learning to use your pc“ on page 17.)
The Start menu also displays the buttons Log Off and Turn Off Computer:
• Click the Log Off button to end your current PC session and to switch
between users.
• Click the Turn Off Computer button to turn off the PC or to restart it.
A
Start button on the
taskbar
B Log Off button
C Turn Off Computer
button
D All Programs

learning the basics
17
using compaq organize software
Compaq Organize software is a desktop tool you use to organize both your PC
shortcuts and your favorite Internet destination links. You use it to organize the
important things you do on the PC and the Internet, and to arrange it the way
you want. Compaq Organize makes all your information available with just a
few mouse-clicks.
Compaq Organize looks like a window with multiple category frames. Each
category has links to Internet destinations or shortcuts to software programs or
files on your PC. Use the player area for viewing pictures, for listening to your
MP3 music files stored on your computer, or for watching streaming video news
clips. For searching, there is a search bar at the top of Compaq Organize where
you can select the search engine you want to use.
To open Compaq Organize:
1 Click Start on the taskbar.
2 Choose All Programs.
3 Choose PC Help & Tools.
4 Click Compaq Organize.
learning to use your pc
Click the Start button and select Presario Info Center (select models only). A
window opens with a welcoming message. Click an item on the left of the
message to view information about your PC, including:
• Locations of drives and connectors on the front of the PC chassis.
• Descriptions and uses of software programs included with your PC.
• Access to the Internet.
• Help and Support.
• Recovery of the operating system and software programs.
For detailed instructions and information about your PC (select models only):
1 Click Start.
2 Choose Help and Support.
3 Choose Compaq Presario PC Help.
For onscreen instructions to run tests for PC-related problems or to get help from
a Support analyst, open Instant Support (select models only):
1 Click Start on the taskbar, and click Help and Support.
2 Click Instant Support.
3 Click Request Help.
4 Follow the onscreen instructions to run a test or to submit a problem. You can
run tests anytime; however, your PC must be connected to the Internet to
submit a problem.

18 user’s guide
using the all programs menu
To find the software programs on your PC:
1 Choose Start.
2 Choose All Programs.
organizing your all programs list
You see folders organized according to task (select models only) when you:
1 Click Start.
2 Choose All Programs.
A folder contains a list of items. Each item is actually a shortcut, or link, to a
program, document, or another folder. The Music folder, for example, contains
shortcuts to the programs you use to play music CDs.
To change the name of an item:
1 Right-click the item.
2 Select Rename.
3 Type the new name and press Enter on the keyboard.
To move an item by using the drag-and-drop technique:
1 Select the item in All Programs or in a folder.
2 Left-click the item and hold down the mouse button.
3 Move the mouse pointer to where you want the item, and then release the
mouse button.
(If you have problems dropping the item into a folder, drag it to your
desktop, and then drag it to the folder.)
To copy an item:
1 Right-click the item.
2 Select Create Shortcut. The shortcut appears in the folder.
3 Drag the item into the All Programs list or into another folder.
If you use Add or Remove Programs in the Control Panel to delete a software
program, the shortcut in All Programs may not be removed. To remove a
shortcut:
1 Click Start.
2 Choose All Programs.
3 Select the folder.
4 Right-click the shortcut, and then select Delete. Click Delete Shortcut to
confirm you want to delete the shortcut.

learning the basics
19
using pc help & tools
The PC Help & Tools folder (select models only) in the All Programs menu
contains special utilities for PC owners. This folder also contains any onscreen
guides included with your PC.
To see the items in the PC Help & Tools folder:
1 Click Start on the taskbar.
2 Choose All Programs.
3 Choose PC Help & Tools.
4 Click an item to view it or use it.
NOTE: If there are no guide titles listed in PC Help & Tools, your PC has no
onscreen guides.
using the mouse
Your PC includes a mouse for directing the cursor (pointer) on the Windows
desktop. The mouse uses a roller ball or optics (a light and sensor) to sense
movement and cause the cursor on the screen to move. Use the mouse on a
flat surface.
NOTE: The optical mouse cannot work on a glass, translucent, or reflective
surface.
A wireless mouse (select models only) is an optical mouse that uses a
receiver/transmitter, instead of a connector cable, to communicate with your
PC. A light on the receiver indicates receiver activity. Refer to “wireless
keyboard set“ on page 23 for receiver indicator information.
NOTE: The wireless mouse goes into a sleep or suspend mode after 20 minutes of
inactivity. Click a button on the mouse to wake it. (Moving the wireless mouse
does not wake it.)
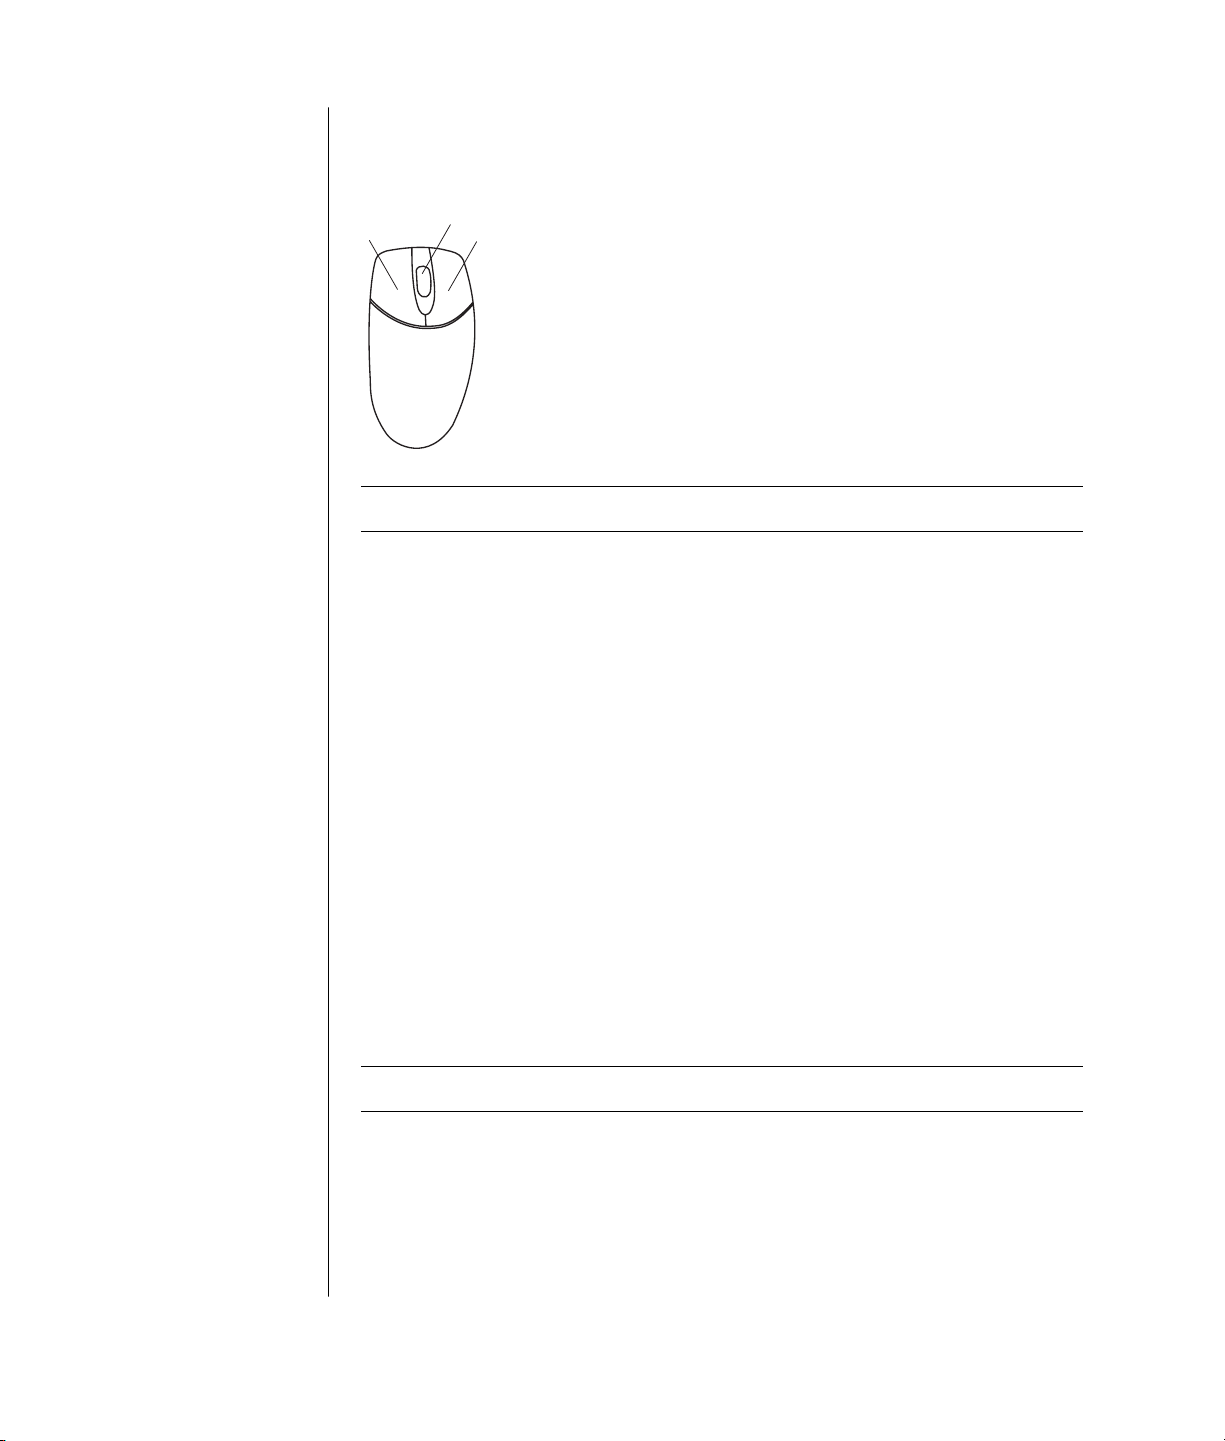
The mouse has two or three buttons on the top.
• Click the left mouse button to position the cursor or to select an item.
• Click the right mouse button to display a menu of commands for the item you
clicked.
• On select models, use the scroll wheel button in the center for scrolling and
panning.
20 user’s guide
Double-click means to press the left button on the mouse two times in a row. To
double-click, you click the button (press it and then release it), and then quickly
click it again.
A
C
B
NOTE: Your mouse may look different from the one shown here.
You can switch the function of the left and right buttons for left-handed use.
Refer to “switching mouse button functions“ on page 21.
If your mouse does not work properly, refer to “troubleshooting“ on page 71.
scrolling
Click the left mouse button to place the cursor in a document, and then:
• To scroll toward the beginning of a document, roll the scroll wheel button up
(away from you).
• To scroll toward the end of a document, roll the scroll wheel button down
(toward you).
autoscrolling
1 Place the cursor anywhere in the text, and press the scroll wheel button once.
An autoscroll icon appears.
2 Move the mouse in the direction you want to scroll. The farther you move the
mouse from the starting point, the faster the document scrolls.
3 To stop autoscrolling, press the scroll wheel button again.
NOTE: Autoscrolling does not work with some software programs.
panning
1 Press and hold down the center scroll wheel button.
2 Slowly move the mouse in the direction you want to pan. The farther you
move the pointer from the starting point, the faster the document pans.
3 To stop panning, release the scroll wheel button.
A Left button
B Scroll wheel button
(scrolling mouse only)
C Right button

learning the basics
21
NOTE: Panning only works if the window’s horizontal scroll bar is active.
Panning does not work with some software programs.
switching mouse button functions
To switch the functions of the right and left mouse buttons:
1 Click the Start button.
2 Click Control Panel.
3 Click Printers and Other Hardware, if it is present.
4 Double-click Mouse.
5 Check Switch primary and secondary buttons on the Buttons tab.
6 Click Apply (using the new primary button), and then click OK.
changing mouse pointer speed
To change the speed of the cursor on the screen relative to the motion of
the mouse:
1 Click the Start button.
2 Click Control Panel.
3 Click Printers and Other Hardware, if it is present.
4 Double-click Mouse.
5 Click the Pointer Options tab.
6 In the area, Motion, use the slider to adjust the pointer speed.
7 Click Apply, and then click OK.
using the keyboard
about your keyboard
Your keyboard has an arrangement of standard keys, indicator lights, and
special buttons (select models only). Locate your keyboard among the following
illustrations and read the feature list for it. Your keyboard may vary from the
illustrations.
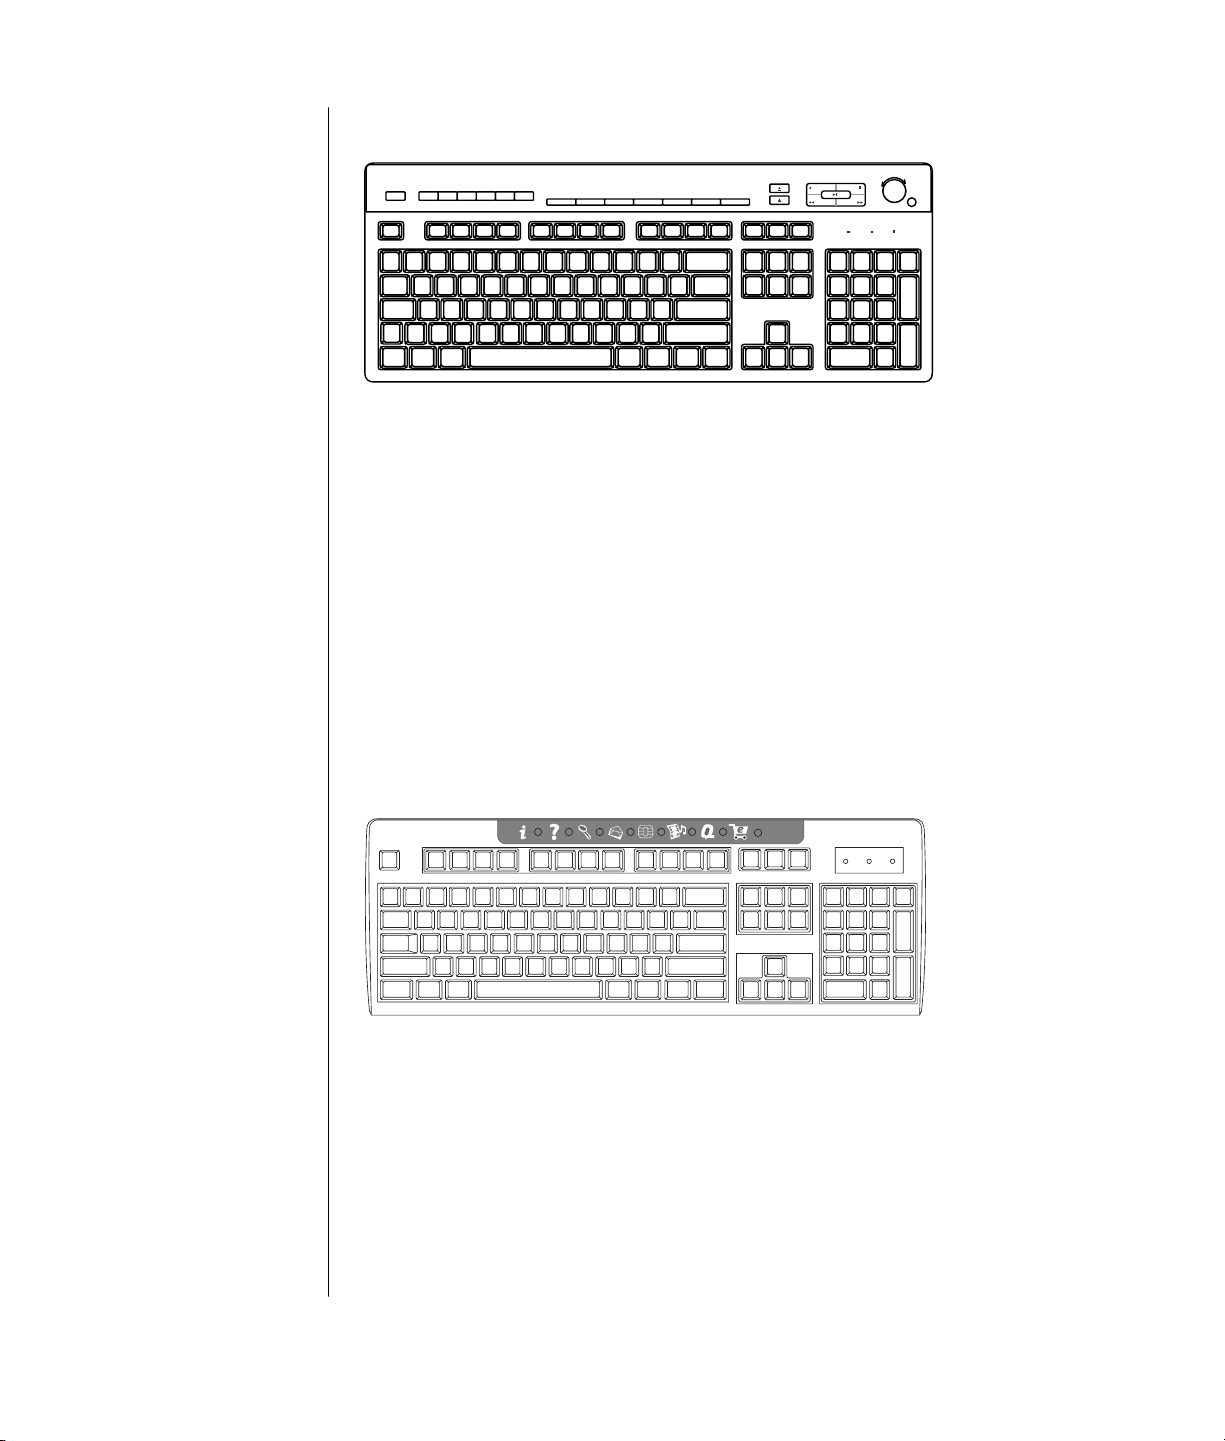
internet keyboards
Internet keyboards may connect directly to your PC or may be wireless. (See
“wireless keyboard set“ on page 23 for a description of the wireless set.)
Some keyboards do not have the Internet buttons shown here at the top of the
keyboard, and some use a different layout on the top right.
Find your keyboard among the following illustrations to read about its features.
22 user’s guide
internet keyboard 1
l
l
This keyboard enables you to:
• Adjust speaker volume.
• Connect to the Internet (if you have an established Internet account).
• Search for information on the Internet.
• Place the PC into standby to save power.
• Start, pause, and stop playing a CD or DVD, skip to the previous or next
track, record, and eject the disc tray (for two drives).
• Mute speaker sound.
• Customize the buttons to open programs and connect to Internet Web sites.
• Get support information.
• Find a file or program on the hard disk drive.
internet keyboard 2
This keyboard enables you to:
• Connect to the Internet (if you have an established Internet account).
• Search for information on the Internet.
• Customize the buttons to open programs and connect to Internet Web sites.
• Get support information.
learning the basics
23
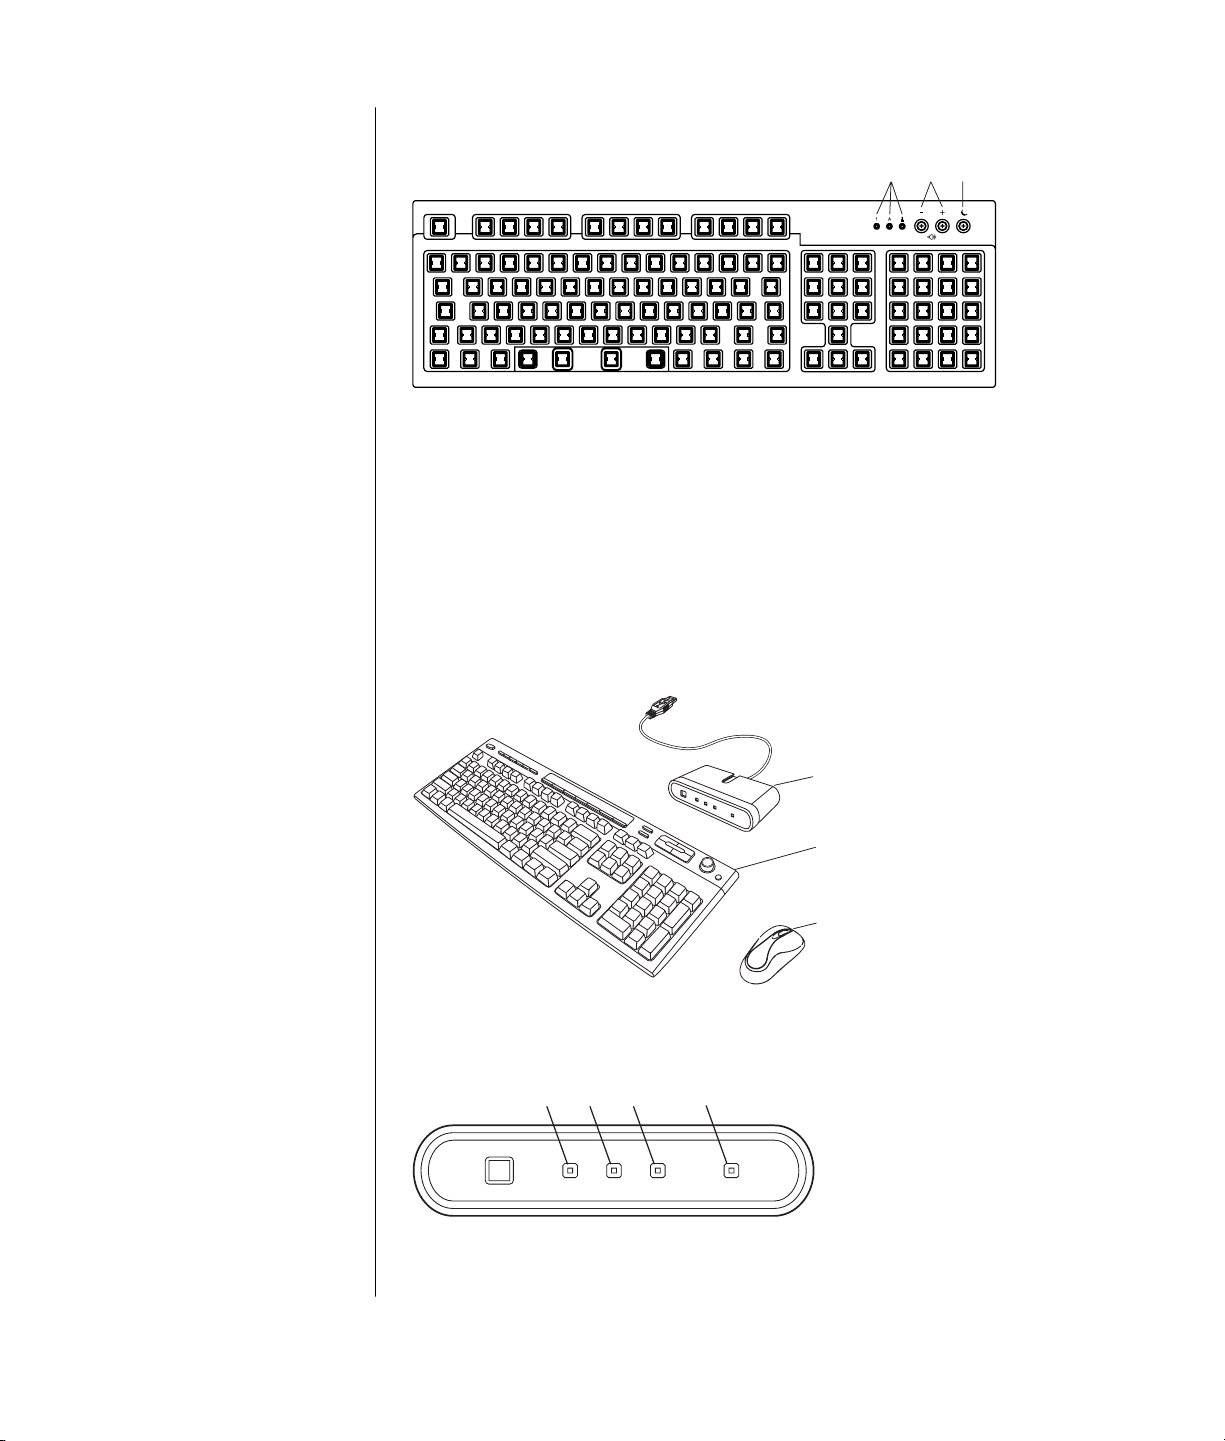
standard keyboard
AB
C
This keyboard enables you to:
• Adjust speaker volume.
• Place the PC into standby to save power.
wireless keyboard set
A wireless keyboard (B) uses a receiver/transmitter unit (A), instead of a
connector cable, to communicate with your PC. The wireless keyboard, mouse
(C), and receiver set is available with select models only.
A
B
C
A light (D) on the receiver indicates receiver activity.
A
CB
D
If your keyboard does not work properly, refer to “troubleshooting“ on page 71.
LEDs, light emitting
diodes, are lights used
to indicate status.
A The lights (LEDs) turn
on to indicate (left to
right) the number lock
on, the capitals lock
on, and the scroll
lock on.
B The plus (+) and
minus (–) buttons
adjust the speaker
volume.
C The moon icon button
places the PC into
standby mode or
wakes the PC from
standby mode.
A Wireless receiver
B Wireless keyboard
C Wireless mouse
A Number lock on
B Caps lock on
C Scroll lock on
D Receiver activity
 Loading...