


Evo D510 e-pc

b
Quick User’s Guide
Compaq Evo D510 e-pc
Document Part Number: 303399-001
5970-5295-EN
August 2002
This book will help you with the initial hardware and software setup
for the Compaq Evo D510 e-pc.

© 2002 Compaq Information Technologies, L.P.
Compaq, the Compaq logo, and Evo are trademarks of Compaq Information
Technologies Group, L.P. in the U.S. and other countries.
Microsoft and Windows are trademarks of Microsoft Corporation in the U.S.
and other countries.
All other product names mentioned herein may be trademarks of their respective
companies.
Compaq Computer Corporation shall not be liable for technical or editorial
errors or omissions contained herein or for incidental or consequential damages
in connection with the furnishing, performance, or use of this material. The
information in this document is provided “as is” without warranty of any kind,
including, but not limited to, the implied warranties of merchantability and
fitness for a particular purpose, and is subject to change without notice. The
warranties for Compaq products are set forth in the express limited warranty
statements accompanying such products. Nothing herein should be construed as
constituting an additional warranty.
This document contains proprietary information that is protected by copyright.
No part of this document may be photocopied, reproduced, or translated to
another language without the prior written consent of Compaq Computer
Corporation.
Å
WARNING: Text set off in this manner indicates that failure to follow
directions could result in bodily harm or loss of life.
Ä
CAUTION: Text set off in this manner indicates that failure to follow
directions could result in damage to equipment or loss of information.
Quick User’s Guide
Compaq Evo D510 e-pc
First Edition (August 2002)
Document Part Number: 303399-001
5970-5295-EN

Quick User’s Guide iii
Contents
1Quick Setup
Connecting Devices. . . . . . . . . . . . . . . . . . . . . . . . . . . . . . . . . . . . . . . . . . . . . . . . . . . . 1–2
Connecting the Power Cords. . . . . . . . . . . . . . . . . . . . . . . . . . . . . . . . . . . . . . . . . . . . . 1–3
Using Your PC . . . . . . . . . . . . . . . . . . . . . . . . . . . . . . . . . . . . . . . . . . . . . . . . . . . . . . . 1–3
Starting Your PC for the First Time . . . . . . . . . . . . . . . . . . . . . . . . . . . . . . . . . . . . 1–3
Customizing the Monitor Display . . . . . . . . . . . . . . . . . . . . . . . . . . . . . . . . . . . . . . . . . 1–4
Protecting Your Software . . . . . . . . . . . . . . . . . . . . . . . . . . . . . . . . . . . . . . . . . . . . . . . 1–4
Compaq Restore Solution . . . . . . . . . . . . . . . . . . . . . . . . . . . . . . . . . . . . . . . . . . . . 1–4
Registration . . . . . . . . . . . . . . . . . . . . . . . . . . . . . . . . . . . . . . . . . . . . . . . . . . . . . . . . . . 1–4
Turning Off the PC . . . . . . . . . . . . . . . . . . . . . . . . . . . . . . . . . . . . . . . . . . . . . . . . . . . . 1–5
Accessibility . . . . . . . . . . . . . . . . . . . . . . . . . . . . . . . . . . . . . . . . . . . . . . . . . . . . . . . . . 1–5
For More Information . . . . . . . . . . . . . . . . . . . . . . . . . . . . . . . . . . . . . . . . . . . . . . . . . . 1–5
2Troubleshooting
Basic Troubleshooting. . . . . . . . . . . . . . . . . . . . . . . . . . . . . . . . . . . . . . . . . . . . . . . . . . 2–1
Overview. . . . . . . . . . . . . . . . . . . . . . . . . . . . . . . . . . . . . . . . . . . . . . . . . . . . . . . . . 2–1
Helpful Hints. . . . . . . . . . . . . . . . . . . . . . . . . . . . . . . . . . . . . . . . . . . . . . . . . . . . . . 2–1
Solving Minor Problems. . . . . . . . . . . . . . . . . . . . . . . . . . . . . . . . . . . . . . . . . . . . . 2–2
Solving Hardware Installation Problems. . . . . . . . . . . . . . . . . . . . . . . . . . . . . . . . . . . . 2–7
A Replacing the Battery
B Specifications
C Safety & Regulatory Notices
Regulatory Compliance Identification Numbers. . . . . . . . . . . . . . . . . . . . . . . . . . . . . . C–1
Federal Communications Commission Notice . . . . . . . . . . . . . . . . . . . . . . . . . . . . . . . C–1
Modifications . . . . . . . . . . . . . . . . . . . . . . . . . . . . . . . . . . . . . . . . . . . . . . . . . . . . . C–2

iv Quick User’s Guide
Contents
Mouse Compliance Statement . . . . . . . . . . . . . . . . . . . . . . . . . . . . . . . . . . . . . . . . C–2
Cables . . . . . . . . . . . . . . . . . . . . . . . . . . . . . . . . . . . . . . . . . . . . . . . . . . . . . . . . . . . C–2
Declaration of Conformity for Products
Marked with the FCC Logo (United States only). . . . . . . . . . . . . . . . . . . . . . . . . . C–2
Canadian Notice . . . . . . . . . . . . . . . . . . . . . . . . . . . . . . . . . . . . . . . . . . . . . . . . . . . C–3
Avis Canadien. . . . . . . . . . . . . . . . . . . . . . . . . . . . . . . . . . . . . . . . . . . . . . . . . . . . . C–3
European Union Notice . . . . . . . . . . . . . . . . . . . . . . . . . . . . . . . . . . . . . . . . . . . . . . . . . C–4
Japanese Notice . . . . . . . . . . . . . . . . . . . . . . . . . . . . . . . . . . . . . . . . . . . . . . . . . . . . . . . C–4
Energy Star Compliance . . . . . . . . . . . . . . . . . . . . . . . . . . . . . . . . . . . . . . . . . . . . . . . . C–5
German Ergonomics Notice . . . . . . . . . . . . . . . . . . . . . . . . . . . . . . . . . . . . . . . . . . . . . C–6
Laser Safety. . . . . . . . . . . . . . . . . . . . . . . . . . . . . . . . . . . . . . . . . . . . . . . . . . . . . . . . . . C–6
CDRH Regulations . . . . . . . . . . . . . . . . . . . . . . . . . . . . . . . . . . . . . . . . . . . . . . . . . C–6
Compliance with International Regulations . . . . . . . . . . . . . . . . . . . . . . . . . . . . . . C–6
Laser Product Label . . . . . . . . . . . . . . . . . . . . . . . . . . . . . . . . . . . . . . . . . . . . . . . . C–7
Laser Information . . . . . . . . . . . . . . . . . . . . . . . . . . . . . . . . . . . . . . . . . . . . . . . . . . C–7
Battery Replacement Notice . . . . . . . . . . . . . . . . . . . . . . . . . . . . . . . . . . . . . . . . . . C–8
Power Cord Set Requirements . . . . . . . . . . . . . . . . . . . . . . . . . . . . . . . . . . . . . . . . . . . C–9

Quick User’s Guide 1–1
1
Quick Setup
Å
WARNING: Misuse of your personal computer or failure to establish a
safe and comfortable workstation may result in discomfort or serious
injury. Refer to your Safety & Comfort Guide for more information on
choosing a workspace and creating a safe and comfortable work
environment.
This equipment has been tested and found to comply with the limits for a
Class B digital device, pursuant to part 15 of the FCC Rules. For more
information, refer to Appendix C, “Safety & Regulatory Notices.” To
reduce the risk of electrical shock, connect your personal computer only to
a grounded (earthed) electrical outlet that is easily accessible at all times.
1–2 Quick User’s Guide
Quick Setup
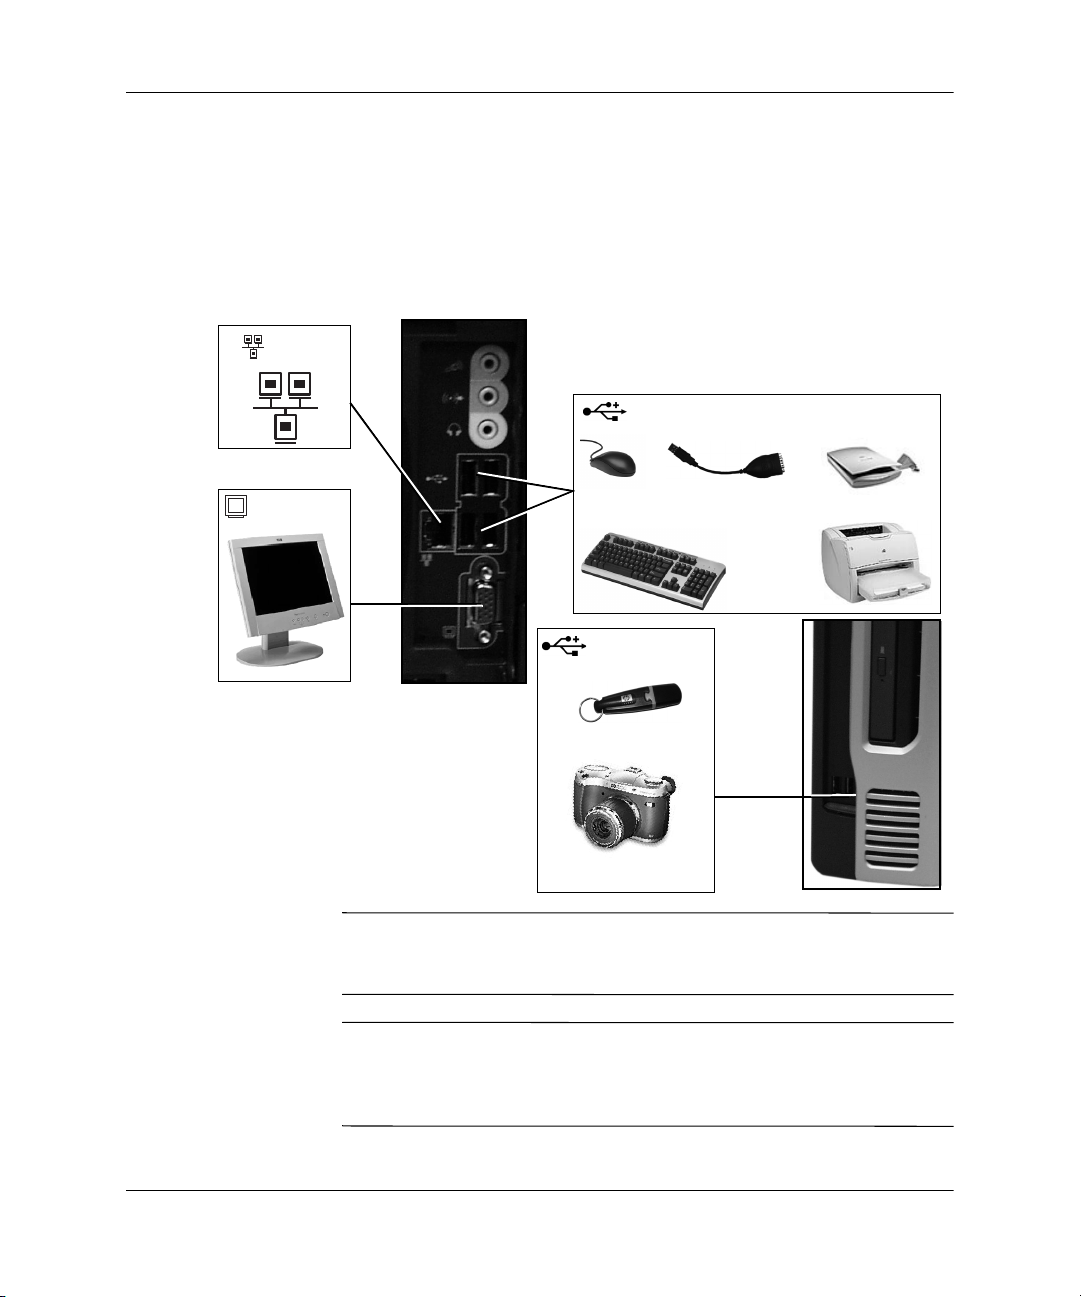
Connecting Devices
Connect the monitor, mouse, and keyboard cables to the personal
computer. If you use a network, connect the network cable to the
Ethernet RJ-45 Connector. Connectors are color-coded for easy setup.
The connectors are shaped to go in one way only. Typical connectors
are shown below:
Å
WARNING: To reduce the risk of electrical shock, fire, or damage to
the equipment, do not plug telecommunications/telephone connections
into the network interface controller (NIC) connectors.
Ä
CAUTION: Do not add additional, optional hardware devices to your
personal computer until the operating system is successfully installed.
Doing so may cause errors and may prevent the operating system from
installing properly.
4 x USB 2.0
LAN
monitor
2 x USB 2.0
USB ↔ serial
USB ↔ printer
Quick User’s Guide 1–3
Quick Setup
Connecting the Power Cords
Å
WARNING: To reduce the risk of electric shock or damage to the equipment:
■ Do not disable the power cord grounding plug. The grounding plug is
an important safety feature.
■ Plug the power cord into a grounded (earthed) electrical outlet that is
easily accessible at all times.
■ Disconnect power from the personal computer by unplugging the
power cord from either the electrical outlet or the personal computer.
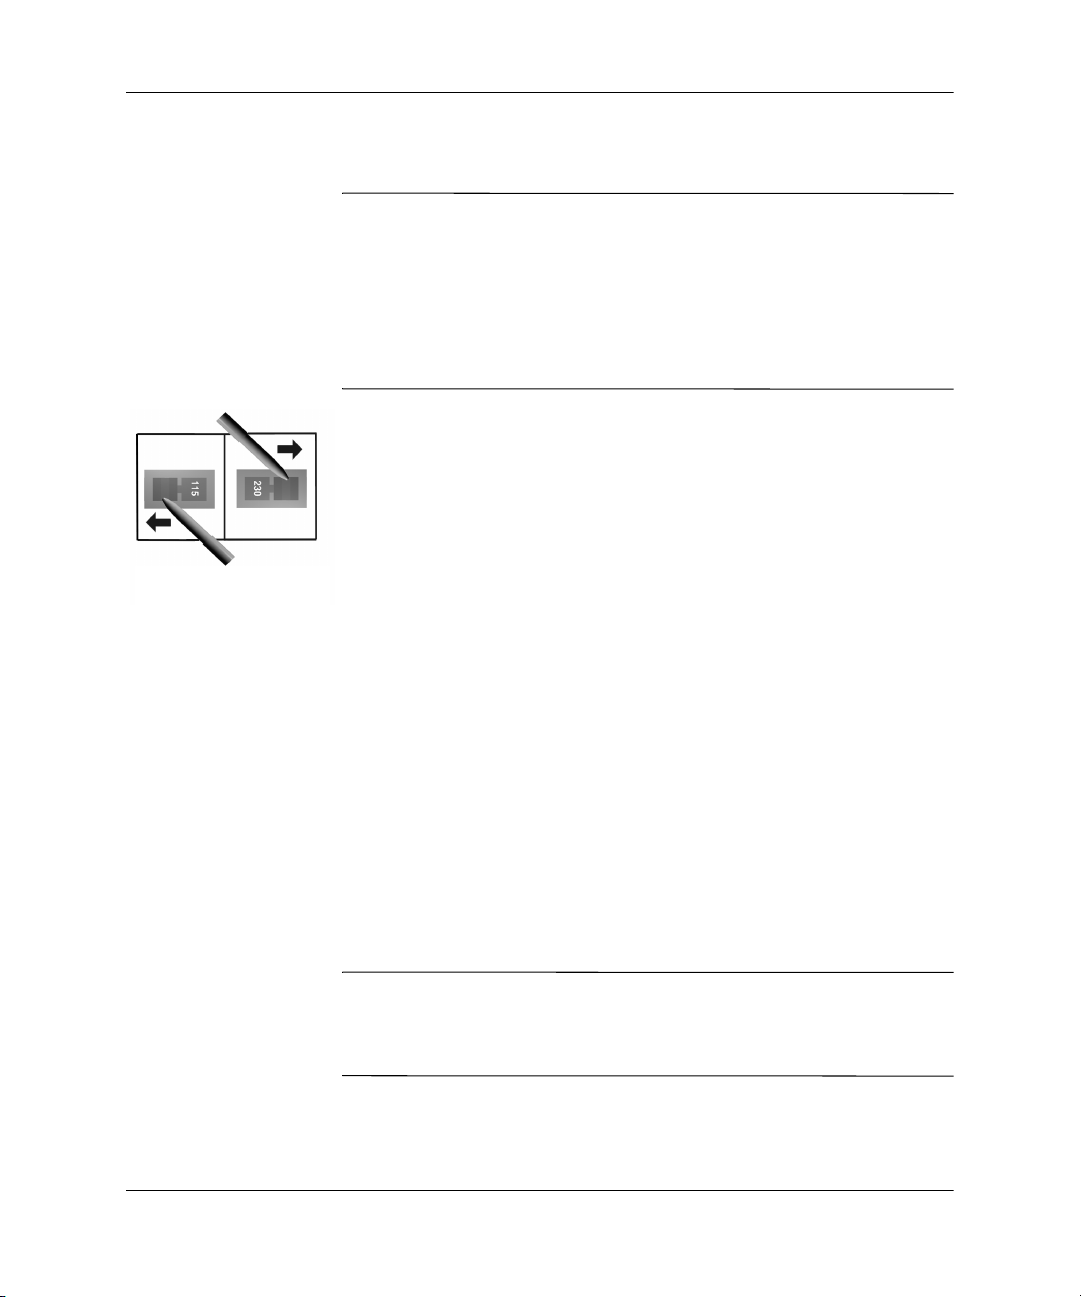
1. Remove the warning label covering the PC’s power connector,
and ensure that the voltage setting is correct for your country.
(Refer to Appendix C, in section “Power Cord Set
Requirements.” The voltage is set during manufacture and should
already be correct.)
2. Connect the power cords to the rear of the monitor and the
computer. (The connectors are shaped to go in one way only).
3. Connect the monitor’s power cord and the computer’s power cord
to a grounded outlet.
Using Your PC
Starting Your PC for the First Time
Turn on the monitor, then press the power button (located on the front
panel) to turn on the PC. The first time you turn on the personal
computer, the operating system is installed automatically. This
process takes about 5 to 10 minutes, depending on which operating
system is being installed. Carefully read and follow the instructions
that appear on the screen to complete the installation. If required, the
product ID number is printed on a label affixed to the PC.
Ä
CAUTION: Once the automatic installation has begun, DO NOT TURN
OFF THE COMPUTER UNTIL THE PROCESS IS COMPLETE. Turning off the
personal computer during the installation process might damage the
software that runs the personal computer.
When the Welcome to Windows screen is displayed, the Windows
installation process is complete.
Voltage Selection
Switch

1–4 Quick User’s Guide
Quick Setup
Customizing the Monitor Display
You can manually select or change the monitor brand, model, refresh
rates, color, resolution, and power management settings. Right-click
on the Windows Desktop, then click Properties to change display
settings, or refer to the online documentation provided with the
graphics controller utility.
Protecting Your Software
To protect your software from loss or damage, you should keep a
backup copy of all system software, applications, and related files
stored on your hard drive. Refer to your operating system or backup
utility documentation for instructions on making backup copies of
your data files.
Compaq Restore Solution
Restore the original operating system and factory-installed software
by using the Compaq Restore Plus! CD and any other CDs that came
with the computer. Carefully read and follow the instructions for the
restore solution that came with the computer the computer.
For questions about or problems with this CD, please contact Compaq
Customer Support.
Registration
Be sure to register your new personal computer with Compaq.
Registration establishes a record of ownership and gives you an
opportunity to receive product announcements, updates, and other
communications periodically, if you choose to do so. Registration is
easy—just visit the Compaq Web site at www.compaq.com/register
and follow the instructions that appear on the screen.

Quick User’s Guide 1–5
Quick Setup
Turning Off the PC
To properly turn off the personal computer, first shut down the
operating system software. In Microsoft Windows operating systems,
click Start > Shut Down.
To turn off power to the computer in the event that the operating
system does not respond to the Shut Down command, press and hold
the power button for five seconds.
Accessibility
Compaq is committed to designing products, services, and programs
with improved usability and accessibility for all customers. Compaq
products with Microsoft Windows XP preinstalled, or that are XP
Ready, are designed for accessibility. These products are tested with
industry-leading Assistive Technology products to ensure equal
access—anytime, anywhere...to anyone.
For More Information
Additional information, software, and driver updates are available on
the Compaq Web site at: www.compaq.com/support (search for Evo
D510 e-pc).


Quick User’s Guide 2–1
2
Troubleshooting
Basic Troubleshooting
Overview
This chapter is intended for basic troubleshooting only. A
comprehensive Troubleshooting Guide is available on the Web at
http://www.compaq.com/support.
If you choose to use an operating system different than what was
shipped with your PC, refer to the following support Web site at
http://www.compaq.com/support for additional support that may be
available.
Helpful Hints
If you encounter some minor problem with your computer, monitor,
or software, refer to the following list of general suggestions before
taking further action:
■ Check that the computer and monitor are plugged into a working
electrical outlet.
■ Check to see that the computer is turned on and the green power
light is on.
■ Check to see that the monitor is turned on and the green monitor
light is on.
■ Turn up the brightness and contrast controls of the monitor if the
monitor is dim.
■ Press and hold any key. If the system beeps, then your keyboard is
operating correctly.
■ Check all cable connections for loose connections or incorrect
connections.
 Loading...