


 Loading...
For series / Para la serie / Pour la série
CAM3001
EN |
Snapp™ Mini Digital Camcorder |
|
Instruction Manual........................................................................... |
Page 2 |
|
ES |
Snapp™ Mini Videocámara Digital |
|
Manual de Instrucciones........................................................... |
Pagina 26 |
|
FR |
Snapp™ Mini Caméscope Numérique |
|
Manuel D’instruction.................................................................... |
Page 50 |
Pleasereadcarefullybeforeuse•Léaelmanualantesdeusar•Veuillezlirecelivretavantutilisation

ÂÂTable of Contents
English
Package Contents ..................................................................................................................... |
4 |
Camera at a Glance................................................................................................................. |
5 |
Front View......................................................................................................................................... |
5 |
Top View........................................................................................................................................... |
6 |
Rear View......................................................................................................................................... |
6 |
Left View........................................................................................................................................... |
6 |
Right View......................................................................................................................................... |
6 |
Bottom View..................................................................................................................................... |
6 |
Getting Started........................................................................................................................... |
7 |
Install the Batteries........................................................................................................................... |
7 |
Insert a Memory Card..................................................................................................................... |
7 |
Using the Camera....................................................................................................................... |
9 |
Turning the Camera On/Off........................................................................................................... |
9 |
Changing Camera Modes............................................................................................................. |
9 |
Video Mode..................................................................................................................................... |
9 |
To Record Video................................................................................................................... |
9 |
Zoom..................................................................................................................................... |
10 |
Video Size............................................................................................................................ |
10 |
Page 2 |
Table Of Contents |
|
|

Photo Mode.................................................................................................................................... |
10 |
To Take a Photo................................................................................................................... |
10 |
Zoom..................................................................................................................................... |
10 |
Photo Size............................................................................................................................. |
11 |
Playback Mode............................................................................................................................. |
11 |
Playback Controls............................................................................................................... |
11 |
Connecting to a TV................................................................................................................. |
13 |
Transferring Files to a Computer........................................................................................ |
14 |
Software by ArcSoft®................................................................................................................................................................................................ |
16 |
Software Requirements................................................................................................................. |
16 |
Installing the Software................................................................................................................... |
16 |
About ArcSoft MediaImpression.................................................................................................. |
17 |
Specifications........................................................................................................................... |
18 |
Troubleshooting & Support................................................................................................... |
19 |
Safety Notices............................................................................................................................ |
21 |
English
Table Of Contents |
Page 3 |
|
|

English
ÂÂPackage Contents
Thank you for purchasing this Coby CAM3001 Mini Digital Video Camera. Please read these instructions before using your camcorder, and retain them for future reference. This package includes:
CAM3001 camera
Two (2) “AA” batteries
AV cable
USB extension cable
Detachable hand strap
Pouch
Installation CD
Should any of the above items be missing, please contact the dealer from whom you purchased this product.
This package may contain plastic bags or other materials that pose a hazard to children. Be sure to safely dispose of all packing materials after opening.
Page 4 |
Package Contents |
|
|
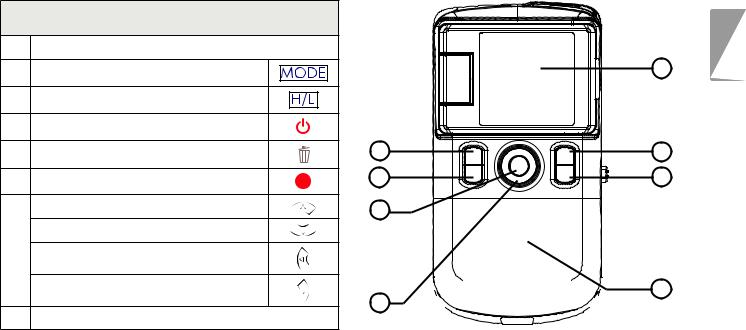
ÂÂCamera at a Glance
Front View
1 LCD screen
2MODE
3Quality (High/Low)
4Power
5Delete
6Record/OK Up/Zoom In Down/Zoom Out
7Left Right
8Battery compartment cover
1
2 |
4 |
3 |
5 |
6 |
|


 8 7
8 7 


English
Camera At A Glance |
Page 5 |
|
|

|
Top View |
||
|
1 |
A/V out jack |
|
English |
2 |
USB Plug |
|
Rear View |
|||
|
|||
|
|
|
|
|
3 |
Lens |
|
|
4 |
Microphone |
|
|
5 |
LED light |
|
|
|
|
|
|
6 |
Speaker |
|
|
|
|
|
|
Left View |
||
|
|
|
|
|
7 |
SD/SDHC card slot |
|
|
|
|
|
|
Right View |
||
8USB plug switch
9Hand strap mount
Bottom View
10 Tripod mount
Page 6
1 |
|
2 |
|
|
|
|
|
|
|
4 |
|
|
|
5 |
|
|
|
3 |
|
|
7 |
6 |
8 |
|
|
9
10
Camera At A Glance
ÂÂGetting Started
Please read and complete the following steps to begin using your digital video camera.
Install the Batteries
1.Remove the battery compartment door by sliding it toward the base of the camera.
2.Insert two (2) “AA” alkaline batteries. Be sure to match their polarities to those indicated in the diagram inside the battery compartment.
3.Replace the battery compartment door and snap it into place.
The battery used in this device may present a fire or chemical burn if mistreated. Do not disassemble, incinerate, or heat the batteries. Used batteries should be disposed of safely.
Keep batteries out of the reach of children.
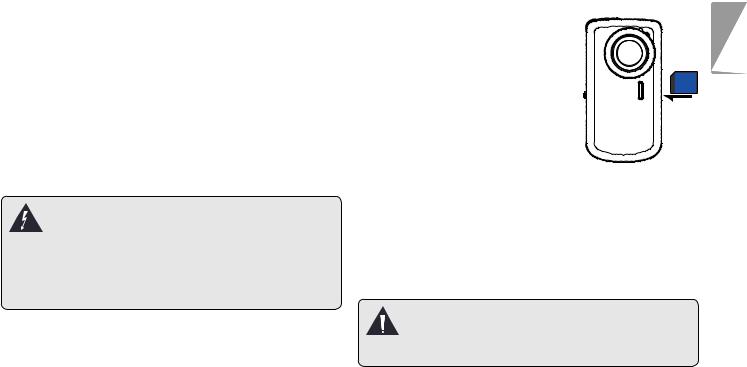
Insert a Memory Card
This camera records to SD or SDHC memory cards. The maximum supported card size is 8GB.
1. Make sure that the write protection switch on the memory card is set to the
“unlocked” position.
2. Install the memory card by inserting it gently into the
card slot on the left side of the video camera. Push the
card until it clicks into place. Make sure the card is properly aligned as indicated by the marking next to the card slot.
3.To release and remove the card, press the card in; it will spring out of the slot. Grasp the card by its edge to remove it.
To avoid data corruption, turn off the digital video camera before inserting or removing a memory card.
English
Getting Started |
Page 7 |
|
|

English
Do not attempt to insert objects other than an SD or SDHC memory card into the card slot. A compatible memory card should fit easily into the card slot; if you encounter resistance, check the alignment of the card. Do not attempt to force the card in.
Avoid touching the gold contacts of the memory card.
Page 8 |
Getting Started |
|
|

ÂÂUsing the Camera
Turning the Camera On/Off
Press and hold  to turn the camera on or off.
Changing Camera Modes
Your video camera includes three modes. Press  to toggle between them.
The mode icon displayed on the upper left corner of the screen indicates the current camera mode.
|
Icon |
Camera |
Function |
|
|
Mode |
|||
|
|
|
|
|
|
|
|
Video |
Record videos. |
|
|
|
||
|
|
|
|
|
|
|
|
|
|
|
|
|
Photo |
Capture still photos. |
|
|
|
||
|
|
|
|
|
|
|
|
|
|
|
|
|
Playback |
Review video and photo files. |
|
|
|
||
|
|
|
|
|
|
|
|
|
|
Video Mode
Place the camera in Video mode to record videos.
When you turn on your camera, it will enter Video Mode automatically.
To Record Video
Press  to begin recording.
Press  to stop recording.
During recording, the elapsed recording time is displayed on the upper right corner of the screen. When the camera is in video mode and not recording, the estimated available recording time is displayed instead.
Recording will stop automatically when the memory card is full.
English
Using The Camera |
Page 9 |
|
|

Zoom
To use the camera’s digital zoom function:
English |
Press |
to zoom in |
Press |
to zoom out. |
The magnification level is displayed on the right side of the screen.
Video Size
The camera records at a default video size of 640x480 pixels. To maximize recording time, you may wish to record video at a lower resolution of 320 x 240.
Press  to toggle between video sizes.
The video size is displayed at the top of the screen (640 or 320).
Recording must be stopped to change the video size.
Photo Mode
Place the camera in Photo mode to record still photos.
To Take a Photo
Press  to take a photo.
The estimated number of available photos on the memory card is displayed on the upper right corner of the screen.
Zoom
To use the camera’s digital zoom function:
Press  to zoom in
Press  to zoom out.
The magnification level is displayed on the right side of the screen.
Page 10 |
Using The Camera |
|
|
Photo Size
The camera records at a default photo size of 3MP (2048 x 1536). To maximize the amount of photos you can take, you may wish to record photos at a lower resolution of 1MP (1280 x 960).
Press  to toggle between photo sizes.
The photo size is displayed at the top of the screen (3MP or 1MP).
Playback Mode
Place the camera in Playback mode to review or delete videos and photos on the camera.
Playback Controls
Press  or
or  to browse the files on the camera.
The  icon on the lower left of the screen indicates a video file; the [JPG] icon indicates a photo file.
Press  to play a video file; press
  again to stop.
Press  or
or  to zoom in or out of a photo file.
When a photo is enlarged, press  or
or  to pan around the image.
Press  to exit Pan mode and return to a normal view.
English
Using The Camera |
Page 11 |
|
|

English
Press  to view multiple files in thumbnail mode.
When viewing files in Thumbnail mode, press  /
/  /
/  /
/  to browse. Press
  to select a file to view.
To delete the current file:
Press  once. At the “Delete Current?” prompt, press
  to delete, or press any other button to cancel.
To delete all files:
Press  twice. At the “Delete All?” prompt, press
  to delete, or press any other button to cancel.
Page 12 |
Using The Camera |
|
|
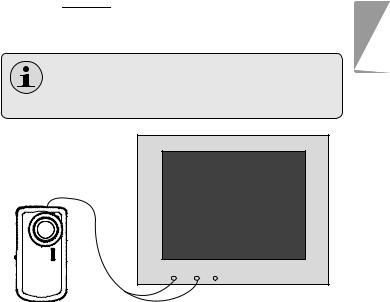
ÂÂConnecting to a TV
To view your video and photo files on a bigger screen, use the included A/V cable to connect your camera to a television.
1.Locate the Composite Video input connectors on the TV.
Connect the cable’s yellow RCA plug to the
Composite Video In jack of the TV.
Connect the cable’s red RCA plug to the red Audio In jack of the TV.
2.Turn on the camera. Connect the cable’s mini plug to the A/V output jack located on the top of the camera. The camera’s screen will turn off automatically.
3.Turn on the TV. Set the TV’s input source mode to display the Composite Video signal. When the TV source mode is set properly, you will see the camera’s display on the TV screen.
4.Press 

 on the camera to place it Playback mode. Use the playback mode controls to play videos or watch photos on the TV.
Please refer to the documentation provided with your TV If you need help setting its input source mode.
TV
Video Audio
INPUT YELLOW RED WHITE
English
Connecting To A Tv |
Page 13 |
|
|
English
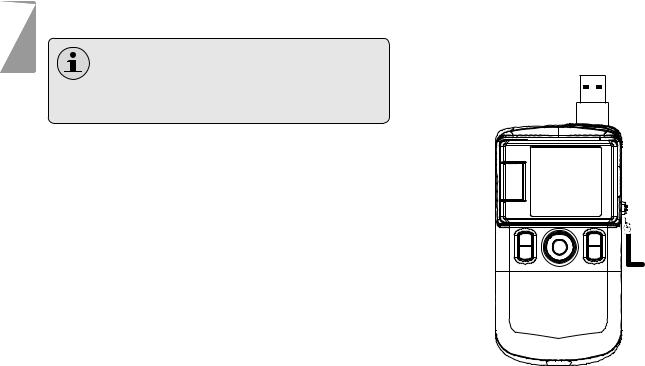
ÂÂTransferring Files to a Computer
Connect your camera to a computer to transfer files from the camera onto your hard drive.
If you are planning to install the software on the included CD, please install these programs BEFORE connecting the camera to your computer.
1.Locate the USB plug switch on the right side of the camera. Press the switch in and slide it up to extend the USB plug.
2.Connect the USB plug to a USB port on the computer.
3.If the camera is off, turn it on. Your computer should automatically recognize the video camera as a removable disk. Follow the prompt on your screen to view files on the camera. If no prompt appears, you may access the camera via “My Computer” on a Windows computer, or via a Finder window on Mac OS X.
4.Transfer files from the camera to your computer as you would with any external disk (i.e., drag- and-drop or copy/paste).
Page 14 |
Transferring Files To A Computer |
|
|

The camera must be turned on to connect to a computer.
The first time you connect the camera to a computer, it may take a moment for the computer to recognize and install the appropriate drivers for the camera.
A USB extension cable has been provided for your convenience. You can use this cable if the only available USB ports are located on the back of your computer, or if the camera is blocked by other USB devices.
If your computer has an SD card reader, you can simply remove the SD card from the camera and load it into the card reader to transfer files.
English
Transferring Files To A Computer |
Page 15 |
|
|

English
ÂÂSoftware by ArcSoft®
Your digital video camera comes with an installation CD which includes software for photo editing, video editing, and uploading your videos to YouTube™.
Software Requirements
CPU: Pentium III 800MHz or higher
Disk Space: At least 250MB space free
Memory: 128MB or higher
Operating System: Windows 7/Vista/XP (with Service Pack 2)
Installing the Software
The included software should be installed BEFORE connecting the camera to your computer.
To begin installing software, insert the CD into your computer’s CD/DVD drive.
When the CD is inserted, an AutoRun menu will appear. Click a menu option to launch the installation routine.
Page 16 |
Software By Arcsoft® |
|
|
Menu Options |
Description |
|
|
Install |
Install software for editing |
MediaImpression |
photos and videos, and for |
|
uploading videos to YouTube™. |
|
Follow the on-screen instruc- |
|
tions to complete installation |
|
of the selected software. |
User Manual |
View the user manual PDF. |
|
To view the user manual, you |
|
may need to download and |
|
install the free Adobe Acrobat |
|
reader from http://get.adobe. |
|
com/reader/. |
Browse CD |
Explore the contents of the CD. |
|
|
Exit |
Exit this CD menu. |
|
|
If the autorun menu does not appear automatically, double-click the CD-ROM icon in [My Computer] or [Windows Explorer], and then double-click the file named [autorun. exe] to start the program.
About ArcSoft MediaImpression
After MediaImpression has been installed, you can launch the programs from the Windows Start menu.
Use MediaImpression to edit photos and videos. You can also use MediaImpression to share your videos with family, friends, or the world with the YouTube web service.
To get acquainted with the MediaImpression software, please refer to the help file included with the application (click on the “?” symbol in the top right corner of the application screen).
To upload videos to YouTube, you must have a valid YouTube account. To sign up for a free account, please visit www.youtube.com.
English
Software By Arcsoft® |
Page 17 |
|
|

English
ÂÂSpecifications
DisplayType |
1.44”colorLCD |
ImageSensor |
1.3MPCMOS(1280x960) |
VideoResolution |
VGA(640x480),30fps |
|
QVGA(320x240),30fps |
Zoom |
4xdigital |
Lens |
3mmf/2.8 |
FocusRange |
1.2m~infinity |
WhiteBalance |
Auto |
Exposure |
Auto |
RemovableMemorySupport |
SD/SDHC(upto8GB) |
VideoFormat |
AVI(MotionJPEG) |
PhotoFormat |
JPEG |
A/VOutput |
MiniCompositeVideo/Mono |
PCConnection |
USB2.0Hi-speed |
Power |
2x“AA”batteries |
Specificationsandmanualaresubjecttochangewithoutnotice.
Page 18 |
Specifications |
|
|

ÂÂTroubleshooting & Support
If you experience a problem with this device, please read the troubleshooting guide below and check our website at www.cobyusa.com for Frequently Asked Questions (FAQ) and firmware updates. If these resources do not resolve the problem, please contact Technical Support.
Address |
COBY Electronics Technical Support |
|
|
150 Knowlton Way |
|
|
Savannah, GA 31407 |
|
techsupport@cobyusa.com |
||
Web |
www.cobyusa.com |
|
Phone |
800-727-3592: |
Monday–Friday, 8:30AM–9:00PM EST |
|
|
Saturday, 9:00AM-5:30PM EST |
|
718-416-3197: |
Monday–Friday, 8:00AM–5:30PM EST |
Camera does not power on.
Check that the batteries have been installed correctly. The polarities of the batteries should match the markings that are inside the battery compartment.
The batteries may be old or may not retain adequate charge. Try replacing the batteries.
English
Troubleshooting & Support |
Page 19 |
|
|

English
The camera does not take pictures/video.
The camera’s memory or memory card may be full. Delete several files and try again.
The memory card type may not be supported. Make sure that you are using an SD or SDHC memory card 8GB or less in size.
The memory card format may not be supported. Make sure that you are using a FATformatted card.
Image is blurry or out of focus.
Blurry images or video may result when the camera is not held steady during recording. Hold the camera steady and try again.
Blurry images or video may result when there is not enough light on the subject. Try recording in a brightly lit location.
Recorded images are not saved in memory.
Images will not save if the camera is turned off before data has finished processing. Be sure to allow adequate time for the image to save
completely before turning off the video camera.
Page 20 |
Troubleshooting & Support |
|
|
ÂÂSafety Notices
Thelightningflashwitharrowheadsymbolwithin anequilateraltriangleisintendedtoalerttheuser tothepresenceofuninsulated“dangerousvoltage” withintheproduct’senclosurethatmaybeofsufficientmagnitudetoconstituteariskofelectricshock.
Theexclamationpointwithinanequilateraltriangle isintendedtoalerttheusertothepresenceof importantoperationandservicinginstructionsinthe literatureaccompanyingtheappliance.
For Customer Use: |
English |
|
Enterbelowtheserialnumberthatislocatedontherearofthe |
||
unit.Retainthisinformationforfuturereference. |
||
|
Model No.
SerialNo.
For recycling or disposal information about this product, please contact your local authorities or the Electronics Industries Alliance: www.eiae.org.
WARNING: To prevent fire or shock hazard, do not expose this device to rain or moisture. Dangerous high voltage is present inside the enclosure. Do not open the cabinet.
Safety Notices |
Page 21 |
|
|

English
FCC Statement
ThisdevicecomplieswithPart15oftheFCCRules.Operationissubjecttothefollowingtwoconditions:
(1)Thisdevicemaynotcauseharmfulinterference.
(2)Thisdevicemustacceptanyinterferencereceived,includinginterferencethatmaycauseundesiredoperation.
Note: ThisequipmenthasbeentestedandfoundtocomplywiththelimitsforClassBdigitaldevices,pursuanttoPart15 oftheFCCrules.Theselimitsaredesignedtoprovidereasonableprotectionagainstharmfulinterferenceinaresidential installation.Thisequipmentgenerates,usesandcanradiateradiofrequencyenergyand,ifnotinstalledandusedinaccordancewiththeinstructions,maycauseharmfulinterferencetoradiocommunications.However,thereisnoguarantee thatinterferencewillnotoccurinaparticularinstallation.Ifthisequipmentdoescauseharmfulinterferencetoradioor televisionreception,whichcanbedeterminedbyturningtheequipmentoffandon,theuserisencouragedtotrytocorrect theinterferencebyoneormoreofthefollowingmeasures:
•Reorientorrelocatethereceivingantenna.
•Increasetheseparationbetweentheequipmentandreceiver.
•Connecttheequipmentintoanoutletonacircuitdifferentfromthattowhichthereceiverisconnected.
•Consultthedealeroranexperiencedradio/TVtechnicianforhelp
UseofshieldedcableisrequiredtocomplywithClassBlimitsinSubpartBofPart15oftheFCCrules.
Donotmakeanychangesormodificationstotheequipmentunlessotherwisespecifiedinthemanual.Ifsuchchangesor modificationsshouldbemade,youcouldberequiredtostopoperationoftheequipment.
Page 22 |
Safety Notices |
|
|

Important Safety Instructions
1.ReadInstructions:Allthesafetyandoperatinginstructionsshouldbereadbeforetheproductisoperated.
2.RetainInstructions:Thesafetyandoperatinginstructionsshouldberetainedforfuturereference.
3.HeedWarnings:Allwarningsontheproductandinthe operatinginstructionsshouldbeadheredto.
4.FollowInstructions:Alloperatingandusageinstructionsshouldbefollowed.
5.Cleaning:Unplugthisproductfromthewalloutlet beforecleaning.Donotuseliquidcleanersoraerosol cleaners.Useadampclothforcleaning.
6.Attachments:Useonlyattachmentsrecommendedby themanufacturer.Useofotherattachmentsmaybe hazardous.
7.WaterandMoisture:Donotusethisproductnearwater (e.g.,nearabathtub,washbowl,kitchensink,laundry tub,inwetbasements,ornearaswimmingpooland thelike).
8.Ventilation:Slotsandopeningsinthecabinetareprovidedforventilationtoensurereliableoperationofthe productandtoprotectitfromoverheating.Theseopeningsshouldneverbeblockedbyplacingtheproducton abed,sofa,rug,orothersimilarsurface.Thisprvoduct shouldnotbeplacedinabuilt-ininstallationsuchasa bookcaseorrackunlessproperventilationisprovidedor themanufacturerinstructionshavebeenadheredto.
9.PowerSources:Thisproductshouldbeoperatedonly fromthetypeofpowersourceindicatedontherating label.Ifyouarenotsureofthetypeofpowersupply toyourhome,consultyourproductdealerorlocal powercompany.Forproductsintendedtooperatefrom batterypowerorothersources,refertotheoperating instructions.
10.Overloading:Donotoverloadwalloutlets,extension cords,orintegralconveniencereceptaclesasthiscan resultinariskoffireorelectricshock.
English
Safety Notices |
Page 23 |
|
|
Loading...