


Owner’s manual
Mode d’emploi
Manual de instrucciones
ARX7570z
AM/FMCASSETTEPLAYER
WITHCD/MDCHANGERCONTROL
•
LECTEURDECASSETTEAM/FMAVEC COMMANDEDECHANGEURCD/MD
•
RADIODEAM/FMYREPRODUCTORDE CASETESCONCONTROLDECAMBIADORDE DISCOSCOMAPCTOS/MINIDISCOS
Clarion Co., Ltd.
|
All Rights Reserved. Copyright © 1998: Clarion Co., Ltd. |
PE-1639B |
1999/1 (A·C) |
Printed in China / Imprimé en Chine / Inpreso en China |
280-7232-00 |
OPEN
ARX7570z
ISR |
1 |
2 |
3 |
4 |
5 |
6 |
Thank you for purchasing the Clarion ARX7570z.
Please read this owner’s manual in its entirety before operating this equipment.
After reading this manual, be sure to keep it in a handy place (e.g., glove compartment).
Check the contents of the enclosed warranty card and keep it carefully with this manual.
This manual includes the operating procedures of the CD changer, MD changer and TV tuner connected via the CeNET cable. The CD changer, MD changer and TV tuner have their own manuals, but no explanations for operating them are described.
Contents |
|
|
1. |
FEATURES ..................................................................................................................................... |
3 |
2. |
PRECAUTIONS .............................................................................................................................. |
3 |
|
Handling Cassette Tapes ................................................................................................................ |
4 |
|
Flip Down Panel .............................................................................................................................. |
4 |
3. |
CONTROLS .................................................................................................................................... |
5 |
4. |
NOMENCLATURE .......................................................................................................................... |
6 |
|
Names of Buttons ............................................................................................................................ |
6 |
|
Display Items ................................................................................................................................... |
6 |
5. |
DCP ................................................................................................................................................. |
7 |
6. |
REMOTE CONTROL ...................................................................................................................... |
8 |
|
Inserting the Batteries ..................................................................................................................... |
8 |
|
Functions of Remote Control Unit Buttons ..................................................................................... |
9 |
7. |
OPERATIONS ............................................................................................................................... |
10 |
|
Basic Operations ........................................................................................................................... |
10 |
|
Radio Operations .......................................................................................................................... |
12 |
|
Tape Operations ............................................................................................................................ |
14 |
|
Other Handy Functions ................................................................................................................. |
16 |
8. |
OPERATIONS OF ACCESSORIES ............................................................................................. |
18 |
|
CD Changer Operations ............................................................................................................... |
18 |
|
MD Changer Operations ............................................................................................................... |
20 |
|
TV Operations ............................................................................................................................... |
21 |
9. |
TROUBLESHOOTING .................................................................................................................. |
23 |
10. |
ERROR DISPLAYS ....................................................................................................................... |
24 |
11. |
SPECIFICATIONS ........................................................................................................................ |
25 |
11. ESPECIFICACIONES
Sintonizador de FM
Gama de frecuencias:
87,9 a 107,9 MHz Sensibilidad útil:
11 dBf
Sensibilidad a 50 dB de silenciamiento:
17 dBf
Selectividad de canal alternativo:
75 dB
Separación entre canales (1 kHz): 35 dB
Respuesta en frecuencia (±3 dB):
30 Hz a 15 kHz
Sintonizador de AM
Gama de frecuencias:
530 a 1710 kHz
Sensibilidad útil:
25 μV
Audio
Salida máxima de potencia:
160 W (40 W × 4 canales) (EIAJ)
Salida media continua de potencia:
14 W × 4, con 4 Ω, de 20 Hz a 20 kHz, distorsión armónica total
Acción de control de graves (30 Hz):
±15 dB
Acción de control de agudos (10 kHz):
±10 dB
Nivel de salida de línea (cinta 0VU):
0,7 V
Generales
Tensión de alimentación:
14,4 V CC (permisible de 10,8 a 15,6 V), negativo a masa
Consumo de corriente:
Menos de 15 A
Impedancia de los altavoces:
4 Ω (permisible de 4 a 8 Ω)
Reproductor de casetes
Fluctuación y trémolo (ponderación eficaz): 0,06%
Separación entre canales (1 kHz): 45 dB
Respuesta en frecuencia (±3 dB)
120 μs (normal):
30 Hz a 18 kHz
70μs (CrO2, FeCr, Metal): 30 Hz a 20 kHz
Relación señal-ruido, 70 μs (CrO2, FeCr, Metal) Dolby NR OFF:
58 dB Dolby B NR: 67 dB
Notas:
Peso / Unidad fuente:
3,52 lb. (1,6 kg)
Peso / Controlador remoto:
1 oz. (30 g) (incluyendo la pila) Dimensiones / Unidad fuente:
7" (An) × 2" (Al) × 6-1/8" (Prf)
[178 (An) × 50 (Al) × 155 (Prf) mm] Dimensiones / Controlador remoto:
1-3/4" (An) × 4-5/16" (Al) × 1-1/8" (Prf)
[44 (An) × 110 (Al) × 27 (Prf) mm]
•Las especificaciones están de acuerdo con las normas de la EIA.
•Las especificaciones y el diseño están sujetos a cambio sin previo aviso por motivo de mejoras.
2 |
ARX7570z |
ARX7570z 77 |
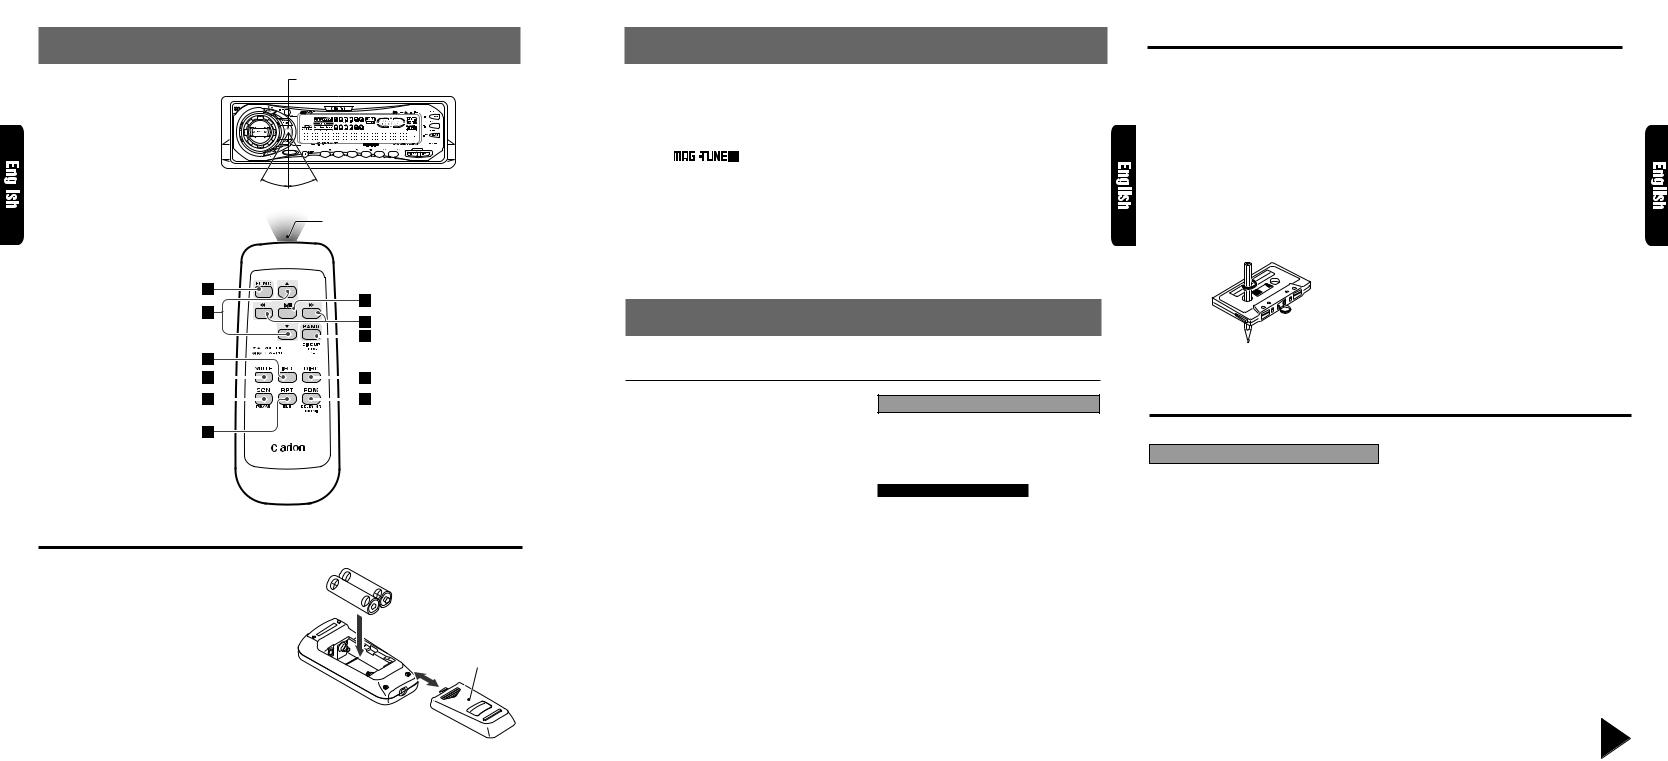
6. REMOTE CONTROL
Receiver for remote control unit
OPEN
ARX7570z
ISR |
1 |
2 |
3 |
4 |
5 |
6 |
|
|
Remote control unit |
Operating range: 30°in all directions |
|||||
|
|||||||
|
|
|
Signal transmitter |
||||
|
|
|
|
|
|
|
|
|
|
|
|
|
|
|
|
|
|
|
|
|
|
|
|
|
|
|
|
|
|
|
|
|
|
|
|
|
|
|
|
Inserting the Batteries
1.Turn the remote control unit over, then slide the rear cover in the direction of the arrow.
2.Insert the AA (UM-3/1.5V) batteries that came with the remote control unit facing in the directions shown in the figure, then close the rear cover.
Notes:
Using batteries improperly can cause them to explode. Take note of the following points:
•When replacing batteries, replace both batteries with new ones.
•Do not short-circuit, disassemble or heat batteries.
•Do not dispose of batteries into fire or water.
•Dispose of spent batteries properly.
 AA (UM-3/1.5V)
Batteries
Rear cover
Rear side
1.FEATURES
■Rotary Encoder Volume Control with Illuminated Search Key
■Touch-n-Go Flip Down Detachable Face
■Controller for Optional TV Tuner Module
■Capability to Read CD TEXT Data from Clarion Compatible CD Changer
■Z-Enhancer with 3 Adjustment Modes
■CeNET with Balanced Audio Line Transmission and Dynamic Noise Canceling
■ |
® FM Reception System |
■Full Logic Tape Transport with True Function / Auto Reverse with Dual Azimuth Adjust
■Dolby ® B Noise Reduction
■4-Channel RCA Line Level Output with Fader Control
■2-Channel Non-Fade RCA Line Level Output
■160W (40W×4) Maximum Power Output
2.PRECAUTIONS
This unit uses a precision mechanism. Even in the event that trouble arises, never open the case, disassemble the unit, or lubricate the rotating parts.
This equipment generates, uses, and can radiate radio frequency energy and, if not installed and used in accordance with the instructions, may cause harmful interference to radio communications. However, there is no guarantee that interference will not occur in a particular installation.
If this equipment does cause harmful interference to radio or television reception, which can be determined by turning the equipment off and on, the user is encouraged to consult the dealer or an experienced radio/TV technician for help.
 CAUTION
CHANGES OR MODIFICATIONS NOT EXPRESSLY APPROVED BY THE MANUFACTURER FOR COMPLIANCE COULD VOID THE USER’S AUTHORITY TO OPERATE THE EQUIPMENT.
INFORMATION FOR USERS:.
CHANGES OR MODIFICATIONS TO THIS PRODUCT NOT APPROVED BY THE MANUFACTURER WILL VOID THE WARRANTY AND WILL VIOLATE FCC APPROVAL.
Handling Cassette Tapes
Using any of the following types of cassette tapes can cause malfunctions.
•Cassette tapes with low recording levels
•Cassette tapes in which the unrecorded section between tracks is shorter than 4 seconds
•Cassette tapes with noise or the like recorded between tracks
•Cassette tapes on which there are long unrecorded sections in the middle of a track
Handling precautions
•Slack in the tape can cause malfunctions. In particular for prerecorded cassette tapes and
90-minute tapes, take up any slack in the tape before inserting it into the cassette player.
•Avoid using cassettes of 120 minutes or longer. (Such cassettes have extremely thin tape, so the tape can become stretched or cut.)
•Periodically play a cleaning cassette in the player to clean the head.
•Keep magnet items like magnets, and iron and steel items like screwdrivers away from both cassette tapes and the tape head in the player.
•Do not oil the cassette mechanism.
•Do not use any cassette tapes with peeling labels or deformed cases. Such cassette tapes can cause breakdowns.
•When not using the player, always take the cassette out of the mechanism. Exposing a cassette to direct sunlight, extreme temperatures or high humidity can damage the cassette.
Flip Down Panel
The ARX7570z uses a flip-down structure that makes possible large-size displays.
 CAUTION
When opening and closing the FLIP DOWN PANEL, be careful not to catch your fingers. They could be injured.
1.Always use the ARX7570z with the FLIP DOWN PANEL closed.
2.Do not force operations or use this device abnormally when opening or closing the FLIP
DOWN PANEL.
3.Do not use the FLIP DOWN PANEL as a tray to place objects on when it is open.
4.When closing the FLIP DOWN PANEL, do not press the OPEN button 1.
5.Strong impacts to the operating or display section can cause damage or deformation.
6.If the FLIP DOWN PANEL does not open fully, gently open it with your hand.
Be sure to unfold and read the next page. Veuillez déplier et vous référer à la page suivante.
Cerciórese de desplegar y de leer la página siguiente.
8 |
ARX7570z |
ARX7570z |
3 |
ARX7570z |
4 |

3. CONTROLS / LES COMMANDES / CONTROLES
Source unit / Appareil pilote / Unidad fuente
OPEN
ARX7570z
ISR |
1 |
2 |
3 |
4 |
5 |
6 |
|
With the FLIP DOWN PANEL opened / Ouverture du PANNEAU RABATTABLE / Apertura del PANEL ABATIBLE
Display / Afficheur / Visualizador
Note: Be sure to unfold this page and refer to the front diagrams as you read each chapter. Remarque: Veuillez déplier cette page et vous référer aux schémas quand vous lisez chaque chapitre. Nota: Cuando lea los capítulos, despliegue esta página y consulte los diagramas.
4. NOMENCLATURE
Note:
• Be sure to read this chapter referring to the front diagrams of chapter “3. CONTROLS” on page 5 (unfold).
Names of Buttons
1 |
OPEN button |
8 |
Z-EHCR (z-enhancer) button |
|
2 |
ENT (enter) button |
9 |
Preset buttons (1 to 6) |
|
|
|
Play/pause button |
|
Direct buttons (1 to 6) (7 to 12) |
|
POWER button |
0 |
DISP (display) button |
|
|
3 |
|||
|
||||
|
|
FNC (function) button |
! ISR (instant station recall) button |
|
4 |
TITLE button |
@ BND (band) button |
||
|
|
ADJ (adjust) button |
|
PROG (program) button |
5 |
PS/AS (preset scan/auto store) button |
# A-M (audio mode) button |
||
|
|
SCN (scan) button |
|
LOUD (loudness) button |
6 |
RPT (repeat) button |
$ SEARCH button |
||
|
|
BLS (blank skip) button |
% Rotary knob |
|
7 |
DOLBY NR button |
¥ Cassette tape insertion slot |
||
|
|
RDM (random) button |
& Eject button |
|
Display Items
1 Cassette tape in indication
2 BLS (blank skip) indication
3 Z-EHCR (z-enhancer) indication
4Preset channel indication (1 to 6)
Disc number indication (1 to 12)
The disc numbers corresponding to the discs in the CD or MD changer light.
5 MANU (manual) indication
6 ST (stereo) indication
7Function mode indication
The names of modes being selected, etc. are displayed.
8 LD (loudness) indication
9 A-M (audio mode) indication
0 CD/MD changer mode indication
!Long title indication
When the texts for CD or MD are more than 11 characters, this indication lights.
@Operation status indication
The frequency, play time, clock, etc. are displayed.
# RDM (random) indication $ RPT (repeat) indication
% SCN (scan) indication
¥ DISC indication
& Dolby B NR indication
5. DCP
The control panel can be detached to prevent theft. When detaching the control panel, store it in the DCP (DETACHABLE CONTROL PANEL) case to prevent scratches.
We recommend taking the DCP with you when leaving the car.
Removing the DCP
1.Hold down POWER button 3for 1 second or longer to turn off the power.
2.Deeply push in OPEN button 1to unlock the FLIP DOWN PANEL.
If the FLIP DOWN PANEL does not open fully, gently open it with your hand.
3. Pull the DCP toward you and remove it.
DCP
4. Close the HOLD FLAP.
Attaching the DCP
1.Insert the right side of the DCP into the source unit.
2.Insert the left side of the DCP into the source unit.
2.
1.
 CAUTION
•The DCP can easily be damaged by shocks. After removing it, be careful not to drop it or subject it to strong shocks.
•If the FLIP DOWN PANEL is kept open, the DCP may drop due to vibration of the car.
This results in damage to the DCP. So close the FLIP DOWN PANEL or remove the DCP to store into the case.
• The connector connecting the source unit and the DCP is an extremely important part. Be careful not to damage it by pressing on it with fingernails, screwdrivers, etc.
Note:
•If the DCP is dirty, wipe off the dirt with a soft, dry cloth only.
HOLD FLAP
 CAUTION
Be sure to close the HOLD FLAP for safety when removing the DCP.
5 |
ARX7570z |
6 |
ARX7570z |
ARX7570z |
7 |
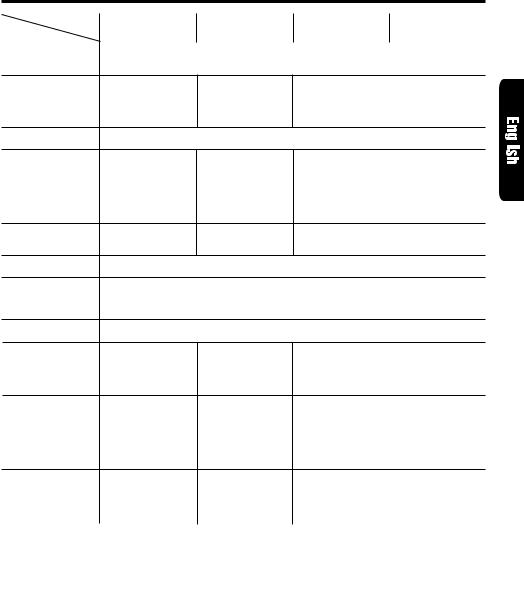
Functions of Remote Control Unit Buttons
Mode |
Radio |
Tape |
CD changer |
|
TV |
|
|
Button |
MD changer |
|
|
|
|||
|
|
|
|
|
|
||
) FUNC |
Turns power on and off. When pressed and held for 1 second: Turns power off. |
|
|
||||
|
Switches among radio, tape, CD changer, MD changer and TV. |
|
|
|
|
||
¡ BAND |
Switches reception |
Switches the side of |
Moves the next disc |
|
Switches reception |
|
|
|
|
|
|||||
DISC UP |
band. |
the tape. |
in increasing order. |
|
band. |
|
|
PROG |
|
|
|
|
|
|
|
TOP |
|
|
|
|
|
|
|
™ VOLUME |
Increases and decreases volume (in all modes). |
|
|
|
|
||
|
|
|
|
||||
|
|
|
|
||||
£ SEARCH |
Moves preset |
Fast-forward and |
Moves tracks up |
|
Moves preset |
|
|
|
|
|
|||||
|
channels up and |
rewinds tape. |
and down. |
|
channels up and |
|
|
|
down. |
APC fast-forward |
When pressed and |
|
down. |
|
|
|
|
and rewind. |
held for 1 second: |
|
|
|
|
|
|
|
Fast-forward/ |
|
|
|
|
|
|
|
fast-backward. |
|
|
|
|
¢ PLAY/PAUSE |
No function. |
Switches between |
Switches between |
|
No function. |
|
|
|
|
playback and pause. |
playback and pause. |
|
|
|
|
∞ MUTE |
Turns mute on and off. |
|
|
|
|
|
|
|
|
|
|
|
|||
§ ISR |
Recalls ISR radio station in memory. |
|
|
|
|
|
|
|
Press and hold for 2 seconds or longer: Stores current station into ISR memory (radio |
|
|
||||
|
mode only). |
|
|
|
|
|
|
¶ DISP |
Switches among main display, sub display and clock display . |
|
|
|
|
||
• SCN |
Preset scan. |
Fast-forward scan. |
Scan play. |
|
Preset scan. |
|
|
|
|
|
|||||
PS/AS |
When pressed and |
|
When pressed and |
|
When pressed and |
|
|
|
held for 2 seconds: |
|
held for 2 seconds: |
|
held for 2 seconds: |
|
|
|
Auto store. |
|
Disc scan play. |
|
Auto store. |
|
|
ª RPT |
No function. |
Repeat play. |
Repeat play. |
|
No function. |
|
|
BLS |
|
When pressed and |
When pressed and |
|
|
|
|
|
|
held for 1 second: |
held for 2 seconds: |
|
|
|
|
|
|
Blank tape skip |
Disc repeat play. |
|
|
|
|
|
|
function turns on |
|
|
|
|
|
|
|
and off. |
|
|
|
|
|
º RDM |
No function. |
Select Dolby Noise |
Random play. |
|
Switches between |
|
|
DOLBY NR |
|
Reduction mode. |
When pressed and |
|
TV and VTR. |
|
|
MONI |
|
|
held for 2 seconds: |
|
|
|
|
|
|
|
Disc random play. |
|
|
|
|
|
|
|
|
|
|
|
|
*Some of the corresponding buttons on the source unit and remote control unit have different functions.
ARX7570z 9

7. OPERATIONS
Basic Operations |
Note: Be sure to read this chapter referring to the front diagrams of |
chapter “3. CONTROLS” on page 5 (unfold). |
 CAUTION
Be sure to lower the volume before switching off the unit power or the ignition key. The unit remembers its last volume setting. If you switch the power off with the volume up, when you switch the power back on, the sudden loud volume may hurt your hearing and damage the unit.
The clock is displayed when the ignition key is turned to the ACC (accessory) or IGN (igni- tion-on) position even when the unit power is off. In some cars, the clock may momentarily disappear when the ignition key is turned to the START position. The clock will reappear after the engine has started and the ignition key is released to the IGN (ignitionon) position.
Radio mode Tape mode CD changer mode MD changer mode TV mode
Radio mode...
External equipment not connected with CeNET is not displayed.
Adjusting the volume
Turning the Rotary knob % clockwise increases the volume; turning it counterclockwise decreases the volume.
The volume level is from 0 (minimum) to 33 (maximum).
Switching the display
Press DISP button 0 to select the desired display.
Each time you press DISP button 0, the display switches in the following order:
Main display
Turning on/off the power
Note:
•Be careful about using this unit for a long time without running the engine. If you drain the car’s battery too far, you may not be able to start the engine and this can reduce the service life of the battery.
1.Press POWER button 3.
2.The illumination and display on the unit light up. The unit automatically remembers its last operation mode and will automatically switch to display that mode.
3.Press and hold POWER button 3 for 1 second or longer to turn off the power for the unit.
Note:
•System check
The first time this unit is turned on after the wire connections are completed, it must be checked what equipment is connected. When the power is
turned on, “SYSTEM CHCK” appears in the display, so press POWER button 3. The system check starts within the unit. When the system
check is complete, the power is turned off, so press POWER button 3 again.
Selecting a mode
1.Press FNC button 3 to change the mode of operation.
2.Each time you press FNC button 3, the mode of operation changes in the following order:
Sub (title) display
Clock display
Main display...
Once selected, the preferred display becomes the display default. When a function adjustment such as volume is made, the screen will momentarily switch to that function’s display, then revert back to the preferred display several seconds after the adjustment.
When you have entered a title in a CD, it appears in the sub display. If you have not entered a title, “NO-TTL” appears in the title display instead. For information on how to enter a title, refer to the subsection “Entering titles” in the “Other Handy Functions”.
10 ARX7570z

Basic Operations
Setting the Z-enhancer
This unit comes with 3 types of sound tone effects stored in memory. Select the one you prefer.
The factory default setting is “Z-EHCR OFF”.
Each time you press Z-EHCR button 8, the tone effect changes in the following order:
“Z-ENHANCER 1” “Z-ENHANCER 2” “Z- ENHANCER 3” “Z-EHCR OFF” “Z-EN- HANCER 1”...
•Z-ENHANCER 1 : bass emphasized
•Z-ENHANCER 2 : treble emphasized
•Z-ENHANCER 3: bass and treble emphasized
• Z-EHCR OFF : no sound effect
Adjusting the tone
Press A-M button # and select the item to adjust. Each time you press A-M button #, the item changes in the following order:
When the Z-enhancer and tone bypass are off
“T-BYPASS” “BASS” “TREBLE” “BALANCE” “FADER” Function mode...
When Z-enhancer 1, 2 or 3 is set
“Z-EHCR” “BALANCE” “FADER” Function mode...
Setting tone bypass
The tone bypass disables the tone (bass and treble) functions and cuts the noise generated when the tone functions are on.
1.Press A-M button #and select “T-BYPASS”.
2.Turning the Rotary knob %clockwise sets the tone bypass to “YES” (ON); turning it counterclockwise sets the tone bypass to “NO”
(OFF).
The factory default setting is “NO” (OFF).
If the setting is “YES” (ON), the bass and treble adjustments cannot be made.
3.When the adjustment is complete, press A-M button #several times until the function mode is reached.
Note:
•If you set the Z-ENHANCER function to ON (1 to 3), you cannot set the tone bypass.
Adjusting the bass
1.Press A-M button # and select “BASS”.
2.Turning the Rotary knob %clockwise emphasizes the bass; turning it counterclockwise attenuates the bass.
The factory default setting is “0”. (Adjustment range: –6 to +6)
The bass cannot be adjusted if the tone bypass setting is “YES” (ON).
3.When the adjustment is complete, press A-M button #several times until the function mode is reached.
Adjusting the treble
1.Press A-M button # and select “TREBLE”.
2.Turning the Rotary knob %clockwise emphasizes the treble; turning it counterclockwise attenuates the treble.
The factory default setting is “0”. (Adjustment range: –6 to +6)
The treble cannot be adjusted if the tone bypass setting is “YES” (ON).
3.When the adjustment is complete, press A-M button #several times until the function mode is reached.
Adjusting the balance
1.Press A-M button # and select “BALANCE”.
2.Turning the Rotary knob %clockwise emphasizes the sound from the right speaker; turning it counterclockwise emphasizes the sound from the left speaker.
The factory default setting is “0”. (Adjustment range: L13 to R13)
3.When the adjustment is complete, press A-M button #several times until the function mode is reached.
Adjusting the fader
1.Press A-M button # and select “FADER”.
2.Turning the Rotary knob %clockwise emphasizes the sound from the front speakers; turning it counterclockwise emphasizes the sound from the rear speakers.
The factory default setting is “0”. (Adjustment range: F12 to R12)
3.When the adjustment is complete, press A-M button #several times until the function mode is reached.
ARX7570z 11
 Loading...