


 Loading...
ADMINISTRATION
GUIDE
Cisco Small Business
RV0xx Series Routers
RV042 Dual WAN VPN Router
RV042G Gigabit Dual WAN VPN Router
RV082 Dual WAN VPN Router
RV016 Multi-WAN VPN Router

Cisco and the Cisco logo are trademarks or registered trademarks of Cisco and/or its affiliates in the U.S. and other countries. To view a list of Cisco trademarks, go to this URL: www.cisco.com/go/trademarks. Third-party trademarks mentioned are the property of their respective owners. The use of the word partner does not imply a partnership relationship between Cisco and any other company. (1110R)
© 2011-2012 Cisco Systems, Inc. All rights reserved. |
78-19576-01 B0 |
|
Contents |
|
|
|
|
Chapter 1: Introduction |
7 |
RV0xx Series Router Features |
7 |
Ports |
9 |
Status Lights |
10 |
Other Hardware Features |
11 |
Default Settings |
12 |
Mounting Options |
12 |
Placement Tips |
12 |
Desktop Placement |
12 |
Wall Mounting |
13 |
Rack Mounting RV082 or RV016 |
14 |
Connecting the Equipment |
15 |
Getting Started with the Configuration |
16 |
Troubleshooting Tips |
17 |
Features of the User Interface |
18 |
Chapter 2: Viewing System Summary Information |
20 |
Chapter 3: Setup |
26 |
Setting Up the Network |
27 |
Changing the Administrator Username and Password |
40 |
Setting the System Time |
42 |
Setting Up a DMZ Host |
43 |
Setting Up Port Forwarding and Port Triggering |
44 |
Setting Up Universal Plug and Play (UPnP) |
48 |
Setting Up One-to-One NAT |
51 |
Cloning a MAC Address for the Router |
53 |
Assigning a Dynamic DNS Host Name to a WAN Interface |
55 |
Setting Up Advanced Routing |
57 |
IPv6 Transition |
61 |
|
|
Cisco Small Business RV0xx Series Routers Administration Guide |
3 |
|
Contents |
|
|
|
|
Chapter 4: DHCP |
63 |
Setting Up the DHCP Server or DHCP Relay |
63 |
Viewing the DHCP Status Information |
70 |
Router Advertisement (IPv6) |
71 |
Chapter 5: System Management |
73 |
Setting Up Dual WAN and Multi-WAN Connections |
73 |
Managing the Bandwidth Settings |
81 |
Setting Up SNMP |
84 |
Enabling Device Discovery with Bonjour |
85 |
Using Built-In Diagnostic Tools |
87 |
Restoring the Factory Default Settings |
89 |
Upgrading the Firmware |
90 |
Restarting the Router |
91 |
Backing Up and Restoring the Settings |
92 |
Chapter 6: Port Management |
95 |
Configuring the Port Settings |
95 |
Viewing the Status Information for a Port |
97 |
Chapter 7: Firewall |
99 |
Configuring the General Firewall Settings |
99 |
Configuring Firewall Access Rules |
103 |
Using Content Filters to Control Internet Access |
110 |
Chapter 8: Cisco ProtectLink Web |
113 |
Getting Started with Cisco ProtectLink Web |
113 |
Specifying the Global Settings for Approved URLs and Clients |
115 |
Approved URLs and Approved Clients |
116 |
Enabling Web Protection for URL Filtering |
117 |
|
|
Cisco Small Business RV0xx Series Routers Administration Guide |
4 |

|
Contents |
|
|
|
|
Updating the ProtectLink License |
120 |
Chapter 9: VPN |
122 |
Introduction to VPNs |
122 |
Site to Site VPN (Gateway To Gateway) |
123 |
Remote Access (Client To Gateway) |
123 |
Remote Access with Cisco QuickVPN |
125 |
Remote Access with PPTP |
125 |
Viewing the Summary Information for VPN |
126 |
Setting Up a Gateway to Gateway (Site to Site) VPN |
130 |
Setting Up a Remote Access Tunnel for VPN Clients (Client To Gateway) |
|
139 |
|
Managing VPN Users and Certificates |
147 |
Setting Up VPN Passthrough |
149 |
Setting Up PPTP Server |
150 |
Chapter 10: Logging System Statistics |
153 |
Setting Up the System Log and Alerts |
153 |
Viewing the System Log |
157 |
Chapter 11: Wizard |
159 |
Appendix A: Glossary |
161 |
Appendix B: Troubleshooting |
165 |
Appendix C: Cisco QuickVPN for Windows |
167 |
Introduction |
167 |
Cisco QuickVPN Client Installation and Configuration |
168 |
Using the Cisco QuickVPN Software |
168 |
Cisco Small Business RV0xx Series Routers Administration Guide |
5 |

Contents
Appendix D: Configuring a Gateway-to-Gateway VPN Tunnel Between RV0xx Se-
ries Routers |
170 |
Topology Options |
170 |
VPN Hub and Spoke Topology |
171 |
VPN Mesh Topology |
172 |
Other Design Considerations |
173 |
Configuring a VPN Tunnel on a Cisco RV0xx Series Router |
175 |
Example: Sites with Static WAN IP Addresses |
176 |
Example: Site with a Dynamic WAN IP Address |
179 |
Appendix E: IPSec NAT Traversal |
183 |
Overview |
183 |
Appendix F: Bandwidth Management |
186 |
Creation of New Services |
186 |
Creation of New Bandwidth Management Rules |
187 |
Appendix G: Specifications |
189 |
RV042 |
189 |
RV042G |
191 |
Cisco RV082 |
194 |
Cisco RV016 |
196 |
Appendix H: Where to Go From Here |
199 |
Cisco Small Business RV0xx Series Routers Administration Guide |
6 |

1
Introduction
Thank you for choosing a RV0xx Series VPN Router. This guide provides complete information to help you configure and manage your router. This chapter includes information to help you get started using your router. Refer to these topics:
•RV0xx Series Router Features, page 7
•Mounting Options, page 12
•Connecting the Equipment, page15
•Getting Started with the Configuration, page 16
•Features of the User Interface, page 18
RV0xx Series Router Features
Cisco RV0xx Series dual WAN and multi-WAN VPN routers offer highly secure, high-performance, reliable connectivity. All of these routers can support a second Internet connection to ensure continuous connectivity or to increase available bandwidth and balance traffic. Three models are available. A comparison is provided below.
|
|
|
Model |
LAN |
WAN/DMZ |
|
Ports |
Ports |
|
|
|
RV042 and RV042G |
4 |
2 |
|
|
|
RV082 |
8 |
2 |
|
|
|
RV016 |
8-13 |
2-7 Internet |
|
|
1 DMZ |
|
|
|
NOTE RV042, RV042G, and RV082 have one dedicated Internet port and a DMZ/Internet port. RV016 has two dedicated Internet ports, one dedicated DMZ port, and five dual-function ports that can be configured as LAN or Internet ports.
Cisco Small Business RV0xx Series Routers Administration Guide |
7 |

Introduction |
1 |
|
|
RV0xx Series Router Features |
|
|
|
|
|
RV042 and RV042G Ports
1 |
2 |
3 |
4 |
Internet |
DMZ/Internet |
278823
RV042 and RV042G Status Lights
System DIAG Internet DMZ/ DMZMode |
1 |
2 |
3 |
4 |
Internet |
|
|
|
|
Cisco Small Business RV042
278822
RV082 Ports and Status Lights
1 |
2 |
3 |
4 |
Cisco Small Business |
|
|
|
|
RV082 |
DIAG |
Internet |
|
1 |
2 |
3 |
4 |
|
|
DMZ/Internet |
Internet |
|
DMZ |
DMZ |
|
|
|
|
|
|
|
|
System |
Internet |
Mode |
5 |
6 |
7 |
8 |
|
|
|
|
|
|
|
|
|
|
|
|
|
|
10/100 |
|
|
|
|
|
|
5 |
6 |
7 |
8 |
16-Port VPN Router |
278824
RV016 Ports and Status Lights
|
|
|
LAN/Act |
1 |
2 |
3 |
4 |
5 |
6 |
7 |
8 |
|
|
|
|
|
|
|
|
|
|
|
|
DIAG |
|
|
LAN/Act |
9 |
10 |
11 |
12 |
13 |
|
|
|
|
|
|
|
|
|
|
|
Internet Internet |
|
||
System |
Dual-Function Ports |
7 |
6 |
5 |
4 |
3 |
2 |
1 |
DMZ |
||
|
|
Internet/Act |
|
|
|
|
|
|
|
|
|
1 |
|
2 |
|
3 |
|
4 |
|
5 |
|
6 |
|
|
7 |
|
|
8 |
|
Cisco Small Business |
|||||||||||||
|
|
|
|
|
|
|
|
|
|
|
|
|
|
|
|
|
|
|
|
|
|
|
|
|
|
|
|
|
|
|
RV016 |
|
|
|
|
|
|
|
|
|
|
|
|
|
|
|
|
|
|
|
|
|
|
|
|
|
|
|
|
|
|
|
10/100 |
|
|
|
|
|
|
|
|
|
|
|
|
|
|
|
|
|
|
|
|
|
|
|
|
|
|
|
|
|
|
|
|
|
|
|
|
|
|
|
|
|
|
|
|
|
|
|
|
|
|
|
|
|
|
|
|
|
|
|
|
|
|
|
|
|
|
|
|
|
|
|
|
|
|
|
|
|
|
|
|
|
|
|
|
|
|
|
|
|
|
|
|
|
|
|
|
97 |
|
106 |
|
115 |
|
124 |
133 |
|
Internet 2 |
Internet 1 |
DMZ |
||||||||||||||||||||
|
|
|
|
16-Port VPN |
|||||||||||||||||||||||||||
278826
Cisco Small Business RV0xx Series Routers Administration Guide |
8 |

Introduction |
1 |
|
|
RV0xx Series Router Features |
|
|
|
|
|
Ports
Port |
Description |
|
|
Internet (RV042 |
Use this port to connect the router to a |
and RV082) or |
broadband network device. |
Internet 1-2 |
|
(RV016) |
|
|
|
DMZ/Internet |
Use this port to connect the router to either |
(RV042 and |
a second broadband network device or a |
RV082) |
DMZ host such as a web server or FTP |
|
server. A DMZ allows public Internet traffic |
|
to access a specified computer on your |
|
network without exposing your LAN. |
|
|
DMZ (RV016) |
Use this port to connect the router to a DMZ |
|
host such as a web server or FTP server. A |
|
DMZ allows public Internet traffic to access |
|
a specified computer on your network |
|
without exposing your LAN. |
|
|
1-4 (RV042 and |
Use these numbered ports to connect |
RV042G) or 1-8 |
computers and other local network devices. |
(RV082 and |
|
RV016) |
|
|
|
9-13 and 3-7 Dual |
Use these numbered ports as LAN ports |
Function Ports |
(numbered 9-13) or configure them for use |
(RV016) |
as Internet ports (numbered 3-7). The status |
|
is shown on the corresponding status lights: |
|
LAN/Act 9-13 or Internet/Act 3-7. |
|
|
Cisco Small Business RV0xx Series Routers Administration Guide |
9 |

Introduction |
1 |
|
|
RV0xx Series Router Features |
|
|
|
|
|
Status Lights
Light |
Description |
|
|
DIAG |
Lit—The router is preparing for use. Unlit— |
|
The router is ready for use. |
|
|
System |
Steady—The router is powered on. |
|
Flashing—The router is running a |
|
diagnostic test. |
|
|
Internet (RV082, |
Steady—A device is connected to the |
RV042, RV042G) |
Internet port. Flashing—There is network |
or Internet 1-2 |
activity over the Internet port. |
(RV016) |
|
|
|
DMZ/Internet |
Steady—A device is connected to the |
(RV082, RV042, |
DMZ/Internet or DMZ port. Flashing— |
RV042G) or DMZ |
There is network activity over the port. |
(RV016) |
|
|
|
DMZ Mode |
Lit—The DMZ/Internet port is configured |
(RV082, RV042, |
as a DMZ. Unlit—The DMZ/Internet port is |
RV042G) |
configured as a secondary Internet |
|
connection. |
|
|
1-4, 1-8 |
Steady—A device is connected to the |
|
numbered LAN port. Flashing—There is |
|
network activity over the numbered port. |
|
|
RV042G Gigabit |
For the Internet, DMZ/Internet, and |
Ports |
numbered ports, the color indicates the |
|
speed. Green—Gigabit. Amber—10/100M. |
|
|
RV016 Dual-Function Ports:
LAN/Act 9-13 Lit if the port is configured as a LAN port. Steady—A device is connected to the port. Flashing—There is network activity over the port.
Internet/Act 3-7 Lit if the port is configured as an Internet (RV016) port. Steady—A device is connected to the
port. Flashing—There is network activity over the port.
Cisco Small Business RV0xx Series Routers Administration Guide |
10 |
Introduction |
1 |
|
|
RV0xx Series Router Features |
|
|
|
|
|
Other Hardware Features
Feature |
Description |
|
|
Reset |
The Reset button is an indented black |
|
button. On the back panel of the RV042 and |
|
RV042G, look for this button near the port |
|
labeled 1. On the front panel of the RV082 |
|
and RV016, look for this button near the |
|
Internet and DMZ ports . |
|
• To restart the router or restore |
|
connectivity: If the router is having |
|
problems connecting to the Internet, |
|
use the tip of a pen to press and hold |
|
the Reset button for one second. |
|
• To restore factory default settings: |
|
If you are experiencing extreme |
|
problems with the router and have |
|
tried all other troubleshooting |
|
measures, press and hold the Reset |
|
button for 30 seconds to restore the |
|
factory default settings. All |
|
previously entered settings will be |
|
abandoned. |
|
|
Security Slot |
Use the security slot on the side panel to |
|
attach a lock to protect the router from theft. |
|
|
Power |
• RV042 and RV042G: Connect the |
|
provided power adapter to the |
|
power port on the side panel. |
|
• RV082 and RV016: Connect the |
|
provided AC power cable to the |
|
power port on the back panel. |
|
|
Cisco Small Business RV0xx Series Routers Administration Guide |
11 |
Introduction |
1 |
|
|
Mounting Options |
|
|
|
|
|
Default Settings
Parameter |
Default Value |
Username |
admin |
Password |
admin |
LAN IP |
192.168.1.1 |
DHCP Range |
192.168.1.100 to 149 |
Netmask |
255.255.255.0 |
Mounting Options
Placement Tips
•Ambient Temperature—To prevent the router from overheating, do not operate it in an area that exceeds an ambient temperature of 104°F (40°C).
•Air Flow—Be sure that there is adequate air flow around the router.
•Mechanical Loading—Be sure that the router is level and stable to avoid any hazardous conditions.
Desktop Placement
Place the router on a flat surface near an electrical outlet.
WARNING Do not place anything on top of the router; excessive weight could damage it.
Cisco Small Business RV0xx Series Routers Administration Guide |
12 |
Introduction |
1 |
|
|
Mounting Options |
|
|
|
|
|
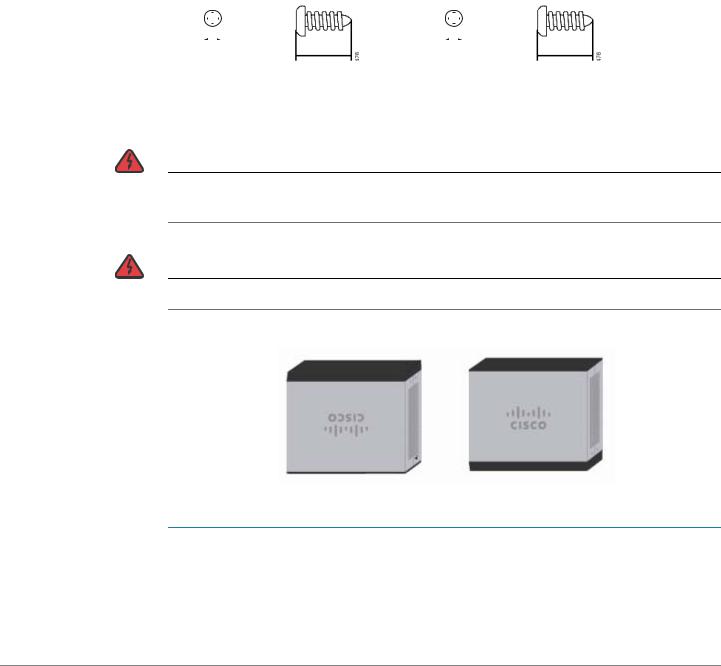
Wall Mounting
The router has two wall-mount slots on the bottom panel. To mount the router on a wall, you need mounting hardware (not included). Suggested hardware is illustrated below (not true to scale).
Suggested Hardware for RV042 and RV042G
Suggested Hardware for RV082 and RV016
|
|
|
|
|
|
|
|
|
|
|
|
|
|
|
|
|
|
|
|
|
|
|
|
|
|
|
|
|
|
|
|
|
|
|
|
|
|
|
|
|
|
|
|
|
|
|
|
|
|
|
|
|
|
|
|
|
|
|
|
|
|
|
|
|
|
|
|
|
|
|
|
|
|
|
5-5.5 mm |
20-22 mm |
|
6.5-7 mm |
16.5-18.5 |
||||||||||
|
|
|
|
|
|
|
|
|
|
|
|
|
|
mm |
|
|
|
|
|
|
|
|
|
|
|
|
|
|
|
|
|
|
|
|
|
|
|
|
|
|
|
|
|
|
WARNING Insecure mounting might damage the router or cause injury. Cisco is not responsible for damages incurred by insecure wall-mounting.
WARNING For safety, ensure that the heat dissipation holes are facing sideways.
STEP 1 Drill two pilot holes into the surface.
•RV042 and RV042G: 58 mm apart
•RV082 and RV016: 94 mm apart
Cisco Small Business RV0xx Series Routers Administration Guide |
13 |
Introduction |
1 |
|
|
Mounting Options |
|
STEP 2 |
Insert a screw into each hole, leaving a gap between the surface and the base of |
|
the screw head of 1 to 1.2 mm. |
STEP 3 |
Place the router wall-mount slots over the screws and slide the router down until |
|
the screws fit snugly into the wall-mount slots. |
|
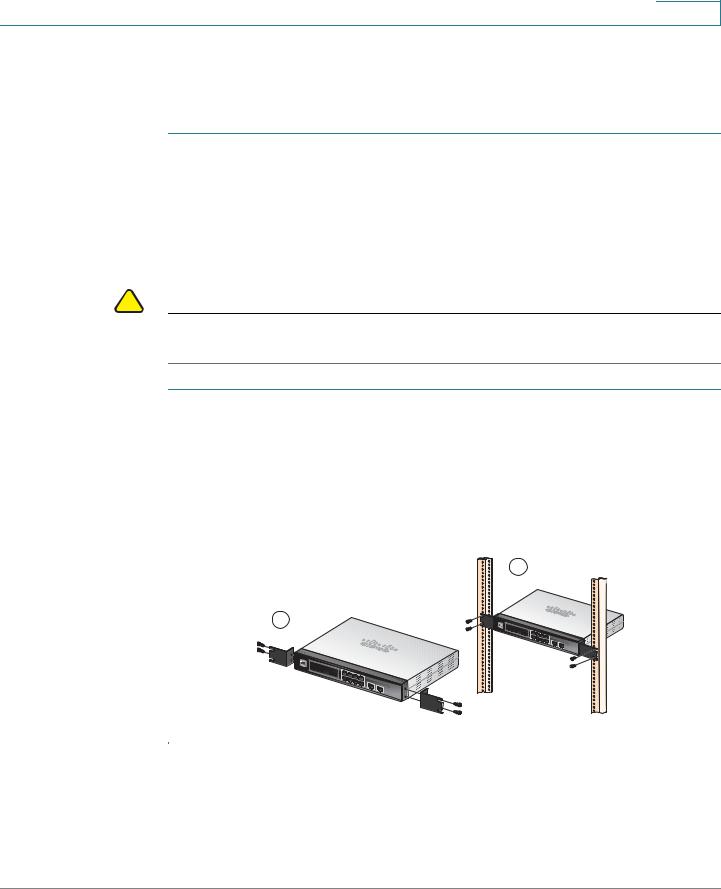
Rack Mounting RV082 or RV016 |
|
You can mount the RV082 or RV016 in a standard size, 19-inch (about 48 cm) wide |
|
rack. The router requires 1 rack unit (RU) of space, which is 1.75 inches (44.45mm) |
|
high. Mounting brackets are provided. |
! |
|
CAUTION |
Do not overload the power outlet or circuit when installing multiple devices in a |
|
rack. |
STEP 1 |
Place the router on a hard, flat surface. |
STEP 2 |
Attach one of the supplied rack–mount brackets to one side of the router with the |
|
supplied screws. Secure the bracket tightly. |
STEP 3 |
Follow the same steps to attach the other bracket to the opposite side. |
STEP 4 |
Use suitable screws to securely attach the brackets to any standard 19-inch rack. |
|
2 |
|
1 |
1 2 3 4
5 6 7 8
DMZ/Internet
Internet
278825
Cisco Small Business RV0xx Series Routers Administration Guide |
14 |
Introduction |
1 |
|
|
Connecting the Equipment |
|
|
|
|
|
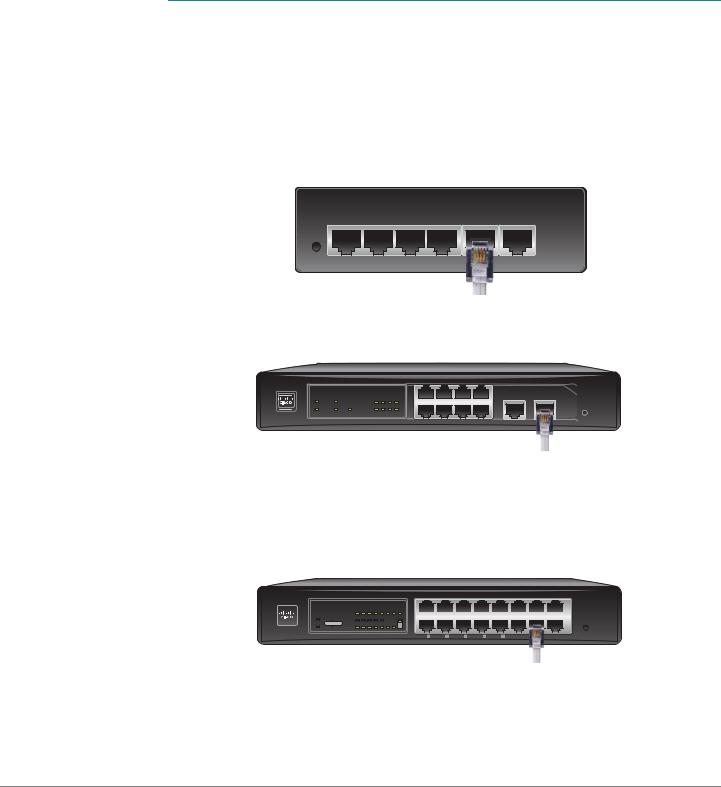
Connecting the Equipment
STEP 1 Make sure that all network devices are powered off, including the router, PCs, Ethernet switches, and broadband network device (DSL or cable modem).
STEP 2 To connect to your Internet service:
•RV042, RV042G, and RV082: Connect an Ethernet cable from the broadband network device to the Internet port of the router.
RV042 and RV042G Internet Port
1 |
2 |
3 |
4 |
Internet |
DMZ/Internet |
199619
RV082 Internet Port
1 |
2 |
3 |
4 |
Cisco Small Business |
|
|
|
|
RV082 |
DIAG |
Internet |
|
1 |
2 |
3 |
4 |
|
|
DMZ/Internet |
Internet |
|
DMZ |
DMZ |
|
|
|
|
|
|
|
|
System |
Internet |
Mode |
5 |
6 |
7 |
8 |
|
|
|
|
|
|
|
|
|
|
|
|
|
|
10/100 |
|
|
|
|
|
|
5 |
6 |
7 |
8 |
16-Port VPN Router |
199620
•RV016: Connect an Ethernet cable from the broadband network device to the Internet 1 port of the router.
RV016 Internet 1 Port
|
|
|
|
LAN/Act |
1 |
2 |
3 |
4 |
5 |
6 |
7 |
8 |
|
|
|
|
|
|
|
|
|
|
|
|
|
||
DIAG |
|
|
|
LAN/Act |
9 |
10 |
11 |
12 |
13 |
|
|
|
|
|
|
|
|
|
|
|
|
|
Internet Internet |
|
|||
System |
Dual-Function Ports |
|
|
|
|
|
|
||||||
7 |
6 |
5 |
4 |
3 |
2 |
1 |
DMZ |
||||||
|
|
|
Internet/Act |
||||||||||
1 |
|
2 |
|
3 |
|
4 |
|
5 |
|
6 |
|
|
7 |
|
|
|
8 |
|
Cisco Small Business |
||||||||||||||
|
|
|
|
|
|
|
|
|
|
|
|
|
|
|
|
|
|
|
|
|
|
|
|
|
|
|
|
|
|
|
|
|
RV016 |
|
|
|
|
|
|
|
|
|
|
|
|
|
|
|
|
|
|
|
|
|
|
|
|
|
|
|
|
|
|
|
|
|
10/100 |
|
|
|
|
|
|
|
|
|
|
|
|
|
|
|
|
|
|
|
|
|
|
|
|
|
|
|
|
|
|
|
|
|
|
|
|
|
|
|
|
|
|
|
|
|
|
|
|
|
|
|
|
|
|
|
|
|
|
|
|
|
|
|
|
|
|
|
|
|
|
|
|
|
|
|
|
|
|
|
|
|
|
|
|
|
|
|
|
|
|
|
|
|
|
|
|
|
|
|
|
|
|
97 |
|
106 |
|
115 |
|
124 |
133 |
|
Internet 2 |
1 |
DMZ |
||||||||||||||||||||||
|
|
|
|
16-Port VPN |
|||||||||||||||||||||||||||||
199621
STEP 3 To connect a secondary Internet service:
•RV042, RV042G, and RV082: Connect an Ethernet cable from the DMZ/ Internet port to a second broadband network device.
Cisco Small Business RV0xx Series Routers Administration Guide |
15 |

Introduction |
1 |
|
|
Getting Started with the Configuration |
|
|
|
|
|
•RV016: Connect an Ethernet cable from the Internet 2 port to a second broadband network device.
STEP 4 To connect a computer or server that will be a DMZ host:
•RV042, RV042G, and RV082: Connect an Ethernet cable from the DMZ/ Internet port to the DMZ host.
•RV016: Connect an Ethernet cable from the DMZ port to the DMZ host.
STEP 5 To connect other network devices, such as computers, print servers, or Ethernet switches, connect an Ethernet cable from a numbered LAN port to the network device.
STEP 6 Power on the broadband network device(s).
STEP 7 Use the power adapter (RV042 and RV042G) or the power cable (RV082 and RV016) to connect the router to a power outlet. The System status light is green.
STEP 8 Power on the other network devices.
Getting Started with the Configuration
STEP 1 Connect a computer to a numbered LAN port on the router. Your PC will become a DHCP client of the router and will receive an IP address in the 192.168.1.x range.
STEP 2 Start a web browser. To use the configuration utility, you need a PC with Internet Explorer (version 6 and higher), Firefox, or Safari (for Mac).
STEP 3 In the address bar, enter the default IP address of the router: 192.168.1.1
STEP 4 When the login page appears, enter the default user name admin and the default password admin (lowercase).
STEP 5 Click Login. The System Summary page appears.
The router’s default settings are sufficient for many small businesses. Your Internet Service Provider may require additional settings. On the System Summary page, check the WAN Status to see if the router was able to receive an IP Address. If not, continue to the next step.
Cisco Small Business RV0xx Series Routers Administration Guide |
16 |

Introduction |
1 |
|
|
Getting Started with the Configuration |
|
|
|
|
|
STEP 6 To use the setup wizard to configure your Internet connection, click Setup Wizard on the System Summary page, or click Wizard in the navigation tree. In the Basic Setup section, click Launch Now. Follow the on-screen instructions.
If your web browser displays a warning message about the pop-up window, allow the blocked content.
STEP 7 To configure other settings, use the links in the navigation tree.
Cisco strongly recommends setting a strong administrator password to prevent unauthorized access to your router. For more information about all settings, refer to the online Help and the Cisco Small Business RV0xx Series VPN Router Administration Guide.
Troubleshooting Tips
If you have trouble connecting to the Internet or the web-based configuration utility:
•Verify that your web browser is not set to Work Offline.
•Check the Local Area Connection settings for your Ethernet adapter. The PC needs to obtain an IP address through DHCP. Alternatively, it can have a static IP address in the 192.168.1.x range with the default gateway set to 192.168.1.1 (the router’s default IP address).
•Verify that you entered the correct settings in the Wizard to set up your Internet connection, including the username and password if required.
•Try resetting the modem and the router by powering off both devices. Next, power on the modem and let it sit idle for about 2 minutes. Then power on the router. You should now receive a WAN IP address.
•Check the DHCP IP address range of your modem. If the modem uses the 192.168.1.x range, disconnect the cable from the modem to the router, and then launch the router configuration utility. In the navigation tree, choose Setup > Network. Enter a new Device IP Address, such as 10.1.1.1 or 192.168.0.1. Alternatively, if you have a DSL modem, leave all settings as is and instead ask your ISP to put the DSL modem into bridge mode.
Cisco Small Business RV0xx Series Routers Administration Guide |
17 |
Introduction |
1 |
|
|
Features of the User Interface |
|
|
|
|
|
Features of the User Interface
The user interface is designed to make it easy for you to set up and manage your router. Refer to these topics:
•Navigation, page18
•Pop-Up Windows, page19
•Setup Wizards, page 19
•Saving the Settings, page19
•Help, page19
•Logout, page19
Navigation
The major modules of the configuration utility are represented by buttons in the left navigation pane. Click a button to view more options. Click an option to open a configuration page. The selected page appears in the main window of the configuration utility.
1 |
2 |
1.Navigation tree
2.Configuration page
Cisco Small Business RV0xx Series Routers Administration Guide |
18 |

Introduction |
1 |
|
|
Features of the User Interface |
|
|
|
|
|
Pop-Up Windows
Some links and buttons launch pop-up windows that display more information or related configuration pages. If your web browser displays a warning message about the pop-up window, allow the blocked content.
Setup Wizards
Two setup wizards make it easy to set up your Internet connection and/or DMZ and to configure access rules for the WAN, LAN, and DMZ. You can use these wizards or use the other pages of the configuration utility.
To open the Wizard page: Click the Setup Wizard button in the Configuration section of the System Summary page. Alternatively, click Wizard in the navigation tree. There are two wizards:
•Basic Setup: Click Launch Now to configure the basic settings for your Internet connection and DMZ. Follow the on-screen instructions.
•Access Rule Setup: Click Launch Now to configure access rules for the WAN, LAN, and DMZ. Follow the on-screen instructions.
Saving the Settings
Your settings on a configuration page are not saved until you click the Save button. When you navigate to another page, any unsaved settings are abandoned.
To clear the settings without saving them, you can click the Cancel button.
Help
To view more information about the selected configuration page, click the Help link near the top right corner of the configuration utility. If your web browser displays a warning message about the pop-up window, allow the blocked content.
Logout
To exit the configuration utility, click the Logout link near the top right corner of the configuration utility. The Login page appears. You can close the browser window.
Cisco Small Business RV0xx Series Routers Administration Guide |
19 |
2
Viewing System Summary Information
The System Summary page appears after you log in to the configuration utility. You also can view this page by clicking System Summary in the navigation tree. Use this page to view information about the current status of the router and the settings. Refer to these topics:
•System Information, page 21
•Cisco ProtectLink Web, page 21
•Configuration, page 22
•Port Statistics, page 22
•WAN Status, page 24
•Firewall Setting Status, page 25
•VPN Setting Status, page 25
•Log Setting Status, page 25
Cisco Small Business RV0xx Series Routers Administration Guide |
20 |
Viewing System Summary Information |
2 |
|
|
|
|
|
|
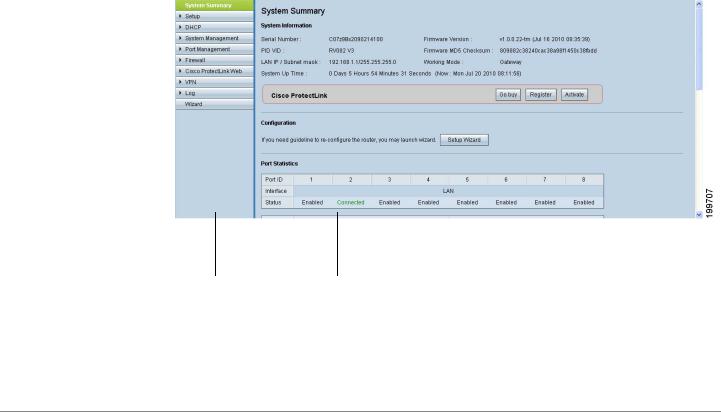
System Information
This section includes the following information:
•Serial Number: The serial number of the router.
•Firmware version: The current version number of the firmware installed on the router.
•PID VID: The current version number of the hardware.
•MD5 Checksum: A value used for file validation.
•LAN IP / Subnet mask: The current IP Address of the router on the local network.
•Working Mode: The working mode (Gateway or Router).
•LAN: If Dual-Stack IP is enabled, on the Setup > Network page, this section displays the IPv4 address and subnet mask as well as the IPv6 address and prefix length.
•System Up time: The length of time in days, hours, and minutes that the router has been active.
Cisco ProtectLink Web
This section displays buttons for the optional Cisco ProtectLink Web service. ProtectLink Web provides security for your network. It filters website addresses (URLs) and blocks potentially malicious websites. (Also see Chapter 8, “Getting Started with Cisco ProtectLink Web.”)
NOTE This service is not available on Cisco RV042G.
You can use the following buttons:
•Go buy: Click this button to purchase a license to use this service. You will be redirected to a list of Cisco resellers on the Cisco website. Then follow the on-screen instructions.
•Register: Click this button if you have a license but have not yet registered it. You will be redirected to the Cisco ProtectLink Web website. Then follow the on-screen instructions.
•Activate: Click this button if you have registered for Cisco ProtectLink Web service and wish to activate it. You will be redirected to the Cisco ProtectLink Web website. Follow the on-screen instructions.
NOTE If the Cisco ProtectLink Web options are not displayed on the System Summary page, you can upgrade the router’s firmware to enable this feature.
Cisco Small Business RV0xx Series Routers Administration Guide |
21 |

Viewing System Summary Information |
2 |
|
|
|
|
|
|
Configuration
If you need help to configure the router, click Setup Wizard. You can then use these wizards:
•Basic Setup Wizard: Use this wizard to set up your Internet connection.
•Access Rule Setup Wizard: Use this Wizard to set up the security policy for your VPN.
Port Statistics
This table shows the status and available statistics for each port. It also provides access to detailed information about current link activity.
•Port ID: The port label.
•Interface: The type of interface, such as LAN, WAN, or DMZ. Multiple WAN interfaces are indicated by a number, such as WAN1 or WAN2.
•Status: The status of the port: Disabled (red), Enabled (black), or Connected (green). The status is a hyperlink that you can click to open the
Port Information window.
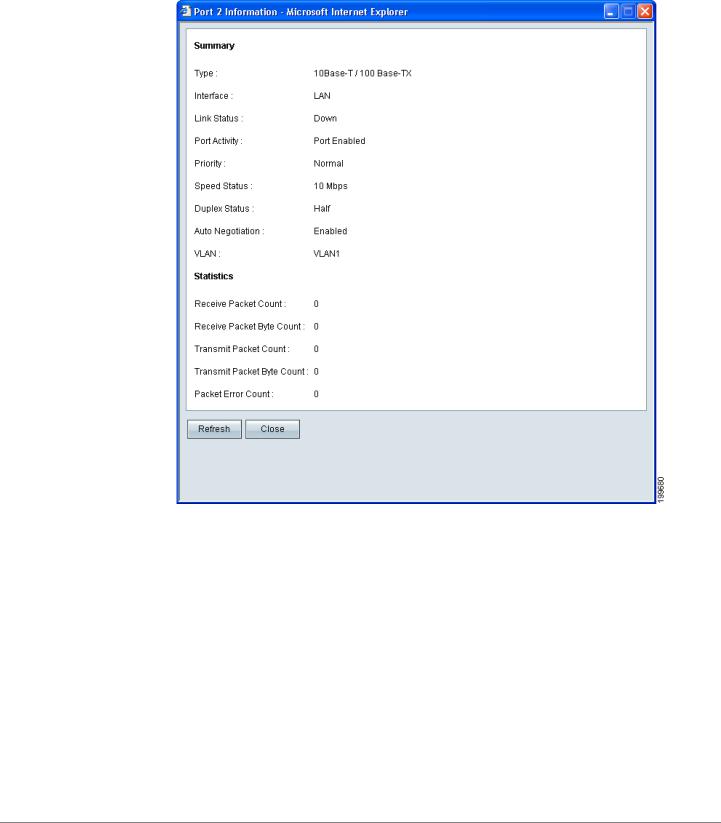
Port Information Window
If you click a status in the Port Statistics table, the Port Information window appears. This window displays the latest information about the interface and the current activity. To update the displayed information, click the Refresh button. To close the window, click the Close button.
Cisco Small Business RV0xx Series Routers Administration Guide |
22 |
Viewing System Summary Information |
2 |
|
|
|
|
|
|
This window displays the following information:
-Type: The type of port, 10Base-T/100 Base-TX.
-Interface: The type of interface, such as LAN, DMZ, or WAN.
-Link Status: The current status of the link: Up or Down.
-Port Activity: The current activity on the port, either Port Enabled, Port Disabled, or Port Connected.
-Priority: The priority setting, High or Normal.
-Speed Status: The speed, 10Mbps or 100Mbps.
-Duplex Status: The duplex mode, Half or Full.
Cisco Small Business RV0xx Series Routers Administration Guide |
23 |

Viewing System Summary Information |
2 |
|
|
|
|
|
|
-Auto negotiation: The auto negotiation setting, On or Off.
-VLAN: The VLAN ID.
-Receive Packet Count: The number of packets received through this port.
-Receive Packet Byte Count: The number of bytes received through this port.
-Transmit Packet Count: The number of packets transmitted through this port.
-Transmit Packet Byte Count: The number of bytes transmitted through this port.
-Packet Error Count: The number of packet errors.
WAN Status
This section displays information for the WAN1 interface as well as DMZ or WAN2, depending on your configuration. On Cisco RV016, additional WAN interfaces may be configured. Use the tabs to view the IPv4 and IPv6 information.
NOTE The IPv6 tab is available if Dual-Stack IP is enabled on the Setup > Network page.
•WAN information:
-IP Address: The current public IP address for this interface.
-Default Gateway: The default gateway for this interface.
-DNS: The IP address of the DNS server for this interface.
-Dynamic DNS (IPv4 only): The DDNS settings for this port, Disabled or Enabled.
-Release and Renew: These buttons appear if the port is set to obtain an IP address automatically. Click Release to release the IP address, and click Renew to update the DHCP lease time or to get a new IP address.
-Connect and Disconnect: These buttons appear if the port is set to PPPoE or PPTP. Click Disconnect to disconnect from the Internet service. Click Connect to re-establish the connection.
Cisco Small Business RV0xx Series Routers Administration Guide |
24 |

Viewing System Summary Information |
2 |
|
|
|
|
|
|
•DMZ information:
-IP Address: The current public IP address for this interface.
-DMZ Host: The DMZ private IP address of the DMZ host. The default is
Disabled.
Firewall Setting Status
This section displays the following information:
•SPI (Stateful Packet Inspection): The status of this feature: On (green) or Off (red).
•DoS (Denial of Service): The status of this feature, On (green) or Off (red).
•Block WAN Request: The status of this feature, On (green) or Off (red).
•Remote Management: The status of this feature, On (green) or Off (red).
•Access Rule: The number of access rules that have been set.
VPN Setting Status
This section displays the following information:
•Tunnel(s) Used: The number of VPN tunnels in use.
•Tunnel(s) Available: The number of VPN tunnels available.
Log Setting Status
This section displays the following information:
•Syslog Server: The status of the syslog server, On (green) or Off (red).
•Email Log: The status of the email log, On (green) or Off (red).
Cisco Small Business RV0xx Series Routers Administration Guide |
25 |

3
Setup
Use the Setup module to set up the basic functions of the router. Refer to these topics:
•Setting Up the Network, page 27
•DMZ Setting, page 32
•Changing the Administrator Username and Password, page 40
•Setting the System Time, page 42
•Setting Up a DMZ Host, page 43
•Setting Up Port Forwarding and Port Triggering, page 44
•Setting Up Universal Plug and Play (UPnP), page 48
•Setting Up One-to-One NAT, page 51
•Cloning a MAC Address for the Router, page 53
•Assigning a Dynamic DNS Host Name to a WAN Interface, page 55
•Setting Up Advanced Routing, page 57
•IPv6 Transition, page 61
Cisco Small Business RV0xx Series Routers Administration Guide |
26 |
Setup |
3 |
|
|
Setting Up the Network |
|
|
|
|
|
Setting Up the Network
Use the Setup > Network page to set up your LAN, WAN (Internet connections), and DMZ interface.
To open this page: Click Setup > Network in the navigation tree.
NOTE Before navigating away from this page, click Save to save your settings, or click Cancel to undo them. Any unsaved changes are abandoned.
This page includes the following sections:
•Host Name and Domain Name, page 27
•LAN Setting (device IP address and subnets), page 28
•WAN Setting (Internet connection), page 31
•DMZ Setting, page 32
Host Name and Domain Name
Some ISPs require that you assign a host name and domain name to identify your router on the ISP network. Default values are provided, but you can change them if needed.
•Host Name: Keep the default setting or enter a host name specified by your ISP.
•Domain Name: Keep the default setting or enter a domain name specified by your ISP.
Cisco Small Business RV0xx Series Routers Administration Guide |
27 |

Setup |
3 |
|
|
Setting Up the Network |
|
|
|
|
|
IP Mode
Choose the type of addressing to use on your network:
•IPv4 Only—Use only IPv4 addressing.
•Dual-Stack IP—Use IPv4 and IPv6 addressing. After you enable this option by saving the settings on this page, you can configure both IPv4 and IPv6 addresses for LAN, WAN, and DMZ settings on this page.
LAN Setting (device IP address and subnets)
The default LAN settings should be sufficient for most small businesses, but if needed, you can change the LAN IP address of the router and enable multiple subnets.
•Changing the device IP address, page 28
•Enabling multiple subnets (IPv4 only), page 29
NOTE If you enabled Dual-Stack IP for the IP Mode, you can click the IPv6 tab to configure IPv6 addresses.
Changing the device IP address
STEP 1 Enter the following information:
•For IPv4: Click the IPv4 tab, and then enter the Device IP Address and Subnet Mask. The default IP address is 192.168.1.1, and the default subnet mask is 255.255.255.0.
Note: The MAC address of the router also appears in this section. This value cannot be changed.
•For IPv6: Click the IPv6 tab, and then enter the IPv6 Address and the Prefix Length. The default IP address is fc00::1, and the default prefix length is 7. The IPv6 tab is available only if Dual-Stack IP is enabled in the IP Mode section. If you change the IP Mode setting, you must save the settings before you continue.
Note: To configure global IPv6 prefixes for your LAN devices, go to the WAN Settings section, click the IPv6 tab, and click the Edit icon for the WAN interface. Then enter the LAN IPv6 Address. For more information, see WAN Setting (Internet connection), page 31.
STEP 2 Click Save to save your changes, or click Cancel to undo them.
Cisco Small Business RV0xx Series Routers Administration Guide |
28 |

Setup |
3 |
|
|
Setting Up the Network |
|
|
|
|
|
After you click Save, a pop-up window displays a reminder that you will need to use the new device IP address to launch the configuration utility. Click OK to close the message and continue with the IP address change, or click Cancel to close the message without applying the changes.
STEP 3 Release and renew the IP address of your PC. You should then receive a new IP address in the new DHCP range for the router.
Notes:
•To release and renew your address in Windows: From the Start menu, open the Network Connections window. Right-click on the connection and choose Disable. Right-click again and enable the connection. To verify, rightclick and choose Status. Then click the Support tab to view the assigned IP address.
•By default, the router is a DHCP server that assigns IP addresses dynamically to all connected devices. For example, if you choose 192.168.15.1 as the device IP address, devices will receive IP addresses in the range of 192.168.2.x.
•By default, a Windows PC receives an IP address dynamically.
•If you previously disabled the router’s DHCP server or set a static IP address on the PC, you will need to configure a new static IP address in the new range.
STEP 4 To reconnect to the configuration utility, enter the new device IP address in the address bar of your browser.
Enabling multiple subnets (IPv4 only)
Typically, a Cisco RV0xx Series router is used as an access router, with a single LAN subnet. By default, the firewall is pre-configured to deny LAN access if the source IP address is on a different subnet than the router’s LAN IP address.
However, you can enable multiple subnets to allow this router to work as an edge device that provides Internet connectivity to different subnets in your LAN.
STEP 1 On the IPv4 tab, check the Enable Multiple Subnet box to enable this feature. Uncheck the box to disable this feature.
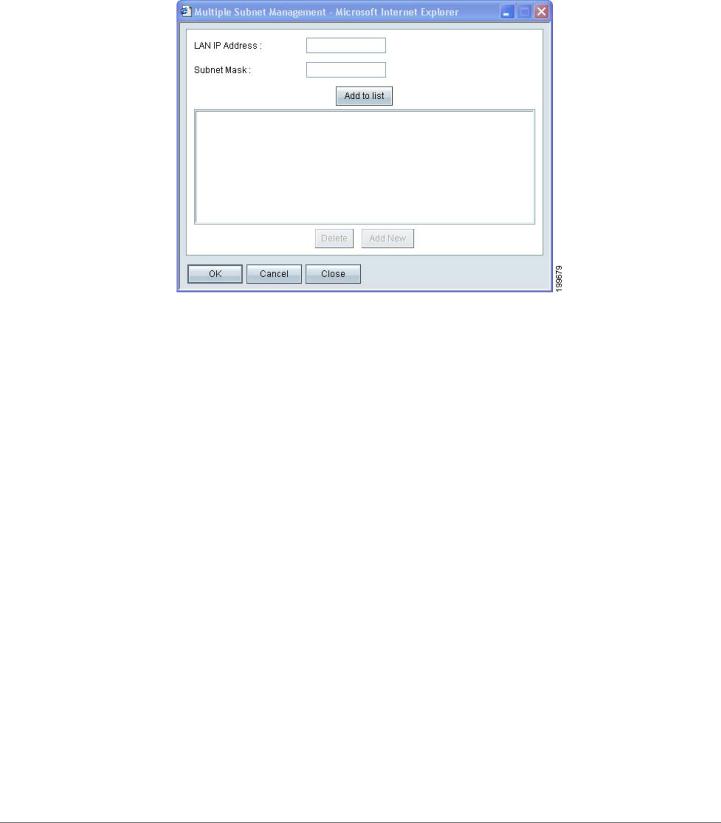
STEP 2 Click Add/Edit to create or modify the subnets. After you click the button, the
Multiple Subnet Management window appears.
Cisco Small Business RV0xx Series Routers Administration Guide |
29 |
Setup |
3 |
|
|
Setting Up the Network |
|
|
|
|
|
STEP 3 In the pop-up window, add or edit entries as needed.
• To add a new subnet: Enter a LAN IP Address and a Subnet Mask. Click Add to list. The IP address and subnet mask appear in the list. Repeat this step as needed to add other subnets.
Examples:
- Two subnets: If the router has a LAN IP address of 192.168.1.1 with a subnet mask of 255.255.255.0, you could set up a second subnet with a LAN IP address of 192.168.2.1 and a subnet mask of 255.255.255.0.
- Four subnets: If the router has a LAN IP Address of 192.168.1.1 and the Subnet Mask of 255.255.255.192, you could create three subnets with IP addresses of 192.168.2.65, 192.168.2.129, and 192.168.2.193, with the same subnet mask of 255.255.255.192.
• To add another subnet: Enter the information, and then click Add to list.
• To modify a subnet: Click the subnet in the list. The existing values appear in the text fields. Enter the new information, and then click Update. If you do not want to modify the selected subnet, you can click Add New to clear the text fields.
• To delete a subnet: Click the subnet in the list, and then click Delete.
Cisco Small Business RV0xx Series Routers Administration Guide |
30 |
Loading...