


 Loading...
User Guide
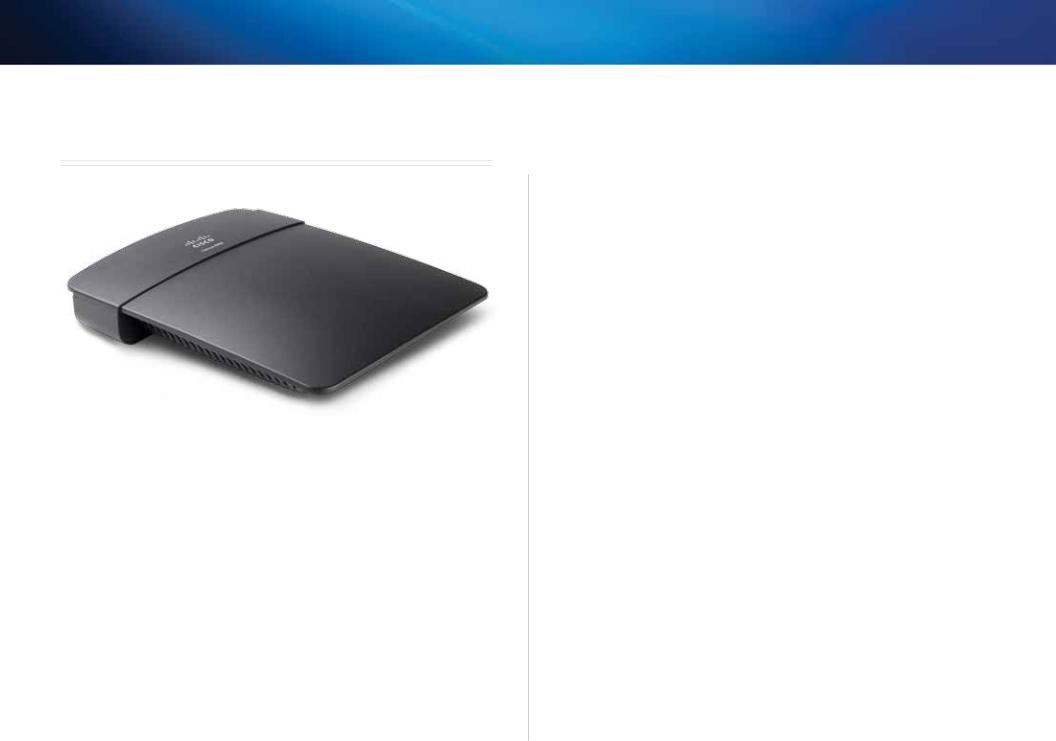
Linksys E800

Linksys E800 |
Contents |
Contents
Product overview
Package contents |
1 |
Features |
1 |
Back view |
2 |
Bottom view |
2 |
Setting Up: Basics
How to create a home network |
3 |
What is a network? |
3 |
How to set up a home network |
3 |
Where to find more help |
3 |
How to set up your router |
3 |
How to start Cisco Connect |
4 |
How to improve your wireless connection speed |
5 |
How to test your Internet connection speed |
5 |
How to connect devices to your network |
6 |
How to connect a computer to your network |
6 |
How to connect a printer |
8 |
How to connect other devices |
8 |
How to change your router’s name and password |
10 |
Setting Up: Advanced
How to open the browser-based utility |
11 |
How to manually set up your router |
11 |
How to manually set up your Internet connection |
12 |
How to set up the DHCP server on your router |
13 |
How to set up DHCP reservation |
13 |
How to find your network on the Internet |
14 |
How to clone a MAC address |
15 |
How to connect to your corporate office using a VPN |
15 |
How to optimize your router for gaming and voice |
16 |
How to remotely change your router settings |
17 |
How to enable Voice over IP on your network |
18 |
How to configure UPnP |
19 |
How to use a router as an access point |
19 |
How to put your new router behind an existing router |
21 |
To add your router to an existing router or gateway |
21 |
To share an Internet connection |
21 |
To extend your network |
23 |
How to expose a device to the Internet |
23 |
Improving Security
How do I know if my network is secure? |
25 |
Network security following a manual setup |
25 |
How to set up wireless security using Wi Fi Protected Setup |
26 |
Wi-Fi Protected Setup activity light |
26 |
Connecting a device using the Wi-Fi Protected Setup button |
26 |
How to connect a device using its Wi-Fi Protected Setup PIN |
27 |
How to connect a device using the router’s Wi-Fi Protected Setup PIN |
27 |
How to connect a device manually |
27 |
How to control access to your wireless network |
28 |
How to improve security using the built-in firewall |
29 |
i

Linksys E800 |
Contents |
Port Forwarding and Port Triggering
How to set up port forwarding |
31 |
How to set up port forwarding for a single port |
31 |
How to set up port forwarding for multiple ports |
32 |
How to set up port forwarding for a range of ports |
32 |
How to set up port range triggering for online gaming |
33 |
How to configure your Xbox for online gaming |
34 |
Maintaining and Monitoring
How to back up and restore your router configuration |
35 |
How to restore factory defaults |
35 |
How to upgrade the router’s firmware |
36 |
How to check the status of your router |
37 |
How to disable the Ethernet port status lights |
39 |
How to test your Internet connection |
39 |
How to configure and use logs |
40 |
Specifications
Linksys E800 |
42 |
ii
Linksys E800
Product overview
Package contents
In addition to your router, your router package includes:
•• Network (Ethernet) cable
•• AC power adapter
•• Setup CD containing router setup software and documentation
Product overview
Features
Wireless-N technology
Built with leading 802.11n technology, create a powerful home wireless network in minutes. Connect your computers, Internet-ready TVs, game consoles, smartphones, and other Wi-Fi devices at fast transfer rates for an unrivaled experience.
Advanced security
Keep Wi-Fi freeloaders and Internet threats at bay with WPA2 encryption and SPI firewall to help keep your network protected.
Benefits of Fast Ethernet
Use the four Fast Ethernet (10/100) ports for quick file sharing between computers and servers.
Home network ready
Connect computers, printers, and more to your wireless network and the Internet. QoS traffic prioritization technology delivers maximum speed and performance so you can enjoy fast downloads and reliable gaming.
Easy to manage
Cisco Connect software helps you customize your settings and quickly add multiple devices to your network:
IPv6 enabled
Supports the latest Internet protocol technology to future-proof your network.
1
Linksys E800
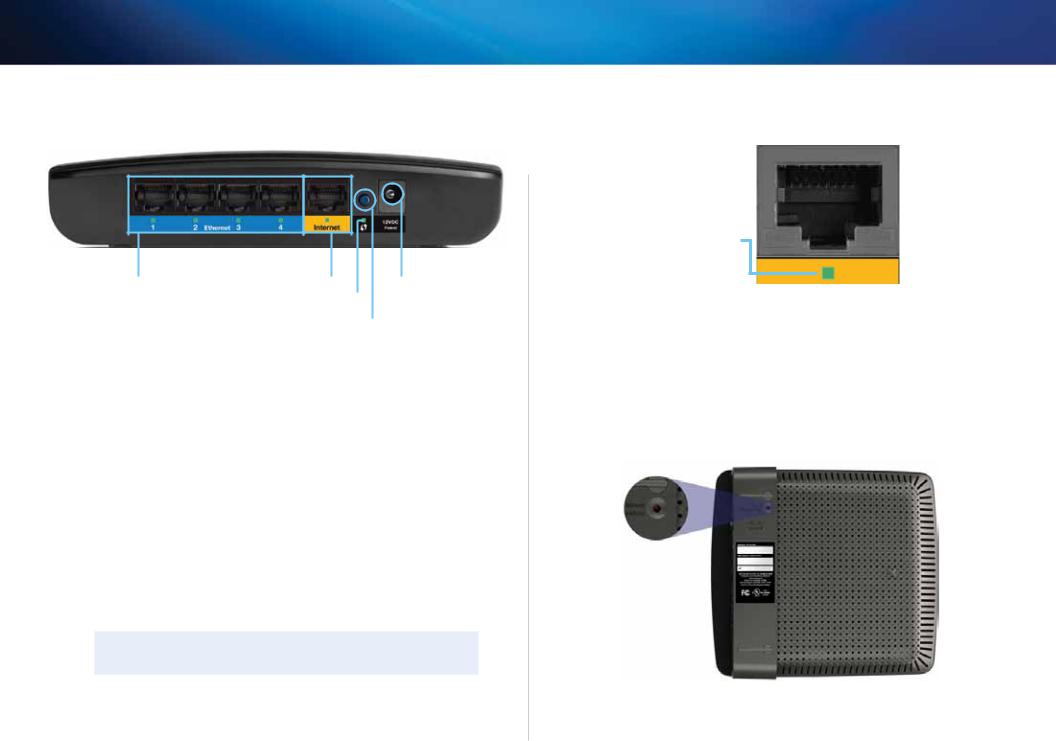
Back view
Product overview
Port activity indicator
Ethernet ports |
Internet port |
Power port |
Wi-Fi Protected Setup indicator
Wi-Fi Protected Setup button
•• Ethernet ports—Connect Ethernet cables (also called network cables) to these Fast Ethernet (10/100) ports, color coded blue, and to wired Ethernet network devices on your network.
•• Internet port—Connect an Ethernet cable (also called a network or Internet cable) to this port, color coded yellow, and to your modem.
••Wi-Fi Protected Setup™ button—Press this button to easily configure wireless security on Wi-Fi Protected Setup-enabled network devices. For more information, see “How to set up wireless security using Wi Fi Protected Setup” on page 43.
•• Power indicator—Stays on steadily while power is connected and following a successful Wi-Fi Protected Setup connection. Flashes slowly during bootup, during firmware upgrades, and during a Wi Fi Protected Setup connection. Flashes quickly when there is a Wi Fi Protected Setup error.
•• Power—Connect the included AC power adapter to this port.
CAUTION
Use only the adapter that came with your router.
Green network activity indicator
Network and Internet port
•• Green activity indicator—On Ethernet ports, stays on when a cable connects the port to another Ethernet port. On the Internet port, stays on while connected to a modem. On both port types, it flashes while transferring data.
Bottom view
•• Reset button—Press and hold this button for 5-10 seconds (until the port lights flash at the same time) to reset the router to its factory defaults. You can also restore the defaults using the browser-based utility. For more information, see “How to restore factory defaults” on page 61.
2

Linksys E800 |
Setting Up: Basics |
Setting Up: Basics
How to create a home network
What is a network?
A network is any group of devices that can communicate with each other. A home network can also include Internet access, which requires a router like this one.
A typical home network may include multiple computers, a printer, a modem, and a router. A large home network may also have a switch, additional routers, access points, and many Internet-capable media devices such as TVs, game consoles, and web cameras.
•• Modem—Connects a computer or a router to your ISP (Internet Service Provider).
•• Router—Connects your wireless and wired network devices to each other and to the modem (and to your ISP).
•• Switch—Allows you to connect several wired network devices to your home network. Your router has a built-in network switch (the Ethernet ports). If you have more wired network devices than available Ethernet ports on your router, you will need an additional switch to consolidate the wired connections.
How to set up a home network
1.Purchase the proper equipment. For a network that includes Internet access, you’ll need:
•• Computers with an Ethernet port or wireless networking capabilities
•• A modem for connecting to your ISP (typically supplied by your ISP)
•• A router to connect your computers with each other and to the modem
•• Internet service to your home, provided by an ISP (Internet Service Provider)
2.Make sure that your modem is working. Your ISP can help you set up your modem and verify that it’s working correctly.
3.Set up your router. See “How to set up your router” on page 3.
4.To connect a computer or other network device to the network, see“How to connect a computer to your network” on page 6 and “How to connect other devices” on page 8.
Where to find more help
In addition to this User Guide, you can find help at these locations:
•• Linksys.com/support (documentation, downloads, FAQs, technical support, live chat, forums)
•• Setup CD (Troubleshooting Guide, legal and regulatory notices)
•• Cisco Connect help (run Cisco Connect, then click Learn More where available)
•• Browser-based utility context-sensitive help (open the utility, then click Help in the right-side column.)
How to set up your router
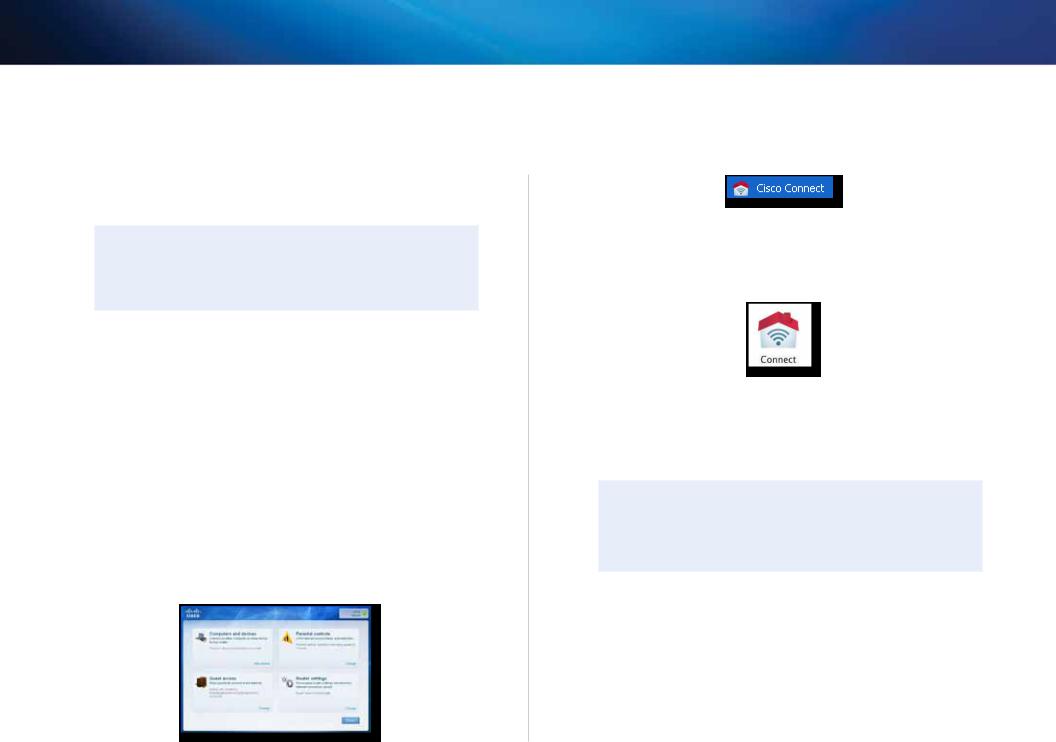
The easiest and fastest way to set up your router is to run the Cisco Connect setup software. You can find Cisco Connect on the CD that came with your router or download it from the router’s support site at Linksys.com/support. Cisco Connect shows you how to connect your router to your home network, step by step. To get started, see “How to start Cisco Connect” below.
If you are an advanced user, you can set up your router manually using the browser-based utility. To get started, see “How to open the browser-based utility” on page 25.
3
Linksys E800
How to start Cisco Connect
When you run the setup CD, Cisco Connect (your router’s setup software) is automatically installed onto your computer. You can then use Cisco Connect to easily manage your router. To install Cisco Connect on another computer after your router has been set up, see “How to install Cisco Connect on another computer” on page 12.
NOTES:
Your Cisco Connect CD works with only this router model.
If you lose your setup CD, you can download the software from
Linksys.com/support.
To start Cisco Connect for the first time:
1.Insert the CD into your CD or DVD drive.
2.Click Set up your Linksys Router. If you do not see this:
•• For Windows, click Start, Computer, then double-click the CD drive and the Setup icon.
•• For Mac, double-click the CD icon on your desktop, then double-click the Setup icon.
3.Follow the on-screen instructions to complete your router setup. When setup has finished, Cisco Connect has also been installed onto your hard drive.
After your router has been set up and Cisco Connect has been installed, you can use Cisco Connect to easily manage many of your router’s settings.
Setting Up: Basics
To start Cisco Connect on a Windows computer:
1.Click Start, All Programs, then click Cisco Connect. The Cisco Connect main menu opens.
To start Cisco Connect on a Mac OS X computer:
1. Open the Applications folder, then double-click the Cisco Connect icon. The Cisco Connect main menu opens.
4
Linksys E800
How to improve your wireless connection speed
Follow these tips to improve your network’s wireless connection speed:
•• Make sure that your router is in a good location:
•• For the widest coverage area, install your router near the center of your home, and near the ceiling, if possible.
•• Avoid placing the router on or near metal objects (such as file cabinets and metal furniture), reflective surfaces (such as glass or mirrors), or masonry walls.
•• Any obstruction can weaken the wireless signal (even non-metallic objects), so the fewer obstructions between the router and the wireless device, the better.
•• Place the router in a location away from other electronics, motors, and fluorescent lighting.
•• Many environmental variables can affect the router’s performance, so if your wireless signal is weak, place the router in several locations and test the signal strength to determine the ideal position.
•• If possible, upgrade wireless network interfaces (such as wireless network cards in computers) from older wireless standards to 802.11n. If a wirelessly networked device uses an older standard, the performance of the entire wireless network may be slower.
Setting Up: Basics
How to test your Internet connection speed
To test your Internet connection speed:
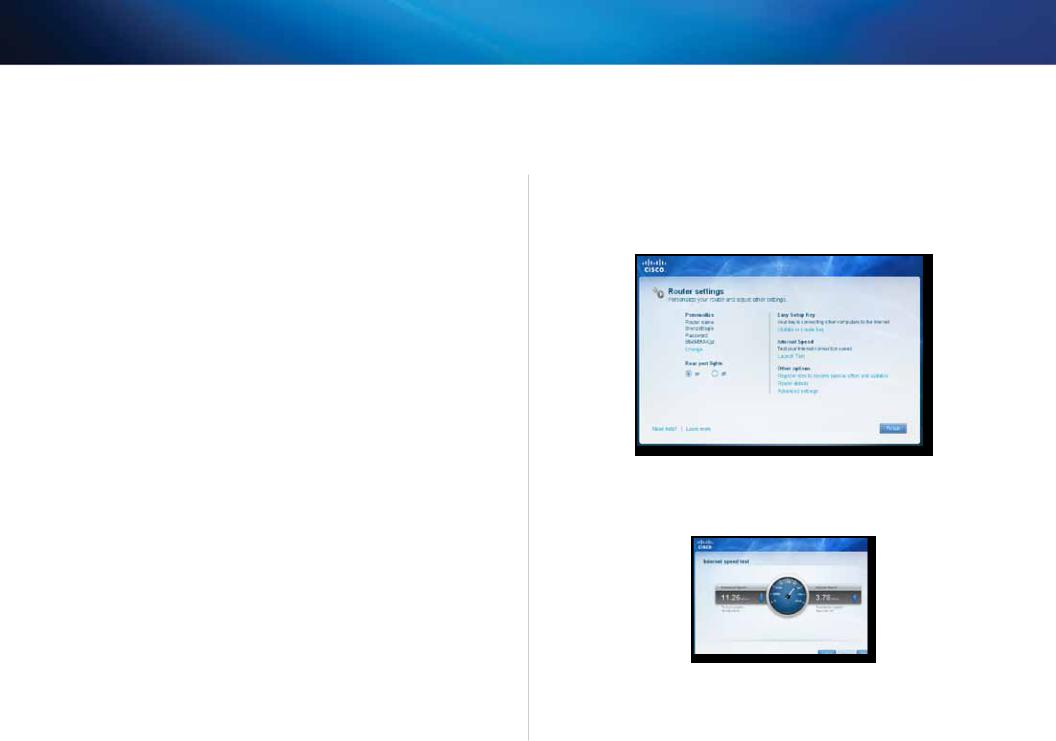
1.Run Cisco Connect, then click Change under Router settings. The Router settings screen opens.
2.Click Launch Test under Internet Speed. The Internet speed test screen opens.
3.Follow the on-screen instructions to complete the test.
5

Linksys E800
How to connect devices to your network
How to connect a computer to your network
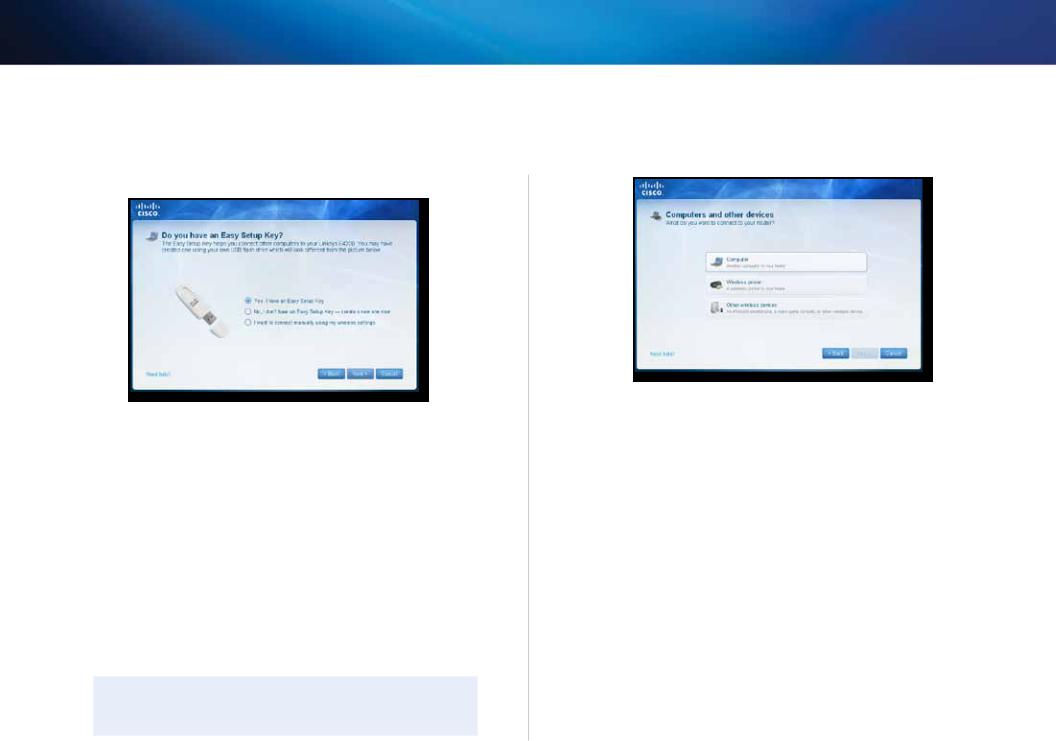
You can connect a computer to your network using an Easy Setup Key (the easiest way) or manually.
How to connect a computer using an Easy Setup Key
To use an Easy Setup Key, you first need to create one using any available USB drive. After it has been created, you can use the same key to connect several computers to your network.
TIP
The Easy Setup Key stores network information (name, password, security type, and security key) so you don’t have to remember them.
To create an Easy Setup Key:
1.Run Cisco Connect, then click Add device under Computers and devices. The Computers and other devices screen opens.
Setting Up: Basics
2. Click Computer.
3.Select No, I don’t have an Easy Setup Key, then click Next.
4.Insert a USB drive into an available USB port on your computer. This USB drive will be your new Easy Setup Key.
Cisco Connect detects the newly attached USB drive and copies the router’s settings and a copy of Cisco Connect to it.
5.When the files have finished copying, remove the Easy Setup Key from your computer. You can now use it to install Cisco Connect onto other computers and to connect them to the network.
6.Click Close.
6
Linksys E800
To use your Easy Setup Key to connect a computer to your network:
1.Run Cisco Connect, then click Add device under Computers and devices.
The Computers and other devices screen opens.
2.Click Computer.
3.Select Yes, I have an Easy Setup Key, then click Next. The Connecting another computer screen opens.
4.Insert the Easy Setup Key into an available USB port on the computer that you want to connect to the network. The Connecting another computer screen opens.
If you do not see this, use Windows Explorer or Finder to view the Easy Setup Key files, then double click Connect.
5.Click Connect to your router, then follow the on-screen instructions.
6.Return to the computer running Cisco Connect, then click Next.
7.Enter a name for the newly connected computer, then click Finish.
How to connect a computer manually
To connect a computer without using an Easy Setup Key, you will need to print or take note of some information.
IMPORTANT
When you manually connect a computer to the network, the computer will not have Cisco Connect installed on it.
Setting Up: Basics
To manually connect a computer to your network:
1.Run Cisco Connect, then click Add device under Computers and devices.
The Computers and other devices screen opens.
2.Click Computer.
3.Select I want to connect manually using my wireless settings, then click Next. A screen opens that displays network information.
4.Write down the Network name (SSID), Security Key, and Security Type information, or click Print these settings if you have a printer attached.
5.At the computer you want to connect, enter the network information into your wireless manager.
6.After that computer connects to your network, return to the computer running Cisco Connect, then click Next.
7.Click Connect to your Linksys router, then follow the on-screen instructions.
8.When you are prompted to enter a name for the newly connected computer, enter the name, then click Finish.
7
Linksys E800
How to connect a printer
When you install a printer that requires a cable, you can:
•• Follow the printer’s instructions for setting it up, then follow your computer’s operating system instructions to share the printer with your network.
TIP
Setting up your printer this way does not require Cisco Connect.
When you set up a wireless printer, you need to make sure that:
•• Your printer has been completely set up except for being connected to the network.
•• Your printer supports the WPA/WPA2 wireless encryption standard.
•• If your wireless printer supports WPS (Wi-Fi Protected Setup), you should use WPS to connect it to your network. See “How to set up wireless security using Wi Fi Protected Setup” on page 43.
To connect a wireless printer to your network:
1.Run Cisco Connect, then click Add device under Computers and devices. The Computers and other devices screen opens.
2.Click Printer, then click Wireless printer. A screen opens that displays network information.
Setting Up: Basics
3.Write down the Network name (SSID), Security Key, and Security Type information, or click Print these settings if you have a different printer already connected.
4.Follow your printer’s instructions for entering the wireless network information into your printer.
5.After the printer connects to your network, click Next in Cisco Connect.
6.Return to the computer running Cisco Connect, then click Next. The
Name your printer screen opens.
7.Enter a name for the printer, then click Finish.
8.Follow your computer operating system’s instructions for adding the new printer to your list of available printers.
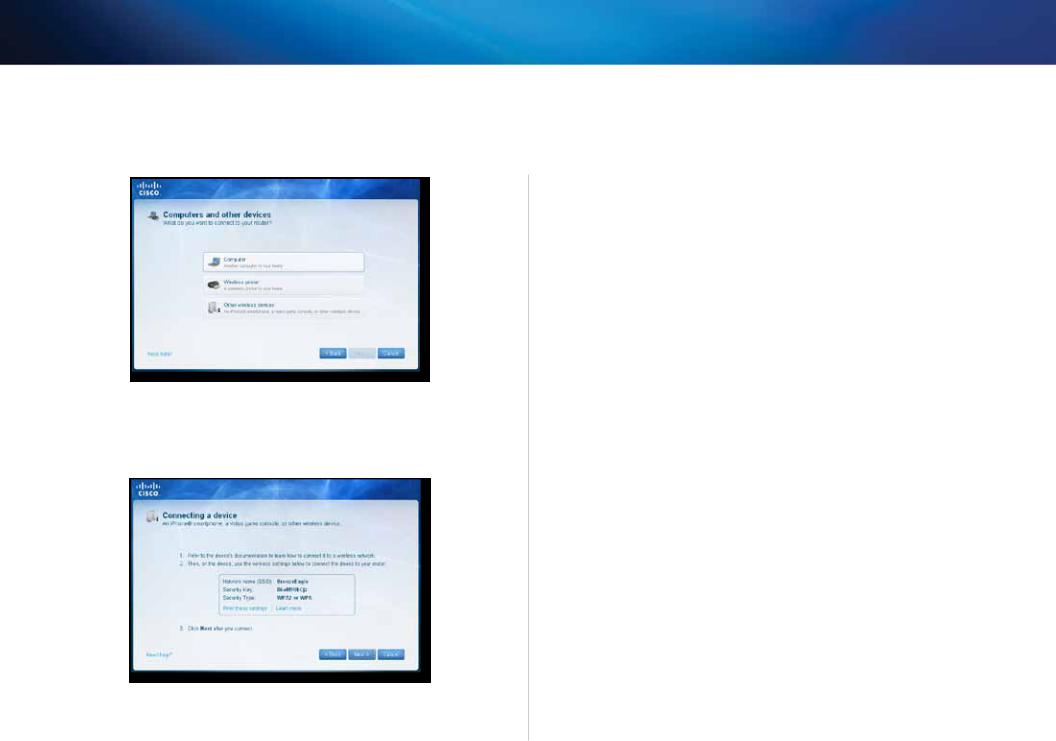
How to connect other devices
Many other types of wireless network devices can connect to your home network, including:
•• Game consoles
•• Internet-capable TVs and media players
•• Digital music players
•• Smart phones
Because of the wide variety of devices and methods of connecting, you must manually enter network information into the devices for a successful network connection.
8
Linksys E800
To manually connect a device to your network:
1.Run Cisco Connect, then click Add device under Computers and devices.
The Computers and other devices screen opens.
2.Click Other wireless devices. A screen opens that displays network information.
3.Write down the Network name (SSID), Security Key, and Security Type information, or click Print these settings if you have a printer attached.
4.Follow your device’s instructions for entering the wireless network information into the device.
5.After the device connects to your network, return to the computer running Cisco Connect, then click Next.
Setting Up: Basics
6. Enter a name for device, then click Finish.
For more instructions on connecting a game console to your network, see also:
•• “How to optimize your router for gaming and voice” on page 32
•• “How to set up port forwarding” on page 57
•• “How to set up port range triggering for online gaming” on page 59
9

Linksys E800
How to change your router’s name and password
You can change the name and password of your router, but if you do so, all wireless devices connected to your router will lose their Internet connection until you reconnect them using the new router name and password.
CAUTION
If you change your router’s name and password using the browserbased utility, you may not be able to manage your router using Cisco Connect. We recommend using the procedure below to change your router’s login information.
To change your router’s name and password:
1.Run Cisco Connect, then click Change under Router settings.
2.Under Personalize, click Change. A Changing router name and password warning appears
3.Click Yes if you want to continue.
4.Enter the new router name and password, then click Change.
TIP
After you make changes, update your Easy Setup Key to make it easier to reconnect all of the other computers on the network.
Setting Up: Basics
10
Linksys E800 |
Setting Up: Advanced |
Setting Up: Advanced
How to open the browser-based utility
To access some advanced settings, you need to open the browser-based utility.
CAUTION
If you change settings in the browser-based utility, you might not be able to run Cisco Connect later.
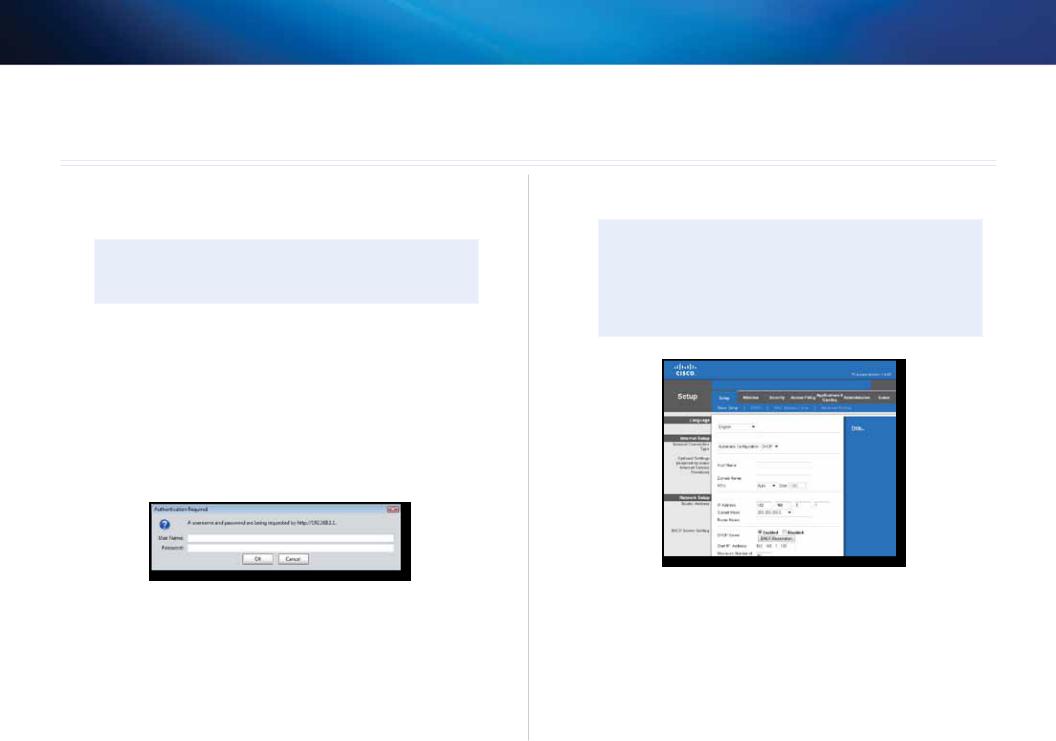
To open the browser-based utility:
1.Run Cisco Connect, click Change under Router settings, click Advanced settings, then click OK.
– or –
Open a web browser on a computer connected to your network, then go to 192.168.1.1. If your router is version 2 (look for V2 on router’s bottom label), you can go to myrouter.local instead.
The router prompts you for a user name and password.
2.Enter the user name and password, then click OK. The utility’s main menu opens.
TIPS
If you set up your router without using Cisco Connect, your router’s default username and password is admin.
If you used Cisco Connect to set up your router, you can see your router’s user name and password by running Cisco Connect, then clicking Router settings.
How to manually set up your router
Although running Cisco Connect is the easiest way to set up and maintain your router, advanced users may want to manually configure their router. Be careful when changing settings using this method.
To manually set up your router:
1.If you have started the Cisco Connect setup, exit Cisco Connect.
2.Connect your router’s power adapter to a power outlet.
11
Loading...