


 Loading...
Cisco Systems SPA514G, SPA504G, SPA512G, SPA508G, SPA509G User Manual
...USER GUIDE
Cisco Small Business
Cisco SPA50X and SPA51X SIP IP Phones Models SPA501G, SPA502G, SPA504G, SPA508G, SPA509G, SPA512G, and SPA514G

Contents
Chapter 1: Getting Started |
6 |
About This Document |
6 |
Overview of the Cisco Small Business IP Phones |
8 |
Caring for Your Phone |
8 |
Understanding Your Phone Lines and Buttons |
9 |
Softkey Buttons |
11 |
Using Keypad Shortcuts |
13 |
Using the Cisco Attendant Console |
14 |
Changing the Cisco SPA500DS Attendant Console Display |
14 |
Chapter 2: Installing Your Phone |
16 |
Before You Begin |
17 |
Phone Connections |
17 |
Connecting the Handset |
18 |
Installing the Desk Stand or Wall Mount (Optional) |
19 |
Reverse the Handset Retention Tab |
19 |
Connecting the Power |
20 |
Connecting Your Phone to the Network |
21 |
Connecting Your Phone to the Wired Network |
21 |
Connecting the Phone to the Wireless Network |
21 |
Connecting a PC to Your Phone |
22 |
Connecting Wired and Wireless Headsets |
22 |
Verifying Phone Startup |
23 |
Updating Your Phone Firmware |
24 |
Determining Your Current Firmware Version |
24 |
Download the Firmware from Cisco |
25 |
Get the Phone IP Address |
25 |
Update the Firmware on the Phone |
26 |
Cisco Small Business SPA50X and SPA51X SIP IP Phone User Guide |
2 |

Contents
Chapter 3: Using Basic Call Management Functions |
27 |
Managing the Audio Source and Volume |
28 |
Adjusting Call Volume |
28 |
Adjusting the Ringer Volume |
28 |
Using Mute |
28 |
Using the Speakerphone |
28 |
Using the Headset with Your IP Phone |
28 |
Switching Between the Handset, Headset, or Speakerphone |
|
During a Call |
29 |
Sending Audio to the Speaker and Handset |
29 |
Choosing Your Preferred Audio Device |
29 |
Answering or Placing a Call |
30 |
Answering a Call |
30 |
Placing a Call |
30 |
Redialing a Call |
31 |
Putting a Call on Hold |
31 |
Resuming a Call |
31 |
Ending a Call |
32 |
Transferring Calls |
32 |
Performing an Attended Transfer |
32 |
Performing an Unattended (Blind) Transfer |
33 |
Transferring a Held Call to an Active Call |
33 |
Managing Missed Calls |
34 |
Turning the Missed Calls Shortcut On and Off |
34 |
Forwarding Calls |
35 |
Forwarding All Calls |
35 |
Forwarding Calls When Your Phone is Busy |
36 |
Forwarding Calls (Delay) Without Answering the Phone |
36 |
Canceling Call Forwarding All |
37 |
Call Forward Deactivation by using Star Codes |
38 |
Cisco Small Business SPA50X and SPA51X SIP IP Phone User Guide |
3 |

Contents
Setting Do Not Disturb |
38 |
Enabling Do Not Disturb |
38 |
Disabling Do Not Disturb |
39 |
Setting Call Waiting |
39 |
Picking Up a Call |
40 |
Parking a Call |
41 |
Placing a Three-Way Conference Call |
42 |
Conferencing a Held Call with an Active Call |
43 |
Using the Phone Directories |
43 |
Using Your Personal Directory |
44 |
Using the Corporate Directory |
45 |
Using the Call History Lists |
45 |
Setting or Changing a Phone Password |
46 |
Accessing Voicemail |
47 |
Chapter 4: Using Advanced Phone Features |
48 |
Configuring Privacy and Security |
49 |
Blocking Caller ID |
49 |
Blocking Anonymous Calls |
49 |
Using Secure Call |
50 |
Enabling and Using Dial Assistance |
51 |
Creating Speed Dials |
51 |
Creating Speed Dials on Unused Line Buttons |
52 |
Creating Numerical Speed Dials |
52 |
Using Speed Dials |
53 |
Using the Paging Feature |
53 |
Paging Another Phone |
53 |
Paging a Group of Phones |
53 |
Configuring Auto Answer |
54 |
Monitoring and Accessing Another Phone |
54 |
Cisco Small Business SPA50X and SPA51X SIP IP Phone User Guide |
4 |

Contents
Customizing Your IP Phone Screen |
55 |
Changing the IP Phone Screen Contrast |
55 |
Changing the Screen Backlight Settings |
55 |
Configuring the Phone Screen Saver |
56 |
Turning on the Screen Saver |
57 |
Using Ring Tones |
58 |
Changing Your Ring Tone |
58 |
Configuring Date and Time |
58 |
Setting Your Phone’s Date and Time |
58 |
Using Star Codes |
59 |
Using the Interactive Voice Response Menu on the Cisco SPA501G |
61 |
Advanced Procedures for Technical Support Personnel |
63 |
Rebooting Your Phone |
64 |
Chapter 5: Using the Phone Web User Interface |
65 |
Logging in to the Phone Web User Interface |
66 |
Making the Web Configuration Utility Viewable and Writable |
67 |
Saving the Configuration Profile |
68 |
Setting Voice System Parameters |
68 |
Setting Voice Phone Parameters |
69 |
Setting Voice User Parameters |
70 |
Viewing Call History Lists |
72 |
Using Your Personal Directory |
73 |
Viewing Attendant Console Status |
74 |
Appendix A: Where to Go From Here |
75 |
Product Resources |
75 |
Cisco Small Business SPA50X and SPA51X SIP IP Phone User Guide |
5 |

1
Getting Started
This chapter provides an overview of this document and basic information about your Cisco Small Business IP phone. It contains the following sections:
•About This Document, page 6
•Overview of the Cisco Small Business IP Phones, page 8
•Understanding Your Phone Lines and Buttons, page 9
•Using the Cisco Attendant Console, page 14
About This Document
This guide describes the concepts and tasks necessary to use and configure your Cisco Small Business IP Phone.
The Cisco Small Business IP Phone features vary, depending on the type of call control system that you are using and the customizations performed by your phone system administrator. This document describes using the Cisco Small Business IP Phones with a SIP phone system, such as a Broadsoft or Asterisk system. If you are using your Cisco Small Business IP Phone with a Cisco Unified Communications 500 Series, also see the Cisco Unified Communications Manager Express Administrator Guide.
Cisco Small Business SPA50X and SPA51X Series SIP IP Phone User Guide |
6 |

Getting Started |
1 |
|
|
About This Document |
|
|
|
|
|
Organization
This table describes the contents of each chapter in this document.
|
Title |
Description |
|
|
|
Chapter 1 |
Getting Started |
A description of this book |
|
|
and an overview of the Cisco |
|
|
Small Business IP Phones. |
|
|
|
Chapter 2 |
Installing Your Phone |
How to connect and install |
|
|
your phone. |
|
|
|
Chapter 3 |
Using Basic Call |
How to perform basic phone |
|
Management Functions |
tasks, such as placing and |
|
|
answering calls, transferring |
|
|
calls, setting up call |
|
|
forwarding, and picking up |
|
|
calls. |
|
|
|
Chapter 4 |
Using Advanced Phone |
How to perform advanced |
|
Features |
phone tasks, such as |
|
|
configuring privacy and |
|
|
security features, speed |
|
|
dials, paging, and ring tones. |
|
|
|
Chapter 5 |
Using the Phone Web User |
How to modify the phone |
|
Interface |
features by using the web |
|
|
configuration utility. |
|
|
|
Appendix A |
Where to Go From Here |
Cisco provides a wide range |
|
|
of resources to help you |
|
|
obtain the full benefits of the |
|
|
Cisco SPA500 Series |
|
|
phones. This appendix |
|
|
provides links to many of |
|
|
these resources. |
|
|
|
Cisco Small Business SPA50X and SPA51X Series SIP IP Phone User Guide |
7 |

Getting Started |
1 |
|
|
Overview of the Cisco Small Business IP Phones |
|
|
|
|
|
Overview of the Cisco Small Business IP Phones
The Cisco Small Business IP Phones are full-featured VoIP (Voice over Internet Protocol) phones that provide voice communication over an IP network. The phones include traditional features, such as call forwarding, redialing, speed dialing, transferring calls, conference calling, and accessing voice mail. Calls can be made or received with a handset, headset, or a speaker.
The Cisco Small Business IP phones contain Ethernet ports that link them to the computer network. They also have secondary Ethernet ports that allow another Ethernet device, such as a computer, to be connected to the network through the IP phone.
Cisco Small Business IP phones require a separate power source. You can power the phones by connecting them to a switch that provides Power over Ethernet (PoE), or by using the optional a Cisco PA100 power adapter.
Caring for Your Phone
The Cisco Small Business IP phones are electronic devices that should not be exposed to excessive heat, sun, cold, or water. To clean the equipment, wipe it with a slightly moistened paper or cloth towel. Do not spray or pour cleaning solution directly onto the device.
Cisco Small Business SPA50X and SPA51X Series SIP IP Phone User Guide |
8 |
Getting Started |
1 |
|
|
Understanding Your Phone Lines and Buttons |
|
|
|
|
|
Understanding Your Phone Lines and Buttons
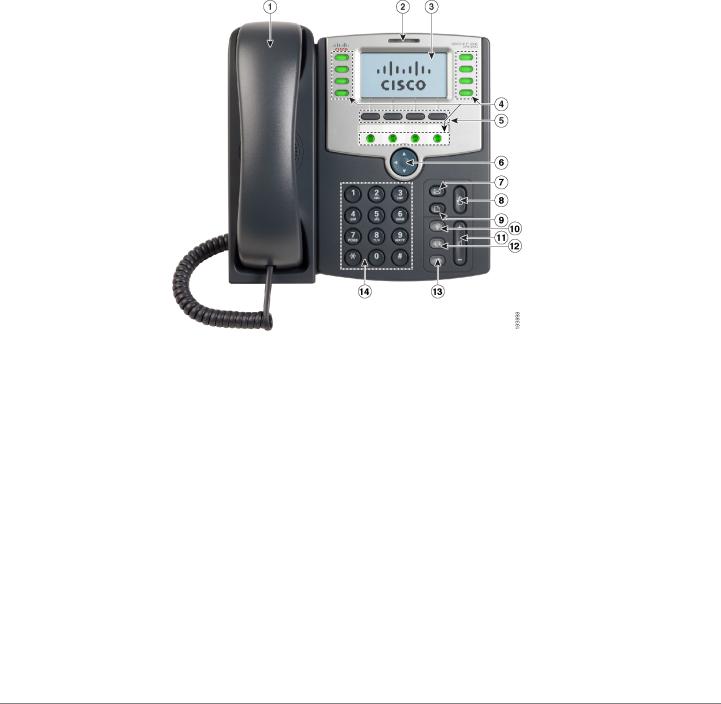
The parts of a SPA509G IP phone are shown in Figure 1. Other models are similar, but might vary.
Figure 1 SPA509G Phone Components
Numbered objects in Figure 1 described in the following table.
# |
Phone Feature |
Description |
|
|
|
1 |
Handset |
Pick up to place or answer a call. |
|
|
|
2 |
Message Waiting |
Displays solid red when you have a new voice mail |
|
indicator |
message. Blinks red during an incoming call. |
|
|
|
3 |
IP phone screen |
Displays date and time, phone station name, line |
|
|
extensions, and softkey options (except on the |
|
|
Cisco SPA501G). |
|
|
|
Cisco Small Business SPA50X and SPA51X Series SIP IP Phone User Guide |
9 |

Getting Started |
1 |
|
|
Understanding Your Phone Lines and Buttons |
|
|
|
|
|
# |
Phone Feature |
Description |
|
|
|
4 |
Line keys |
Indicates phone line status. (Not available on the |
|
|
Cisco SPA502G or Cisco SPA512G.) |
|
|
When lit: |
|
|
Green: Line is idle. |
|
|
Red (steady): Line is active or in use. |
|
|
Red (flashing): Line is on hold or there is an inbound call. |
|
|
Orange: Line is unregistered (cannot be used). |
|
|
These keys can also be programmed by your system |
|
|
administrator to perform differently than described here |
|
|
or to add functions such as speed dial, call pickup, or |
|
|
monitor an extension. |
|
|
|
5 |
Softkey buttons |
Press a softkey button to perform the action shown on |
|
|
the label on the IP phone screen. |
|
|
Note: The Cisco SPA501G has the following four buttons: |
|
|
Redial—Dials the last number called. |
|
|
Cancel—Cancels an action (such as a transfer). |
|
|
Conference—While on a call, press to start a |
|
|
conference call and dial another number. After |
|
|
the second party answers, press Conference again to |
|
|
create the conference. |
|
|
Transfer—Transfers a call. |
|
|
|
6 |
Navigation button |
Press an arrow key to scroll left, right, up, or down |
|
|
through items shown on the IP phone screen (except |
|
|
on the Cisco SPA501G). |
|
|
|
7 |
Messages button |
Press to access voice mail. (This feature must be set up |
|
|
by your phone system administrator). |
|
|
|
8 |
Hold button |
Press to place a call on hold. |
|
|
|
Cisco Small Business SPA50X and SPA51X Series SIP IP Phone User Guide |
10 |
Getting Started |
1 |
|
|
Understanding Your Phone Lines and Buttons |
|
|
|
|
|
# |
Phone Feature |
Description |
|
|
|
9 |
Setup button |
Press to access a menu to configure features and |
|
|
preferences (such as your directory, status, and speed |
|
|
dials), access your call history, set up functions (such as |
|
|
call forwarding), and provide phone status information. |
|
|
For the Cisco SPA501G, press Setup to access the |
|
|
Interactive Voice Response (IVR) menu that allows you to |
|
|
perform tasks such as getting the IP address of the |
|
|
phone. |
|
|
|
10 |
Mute button |
Press to mute or unmute the phone. When phone is |
|
|
muted, the button is lit red. A blinking or steady red mute |
|
|
button indicates the network connection cannot be |
|
|
found. |
|
|
|
11 |
Volume button |
Press + to increase the volume and - to lower the volume |
|
|
of the handset, headset, speaker when the phone is off- |
|
|
hook, or ringer volume when the phone is on-hook. |
|
|
|
12 |
Headset button |
Push to turn the headset on or off. When the headset is |
|
|
on, the button is lit green. |
|
|
|
13 |
Speaker button |
Push to turn the speaker on or off. When the speaker is |
|
|
on, the button is lit green. |
|
|
|
14 |
Keypad |
Use to dial phone numbers, enter letters, and choose |
|
|
menu items. |
|
|
|
Softkey Buttons
The softkey buttons on your phone display might vary depending on your phone model and the phone system setup. (Softkey buttons are not available on the Cisco SPA501G.) Press the Right Arrow or Left Arrow keys on the navigation button to view additional softkey buttons.
Below is a partial listing of softkey buttons that might be available on your phone. You might not have all of these softkey buttons on your phone, and you might have additional buttons that are not listed here, as your phone administrator might provide custom softkey buttons on your phone, such as a speed dial to a company number, or a specialized program that runs on your phone. Contact your phone administrator for more information.
Cisco Small Business SPA50X and SPA51X Series SIP IP Phone User Guide |
11 |

Getting Started |
1 |
|
|
Understanding Your Phone Lines and Buttons |
|
|
|
|
|
Button |
Function |
|
|
<< or >> |
Move left or right through an entry without deleting characters. |
|
|
activ |
Activates screen saver mode. |
|
|
add |
Add an entry. |
|
|
bXfer |
Performs a blind call transfer (transferring a call without speaking to the |
|
party to whom you are transferring the call.) |
|
|
cancel |
Cancels any changes you have made. (Press before ok or save.) |
|
|
cfwd |
Forwards all calls coming to your phone to a specified number. |
|
|
-cfwd |
Clears call forwarding. |
|
|
conf |
Initiates a conference call. |
|
|
confLx |
Conferences active lines on the phone together. |
|
|
delChr |
Deletes the last number or letter. |
|
|
delete |
Deletes an entire item (for example, a number from the Call History list). |
|
|
dial |
Dials a number. |
|
|
dir |
Accesses phone directories. |
|
|
dnd |
Do Not Disturb; prevents incoming calls from ringing your phone. |
|
|
-dnd |
Clears Do Not Disturb. |
|
|
edit |
Opens an item so that you can edit numbers or letters, or enable or |
|
disable a feature. |
|
|
grPick |
Allows you to answer a call ringing on an extension by discovering the |
|
number of the ringing extension. |
|
|
ignore |
Ignores an incoming call. |
|
|
lcr |
Dials the Last Call Received. |
|
|
miss |
Shows the Missed Calls list. |
|
|
park |
Puts a call on hold at a designated “park” number. The call is parked on |
|
the line until you unpark it or the caller disconnects. Must be configured |
|
by your phone system administrator. |
|
|
Cisco Small Business SPA50X and SPA51X Series SIP IP Phone User Guide |
12 |

Getting Started |
1 |
|
|
Understanding Your Phone Lines and Buttons |
|
|
|
|
|
Button |
Function |
|
|
pickup |
Answers a call ringing on another extension by entering the extension |
|
number. |
|
|
phold |
Puts a call on hold on an active shared line. |
|
|
redial |
Displays a list of recently dialed numbers. |
|
|
resume |
Resumes a call that is on hold. |
|
|
save |
Saves your changes. |
|
|
select |
Selects the highlighted item on the IP phone screen. |
|
|
starcode |
Allows you to enter a star code. See “Using Star Codes,” on page 59. |
|
|
unpark |
Resumes a parked call. |
|
|
xfer |
Performs a call transfer. |
|
|
xferLx |
Transfers an active line on the phone to a called number. |
|
|
y/n |
Enters a submenu and when pressed, toggles between Yes or No to |
|
enable or disable an option. |
|
|
Using Keypad Shortcuts
When using the phone menus, you can use the keypad to enter the number shown next to the menu or sub-menu item on the IP phone screen. (Not applicable to the Cisco SPA501G.)
For example, to obtain your IP address on the Cisco SPA 504G, press the Setup button and dial 9.
Cisco Small Business SPA50X and SPA51X Series SIP IP Phone User Guide |
13 |

Getting Started |
1 |
|
|
Using the Cisco Attendant Console |
|
|
|
|
|
The IP address is displayed on the Network screen.
NOTE Menus and options vary depending on phone model.
Using the Cisco Attendant Console
The Cisco Attendant Consoles are accessory consoles for the Cisco SPA500 Series IP phones. The Cisco SPA500S provides 32 three-color (red, green, and orange) programmable line buttons, and the Cisco SPA500DS provides 30 buttons. The Cisco Attendant Console attaches to the IP phone with the attachment arm provided. It obtains power directly from the IP phone; it does not require a separate power supply. Two Cisco Attendant Console units can be attached to a single IP phone to monitor a total of 64 (SPA500S) or 60 (SPA500DS) separate lines.
Detailed information on the installation of the Cisco Attendant Consoles are provided in the Cisco Small Business SPA500S Attendant Console Quick Start Guide and the Cisco Small Business SPA500DS 15-Button Digital Attendant Console for SPA500 Family Phones Quick Start Guide.
Configuration of the Cisco Attendant Console and assignment of the line buttons is typically performed by the phone system administrator and is not described in this document. The Cisco Attendant Console can be configured by using the same web configuration utility for the IP phone to which the Cisco Attendant Console is attached. See the Cisco SPA300 Series, SPA500 Series, and WIP310 Administration Guide on Cisco.com for more information.
Changing the Cisco SPA500DS Attendant Console Display
The Cisco SPA500DS provides a backlit LCD display. The backlight is controlled by the backlight settings of the phone display and is not separately configurable; that is, the Cisco SPA500DS display is lit when the phone display is lit, and is off when the phone display is off.
Cisco Small Business SPA50X and SPA51X Series SIP IP Phone User Guide |
14 |

Getting Started |
1 |
|
|
Using the Cisco Attendant Console |
|
|
|
|
|
You can choose the font size (10 or 12 point) of the text displayed on the Cisco SPA500DS. You can also configure the text contrast, or how dark the text appears on the display. To configure these options from the phone:
STEP 1 Press the Setup button.
STEP 2 Scroll to Att. Cons. Preferences and press select.
STEP 3 Choose Font Size or Contrast from the menu and press edit:
•To change the font size, press option to switch between 10 and 12 point font. Press ok to save.
•To change the display contrast, use the keypad to enter a number value from 1 to 30. The higher the number, the greater the contrast on the display. Press ok to save.
STEP 4 Press save to save your changes.
Cisco Small Business SPA50X and SPA51X Series SIP IP Phone User Guide |
15 |

2
Installing Your Phone
This chapter describes how to install your Cisco Small Business IP Phone and connect it to your network. It contains the following sections:
•Before You Begin, page 17
•Phone Connections, page 17
•Connecting the Handset, page 18
•Installing the Desk Stand or Wall Mount (Optional), page 19
•Connecting the Power, page 20
•Connecting Your Phone to the Network, page 21
•Connecting a PC to Your Phone, page 22
•Connecting Wired and Wireless Headsets, page 22
•Verifying Phone Startup, page 23
•Updating Your Phone Firmware, page 24
Cisco Small Business SPA50X and SPA51X Series SIP IP Phone User Guide |
16 |

Installing Your Phone |
2 |
|
|
Before You Begin |
|
|
|
|
|
Before You Begin
Before you install and connect your phone, verify with your system administrator (if applicable) that the network is ready for the phone. Read the safety notices, and make sure you have all the phone parts and documentation.
!
CAUTION Do not plug a telephone line cord into the port marked AUX. The RJ-11 port marked AUX is reserved for connection with the Cisco Attendant Console. It is not for use as a telephone line port or IP device connection.
Phone Connections
The phone connections are shown in Figure 1.
Figure 1 Phone Connections
1
|
2 |
|
3 |
8 |
4 |
|
5 |
|
6 |
|
7 |
|
284539 |
Cisco Small Business SPA50X and SPA51X Series SIP IP Phone User Guide |
17 |
Installing Your Phone |
2 |
|
|
Connecting the Handset |
|
|
|
|
|
Numbered objects in Figure 1 are described in the following table.
# |
Description |
|
|
1 |
Auxiliary port. (For use only with the Cisco Attendant Console.) |
|
|
2 |
Upper slots. |
|
|
3 |
Lower slots. |
|
|
4 |
PC port. |
|
|
5 |
Network (switch) port. |
|
|
6 |
Cable run. |
|
|
7 |
Handset port. |
|
|
8 |
Power port. (Use only with a Cisco PA100 power adapter.) |
|
|
Connecting the Handset
STEP 1 Turn the phone body over to expose the ports on the back of the device.
!
CAUTION Do not insert a telephone line cord into the auxiliary (AUX) port.
STEP 2 Insert the long end of the phone cord into the handset port on the phone body that is marked with a phone symbol.
STEP 3 (Optional) Route the phone cord through the cable slot.
STEP 4 Insert the other end of the phone cord into the port at the bottom of the handset (not shown).
Cisco Small Business SPA50X and SPA51X Series SIP IP Phone User Guide |
18 |

Installing Your Phone |
2 |
|
|
Installing the Desk Stand or Wall Mount (Optional) |
|
|
|
|
|
Installing the Desk Stand or Wall Mount (Optional)
The phone can be set on a flat surface, such as a desk, or mounted to a wall. This section describes the installation of the desk stand. If you are attaching a
Cisco SPA500S or SPA500DS attendant console, attach the console before attaching the desk stand.
To mount the phone to the wall, you must use the MB100 wall mount bracket kit (available separately). Do not attach the desk stand if you intend to mount the phone to the wall. To mount the phone on the wall, follow the instructions included with the wall mount.
To install the desk stand:
STEP 1 Connect the phone stand by lining up the tabs on the stand with the slots on the phone body.
STEP 2 Slide the bottom tabs into the lower slots on the phone body and lightly press down on the stand. It should easily slide into the upper stand slots. Do not force it.
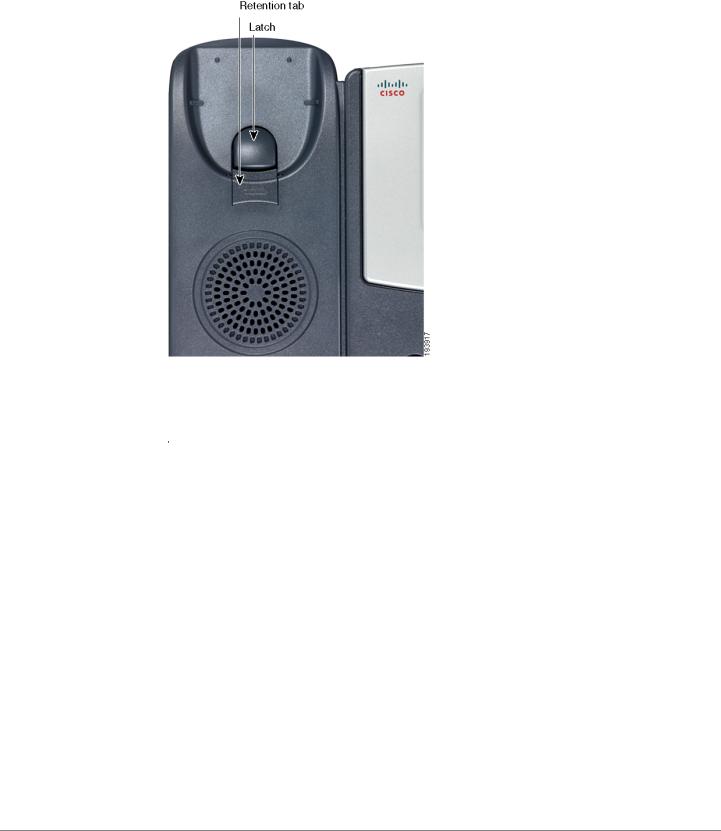
Reverse the Handset Retention Tab
If you mount the phone to a vertical surface, such as a wall, you must reverse the handset retention tab on the phone body so that the handset does not fall off the phone when it is placed on the cradle.
STEP 1 Push the latch in.
STEP 2 Slide the retention tab up until it detaches from the phone.
Cisco Small Business SPA50X and SPA51X Series SIP IP Phone User Guide |
19 |
Installing Your Phone |
2 |
|
|
Connecting the Power |
|
|
|
|
|
STEP 3 Rotate the tab 180° and re-insert into the phone base. The tab now catches the slot in the handset when the handset is placed onto the cradle.
Connecting the Power
The Cisco 500 Series IP phones do not ship with power supplies. If you are not using Power over Ethernet (PoE), you must order a Cisco PA100 power supply for each phone.
If you are using Power over Ethernet (PoE) to power the phone, the phone receives power when you connect an Ethernet cable from the phone SW port to a switch that provides PoE. If you are using a Cisco PA100 power adapter, insert one end of the power adapter into an outlet and insert the other end into the power port on the phone body.
Cisco Small Business SPA50X and SPA51X Series SIP IP Phone User Guide |
20 |
Installing Your Phone |
2 |
|
|
Connecting Your Phone to the Network |
|
|
|
|
|
Connecting Your Phone to the Network
The phone can be connected to the network by using a Cat5e or higher Ethernet cable or through a wireless network connection.
Connecting Your Phone to the Wired Network
To connect the phone by using an Ethernet cable:
STEP 1 Insert one end of the Ethernet cable into the network port on the RJ-45 phone port marked “SW.”
STEP 2 Insert the other end of the Ethernet cable into the device, such as a switch.
Connecting the Phone to the Wireless Network
You can use a wireless device, such as a Cisco Wireless-N Bridge for Phone Adapters (WNBP), to connect the IP phone to a wireless network. This example procedure requires the Cisco PA100 power adapter to provide power to the Cisco WNBP. Cisco does not recommend connecting a PC to the network by using the phone when it is operating wirelessly.
To connect your phone to the Cisco WNBP:
STEP 1 Configure the Cisco WNBP by using the Setup Wizard.
STEP 2 When instructed to do so by the Setup Wizard, insert the Ethernet cable of the wireless bridge into the RJ-45 phone port marked SW, located on the back of the IP phone base station.
STEP 3 Connect the power cable of the Cisco WNBP to the power port on the phone base.
STEP 4 Connect one end of the IP phone power adapter into the power port of the wireless bridge.
STEP 5 Connect the other end of the IP phone power adapter into an electrical outlet.
Cisco Small Business SPA50X and SPA51X Series SIP IP Phone User Guide |
21 |

Installing Your Phone |
2 |
|
|
Connecting a PC to Your Phone |
|
|
|
|
|
Connecting a PC to Your Phone
A PC can be connected to the network through the phone. Cisco does not recommend connecting a PC to the phone if the phone is connected to the network wirelessly.
To connect a PC to your phone:
STEP 1 To provide network access to a PC, connect one end of a Cat5e or higher Ethernet cable (not provided) to the PC port on the back of the phone body. See Figure 1.
STEP 2 Connect the other end of the Ethernet cable to the RJ-45 port on your PC.
Connecting Wired and Wireless Headsets
The IP phones support headsets from different manufacturers. For a list of supported models, contact your reseller. Additional information can be found at the manufacturer websites.
Each brand and type of headset might require different steps for connection. Consult the documentation for your particular headset for more information. In general, to connect a headset:
•Wireless—Connect the headset telephone cord into the telephone port on the back of the IP Phone.
Cisco Small Business SPA50X and SPA51X Series SIP IP Phone User Guide |
22 |

Installing Your Phone |
2 |
|
|
Verifying Phone Startup |
|
|
|
|
|
•Wired headsets—Connect the 2.5mm connector from the headset into the headset port on the right side of the IP phone:
Verifying Phone Startup
After receiving power and network connectivity, the phone executes a boot-up sequence. During this sequence, phones with screens display the Cisco logo and then Initializing Network. All of the lights on the phone flash.
After your phone is successfully connected to the network and receives a basic configuration, your phone line keys should glow green (on models with phone line keys).
On models with screens, the phone displays the standard menu for the phone. The date, name and number of the phone display on the top line of the IP phone screen. At the bottom of the IP phone screen, softkeys are displayed over their associated soft buttons.
Cisco Small Business SPA50X and SPA51X Series SIP IP Phone User Guide |
23 |

Installing Your Phone |
2 |
|
|
Updating Your Phone Firmware |
|
|
|
|
|
On models with no screen, such as the Cisco SPA501G, the lines glow green and you hear a dial tone when picking up the handset or pressing the speakerphone button.
If the phone does not start, confirm your installation and connections. If these are correct, try unplugging the phone and plugging it back in again. If you still do not see the display, contact your phone administrator or Internet Telephony Service Provider (ITSP).
Updating Your Phone Firmware
Your phone ships with pre-installed firmware. However, later firmware versions might be available that add features and fix problems with your phone. It is necessary to use the latest firmware for ideal performance.
!
CAUTION If you are using your phone with an Internet Telephony Service Provider system, do not update your phone firmware without consulting your service provider. Your provider can automatically update your phones without any action on your part necessary.
To update your phone firmware, do one of the following:
•Download the firmware from Cisco.com and install it from your PC. (See the next section for instructions.)
•Update by using the Cisco Voice System Setup Wizard (for example, if your phone is part of a Cisco Voice System network). See the Cisco Voice System Setup Wizard User Guide.
Determining Your Current Firmware Version
Cisco SPA502G, Cisco SPA504G, Cisco SPA508G, Cisco SPA509G,
Cisco SPA512G, Cisco SPA514G:
STEP 1 Press the Setup button.
STEP 2 Scroll to Product Info and press select.
Cisco Small Business SPA50X and SPA51X Series SIP IP Phone User Guide |
24 |
Loading...