


Sebring 2004

SECTION PAGE
1
INTRODUCTION
2
THINGS TO KNOW BEFORE STARTING YOUR VEHICLE
3
UNDERSTANDING THE FEATURES OF YOUR VEHICLE
4
UNDERSTANDING YOUR INSTRUMENT PANEL
5
STARTING AND OPERATING
6
WHAT TO DO IN EMERGENCIES
7
MAINTAINING YOUR VEHICLE
8
MAINTENANCE SCHEDULES
9
IF YOU NEED CONSUMER ASSISTANCE
TABLE OF CONTENTS
.............................................................3
...........................9
............................51
..................................79
................................................129
.............................................171
..............................................185
................................................231
.......................................251
1
2
3
4
5
6
7
8
9
10
INDEX
...................................................................261
10


CONTENTS
INTRODUCTION
1
m Introduction
m How To Use This Manual
m Warnings And Cautions
m Vehicle Identification Number
...........................4
.................4
..................6
..............6
▫ Partial Zero Emission Vehicle (PZEV)
For 2.4L — If Equipped ..................7
m Vehicle Modifications / Alterations
..........7

4 INTRODUCTION
INTRODUCTION
This manual has been prepared with the assistance of
service and engineering specialists to acquaint you with
the operation and maintenance of your new vehicle. It is
supplemented by a Warranty Information Booklet and
various customer oriented documents. You are urged to
read these publications carefully. Following the instructions and recommendations in this manual will help
assure safe and enjoyable operation of your vehicle.
NOTE:
After you read the manual, it should be stored
in the vehicle for convenient reference and remain with
the vehicle when sold so that the new owner will be
aware of all safety warnings.
When it comes to service, remember that your manufacturer’s dealer knows your vehicle best, has the factorytrained technicians and genuine Mopart parts, and is
interested in your satisfaction.
WARNING!
Engine exhaust, some of its constituents, and certain
vehicle components contain or emit chemicals
known to the State of California to cause cancer and
birth defectsor otherreproductive harm. In addition,
certain fluids contained in vehicles and certain products of component wear contain or emit chemicals
known to the State of California to cause cancer and
birth defects or other reproductive harm.
HOW TO USE THIS MANUAL
Consult the table of contents to determine which section
contains the information you desire.
The detailed index, at the rear of this manual, contains a
complete listing of all subjects.
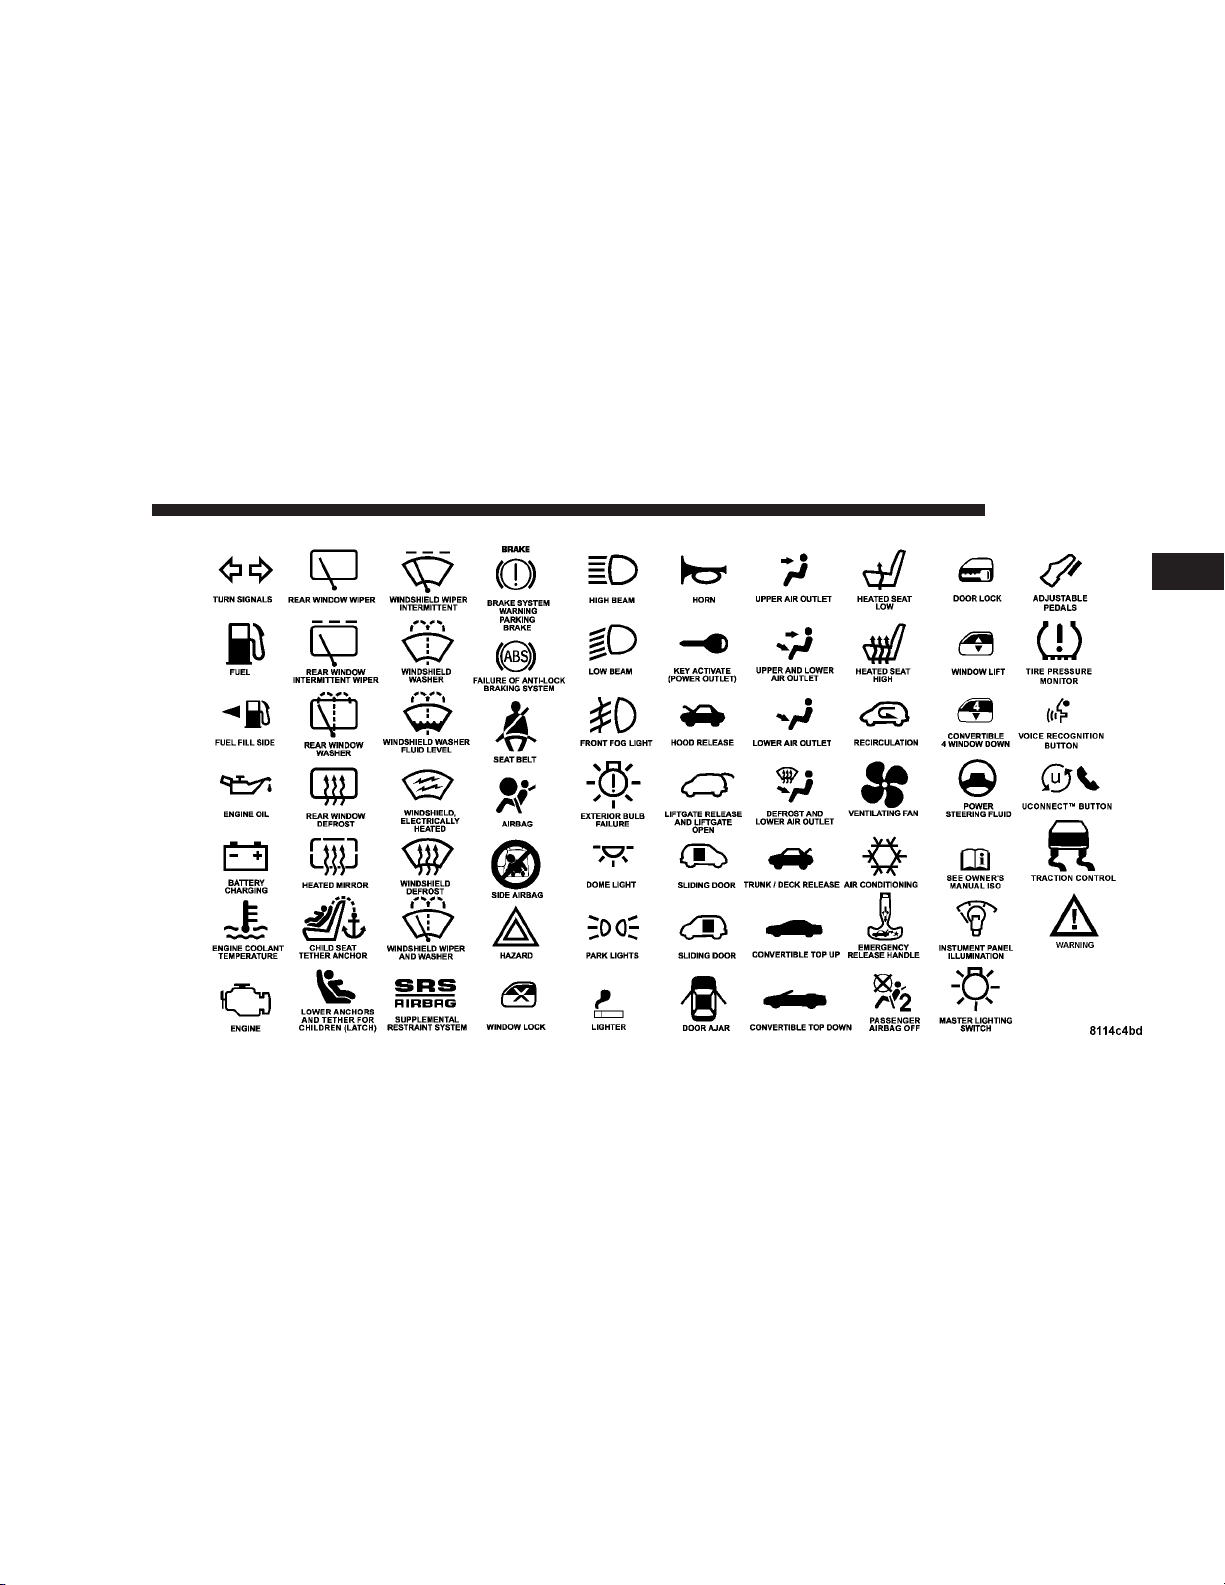
Consult the following table for a description of the
symbols that may be used throughout this owner’s
manual:
INTRODUCTION 5
1
6 INTRODUCTION
WARNINGS AND CAUTIONS
This manual contains WARNINGS against operating
procedures which could result in an accident or bodily
injury. It also contains CAUTIONS against procedures
which could result in damage to your vehicle. If you do
not read this entire manual you may miss important
information. Observe all Warnings and Cautions.
VEHICLE IDENTIFICATION NUMBER
The vehicle identification number (VIN) is on a stamped
plate on the left front corner on the body of the vehicle,
visible through the windshield. This number also appears on the Automobile Information Disclosure Label
affixed to a window on your vehicle. Save this label as a
convenient record of your vehicle identification number
and optional equipment.
INTRODUCTION 7
Partial Zero Emission Vehicle (PZEV) for 2.4L — If
Equipped
NOTE:
number (VIN) contains a 9J9 then your vehicle is
equipped with the Partial Zero Emissions Vehicle (PZEV)
package.
NOTE:
to change the ignition cables and spark plugs with the
PZEV package. Please refer to the Maintenance Schedules section in your owner’s manual for specific maintenance instructions.
If the 8th digit of the vehicle identification
There are specific instructions regarding when
VEHICLE MODIFICATIONS / ALTERATIONS
1
WARNING!
Any modifications or alterations to this vehicle
could seriously affect its roadworthiness and safety
and may lead to an accident resulting in serious
injury or death.


THINGS TO KNOW BEFORE STARTING YOUR VEHICLE
CONTENTS
m A Word About Your Keys
▫ Ignition Key Removal ...................11
▫ Automatic Transaxle Ignition Interlock System . .12
▫ Key-In-Ignition Reminder ................12
m Sentry Key — If Equipped
▫ Replacement Keys ......................13
▫ Customer Key Programming ..............14
▫ General Information ....................14
m Illuminated Entry System
m Door Locks
▫ Power Door Locks .....................15
...........................15
.................11
................12
.................14
▫ Central Locking — If Equipped ............16
▫ Door Ajar Warning .....................16
▫ Automatic (Rolling) Door Locks ............16
▫ Automatic Unlock On Exit — Only Available If
Automatic Door Locks Are Enabled .........17
▫ “Child Protection” Door Lock System
(Rear Doors) ..........................18
m Remote Keyless Entry — If Equipped
▫ To Unlock The Doors ...................19
▫ To Lock The Doors .....................19
▫ To Unlock The Trunk ....................20
▫ Panic Alarm ..........................20
........19
2

10 THINGS TO KNOW BEFORE STARTING YOUR VEHICLE
▫ To Use The Panic Alarm .................20
▫ To Program Additional Transmitters .........20
▫ General Information ....................21
▫ Transmitter Battery Service ...............21
m Vehicle Theft Alarm
.....................22
▫ Tamper Alert .........................22
▫ Security System Manual Override ...........23
m Trunk Lock And Release
m Trunk Safety Warning
..................23
....................23
▫ Trunk Internal Emergency Release ..........24
m Power Windows
........................24
▫ Wind Buffeting ........................25
m Occupant Restraints
.....................25
▫ Lap/Shoulder Belts .....................26
▫ Pretensioners .........................30
▫ Enhanced Driver Seat Belt Reminder System
(BeltAlert) ...........................30
▫ Seat Belts And Pregnant Women ............31
▫ Seat Belt Extender ......................31
▫ Driver And Right Front Passenger Supplemental
Restraint System (SRS) - Airbag ............32
m Engine Break-In Recommendations
m Safety Tips
............................48
..........47
▫ Exhaust Gas ..........................48
▫ Safety Checks You Should Make Inside The
Vehicle ..............................48
▫ Periodic Safety Checks You Should Make
Outside The Vehicle ....................49
THINGS TO KNOW BEFORE STARTING YOUR VEHICLE 11
A WORD ABOUT YOUR KEYS
You can insert the double sided keys into the locks with
either side up.
The dealer that sold you your new vehicle has the key
code numbers for your vehicle locks. These numbers can
be used to order duplicate keys from your dealer. Ask
your dealer for these numbers and keep them in a safe
place.
Ignition Key Removal
Place the shift lever in PARK and make sure that the
gearshift knob push button has returned to the out
position. Turn the key to the Lock position and remove
the key.
NOTE:
the lever in PARK, the key may become trapped temporarily in the key cylinder. If this occurs, rotate the key
clockwise slightly, then remove the key as described. If a
malfunction occurs, the system may trap the key in the
ignition cylinder to warn you that this safety feature is
If you try to remove the key before you place
2

12 THINGS TO KNOW BEFORE STARTING YOUR VEHICLE
inoperable. The engine can be started and stopped but
the key cannot be removed until you obtain service.
WARNING!
Leaving children in a vehicle unattended is dangerous for a number of reasons. A child or others could
be injured. Children should be warned not to touch
the parking brake, brake pedal or the gear selector
lever. Don’t leave the keys in the ignition. A child
could operate power windows, other controls, or
move the vehicle.
CAUTION!
An unlocked car is an invitation to thieves. Always
remove key from the ignition and lock all doors
when leaving the vehicle unattended.
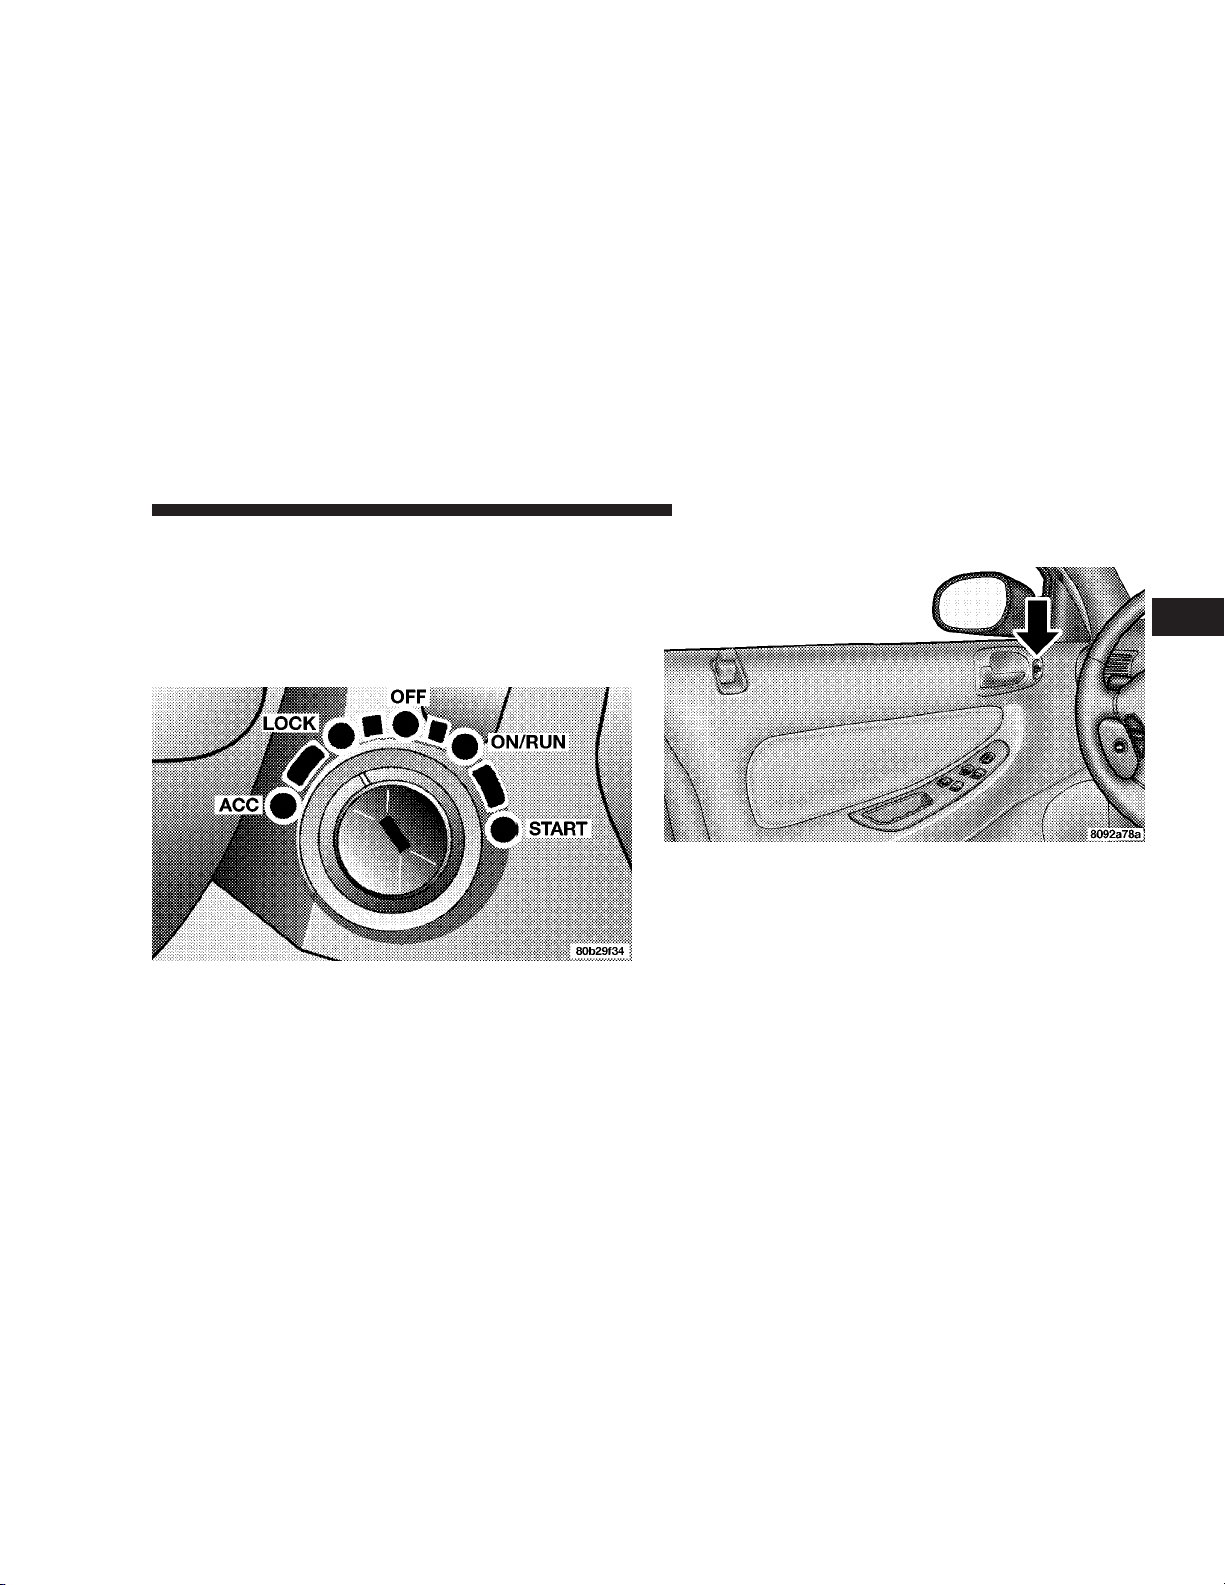
Automatic Transaxle Ignition Interlock System
This system prevents the key from being removed unless
the shift lever is in PARK. It also prevents shifting out of
PARK unless the key is in the OFF or RUN positions.
Key-In-Ignition Reminder
Opening the driver’s door when the key is in the ignition
and is in the OFF, LOCK, or ACC position, sounds a
signal to remind you to remove the key.
SENTRY KEY — IF EQUIPPED
With this system, an electronically coded ignition key
sends a signal to the vehicle electronics. If the electronics
recognizes the signal, the vehicle will start and continue
to run. If the system does not recognize the signal the
vehicle will start and run for 2 seconds then shut off. The
system will allow the engine to be started and run (for 2
seconds) up to six times after which the starter motor will
be disabled and the engine will not crank.

THINGS TO KNOW BEFORE STARTING YOUR VEHICLE 13
NOTE:
The Sentry Key Immobilizer System is not compatible
•
with remote starting systems. Use of these systems
may result in vehicle starting problems and loss of
security protection.
•
Additional Sentry Keys or Mobil Speed Pass™ devices
held too close to the ignition key when starting the
vehicle may cause problems when attempting to start
the vehicle. These devices cannot damage the Sentry
Key System, but can cause a momentary problem
when attempting to start the engine. If a problem
occurs, remove the Sentry Key from the key ring and
restart the vehicle. Pagers, cell phones, walkmans, etc.,
have no effect on this system.
The Theft Alarm Light, located on the instrument cluster
to the right of the fuel gauge, will illuminate for about 3
seconds when the ignition switch is first turned to the On
position. If the vehicle electronics do not receive a valid
signal from the ignition key, the theft alarm light will
flash continuously to signal that the vehicle has been
immobilized. If the Theft Alarm Light remains On during
vehicle operation, it indicates a fault in the system
electronics.
All of the keys provided with your new vehicle have
been programmed to the vehicle electronics.
Replacement Keys
NOTE:
vehicle electronics can be used to start the vehicle. Once
a Sentry Key has been programmed to a vehicle, it can
not be programmed to any other vehicle.
At the time of purchase, the original owner is provided
with a four digit PIN number. This number is required
for dealer replacement of keys. Duplication of keys may
be performed at an authorized dealer or by using the
Customer Key Programming procedure. This procedure
consists of programming a blank key to the vehicle
electronics. A blank key is one which has never been
programmed.
NOTE:
bring all vehicle keys to the dealer.
Only keys that have been programmed to the
When having the Sentry Key System serviced,
2

14 THINGS TO KNOW BEFORE STARTING YOUR VEHICLE
Customer Key Programming
You can program new keys to the system if you have two
valid keys by doing the following:
1. Insert the first valid key into the ignition and turn the
ignition On for at least 3 seconds but no longer than 15
seconds.
Turn the ignition Off and remove the first key.
2. Insert the second valid key and switch the ignition On
within 15 seconds. After ten seconds a chime will sound
and the Theft Alarm Light will begin to flash.
Turn the ignition Off and remove the second key.
3. Insert a blank Sentry Key into the ignition and switch
the ignition On within 60 seconds. After 10 seconds a
single chime will sound. The Theft Alarm Light will stop
flashing, turn on for 3 seconds; then turn off.
The new Sentry Key has been programmed. Repeat this
process to program up to a total of 8 keys.
General Information
The Sentry Key system complies with FCC rules part 15.
Operation is subject to the following two conditions:
1. this device may not cause harmful interference
2. this device must accept any interference that may be
received, including interference that may cause undesired operation
ILLUMINATED ENTRY SYSTEM
The interior lights will come on when you open any door,
unlock the vehicle with the remote keyless entry (if so
equipped) or central unlock (if so equipped). They will
remain on for about 30 seconds after all doors are closed
then fade to off.
The lights also will turn off if you turn on the ignition
after you close all doors.
THINGS TO KNOW BEFORE STARTING YOUR VEHICLE 15
DOOR LOCKS
WARNING!
For personal security and safety in the event of an
accident, lock the vehicle doors as you drive and
when you park and leave the vehicle.
WARNING!
When leaving the vehicle always remove the key
from the ignition lock, and lock your vehicle. Do not
leave children unattended in the vehicle, or with
access to an unlocked vehicle. Unsupervised use of
vehicle equipment may cause severe personal injuries and death.
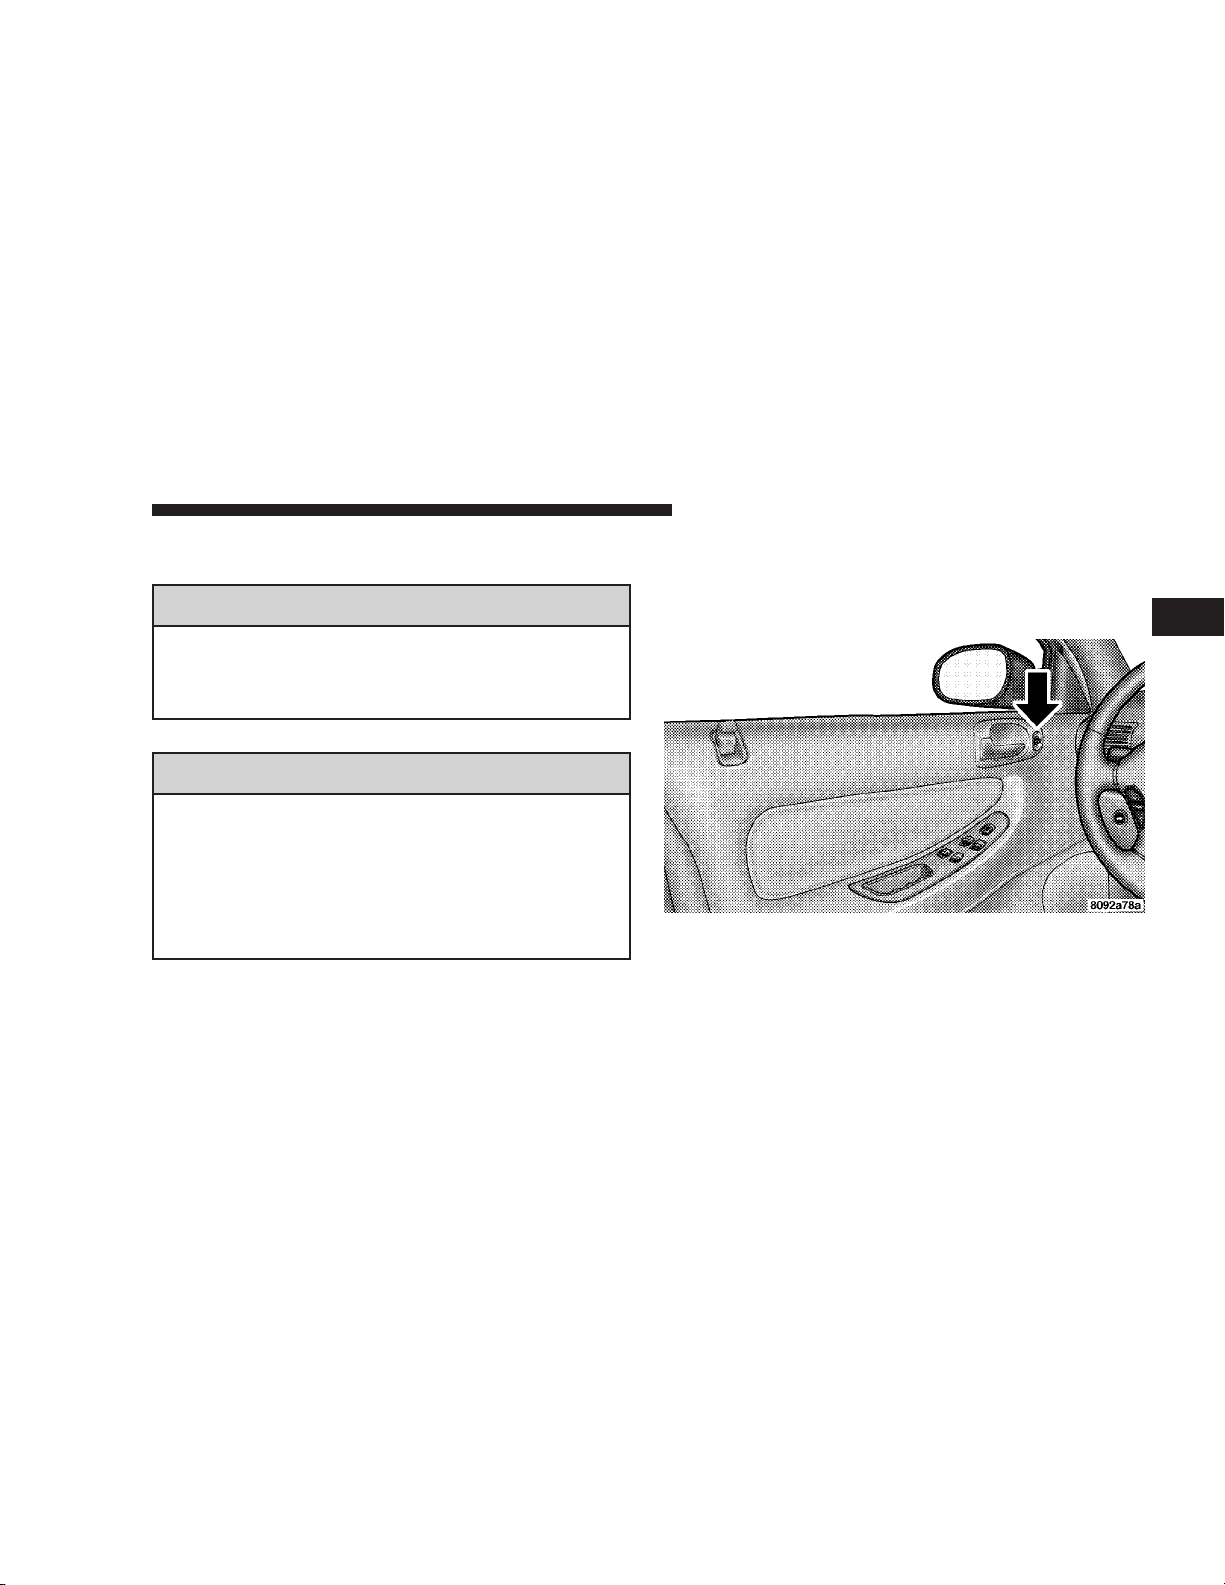
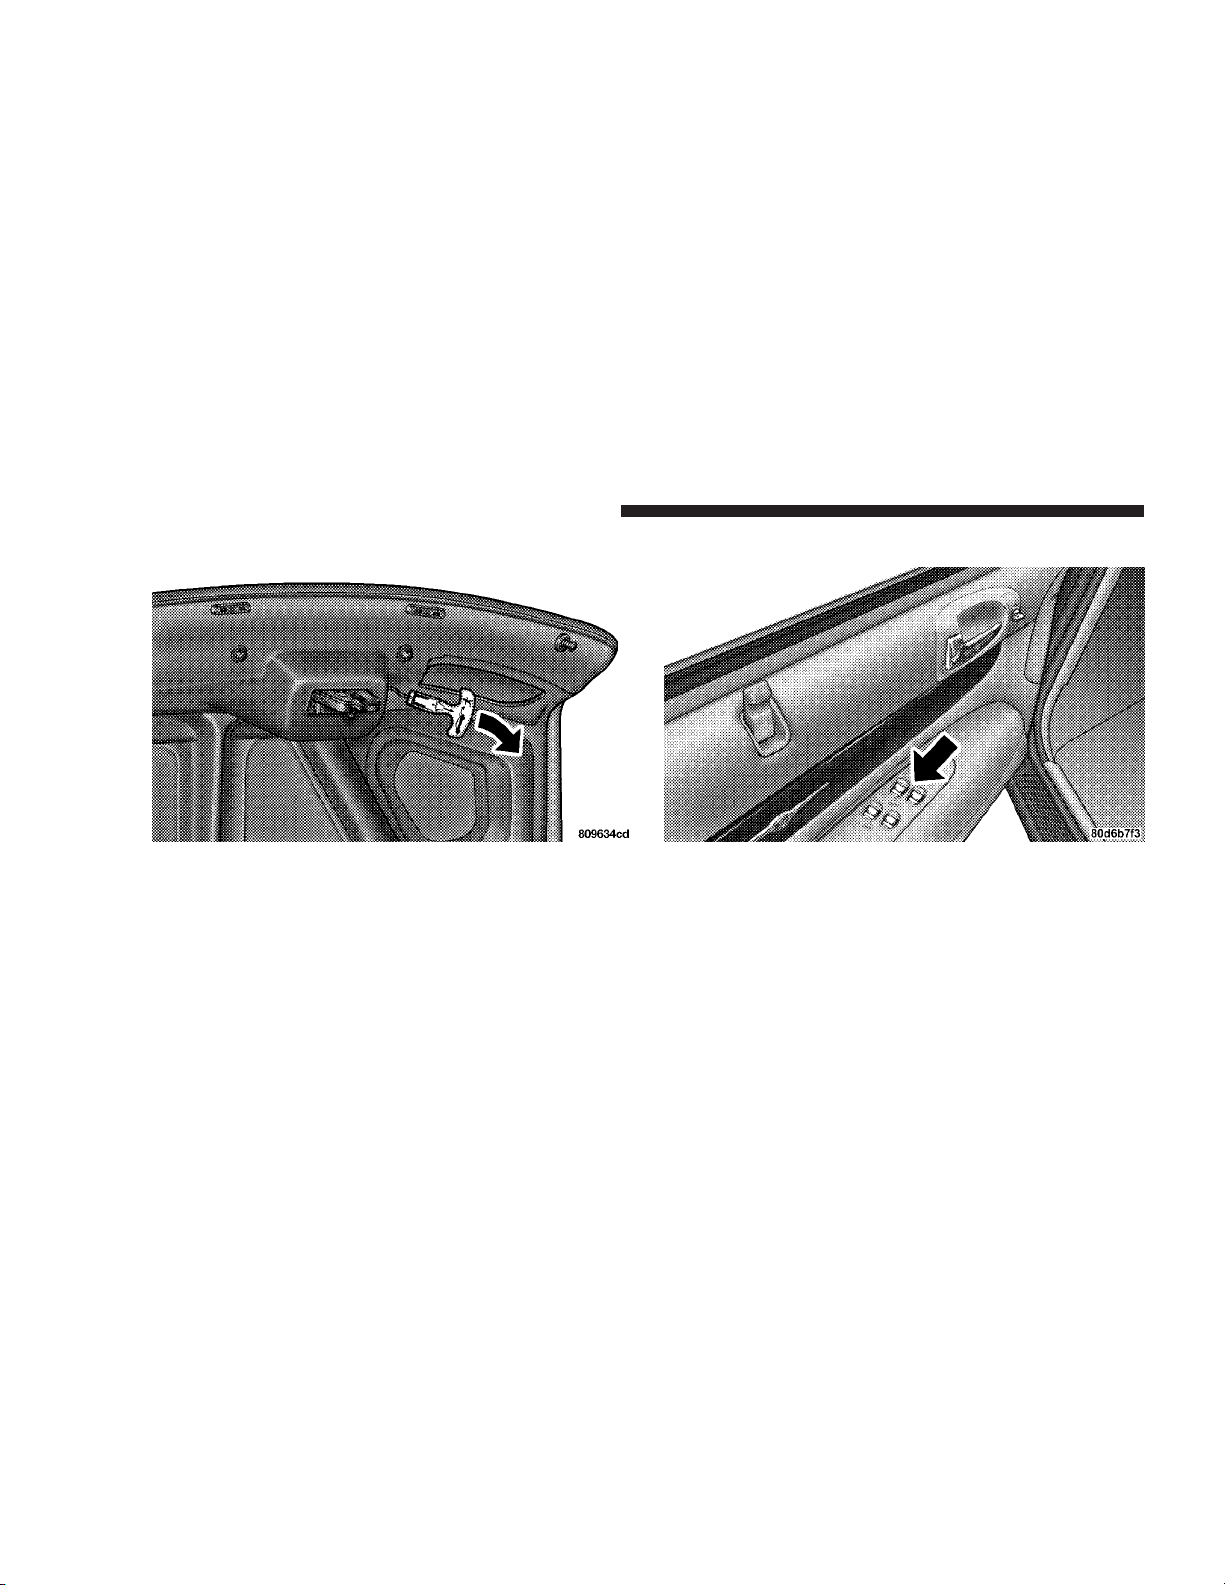
Power Door Locks
There is a door lock switch on each front door trim panel
located to the front of the door handle. Press this switch
to lock or unlock the four doors.
Power Door Lock Switch
2
16 THINGS TO KNOW BEFORE STARTING YOUR VEHICLE
If you press the door lock switch while the keys are in the
ignition switch, and the driver’s door is open, the doors
will not lock.
Door Lock Plunger
If the door lock plunger is down when you shut the door,
the door will lock. Therefore, make sure that the keys are
not inside the vehicle before closing the door.
The rear doors cannot be opened from inside the vehicle
until you pull up the lock plungers.
Central Locking — If Equipped
All vehicle doors are locked with the first turn of the key
to the LOCK position. The double activation feature
requires you to turn the key in the cylinder lock two
times within five seconds to UNLOCK all vehicle doors
at once.
Door Ajar Warning
If you move the vehicle and a door is not completely
closed, the word DOOR will replace the odometer display and a chime will sound once. The odometer display
will reappear once the door is closed.
Automatic (Rolling) Door Locks
The doors will lock automatically, as programmed from
the factory, if:
1. The transaxle is in gear,
2. All doors are closed,
3. Vehicle speed is above 15 mph (24 km/h),
4. The accelerator pedal is depressed.
THINGS TO KNOW BEFORE STARTING YOUR VEHICLE 17
The Automatic Door Locks can be disabled or re-enabled
by performing the following procedure:
1. Close all doors and place the key in the ignition.
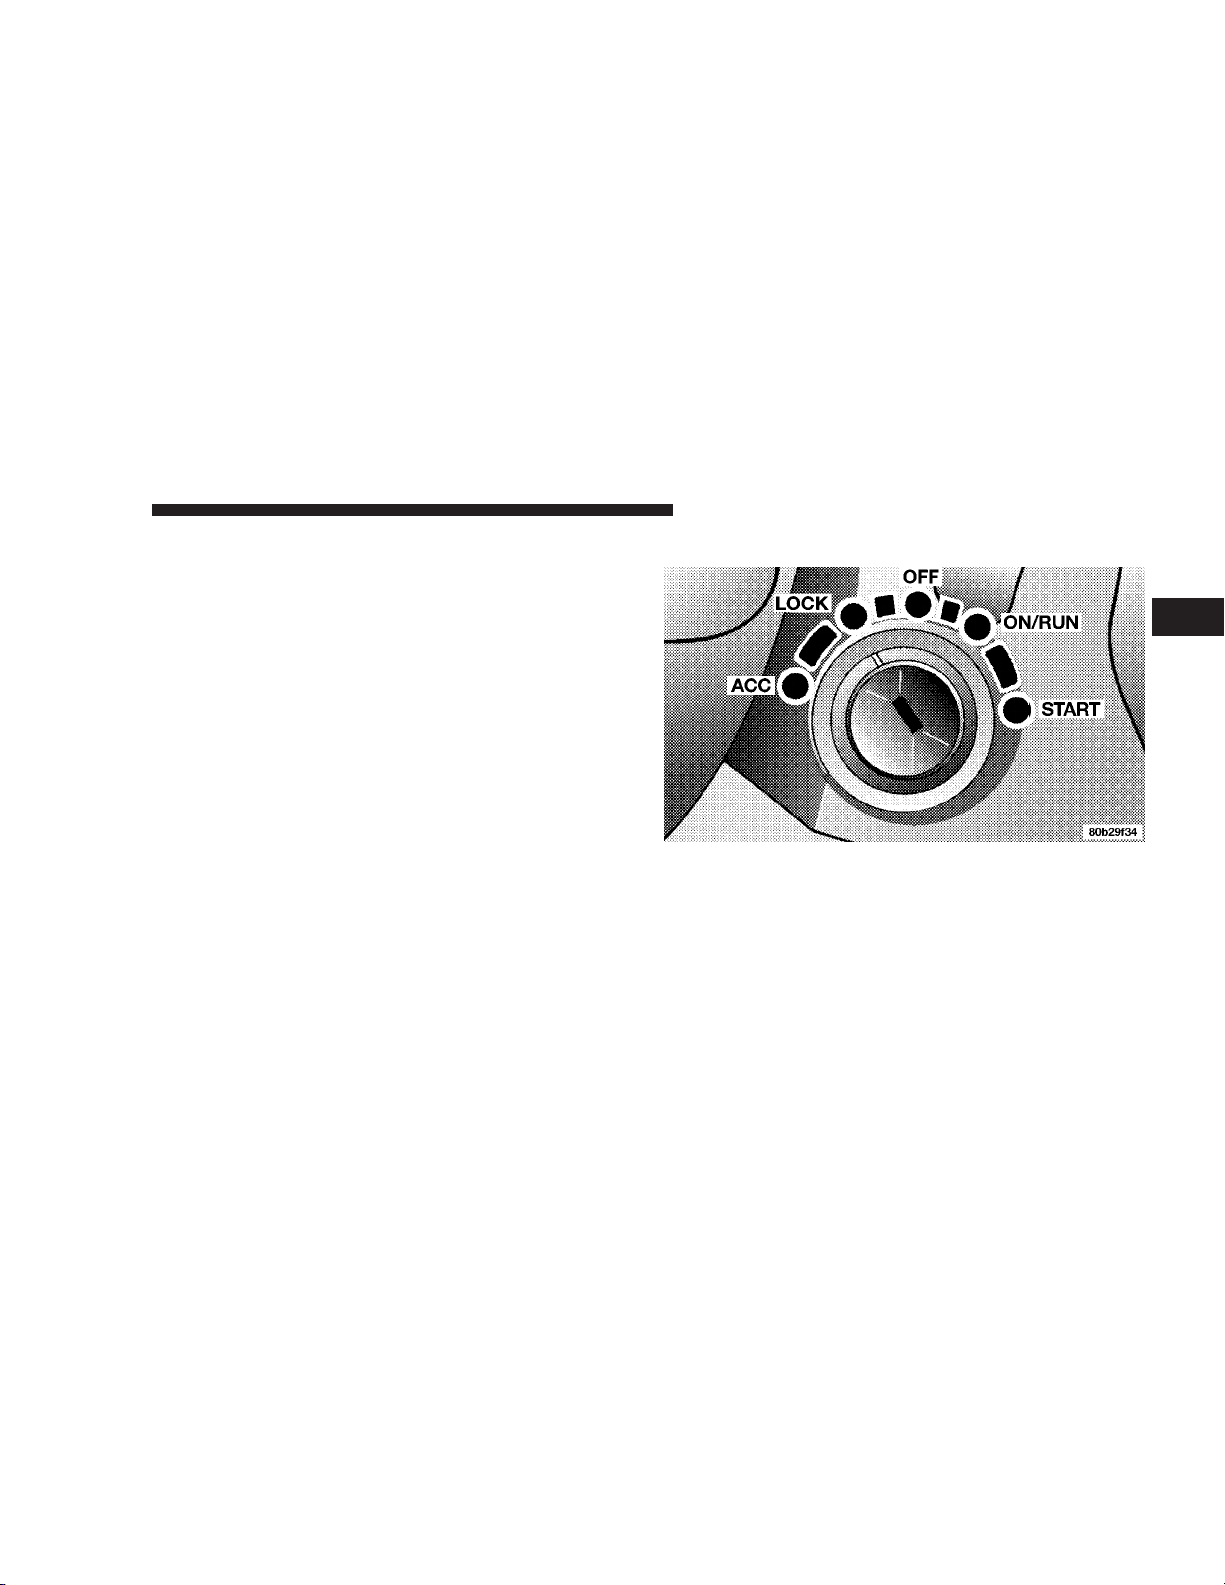
2. Cycle the ignition switch between OFF and ON/RUN
and back to OFF 4 times ending up in the OFF position.
3. Depress the power door lock switch to lock the doors.
2
4. A single chime will indicate the completion of the
programming.
Automatic Unlock on Exit — Only Available if
Automatic Door Locks are Enabled
This feature will unlock all the doors when the driver’s
door is opened and the ignition switch is in the LOCK
position. This function is disabled as delivered from the
factory. Automatic Unlock on Exit can be enabled or
disabled by performing the following procedure:
18 THINGS TO KNOW BEFORE STARTING YOUR VEHICLE
1. Close all doors and place the key in the ignition.
2. Cycle the ignition switch between OFF and ON/RUN
and back to OFF 4 times ending up in the OFF position.
3. Depress the power door lock switch to unlock the
doors.
4. A single chime will indicate the completion of the
programming.
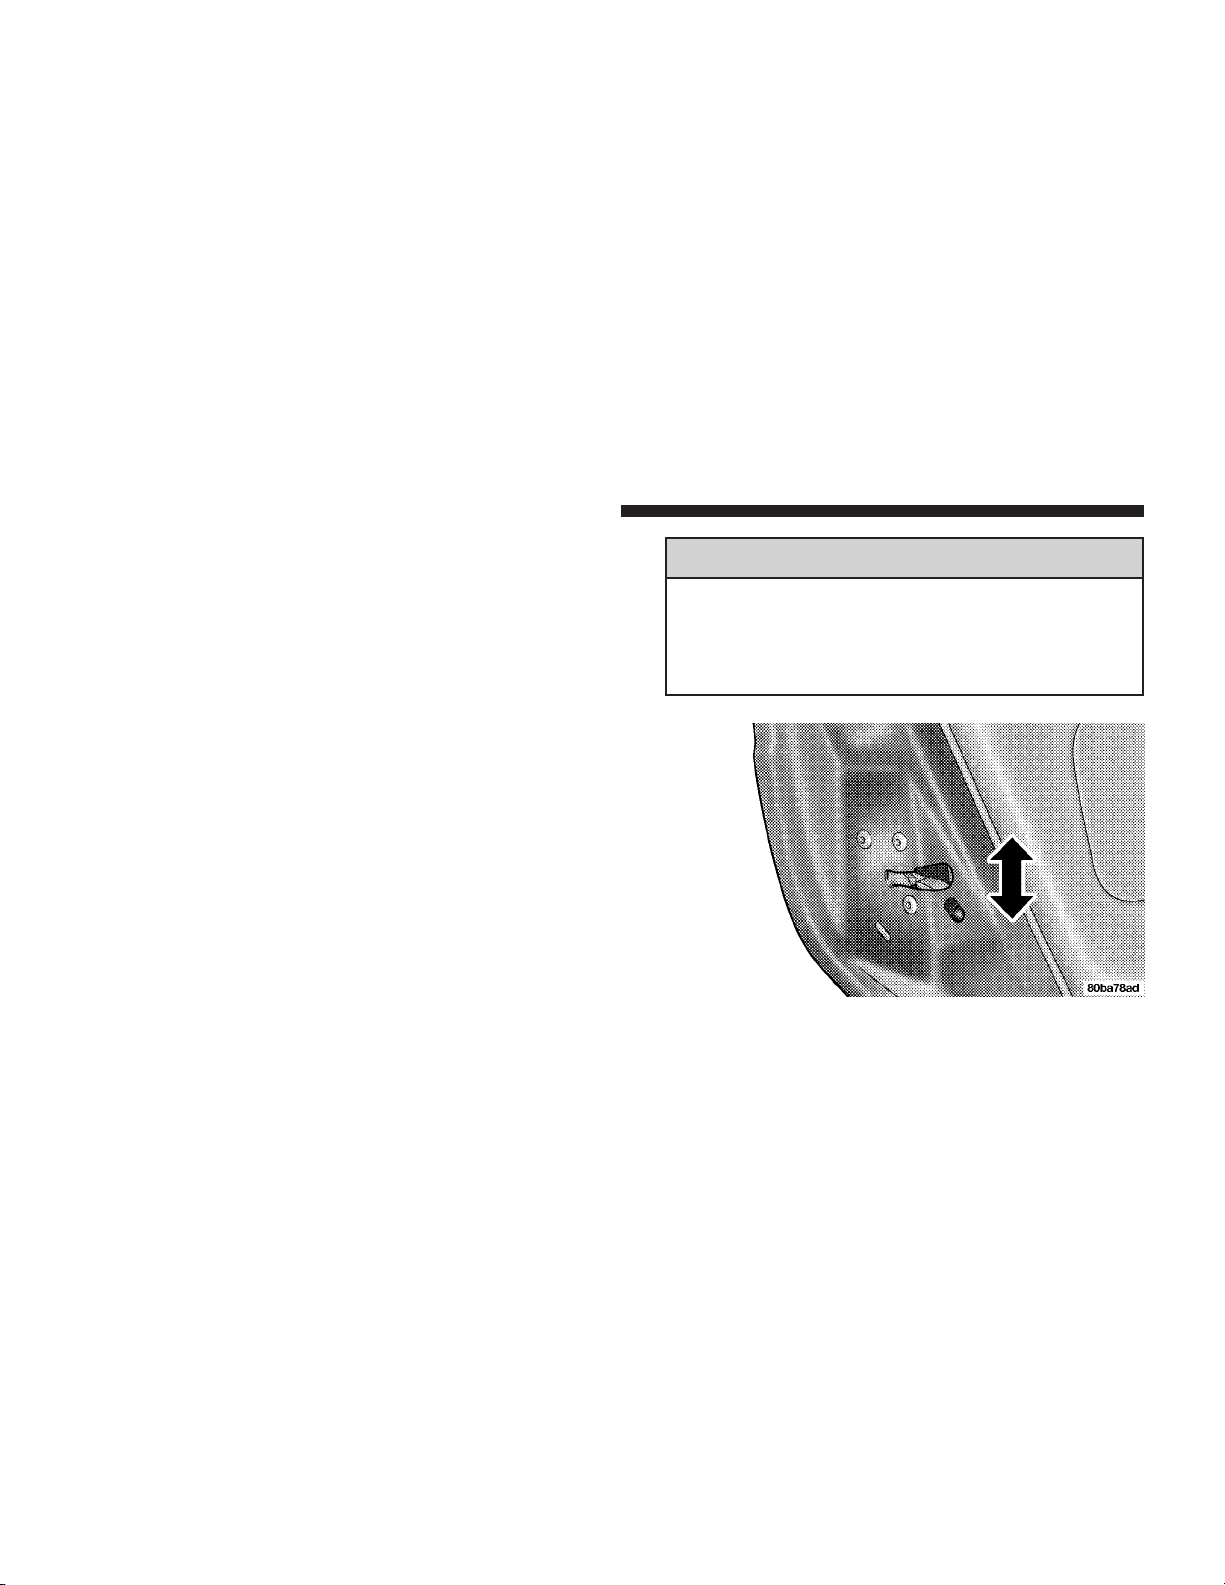
“Child Protection” Door Lock System (Rear
Doors)
To provide a safer environment for small children riding
in the rear seat, the rear doors of your vehicle have the
“child-protection” door lock system.
To use the system, open each rear door and use a key to
move the control near the door latch UP to the “Engage”
position as shown on the door label. When the system on
a door is engaged, that door can be opened only by using
the outside door handle. This will occur even though the
inside door lock is in the unlocked position.
WARNING!
Avoid trapping anyone in the vehicle in a collision.
Remember that the rear doors can only be opened
from the outside when the child protection locks are
engaged.
NOTE:
move the lock plunger up (unlocked position), lower the
window and open the door with the outside door handle.
For emergency exit with the system engaged,
THINGS TO KNOW BEFORE STARTING YOUR VEHICLE 19
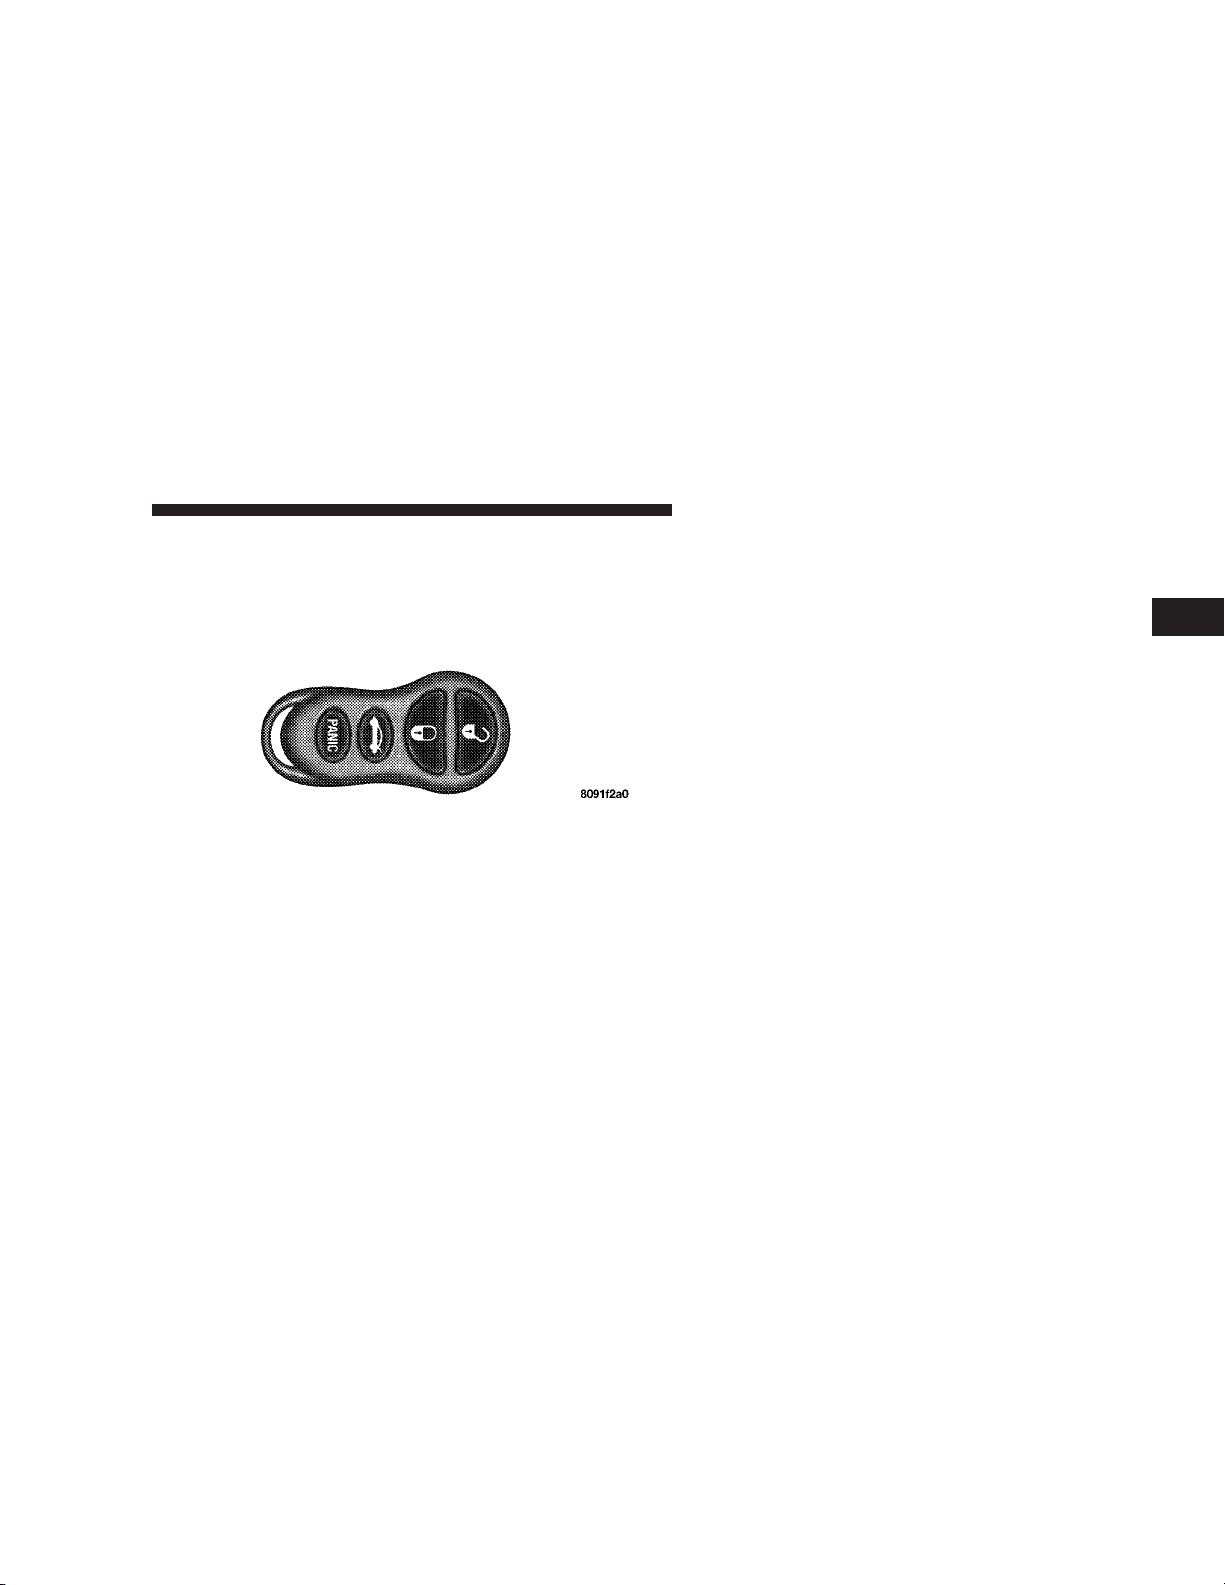
REMOTE KEYLESS ENTRY — IF EQUIPPED
This system allows you to lock or unlock the doors or
open the trunk from distances up to 23 feet (7 meters)
using a transmitter. You don’t have to point the transmitter at the vehicle to activate the system.
To unlock the doors:
Press and release the UNLOCK button once to unlock the
driver’s door. Press the button twice within 5 seconds to
unlock all doors. If your vehicle is equipped with Illuminated Entry, the interior lights also come on and remain
on for about 30 seconds, when you unlock the doors.
NOTE:
the doors upon the first press of the Unlock button. To
toggle between the first press unlock of the driver’s door
to unlock of all doors, perform the following procedure:
The system may be programmed to unlock all
1.
Press and hold the Unlock button on the transmitter.
2. Continue to hold the Unlock button, wait at least 4
but no longer than 10 seconds, then press the LOCK
button.
3. Release both buttons.
The headlights will flash twice to acknowledge the
unlock signal.
NOTE:
performing the following procedure:
1. Press and hold the Lock button on the transmitter.
2. Continue to hold the Lock button, wait at least 4 but
no longer than 10 seconds, then press the Trunk
button.
3. Release both buttons.
To lock the doors:
The horn will chirp and the headlamps will flash once to
acknowledge the lock signal.
NOTE:
the following procedure:
The Lamp Flash can be enabled or disabled by
The horn chirp can be enabled or disabled by
2

20 THINGS TO KNOW BEFORE STARTING YOUR VEHICLE
1. Press and hold the Lock button on the transmitter.
2. Continue to hold the Lock button, wait at least 4 but
no longer than 10 seconds, then press the Unlock
button.
3. Release both buttons.
To unlock the trunk:
Press and hold the Trunk button on the transmitter to
unlatch the trunk.
NOTE:
The transmitter can be programmed to unlatch
the trunk immediately upon activation of the Trunk
button (without pressing and holding) by performing the
following procedure:
1. Press and hold the Unlock button on the transmitter.
2. Continue to hold the Unlock button, wait at least 4
but no longer than 10 seconds, then press the Trunk
button.
3. Release both buttons.
Panic Alarm
The panic mode unlocks the driver’s door, turns on the
interior lights, flashes the headlights, and sounds the
horn for about 3 minutes or until the alarm is turned off.
To use the Panic Alarm:
Press and hold the Panic Button for at least 1 second to
activate the panic alarm. Press and hold the panic button
a second time or unlock the door with the key (if
equipped with central locking) to deactivate the alarm.
The alarm will also shut itself off after 3 minutes, or when
the vehicle speed reaches 15 MPH (24 km/h).
To Program Additional Transmitters:
Up to 4 transmitters can be programmed to your vehicle.
To program a transmitter, perform the following procedure:
1. With the vehicle in Park, turn the ignition switch to the
ON/RUN position.
2. Using a currently programmed transmitter, press the
Unlock button on the transmitter. Continue to hold the
Unlock button, wait at least 4 but no longer than 10
seconds, then press and hold the Panic button for at least
THINGS TO KNOW BEFORE STARTING YOUR VEHICLE 21
one second. Release both buttons simultaneously. You
will hear a chime to signal that you can proceed with
programming the new transmitter.
3. Press and release the Lock and Unlock buttons simultaneously, followed by a press and release of ANY button
on each new transmitter to be programmed as well as the
original transmitter. You will hear a chime when a
transmitter has been successfully programmed. You will
have 30 seconds to finish programming all new transmitters. A chime will sound when the 30 seconds is over or
the ignition switch is turned to the LOCK position.
General Information
This transmitter complies with FCC rules part 15 and
with RS-210 of Industry Canada. Operation is subject to
the following two conditions:
1. This device may not cause harmful interference
2. This device must accept any interference that may be
received, including interference that may cause undesired operation
If your Remote Lock Control fails to operate from a
normal distance, check for these two conditions:
1. Weak batteries in transmitter. The expected life of
batteries is from one to two years
2. Closeness to a radio transmitter such as a radio station
tower, airport transmitter, and some mobile or CB radios.
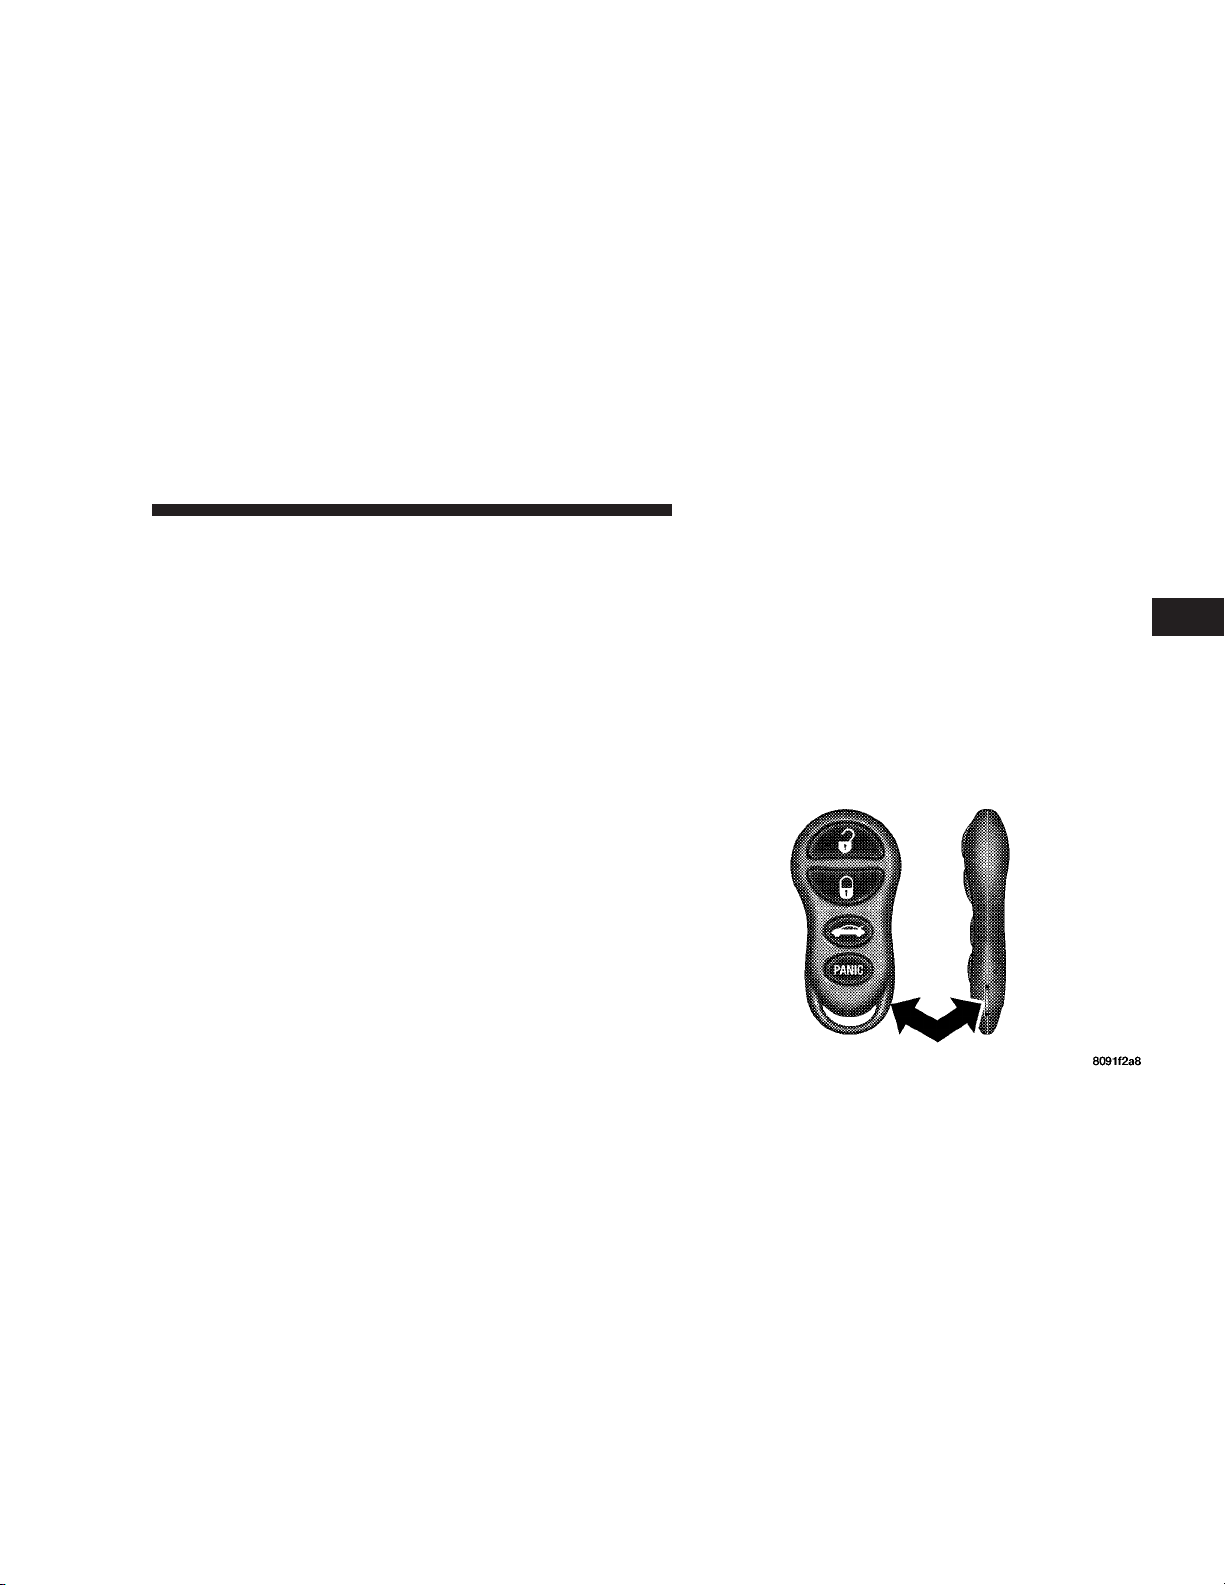
Transmitter Battery Service
The recommended replacement batteries are CR2016.
1. Pry the transmitter halves apart with a dime or similar
object. Make sure not to damage the rubber gasket
material during removal.
2

22 THINGS TO KNOW BEFORE STARTING YOUR VEHICLE
2. Remove and replace the batteries. Avoid touching the
new batteries with your fingers. Skin oils may cause
battery deterioration. If you touch the battery, clean it
with rubbing alcohol.
3. Reassemble the transmitter case. Snap the halves
together and test transmitter operation.
VEHICLE THEFT ALARM
The system monitors the doors, trunk, and ignition for
unauthorized operation.
If something triggers the alarm, the system will signal for
up to 18 minutes. For the first three minutes the horn will
sound and the headlights and interior lights will flash.
Then the horn will stop and if the source of the trigger is
still present, the lights will continue to flash for another
15 minutes.
NOTE:
The engine will not start until you disarm the
system.
To set the alarm:
1. Remove the keys from the ignition switch and get out
of the vehicle.
2. Lock the door using either the power door lock switch,
the key, or the Keyless Entry Transmitter and close all
doors.
3. The light in the instrument cluster will flash rapidly
for 15 seconds. This shows that the system is arming. If
the light comes on but does not flash, the system is still
armed, but there is a problem in the trunk circuit.After 15
seconds the light will continue to flash slowly. This
shows that the system is fully armed.
To disarm the system:
Unlock a front door using either the key or the Keyless
Entry Transmitter.
Tamper Alert
If the horn sounds 3 times when you unlock a front door
using either a key or the Keyless Entry Transmitter, the
alarm had been triggered. Check the vehicle for tampering.
THINGS TO KNOW BEFORE STARTING YOUR VEHICLE 23
Security System Manual Override
The system will not arm if you lock the doors using the
manual lock control.
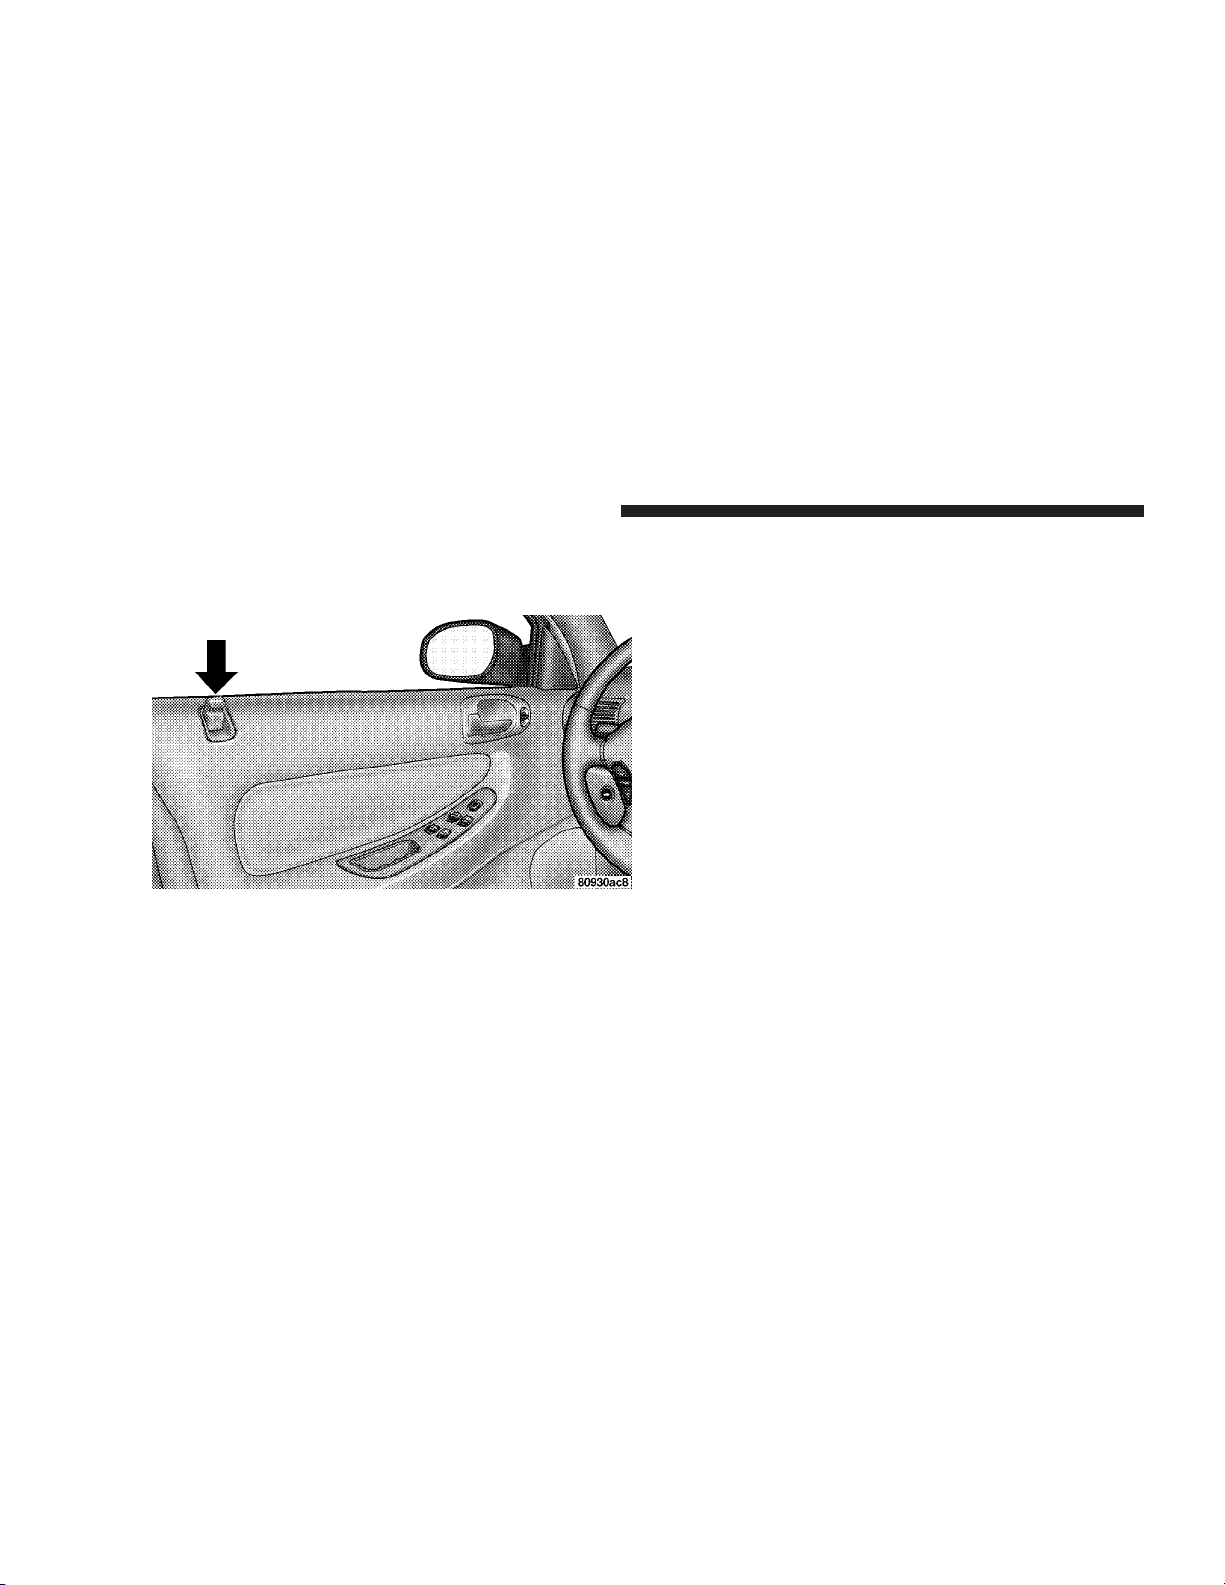
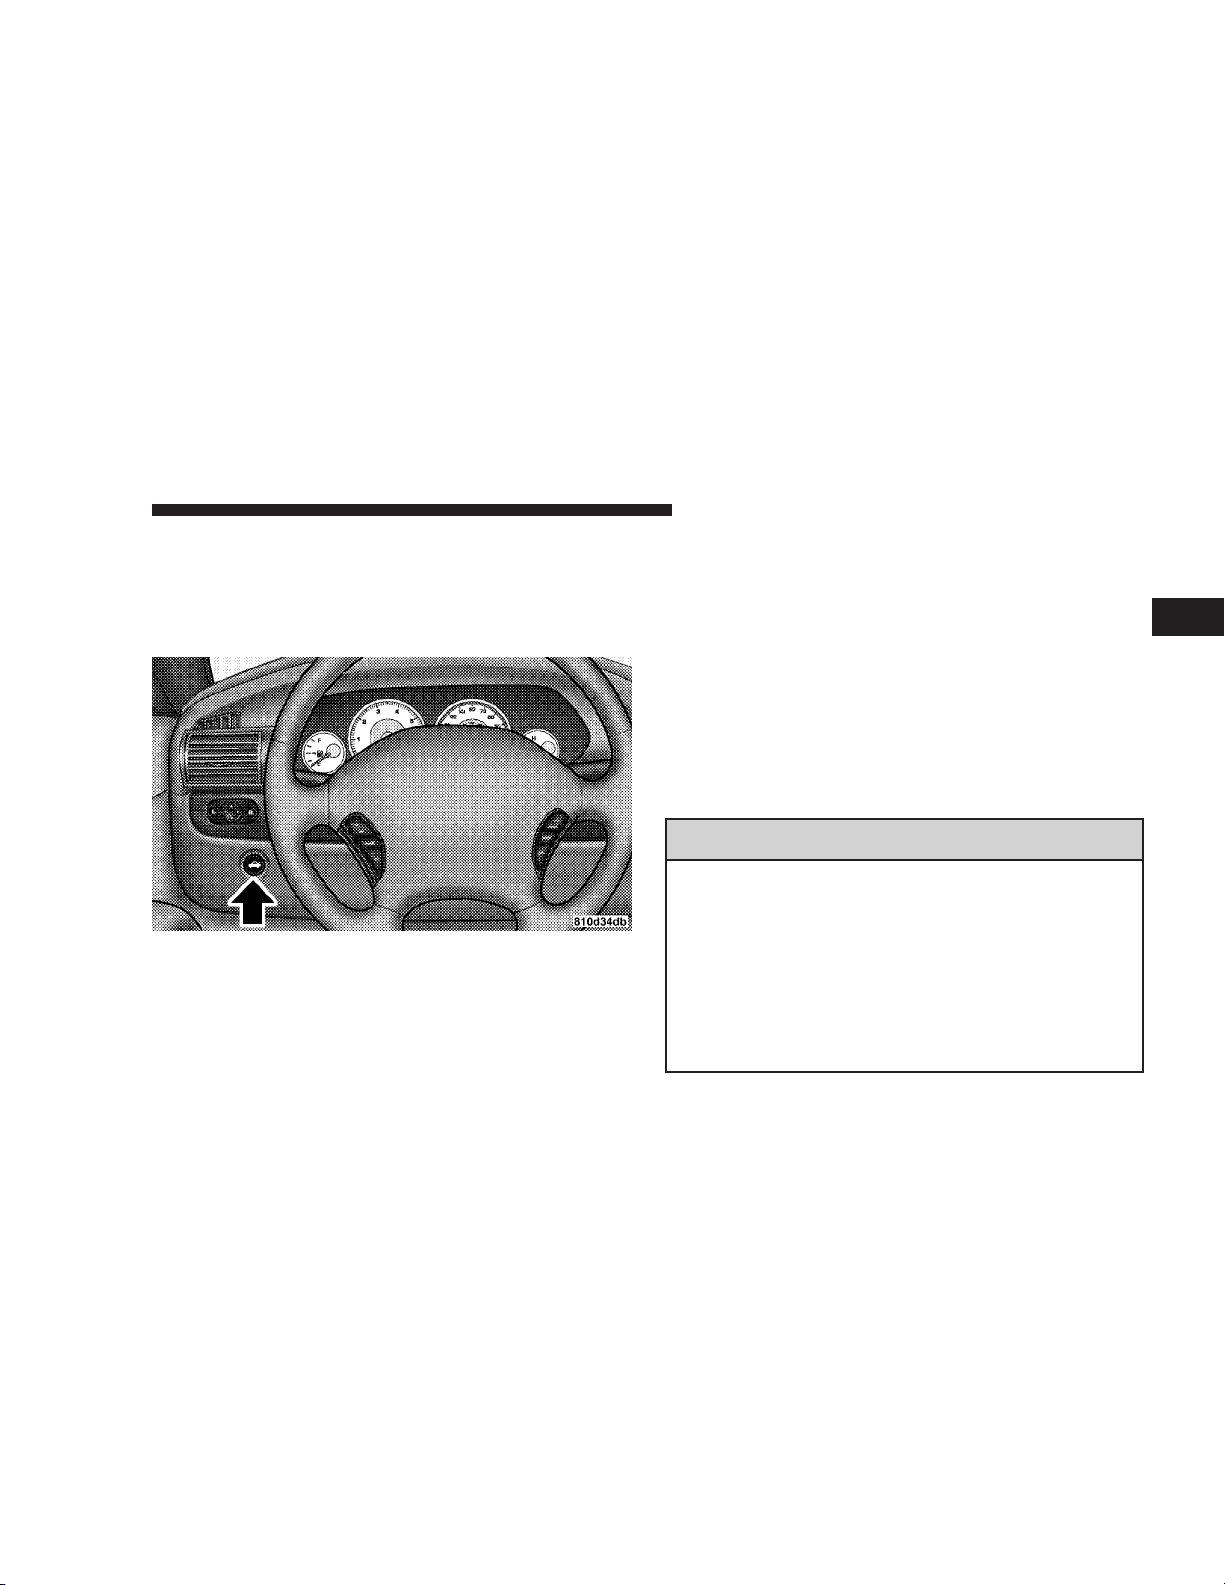
TRUNK LOCK AND RELEASE
Use the key or the Remote Keyless Entry Transmitter to
open the trunk from outside the vehicle. From inside the
car the trunk lid can be released by depressing the Trunk
Release Button located on the instrument panel to the left
of the steering wheel. The transmission must be in Park
before the switch will operate. Vehicles with manual
transmissions must be at zero mph for the switch to work.
With the ignition ON, the word “deck” will be displayed
in place of the odometer display indicating that the trunk
is open. The odometer display will reappear once the
trunk is closed or if the trip button is depressed.
With the key in lock position or key out, the “deck” will
be displayed until the trunk is closed.
TRUNK SAFETY WARNING
WARNING!
Do not allow children to have access to the trunk,
either by climbing into the trunk from outside, or
through the inside of the vehicle. Always close the
trunk lid when your vehicle is unattended. Once in
the trunk, young children may not be able to escape,
even if they entered through the rear seat. If trapped
in the trunk, children can die from suffocation or
heat stroke.
2
24 THINGS TO KNOW BEFORE STARTING YOUR VEHICLE
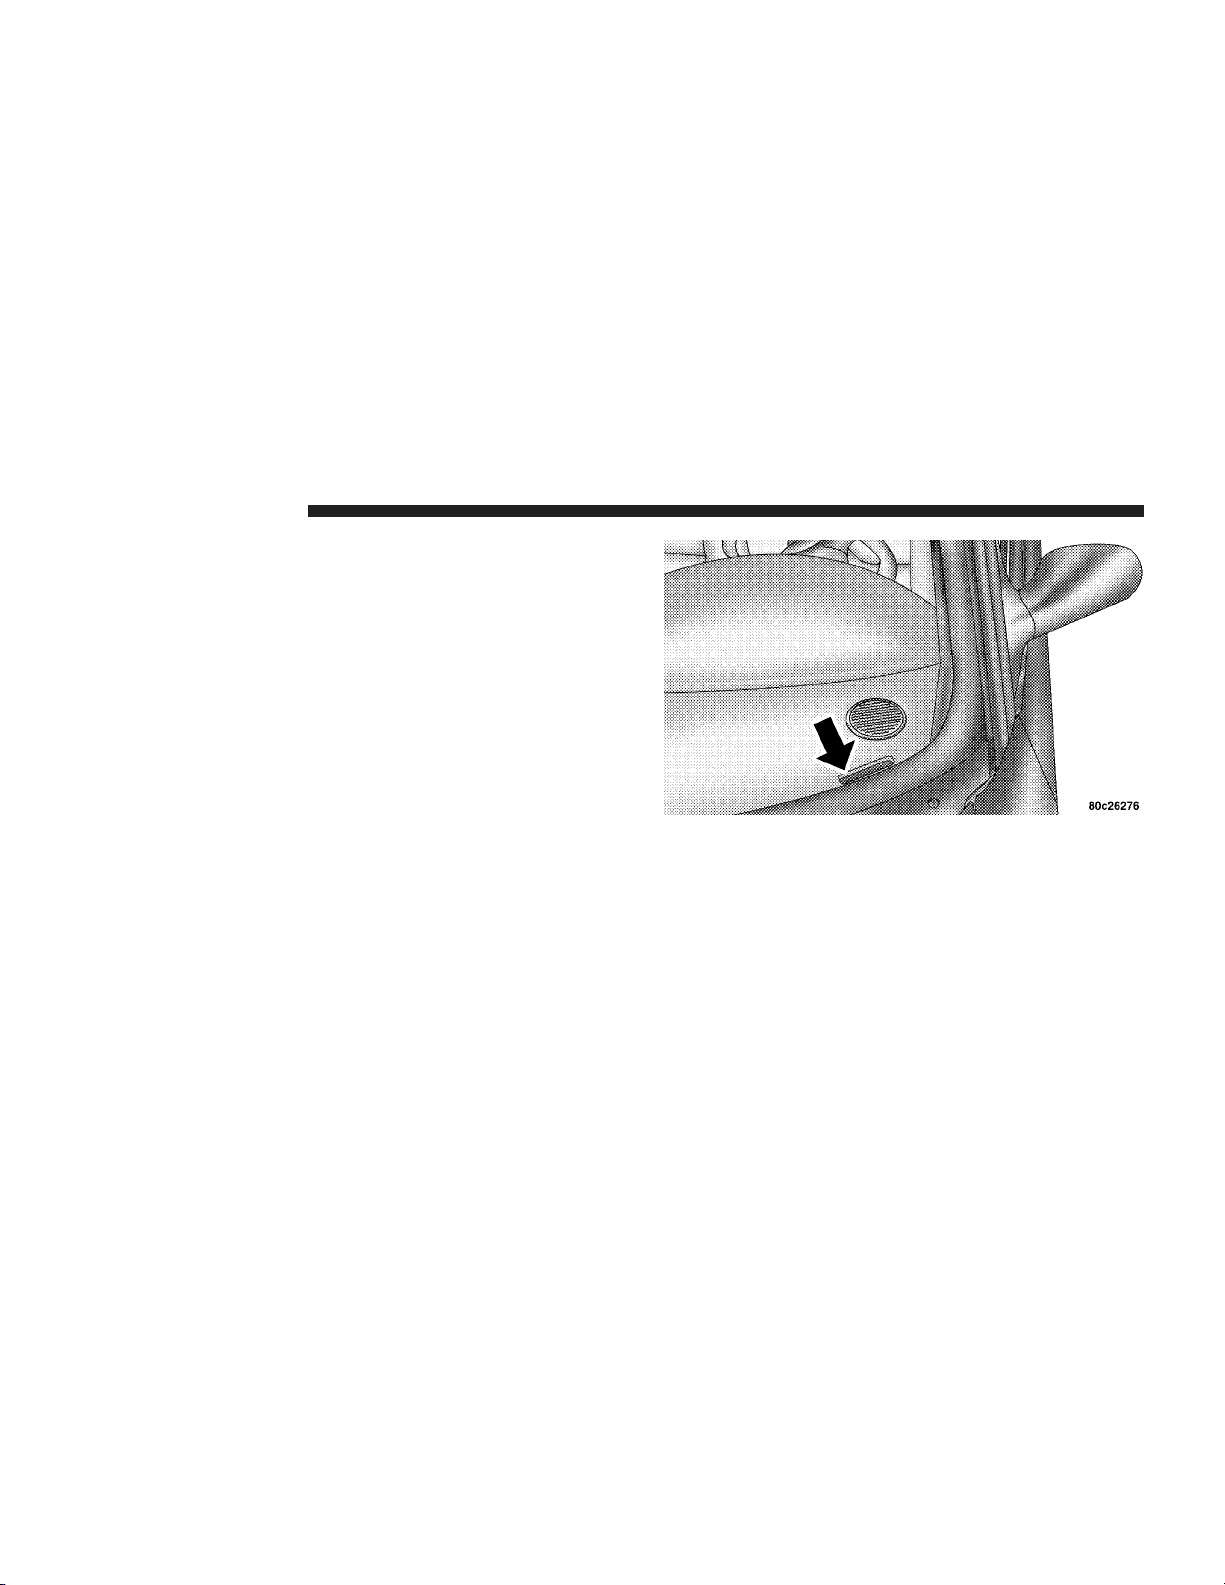
Trunk Internal Emergency Release
NOTE:
As a security measure, a Trunk Internal Emergency Release lever is built into the trunk latching
mechanism. In the event of an individual being locked
inside the trunk, the trunk can be simply opened by
pulling on the glow-in-the-dark handle attached to the
trunk latching mechanism. See picture.
POWER WINDOWS
The window controls on the driver’s door operate all
windows.
The driver’s window switch has an Auto Down feature.
Press the window switch past the detent, release, and the
window will go down automatically.
To open the window part way, pull the window switch
part way and release it when you want the window to
stop.
THINGS TO KNOW BEFORE STARTING YOUR VEHICLE 25
Wind Buffeting
Wind buffeting can be described as the perception of
pressure on the ears or a helicopter type sound in the
ears. Your vehicle may exhibit wind buffeting with the
windows down, or in certain open or partially open
positions. This is a normal occurrence and can be minimized. If the buffeting occurs with the rear windows
open, open the front and rear windows together to
minimize the buffeting.
OCCUPANT RESTRAINTS
Some of the most important safety features in your
vehicle are the restraint systems. These include the front
and rear seat belts for the driver and all passengers, front
airbags for both the driver and front passenger and, if so
equipped, left and right window bags for the driver and
passengers seated next to a window. If you will be
carrying children too small for adult-size belts, your seat
belts also can be used to hold infant and child restraint
systems.
Please pay close attention to the information in this
section. It tells you how to use your restraint system
properly to keep you and your passengers as safe as
possible.
WARNING!
In a collision, you and your passengers can suffer
much greater injuries if you are not properly buckled up. You can strike the interior of your vehicle or
other passengers, or you can be thrown out of the
vehicle. Always be sure you and others in your
vehicle are buckled up properly.
Buckle up even though you are an excellent driver, even
on short trips. Someone on the road may be a poor driver
and cause a collision which includes you. This can
happen far away from home or on your own street.
2

26 THINGS TO KNOW BEFORE STARTING YOUR VEHICLE
Research has shown that seat belts save lives, and they
can reduce the seriousness of injuries in a collision. Some
of the worst injuries happen when people are thrown
from the vehicle. Seat belts reduce the possibility of
ejection and the risk of injury caused by striking the
inside of the vehicle. Everyone in a motor vehicle should
be belted at all times.
Lap/Shoulder Belts
All seating positions in your vehicle are equipped with
Lap/Shoulder Belts.
The belt webbing retractor is designed to lock during
very sudden stops or impacts. This feature allows the
shoulder part of the belt to move freely with you under
normal conditions. But in a collision, the belt will lock
and reduce your risk of striking the inside of the vehicle
or being thrown out.
WARNING!
•
Wearing a seat belt incorrectly is dangerous. Seat
belts are designed to go around the large bones of
your body. These are the strongest parts of your
body and can take the forces of a collision the
best. Wearing your belt in the wrong place could
make your injuries in a collision much worse. You
might suffer internal injuries, or you could even
slide out of part of the belt. Follow these instructions to wear your seat belt safely and to keep
your passengers safe, too.
•
Two people should never be belted into a single
seat belt. People belted together can crash into one
another in an accident, hurting one another badly.
Never use a lap/shoulder belt or a lap belt for
more than one person, no matter what their size.
THINGS TO KNOW BEFORE STARTING YOUR VEHICLE 27
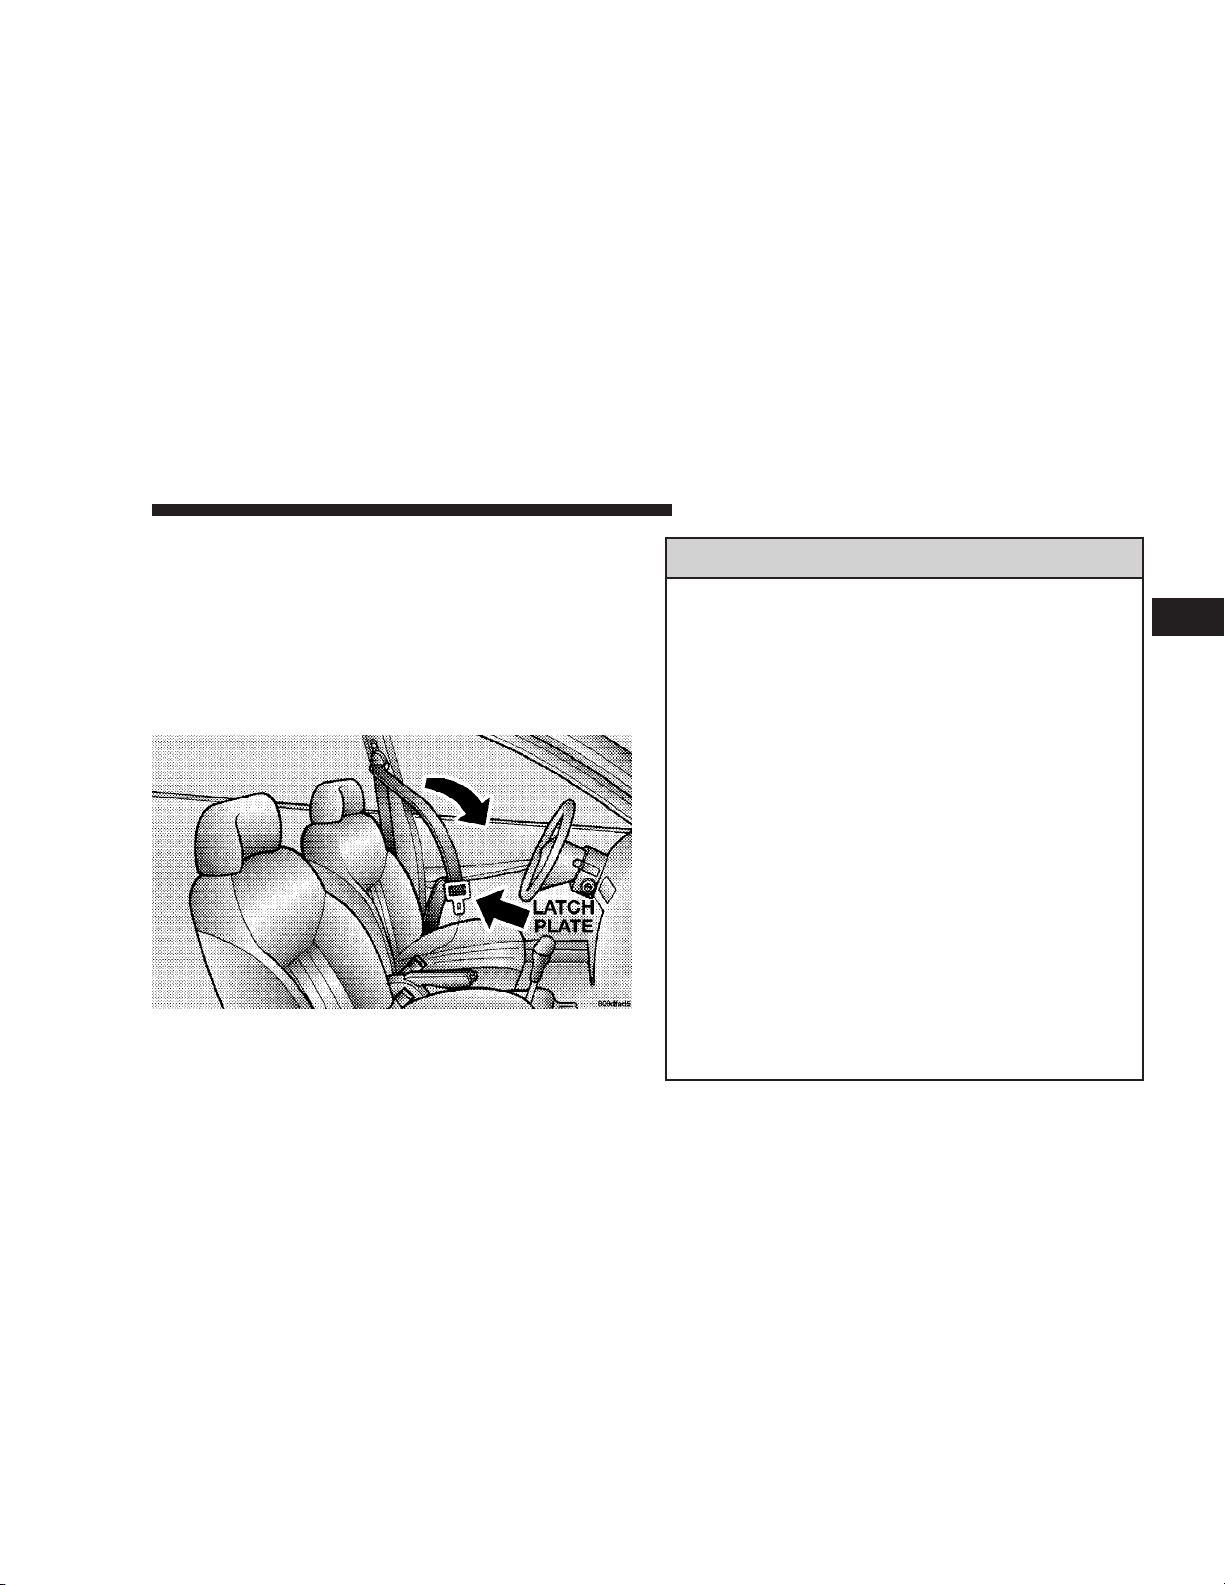
Lap/Shoulder Belt Operating Instructions
1. Enter the vehicle and close the door. Sit back and
adjust the front seat.
2. The seat belt latch plate is above the back of your seat.
Grasp the latch plate and pull out the belt. Slide the latch
plate up the webbing as far as necessary to make the belt
go around your lap.
3. When the belt is long enough to fit, insert the latch
plate into the buckle until you hear a “click.”
WARNING!
• A belt that is buckled into the wrong buckle will
not protect you properly. The lap portion could ride
too high on your body, possibly causing internal
injuries. Always buckle your belt into the buckle
nearest you.
• Abelt that is too loose will not protect you as well.
In a sudden stop you could move too far forward,
increasing the possibility of injury. Wear your seat
belt snugly.
• A belt that is worn under your arm is very
dangerous. Your body could strike the inside surfaces of the vehicle in a collision, increasing head
and neck injury. A belt worn under the arm can cause
internal injuries. Ribs aren’t as strong as shoulder
bones. Wear the belt over your shoulder so that your
strongest bones will take the force in a collision.
• Ashoulder belt placed behind you will not protect
you from injury during a collision. You are more
likely to hit your head in a collision if you do not
wear your shoulder belt. The lap and shoulder belt
are meant to be used together.
2

28 THINGS TO KNOW BEFORE STARTING YOUR VEHICLE
4. Position the lap belt across your thighs, below your
abdomen. To remove slack in the lap belt portion, pull up
a bit on the shoulder belt. To loosen the lap belt if it is too
tight, tilt the latch plate and pull on the lap belt. A snug
belt reduces the risk of sliding under the belt in a
collision.
WARNING!
• A lap belt worn too high can increase the risk of
internal injury in a collision. The belt forces won’t
be at the strong hip and pelvic bones, but across your
abdomen. Always wear the lap belt as low as possible and keep it snug.
• Atwisted belt can’t do its job as well. In a collision
it could even cut into you. Be sure the belt is straight.
If you can’t straighten a belt in your vehicle, take it
to your dealer and have it fixed.
5. Position the shoulder belt on your chest so that it is
comfortable and not resting on your neck. The retractor
will withdraw any slack in the belt.
6. To release the belt, push the red button on the buckle.
The belt will automatically retract to its stowed position.
If necessary, slide the latch plate down the webbing to
allow the belt to retract fully.
WARNING!
A frayed or torn belt could rip apart in a collision
and leave you with no protection. Inspect the belt
system periodically, checking for cuts, frays, or loose
parts. Damaged parts must be replaced immediately.
Do not disassemble or modify the system. Seat belt
assemblies must be replaced after a collision if they
have been damaged (bent retractor, torn webbing,
etc.).
THINGS TO KNOW BEFORE STARTING YOUR VEHICLE 29
2
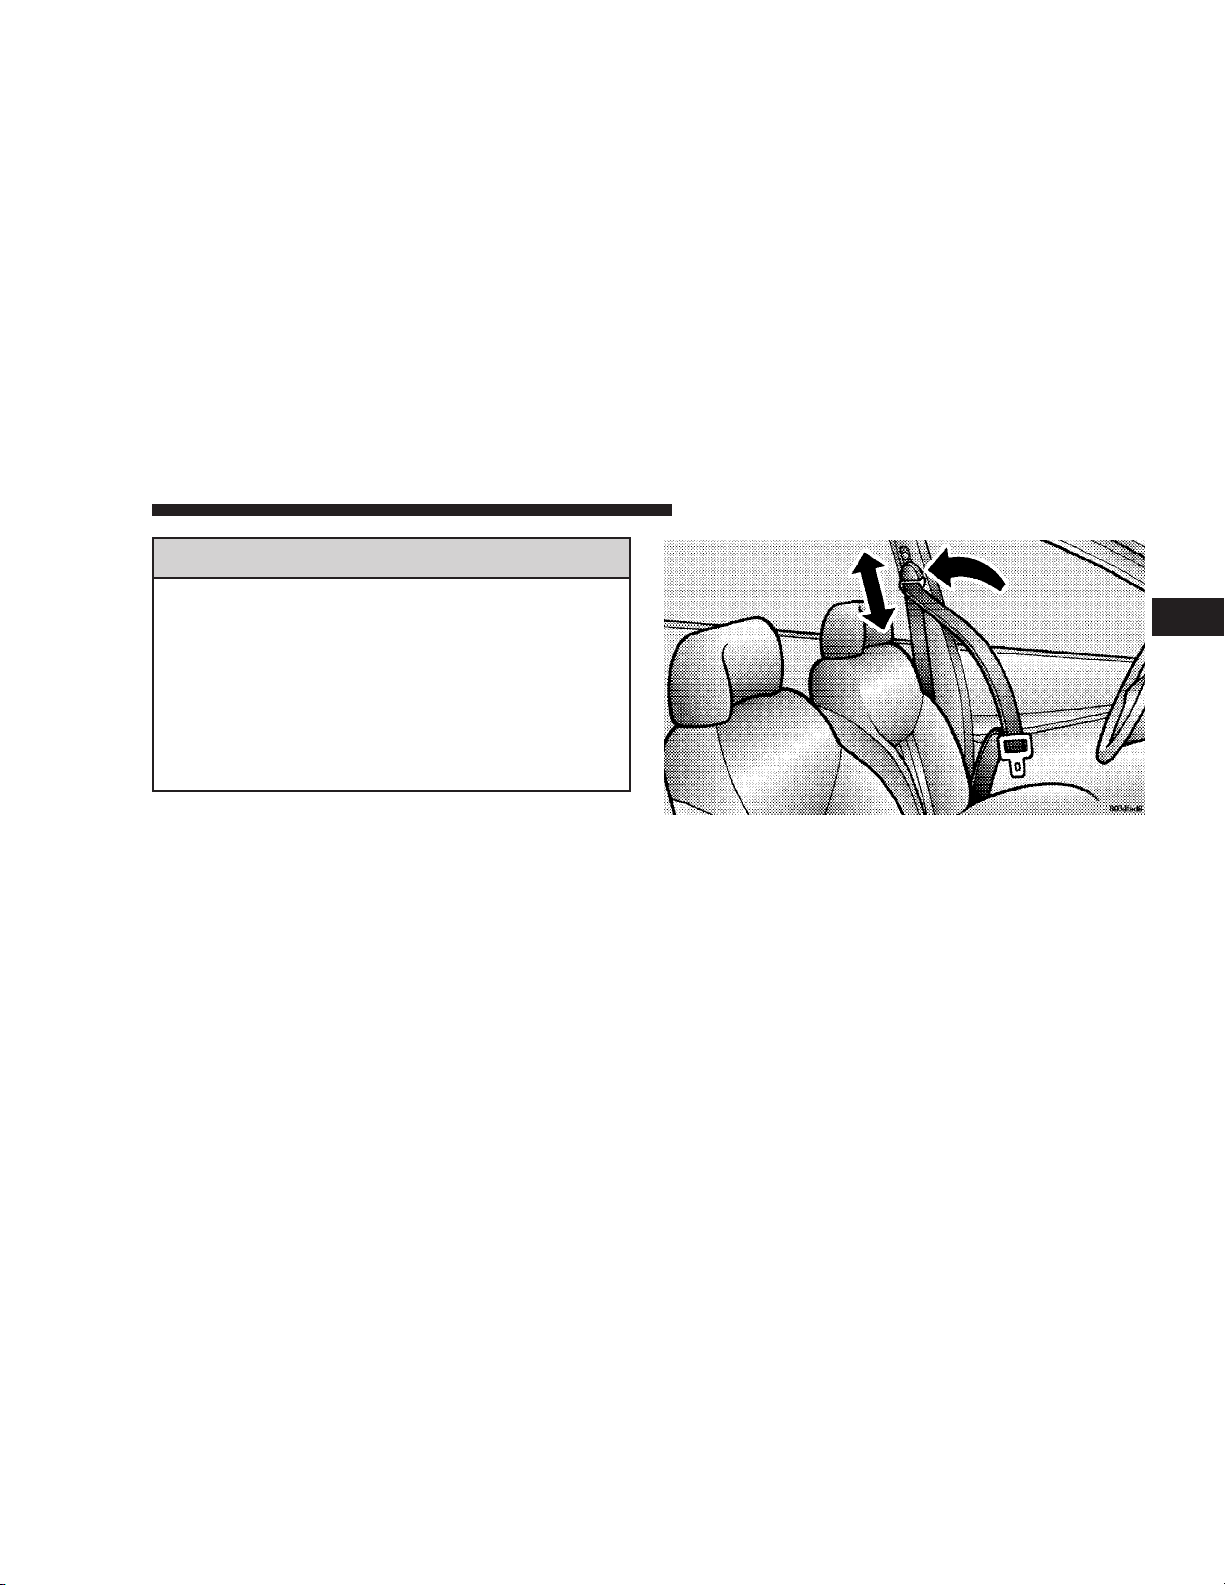
Adjustable Upper Shoulder Belt Anchorage
In the driver and front passenger seats, the shoulder belt
can be adjusted upward or downward to position the belt
away from your neck. Push the lever above the webbing
upward to release the anchorage, and then move it up or
down to the position that serves you best.
As a guide, if you are shorter than average, you will
prefer a lower position, and if you are taller than average,
you’ll prefer a higher position. When you release the
anchorage, try to move it up or down to make sure that
it is locked in position.
In the rear seat, move toward the center of the seat to
position the belt away from your neck.

30 THINGS TO KNOW BEFORE STARTING YOUR VEHICLE
Pretensioners
The seat belts for both front seating positions are
equipped with pretensioning devices that are designed to
remove any slack from the seat belts in the event of a
collision. These devices improve the performance of the
seat belt system by assuring that the belt is tight about the
occupant early in a collision. Pretensioners work for all
size occupants, including those in child restraints.
NOTE:
These devices are not a substitute for proper
seat belt placement by the occupant. The seat belt still
must be worn snugly and positioned properly.
The pretensioners are triggered by the front airbag control module (see Airbag Section). Like the front airbags,
the pretensioners are single use items. After a collision
that is severe enough to deploy the airbags and pretensioners, both must be replaced.
Enhanced Driver Seat Belt Reminder System
(BeltAlert)
If the driver’s seat belt has not been buckled within 60
seconds of starting the vehicle and if the vehicle speed is
greater than 5 mph (8 km/h), the Enhanced Warning
System (BeltAlert) will alert the driver to buckle their seat
belt. The driver should also instruct all other occupants to
buckle their seat belts. Once the warning is triggered, the
Enhanced Warning System (BeltAlert) will continue to
chime and flash the Seat Belt Warning Light for 96
seconds or until the driver’s seat belt is buckled. The
Enhanced Warning System (BeltAlert) will be reactivated
if the driver’s seat belt is unbuckled for more than 10
seconds and the vehicle speed is greater than 5 mph (8
km/h).
The Enhanced Warning System (BeltAlert) can be enabled or disabled by your authorized dealer or by
following these steps:
NOTE:
The following steps must occur within the first
60 seconds of the ignition switch being turned to the ON
or START position. DaimlerChrysler does not recommend deactivating the Enhanced Warning System
(BeltAlert).
1. Turn the ignition switch to the OFF position and
buckle the driver’s seat belt.
2. Start the engine and wait for the Seat Belt Warning
Light to turn off.
 Loading...