


 Loading...
E
DATA PROJECTOR
XJ-H1600/XJ-H1650* XJ-ST145*/XJ-ST155*
* USB Port Models
User’s Guide
zBe sure to read the precautions in the separate Setup Guide. For details about setting up the projector, see the Setup Guide.
zBe sure to keep all user documentation handy for future reference.

z DLP is a registered trademark of Texas Instruments of the United States.
z Microsoft, Windows, and Windows Vista are registered trademarks or trademarks of Microsoft Corporation in the United States and other countries.
zHDMI, the HDMI Logo and High-Definition Multimedia Interface are trademarks or registered trademarks of HDMI Licensing, LLC.
zXGA is a registered trademark of IBM Corporation of the United States.
zPJLink is a trademark applied for registration or is already registered in Japan, the United States of America and other countries and areas.
zCrestron is a registered trademark of Crestron Electronics, Inc. of the United States.
zAMX is a registered trademark of AMX LLC of the United States.
zOther company and product names may be registered product names or trademarks of their respective owners.
zPortions of this product are based in part on the work of the Independent JPEG Group.
zThe contents of this User’s Guide are subject to change without notice.
zCopying of this manual, either in part or its entirety is forbidden. You are allowed to use this manual for your own personal use. Any other use is forbidden without the permission of CASIO COMPUTER CO., LTD.
zCASIO COMPUTER CO., LTD. shall not be held liable for any lost profits or claims from third parties arising out of the use of this product or this manual.
zCASIO COMPUTER CO., LTD. shall not be held liable for any loss or lost profits due to loss of data due to malfunction or maintenance of this product, or any other reason.
zThe sample screens shown in this manual are for illustrative purposes only, and may not be exactly the same as the screens actually produced by the product.
zUnless specifically stated otherwise, all illustrations in this manual show the XJ-H1650.
2

Contents |
|
About this manual... ............................................................................... |
5 |
Projector Overview ......................................................... |
6 |
Projector Features and Main Functions ................................................. |
6 |
Remote Controller and Projector Keys................................................... |
8 |
Back Terminals....................................................................................... |
9 |
Operation During Projection ........................................ |
10 |
Selecting the Input Source ................................................................... |
10 |
To select a different input source .............................................................................. |
10 |
3D Input Mode ........................................................................................................... |
11 |
Horizontal Flipping in the 3D Input Mode .................................................................. |
12 |
Image Operations During Projection .................................................... |
13 |
Adjusting Image Brightness....................................................................................... |
13 |
Selecting the Color Mode .......................................................................................... |
14 |
Zooming an Image ..................................................................................................... |
14 |
Momentarily Cutting Off the Input Source Image ...................................................... |
15 |
Freezing an Image...................................................................................................... |
15 |
Displaying a Pointer in the Projected Image.............................................................. |
16 |
Changing the aspect ratio of the projected image .................................................... |
17 |
Adjusting the Volume Level .................................................................. |
18 |
To adjust the volume level ......................................................................................... |
18 |
To mute the audio...................................................................................................... |
18 |
Eco Mode (Power Saving, Low Noise) ................................................. |
19 |
To select the Eco Mode............................................................................................. |
19 |
Using the [FUNC] Key .......................................................................... |
20 |
3
Configuring Advanced Projector Settings.................. |
21 |
Basic Setup Menu Operations ............................................................. |
21 |
Displaying the Setup Menu........................................................................................ |
21 |
Configuring Setup Menu Settings.............................................................................. |
21 |
Basic Setup Menu Example....................................................................................... |
22 |
Direct Power On......................................................................................................... |
23 |
Password Protecting the Projector ...................................................... |
24 |
Inputting a Password ................................................................................................. |
24 |
Using the Password Feature...................................................................................... |
24 |
Entering the Password when Turning On the Projector ............................................ |
26 |
Restoring Projector Settings to Their Initial Factory Defaults .............. |
27 |
Setup Menu Contents .......................................................................... |
29 |
Image Adjustment 1 Main Menu................................................................................ |
29 |
Image Adjustment 2 Main Menu................................................................................ |
31 |
Volume Adjustment Main Menu................................................................................. |
31 |
Screen Settings Main Menu....................................................................................... |
32 |
Input Settings Main Menu.......................................................................................... |
34 |
Option Settings 1 Main Menu .................................................................................... |
35 |
Option Settings 2 Main Menu .................................................................................... |
36 |
Wired LAN Settings Main Menu (USB Port Models Only) ......................................... |
38 |
USB Settings Main Menu (USB Port Models Only) ................................................... |
38 |
Operational Info Main Menu ...................................................................................... |
39 |
Restore All Defaults Main Menu................................................................................. |
39 |
Cleaning the Projector.................................................. |
40 |
Cleaning the Projector Exterior ............................................................ |
40 |
Cleaning the Lens................................................................................. |
40 |
Cleaning the Vents ............................................................................... |
40 |
Error Indicators and Warning Messages .................... |
41 |
4

Appendix ........................................................................ |
44 |
Connecting to a Video Device.............................................................. |
44 |
Connection to a composite video output or S-video output ..................................... |
44 |
Connection to a component video output ................................................................. |
45 |
Connecting the HDMI Output of a Video Device or Computer to the |
|
Projector ............................................................................................... |
46 |
Remote Controller Signal Range.......................................................... |
47 |
Hanging the Projector from a Ceiling ................................................... |
48 |
Projection Distance and Screen Size ................................................... |
49 |
Aspect Ratio Setting and Projection Image ......................................... |
50 |
Supported Signals................................................................................ |
52 |
Using Wired LAN to Control the Projector |
|
(XJ-H1650, XJ-ST145, XJ-ST155) ........................................................ |
55 |
Supported External Devices ...................................................................................... |
55 |
Controlling the Projector from a Computer ............................................................... |
55 |
Projector RS-232C Control .................................................................. |
60 |
Connecting the Projector to a Computer................................................................... |
60 |
Specifications ....................................................................................... |
63 |
About this manual...
All of the operations in this manual are explained using the remote controller that comes with the projector.
5

Projector Overview
This section describes the features of the projector, and explains the functions of the projector and remote controller keys.
Projector Features and Main Functions
XJ-H1600/XJ-H1650/XJ-ST145/XJ-ST155
zMercury-free Hybrid Light Source:
A CASIO-original laser and LED hybrid light source delivers high luminance from 2500 to 3500 lumens. This projector does not use a mercury lamp, making it environmentally friendly.
zA wide selection of input sources:
Analog RGB, composite video, S-video, component video (Y·Cb·Cr, Y·Pb·Pr), and HDMI input sources are supported.
zIntelligent Brightness Control function (Eco Mode):
The projector senses surrounding light levels and adjusts projection brightness automatically as required for efficient low-power operation. (Requires “Eco Mode” setting to be set to “On (Auto)”.)
z3D image projection support:
Projection of a 3D image signal (60Hz/120Hz field sequential protocol) via one of three input sources (analog RGB, composite video, S-video) is supported.
*Separately available 3D glasses (YA-G30) are required in order to view a projected 3D image in 3D. Also, separately available special software (CASIO 3D Converter) is required to project a 3D image with the projector when a computer (analog RGB) is the input source.
zPointer:
The remote controller can be used to select one of a variety of different pointers for use during projection.
zDirect Power On:
The projector can be configured to turn on automatically and start projecting as soon as it is plugged into a power outlet.
6
XJ-H1650/XJ-ST145/XJ-ST155
z Projection of Data from USB Memory or a Memory Card without a Computer:
USB memory or a memory card (using a commercially available USB card reader) can be connected directly to the projector’s USB-A port. The projector comes with special software for converting PowerPoint presentation data to a format that can be stored to USB memory or a memory card and projected without using a computer. Images and movies also can be projected directly from USB memory or a memory card.
z Interactive Pointing Function:
You can use a separately available interactive pointer (YA-P10) to draw lines and figures directly on an image being projected by the projector from a connected computer. You can also use the pointer to perform mouse operations.
zMulti Projection Camera (YC-400, YC-430) Connection:
A CASIO Multi Projection Camera can be connected directly to the projector’s USB-A port for fine resolution projection of documents and other images. Document camera capabilities allow projection of data without going through a computer.
zGraphic Scientific Function Calculator Connection:
Certain CASIO graphic scientific calculator models can be connected directly to the projector’s USB-A port for projection of the calculator screen contents.
zProjection of Computer Screen Contents via Wireless LAN:
The projector comes with a wireless LAN adapter. After a wireless LAN connection is established, the contents of the computer screen can be sent to the projector for projection.
zSupport for Wireless projection from MobiShow:
You can install AWIND’s MobiShow (client software for wireless connection to a projector) on a smartphone or mobile terminal, and then use the projector to project photographs and presentation files stored in the smartphone or terminal memory.
*Note that the type of terminal and the MobiShow version can limit certain functions or can even make projection impossible.
zProjector operation via wired or wireless LAN:
Remote control of the projector is supported via a wired connection to the LAN port on the back or the projector or via wireless LAN.
7
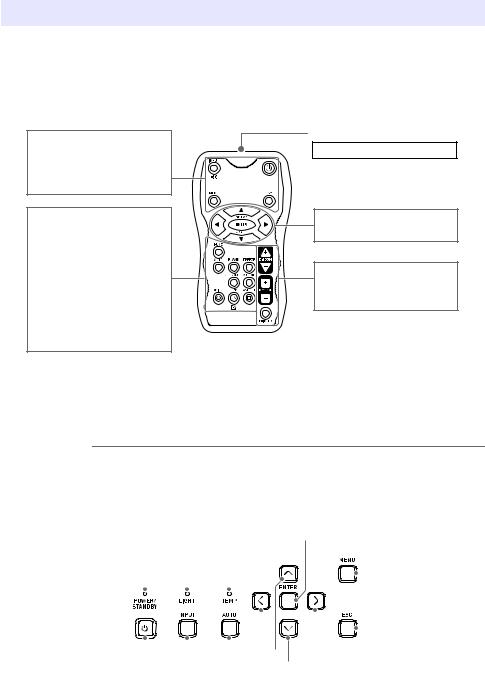
Remote Controller and Projector Keys
Operations in this manual are presented based on the remote controller that comes with the projector. Major operation keys are also provided on the projector unit, so the most of the same procedures can also be performed directly on the projector.
Remote Controller Keys
[INPUT] key [MENU] key [P] (Power) key [ESC] key
[FUNC] key [AUTO] key [BLANK] key [FREEZE] key
[COLOR MODE] key [VOLUME] key [BRIGHT] key ([O] key) [ECO] key ([f] key) [ASPECT] key ([Z] key)
Remote control signal emitter
CLASS 1 LED PRODUCT
Cursor keys (S/T/W/X) [ENTER] key ([STYLE] key)
[D-ZOOM +] [D-ZOOM –] keys [KEYSTONE +] [KEYSTONE –] keys [POINTER] key
The remote controller does not come with batteries loaded. You need to load the two supplied batteries before use.
 Important!
To avoid running down the batteries, store the remote control unit so its keys are not pressed inadvertently.
Projector Keys and Indicators
|
|
TEMP indicator |
[ENTER] key |
|||
|
LIGHT indicator |
|
[MENU] key |
|||
|
|
|
|
|
|
|
POWER/STANDBY indicator |
|
|
|
|
|
|
|
|
|
|
|
|
|
|
|
|
|
|
|
|
|
|
|
|
|
|
|
|
|
|
|
|
|
|
|
|
|
|
|
|
|
|
|
|
|
|
|
|
|
|
|
|
|
|
|
|
|
|
|
|
[P] (Power) key |
|
|
|
|
[ESC] key |
|||||
|
[INPUT] |
key |
|
|
Cursor keys (q/w/U/I) |
|||||
|
|
|
|
|
[AUTO] |
key |
||||
8

Back Terminals
1 2 3 4 5 6
7 8 9 bkblbm bn bo bp bq br
1 USB-A port (XJ-H1650/XJ-ST145/XJ-ST155 only) 2 LAN port (XJ-H1650/XJ-ST145/XJ-ST155 only) 3 HDMI port
4 MONITOR OUT terminal
5 COMPUTER IN 1 terminal
6 COMPUTER IN 2 terminal
7 Remote control signal receiver
8 Power connector
9 SERIAL port*1
bk AUDIO OUT terminal bl Anti-theft lock hole bm AUDIO IN 1 terminal bn AUDIO IN 2 terminal
bo AUDIO IN L/R terminals bp VIDEO terminal
bq S-VIDEO terminal
br USB-B port*2 (XJ-H1650/XJ-ST145/XJ-ST155 only)
*1 This terminal is for controlling the projector from an external device. It normally is not used. For information about using control commands and other details, See “Projector RS-232C Control” (page 60).
*2 This port is for USB connection between the projector and a computer when using the optionally available interactive pointer (YA-P10).
9

Operation During Projection
Selecting the Input Source
Turning on the projector initially causes the same input source that was selected the last time it was turned off to be selected.
To select a different input source
1. Press the [INPUT] key.
z This displays the input source selection screen.
2. Select either the Normal Input Mode or 3D Input Mode depending on the type of image you want to project.
z For details about the 3D Input Mode, see the explanation in the following section.
3. Use the [T] and [S] keys to select the name of the input source you want to select and then press the [ENTER] key.
z The name of the input source you select appears in the upper right corner of the projection screen for a few seconds.
z The message “No signal input.” will appear if no input signal can be selected.
 Note
Note
The table below shows how the input source selection affects the projector’s MONITOR OUT terminal and speaker (or AUDIO OUT terminal)*1 output signals.
When this input source is |
The video input signal from this |
The audio input signal from this |
|
terminal is output to the |
terminal is output to the speaker |
||
selected: |
|||
MONITOR OUT terminal: |
(or AUDIO OUT terminal): |
||
|
|||
|
|
|
|
Computer 1 |
COMPUTER IN 1*2 |
AUDIO IN 1 |
|
Computer 2 |
COMPUTER IN 2*2 |
AUDIO IN 2 |
|
S-video |
*2 *3 |
AUDIO IN L/R |
|
|
|
|
|
Video |
*2 *3 |
AUDIO IN L/R |
|
|
|
|
|
HDMI |
*2 *3 |
HDMI |
|
|
|
|
|
USB |
*2 *3 |
USB |
|
|
|
|
*1 Audio is output from either the speaker or AUDIO OUT terminal in accordance with the setup menu “Option Settings 2 J Audio Output” setting.
*2 Output is proper only when the input signal is an RGB signal. Output is not guaranteed when the input signal is a component signal.
*3 The video input signal is output from either Computer 1 or Computer 2, in accordance with the last selected input source (COMPUTER IN 1 terminal or COMPUTER IN 2 terminal). For example, even if the input source is switched from Computer 1 to S-video, the MONITOR OUT terminal continues output the video input signal from COMPUTER IN 1.
10
3D Input Mode
Your projector supports projection of 3D images. To project a 3D image, first enter the projector’s 3D input mode, and then select the input source.
 Important!
zSeparately available 3D glasses (YA-G30) are required in order to view a projected 3D image in 3D.
zSeparately available special software (CASIO 3D Converter) is required to project a 3D image with the projector when a computer (analog RGB) is the input source.
The input sources described below can be selected for projection in the 3D Input Mode.
Input Source |
Projection Conditions |
Computer (Analog RGB) |
z Any of the following types of 3D image data played back using separately available |
|
special software (CASIO 3D Converter). |
|
– 2D image file converted to a 3D image file using CASIO 3D Converter |
|
– Side-by-side 3D format files |
|
z Signal with 60Hz/120Hz vertical scan frequency |
|
|
Composite Video, S-video |
z Field sequential 3D format files recorded with field sequential DVD software, etc. |
|
z Signal with 60Hz vertical scan frequency |
|
|
 Note
Note
See “3D Signals (3D Input Mode)” (page 54) for a list of 3D image signals supported by this projector.
Entering the 3D Input Mode
1. Press the [INPUT] key to display the input source selection screen.
2. Select Computer 1 (RGB), Computer 2 (RGB), S-video, or Video as the input source.
3. Use the [T] and [S] keys to move the highlighting to “To 3D input mode” and then press the [ENTER] key.
z This enters the 3D input mode and closes the input source selection screen.
 Important!
z You cannot select HDMI or USB as the input source in the 3D input mode. To use either of these input sources, change the input source setting back to normal input mode.
z When Computer 1 (or Computer 2) is selected as the input source in the 3D input mode, a component video signal input through the projector’s COMPUTER IN 1 (or COMPUTER IN 2) terminal is treated as an RGB signal resulting in abnormal image projection.
z Except when using the projector for 3D image projection, you should normally leave it in the normal input mode.
11
Returning to the Normal Input Mode from the 3D Input Mode
1. Press the [INPUT] key to display the input source selection screen.
2. Use the [T] and [S] keys to move the highlighting to “To normal input mode” and then press the [ENTER] key.
z This enters the normal input mode and closes the input source selection screen.
Horizontal Flipping in the 3D Input Mode
In side-by-side 3D, a full frame consists of two halves on the left and right for each eye. In rare cases, the left and right images may be reversed, which causes a loss of 3D depth. If this happens, try using the following procedure to swap the left and right images with each other.
To swap the left and right images
In the 3D input mode, press the [ENTER] key.
12
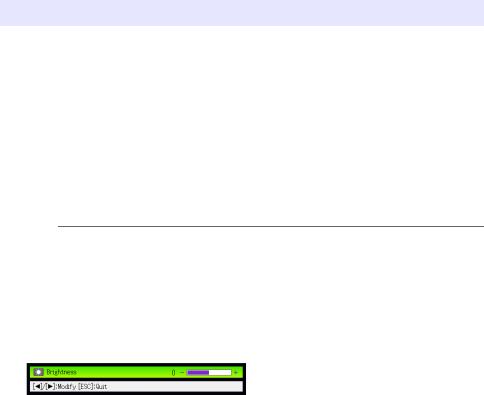
Image Operations During Projection
You can perform the following operations while projecting an image. z Image brightness adjustment
z Color mode selection z Image zooming
z Momentary cut off of the input source image and projection of a black or blue screen, or a logo z Image freeze
z Pointer display in the projected image z Aspect ratio switching
Adjusting Image Brightness
 Note
Note
(for USB port model users)
Use the setup menu (page 21) to adjust image brightness when the input source is an external device connected to the USB-A port.
To adjust image brightness
1.
2.
Press the [BRIGHT] key.
z This displays the brightness adjustment window.
Use the [W] and [X] keys to adjust image brightness.
3. To hide the window, press the [ESC] key.
13

Selecting the Color Mode
You can select from among various different color mode settings in accordance with image contents and projection conditions.
 Important!
z The color mode cannot be selected in the following cases. z When “Off” is selected for the Eco Mode setting (page 19)
z When the projector is in the 3D input mode. See “3D Input Mode” (page 11).
z The color mode cannot be selected while “On” is selected for the setup menu “Option Settings 2 J Interactive Pointer” setting. Though the color mode change operation may be possible on some projector models, doing so may cause problems with the optional interactive pointer (YA-P10) in some color modes.
To change the color mode
1. Press the [COLOR MODE] key.
z This displays the color mode selection window. The currently selected color mode is the one whose button is selected (filled in).
2. Use the [T] and [S] keys to move the highlighting to the color mode you want to select, and then press the [ENTER] key.
z This will select the button next to the highlighted color mode name.
z For details on what each color mode does, see “Color Mode” under “Image Adjustment 1 Main Menu” on page 30.
3. To hide the window, press the [ESC] key.
Zooming an Image
1. Press the [D-ZOOM +] key.
z This will enlarge the center of the projected image one step.
2. To zoom in on the center of the projected image more, press the [D-ZOOM +] key again. To zoom out, press the [D-ZOOM –] key.
zEach press of [D-ZOOM +] zooms in (increases the zoom factor), while [D-ZOOM –] zooms out. Holding down either key continuously scrolls the zoom factor.
3.While an image is zoomed, use the [S], [T], [W], and [X] keys to scroll the view to other parts of the image.
4.To exit the zoom operation, press the [ESC] key.
14

Momentarily Cutting Off the Input Source Image
1. Press the [BLANK] key.
z This temporarily cuts off the image from the input source and projects a black screen in its place.
2. To resume projection of the image from the input source, press the [BLANK] key (or [ESC] key).
 Note
Note
You can specify projection of a black screen or blue screen, or a logo. For details, see “Blank Screen” under “Screen Settings Main Menu” on page 33.
Freezing an Image
Pressing the [FREEZE] key freezes the projected image.
To freeze the projected image
1. While an image is being projected from an input source, press the [FREEZE] key.
zThis will capture the image that is on the screen at the moment you press [FREEZE] and stores it in projector memory. That image remains projected on the screen.
2.To restore projection of the image from an input source, press the [ESC] key.
15
Displaying a Pointer in the Projected Image
You can select from among different pointer styles, including various arrow styles, for display in the projected image. Pointers can be used during a presentation to indicate or highlight a specific part of the image.
 Note
Note
Depending on the pointer style you are using, the pointer may not display properly when you are using keystone correction. If this happens, use the [KEYSTONE +] and [KEYSTONE –] keys to change the keystone correction value to zero.
To display a pointer in the image
1. Press the [POINTER] key.
z This will cause a pointer to appear in the image.
zYou also can use the setup menu to specify the pointer type that appears first when you press the [POINTER] key. For details, see “Pointer” under “Option Settings 2 Main Menu” on
page 36.
2.Use the cursor keys to move the pointer to the location you want.
zHolding down a cursor key moves the cursor at high speed.
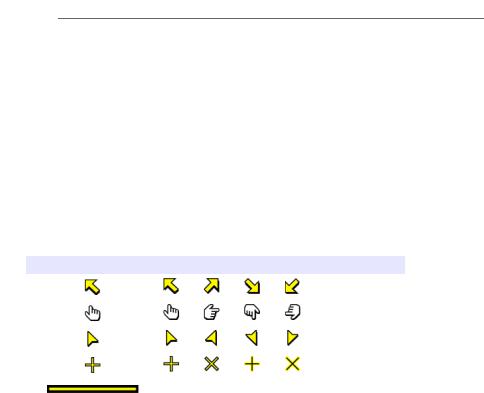
3.To modify the pointer as described below, press the [STYLE] key.
For this pointer type: |
Pressing [STYLE] will change it like this: |
||
|
|
|
|
|
J |
J |
J |
|
|
|
|
|
J |
J |
J |
|
|
|
|
|
J |
J |
J |
|
|
|
|
|
J |
J |
J |
|
|
||
|
Toggle between flashing and not flashing |
||
|
|
|
|
To select the pointer type
1.
2.
Press the [POINTER] key to display the pointer.
Keep pressing the [POINTER] key until the pointer you want is displayed. z Each press of the [POINTER] key cycles through the available pointer types.
To clear the pointer from the image
Press the [ESC] key.
16

Changing the aspect ratio of the projected image
Press the [ASPECT] key to cycle through the aspect ratio settings for the projected image.
Available settings are as shown below. For details about the meaning of each setting, see the “Aspect Ratio” setting under “Screen Settings Main Menu” on page 32.
Input Source |
Pressing [ASPECT] will toggle between these settings: |
Video, S-video, Component, HDMI (DTV) |
Normal 16:9 |
|
|
RGB, HDMI (PC) |
Normal Full |
|
|
 Note
Note
z When the input source is a component or an HDMI (DTV) signal with an aspect ratio of 16:9, the aspect ratio is fixed at 16:9. In this case, pressing the [ASPECT] key will not change the aspect ratio setting.
z For details about how the aspect ratio setting affects the projected image, see “Aspect Ratio Setting and Projection Image” (page 50).
z You also can change the aspect ratio setting using the setup menu. For details, see “Aspect Ratio” under “Screen Settings Main Menu” on page 32.
 Important!
Note that enlarging or reducing the size of an image using the [ASPECT] key for commercial purposes or public presentation may infringe on the legally protected copyright of the copyright holder of the original material.
17
Adjusting the Volume Level
You can use the remote controller keys to adjust the volume level of the audio that is output from the projector’s speaker.
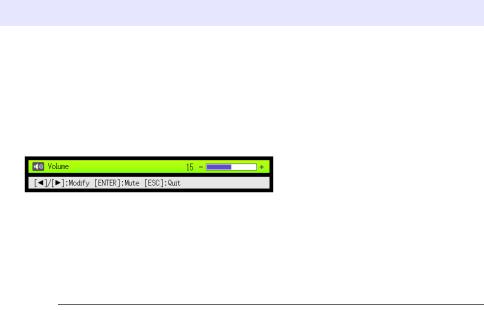
To adjust the volume level
1.
2.
Press the [VOLUME] key.
z This causes the [Volume] screen to appear on the projected image.
Press the [X] key to increase the volume, or the [W] key to lower the volume.
3. After the setting is the way you want, press the [ESC] key. z This causes the [Volume] screen to disappear.
 Note
Note
You also can use the setup menu to adjust the volume level. For details, see “Volume Adjustment Main Menu” on page 31.
To mute the audio
1.
2.
Press the [VOLUME] key.
Press the [ENTER] key.
z This stops output from the speaker.
3. To restore the audio, press the [VOLUME] key again.
18
Eco Mode (Power Saving, Low Noise)
The following three Eco Mode settings are available to specify whether priority should be given to low-power, low-noise operation or to projection brightness.
On (Auto) : A brightness sensor on the top of the projector senses surrounding light, and automatically adjusts projection brightness and color accordingly. Brightness is reduced for darker surroundings, which saves power and reduces operation noise.
On (Manual): Enables manual adjustment to balance the needs of low-power, quiet operation and
|
projection brightness. |
Off |
: Give top priority to projection brightness. |
 Important!
z While “On (Auto)” is selected as the Eco Mode setting, make sure that the brightness sensor on the top of the projector is not blocked by anything.
z The local environment and setup conditions affect the brightness sensor, so operation when “On (Auto)” is selected for the Eco Mode depends on these factors.
To select the Eco Mode
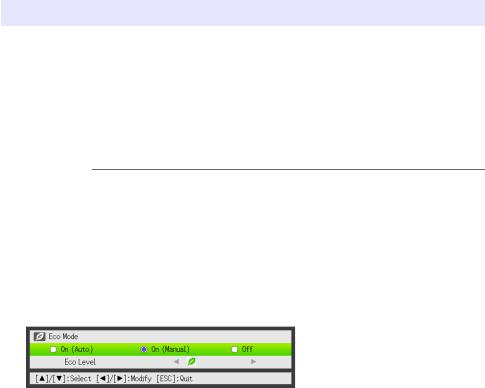
1. Press the [ECO] key.
z This causes “Eco Mode” window to appear on the projection screen.
2. Use the [W] and [X] keys to select the setting you want.
z If you select “On (Manual)” here, go to step 3. If you select another setting, jump to step 4.
3. Perform the following steps to adjust the “Eco Level” (the balance between low-power, quiet operation and projection brightness).
1 Press the [T] key to move the highlighting to the Eco Level.
2Use the [W] and [X] keys to adjust the Eco Level to the setting you want.
Fewer  marks gives higher priority to projection brightness. A greater number gives high priority to low-power, quiet operation.
4.To hide the window, press the [ESC] key.
19
 Important!
zThe Eco Mode setting automatically changes to “Off” whenever the projector is in the 3D input mode (“3D Input Mode”, page 11) or “On” is selected for the “Option Settings 2 J Interactive Pointer” setting.
zThe “On (Auto)” setting cannot be selected for the Eco Mode while “On” is selected for “Screen Settings J Ceiling Mount” on the setup menu. If the “Ceiling Mount” setting is changed to “On” while “On (Auto)” is selected for the Eco Mode setting, the Eco Mode setting will automatically change to “On (Manual)”.
zThe “On (Auto)” setting cannot be selected for the Eco Mode while “Rear” is selected for “Screen Settings J Projection Mode” on the setup menu. If the “Projection Mode” setting is changed to “Rear” while “On (Auto)” is selected for the Eco Mode setting, the Eco Mode setting will automatically change to “On (Manual)”.
 Note
Note
z While “Off” is selected for the Eco Mode setting, you also can specify whether brightness or color should be given emphasis. For details, see “Eco Off Mode” under “Image Adjustment 1 Main Menu” (page 30).
z (for USB port model users)
Use the setup menu (page 21) to select the Eco Mode when the input source is an external device connected to the USB-A port.
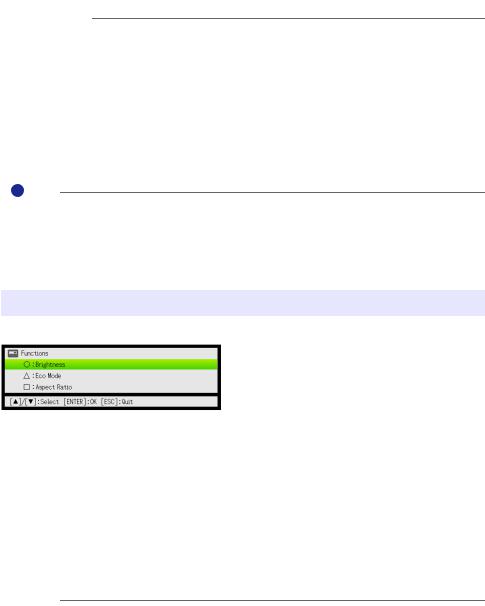
Using the [FUNC] Key
Pressing the [FUNC] key displays the menu shown below.
You can use this menu to perform the operations described below. z Adjust image brightness
Highlight “Brightness” and then press the [ENTER] key.
J This performs the same operation as pressing the [BRIGHT] key (O key) described on page 13.
z Turn the Eco Mode on or off
Highlight “Eco Mode” and then press the [ENTER] key.
J This performs the same operation as pressing the [ECO] key (f key) described on page 19.
z Select the aspect ratio of the projected image
Highlight “Aspect Ratio” and then press the [ENTER] key.
J This performs the same operation as pressing the [ASPECT] key (Z key) described on page 17.
 Note
Note
(for USB port model users)
When the input source is an external device connected to the USB-A port, use the [FUNC], [O], [f], and [Z] keys to control the connected device. For details, see the “USB Function Guide” and “Wireless Function Guide” on the bundled CD-ROM.
20
Loading...