


LK-135 |
EN/ES |
|
|
LK-136 |
|
USER’S GUIDE
Please keep all information for future reference.
Safety Precautions
Before trying to use the Digital Keyboard, be sure to read the separate “Safety Precautions”.
GUÍA DEL USUARIO
Guarde toda la información para futuras consultas.
Precauciones de seguridad
Antes de intentar usar el teclado digital, asegúrese de leer las “Precauciones de seguridad” separadas.
About Music Score data
You can use a computer to download music score data from the CASIO Website. For more information, visit the URL below.
http://world.casio.com/
Acerca de los datos de partituras
Puede utilizar un ordenador (computadora) para descargar los datos de partituras desde el sitio web de CASIO. Para obtener más información, visite la siguiente URL.
http://world.casio.com/
LK135-ES-1A
Español English
NOTICE
This equipment has been tested and found to comply with the limits for a Class B digital device, pursuant to Part 15 of the FCC Rules. These limits are designed to provide reasonable protection against harmful interference in a residential installation. This equipment generates, uses and can radiate radio frequency energy and, if not installed and used in accordance with the instructions, may cause harmful interference to radio communications. However, there is no guarantee that interference will not occur in a particular installation. If this equipment does cause harmful interference to radio or television reception, which can be determined by turning the equipment off and on, the user is encouraged to try to correct the interference by one or more of the following measures:
•Reorient or relocate the receiving antenna.
•Increase the separation between the equipment and receiver.
•Connect the equipment into an outlet on a circuit different from that to which the receiver is connected.
•Consult the dealer or an experienced radio/TV technician for help.
FCC CAUTION
Changes or modifications not expressly approved by the party responsible for compliance could void the user’s authority to operate the equipment.
Declaration of Conformity
Model Number: LK-135/LK-136
Trade Name: CASIO COMPUTER CO., LTD. Responsible party: CASIO AMERICA, INC.
Address: 570 MT. PLEASANT AVENUE, DOVER, NEW JERSEY 07801 Telephone number: 973-361-5400
This device complies with Part 15 of the FCC Rules, Operation is subject to the following two conditions:
(1) This device may not cause harmful interference, and (2) this device must accept any interference received, including interference that may cause undesired operation.
Important!
Please note the following important information before using this product.
•Before using the optional AD-E95100L Adaptor to power the unit, be sure to check the AC Adaptor for any damage first. Carefully check the power cord for breakage, cuts, exposed wire and other serious damage. Never let children use an AC adaptor that is seriously damaged.
•Never attempt to recharge batteries.
•Do not use rechargeable batteries.
•Never mix old batteries with new ones.
•Use recommended batteries or equivalent types.
•Always make sure that positive (+) and negative (–) poles are facing correctly as indicated near the battery compartment.
•Replace batteries as soon as possible after any sign they are getting weak.
•Do not short-circuit the battery terminals.
•The product is not intended for children under 3 years.
•Use only CASIO AD-E95100L adaptor.
•The AC adaptor is not a toy.
•Be sure to disconnect the AC adaptor before cleaning the product.
Declaration of Conformity According to EU Directive
Manufacturer:
CASIO COMPUTER CO., LTD.
6-2, Hon-machi 1-chome, Shibuya-ku, Tokyo 151-8543, Japan
Responsible within the European Union: Casio Europe GmbH
Casio-Platz 1, 22848 Norderstedt, Germany www.casio-europe.com
●Any reproduction of the contents of this manual, either in part or its entirety, is prohibited. Except for your own, personal use, any other use of the contents of this manual without the consent of CASIO is prohibited under copyright laws.
●IN NO EVENT SHALL CASIO BE LIABLE FOR ANY DAMAGES WHATSOEVER (INCLUDING, WITHOUT LIMITATION, DAMAGES FOR LOSS OF PROFITS, BUSINESS INTERRUPTION, LOSS OF INFORMATION) ARISING OUT OF THE USE OF OR INABILITY TO USE THIS MANUAL OR PRODUCT, EVEN IF CASIO HAS BEEN ADVISED OF THE POSSIBILITY OF SUCH DAMAGES.
●The contents of this manual are subject to change without notice.
●The actual appearance of the product may be different from that shown in the illustrations in this User’s Guide. ●Company and product names used in this manual may be registered trademarks of others.
Contents
General Guide |
EN-2 |
Timeout . . . . . . . . . . . . . . . . . . . . . . . . . . . . . . . . . . |
EN-4 |
Using the 10-key Pad (9) . . . . . . . . . . . . . . . . . . . |
EN-4 |
Using the FUNCTION Button (bm) . . . . . . . . . . . . . |
EN-4 |
Getting Ready to Play |
EN-7 |
Preparing the Music Stand . . . . . . . . . . . . . . . . . . . |
EN-7 |
Power Supply . . . . . . . . . . . . . . . . . . . . . . . . . . . . . |
EN-7 |
Playing the Digital Keyboard |
EN-8 |
Appendix |
A-1 |
Tone List. . . . . . . . . . . . . . . . . . . . . . . . . . . . . . . . . . . A-1
Drum Assignment List. . . . . . . . . . . . . . . . . . . . . . . . . A-2
Rhythm List. . . . . . . . . . . . . . . . . . . . . . . . . . . . . . . . . A-3
Song List. . . . . . . . . . . . . . . . . . . . . . . . . . . . . . . . . . . A-4
Dance Music Mode List . . . . . . . . . . . . . . . . . . . . . . . A-5
Fingering Guide . . . . . . . . . . . . . . . . . . . . . . . . . . . . . A-6
Chord Example List . . . . . . . . . . . . . . . . . . . . . . . . . . A-7
Turning on Power and Playing . . . . . . . . . . . . . . . . EN-8 Playing the Demo Songs. . . . . . . . . . . . . . . . . . . . . EN-8 Using Headphones . . . . . . . . . . . . . . . . . . . . . . . . . EN-8 Turning Off Keyboard Lighting (KeyLight). . . . . . . . EN-8
Controlling the Keyboard Sounds |
EN-9 |
Select from a variety of musical instrument
sounds . . . . . . . . . . . . . . . . . . . . . . . . . . . . . . . . . EN-9
Playing in the Dance Music Mode |
EN-10 |
Dance Music Mode . . . . . . . . . . . . . . . . . . . . . . . . |
EN-10 |
Switch Keyboard Functions. . . . . . . . . . . . . . . . . . |
EN-10 |
Using the Dance Music Mode . . . . . . . . . . . . . . . . |
EN-11 |
Creating a Build Up . . . . . . . . . . . . . . . . . . . . . . . . |
EN-11 |
Dance Music Mode Settings . . . . . . . . . . . . . . . . . |
EN-12 |
Playing Built-in Songs |
EN-12 |
Playing Back a Particular Song. . . . . . . . . . . . . . . |
EN-12 |
Using Built-in Songs to Master Keyboard |
|
Play |
EN-14 |
Easy Mode . . . . . . . . . . . . . . . . . . . . . . . . . . . . . . |
EN-14 |
Lesson Lite . . . . . . . . . . . . . . . . . . . . . . . . . . . . . . |
EN-14 |
Settings You Can Use During Lesson Lite . . . . . . |
EN-14 |
Using Auto Accompaniment |
EN-15 |
Playing the Rhythm Part only . . . . . . . . . . . . . . . . EN-15 Playing All Parts . . . . . . . . . . . . . . . . . . . . . . . . . . EN-15 Using Auto Accompaniment Effectively . . . . . . . . EN-17
Connecting External Devices |
EN-17 |
Connecting to Audio Equipment . . . . . . . . . . . . . . |
EN-17 |
Reference |
EN-18 |
Troubleshooting . . . . . . . . . . . . . . . . . . . . . . . . . . EN-18
Returning the Digital Keyboard to
Its Factory Default Settings . . . . . . . . . . . . . . . . EN-19 Specifications . . . . . . . . . . . . . . . . . . . . . . . . . . . . EN-20 Operating Precautions . . . . . . . . . . . . . . . . . . . . . EN-21
Included Accessories
●Music Stand
●Leaflets
•Safety Precautions
•Other (Warranty, etc.)
Items included as accessories are subject to change without notice.
Separately Available Accessories
•You can get information about accessories that are separately for this product from the CASIO catalog available from your retailer, and from the CASIO website at the following URL.
http://world.casio.com/
English
EN-1

General Guide
• Illustrations in this User’s Guide show the LK-135.
1
2 |
3 |
4 |
5 |
 The following explains the
 meaning of the $symbol
 that appears on the product
  console and with the key
 names below.
 $: Indicates a function that
is enabled by holding
down the button for some time.
6 |
7 |
8 |
9 |
|
bk |
bl |
|
|
|
bm |
bn |
bo |
bp |
bq |
|
br |
bs |
bt |
ck |
|
bp |
cl
EN-2
1 P(Power) button EN-8 |
bl TEMPO button EN-11, 13 |
||
2 VOLUME buttons EN-8 |
bm FUNCTION button EN-4 |
||
3 kPAUSE, SYNCHRO/FILL-IN button EN-12, 17 |
bn EASY MODE button EN-14 |
||
4 PLAY/STOP, START/STOP button EN-12, 13, 15 |
bo LESSON LITE button EN-14 |
||
5 PART SELECT, ACCOMP, $CHORDS button |
bp Speakers |
||
EN-13, 15, 16 |
bq Song Bank list |
||
|
|
|
|
6 TONE button EN-9, 13 |
br Display |
||
|
|
|
|
7 RHYTHM button EN-15 |
bs Rhythm list |
||
|
|
|
|
8 SONG BANK button EN-12 |
bt Tone list |
||
|
|
|
|
9 Number buttons, [–]/[+] keys EN-4 |
ck Dance Music Track list |
||
|
|
|
|
bk DANCE MUSIC button EN-11 |
cl Dance Music tone |
||
|
|
|
|
Back |
|
||
|
|
|
|
General Guide
English
cm cn
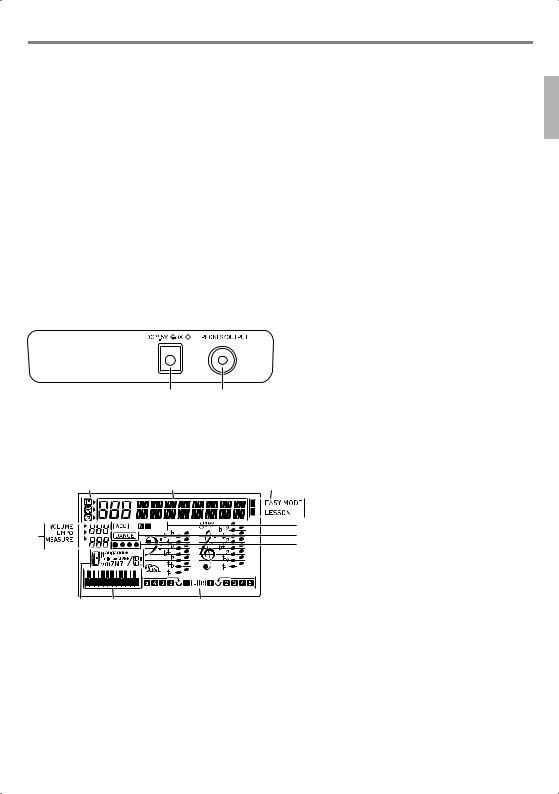
cm DC 9.5V terminal EN-7 |
cn PHONES/OUTPUT jack EN-8, 17 |
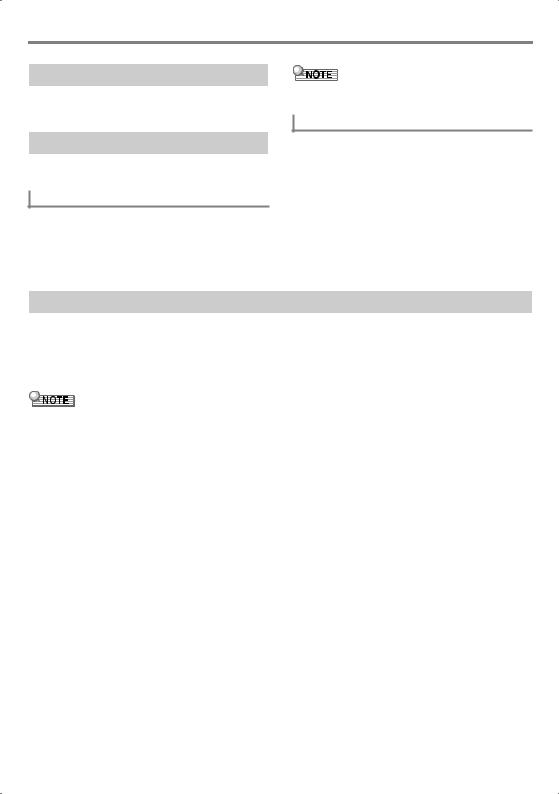
Display
1 |
|
2 |
3 |
Tone, rhythm, song bank indicators |
|
|
|
|
Number, setting name/status display |
|
|
|
|
Indicators |
|
|
|
5 |
Volume, Tempo, measure |
|
|
|
N F (Auto Accompaniment Types) indicators*, |
|
4 |
|
|
6 |
Acc (Auto Accompaniment) indicator |
|
|
|
7 |
|
|
|
|
Dance Music Mode indicator |
|
|
|
|
|
|
|
|
|
|
Beat display |
|
|
|
|
Chord name |
|
|
|
|
Pattern phrase keyboard/chord keyboard |
8 |
9 |
bk |
|
Part, fingering display |
|
* N:Normal, F:Fill-in |
EN-3
General Guide
Timeout
If you do not perform any operation for a while configuring settings, the display will return to the previous screen automatically.
Using the 10-key Pad (9)
Use the number buttons and the [–] and [+] keys to change displayed numbers and settings.
Number Buttons
Use the number buttons to enter numbers and values.
•Enter the same number of digits as the currently displayed
value.
Example: To enter tone number 004, input 0 30 34.
•Negative values cannot be input using the number buttons. Use [+] (increase) and [–] (decrease) instead.
[–]and [+] Keys
You can use the [+] (increase) and [–] (decrease) keys to change the displayed number or value.
•Holding down either key scrolls the displayed setting.
•Pressing both keys at the same time will revert to the initial default setting or the recommended setting.
Using the FUNCTION Button (bm)
Use this button to change the volume level and pitch, and to configure other settings.
1. Press bm FUNCTION.
2. Next, press bm FUNCTION the number of times required to select the setting you want to change.
Each press of bm FUNCTION cycles through the available parameters.
• You can also scroll back through settings by holding down bm FUNCTION and pressing bn EASY MODE.
bm key |
Parameter |
Display |
Description |
|
presses |
||||
|
|
|
||
1 |
Transpose |
Trans. |
Changes (transposes) overall instrument tuning by semitone units. |
|
|
|
|
–12 to +12 (semitone units, one octave up/down) |
|
|
|
|
|
|
2 |
Accompaniment |
AcompVol |
Changes the Auto Accompaniment volume. |
|
|
Volume |
|
|
|
|
|
|
|
|
3 |
Song Volume |
Song Vol |
Changes the song playback volume. |
|
|
|
|
|
|
4 |
Dance Music |
DM Vol. |
Changes the dance music song playback volume. |
|
|
Volume |
|
|
|
|
|
|
|
|
5 |
Dance Music |
DM Sync |
Sets the timing of dance music syncing. |
|
|
Sync Type |
|
1: No misalignment of phrase playback between each part, regardless of pattern |
|
|
|
|
phrase switch timing. |
|
|
|
|
2: Start pattern phrase playback to match timing of the pattern switching |
|
|
|
|
keyboard key. If there is misalignment with the playback timing of the pattern |
|
|
|
|
phrase between parts, alignment will be adjusted automatically measure-by- |
|
|
|
|
measure as playback proceeds. |
|
|
|
|
|
EN-4

|
|
|
General Guide |
|
|
|
|
|
|
|
|
|
|
|
|
|
|
bm key |
Parameter |
Display |
Description |
|
|
presses |
|
|
|||
|
|
|
|
|
|
6 |
Dance Music |
DM Tempo |
Specifies whether or not the performance tempo changes to the value that is |
|
English |
|
Tempo Setting |
|
preset for each pattern. |
||
|
|
|
|||
|
|
|
on: When the pattern is switched, the performance tempo changes to the tempo |
|
|
|
|
|
suggested for the selected pattern. Since the tempo changes, melody can be |
|
|
|
|
|
completely changed. |
|
|
|
|
|
|
||
|
|
|
oFF: Even if the pattern is switched, the performance tempo remains at its |
|
|
|
|
|
current setting, without changing. |
|
|
|
|
|
Tempo does not change suddenly, which enables natural pattern connection. |
|
|
|
|
|
|
|
|
7 |
Dance Music |
DM Tone |
Specifies whether or not the keyboard tone changes to the tone that is preset for |
|
|
|
Tone Setting |
|
each pattern. |
|
|
|
|
|
on: When the pattern is switched, the tone changes to the tone suggested for the |
|
|
|
|
|
selected pattern. Select this setting when you want to change the performance |
|
|
|
|
|
tone whenever the pattern changes. |
|
|
|
|
|
oFF: Even if the pattern is switched, the tone remains at its current setting, |
|
|
|
|
|
without changing. Select this setting when you want the same tone to play even |
|
|
|
|
|
if the pattern changes. |
|
|
|
|
|
|
|
|
8 |
Voice Fingering |
Speak |
Enables or disables Voice Fingering Guide, which uses a voice to tell you which |
|
|
|
Guide |
|
finger to use to play each note during Lesson Lite. |
|
|
|
|
|
on: Voice Fingering Guide enabled. |
|
|
|
|
|
oFF: Voice Fingering Guide disabled. |
|
|
|
|
|
|
|
|
9 |
Note Guide |
NoteGuid |
Enables or disables Note Guide, which sounds each note you need to play |
|
|
|
|
|
during a Lesson Lite. |
|
|
|
|
|
on: Note Guide enabled. |
|
|
|
|
|
oFF: Note Guide disabled. |
|
|
|
|
|
|
|
|
10 |
Performance |
Scoring |
Enables or disables Performance Evaluation, which displays scores for your |
|
|
|
Evaluation |
|
Lesson Lite results. |
|
|
|
|
|
on: Performance Evaluation enabled. |
|
|
|
|
|
oFF: Performance Evaluation disabled. |
|
|
|
|
|
|
|
|
11 |
Keyboard |
KeyLight |
Enables or disables Keyboard Lighting, which is a function that causes keyboard |
|
|
|
Lighting |
|
keys to light in order to guide note play. |
|
|
|
|
|
on: Keyboard Lighting enabled. |
|
|
|
|
|
oFF: Keyboard lighting disabled. |
|
|
|
|
|
|
|
|
12 |
Power On Alert |
Demo2 |
Keyboard keys will light to remind you that power is on if you do not perform |
|
|
|
|
|
any operation for about six minutes. You can disable power on alert to ensure |
|
|
|
|
|
that keyboard keys do not light during a concert, etc. |
|
|
|
|
|
on: Keyboard keys light after six minutes of non-operation. |
|
|
|
|
|
oFF: Keyboard keys do not light after six minutes of non-operation. |
|
|
|
|
|
|
|
|
13 |
Tuning |
Tune |
Makes slight adjustments to the overall pitch. Use this feature to adjustment |
|
|
|
|
|
Digital Keyboard tuning to another musical instrument or to playback from a |
|
|
|
|
|
CD. This setting is the frequency of A4 (A above middle C). See the notes under |
|
|
|
|
|
“IMPORTANT!” below. |
|
|
|
|
|
415.5 to 465.9 Hz (Initial Default: 440.0 Hz) |
|
|
|
|
|
|
|
|
EN-5

General Guide
bm key |
Parameter |
Display |
Description |
|
presses |
||||
|
|
|
||
14 |
LCD Contrast |
Contrast |
Adjusts display contrast. |
|
|
|
|
1 to 12: A larger value makes the display contrast darker. |
|
|
|
|
|
|
15 |
Auto Power Off |
APO |
Setting that controls whether or not the Digital Keyboard turns off automatically |
|
|
|
|
after a period of non-use. |
|
|
|
|
oFF: Auto Power off disabled. |
|
|
|
|
30: The Digital Keyboard turns off automatically after 30 minutes of non-use. |
|
|
|
|
|
3. When the parameter you want is displayed, use 9 (10-key) to change its setting.
•The tone and other parameters revert to their initial defaults whenever you turn on power. The main volume, and Tuning, LCD Contrast, and Auto Power Off settings are automatically saved and retained when power is turned off.
•You can use the [+] and [–] buttons to input a value to the right of a decimal point.
To specify 442.2 Hz, for example, first use the number buttons to input 4 34 32. Next, press the [+] button twice.
EN-6
Getting Ready to Play
Preparing the Music Stand
 Music stand
Power Supply
Either an AC adaptor or batteries can be used to power this Digital Keyboard. Normally, use of AC adaptor power is recommended.
•Depending on your geographical area, an AC adaptor may not be included. In this case, will need to purchase an AC adaptor from your retailer.
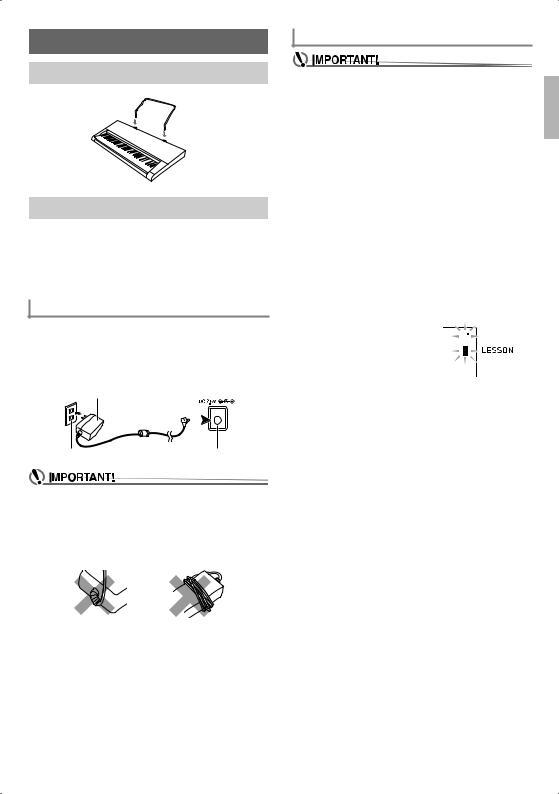
Using the AC Adaptor
Make sure that you use only the AC adaptor specified for this Digital Keyboard. Use of a different type of AC adaptor can cause malfunction.
Specified AC Adaptor: AD-E95100L
(JEITA Standard plug)
AC adaptor
Household power outlet |
DC 9.5V terminal |
•Be sure to turn off Digital Keyboard power before connecting or disconnecting the AC adaptor.
•The AC adaptor will become warm to the touch after very long use. This is normal and does not indicate malfunction.
•To prevent breaking of the wire, take care to avoid putting any type of load on the power cord.
No bending! |
No winding! |
•Never insert metal, pencils, or any other objects into the product’s 9.5V DC terminal. Doing so creates the risk of accident.
Using Batteries
•Be sure to turn off power before loading batteries.
•It is up to you to prepare six commercially available AA-size batteries. Do not use oxyride batteries or any other nickel based batteries.
1. Open the battery cover on the bottom of the Digital Keyboard.
2. Load six AA-size batteries into the battery compartment.
Make sure the positive + and negative - ends of the batteries are facing as shown in the illustration.
3. Insert the tabs of the battery cover into the holes on the side of the battery compartment, and close the cover.
■ Low Battery Indication
The indicator shown below starts to flash to let you know when battery power is low. Replace the batteries with new ones.
Low battery indicator (flashes) 


English
EN-7
Playing the Digital Keyboard
Turning on Power and Playing
1. Press 1P(Power).
This turns on power.
•To turn off the Digital Keyboard, hold down the 1P (Power) button until the Digital Keyboard’s display goes blank.
2.Try playing something on the keyboard. You could use 2 VOLUME to adjust the volume setting.
•This causes the volume indicator, which shows the current volume level, to appear on the display.
•Turning off power causes tone, rhythm, and other settings (except for main volume, the Tuning, LCD Contrast, and Auto Power Off settings) to return to their initial defaults.
Playing the Demo Songs
Following playback of the dance music demo (000), the builtin songs will playback sequentially from 001 to 100. You can switch to a different song while playback is in progress.
1. Press 4 PLAY/STOP, START/STOP and
5 PART SELECT, ACCOMP, CHORDS at the same time.
This will start playback of the demo songs. Demo playback continues until you stop it.
•Demo songs always start from song number 000 (dance music demo song).
•See page A-4 for a complete list of available songs.
2.To change to another song while demo playback is in progress, use 9 (10-key) [–] and [+] keys to enter the song number you want (page EN-4).
This will cause demo playback to jump to the song whose number you entered.
•You cannot use 9(10-key) number buttons to select a song.
3.To stop demo playback, press 4 PLAY/STOP,
START/STOP.
Demo playback continues until you stop it by pressing
4 PLAY/STOP, START/STOP.
Using Headphones
Using headphones cuts off output from the built-in speakers, which means you can practice playing even late at night without disturbing others.
•Be sure to turn down the volume level before connecting headphones.
•Headphones do not come with the Digital Keyboard.
•Use commercially available headphones. See page EN-1 for information about options.
•Do not listen to very high volume output over headphones for long period. Doing so creates the risk of hearing damage.
•If the plug of the headphones you are using does not match the cn PHONES/OUTPUT jack, use the applicable commercially available adaptor plug.
•If you are using headphones that require an adaptor plug, make sure you do not leave the adaptor plugged in when removing the headphones.
Turning Off Keyboard Lighting (KeyLight)
See “Using the FUNCTION Button (bm)” (page EN-4).
EN-8
 Loading...