


MO1001-A
KL-T100 Quick Guide
•The Chinese language dialects supported by this printer are Standard Mandarin (Putonghua) and simplified Chinese.
•“QR code”is a registered trademark of Denso Wave Incorporated.
General Guide
Press to turn power on or off
Keyboard
Handwriting panel
Tape cartridge compartment open button
USB connector
Plug in a USB cable to connect the printer to a computer.
AC adaptor terminal
Connect the specified AC adaptor.
LCD (main panel)
Touch pen
Tape outlet
Tape cartridge compartment
Carrying handle
Unfold as shown above to carry the printer.
Battery compartment cover
Using the Touch Pen
You can use the printer’s touch pen to write characters on the handwriting panel and to perform various touch operations.
■ Removing the Touch Pen from Its Holder
When not in use, the touch pen is stowed in a holder near the tape cartridge compartment cover.
Use the tip of your finder to slide the touch pen from its holder.
|
Power Requirements |
|
|
Loading and Removing the Tape Cartridge |
|
You can power your printer using the specified AC adaptor or |
A tape cartridge must be loaded in the printer in order to print |
||||
commercially available alkaline batteries. |
labels. Use the tape cartridge that comes with the printer or a |
||||
|
|
|
commercially available tape cartridge. |
||
Using the AC Adaptor |
To load a tape cartridge |
||||
■ Connecting the AC Adaptor to the Printer |
|||||
• |
Use only the AC adaptor specified for this printer. |
1 Check to make sure that the printer is turned off. |
|||
|
|
|
|||
1 |
Plug the AC adaptor plug into the printer’s AC adaptor |
|
• The printer is on if there are characters on its display. If there |
||
|
are, press to turn it off. |
||||
|
terminal. |
2 |
Press the tape cartridge compartment open button and |
||
2 |
Plug the AC adaptor into a standard 100V AC household |
||||
open it. |
|||||
|
power outlet. |
|
|
||
1
2
•For information about powering the printer using commercially available alkaline batteries, see the“KL-T100 ”.
Initialize printer memory first!!
Be sure to initialize printer memory before using the printer for the first time after purchasing it. Failure to initialize memory may result in improper printer operation.
•Initializing printer memory will delete all data currently stored in memory. Normally you should not initialize printer memory. Perform this procedure only before using the printer for the first time after purchasing it.
Check to make sure that the printer is turned off.
•The printer is on if there are characters on its display. If there are, press  to turn it off.
While holding down  and
and  at the same time, press
  .
.
Keep the keys depressed until the message“”appears on the display.
Press  .
.
3 Remove the stopper from the tape cartridge.
Stopper
4 Check the condition of the tape and ink ribbon.
•Make sure the tip of the tape is not bent. If it is, use scissors to cut off the bent part.
•Make sure the end of the tape is passing through the tape guide.
•Make sure there is no slack in the ink ribbon.
 Tape guide
Tape
(pull out approximately 3 cm)
Ink ribbon (under tape)
•Never try to push tape back into the cartridge.
•Do not pull on the tape with excessive force. Doing so can cause the ink ribbon to break, leading to malfunction.
•Loading a tape cartridge while its ink ribbon is slack can cause the ink ribbon to break, leading to malfunction.
How to take up ink ribbon slack
If there is slack in the ink ribbon, use a |
a |
pencil or similar object to rotate the take- |
|
up spool in the direction indicated by |
|
arrow“a”in the nearby illustration. Keep |
|
rotating until the lower left spool start to |
|
rotate in the direction indicated by arrow |
b |
“b”. Note that the tape does not move |
|
along with the ink ribbon at this time. |
|
5 Load the tape cartridge into the printer.
•Taking care so the ink ribbon does not get pulled out, load the cartridge so the tape and ink ribbon pass between the print head and rubber roller (illustration below). Press down on the tape cartridge as far as it will go, until it clicks into place.
•Incorrectly loading the tape cartridge can cause the ribbon to break.
|
|
|
|
|
Rubber roller |
|
1 |
Press |
and then . |
Tape |
|
Precautions when Using the Touch Pen |
2 |
Use |
and |
to select |
and then press . |
3 |
Use |
and |
to select and then press . |
||
• Excessive force is not required when using the touch pen to write
on the handwriting panel.
Print head
• Take care not to press too hard on the handwriting panel surface. Doing so can crack or break the handwriting panel.
6 Close the tape cartridge compartment cover.
• Press down on the cover until is clicks securely into place.
• Do not pull on the tape or try to push it back in while the tape cassette is loaded in the printer.
To remove a tape cartridge
1 Check to make sure that the printer is turned off.
•The printer is on if there are characters on its display. If there are, press  to turn it off.
2 Press the tape cartridge compartment open button and open it.
3 Grasp the left and right edges of the tape cartridge with your thumb and forefinger and lift straight up.
•The print head becomes hot during printing. Be sure to allow enough time for it to cool before removing the tape cartridge.
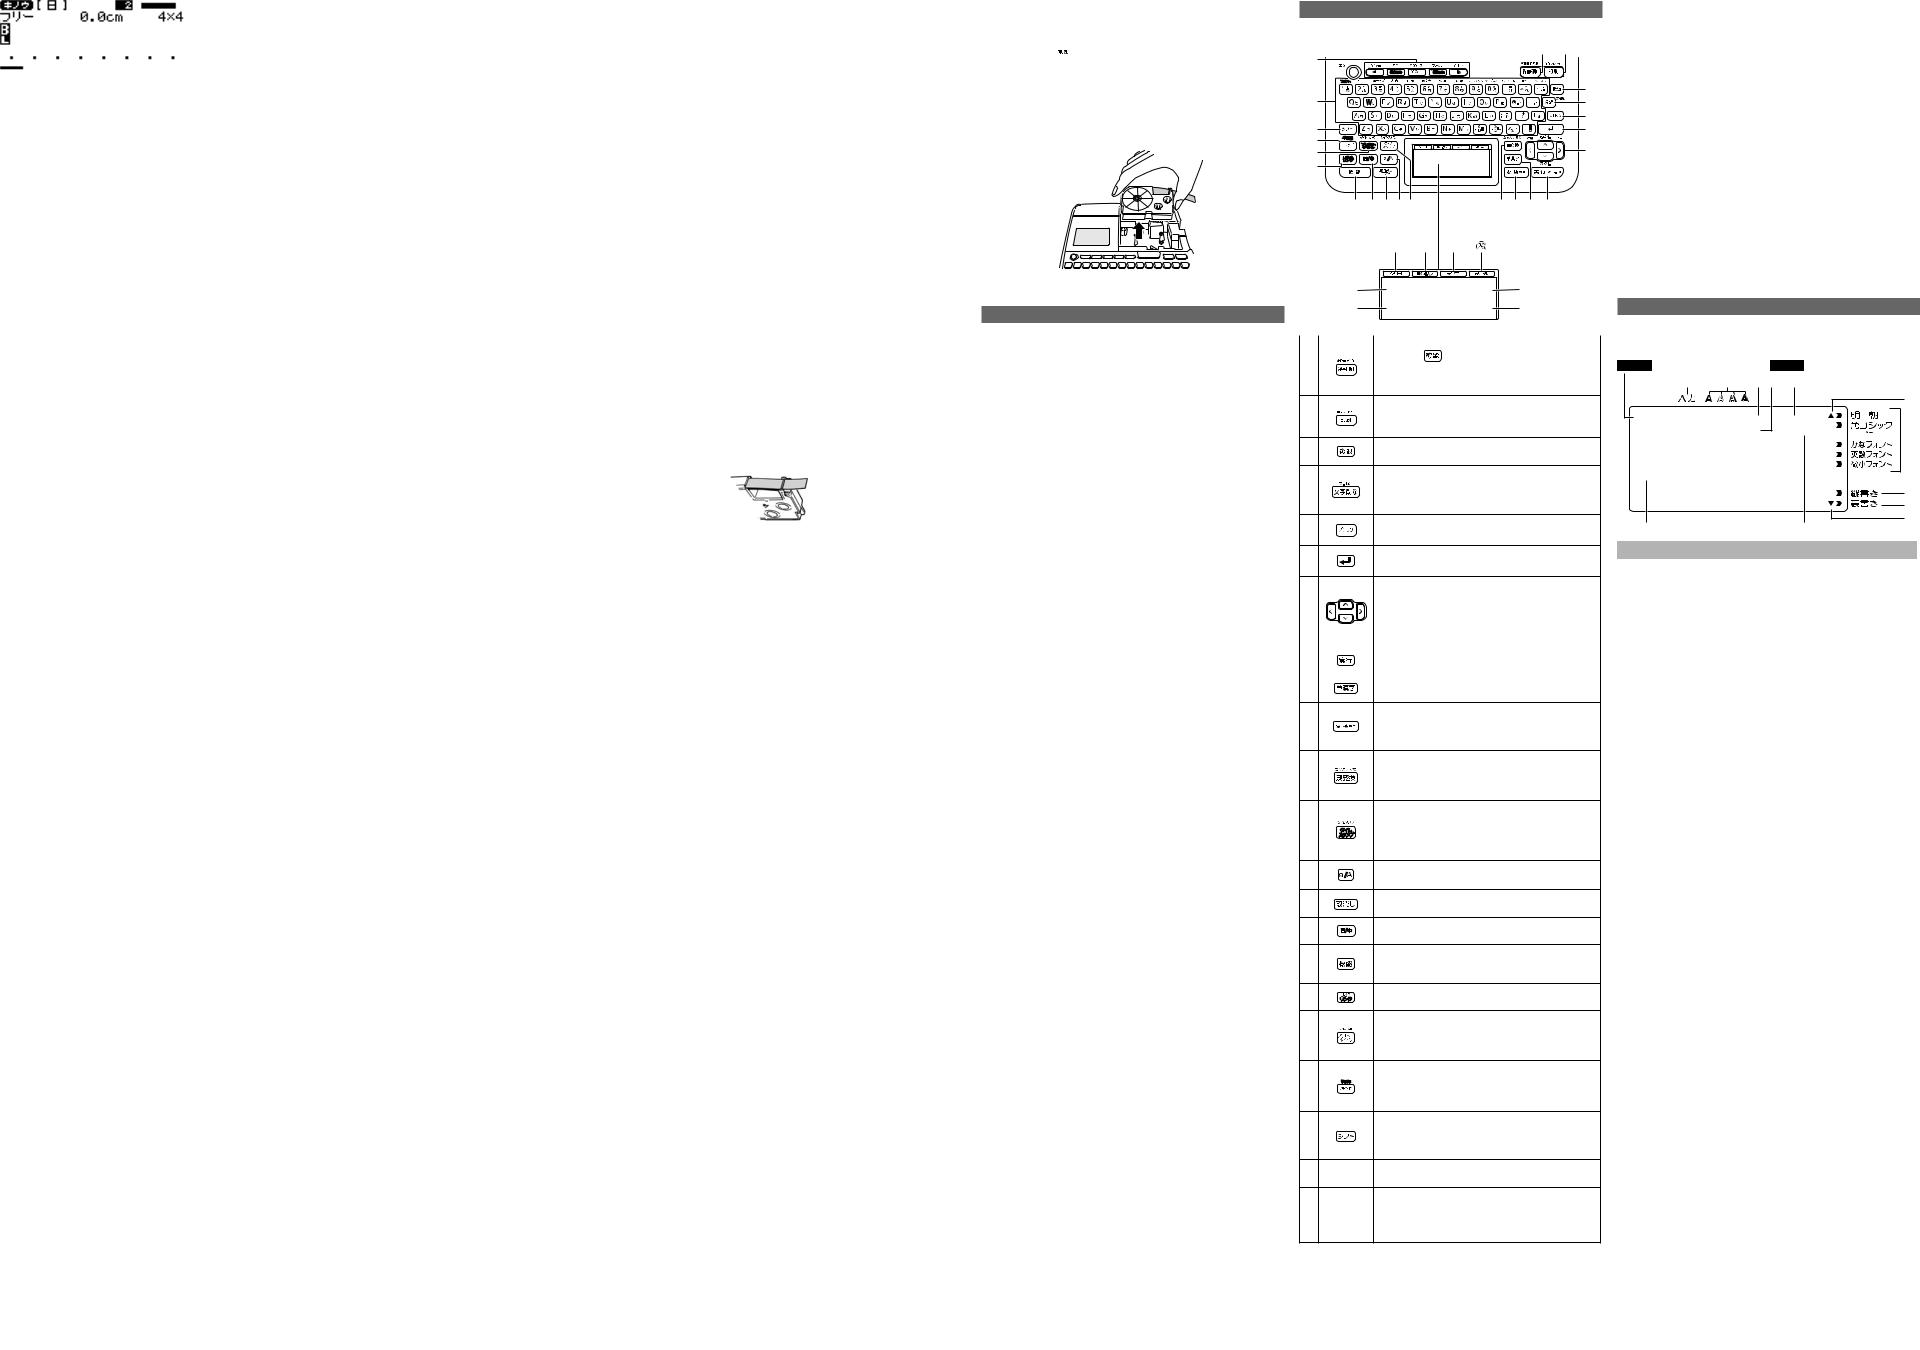
Keys and Icons
■ Keyboard
|
|
|
|
|
|
|
|
|
|
|
|
|
|
|
|
|
|
A |
|
|
|
||
|
||
|
|
|
# a |
|
■Handwriting Panel
B
Label Creation Functions
Your printer provides you with the following label creation functions.
● Free Label
Enter any text you want to create a label. A Free Label creation example is provided under“Label Creation Example”on the back of this sheet.
● Preset Labels
Select from a rich selection of preset label formats for quick and simple creation of labels for videos, files, name tags, and much more.
● Numbering Labels
Create sequentially numbered labels for use as page numbers, serial numbers, etc.
● Index Labels
Print index labels that are great for organizing files. Index labels also can be created using the convenient built-in preset formats.
● Bar Code Labels
Print any one of a variety of bar code label formats. Bar codes can be created using the following formats: JAN-13 (EAN-13), JAN-8 (EAN-8), UPC-A, UPC-E, ITF, CODE39, CODABAR (NW-7).
● QR Code Labels
Printing QR codes has never been easier! A QR code is one type of two-dimensional bar code. QR codes are often used for reading names, phone numbers, URLs, and other information with a mobile phone.
● Large-format Printing
Though the maximum tape width supported by your printer is 24mm, you can reproduce images that are much larger. Simply divide the image into multiple widths of tape and then assemble the pieces into the final image after printing is complete.
● Handwritten Labels
Images you draw on the handwriting panel with the Touch Pen can be used as-is in a label. There are two handwritten image only formats for printing, and 12 formats that let you combine handwritten images with input text.
● Design Logos
Simple select a location (office, factory, construction site, etc.) for easy creation of labels that contain logos that include illustrations and text that are great for catching the eye of customers and employees. Design logos also can be downloaded from the CASIO download site to your computer and transferred to the printer for use in labels. The CASIO
download site provides a variety of different designs for a wide range of locations.
|
|
|
|
|
|
|
|
|
|
|
|
|||
1 |
Press to print vertically. |
|||
|
• Pressing |
and this key prints both vertically |
||
|
|
and horizontally. |
||
•These functions are supported for Free Label creation only.
2Press to print.
• Pressing  and this key displays a preview of the print image (print preview).
3Press to delete the character before the current cursor location.
4Press to delete the character at the current cursor
location.
• If you are currently inputting text, pressing  and this key deletes all of the text you are inputting.
5Press to divide text into blocks.
6Press to input a newline mark.
7• Use these keys to move the cursor ( ) during
|
text input or the cursor ( ■ ) during text editing |
|
and other operations that require specification of a |
|
range of text. |
|
• These keys are also used for selection of menu |
|
items, kanji conversion candidates, etc. |
|
|
8 |
Press to execute an operation or apply a setting. |
|
|
Ч |
Press to convert one character at a time. |
ΠPress to convert hiragana or pinyin characters to kanji.
•To input a blank space, press this key when there is no committable character on the display.
´Press to commit hiragana characters as-is without
conversion to kanji.
• To convert input hiragana characters to katakana, press  and then this key.
=• Press to stamp the current date and time into the
current input.
• To input an expiration date, term of validity, or other future date or time while inputting text, press
 and then this key.
~Press to toggle between upper case and lower case alpha character input.
ΑPress to return to the previous operation or to cancel the current operation.
@Press to switch between Japanese input and Chinese input.
ВTo access a function marked above or next to a key
in the same color as the  key marking, press this key and then the applicable function key.
$Press to print data created on a computer on this
printer.
%• Press to recall and use pre-registered often-used
terms or expressions.
• To register or edit an often-used term or phrase, press  and then this key.
±Press to print a design logo or to install design
logo data from a computer. Pressing this key when creating a label switches to the Design Logo Mode.
•To use“ ”, press  and then this key.
Ζ• Press when inputting kana to input“ ”,“ ”, and other soku-on and yo-on characters.
•When inputting alpha characters, press this key to input a single upper case (or lower case) character.
Κ(Character Use these keys to input text. keys)
Θ (Tape length |
Use these keys to specify the length of a Free Label. |
direct setting |
• Tape length setting is supported for Free Label |
keys) |
creation only. |
|
|
З |
Touch to input a blank space. |
н |
|
Touch to return to the previous operation or to |
|
|
cancel the current operation. |
+ |
|
Touch to execute an operation or apply a setting. |
|
|
|
|
|
Touch to trigger recognition one handwritten |
|
character at a time, or after you input the final |
|
|
|
character. |
|
|
|
|
|
Touch to view the print image on the display. |
|
|
|
|
|
|
|
|
Touch to feed the tape without printing. |
|
|
|
|
|
Touch to cut the tape. |
|
|
|
|
|
|
|
|
Touch to change the printer setup. |
|
|
|
•When describing functions in this manual that could be performed using either the keyboard or the handwriting panel, operation examples mainly show keyboard operation.
•There are two possible operations that can be performed with the  and
and  keys.
keys.
1.Press  (
(  ) and then another key.
2.Hold down  (
(  ) as you press another key.
Display (Main Panel)
The display (main panel) of the printer has a number of different indicator marks. The table below explains the meaning or function of each of these marks.
Appears when  is pressed./ Appears when
  is pressed.
12 3 4 5
6


 7
7
8
9
0
Cursor |
- |
|
|
|
|
|
Display Screen Explanation |
|
|
|
|
1 |
Type of characters that can be input |
|
|
|
|
2 |
Character style |
|
|
|
|
3 |
Block where the cursor is located |
|
|
|
|
4 |
Length of label being created |
|
|
|
|
5 |
Layout image when Free Label is selected |
|
|
|
|
6 |
Indicates characters or other data above the current screen. |
|
|
|
|
7 |
Font |
|
(Chinese font is always“ ”, regardless of what is displayed here.) |
||
8 |
Vertical printing indicator |
|
|
|
|
9 |
Mirror printing indicator |
|
|
|
|
0 |
Indicates characters or other data below the current screen. |
|
|
|
|
- |
Character size |
|
|
|
|
 Loading...