


 Loading...
EN
Digital Camera
User’s Guide
Thank you for purchasing this CASIO product.
•Before using it, be sure to read the precautions contained in this User’s Guide.
•Keep the User’s Guide in a safe place for future reference.
•For the most up-to-date information about this product, visit the official EXILIM Website at http://www.exilim.com/
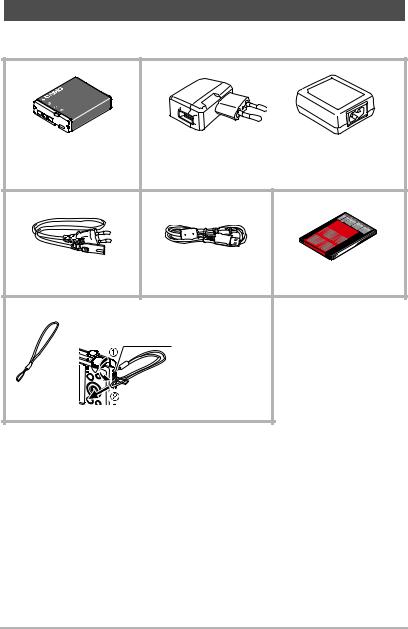
Accessories
As you unpack your camera, check to make sure that all accessories shown below are included. If anything is missing, contact your original retailer.
Rechargeable lithium |
USB-AC adaptor*1 |
||
ion battery |
|||
(AD-C54UG/AD-C53U) |
|||
(NP-130A or NP-130) |
|||
|
|
||
Power cord*2 |
USB cable |
Basic Reference |
|
To attach the strap to the camera |
|
||
|
Attach strap here. |
|
|
Strap |
|
|
|
*1 The type of USB-AC adaptor included varies according to the country or geographic area where the camera is sold.
*2 A power cord is included with the AD-C53U USB-AC adapter. The shape of the power cord plug varies according to the country or geographic area where the camera is sold.
2

Read this first!
•The contents of this manual are subject to change without notice.
•The contents of this manual have been checked at each step of the production process. Feel free to contact us if you notice anything that is questionable, erroneous, etc.
•Any copying of the contents of this User’s Guide, either in part or its entirety, is forbidden. Except for your own personal use, any other use of the contents of this manual without the permission of CASIO COMPUTER CO., LTD. is forbidden under copyright laws.
•CASIO COMPUTER CO., LTD. shall not be held liable for any damages or lost profits suffered by you or any third party due to the use or malfunction of this product.
•CASIO COMPUTER CO., LTD. shall not be held liable for any damages or lost profits caused by loss of memory contents due to malfunction, repair, or any other reason.
•Note that the example screens and product illustrations shown in this User’s Guide may differ somewhat from the screens and configuration of the actual camera.
LCD Panel
The liquid crystal panel of the monitor screen uses high-precision technology that provides a pixel yield in excess of 99.99%. This means that some very small number of pixels may not light or may remain lit at all times. This is due to the characteristics of the liquid crystal panel, and does not indicate malfunction.
Take test shots
Before shooting your final image, shoot a test shot to ensure that the camera is recording correctly.
3

Contents
Accessories . . . . . . . . . . . . . . . . . . . . . . . . . . . . . . . . . . . . . . . . . . . . . . . . . . . . 2 Read this first! . . . . . . . . . . . . . . . . . . . . . . . . . . . . . . . . . . . . . . . . . . . . . . . . . . 3
] General Guide |
9 |
] Monitor Screen Contents and How to Change Them |
10 |
] Quick Start Basics |
13 |
What you can do with your CASIO camera . . . . . . . . . . . . . . . . . . . . . . . . . . . 13 First, charge the battery prior to use.. . . . . . . . . . . . . . . . . . . . . . . . . . . . . . . . 15
] To load the battery . . . . . . . . . . . . . . . . . . . . . . . . . . . . . . . . . . . . . . . . . . . . . . . 15 ] Charge the Battery . . . . . . . . . . . . . . . . . . . . . . . . . . . . . . . . . . . . . . . . . . . . . . . 16
Configuring Basic Settings the First Time You Turn On the Camera. . . . . . . . 20 Preparing a Memory Card . . . . . . . . . . . . . . . . . . . . . . . . . . . . . . . . . . . . . . . . 22
] Supported Memory Cards. . . . . . . . . . . . . . . . . . . . . . . . . . . . . . . . . . . . . . . . . . 22 ] To load a memory card . . . . . . . . . . . . . . . . . . . . . . . . . . . . . . . . . . . . . . . . . . . . 23 ] To format (initialize) a new memory card . . . . . . . . . . . . . . . . . . . . . . . . . . . . . . 24
Turning the Camera On and Off . . . . . . . . . . . . . . . . . . . . . . . . . . . . . . . . . . . 25 Holding the Camera Correctly . . . . . . . . . . . . . . . . . . . . . . . . . . . . . . . . . . . . . 26 To shoot a snapshot. . . . . . . . . . . . . . . . . . . . . . . . . . . . . . . . . . . . . . . . . . . . . 27
] Selecting an Auto Recording Mode . . . . . . . . . . . . . . . . . . . . . . . . . . . . . . . . . . 27 ] To shoot a snapshot . . . . . . . . . . . . . . . . . . . . . . . . . . . . . . . . . . . . . . . . . . . . . . 28
Viewing Snapshots . . . . . . . . . . . . . . . . . . . . . . . . . . . . . . . . . . . . . . . . . . . . . 31 Deleting Snapshots and Movies . . . . . . . . . . . . . . . . . . . . . . . . . . . . . . . . . . . 32 Snapshot Shooting Precautions . . . . . . . . . . . . . . . . . . . . . . . . . . . . . . . . . . . 33
] Snapshot Tutorial |
35 |
Selecting the Recording Mode. . . . . . . . . . . . . . . . . . . . . . . . . . . . . . . . . . . . . 35 Using the Control Panel. . . . . . . . . . . . . . . . . . . . . . . . . . . . . . . . . . . . . . . . . . 37 Using the Self-timer . . . . . . . . . . . . . . . . . . . . . . . . . . . . . . . . .(Self-timer) . . 38 Adjusting White Balance . . . . . . . . . . . . . . . . . . . . . . . . . . (White Balance) . . 39 Selecting a Focus Mode . . . . . . . . . . . . . . . . . . . . . . . . . . . . . . . . (Focus) . . 41 Specifying ISO Sensitivity . . . . . . . . . . . . . . . . . . . . . . . . . . . . . . . . . (ISO) . . 44 Recording Beautiful Portraits . . . . . . . . . . . . . . . . . . . . . .(Make-up Level) . . 45 Correcting Image Brightness . . . . . . . . . . . . . . . . . . . . . . . . . . . (EV Shift) . . 46 Using Flash . . . . . . . . . . . . . . . . . . . . . . . . . . . . . . . . . . . . . . . . . . . (Flash) . . 47 Specifying the Metering Mode . . . . . . . . . . . . . . . . . . . . . . . . . (Metering) . . 49 Shooting with Zoom . . . . . . . . . . . . . . . . . . . . . . . . . . . . . . . . . . . . . . . . . . . . . 50
] Monitor Screen Information when Zooming . . . . . . . . . . . . . . . . . . . . . . . . . . . . 51 ] Zooming with Super Resolution . . . . . . . . . . . . . . . . . . . . . . . . (Zoom (SR)). . . 53 ] Expanding the Zoom Range to Shoot Clearer Snapshots . (Multi SR Zoom). . . 54
Shooting a Burst of Images . . . . . . . . . . . . . . . . . . . . . . |
(High Speed CS) . . 54 |
4 |
Contents |
|

Shooting with Artistic Effects . . . . . . . . . . . . . . . . . |
. . . . . |
. . (ART SHOT) . . |
58 |
] Saving a Second Normal Image When |
|
|
|
Shooting With HDR Art . . . . . . . . . . . . . . . . . . . . . . |
. . .(Double (HDR Art)). . . |
60 |
|
Shooting with Triple Shot. . . . . . . . . . . . . . . . . . . . . . |
. . . . |
. . . . . . . . . . . . . . . |
61 |
] Recording Movies |
|
|
62 |
To record a movie . . . . . . . . . . . . . . . . . . . . . . . . . . . |
. . . . |
. . . . . . . . . . . . . . . |
62 |
] Audio. . . . . . . . . . . . . . . . . . . . . . . . . . . . . . . . . . . . . |
. . . . . |
. . . . . . . . . . . . . . . . |
63 |
Recording a High-definition Movie. . . . . . . . . . . . . . . |
. . . . |
. . . . . . . . . . . . . . . |
65 |
Recording a High Speed Movie . . . . . . . . . . . . . . . . . |
. . . . |
. . . . . . . . . . . . . . . |
65 |
Using Prerecord Movie . . . . . . . . . . . . . . . . . . . . . . . |
. (Prerecord (Movie)) . . |
67 |
|
Recording a Time Lapse Movie . . . . . . . . . . . . . . . . |
. . . . |
. . (Time Lapse) . . |
69 |
Recording a Movie for YouTube . . . . . . . . . . . . . . . . |
. . . . |
. (For YouTube) . . |
71 |
Shooting a Snapshot while Shooting a Movie . . . . . (Snapshot In Movie) . . |
72 |
||
] Using BEST SHOT |
|
|
74 |
To shoot with BEST SHOT . . . . . . . . . . . . . . . . . . . . |
. . . . |
. . . . . . . . . . . . . . . |
74 |
Creating and Using Your Own Setups . . . . . . . . . . . |
. . (CUSTOM SHOT) . . |
76 |
|
Shooting Bright Images in the Dark without Flash . . |
. . . . |
(HS Night Shot) . . |
77 |
Digitally Correcting for Overexposure and Underexposure |
. . . . . . (HDR) . . |
78 |
|
Shooting with High Speed Anti Shake . . . . . . . . . . . |
. . . . |
(HS Anti Shake) . . |
78 |
Shooting with a Blurred Background . . . . . . . . . . . |
(Blurred Background) . . |
79 |
|
Shooting with Full Focus Macro . . . . . . . . . . . . . . . . |
(All-In-Focus Macro) . . |
80 |
|
Using Continuous Shutter with Auto Focus . . . . . . . |
. . . . |
. . . . . . (AF-CS) . . |
81 |
Shooting with Priority on Subject Faces . . . . . . . . . . |
. (HS Best Selection) . . |
82 |
|
Shooting a Panorama Image . . . . . . . . . . . . . . . . . . |
. . .(Slide Panorama) . . |
83 |
|
Shooting with a Super Wide Angle of View . . . . . . . |
. . . . |
. . . (Wide Shot) . . |
85 |
Shooting Snapshots . . . . . . . . . . . . . . . . . . . . . . . . . |
. . . . |
. . . . (Snapshot) . . |
88 |
Using a TV Screen to Shoot Snapshots . . . . . . . . . . |
. . (HDMI TV Output) . . |
89 |
|
] Advanced Settings |
(REC MENU) |
91 |
|
Configuring Recording Settings . . . . . . . . . . . . . . . . . . . . . . . . . . . . . . . . . . . . 91 Triggering a Self-timer Operation with Motion . . . . . . . . .(Motion Shutter) . . 92 Repositioning the Motion Detection Area . . . . . . . . . . . . (Motion Position) . . 94 Assigning Functions to the [4] and [6] Keys . . . . . . . . . . . . . . . (L/R Key) . . 94 Saving a Second Normal Image When
Shooting With HDR Art . . . . . . . . . . . . . . . . . . . . . . . (Double (HDR ART)) . . 95 To select the snapshot image size . . . . . . . . . . . . . . . . . . . . (Image Size) . . 95 Specifying Snapshot Image Quality . . . . . . . . . . . . . . . . . (Image Quality) . . 97 Movie Image Quality Settings . . . . . . . . . . . . . . . . . . . . . . (Movie Quality) . . 97 Specifying ISO Sensitivity . . . . . . . . . . . . . . . . . . . . . . . . . . . . . . . . . (ISO) . . 98 Specifying the ISO Sensitivity Upper Limit . . . . . . . . . . . . (ISO High Limit) . . 99 Zooming with Super Resolution . . . . . . . . . . . . . . . . . . . . . . .(Zoom (SR)) . . 99 Specifying the Auto Focus Area . . . . . . . . . . . . . . . . . . . . . . . . . (AF Area) . 100
5 |
Contents |
|

Reducing the Effects of Camera and Subject Movement |
. . . .(Anti Shake) . 101 |
Optimizing Image Brightness . . . . . . . . . . . . . . . . . . . . . |
. . . . . . (Lighting) . 102 |
Shooting with Continuous Auto Focus . . . . . . . . . . . . . . |
(Continuous AF) . 103 |
Shooting with Face Detection . . . . . . . . . . . . . . . . . . . . . |
(Face Detection) . 103 |
Turning Digital Zoom On or Off . . . . . . . . . . . . . . . . . . . . |
. . (Digital Zoom) . 104 |
Reducing Wind Noise during Movie Recording . . . . . . . |
(Wind Noise Cut) . 104 |
Recording Beautiful Portraits . . . . . . . . . . . . . . . . . . . . . |
.(Make-up Level) . 105 |
Correcting Image Brightness . . . . . . . . . . . . . . . . . . . . . |
. . . . . . (EV Shift) . 105 |
Adjusting White Balance . . . . . . . . . . . . . . . . . . . . . . . . . |
. (White Balance) . 105 |
Selecting a Focus Mode . . . . . . . . . . . . . . . . . . . . . . . . . |
. . . . . . . (Focus) . 105 |
Using the Self-timer . . . . . . . . . . . . . . . . . . . . . . . . . . . . |
. . . . .(Self-timer) . 105 |
Specifying the Metering Mode . . . . . . . . . . . . . . . . . . . . |
. . . . . (Metering) . 106 |
Specifying Flash Intensity . . . . . . . . . . . . . . . . . . . . . . . . |
. (Flash Intensity) . 106 |
Controlling Image Sharpness . . . . . . . . . . . . . . . . . . . . . |
. . . . (Sharpness) . 106 |
Controlling Color Saturation . . . . . . . . . . . . . . . . . . . . . . |
. . . . (Saturation) . 106 |
Adjusting Image Contrast . . . . . . . . . . . . . . . . . . . . . . . . |
. . . . . .(Contrast) . 106 |
Using the Auto Focus Assist Light . . . . . . . . . . . . . . . . . |
(AF Assist Light) . 107 |
Turning on Image Review . . . . . . . . . . . . . . . . . . . . . . . . |
. . . . . . (Review) . 107 |
Using Icon Help . . . . . . . . . . . . . . . . . . . . . . . . . . . . . . . |
. . . . . (Icon Help) . 108 |
Changing the Monitor Screen when Recording . . . . . . . |
. . (Shooting Info) . 108 |
Configuring Power On Default Settings . . . . . . . . . . . . . |
. . . . . . (Memory) . 110 |
] Viewing Snapshots and Movies |
111 |
Viewing Snapshots . . . . . . . . . . . . . . . . . . . . . . . . . . . . . . . . . . . . . . . . . . . . .111 Viewing a Movie. . . . . . . . . . . . . . . . . . . . . . . . . . . . . . . . . . . . . . . . . . . . . . . .111 Viewing a Panorama Image. . . . . . . . . . . . . . . . . . . . . . . . . . . . . . . . . . . . . . 112 Viewing Continuous Shutter Images . . . . . . . . . . . . . . . . . . . . . . . . . . . . . . . 113
] Deleting Continuous Shutter Images . . . . . . . . . . . . . . . . . . . . . . . . . . . . . . . . 114 ] Dividing Up a CS Group . . . . . . . . . . . . . . . . . . . . . . . . . . . . . . . . . . . . . . . . . . 116 ] Copying a CS Group Image . . . . . . . . . . . . . . . . . . . . . . . . . . . . . . . . . . . . . . . 117
Zooming an On-screen Image . . . . . . . . . . . . . . . . . . . . . . . . . . . . . . . . . . . . 117 Displaying the Image Menu . . . . . . . . . . . . . . . . . . . . . . . . . . . . . . . . . . . . . . 118 Viewing Snapshots and Movies on a TV Screen. . . . . . . . . . . . . . . . . . . . . . 118
] Viewing High-quality Movies on a Hi-Vision Television . . . . . . . . . . . . . . . . . . . 119
] Other Playback Functions |
(PLAY MENU) 122 |
Playing a Slideshow on the Camera . . . . . . . . . . . . . . . . . . . . (Slideshow) . 122
] Transferring Music from Your Computer to Camera Memory . . . . . . . . . . . . . . 124
Creating a Snapshot of Movie Frames . . . . . . . . . . . . . (MOTION PRINT) . 125 Editing a Movie on the Camera . . . . . . . . . . . . . . . . . . . . .(Movie Editing) . 125 To merge two movies . . . . . . . . . . . . . . . . . . . . . . . . . . . . . (Movie Merge) . 127 Optimizing Image Brightness . . . . . . . . . . . . . . . . . . . . . . . . . . . (Lighting) . 128 Adjusting White Balance . . . . . . . . . . . . . . . . . . . . . . . . . . (White Balance) . 128 Adjusting the Brightness of an Existing Snapshot . . . . . . . . . (Brightness) . 129
6 |
Contents |
|

Selecting Images for Printing . . . . . . . . . . . . . . . . . . . . . . (DPOF Printing) . 129 Protecting a File Against Deletion . . . . . . . . . . . . . . . . . . . . . . . . .(Protect) . 129 Editing the Date and Time of an Image . . . . . . . . . . . . . . . . . (Date/Time) . 131 Rotating an Image . . . . . . . . . . . . . . . . . . . . . . . . . . . . . . . . . . .(Rotation) . 131 Resizing a Snapshot . . . . . . . . . . . . . . . . . . . . . . . . . . . . . . . . . . . (Resize) . 132 Cropping a Snapshot . . . . . . . . . . . . . . . . . . . . . . . . . . . . . . . . (Trimming) . 132 Copying Files . . . . . . . . . . . . . . . . . . . . . . . . . . . . . . . . . . . . . . . . . (Copy) . 133 Dividing Up a Continuous Shutter Group . . . . . . . . . . . . . . (Divide Group) . 133 Combining CS Images into a Single Still Image . . . . . . . . (CS Multi Print) . 134 Editing a CS Image . . . . . . . . . . . . . . . . . . . . . . . . . . . . . .(CS Frame Edit) . 134
] Printing |
135 |
Printing Snapshots. . . . . . . . . . . . . . . . . . . . . . . . . . . . . . . |
. . . . . . . . . . . . . . 135 |
Connecting Directly to a PictBridge Compatible Printer . . |
. . . . . . . . . . . . . . 135 |
Using DPOF to Specify Images to be Printed and |
|
the Number of Copies . . . . . . . . . . . . . . . . . . . . . . . . . . . . |
(DPOF Printing) . 137 |
] Using the Camera with a Computer |
142 |
Things you can do using a computer... . . . . . . . . . . . . . . . . . . . . . . . . . . . . . 142 Using the Camera with a Windows Computer . . . . . . . . . . . . . . . . . . . . . . . . 143
] Viewing and Storing Images on a Computer. . . . . . . . . . . . . . . . . . . . . . . . . . . 143 ] Playing Movies . . . . . . . . . . . . . . . . . . . . . . . . . . . . . . . . . . . . . . . . . . . . . . . . . 146
Using the Camera with a Macintosh . . . . . . . . . . . . . . . . . . . . . . . . . . . . . . . 147
] Connecting the Camera to Your Computer and Saving Files . . . . . . . . . . . . . . 147 ] Playing a Movie. . . . . . . . . . . . . . . . . . . . . . . . . . . . . . . . . . . . . . . . . . . . . . . . . 149
Using an SD Memory Card with Built-in LAN . . . . . . . . . . . . . . . . . . . . . . . . 150
] Transferring Images with an Eye-Fi Card . . . . . . . . . . . . . |
. . . . . . (Eye-Fi). . |
150 |
] Using a Smartphone to Play Back Images Stored |
|
|
on a FlashAir Card . . . . . . . . . . . . . . . . . . . . . . . . . . . . . . . |
. . . . . (FlashAir). . |
152 |
Files and Folders . . . . . . . . . . . . . . . . . . . . . . . . . . . . . . . . . |
. . . . . . . . . . . . . |
154 |
Memory Card Data . . . . . . . . . . . . . . . . . . . . . . . . . . . . . . . |
. . . . . . . . . . . . . |
155 |
] Other Settings |
(SETTING) 157 |
|
Enabling Power Saving . . . . . . . . . . . . . . . . . . . . . . . . . . . . . (ECO Mode) . 157 Adjusting Monitor Screen Brightness . . . . . . . . . . . . . . . . . . . . . .(Screen) . 157 Turning off Eye-Fi Card Communication . . . . . . . . . . . . . . . . . . . . (Eye-Fi) . 158 Configuring FlashAir Card Communication Settings . . . . . . . . . (FlashAir) . 158 Configuring Camera Sound Settings . . . . . . . . . . . . . . . . . . . . . (Sounds) . 158 Creating an Image Storage Folder . . . . . . . . . . . . . . . . . . (Create Folder) . 159 Time Stamping Snapshots . . . . . . . . . . . . . . . . . . . . . . . . . . .(Timestamp) . 159 Auto Image Orientation Detection and Rotation . . . . . . . . . . (Auto Rotate) . 160 Specifying the File Name Serial Number Generation Rule . . . . . (File No.) . 160 Configuring Sleep State Settings . . . . . . . . . . . . . . . . . . . . . . . . . . (Sleep) . 161 Configuring Auto Power Off Settings . . . . . . . . . . . . . . . (Auto Power Off) . 161
7 |
Contents |
|

Configuring [r] Setting . . . . . . . . . . . . . . . . . . . . . . . . . . . . . . . . . .(REC) . 162 Configuring [p] Setting . . . . . . . . . . . . . . . . . . . . . . . . . . . . . . . . . (PLAY) . 162 Disabling File Deletion . . . . . . . . . . . . . . . . . . . . . . . . . . . . . .(Delete Key) . 162 Configuring World Time Settings . . . . . . . . . . . . . . . . . . . . . (World Time) . 163 Setting the Camera’s Clock . . . . . . . . . . . . . . . . . . . . . . . . . . . . . (Adjust) . 164 Specifying the Date Style . . . . . . . . . . . . . . . . . . . . . . . . . . . . (Date Style) . 164 Specifying the Display Language . . . . . . . . . . . . . . . . . . . . . . (Language) . 165 Configuring USB Protocol Settings . . . . . . . . . . . . . . . . . . . . . . . . . .(USB) . 165 Selecting the Screen Aspect Ratio and Video Output System (Video Out) . 166 Selecting the HDMI Terminal Output Method . . . . . . . . . . . (HDMI Output) . 166 Formatting Built-in Memory or a Memory Card . . . . . . . . . . . . . . .(Format) . 167 Resetting the Camera to Factory Defaults . . . . . . . . . . . . . . . . . . .(Reset) . 167
] Appendix |
168 |
Safety Precautions. . . . . . . . . . . . . . . . . . . . . . . . . . . . . . . . . . . . . . . . . . . . . 168 Precautions During Use. . . . . . . . . . . . . . . . . . . . . . . . . . . . . . . . . . . . . . . . . 175 Power Supply. . . . . . . . . . . . . . . . . . . . . . . . . . . . . . . . . . . . . . . . . . . . . . . . . 178
] Charging . . . . . . . . . . . . . . . . . . . . . . . . . . . . . . . . . . . . . . . . . . . . . . . . . . . . . . 178 ] Battery Precautions. . . . . . . . . . . . . . . . . . . . . . . . . . . . . . . . . . . . . . . . . . . . . . 179 ] Using the Camera in another Country . . . . . . . . . . . . . . . . . . . . . . . . . . . . . . . 179
Using a Memory Card . . . . . . . . . . . . . . . . . . . . . . . . . . . . . . . . . . . . . . . . . . 180 Reset Initial Default Settings . . . . . . . . . . . . . . . . . . . . . . . . . . . . . . . . . . . . . 182 When things don’t go right... . . . . . . . . . . . . . . . . . . . . . . . . . . . . . . . . . . . . . 184
] Troubleshooting . . . . . . . . . . . . . . . . . . . . . . . . . . . . . . . . . . . . . . . . . . . . . . . . 184 ] Display Messages. . . . . . . . . . . . . . . . . . . . . . . . . . . . . . . . . . . . . . . . . . . . . . . 189
Number of Snapshots/Movie Recording Time . . . . . . . . . . . . . . . . . . . . . . . . 191 Specifications. . . . . . . . . . . . . . . . . . . . . . . . . . . . . . . . . . . . . . . . . . . . . . . . . 195
8 |
Contents |
|
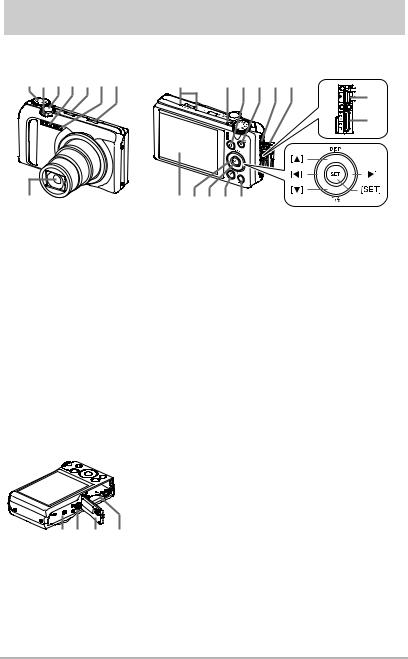
General Guide
The numbers in parentheses indicate the pages where each item is explained.
Front |
Back |
1234567 |
9 bk bl bm bn bo |
|
bp |
|
bq |
8 |
cl ck bt bs br |
|
1Mode dial |
bkBack lamp |
br[MENU] button |
(pages 27, 35, 62) |
(pages 17, 19, 25, 28, |
(pages 62, 91) |
2Zoom controller |
47) |
bs[p] (PLAY) button |
(pages 28, 50, 117) |
bl[r] (REC) button |
(pages 25, 31) |
3Shutter button |
(page 25) |
bt[SET] button |
(pages 25, 27) |
bm[0] (Movie) button |
(pages 37, 62, 91) |
4Flash (page 47) |
(page 62) |
ckControl button |
5[ON/OFF] (Power) |
bnStrap hole (page 2) |
([8] [2] [4] [6]) |
(pages 20, 25) |
boTerminal cover |
(pages 37, 62, 74, 91) |
6Front lamp |
bp[USB/AV] port |
clMonitor screen |
(pages 38, 107) |
(pages 16, 18) |
(pages 10, 27) |
7[Õ] (Continuous |
bq[HDMI OUT] |
|
Shutter) button (page 54) |
HDMI output (mini) |
|
8Lens |
(pages 89, 120) |
|
9Microphones (page 63) |
|
|
Bottom |
|
|
|
cmBattery/memory card slots (pages 15, 23) |
|
|
cnBattery cover |
|
|
coTripod hole |
|
|
Use this hole when attaching to a tripod. |
|
|
cpSpeaker |
|
cp co cn cm |
|
|
9 |
General Guide |
|

Monitor Screen Contents and How to Change Them
The monitor screen uses various indicators, icons, and values to keep you informed of the camera’s status.
•The sample screens in this section are intended to show you the locations of all the indicators and figures that can appear on the monitor screen in various modes. They do not represent screens that actually appear on the camera.
. Snapshot Recording (1 Shot)
1 2 34567 |
|
cn |
8 |
cm |
9 |
cl |
bk |
ck |
bl |
bt |
bm |
bs |
bn |
br |
bo |
bq |
bp |
1Self-timer mode (page 38)
2Face Detection (page 103)
3Recording mode (page 27)
4Image deterioration indicator/ Zoom (SR) indicator (page 52)
5Remaining movie memory capacity (page 62)
 NOTE
NOTE
6Remaining snapshot memory capacity (page 191)
7Snapshot image size/Quality (pages 95, 97)
8Movie quality (FHD/STD movie) (pages 62, 65)/
Recording speed (high speed movie) (page 65) 9Focal distance
(Converted to 35 mm film format.) (page 51) bkAnti Shake (page 101)
blTimestamp indicator (page 159) bmHistogram (page 108)
bnAF Area (page 100) boDate/Time (pages 20, 164) bpFocus frame (pages 28, 100) bqBattery level indicator (page 20) brMetering mode (page 49) bsFlash (page 47)
btExposure compensation (page 46) ckMake-up level (page 45)
clISO sensitivity (page 44) cmFocus mode (page 41) cnWhite balance (page 39)
•Depending on recording settings, the aperture, shutter speed, and ISO sensitivity values may not appear on the monitor screen. These values will be red if the Auto Exposure (AE) is not correct for some reason.
10 |
Monitor Screen Contents and How to Change Them |
|
. Snapshot Recording (Burst Shooting)
1 2 3 4
8
7
6
. Movie Recording
1 23 45
8
|
|
|
|
|
1Continuous Shutter (CS) speed (page 55) |
|
|
|
|
|
2Recording mode (page 27) |
|
5 |
3Remaining snapshot memory capacity |
|||
|
(page 191) |
||||
|
|
|
|
|
4Allowable CS time/number of CS images |
|
|
|
|
|
(page 55) |
|
|
|
|
|
5Remaining movie memory capacity (page 192) |
|
|
|
|
|
6Continuous Shutter mode (page 54) |
|
|
|
|
|
7Prerecord CS shots (page 56) |
|
|
|
|
|
8Maximum CS shots (page 55) |
|
|
|
|
|
1Snapshot recording mode (Snapshot In Movie) |
|
|
|
|
6 |
(page 72) |
|
|
7 |
2Audio recording disabled (page 65) |
||
|
|
||||
3Recording mode (page 62)
4Movie recording time (page 62)
5Remaining movie memory capacity (page 62)
6Movie recording in progress (page 62)
7Movie quality (FHD/STD movie) (pages 62, 65)/
Recording speed (high speed movie) (page 65) 8Remaining snapshot memory capacity
(page 191)
. Snapshot Viewing |
|
|
|
|
|
||||||||||||||||||
123 4 |
|
|
|
|
|
|
|
||||||||||||||||
br |
|
|
|
|
|
|
|
|
|
|
|
|
|
|
|
|
|
|
|
5 |
|||
|
|
|
|
|
|
|
|
|
|
|
|
|
|
|
|
|
|
|
|||||
|
|
|
|
|
|
|
|
|
|
|
|
|
|
|
|
|
|
||||||
|
|
|
|
|
|
|
|
|
|
|
|
|
|
|
|
|
|
|
|||||
|
|
|
|
|
|
6 |
|||||||||||||||||
bq |
|
|
|
|
|
|
7 |
||||||||||||||||
|
|
|
|
|
|
|
|
|
|
|
|
|
|
|
|
|
|
|
|||||
bp |
|
|
|
|
|
|
|
||||||||||||||||
|
|
|
|
|
|
|
|||||||||||||||||
bo |
|
|
|
|
|
|
|
||||||||||||||||
|
|
|
|
|
|
|
|||||||||||||||||
bn |
|
|
|
|
|
|
|
8 |
|||||||||||||||
|
|
|
|
|
|
|
|
|
|||||||||||||||
bm |
|
|
|
|
|
|
|
|
|
|
|
|
|
|
|
|
|
|
|
||||
|
|
|
|
|
|
|
|
|
|
|
|
|
|
|
|
|
|||||||
|
blbk9 |
|
|
|
|
|
|||||||||||||||||
1File type
2Protect indicator (page 129)
3Snapshot image size (page 95)
4Folder name/file name (page 154)
5Snapshot image quality (page 97)
6Recording mode (page 27)
7Histogram (page 108)
8Date/time (page 164)
9Metering mode (page 106) bkWhite balance (page 128) blBattery level indicator (page 20) bmFlash (page 47)
bnExposure compensation (page 46) boShutter speed
bpAperture value
bqISO sensitivity (page 44) brFocal distance
(Converted to 35 mm film format.)
11 |
Monitor Screen Contents and How to Change Them |
|
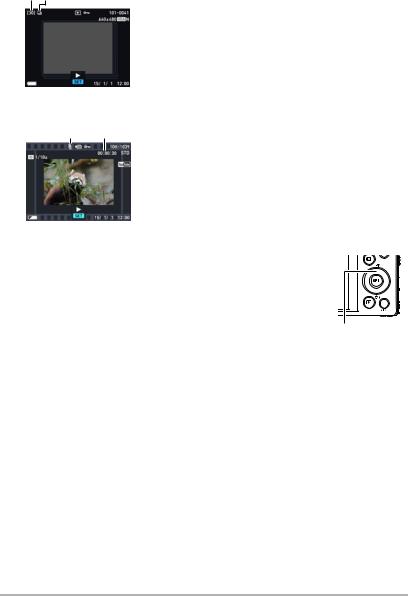
. CS Image Viewing
12
. Movie Playback
1 2
1Number of images in the group (page 113)
2CS group icon (page 113)
1No audio data available
2Movie recording time (page 111)
 3 3Recording mode/Movie quality/speed
 4 (pages 62, 65, 65) 4YouTube (page 71)
. Configuring Monitor Screen Settings
Each press of [8] (DISP) will cycle through display settings that display or hide on-screen information. You can configure separate settings for the REC mode and PLAY mode.
[8] (DISP)
REC mode
Information on |
Displays setting information. |
|
Information off |
Hides setting information. |
|
PLAY mode |
|
|
Information on |
Displays settings when shooting, current date and time, |
|
histogram (page 108), and other information. |
||
|
||
Information off |
No information displayed when shooting. |
|
|
|
12 |
Monitor Screen Contents and How to Change Them |
|
Quick Start Basics
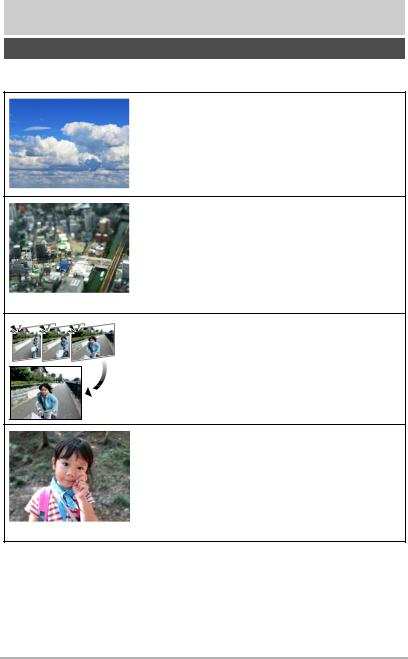
What you can do with your CASIO camera
Your CASIO camera is packed with a powerful selection of features and functions to make recording of digital images easier, including the following main functions.
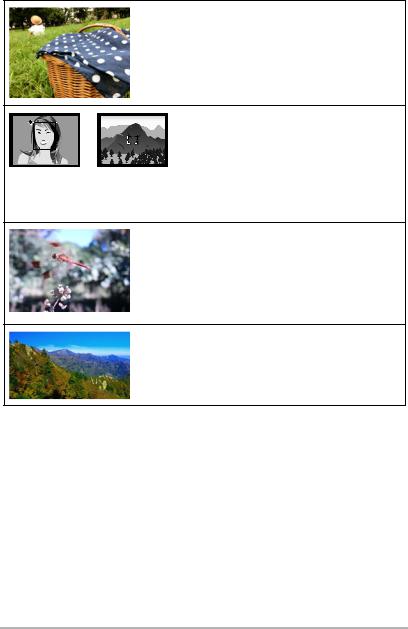
Time Lapse Movie
You can use this function to record movies of natural events that occur over time, to speed up the flow of traffic in a city scene, or to record other similar types of movies.
*See page 69 for more information.
ART SHOT
A variety of artistic effects help to make even common, ordinary subjects become more novel and exciting. “ART SHOT” provides the following effects: HDR Art, Toy Camera, Soft Focus, Light Tone, Pop, Sepia, Monochrome, Miniature, Fisheye, Sparkling Shot.
*See page 58 for more information.
Triple Shot
Pressing the shutter button shoots a burst of three images and stores them in memory. This feature is great for making sure you don’t miss those special moments when kids are around.
*See page 61 for more information.
Blurred Background
This function analyzes a burst of consecutive images and then blurs the background behind the main subject. This creates an effect that really makes the subject stand out, just like photographs taken with a single-lens reflex camera.
*See page 79 for more information.
13 |
Quick Start Basics |
|
All-In-Focus Macro
All-In-Focus Macro shoots and analyzes a burst of multiple images and combines them in a way that produces an image in which everything is in focus: from nearby objects to distant objects.
*See page 80 for more information.
Premium Auto Pro
Select Premium Auto Pro recording and the camera automatically determines whether you are shooting a subject or scenery, and other conditions. Premium Auto Pro delivers higher image quality than standard Auto.
*See page 27 for more information.
High Speed Movie
Movies can be recorded at up to 1000 frames per second. This makes it possible to clearly view phenomena that are invisible to the human eye, in slow motion.
*See page 65 for more information.
FHD Movie Recording
You can record movies in high-quality FHD. (1920x1080 pixels 30 fps)
*See page 65 for more information.
14 |
Quick Start Basics |
|
First, charge the battery prior to use.
Note that the battery of a newly purchased camera is not charged. Perform the steps below to load the battery into the camera and charge it.
•Your camera requires a special CASIO rechargeable lithium ion battery (NP-130A or NP-130) for power. Never try to use any other type of battery.

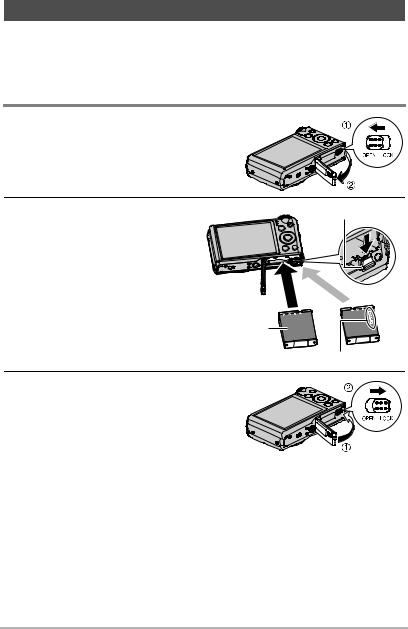
 To load the battery
1. Open the battery cover.
2. Load the battery. |
Stopper |
|
With the CASIO logo on the battery |
|
|
facing downwards (in the direction |
|
|
of the lens), hold the stopper next |
|
|
to the battery in the direction |
|
|
indicated by the arrow as you slide |
|
|
the battery into the camera. Press |
NG |
|
the battery in until the stopper |
||
OK |
||
secures it in place. |
|
|
|
Battery |
|
|
CASIO logo |
3. Close the battery cover.
15 |
Quick Start Basics |
|
To replace the battery |
|
|
1. |
Open the battery cover and |
Stopper |
|
remove the current battery. |
|
|
|
|
2. |
Load a new battery. |
|

 Charge the Battery
You can use either of the two following methods to charge the camera’s battery.
•USB-AC adaptor
•USB connection to a computer (Using the included USB cable.)
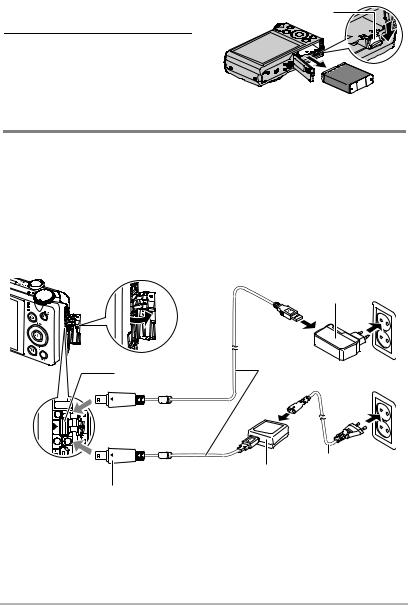
. To charge with the USB-AC adaptor
The adaptor lets you charge the battery while it is loaded in the camera. While the camera is turned off, connect in the sequence shown below. The back lamp should light red, indicating that charging has started. The back lamp will go out when charging is complete.
Charging time: Approximately 240 minutes
|
|
USB-AC adaptor |
|
|
(AD-C54UG) |
|
|
2 |
|
|
1 |
[USB/AV] port |
|
USB cable |
3 |
|
(included with camera) |
|
|
3 |
|
1 |
2 |
4 |
|
|
|
|
|
|
|
Power cord |
|
USB-AC adaptor (AD-C53U) |
|
Making sure that the 6 mark on the camera is aligned with the 4 mark of the USB cable connector, connect the cable to the camera.
•When disconnecting the USB-AC adaptor from the camera, be sure to disconnect from the camera first.
B |
16 |
Quick Start Basics |
|
 IMPORTANT!
•A battery that has not been used for a long time, or ambient temperature extremes can cause charging to take longer than normal. If charging takes longer than about six hours, a timer will terminate it automatically, even if the battery is not fully charged. This is indicated by the back lamp flashing red. If the battery has not been used for a very long time, charging may be terminated automatically and the back lamp may start flashing red after only about 45 minutes. In either case, disconnect the USB cable from the camera and then reconnect it to resume charging.
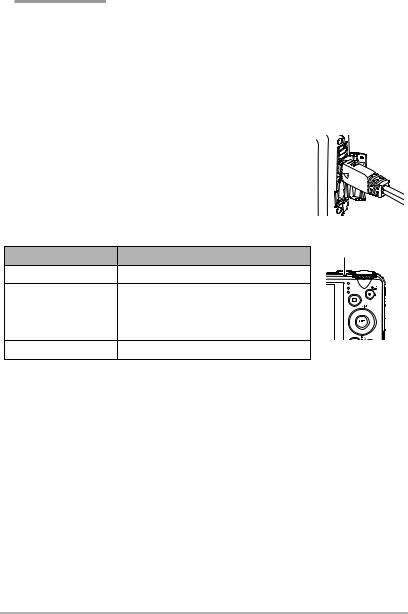
•Make sure that you insert the cable connector into the [USB/AV] port until you feel it click securely into place. Failure to insert the connector fully can result in poor communication or malfunction.
•Note that even while the connector is fully inserted, you
still will be able to see the metal part of the connector as shown in the illustration.
•The USB-AC adaptor will become warm during charging. This is normal and does not indicate malfunction.
• The shape of the power plug depends on each country or geographic area.
Back Lamp Operation
Lamp Status |
Description |
Back lamp |
|
||
Lit Red |
Charging |
|
|
Abnormal ambient temperature, USB- |
|
Flashing Red |
AC adaptor problem, battery problem, |
|
or charging terminated by timer (page |
|
|
|
|
|
|
178) |
|
Off |
Charging complete |
|
B |
17 |
Quick Start Basics |
|

. To charge using a USB connection to a computer
USB connection lets you charge the battery while it is loaded in the camera. While the camera is turned off, connect in the sequence shown below (1, 2). The camera’s back lamp will light red. After a short while, the camera will turn on
automatically and the back lamp will light amber to indicate that charging has started. The back lamp will light green when charging is complete. Note, however, that some computer models or connection conditions can produce low supply capacity. If low supply capacity exists, charging will start without the camera turning on. This is indicated by the back lamp lighting red. The back lamp will go out in this case after charging is complete.
Computer (power turned on)
USB 2
USB port
[USB/AV] port |
1 |
USB cable (included with camera)
Making sure that the 6 mark on the camera is aligned with the 4 mark of the USB cable connector, connect the cable to the camera.
•If the camera is on, press [ON/OFF] (Power) to turn it off before connecting it to your computer.
 IMPORTANT!
•The first time you connect the camera to your computer with the USB cable, an error message may appear on your computer. If this happens, disconnect and then reconnect the USB cable.
•A battery that has not been used for a long time, certain types of computers, and connection conditions can cause charging to take more than approximately six hours, which will trigger a timer that terminates charging automatically, even if the battery is not fully charged. If this happens, disconnect and then reconnect the USB cable to restart charging. To complete charging faster, use of the included USB-AC adaptor is recommended.
•If the battery has not been used for a very long time, charging may terminate automatically and the back lamp may start flashing red or go out after only about 45 minutes. In either case, use of the USB-AC adaptor that comes with the camera is recommended.
•Charging is not performed while the connected computer is in the hibernate mode.
•A charging error can occur immediately after charging begins or some time after charging begins. A charging error is indicated by the back lamp flashing red.
B |
18 |
Quick Start Basics |
|

•If low supply capacity exists due to your computer model or connection conditions, charging will start without the camera turning on. Turning on the camera in this case will cause charging to stop and enter USB data communication between the camera and the computer. The camera’s back lamp will be lit green at this time.
Back Lamp Operation
Lamp Status |
Description |
Back lamp |
|
||
Lit Amber |
Charging |
|
Lit Red |
Charging in progress (Data transfer with |
|
computer not supported.) |
|
|
|
|
|
|
Abnormal ambient temperature, battery |
|
Flashing Red/Off |
problem, or charging terminated by timer |
|
|
(page 178) |
|
Lit Green |
Charging complete, or charging stopped |
|
 NOTE
NOTE
•Charging continues while a camera is connected to a computer’s USB port, even if the camera is turned off. Under this condition, the back lamp operates as described under “Back Lamp Operation” (page 17).
Other Charging Precautions
•With the two charging methods described above, you can charge the camera’s battery (NP-130A or NP-130) without removing it from the camera. You also can charge the battery using an optionally available charger unit (BC-130L). Never use any other type of charger device. Attempting to use a different charger can result in unexpected accident.
•This model can be charged only via from USB 2.0 specification USB port only.
•USB charging devices and power supply devices are subject to fixed standards. Use of an inferior device or a device that is not up to standard can cause malfunction and/or failure of your camera.
•Operation is not guaranteed in the case of a computer built or modified by you. Even in the case of a commercially available computer, certain USB port specifications may make it impossible to charge via the USB cable.
•A battery that is still warm immediately after normal use may not charge fully. Give the battery time to cool before charging it.
•A battery discharges slightly even when it is not loaded in the camera. Because of this, it is recommended that you charge the battery immediately before you need to use it.
•Charging the camera’s battery may cause interference with TV and radio reception. If this happens, plug the USB-AC adaptor into an outlet that is further away from the TV or radio.
•Actual charging time depends on current battery capacity and charging conditions.
•Do not use the USB-AC adaptor with any other device.
•Never use the power cord with another device.
•Use only the USB-AC adaptor and USB cable specified in this manual for charging. Use of any other type of devices may result in improper charging.
B |
19 |
Quick Start Basics |
|

Checking Remaining Battery Power
As battery power is consumed, a battery indicator on the monitor screen indicates remaining power as shown below.
Remaining Power |
High |
|
|
Low |
|
|
|||
Battery Indicator |
* |
* |
* |
|
Indicator Color |
White * White |
* Red |
* Red |
|
|
|
|
|
|
 indicates battery power is low. Charge the battery as soon as possible. Recording is not possible when
  is indicated. Charge the battery immediately.
•The level shown by the battery indicator may change when you switch between the REC mode and PLAY mode.
•Leaving the camera for about 30 days with no power supplied while the battery is dead will cause its date and time settings to be cleared. A message telling you to configure time and date settings will appear the next time you turn on the camera after restoring power. When this happens, configure date and time settings (page 164).
•See page 197 for information about battery life and number of shots.
Battery Power Conservation Tips
•Entering the “ECO Mode” enables low-power operation (page 157).
•When you do not need to use the flash, select ? (Flash Off) for the flash setting (page 47).
•Enable the Auto Power Off and the Sleep features to protect against wasting battery power when you forget to turn off the camera (pages 161, 161).
•Select “Off” for “Continuous AF” (page 103).
Configuring Basic Settings the First Time You Turn On the
Camera
The first time you load a battery into the camera, a screen appears for configuring the display language, date, and time settings. Failure to set the date and time correctly will cause the wrong date and time data to be recorded with images.
 IMPORTANT!
•A screen for language selection will not appear in step 2 of the procedure below if you purchased a camera intended for the Japanese market. To change the display language from Japanese in this case, use the procedure under “Specifying the Display Language (Language)” (page 165). Note that a version of this manual in the language you select may not be included with a camera intended for the Japanese market.
•Camera models sold in certain geographic areas may not support display language selection.
20 |
Quick Start Basics |
|
1. Press [ON/OFF] (Power) to turn on the |
[ON/OFF] (Power) |
camera. |
|
2. Use [8], [2], [4], and [6] to select the language you want and then press [SET].
3.Use [8] and [2] to select a date style and then press [SET].
Example: July 10, 2015 YY/MM/DD * 15/7/10 DD/MM/YY * 10/7/15 MM/DD/YY * 7/10/15
4.Set the date and the time.
Use [4] and [6] to select the setting you want to change and then use [8] and [2] to change it.
To switch between 12-hour and 24-hour format, select “24h” and then use [8] and [2] to change the setting.
5.After setting the date and time, use [4] and [6] to select “Apply” and then press [SET].
If you make a mistake configuring display language, date, or time settings with the above procedure, refer to the following pages for information about how to correct the settings.
–Display language: page 165
–Date and time: page 164
 NOTE
NOTE
•Each country controls its local time offset and the use of summer time, and so they are subject to change.
•Removing the battery from the camera too soon after configuring time and date settings for the first time can cause the settings to be reset to their factory defaults. Do not remove the battery for at least 24 hours after configuring settings.
21 |
Quick Start Basics |
|

Preparing a Memory Card
Though the camera has built-in memory that can be used to store images and movies, you probably will want to purchase a commercially available memory card for greater capacity. The camera does not come with a memory card. Images recorded while a memory card is loaded are saved to the memory card. When no memory card is loaded, images are saved to built-in memory.
• For information about memory card capacities, see page 191.

 Supported Memory Cards
– SD Memory Card
– SDHC Memory Card
– SDXC Memory Card
Use one of the above types of memory card.
•The above are supported memory card types as of November 2013.
•This camera supports use of SD memory cards of the following types and capacities: SD memory cards up to 2GB, SDHC memory cards from 2GB up to 32GB, SDXC memory cards from 32GB up to 2TB. Note that the ability to use any particular card with this camera, even if it satisfies the above capacity and type requirements, is not guaranteed.
•This camera supports use of Eye-Fi cards and FlashAir cards.
. Memory Card Handling Precautions
Certain types of cards can slow down processing speeds, and even can make it impossible to store High Quality movies correctly. Also, use of certain types of memory cards slows down data transfer and increases the time it takes to record movie data, which can result in movie frames being dropped. The Y indicator on the monitor screen turns yellow to indicate that frames are being dropped. In order to avoid problems such as these, use of an Ultra High Speed Type SD memory card is recommended. Note, however that CASIO makes no guarantees about the operation of any Ultra High Speed Type SD memory card used with this camera.
22 |
Quick Start Basics |
|
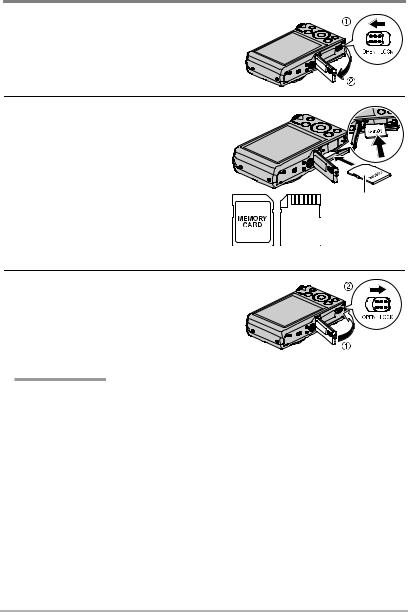

 To load a memory card
1. Press [ON/OFF] (Power) to turn off the camera and then open the battery cover.
2. Load a memory card.
Positioning the memory card so its front is facing upwards (towards the monitor screen side of the camera), slide it into the card slot all the way in until you hear it click securely into place.
Front
Front Back
3. Close the battery cover.
 IMPORTANT!
•Never insert anything besides a supported memory card (page 22) into the memory card slot.
•Should water or any foreign object ever get into the card slot, immediately turn off the camera, remove the battery, and contact your retailer or nearest CASIO authorized service center.
23 |
Quick Start Basics |
|

To replace the memory card
Press the memory card and then release it. This will cause it to pop out of the memory card slot slightly. Pull the card out the rest of the way and then insert another one.
• Never remove a card from the camera while the back lamp is flashing green. Doing so can cause the image save operation to fail and even damage the memory card.

 To format (initialize) a new memory card
Format a memory card on the camera before using it for the first time.
 IMPORTANT!
•Formatting a memory card that already has snapshots or other files on it, will delete its contents. Normally you do not need to format a memory card again. However, if storing to a card has slowed down or if you notice any other abnormality, re-format the card.
•Be sure to use the camera to format a memory card. Formatting a card on a computer will result in a non-SD standard format, which can greatly slow down processing time and cause compatibility, performance, and other problems.
•Before formatting a new Eye-Fi card to use it for the first time, copy the Eye-Fi install file from the card to your computer.
•Formatting a FlashAir card with the camera will delete files on the card that are required for communication. For details about formatting, see the instructions that come with the FlashAir card.
1.Turn on the camera and press [MENU].
2.Press [4], use [8] and [2] to select the “¥ SETTING” tab, and then press [6].
3.Use [8] and [2] to select “Format” and then press [SET].
4.Use [8] and [2] to select “Format” and then press [SET].
5.Use [8] and [2] to select “Yes” and then press [SET].
24 |
Quick Start Basics |
|

Turning the Camera On and Off
. To turn power on
Pressing [ON/OFF] (Power) enters the REC mode so you can record images. Pressing [p] (PLAY) while in the REC mode enters the PLAY mode, which you can use to view snapshots and movies (pages 31, 111).
•You also can turn on the camera by pressing [p] (PLAY).
•Pressing [r] (REC) or the shutter button while in the PLAY mode returns to the REC mode.
•Take care to ensure that nothing is restricting or coming into contact with the lens as it extends. Holding the lens with your hand so it cannot extend creates the risk of malfunction.
•About 10 seconds after you press [p] (PLAY) to enter the PLAY mode, the lens will retract into the camera.
•The Sleep function (page 161) or Auto Power Off (page 161) will turn off power automatically if you do not perform any operation for a preset amount of time.
[ON/OFF] (Power)
Shutter button
Back lamp
[p] (PLAY) [r] (REC)
. To turn off the camera
Press [ON/OFF] (Power).
 NOTE
NOTE
•You also can configure the camera to turn on or off when you press [r] (REC) (page 162).
•The camera can be configured so power turns off when [p] (PLAY) is pressed (page 162).
25 |
Quick Start Basics |
|

Holding the Camera Correctly
Your images will not come out |
Horizontal |
Vertical |
clearly if you move the camera |
||
when you press the shutter |
|
|
button. When pressing the |
|
|
shutter button, be sure to hold |
|
|
the camera as shown in the |
|
|
illustration, and keep it still by |
|
|
pressing your arms firmly |
|
|
against your sides as you shoot. |
|
|
Holding the camera still, |
Hold the camera so the flash is above the lens. |
|
carefully press the shutter button |
||
and take care to avoid all |
|
|
movement as the shutter
releases and for a few moments after it releases. This is especially important when available lighting is low, which slows down the shutter speed.
 NOTE
NOTE
• |
Take care that your fingers and the strap do not |
Flash |
|
cover any of the areas indicated in the illustration. |
|
• |
To protect against accidentally dropping the |
Front lamp |
|
camera, attach the wrist strap and make sure it is |
|
|
around your fingers or wrist while you are |
|
|
operating the camera. |
|
• |
Never swing the camera around by its strap. |
|
• The supplied strap is intended for use with this camera only. Never use it for any other purpose.
• When the “Auto Rotate” setting is turned on, the
camera will detect whether it is being held |
Lens |
|
|
vertically or horizontally when a snapshot image is |
|
shot. When you display an image shot with the camera held vertically, the image is rotated automatically 90 degrees when displayed on the monitor screen (page 160).
 IMPORTANT!
•Take care to ensure that your fingers are not blocking or are not too close to the flash. Fingers
can cause unwanted shadows when using the flash.
26 |
Quick Start Basics |
|
To shoot a snapshot

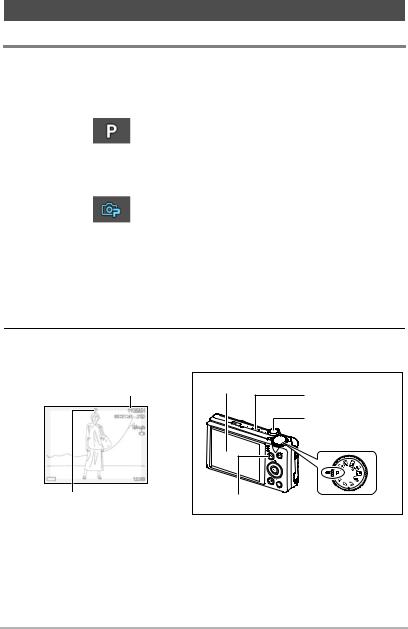
 Selecting an Auto Recording Mode
You can select one of two auto recording modes (Program Auto or Premium Auto Pro) according to your digital imaging needs.
Setting |
REC Screen |
Description |
||
Icon Display |
||||
|
|
|
||
P Program |
|
This is the standard Auto recording mode. |
||
Auto |
|
|||
|
|
|
||
|
|
|
||
|
|
With Premium Auto Pro recording, the camera |
||
|
|
automatically determines whether you are shooting a |
||
|
|
subject or scenery, and other conditions. Premium |
||
Ÿ Premium |
|
Auto Pro recording delivers higher image quality than |
||
|
Program Auto recording. |
|||
Auto Pro |
|
|||
|
• |
Some of the settings configured automatically by |
||
|
|
|||
|
|
|
Premium Auto Pro cannot be changed by you. |
|
|
|
• |
It also requires more power (and runs down the |
|
|
|
|
battery quicker) than Program Auto. |
|
|
|
|
|
|
1.Press [ON/OFF] (Power) to turn on the camera.
The camera will enter the REC mode.
•If the camera is in the PLAY mode, press [r] (REC) or the shutter button.
2.Align the mode dial with [P] (Program Auto) or [Ÿ] (Premium Auto
Pro) to select Auto recording mode.
Remaining Snapshot Memory
Capacity (page 191)
Auto recording mode icon
Monitor screen |
[ON/OFF] (Power) |
|
|
|
Shutter button |
|
Mode dial |
[r] (REC) |
|
27 |
Quick Start Basics |
|
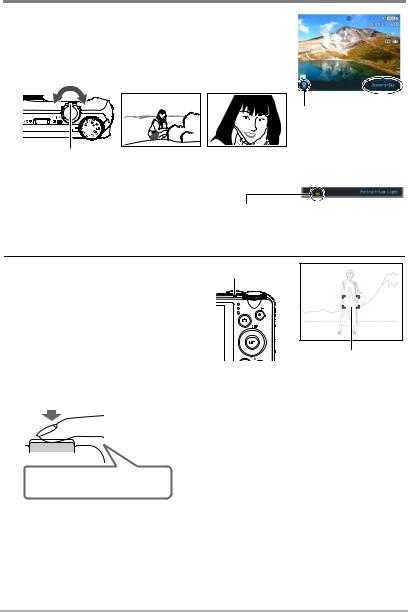

 To shoot a snapshot
1. Point the camera at the subject.
If you are shooting with Premium Auto Pro, text will appear at the bottom of the monitor screen describing the type of shot the camera has detected.
• You can zoom the image, if you want.
Zoom controller |
w Wide Angle |
z Telephoto |
Appears when the camera detects it is stationary on a tripod.
If the camera decides that it needs to shoot a series of images with Continuous Shutter (CS), it will display “Š”. Take care to avoid any camera and subject movement until shooting of all of the CS images is complete.
2.Half-press the shutter button to focus the image.
When focus is complete, the camera will beep, the back lamp will light green, and the focus frame will turn green.
Back lamp
Focus frame
Half-press
Press lightly until the button stops.
When you half-press the shutter button, the camera automatically adjusts exposure and focuses on the subject it is currently pointed at. Mastering how much pressure is required for a half-press and a full-press of the shutter button is an important technique for good-looking images.
Beep, beep (Image is in focus.)
28 |
Quick Start Basics |
|
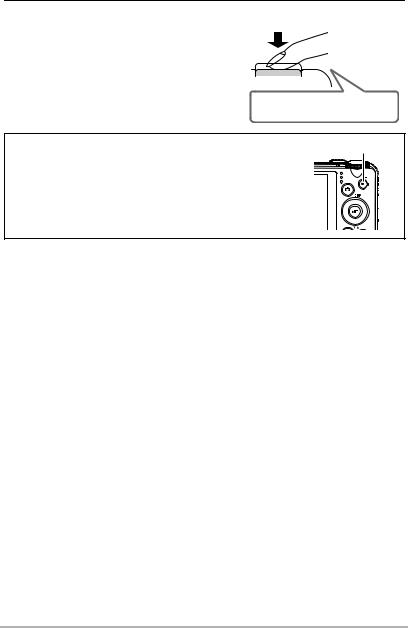
3.Continuing to keep the camera still, press the shutter button the rest of the way down.
This records the snapshot.
Full-press
Snap (Image is recorded.)
Recording a Movie |
[0] (Movie) |
Press [0] (Movie) to start movie recording. Press [0] (Movie) again to stop movie recording. See the following pages for details.
Standard movie (STD movie): page 62 High-definition movie (FHD movie): page 65 High speed movie (HS movie): page 65
. If the image does not focus...
If the focus frame stays red and the back lamp is flashing green, it means that the image is not in focus (because the subject is too close, etc.). Re-point the camera at the subject and try to focus again.
. Shooting with Auto
If the subject is not in the center of the frame...
“Focus lock” (page 43) is the name of a technique you can use when you want to shoot an image in which the subject to be focused on is not within the focus frame in the center of the screen.
To track the movement of a moving subject
Half-press the shutter button to follow and focus automatically on a moving subject. See “O Tracking” (page 100) for more information.
29 |
Quick Start Basics |
|

. Shooting with Premium Auto Pro
•Some menu items are not available while Premium Auto Pro is in use (page 91). Only the menu items whose settings can be configured will be displayed on the menus while Premium Auto Pro is in use.
•In addition to shutter speed, aperture, and ISO sensitivity, the camera automatically executes the following operation as required when shooting with Premium Auto Pro.
–Continuous AF (page 103)
–Intelligent AF (page 100)
–Face Detection (page 103)
–HS Scene Shooting (page 30)
•Shooting with Premium Auto Pro can cause vibration and noise to occur due to lens operation. This does not indicate malfunction.
•When Shooting with Premium Auto Pro, the message “Processing Premium Auto.” may appear on the monitor screen. If you feel the camera is taking too long to process data, try shooting with standard Auto instead.
•In some cases, Premium Auto Pro may not be able to interpret the shooting environment correctly. If this happens, shoot with standard Auto.
•If “Š” is displayed, the camera will shoot a series of CS images and merge them into a final image. Take care to avoid any camera and subject movement until shooting of all of the CS images is complete. If you do not want to shoot CS images, select “Off” for the Control Panel (page 37) “HS Scene Shooting” item.
•Certain flash settings (page 47) can limit environmental factors detectable by Premium Auto Pro.
30 |
Quick Start Basics |
|
Loading...