


 Loading...
E
Digital Camera
EX-S880
User’s Guide
Thank you for purchasing this CASIO product.
•Before using it, be sure to read the precautions contained in this User’s Guide.
•Keep the User’s Guide in a safe place for future reference.
•For the most up-to-date information about this
product, visit the official EXILIM Website at http://www.exilim.com/
K838PCM1DMX
1
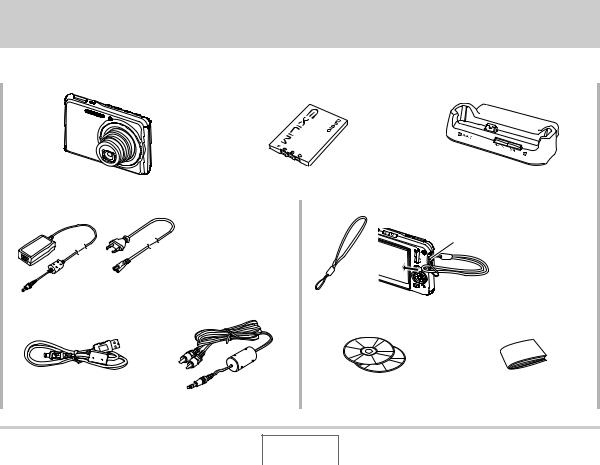
UNPACKING
As you unpack your camera, check to make sure that all items shown below are included. If anything is missing, contact your original retailer.
Digital Camera |
Rechargeable Lithium Ion Battery |
USB Cradle (CA-37) |
|
(NP-20) |
|||
|
|
||
|
|
|
*The shape of the AC power cord plug varies according to country or geographic area.
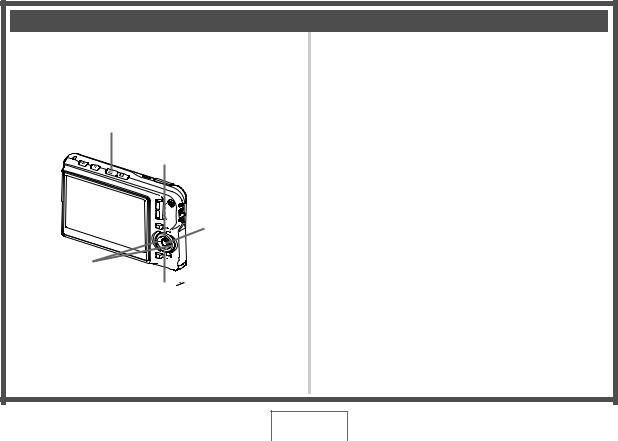
To attach the strap to the camera.
Attach strap here.
Special AC Adaptor (AD-C52G)/AC Power Cord * |
Strap |
USB Cable |
AV Cable |
CD-ROMs (2) |
Basic Reference |
|
|
|
|
UNPACKING
2

CONTENTS
UNPACKING |
2 |
QUICK START BASICS |
9 |
First, charge the battery . . . . . . . . . . . . . . . . . . . . |
. . 9 |
Configuring Display Language, Date, |
|
and Time Settings . . . . . . . . . . . . . . . . . . . . . . . . . |
. 11 |
Using a Memory Card . . . . . . . . . . . . . . . . . . . . . . . |
13 |
Shooting a Snapshot. . . . . . . . . . . . . . . . . . . . . . . . |
15 |
Viewing Snapshots . . . . . . . . . . . . . . . . . . . . . . . . . |
17 |
Shooting a Movie . . . . . . . . . . . . . . . . . . . . . . . . . . . |
18 |
Viewing a Movie . . . . . . . . . . . . . . . . . . . . . . . . . . . . |
19 |
Deleting a File . . . . . . . . . . . . . . . . . . . . . . . . . . . . . |
20 |
INTRODUCTION |
21 |
Features . . . . . . . . . . . . . . . . . . . . . . . . . . . . . . . . . . 21 Read this first! . . . . . . . . . . . . . . . . . . . . . . . . . . . . . 22 Precautions during Use . . . . . . . . . . . . . . . . . . . . . 26
GETTING READY |
36 |
Charging the Battery . . . . . . . . . . . . . . . . . . . . . . . |
. 36 |
■ To load the battery |
36 |
■ To charge the battery |
37 |
■ Replacing the Battery |
41 |
■ Battery Precautions |
42 |
Using the Camera in another Country . . . . . . . . . . 43 Turning Power On and Off . . . . . . . . . . . . . . . . . . . 43 Using a Memory Card . . . . . . . . . . . . . . . . . . . . . . . 46
■ Supported Memory Cards |
47 |
■ Loading a Memory Card into the Camera |
48 |
■ Replacing the Memory Card |
49 |
■ Formatting a Memory Card |
50 |
Using On-screen Menus . . . . . . . . . . . . . . . . . . . . . 52
Configuring Monitor Screen Settings . . . . . . . . . . 53
■ Selecting a Screen Layout (Layout) |
54 |
■ Turning Display Information On and Off (Info.) |
57 |
■ Adjusting Monitor Screen Brightness (Brightness) |
58 |
■ Adjusting Monitor Screen Image Quality (Type) |
59 |
If you lose your way... . . . . . . . . . . . . . . . . . . . . . . . 60
CONTENTS
3

SHOOTING A SNAPSHOT |
62 |
Holding the Camera Correctly . . . . . . . . . . . . . . . |
. 62 |
Shooting a Snapshot. . . . . . . . . . . . . . . . . . . . . . . . |
63 |
■ Specifying Image Size |
66 |
■ Specifying Image Quality |
68 |
■ Turning Off the AF Assist Lamp |
69 |
■ Snapshot Shooting Precautions |
70 |
■ Auto Focus Restrictions |
71 |
Shooting with Zoom . . . . . . . . . . . . . . . . . . . . . . . . 71 Using Flash . . . . . . . . . . . . . . . . . . . . . . . . . . . . . . . 75 Using the Self-Timer . . . . . . . . . . . . . . . . . . . . . . . . 79 Using Continuous Shutter . . . . . . . . . . . . . . . . . . . 81
■ Selecting the Continuous Shutter Mode |
82 |
■Recording with Normal-speed Continuous Shutter, High-speed Continuous Shutter,
and Flash Continuous Shutter |
82 |
■ Recording with Zoom Continuous Shutter |
83 |
■ Continuous Shutter Precautions |
84 |
Adding Audio to a Snapshot . . . . . . . . . . . . . . . . . 85 Face Recognition. . . . . . . . . . . . . . . . . . . . . . . . . . . 87
■ Performing a face recognition recording |
|
operation (Normal Mode) |
87 |
■ Using the Family First Mode to Give Priority |
|
to Particular Faces |
88 |
■ Face Recognition Precautions |
92 |
SHOOTING A MOVIE |
94 |
Movie Image Quality . . . . . . . . . . . . . . . . . . . . . . . |
. 94 |
Shooting a Movie . . . . . . . . . . . . . . . . . . . . . . . . . . |
. 95 |
■ Movie Recording Precautions |
96 |
Using Short Movie . . . . . . . . . . . . . . . . . . . . . . . . . . 97 Using Past Movie . . . . . . . . . . . . . . . . . . . . . . . . . . 100 Shooting a Snapshot while Shooting
a Movie (Snapshot-In-Movie) . . . . . . . . . . . . . . . . 102
USING BEST SHOT |
104 |
Reducing the Effects of Hand and Subject Movement . . . . . . . . . . . . . . . . . . . . . . . . . . . . . . . . 110 Taking Bright Images without Flash . . . . . . . . . . 111 Shooting Images of Business Cards
and Documents (Business Shot) . . . . . . . . . . . . . 112 Restoring an Old Photograph. . . . . . . . . . . . . . . . 115 Recording Snapshots into a Multi-image
Layout (Layout Shots) . . . . . . . . . . . . . . . . . . . . . . 117 Auto Tracking a Moving Subject
(Auto Framing) . . . . . . . . . . . . . . . . . . . . . . . . . . . . 119
CONTENTS
4

ADVANCED SETTINGS |
121 |
Changing the Focus Mode . . . . . . . . . . . . . . . . . . 121 |
|
■ Using Auto Focus |
122 |
■ Using Macro Focus |
123 |
■ Using Fixed Focus (Pan Focus) |
129 |
■ Using Infinity Focus |
129 |
■ Using Manual Focus |
129 |
Correcting Image Brightness (EV Shift) . . . . . . . 131 Controlling White Balance . . . . . . . . . . . . . . . . . . 132 Specifying ISO Sensitivity . . . . . . . . . . . . . . . . . . 135 Specifying the Metering Mode . . . . . . . . . . . . . . . 136 Reducing the Effects of Overexposure and Underexposure . . . . . . . . . . . . . . . . . . . . . . . . . . . 138 Enhancing Human Skin Textures. . . . . . . . . . . . . 139 Using the Camera’s Color Filter Effects . . . . . . . 139 Controlling Image Sharpness. . . . . . . . . . . . . . . . 140 Controlling Color Saturation . . . . . . . . . . . . . . . . 140 Adjusting Image Contrast . . . . . . . . . . . . . . . . . . . 141 Date Stamping Snapshots . . . . . . . . . . . . . . . . . . 141 Using the On-screen Histogram to
Check Exposure. . . . . . . . . . . . . . . . . . . . . . . . . . . 142
Other Useful Recording Functions . . . . . . . . . . . 144
■ Using Key Customize to Assign Functions |
|
[W] and [X] |
145 |
■ Displaying an On-screen Grid |
146 |
■ Displaying the Image You Just Recorded |
|
(Image Review) |
146 |
■ Using Icon Help |
147 |
■ Using Mode Memory to Configure Power On |
|
Default Settings |
148 |
■ Resetting the Camera to Its Initial Factory |
|
Defaults |
150 |
VIEWING SNAPSHOTS |
|
AND MOVIES |
151 |
Viewing a Snapshot . . . . . . . . . . . . . . . . . . . . . . . |
. 151 |
■ Listening to the Audio of an Audio Snapshot |
152 |
Viewing a Movie . . . . . . . . . . . . . . . . . . . . . . . . . . |
. 153 |
■ Playing Back a Movie with Anti Shake |
155 |
Playing a Slideshow on the Camera . . . . . . . . . . 156 Viewing Camera Images on a TV . . . . . . . . . . . . . 162 Zooming the Displayed Image . . . . . . . . . . . . . . . 165 Using the 12-image Screen . . . . . . . . . . . . . . . . . . 166 Using the Calendar Screen . . . . . . . . . . . . . . . . . . 166 Using Image Roulette . . . . . . . . . . . . . . . . . . . . . . 168
CONTENTS
5

EDITING IMAGES |
169 |
Resizing a Snapshot . . . . . . . . . . . . . . . . . . . . . . . 169 Cropping a Snapshot . . . . . . . . . . . . . . . . . . . . . . 170 Keystone Correction . . . . . . . . . . . . . . . . . . . . . . . 171 Using Color Restoration to Correct
the Color of an Old Photograph . . . . . . . . . . . . . . 172 Editing the Date and Time of an Image . . . . . . . . 174 Rotating an Image . . . . . . . . . . . . . . . . . . . . . . . . . 175 Combining Multiple Snapshots into
a Single Image (Layout Print) . . . . . . . . . . . . . . . . 176 Adjusting White Balance of
a Recorded Image . . . . . . . . . . . . . . . . . . . . . . . . . 177 Adjusting Image Brightness . . . . . . . . . . . . . . . . . 178 Reducing the Effects of Underexposure . . . . . . . 179 Editing a Movie on the Camera . . . . . . . . . . . . . . 180 Creating a Snapshot of a Movie Frame
(MOTION PRINT) . . . . . . . . . . . . . . . . . . . . . . . . . . 182
USING AUDIO |
184 |
Adding Audio to a Snapshot. . . . . . . . . . . . . . . . . 184 Recording Audio Only (Voice Recording) . . . . . . 186
MANAGING YOUR FILES |
189 |
Files and Folders . . . . . . . . . . . . . . . . . . . . . . . . . . 189
Protecting a File Against Deletion . . . . . . . . . . . . 190
Using the FAVORITE Folder . . . . . . . . . . . . . . . . . 192
Copying Files . . . . . . . . . . . . . . . . . . . . . . . . . . . . . 194
DELETING FILES |
196 |
Deleting a Specific File . . . . . . . . . . . . . . . . . . . . . 196
Deleting All Files . . . . . . . . . . . . . . . . . . . . . . . . . . 197
Deleting FAVORITE Folder Snapshots . . . . . . . . 197
C |
6 |
CONTENTS |
|
|
|
|
|
|

OTHER SETTINGS |
198 |
Configuring Camera Sound Settings. . . . . . . . . . 198 Turning the Startup Screen On or Off . . . . . . . . . 200 Specifying the File Name Serial Number Generation Rule . . . . . . . . . . . . . . . . . . . . . . . . . . . 201 Changing the Camera Date and Time Setting. . . 202 Using World Time . . . . . . . . . . . . . . . . . . . . . . . . . 204
■ Configuring World Time Settings |
204 |
Changing the Display Language . . . . . . . . . . . . . 206 Changing the USB Port Protocol . . . . . . . . . . . . . 207 [ ] (REC) and [
 ] (PLAY) Button Settings . . 208 Formatting Built-in Memory . . . . . . . . . . . . . . . . . 209
PRINTING |
210 |
Types of Printing . . . . . . . . . . . . . . . . . . . . . . . . . . 210 Using Professional Print Service . . . . . . . . . . . . . 211 Using Your Printer to Print Images . . . . . . . . . . . 212 Using DPOF to Specify Images to be
Printed and the Number of Copies. . . . . . . . . . . . 215
■ Date Stamping |
218 |
Supported Protocols . . . . . . . . . . . . . . . . . . . . . . . 219
USING THE CAMERA WITH A |
|
COMPUTER |
220 |
What you can do . . . . . . . . . . . . . . . . . . . . . . . . . . 220 Using the Camera with a Windows Computer . . 221
■ Viewing and Storing Images on a Computer |
225 |
■ Transfer of Images from the Camera and |
|
Management of Images on the Computer |
232 |
■ Playing Movies |
234 |
■ Uploading Movie Files to YouTube |
235 |
■ Editing a Movie |
238 |
■ Transferring Images to the Camera |
239 |
■ Viewing User Documentation (PDF Files) |
242 |
■ User Registration |
243 |
■ Exiting the CD-ROM Menu |
243 |
Using the Camera with a Macintosh . . . . . . . . . . 243
■ Viewing and Storing Images on a Macintosh |
245 |
■ Transfer of Images from the Camera and |
|
Management of Images on Your Macintosh |
250 |
■ Playing Movies |
251 |
■ Viewing User Documentation (PDF Files) |
251 |
■ Registering as a User |
251 |
Reading Files Directly from a Memory Card . . . . 252 Memory Card Data . . . . . . . . . . . . . . . . . . . . . . . . . 253
CONTENTS
7

TRANSFERRING DOCUMENTS TO YOUR CAMERA (DATA STORAGE) 257
Transferring Documents to the Camera . . . . . . . 257
■ Transferring documents from a computer |
|
running Windows |
257 |
■ Transferring documents from a Macintosh |
259 |
Viewing a Transferred Document on |
|
the Camera . . . . . . . . . . . . . . . . . . . . . . . . . . . . . . |
. 261 |
■ Rotating a Document Page |
262 |
Managing Document Data on the Camera. . . . . |
. 264 |
■ Protecting Document Data |
264 |
■ Deleting Document Data |
265 |
APPENDIX |
268 |
General Guide . . . . . . . . . . . . . . . . . . . . . . . . . . . . 268
Monitor Screen Contents . . . . . . . . . . . . . . . . . . . 270
Menu Reference . . . . . . . . . . . . . . . . . . . . . . . . . . . 273
Display Menu Reference . . . . . . . . . . . . . . . . . . . . 277
Indicator Lamps . . . . . . . . . . . . . . . . . . . . . . . . . . . 277
Troubleshooting Guide . . . . . . . . . . . . . . . . . . . . . 280
■ Finding the Problem and Fixing It |
280 |
■ Display Messages |
285 |
Specifications . . . . . . . . . . . . . . . . . . . . . . . . . . . . 287
CONTENTS
8
QUICK START BASICS
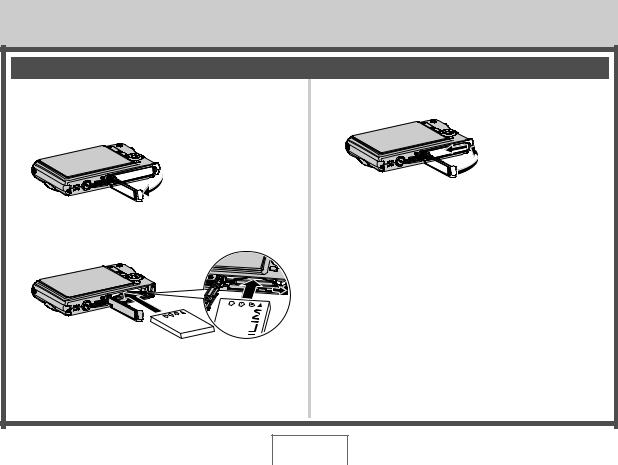
First, charge the battery
■ Loading the Battery into the Camera
1. Open the battery cover.
While pressing lightly on
the cover, slide it in the

 direction indicated by the arrow to open.
(page 36)
3. Close the battery cover.
2. Load the battery into the camera.
QUICK START BASICS
9
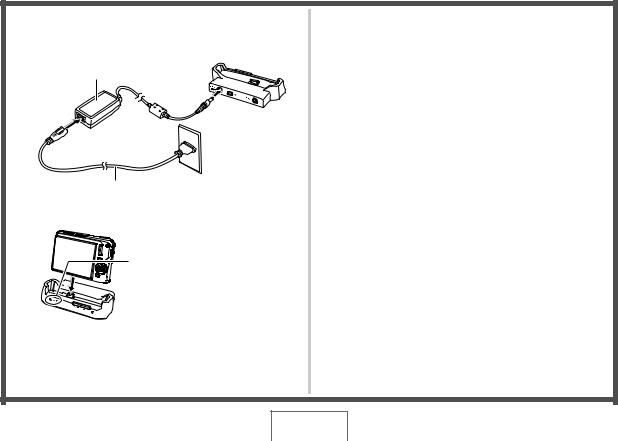
■ Using the USB Cradle to Charge
1.Plug the USB cradle into a household power outlet.
AC adaptor
AC power cord
2. Place the camera onto the USB cradle.
[CHARGE] lamp Red: Charging Green: Charged (Full)
• It takes about two hours to achieve a full charge.
QUICK START BASICS
10
Configuring Display Language, Date, and Time Settings
[ON/OFF] (Power)
[BS] |
SET |
|
The settings on this page are required the first time you turn on the camera after purchasing it.
•If you make a mistake when configuring the language, date, and time settings, you can change the settings (pages 202, 206).
(pages 202, 206)
1.Press [ON/OFF] to turn on the camera.
2.Use [S], [T], [W], and [X] to select the language you want and then press [SET].
3.Use [S], [T], [W], and [X] to select the area where you will use the camera and then press [SET].
4.Use [S] and [T] to select the city where you will use the camera and then press [SET].
5.Use [S] and [T] to select the summer time
(DST) setting you want and then press [SET].
QUICK START BASICS
11

6. Use [S] and [T] to select the date format and then press [SET].
Example: December 19, 2007
To display the date like this: |
Select this option: |
07/12/19 |
YY/MM/DD |
|
|
19/12/07 |
DD/MM/YY |
|
|
12/19/07 |
MM/DD/YY |
|
|
7. Set the date and the time.
Use [W] and [X] to select the setting you want (year, month, day, hour, minute) and then use [S] and [T] to change the setting. To switch between 12-hour and 24-hour format, press [BS].
8. When settings are completed, press [SET].
9.Press [ON/OFF] to turn off the camera.
• After finishing this procedure, advance to the procedure on the next page.
QUICK START BASICS
12
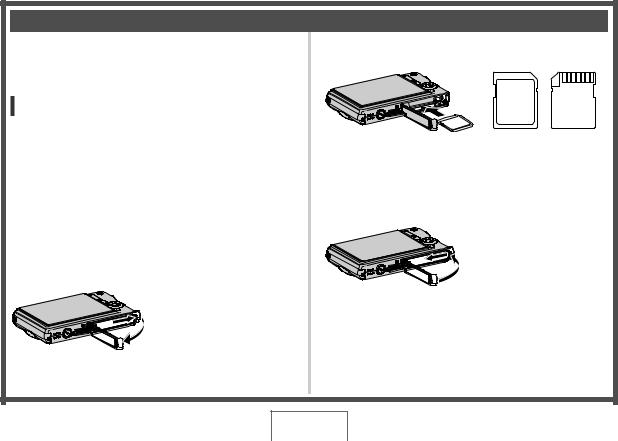
Using a Memory Card
■ Loading a Memory Card into the Camera
When a memory card is loaded, the camera stores images you shoot on the card.
NOTE
•Though the camera has built-in memory, using a memory card provides additional capacity you can use to store more images, high-quality and large-size images, and longer movies.
•The camera will store images in its built-in memory if there is no memory card loaded. If you prefer to use built-in memory, skip this procedure and go to “Shooting a Snapshot” on page 15.
•For information about memory card capacity, see page 287.
1.Open the battery cover.
While pressing lightly on the cover, slide it in the direction indicated by the arrow to open.
(page 46)
2. Load a memory card into the camera.
MEMORY
CARD
|
Y |
R |
|
EMO |
|
M CARD |
|
Front Back
With the front of the memory card facing upwards (towards the monitor screen side of the camera), slide it into the card slot and press until it clicks securely into place.
3. Close the battery cover.
QUICK START BASICS
13
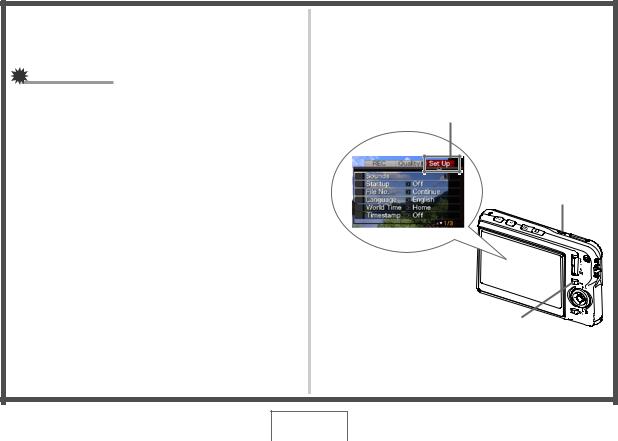
■ Formatting a Memory Card
Before you can use a memory card with your camera, you must format it.
IMPORTANT!
•Formatting a memory card that already has snapshots or other files on it, will delete its contents. Normally you do not need to format a memory card again. However, if storing to a card has slowed down or if you notice any other abnormality, re-format the card.
•Be sure to perform the following procedure on the camera to format the memory card.
1.Press [ON/OFF] to turn on the camera.
2.Press [MENU].
3.Use [W] and [X] to select the “Set Up” tab.
4.Use [T] to select “Format” and then press [X].
5.Press [S] to select “Format” and then press
[SET].
•To cancel formatting, select “Cancel” and then press [SET].
•Wait until the “Busy... Please wait...” message disappears from the monitor screen before doing anything else.
“Set Up” Tab
[ON/OFF] (Power)
[MENU]
QUICK START BASICS
14

Shooting a Snapshot
Auto icon
Operation Lamp
[ ] (REC)
Shutter Button
Focus Frame
Monitor Screen
(page 62)
1. Press [ ] to turn on the camera.
This enters the REC mode and displays “  ” (Auto icon) on the monitor screen.
2.Point the camera at the subject.
3.While taking care to keep the camera still, halfpress the shutter button.
When the image is in focus, the camera will beep, the operation lamp will light green, and the focus frame will turn green.
4.Continuing to keep the camera still, press the shutter button all the way down.
The recorded image will remain on the display for about one second, and then it will be stored in memory. After that, the camera will be ready to shoot the next image.
QUICK START BASICS
15
Snapshot Image Size and Image Quality
Your camera lets you select from among various image size and quality settings. Note that image size and quality settings affect how many images can be stored in memory.
•You can change the image size and quality settings as required to shoot a smaller or lower-resolution image for attachment to an e-mail message, for publishing on a website, etc. You can also select an image size that suits the size of paper you plan to use for printing your images.
For details, see pages 66, 68, and 287.
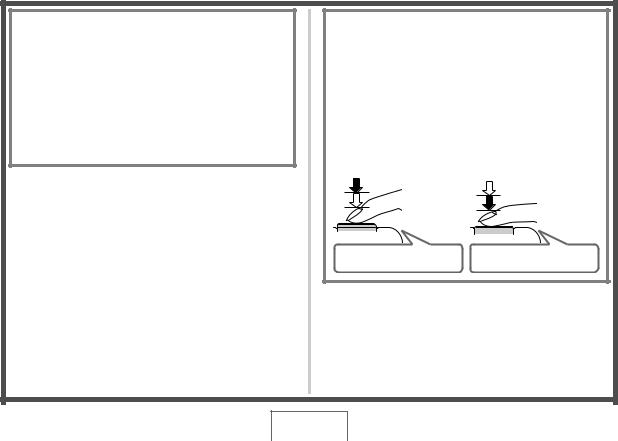
How do I half-press the shutter button?
The shutter button is designed to stop about half way down when you press it lightly. Stopping at this point is called a “half-press”. When you half-press the shutter button, the camera automatically adjusts exposure and focuses on the subject it is currently pointed at.
Mastering how much pressure is required for a half-press and a full-press of the shutter button is an important technique for good-looking images.
Half-press |
Full-press |
Press lightly
until the All the way button stops.
Beep-beep! Click!
QUICK START BASICS
16
■Fully pressing the shutter button without waiting for Auto Focus
Fully pressing the shutter button without waiting for Auto Focus to operate will record using Quick Shutter (page 128). Quick Shutter lets you capture exactly the moment you want.
•With Quick Shutter, the camera uses high-speed Auto Focus, which means you can capture quick moving action more easily. Note, however, that some images may be out of focus when Quick Shutter is used.
•Whenever possible, take a little extra time to half-press the shutter button in order to ensure proper focus.
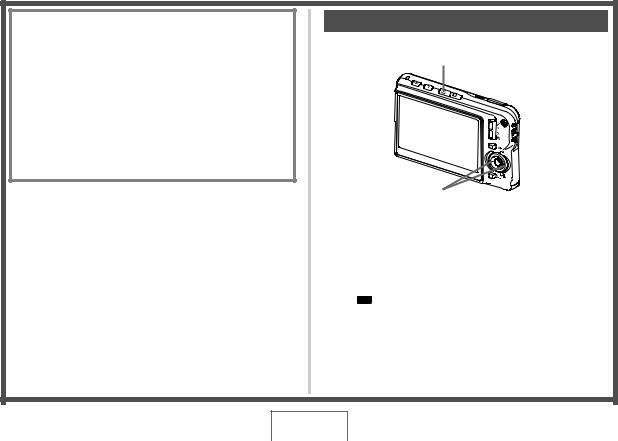
Viewing Snapshots
(page 151)
[ ] (PLAY)
[W][X]
1. Press [ ] to enter the PLAY mode.
If there are multiple images in memory, use [W] and [X] to scroll through them.
■ To return to the REC mode
Press [ ].
].
QUICK START BASICS
17
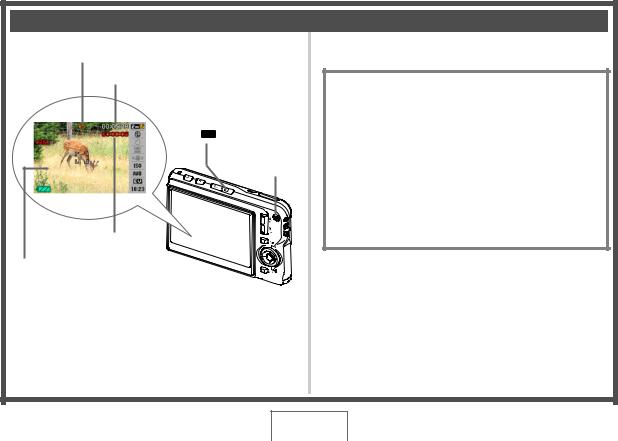
Shooting a Movie
Movie Icon
Remaining Recording Time
[ ] (REC)
[  ]
]
Recording Time
Movie Recording Screen
1.Press [ ] to enter the REC mode.
2.Press [  ] to start shooting the movie.
“  ” (movie icon) remains on the monitor screen while movie recording is in progress.
• Audio is also recorded during movie recording.
(page 94)
3. Press [  ] again to stop recording.
Movie Image Quality
Your camera lets you select from among six image quality settings (UHQ, UHQ Wide, HQ, HQ Wide, Normal, LP) for movies. For best camera performance, use the “HQ” (High Quality) or “HQ Wide” setting for movie recording.
Movie quality is a standard that determines the detail, smoothness, and clarity of the image during playback. Reducing image quality let’s you shoot longer, so you can switch to “Normal” or “LP” conserve remaining memory capacity if you start to run low.
For details, see pages 94 and 288.
QUICK START BASICS
18

Viewing a Movie
The film-like frame that appears on the monitor screen indicates that this is an image from a movie.
“  ” Movie icon
[ ] (PLAY)
[SET]
[W] [X]
(page 153)
1.Press [ ] to enter the PLAY mode.
2.Use [W] and [X] to select the movie you want to play.
When scrolling through images, a movie is displayed on the monitor screen by showing its first frame.
3. Press [SET] to start playback.
The monitor screen will return to the image selection screen in step 2 after the end of the movie is reached.
•During movie playback, you can adjust volume, skip forward and back, and perform other operations (page 154).
■To return to the REC mode
Press [ ].
].
QUICK START BASICS
19
Deleting a File
You can use the following procedure to delete files you have transferred to your computer’s hard disk, images you have printed, or files you simply no longer need. This frees up memory for recording more images.
[  ] (PLAY)
[S]
[SET]
[W] [X]
[T] ( )
)
(page 196)
1.Press [ ].
].
2.Press [T] ( 
 ).
).
3.Use [W] and [X] to select the snapshot or movie you want to delete.
4.Press [S] to select “Delete”.
• To cancel the delete operation, select “Cancel”.
5.Press [SET].
This deletes the selected snapshot or movie.
•If you want to delete more, repeat the above procedure from step 3.
•To quit the delete operation, press [MENU].
QUICK START BASICS
20
INTRODUCTION
Features
■BEST SHOT for beautiful shots simply by selecting a sample image built into the camera
Simply select the scene that is similar to what you want to shoot (Night Scene Portrait, Flower, etc.), for instant camera setups. A dedicated [BS] button gives you direct access to the BEST SHOT library of sample scenes.
Example: Select for beautiful portraits.
■ Direct Mode Power On
To view images, press |
To record, press [ |
] to |
|
[ |
] to power up in the |
power up in the REC |
|
PLAY mode. |
mode. |
|
|
■A powerful collection of useful recording features
•Face recognition during image recording (page 87)
•Reduction of the effects of hand and subject movement using high shutter speeds and an anti-shake feature (page 110)
•High-sensitivity recording avoids dark images, even when the flash is not being used (page 111)
•Quick Shutter, which helps you capture exactly the moment you want (page 128)
•High quality (H.264) movie recording (page 94)
INTRODUCTION
21

■ Powerful Print Features
•DPOF feature for easy specification of date stamping and the number of copies (page 215)
•Timestamp feature that stamps the date into the image data (page 141)
•Support for PictBridge and USB DIRECT-PRINT for easy athome printing on a printer that supports one of these standards, without a computer (page 212)
■ Document transfer to the camera
•Bundled Photo Transport software (page 239) lets you transfer images saved on your computer or displayed on your computer screen (website data, maps, etc.) to your camera.
•Bundled CASIO DATA TRANSPORT software lets you transfer documents from your computer to the camera and take it along with you (page 257).
Read this first!
■ LCD Panel
The liquid crystal panel of the monitor screen uses highprecision technology that provides a pixel yield in excess of 99.99%.
This means that some pixels may not light or may remain lit at all times. This is due to the characteristics of the liquid crystal panel, and does not indicate malfunction.
INTRODUCTION
22

■ Copyrights
Except for your own personal enjoyment, unauthorized use of snapshots or movies of images recorded with this camera without the permission of the applicable right holder is forbidden by copyright laws. In some cases, shooting of public performances, shows, exhibitions, etc. may be restricted entirely, even if it is for your own personal enjoyment. Regardless of whether such files are purchased by you or obtained for free, posting them on a website, a file sharing site, or any other Internet site, or otherwise distributing them to third parties without the permission of the copyright holder is strictly prohibited by copyright laws and international treaties. Uploading or distributing on the Internet images of TV programs, live concerts, music videos, etc. that were photographed or recorded by you may infringe upon the rights of others. Note that CASIO COMPUTER CO., LTD. shall not be held liable for any use of this product that infringes on the copyrights of others or that violates copyright laws.
The trademarks and registered trademarks shown below are used in an editorial fashion in the explanatory text of this manual without trademark ™ or registered trademark ® symbols. No infringement on trademarks is intended.
•The SDHC Logo is a trademark.
•Microsoft, Windows, Internet Explorer, Windows Media, Windows Vista, and DirectX are either registered trademarks or trademarks of Microsoft Corporation in the United States and/or other countries.
•Macintosh, Mac OS, QuickTime, QuickTime logo, and iPhoto are trademarks of Apple Inc. in the United States and/or other countries.
•MultiMediaCard is a trademark of Infineon Technologies AG of Germany, and licensed to the MultiMediaCard Association (MMCA).
•MMCplus is a trademark of the MultiMediaCard Association.
•Adobe and Reader are either registered trademarks or trademarks of Adobe Systems Incorporated in the United States and/or other countries.
•Ulead, Ulead VideoStudio, and Movie Wizard are trademarks of Ulead Systems, Inc.
•HOTALBUM and the HOT ALBUM logo are registered trademarks or trademarks of Konica Minolta Photo Imaging, Inc., and licensed to HOTALBUMcom, Inc.
•YouTube, the YouTube logo and “Broadcast Yourself” are either registered trademarks or trademarks of YouTube, LLC.
•EXILIM, Photo Loader, Photo Transport, YouTube Uploader for CASIO, and CASIO DATA TRANSPORT are registered trademarks or trademarks of CASIO COMPUTER CO., LTD.
INTRODUCTION
23

•Photo Loader with HOT ALBUM was developed based on HOT ALBUM, which is copyrighted by HOTALBUMcom, Inc., and Photo Loader, which is copyrighted by CASIO COMPUTER CO., LTD. All copyrights and other rights revert to original copyright holders.
•All other company or product names mentioned herein are registered trademarks or trademarks of their respective companies.
Any and all unauthorized commercial copying, distribution, and copying of the bundled software over a network are prohibited.
This product contains PrKERNELv4 Real-time OS of eSOL Co., Ltd. Copyright© 2007 eSOL Co., Ltd. PrKERNELv4 is a registered trademark of eSOL Co., Ltd. in Japan.
This product’s YouTube upload functionality is included under license from YouTube, LLC. The presence of YouTube upload functionality in this product is not an endorsement or recommendation of the product by YouTube, LLC.
INTRODUCTION
24

•The contents of this manual are subject to change without notice.
•The content of this manual has been checked at each step of the production process. Please contact us if you notice anything that is questionable, erroneous, etc.
•Any copying of the contents of this manual, either in part or its entirety, is forbidden. Except for your own personal use, and other use of the contents of this manual without the permission of CASIO COMPUTER CO., LTD. is forbidden under copyright laws.
•CASIO COMPUTER CO., LTD. shall not be held liable for any damages or loss suffered by you or any third party due to the use or malfunction of this product.
•CASIO COMPUTER CO., LTD. shall not be held liable for any damages or loss suffered by you or any third party due to the use of Photo Loader with HOT ALBUM, Photo Transport, YouTube Uploader for CASIO, and/or CASIO DATA TRANSPORT.
•CASIO COMPUTER CO., LTD. shall not be held liable for any damages or loss caused by deletion of memory contents due to malfunction, repair, or any other reason.
•Note that the example screens and product illustrations shown in this manual may differ somewhat by the screens and configuration of the actual camera.
INTRODUCTION
25

Precautions during Use
■Take test shots before shooting the final shot.
•Before shooting your final image, shoot a test shot to ensure that the camera is recording correctly.
■ Avoid Use While In Motion
•Never use the camera to record or play back images while operating an automobile or other vehicle, or while walking. Looking at the monitor while in motion creates the risk of serious accident.
■ Directly Viewing the Sun or Bright Light
•Never look at the sun or any other bright light through the cameras viewfinder. Doing so can damage your eyesight.
■ Flash
•Never use the flash unit in areas where flammable or explosive gas may be present. Such conditions create the risk of fire and explosion.
•Never fire the flash in the direction of a person operating a motor vehicle. Doing so can interfere with the driver’s vision and creates the risk of accident.
•Never fire the flash too close to the eyes of the subject. Doing so creates the risk of loss of eyesight.
INTRODUCTION
26

■ Display Panel
•Do not apply strong pressure to the LCD panel surface or subject it to strong impact. Doing so can cause the display panel glass to crack.
•Should the display panel ever become cracked, never touch any of the liquid inside the panel. Doing so creates the risk of skin inflammation.
•Should display panel liquid ever get into your mouth, immediately rinse your mouth out and contact your physician.
•Should display panel liquid ever get into your eyes or onto your skin, immediately rinse with clean water for at least 15 minutes and contact your physician.
■ Connections
•Never plug any devices that are not specified for use with this camera into connectors. Connecting a non-specified device creates the risk of fire and electric shock.
■ Transport
•Never operate the camera inside of an aircraft or anywhere else where operation of such devices is restricted. Improper use creates the risk of serious accident.
■Smoke, abnormal odor, overheating, and other abnormalities
•Continued use of the camera while it is emitting smoke or strange odor, or while it is overheating creates the risk of fire and electric shock. Immediately perform the following steps whenever any of the above symptoms are present.
1.Turn off the camera.
2.Remove the battery from the camera, taking care to protect yourself against burn injury.
3.Contact your dealer or nearest CASIO authorized service center.
INTRODUCTION
27

■ Water and Foreign Matter
•Water, other liquids, or foreign matter (especially metal) getting inside the camera creates the risk of fire and electric shock. Immediately perform the following steps whenever any of the above symptoms are present. Particular care is required when using the camera where it is raining or snowing, near the ocean or other body of water, or in a bathroom.
1.Turn off the camera.
2.Remove the battery from the camera.
3.Contact your dealer or nearest CASIO authorized service center.
■ Dropping and Rough Treatment
•Continued use of the camera after it is damaged by dropping or other rough treatment creates the risk of fire and electric shock. Immediately perform the following steps whenever any of the above symptoms are present.
1.Turn off the camera.
2.Remove the battery from the camera.
3.Contact your dealer or nearest CASIO authorized service center.
■ Keep Away From Fire
•Never expose the camera to fire, which can cause it to explode and creates the risk of fire and electric shock.
INTRODUCTION
28

■ Disassembly and Modification
•Never try to take the camera apart or modify it in any way. Doing so creates the risk of electric shock, burn injury, and other personal injury. Be sure to leave all internal inspection, maintenance, and repair up to your dealer or nearest CASIO authorized service center.
■ Locations To Be Avoided
•Never leave the camera in any of the following types of locations. Doing so creates the risk of fire and electric shock.
–Areas subject to large amounts of humidity or dust
–Food preparation areas or other locations where oil smoke is present
–Near heaters, on a heated carpet, in areas exposed to direct sunlight, in a closed vehicle parked in the sun, or other areas subject to very high temperatures
•Never place the camera on an unstable surface, on a high shelf, etc. Doing so can cause the camera to fall, creating the risk of personal injury.
■ Backing Up Important Data
•Always keep backup copies of important data in camera memory by transferring it to a computer or other storage device. Note that data can be deleted in the case of camera malfunction, repair, etc.
■ Memory Protection
•Whenever replacing the battery, be sure to follow the correct procedure as described in the documentation that comes with the camera. Incorrectly replacing the battery can result in corruption or loss of data in camera memory.
INTRODUCTION
29

■ Rechargeable Battery
•Use only the specified charger unit or the specified device to charge the battery. Attempting to charge the battery by an unauthorized means creates the risk of battery overheating, fire, and explosion.
•Do not expose or immerse the battery in fresh water or salt water. Doing so can damage the battery, and cause deterioration of its performance and loss of service life.
•This battery is intended for use with a CASIO Digital Camera only. Use with any other device creates the risk of the battery damage, or deterioration of battery performance and service life.
•Failure to observe any of the following precautions creates the risk of battery overheating, fire, and explosion.
–Never use or leave the battery near open flame.
–Do not expose batteries to heat or fire.
–Make sure the battery is oriented correctly when it is connected to the charger unit.
–Never carry or store the battery together with items that can conduct electricity (necklaces, pencil lead, etc.)
–Never disassemble the battery, pierce it with a needle, or expose it to strong impact (hit it with a hammer, step on it, etc.), and never apply solder to it. Never place the battery into a microwave oven, heater, high-pressure generating device, etc.
•Should you ever notice leakage, strange odor, heat generation, discoloration, deformation, or any other abnormal condition while using, charging, or storing a battery, immediately remove it from the camera or charger unit and keep it away from open flame.
•Do not use or leave the battery under direct sunlight, in an automobile parked in the sun, or in any other area subject to high temperatures. Doing so can damage the battery, and cause deterioration of its performance and loss of service life.
•If the battery charging does not end normally within the specified charging time, stop charging anyway and contact your local CASIO authorized service center. Continued charging creates the risk of battery overheating, fire, and explosion.
•Battery fluid can damage your eyes. Should battery fluid get into your eyes accidentally, immediately rinse them with clean tap water and then consult a physician.
•Be sure to read the user documentation that comes with the camera and special charger unit before using or charging the battery.
INTRODUCTION
30
Loading...