


(with price)
SF-A7(LX-553A)
DC-8000(LX-553B)
FEB. 1995
SF-A7
R
CONTENTS
SPECIFICATIONS ............................................................................................................ |
1 |
REPLACING THE BATTERIES ........................................................................................ |
2 |
TO RESET THE UNIT'S MEMORY ................................................................................... |
2 |
TO SAVE THE DATA ........................................................................................................ |
3 |
OPERATION CHECK ....................................................................................................... |
4 |
LOW BATTERY TEST ...................................................................................................... |
6 |
TROUBLESHOOTING ...................................................................................................... |
6 |
SCHEMATIC DIAGRAM ................................................................................................... |
7 |
EXPLODED VIEW ............................................................................................................. |
9 |
PARTS LIST .................................................................................................................... |
10 |
SPECIFICATIONS
Main Modes: |
Telephone Directory, Memo, Schedule, Reminder, Home Time, World Time |
|
and Calculator. |
Data storage: |
Storage and recall of telephone, memo, schedule, reminder data; secret |
|
area; editing; memory status display. |
Clock: |
Worldtime; reminder alarm; daily alarm; hourly time signal; accuracy under |
|
normal temperatures: ±3 seconds average |
Calculation: |
10-digit arithmetic calculations; arithemetic constants (+, –, ×, ÷); independ- |
|
ent memory; percentages; square roots; 20-digit approximations; other |
|
mixed calculations |
General: |
16-column × 3-line LCD |
Display element: |
|
Memory capacity: |
32KB (32768 bytes) |
Main component: |
LSI |
Power supply: |
2 lithium batteries (CR2032) |
Power consumption: |
0.02 W |
Battery life*: |
Approximately 1 year (1 hour use per day); approximately 1,800 hours |
|
repeating one minute of input and 10 minutes of display in Telephone |
|
Directory. |
|
* The batteries that come installed in this unit when you purchase it are for |
|
factory test purposes, so they will probably not provide normal service life. |
Auto power off: Approximately 6 minutes after last key operation
Operating temperature: 0°C ~ 40°C (32°F ~ 104°F)
Dimensions (HWD):
Unfolded: |
9.3 x 130 x 159.7 mm (3/8 x 5 1/8 x 6 1/4 inches) |
Folded: |
12.4 x 130 x 82 mm (1/2 x 5 1/8 x 3 1/4 inches) |
Weight: |
95.6 g (3.4 oz) |
— 1 —
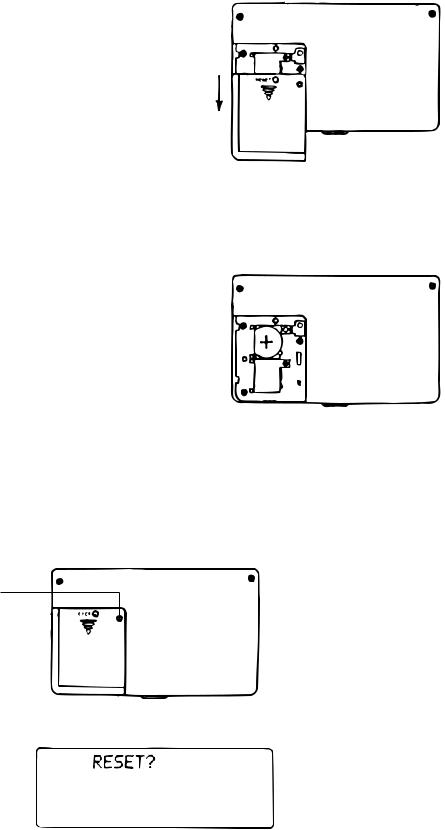
REPLACING THE BATTERIES
1. Loosen the screw on the back of the unit that holds the battery compartment cover in place, and remove the cover by sliding it to the direction indicated by the arrow.
2. Loosen the screw that secures one of the two battery holders in place and remove the battery holder.
Caution: Be sure to remove only one battery at a time.
Otherwise, you will lose all data stored in memory.
3.Replace the old battery with a new one, making sure that the positive (+) side of the new battery is facing up (so you can see it).
4.Replace the battery holder and secure it by tightening its screw.
• Be careful that you do not overtighten the screw.
5.Repeat Steps 2 through 4 for the other battery.
• Be sure to replace both batteries. Never mix old batteries with new ones, and be sure to use CR2032 lithium batteries only.
6. After you replace both batteries, replace the battery compartment cover and secure it by tightening its screw.
• Be careful that you do not overtighten the screw.
TO RESET THE UNIT'S MEMORY
Warning!
The following procedure erases all data stored in the memory of the unit. Perform the following operation only when you want to delete all data and initialize the settings of the unit.
Remember — you should always keep copies of important data by writing it down.
RESET button
1. Switch on power and press the RESET button with a thin, pointed object.
Warning!
The next step deletes all data stored in the unit's memory. Make sure that you really want to delete the data before you continue!
— 2 —
2.Press EXE to reset the memory and delete all data or any other key to abort the reset operation without deleting anything.
Following the reset operation described above, the Home Time display appears and the unit settings are initialized as noted below.
Home Time: |
12-hour format |
|
JAN/1/1995 |
|
AM/12:00 00 |
Zone: |
Tokyo (TYO) |
World Time: |
London (LON) |
Daily Alarm: |
12:00 AM |
Sound: |
Reminder alarm → OFF |
|
Daily alarm → OFF |
|
Key input tone → OFF |
|
Hourly time signal → OFF |
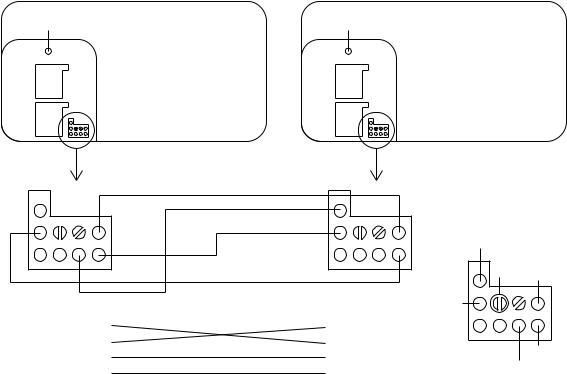
TO SAVE THE DATA
The unit can transfer the data stored to another unit.
CAUTION: Before connecting wires, be sure to put the units in transmission and receiving mode. Furthermore, after completing saving data, remove wires while showing OK or NG on display. If no, data stored in customer's unit are corrupted.
To save the data, the following steps must be followed;
1.Remove the battery cover of both units.
2.Press RESET button of both units.
3.Short the pad TR of customer's unit. (Display shows "T".)
4.Short the pad TR twice of slave unit. (Display shows "R".)
5.Connect 4 terminals on PCB with wires as shown in the figure below.
Customers |
Slave |
RESET button |
RESET button |
Enlarge |
Enlarge |
CP10 |
CP10 |
CP11 |
CP11 |
CP13 |
CP12 |
CP2 |
CP2 |
CP12 |
|
TR |
CP2 |
CP10 |
|
|
CP11 |
CP13 |
|
— 3 —
 Loading...