


 Loading...
E
ClassPad 300 PLUS
ClassPad OS Version 2.20
User’s Guide
http://world.casio.com/edu/ http://classpad.net/

GUIDELINES LAID DOWN BY FCC RULES FOR USE OF THE UNIT IN THE U.S.A. (not applicable to other areas).
NOTICE
This equipment has been tested and found to comply with the limits for a Class B digital device, pursuant to Part 15 of the FCC Rules. These limits are designed to provide reasonable protection against harmful interference in a residential installation. This equipment generates, uses and can radiate radio frequency energy and, if not installed and used in accordance with the instructions, may cause harmful interference to radio communications. However, there is no guarantee that interference will not occur in a particular installation. If this equipment does cause harmful interference to radio or television reception, which can be determined by turning the equipment off and on, the user is encouraged to try to correct the interference by one or more of the following measures:
•Reorient or relocate the receiving antenna.
•Increase the separation between the equipment and receiver.
•Connect the equipment into an outlet on a circuit different from that to which the receiver is connected.
•Consult the dealer or an experienced radio/TV technician for help.
FCC WARNING
Changes or modifications not expressly approved by the party responsible for compliance could void the user’s authority to operate the equipment.
Proper connectors must be used for connection to host computer and/or peripherals in order to meet FCC emission limits.
Connector SB-62 |
ClassPad to ClassPad |
USB connector that comes with the ClassPad 300 PLUS |
ClassPad to Windows PC |
|
Declaration of Conformity |
Model Number: |
ClassPad 300 PLUS |
Trade Name: |
CASIO COMPUTER CO., LTD. |
Responsible party: |
CASIO, INC. |
Address: |
570 MT. PLEASANT AVENUE, DOVER, NEW JERSEY 07801 |
Telephone number: 973-361-5400
This device complies with Part 15 of the FCC Rules. Operation is subject to the following two conditions: (1) This device may not cause harmful interference, and
(2) this device must accept any interference received, including interference that may cause undesired operation.
Fugue ©1999 – 2002 Kyoto Software Research, Inc. All rights reserved.

1
Getting Ready
Getting Ready
This section contains important information you need to know before using the ClassPad for the first time.
1. Unpacking
When unpacking your ClassPad, check to make sure that all of the items shown here are included. If anything is missing, contact your original retailer immediately.
ClassPad |
CD-ROM |
Front Cover |
|
|
(Attached to |
|
|
ClassPad.) |
Keyboard
ON/OFF
Clear
= x y z ^ ÷
( 7 8 9
) 4 5 6 − , 1 2 3 +
(–)0 . EXP EXE
Stylus (Inserted in ClassPad.) 3-pin Cable (SB-62) |
USB Cable |
Touch Screen Protector |
Four AAA-size Batteries LR03 Quick Start Guide |
|
|
(AM4) |
|
|
|
E |
|
ClassPad 300 PLUS |
|
|
ClassPad OS Version 2.20 |
|
|
Quick Start Guide |
|
(The protector is already installed on |
RJA510188-029V01 |
http://classpad.net |
|
|
http://world.casio.com/edu/ |
the touch screen when you purchase |
|
|
the ClassPad.) |
|
|
20050501
2 Getting Ready
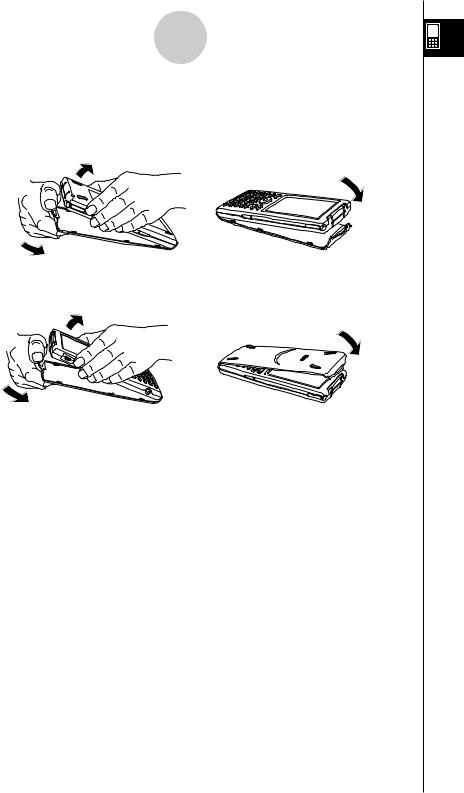
2. Attaching and Removing the Front Cover
u To remove the front cover
Before using the ClassPad, remove the front cover and attach it to the back.
u To attach the front cover
When you are not using the ClassPad, attach the front cover to the front.
Important!
•Always attach the front cover to the ClassPad whenever you are not using it. Otherwise, accidental operation of the touch screen or the okey can cause the power to turn on and
run down the batteries.
20050501
3 Getting Ready
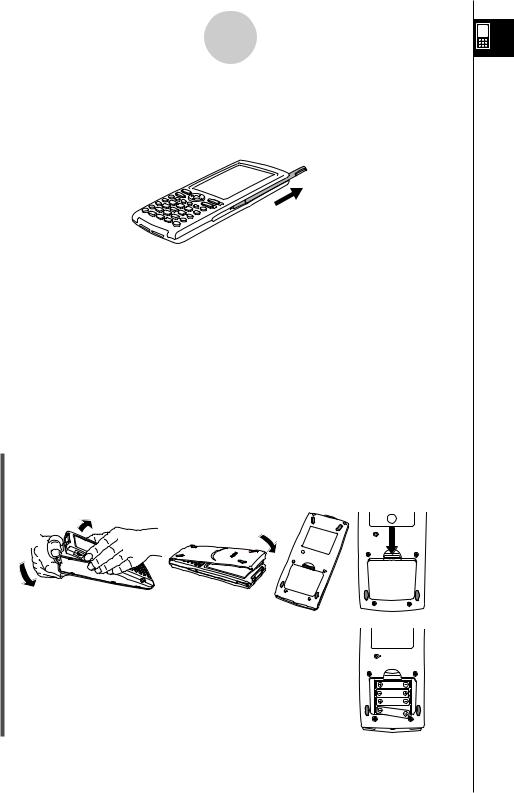
3. Using the Stylus
Slide the stylus from the slot provided for it on the ClassPad, and then use it to perform touch panel operations.
Important!
•Be careful so that you do not misplace or lose the stylus. When you are not using it, always keep the stylus in the slot provided for it on the ClassPad.
•Be careful so that you do not damage the tip of the stylus. A damaged tip can scratch or otherwise damage the ClassPad touch panel.
•Use only the supplied stylus or a similar instrument to perform touch panel operations. Never use a pen, pencil, or other writing instrument.
4.Replacing Batteries and Setting Up the ClassPad
u ClassPad Operation
(1)Making sure that you do not accidentally press the okey, attach the front cover to the
ClassPad and then turn the ClassPad over. Remove the battery cover from the ClassPad by pulling with your finger at the point marked 1.
1
 P
P
(2)Load the four batteries that come with ClassPad.
•Make sure that the positive (+) and negative (–) ends of the batteries are facing correctly.
20050501
4
Getting Ready
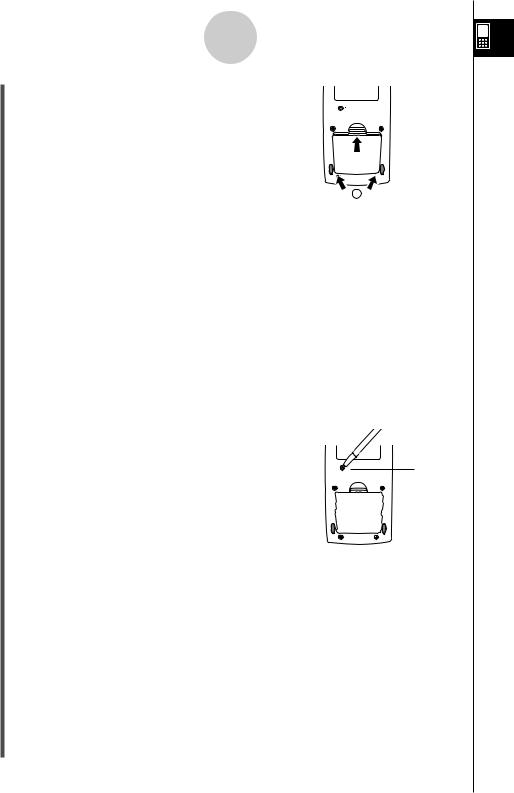
(3) Replace the battery cover, making sure that its tabs enter the holes marked 2and turn the ClassPad front side up.
(4) Remove the front cover from the ClassPad.
2
(5)Align the touch panel.
a.Your ClassPad should turn on automatically and display the Touch Panel Alignment screen.
b.Tap the center of each of the four cross marks as they appear on the display.
• If the Touch Panel Alignment screen does not appear, use the stylus to press the P button on the back of the
ClassPad.
P button
Important!
•It may take a little time for your ClassPad to start up after you press the P button.
(6)Adjust the display contrast.
a. Tap the  button to make contrast darker, or the
  button to make it lighter.
b. After the contrast setting is the way you want, tap [Set].
•Tapping [Initial] on the Contrast dialog box returns contrast to its initial factory default setting.
20050501

5
Getting Ready
(7)Specify the display language.
a. On the list that appears, tap the language you want to use.
•You can select German, English, Spanish, French, or Portuguese.
b. When the language you want is selected, tap [Set].
• Tapping [Cancel] selects English and advances to the next dialog box.
(8)Specify the soft keyboard key arrangement.
a. On the list that appears, tap the key arrangement you want to use.
b. When the key arrangement you want is selected, tap [Set].
•Tapping [Cancel] selects QWERTY arrangement and advances to the next dialog box.
(9)Specify the font set.
a. On the list that appears, tap the font set you want to use.
•You can select Regular or Bolder.
b. When the font set you want is selected, tap [Set].
• Tapping [Cancel] selects Bolder and finalizes the setup operation.
20050501

6
Getting Ready
5. User Registration
Before using your ClassPad 300 PLUS or RM-ClassPad PLUS, be sure to read the contents of the file named Readme.html, which is on the bundled CD-ROM. There you will find the URL for a
Website where you can register as an official user.
http://classpad.net/register/regist_form.html
20050501

7
Getting Ready
Handling Precautions
•Your ClassPad is made of precision components. Never try to take it apart.
•Avoid dropping your ClassPad and subjecting it to strong impact.
•Do not store the ClassPad or leave it in areas exposed to high temperatures or humidity, or large amounts of dust. When exposed to low temperatures, the ClassPad may require more time to display results and may even fail to operate. Correct operation will resume once the
ClassPad is brought back to normal temperature.
•Replace the batteries once every one year regardless of how much the ClassPad is used during that period. Never leave dead batteries in the battery compartment. They can leak and damage the ClassPad.
•Keep batteries out of the reach of small children. If swallowed, consult a physician immediately.
•Avoid using volatile liquids such as thinners or benzine to clean the ClassPad. Wipe it with a soft, dry cloth, or with a cloth that has been moistened with a solution of water and a neutral detergent and wrung out.
•Always be gentle when wiping dust off the display to avoid scratching it.
•In no event will the manufacturer and its suppliers be liable to you or any other person for any damages, expenses, lost profits, lost savings or any other damages caused by loss of data and/or formulas arising out of malfunction, repairs, or battery replacement. It is up to you to prepare physical records of data to protect against such data loss.
•Never dispose of batteries, the liquid crystal panel, or other components by burning them.
•When the “Batteries are extremely low!” message appears on the display, replace the batteries as soon as possible.
•Be sure to turn off the ClassPad before replacing the batteries.
•If the ClassPad is exposed to a strong electrostatic charge, its memory contents may be damaged or the keys may stop working. In such a case, perform the reset operation to clear the memory and restore normal key operation.
•If the ClassPad stops operating correctly for some reason, use the stylus to press the P button on the back of the ClassPad. Note, however, that this clears all the data in ClassPad memory.
•Note that strong vibration or impact during program execution can cause execution to stop or can damage the ClassPad’s memory contents.
•Using the ClassPad near a television or radio can cause interference with TV or radio reception.
•Before assuming malfunction of the ClassPad, be sure to carefully reread this user’s guide to ensure that the problem is not due to insufficient battery power, programming, or operational errors.
•Make sure nothing gets between the front cover and the touch screen. Besides creating the risk of scratching the touch screen, an object coming into contact with the screen can cause the power to turn on and run down the batteries.
•Always attach the front cover to the ClassPad whenever you are not using it. Otherwise, accidental operation of the touch screen or the okey can cause the power to turn on and run down the batteries.
20050501

8
Getting Ready
Be sure to keep physical records of all important data!
Low battery power or incorrect replacement of the batteries that power the ClassPad can cause the data stored in memory to be corrupted or even lost entirely. Stored data can also be affected by strong electrostatic charge or strong impact. It is up to you to keep back up copies of data to protect against its loss.
Backing Up Data
Your ClassPad comes bundled with a special USB cable and ClassPad Manager software, which you can use to backup data to a computer running Windows® 98SE, Me, XP, or 2000.
• The ClassPad Manager software is on the CD-ROM.
In no event shall CASIO Computer Co., Ltd. be liable to anyone for special, collateral, incidental, or consequential damages in connection with or arising out of the purchase or use of these materials. Moreover, CASIO Computer Co., Ltd. shall not be liable for any claim of any kind whatsoever against the use of these materials by any other party.
•The contents of this user’s guide are subject to change without notice.
•No part of this user’s guide may be reproduced in any form without the express written consent of the manufacturer.
•The options described in Chapter 16 of this user’s guide may not be available in certain geographic areas. For full details on availability in your area, contact your nearest CASIO dealer or distributor.
20050501
• • • • • • • • • • • • • • • • • • •
• • • • • • • • • • • • • • • • • • •
• • • • • • • • • • • • • • • • • • •
• • • • • • • • • • • • • • • • • • •
• • • • • • • • • • • • • • • • • • •
• • • • • • • • • • • • • • • • • • •
ClassPad 300 PLUS
ClassPad OS Version 2.20
• • • • • • • • • • • • • • • • • • •
• • • • • • • • • • • • • • • • • • •
• • • • • • • • • • • • • • • • • • •
• • • • • • • • • • • • • • • • • • •
• • • • • • • • • • • • • • • • • • •
• • • • • • • • • • • • • • • • • • •
• • • • • • • • • • • • • • • • • • •
• • • • • • • • • • • • • • • • • • •
• • • • • • • • • • • • • • • • • • •
• |
• |
• |
• |
• |
• |
• |
• |
• |
• |
• |
• |
• |
• |
• |
• |
• |
• |
• |
• |
• |
• |
• |
• |
• |
• |
• |
• |
• |
• |
• |
• |
• |
• |
• |
• |
• |
• |
• |
• |
• |
• |
• |
• |
• |
• |
• |
• |
• |
• |
• |
• |
• |
• |
• |
• |
• |
20050501

1
Contents
Contents
Getting Ready
1. |
Unpacking ................................................................................................... |
1 |
2. |
Attaching and Removing the Front Cover ............................................... |
2 |
3. |
Using the Stylus ......................................................................................... |
3 |
4. |
Replacing Batteries and Setting Up the ClassPad .................................. |
3 |
5. |
User Registration ........................................................................................ |
6 |
Handling Precautions ...................................................................................... |
7 |
|
About This User’s Guide
|
ClassPad Keypad and Icon Panel .................................................................... |
0-1-1 |
|
On-screen Keys, Menus, and Other Controllers ............................................... |
0-1-2 |
|
Page Contents .................................................................................................. |
0-1-3 |
Chapter |
1 Getting Acquainted |
|
1-1 |
General Guide ....................................................................................... |
1-1-1 |
|
General Guide ................................................................................................... |
1-1-2 |
|
Using the Stylus ................................................................................................ |
1-1-4 |
1-2 Turning Power On and Off ................................................................... |
1-2-1 |
|
|
Turning Power On ............................................................................................. |
1-2-1 |
|
Turning Power Off ............................................................................................. |
1-2-1 |
|
Resume Function .............................................................................................. |
1-2-1 |
|
Limiting the Duration of the Sleep State ........................................................... |
1-2-2 |
1-3 Using the Icon Panel ............................................................................ |
1-3-1 |
|
1-4 |
Built-in Applications ............................................................................. |
1-4-1 |
|
Starting a Built-in Application ............................................................................ |
1-4-2 |
|
Application Menu Operations ............................................................................ |
1-4-2 |
1-5 |
Built-in Application Basic Operations ................................................ |
1-5-1 |
|
Application Window ........................................................................................... |
1-5-1 |
|
Using a Dual Window Display ........................................................................... |
1-5-1 |
|
Using the Menu Bar .......................................................................................... |
1-5-2 |
|
Using the OMenu .......................................................................................... |
1-5-4 |
|
Using Check Boxes ........................................................................................... |
1-5-6 |
|
Using Option Buttons ........................................................................................ |
1-5-7 |
|
Using the Settings Menu ................................................................................... |
1-5-8 |
|
Using the Toolbar .............................................................................................. |
1-5-9 |
|
Interpreting Status Bar Information ................................................................. |
1-5-10 |
|
Pausing and Terminating an Operation ........................................................... |
1-5-10 |
1-6 |
Input ....................................................................................................... |
1-6-1 |
|
Using the Soft Keyboard ................................................................................... |
1-6-1 |
|
Input Basics ....................................................................................................... |
1-6-3 |
|
Advanced Soft Keyboard Operations ................................................................ |
1-6-8 |
20050501

|
|
2 |
|
|
|
|
Contents |
|
|
1-7 |
|
Variables and Folders |
1-7-1 |
|
|
|
|||
|
|
Folder Types ..................................................................................................... |
1-7-1 |
|
|
|
Variable Types ................................................................................................... |
1-7-2 |
|
|
|
Creating a Folder .............................................................................................. |
1-7-4 |
|
|
|
Creating and Using Variables ............................................................................ |
1-7-5 |
|
|
|
Assigning Values and Other Data to a System Variable ................................. |
1-7-10 |
|
|
|
Locking a Variable or Folder ........................................................................... |
1-7-10 |
|
|
|
Rules Governing Variable Access .................................................................... |
1-7-11 |
|
1-8 Using the Variable Manager ................................................................. |
1-8-1 |
|
||
|
|
Variable Manager Overview .............................................................................. |
1-8-1 |
|
|
|
Starting Up the Variable Manager ..................................................................... |
1-8-1 |
|
|
|
Variable Manager Views ................................................................................... |
1-8-2 |
|
|
|
Exiting the Variable Manager ............................................................................ |
1-8-2 |
|
|
|
Variable Manager Folder Operations ................................................................ |
1-8-3 |
|
|
|
Variable Operations ........................................................................................... |
1-8-7 |
|
Chapter |
2 Using the Main Application |
|
|
|
2-1 |
|
Main Application Overview .................................................................. |
2-1-1 |
|
|
|
Starting Up the Main Application ....................................................................... |
2-1-1 |
|
|
|
Main Application Window .................................................................................. |
2-1-1 |
|
|
|
Main Application Menus and Buttons ................................................................ |
2-1-3 |
|
|
|
Using Main Application Modes .......................................................................... |
2-1-4 |
|
|
|
Accessing ClassPad Application Windows from the Main Application .............. |
2-1-5 |
|
|
|
Accessing the Main Application Window from Another ClassPad |
|
|
|
|
Application ......................................................................................................... |
2-1-6 |
|
2-2 |
|
Basic Calculations ................................................................................ |
2-2-1 |
|
|
|
Arithmetic Calculations and Parentheses Calculations ..................................... |
2-2-1 |
|
|
|
Using the eKey ............................................................................................ |
2-2-2 |
|
|
|
Omitting the Multiplication Sign ......................................................................... |
2-2-2 |
|
|
|
Using the Answer Variable (ans) ....................................................................... |
2-2-2 |
|
|
|
Calculation Error ............................................................................................... |
2-2-3 |
|
|
|
Calculation Priority Sequence ........................................................................... |
2-2-4 |
|
|
|
Calculation Modes ............................................................................................. |
2-2-5 |
|
2-3 |
Using the Calculation History ............................................................. |
2-3-1 |
|
|
|
|
Viewing Calculation History Contents ............................................................... |
2-3-1 |
|
|
|
Re-calculating an Expression ............................................................................ |
2-3-2 |
|
|
|
Deleting Part of the Calculation History Contents ............................................. |
2-3-4 |
|
|
|
Clearing All Calculation History Contents .......................................................... |
2-3-4 |
|
2-4 |
|
Function Calculations .......................................................................... |
2-4-1 |
|
2-5 |
|
List Calculations ................................................................................... |
2-5-1 |
|
|
|
Inputting List Data ............................................................................................. |
2-5-1 |
|
|
|
Using a List in a Calculation .............................................................................. |
2-5-3 |
|
2-6 |
Matrix and Vector Calculations ........................................................... |
2-6-1 |
|
|
|
|
Inputting Matrix Data ......................................................................................... |
2-6-1 |
|
|
|
Performing Matrix Calculations ......................................................................... |
2-6-4 |
|
20050501

3
Contents
2-7 Using the Action Menu ......................................................................... |
2-7-1 |
Abbreviations and Punctuation Used in This Section ....................................... |
2-7-1 |
Example Screenshots ....................................................................................... |
2-7-2 |
Displaying the Action Menu ............................................................................... |
2-7-3 |
Using the Transformation Submenu .................................................................. |
2-7-3 |
Using the Calculation Submenu ........................................................................ |
2-7-8 |
Using the Complex Submenu ......................................................................... |
2-7-15 |
Using the List-Create Submenu ...................................................................... |
2-7-17 |
Using the List-Calculation Submenu ............................................................... |
2-7-20 |
Using the Matrix-Create Submenu .................................................................. |
2-7-26 |
Using the Matrix-Calculation Submenu ........................................................... |
2-7-29 |
Using the Vector Submenu ............................................................................. |
2-7-34 |
Using the Equation/Inequality Submenu ......................................................... |
2-7-38 |
Using the Assistant Submenu ......................................................................... |
2-7-44 |
2-8 |
Using the Interactive Menu .................................................................. |
2-8-1 |
|
Interactive Menu and Action Menu .................................................................... |
2-8-1 |
|
Interactive Menu Example ................................................................................. |
2-8-1 |
|
Using the “apply” Command ............................................................................. |
2-8-4 |
2-9 |
Using the Main Application in Combination with Other |
|
Applications .......................................................................................... |
2-9-1 |
Opening Another Application’s Window ............................................................ |
2-9-1 |
Closing Another Application’s Window .............................................................. |
2-9-2 |
Using the Graph Window $ and 3D Graph Window %................................ |
2-9-2 |
Using a Graph Editor Window (Graph & Table: !, Conics: *, |
|
3D Graph: @, Numeric Solver: 1) ................................................................ |
2-9-4 |
Using the List Editor Window (...................................................................... |
2-9-5 |
Using the Geometry Window 3...................................................................... |
2-9-9 |
Using the Sequence Editor Window & ......................................................... |
2-9-12 |
Using the Table Window # ........................................................................... |
2-9-12 |
2-10 Using Verify ......................................................................................... |
2-10-1 |
Starting Up Verify ............................................................................................ |
2-10-1 |
Verify Menus and Buttons ............................................................................... |
2-10-2 |
Using Verify ..................................................................................................... |
2-10-3 |
Chapter 3 Using the Graph & Table Application
3-1 Graph & Table Application Overview .................................................. |
3-1-1 |
Starting Up the Graph & Table Application ........................................................ |
3-1-1 |
Graph & Table Application Window ................................................................... |
3-1-1 |
Graph & Table Application Menus and Buttons ................................................. |
3-1-2 |
Graph & Table Application Status Bar ............................................................... |
3-1-7 |
Graph & Table Application Basic Operations .................................................... |
3-1-7 |
3-2 Using the Graph Window ..................................................................... |
3-2-1 |
Configuring View Window Parameters for the Graph Window .......................... |
3-2-1 |
Scrolling the Graph Window .............................................................................. |
3-2-5 |
Panning the Graph Window .............................................................................. |
3-2-5 |
Zooming the Graph Window ............................................................................. |
3-2-6 |
Other Graph Window Operations .................................................................... |
3-2-10 |
20050501

|
|
4 |
|
|
|
|
Contents |
|
|
3-3 |
|
Storing Functions |
3-3-1 |
|
|
|
|||
|
|
Using Graph Editor Sheets ............................................................................... |
3-3-1 |
|
|
|
Specifying the Function Type ............................................................................ |
3-3-2 |
|
|
|
Storing a Function ............................................................................................. |
3-3-3 |
|
|
|
Using Built-in Functions .................................................................................... |
3-3-5 |
|
|
|
Saving the Message Box Expression to the Graph Editor Window .................. |
3-3-5 |
|
|
|
Editing Stored Functions ................................................................................... |
3-3-6 |
|
|
|
Deleting All Graph Editor Expressions .............................................................. |
3-3-7 |
|
|
|
Graphing a Stored Function .............................................................................. |
3-3-7 |
|
|
|
Saving Graph Editor Data to Graph Memory .................................................... |
3-3-9 |
|
3-4 |
Using Table & Graph ............................................................................ |
3-4-1 |
|
|
|
|
Generating a Number Table .............................................................................. |
3-4-1 |
|
|
|
Editing Number Table Values ............................................................................ |
3-4-4 |
|
|
|
Deleting, Inserting, and Adding Number Table Lines ........................................ |
3-4-5 |
|
|
|
Regenerating a Number Table .......................................................................... |
3-4-6 |
|
|
|
Generating a Number Table and Using It to Draw a Graph .............................. |
3-4-7 |
|
|
|
Saving a Number Table to a List ....................................................................... |
3-4-8 |
|
|
|
Generating a Summary Table ........................................................................... |
3-4-9 |
|
|
|
Making the Graph Editor Window the Active Window ..................................... |
3-4-15 |
|
3-5 |
|
Modifying a Graph ................................................................................ |
3-5-1 |
|
|
|
Modifying a Single Graph by Changing the Value of a Coefficient |
|
|
|
|
(Direct Modify) ................................................................................................... |
3-5-1 |
|
|
|
Simultaneously Modifying Multiple Graphs by Changing Common Variables |
|
|
|
|
(Dynamic Modify) .............................................................................................. |
3-5-4 |
|
3-6 |
Using the Sketch Menu ........................................................................ |
3-6-1 |
|
|
|
|
Sketch Menu Overview ..................................................................................... |
3-6-1 |
|
|
|
Using Sketch Menu Commands ........................................................................ |
3-6-1 |
|
3-7 |
|
Using Trace ........................................................................................... |
3-7-1 |
|
|
|
Using Trace to Read Graph Coordinates .......................................................... |
3-7-1 |
|
|
|
Linking Trace to a Number Table ...................................................................... |
3-7-3 |
|
|
|
Generating Number Table Values from a Graph ............................................... |
3-7-4 |
|
3-8 |
Analyzing a Function Used to Draw a Graph ..................................... |
3-8-1 |
|
|
|
|
G-Solve Menu Overview ................................................................................... |
3-8-1 |
|
|
|
Using G-Solve Menu Commands ...................................................................... |
3-8-2 |
|
Chapter |
4 Using the Conics Application |
|
|
|
4-1 |
|
Conics Application Overview .............................................................. |
4-1-1 |
|
|
|
Starting Up the Conics Application .................................................................... |
4-1-1 |
|
|
|
Conics Application Window ............................................................................... |
4-1-1 |
|
|
|
Conics Application Menus and Buttons ............................................................. |
4-1-2 |
|
|
|
Conics Application Status Bar ........................................................................... |
4-1-4 |
|
4-2 |
|
Inputting Equations ............................................................................. |
4-2-1 |
|
|
|
Using a Conics Form to Input an Equation ....................................................... |
4-2-1 |
|
|
|
Inputting an Equation Manually ......................................................................... |
4-2-3 |
|
|
|
Transforming a Manually Input Equation to a Conics Form .............................. |
4-2-3 |
|
20050501

|
|
5 |
|
|
|
|
Contents |
|
|
4-3 |
Drawing a Conics Graph |
4-3-1 |
|
|
|
||||
|
|
Drawing a Parabola .......................................................................................... |
4-3-1 |
|
|
|
Drawing a Circle ................................................................................................ |
4-3-4 |
|
|
|
Drawing an Ellipse ............................................................................................ |
4-3-5 |
|
|
|
Drawing a Hyperbola ......................................................................................... |
4-3-6 |
|
|
|
Drawing a General Conics ................................................................................ |
4-3-8 |
|
4-4 |
Using Trace to Read Graph Coordinates ........................................... |
4-4-1 |
|
|
|
|
Using Trace ....................................................................................................... |
4-4-1 |
|
4-5 Using G-Solve to Analyze a Conics Graph ......................................... |
4-5-1 |
|
||
|
|
Displaying the G-Solve Menu ............................................................................ |
4-5-1 |
|
|
|
Using G-Solve Menu Commands ...................................................................... |
4-5-2 |
|
Chapter |
5 Using the 3D Graph Application |
|
|
|
5-1 |
|
3D Graph Application Overview .......................................................... |
5-1-1 |
|
|
|
Starting Up the 3D Graph Application ............................................................... |
5-1-1 |
|
|
|
3D Graph Application Window .......................................................................... |
5-1-1 |
|
|
|
3D Graph Application Menus and Buttons ........................................................ |
5-1-2 |
|
|
|
3D Graph Application Status Bar ...................................................................... |
5-1-4 |
|
5-2 |
|
Inputting an Expression ....................................................................... |
5-2-1 |
|
|
|
Using 3D Graph Editor Sheets .......................................................................... |
5-2-1 |
|
|
|
Storing a Function ............................................................................................. |
5-2-2 |
|
5-3 |
Drawing a 3D Graph ............................................................................. |
5-3-1 |
|
|
|
|
Configuring 3D Graph View Window Parameters ............................................. |
5-3-1 |
|
|
|
3D Graph Example ............................................................................................ |
5-3-3 |
|
5-4 |
Manipulating a Graph on the 3D Graph Window ............................... |
5-4-1 |
|
|
|
|
Enlarging and Reducing the Size of a Graph .................................................... |
5-4-1 |
|
|
|
Switching the Eye Position ................................................................................ |
5-4-1 |
|
|
|
Rotating the Graph Manually ............................................................................ |
5-4-2 |
|
|
|
Rotating a Graph Automatically ......................................................................... |
5-4-2 |
|
|
|
Initializing the Graph Window ............................................................................ |
5-4-2 |
|
5-5 Other 3D Graph Application Functions .............................................. |
5-5-1 |
|
||
|
|
Using Trace to Read Graph Coordinates .......................................................... |
5-5-1 |
|
|
|
Inserting Text into a 3D Graph Window ............................................................. |
5-5-1 |
|
|
|
Calculating a z-value for Particular x- and y-values .......................................... |
5-5-2 |
|
Chapter |
6 Using the Sequence Application |
|
|
|
6-1 |
|
Sequence Application Overview ......................................................... |
6-1-1 |
|
|
|
Starting up the Sequence Application ............................................................... |
6-1-1 |
|
|
|
Sequence Application Window .......................................................................... |
6-1-1 |
|
|
|
Sequence Application Menus and Buttons ....................................................... |
6-1-2 |
|
|
|
Sequence Application Status Bar ...................................................................... |
6-1-6 |
|
6-2 Inputting an Expression in the Sequence Application ...................... |
6-2-1 |
|
||
|
|
Inputting Data on the Sequence Editor Window ............................................... |
6-2-1 |
|
|
|
Inputting Data on the Sequence RUN Window ................................................. |
6-2-1 |
|
20050501

6
Contents
6-3 |
Recursive and Explicit Form of a Sequence ...................................... |
6-3-1 |
|
Generating a Number Table .............................................................................. |
6-3-1 |
|
Graphing a Recursion ....................................................................................... |
6-3-3 |
|
Determining the General Term of a Recursion Expression ............................... |
6-3-5 |
|
Calculating the Sum of a Sequence .................................................................. |
6-3-6 |
6-4 |
Using LinkTrace .................................................................................... |
6-4-1 |
Chapter |
7 Using the Statistics Application |
|
|
|
|
||
7-1 |
|
Statistics Application Overview .......................................................... |
|
|
|
|
7-1-1 |
|
|
Starting Up the Statistics Application ................................................................ |
|
|
|
|
7-1-2 |
|
|
List Editor Window Menus and Buttons ............................................................ |
|
|
|
|
7-1-3 |
|
|
List Editor Window Status Bar ........................................................................... |
|
|
|
|
7-1-4 |
7-2 |
|
Using List Editor ................................................................................... |
|
|
|
|
7-2-1 |
|
|
Basic List Operations ........................................................................................ |
|
|
|
|
7-2-1 |
|
|
Inputting Data into a List ................................................................................... |
|
|
|
|
7-2-4 |
|
|
Editing List Contents ......................................................................................... |
|
|
|
|
7-2-7 |
|
|
Sorting List Data ................................................................................................ |
|
|
|
|
7-2-8 |
|
|
Controlling the Number of Displayed List Columns ........................................... |
7-2-9 |
||||
|
|
Clearing All List Editor Data .............................................................................. |
|
|
|
|
7-2-9 |
7-3 |
Before Trying to Draw a Statistical Graph .......................................... |
|
|
7-3-1 |
|||
|
|
Using the SetGraph Menu ................................................................................. |
|
|
|
|
7-3-1 |
|
|
Configuring StatGraph Setups .......................................................................... |
|
|
|
|
7-3-2 |
7-4 |
Graphing Single-Variable Statistical Data .......................................... |
|
|
7-4-1 |
|||
|
|
Normal Probability Plot (NPPlot) ....................................................................... |
|
|
|
|
7-4-1 |
|
|
Histogram Bar Graph (Histogram) .................................................................... |
|
|
|
|
7-4-2 |
|
|
Med-Box Plot (MedBox) .................................................................................... |
|
|
|
|
7-4-2 |
|
|
Modified-Box Plot (ModBox) ............................................................................. |
|
|
|
|
7-4-3 |
|
|
Normal Distribution Curve (NDist) ..................................................................... |
|
|
|
|
7-4-3 |
|
|
Broken Line Graph (Broken) ............................................................................. |
|
|
|
|
7-4-4 |
7-5 |
Graphing Paired-Variable Statistical Data .......................................... |
|
|
7-5-1 |
|||
|
|
Drawing a Scatter Plot and xy Line Graph ........................................................ |
|
|
|
|
7-5-1 |
|
|
Drawing a Regression Graph ............................................................................ |
|
|
|
|
7-5-2 |
|
|
Graphing Previously Calculated Regression Results ........................................ |
7-5-4 |
||||
|
|
Drawing a Linear Regression Graph ................................................................. |
|
|
|
|
7-5-5 |
|
|
Drawing a Med-Med Graph ............................................................................... |
|
|
|
|
7-5-6 |
|
|
Drawing Quadratic, Cubic, and Quartic Regression Graphs ............................. |
7-5-7 |
||||
|
|
Drawing a Logarithmic Regression Graph ........................................................ |
|
|
|
|
7-5-9 |
|
|
Drawing a Exponential Regression Graph (y = a·eb · x) .................................... |
7-5-10 |
||||
|
|
Drawing a Exponential Regression Graph (y = a·bx) ....................................... |
7-5-11 |
||||
|
|
Drawing a Power Regression Graph (y = a·xb) |
............................................... |
|
|
7-5-12 |
|
|
|
Drawing a Sinusoidal Regression Graph (y = a·sin(b·x + c) + d) .................... |
7-5-13 |
||||
|
|
Drawing a Logistic Regression Graph ( y = |
|
c |
|
) ..................................... |
7-5-14 |
|
|
1 + a·e |
–b·x |
||||
|
|
Overlaying a Function Graph on a Statistical Graph ....................................... |
7-5-15 |
||||
20050501

7
Contents
7-6 |
Using the Statistical Graph Window Toolbar ..................................... |
7-6-1 |
7-7 |
Performing Statistical Calculations .................................................... |
7-7-1 |
|
Viewing Single-variable Statistical Calculation Results ..................................... |
7-7-1 |
|
Viewing Paired-variable Statistical Calculation Results .................................... |
7-7-2 |
|
Viewing Regression Calculation Results ........................................................... |
7-7-3 |
|
Residual Calculation ......................................................................................... |
7-7-3 |
|
Copying a Regression Formula to the Graph & Table Application .................... |
7-7-4 |
7-8 |
Test, Confidence Interval, and Distribution Calculations ................. |
7-8-1 |
7-9 |
Tests ....................................................................................................... |
7-9-1 |
|
Test Command List ........................................................................................... |
7-9-2 |
7-10 |
Confidence Intervals .......................................................................... |
7-10-1 |
|
Confidence Interval Command List ................................................................. |
7-10-2 |
7-11 |
Distribution ......................................................................................... |
7-11-1 |
|
Distribution Command List ............................................................................... |
7-11-2 |
7-12 |
Statistical System Variables .............................................................. |
7-12-1 |
Chapter |
8 Using the Geometry Application |
|
8-1 |
Geometry Application Overview ......................................................... |
8-1-1 |
|
Starting Up the Geometry Application ............................................................... |
8-1-3 |
|
Geometry Application Menus and Buttons ........................................................ |
8-1-3 |
8-2 |
Drawing Figures ................................................................................... |
8-2-1 |
|
Using the Draw Menu ........................................................................................ |
8-2-1 |
|
Using the Special Shape Submenu .................................................................. |
8-2-9 |
|
Using the Construct Submenu ........................................................................ |
8-2-12 |
|
Transformation Using a Matrix or Vector (General Transform) ....................... |
8-2-19 |
8-3 |
Editing Figures ..................................................................................... |
8-3-1 |
|
Selecting and Deselecting Figures .................................................................... |
8-3-1 |
|
Moving and Copying Figures ............................................................................ |
8-3-3 |
|
Using the Measurement Box ............................................................................. |
8-3-4 |
8-4 Controlling Geometry Window Appearance ...................................... |
8-4-1 |
|
|
Configuring View Window Settings ................................................................... |
8-4-1 |
|
Selecting the Axis Setting .................................................................................. |
8-4-1 |
|
Toggling Integer Grid Display On and Off ......................................................... |
8-4-2 |
|
Zooming ............................................................................................................ |
8-4-3 |
|
Using Pan to Shift the Display Image ................................................................ |
8-4-5 |
8-5 |
Working with Animations ..................................................................... |
8-5-1 |
|
Using Animation Commands ............................................................................. |
8-5-1 |
8-6 Using the Geometry Application with Other Applications ................ |
8-6-1 |
|
|
Drag and Drop ................................................................................................... |
8-6-1 |
|
Copy and Paste ................................................................................................. |
8-6-5 |
|
Dynamically Linked Data ................................................................................... |
8-6-5 |
8-7 |
Managing Geometry Application Files ............................................... |
8-7-1 |
|
File Operations .................................................................................................. |
8-7-1 |
|
Folder Operations ............................................................................................. |
8-7-4 |
20050501

8
Contents
Chapter |
9 Using the Numeric Solver Application |
|
9-1 |
Numeric Solver Application Overview ................................................ |
9-1-1 |
|
Starting Up the Numeric Solver Application ...................................................... |
9-1-1 |
|
Numeric Solver Application Window ................................................................. |
9-1-1 |
|
Numeric Solver Menus and Buttons .................................................................. |
9-1-1 |
9-2 |
Using Numeric Solver .......................................................................... |
9-2-1 |
Chapter 10 Using the eActivity Application |
|
|
10-1 |
eActivity Application Overview ......................................................... |
10-1-1 |
|
Starting Up the eActivity Application ............................................................... |
10-1-1 |
|
eActivity Application Window ........................................................................... |
10-1-1 |
|
eActivity Application Menus and Buttons ........................................................ |
10-1-2 |
|
eActivity Application Status Bar ....................................................................... |
10-1-4 |
|
eActivity Key Operations ................................................................................. |
10-1-4 |
10-2 |
Creating an eActivity .......................................................................... |
10-2-1 |
|
Basic Steps for Creating an eActivity .............................................................. |
10-2-1 |
|
Managing eActivity Files ................................................................................. |
10-2-3 |
10-3 |
Inserting Data into an eActivity ......................................................... |
10-3-1 |
|
Inserting a Text Row ........................................................................................ |
10-3-1 |
|
Inserting a Calculation Row ............................................................................ |
10-3-3 |
|
Inserting an Application Data Strip .................................................................. |
10-3-5 |
|
Moving Information Between eActivity and Applications ............................... |
10-3-10 |
|
Inserting a Geometry Link Row ..................................................................... |
10-3-12 |
10-4 |
Working with eActivity Files .............................................................. |
10-4-1 |
|
Opening an Existing eActivity ......................................................................... |
10-4-1 |
|
Browsing the Contents of an eActivity ............................................................ |
10-4-2 |
|
Editing the Contents of an eActivity ................................................................ |
10-4-2 |
|
Expanding an Application Data Strip ............................................................... |
10-4-2 |
|
Modifying the Data in an Application Data Strip .............................................. |
10-4-3 |
|
Saving an Edited eActivity ............................................................................... |
10-4-3 |
10-5 |
Transferring eActivity Files ............................................................... |
10-5-1 |
|
Transferring eActivity Files between Two ClassPad Units .............................. |
10-5-1 |
|
Transferring eActivity Files between a ClassPad Unit and a Computer .......... |
10-5-2 |
Chapter 11 Using the Presentation Application |
|
|
11-1 |
Presentation Application Overview .................................................. |
11-1-1 |
|
Starting Up the Presentation Application ......................................................... |
11-1-2 |
|
Presentation Application Window ..................................................................... |
11-1-2 |
|
Presentation Application Menus and Buttons .................................................. |
11-1-3 |
|
Screen Capture Precautions ............................................................................ |
11-1-4 |
11-2 |
Building a Presentation ..................................................................... |
11-2-1 |
|
Adding a Blank Page to a Presentation ........................................................... |
11-2-2 |
11-3 |
Managing Presentation Files ............................................................. |
11-3-1 |
11-4 |
Playing a Presentation ....................................................................... |
11-4-1 |
|
Using Auto Play ................................................................................................ |
11-4-1 |
|
Using Manual Play ........................................................................................... |
11-4-2 |
|
Using Repeat Play ........................................................................................... |
11-4-3 |
20050501

9
Contents
11-5 |
Editing Presentation Pages ............................................................... |
11-5-1 |
|
About the Editing Tool Palette .......................................................................... |
11-5-1 |
|
Entering the Editing Mode ................................................................................ |
11-5-1 |
|
Editing Operations ............................................................................................ |
11-5-3 |
|
Using the Eraser .............................................................................................. |
11-5-7 |
11-6 |
Configuring Presentation Preferences ............................................. |
11-6-1 |
11-7 |
Presentation File Transfer Precautions ............................................ |
11-7-1 |
Chapter 12 Using the Program Application
12-1 Program Application Overview ......................................................... |
12-1-1 |
Starting Up the Program Application ............................................................... |
12-1-1 |
Program Loader Window ................................................................................ |
12-1-1 |
Program Editor Window .................................................................................. |
12-1-3 |
12-2 Creating a New Program .................................................................... |
12-2-1 |
|
|
General Programming Steps ........................................................................... |
12-2-1 |
|
Creating and Saving a Program ...................................................................... |
12-2-1 |
|
Running a Program ......................................................................................... |
12-2-5 |
|
Pausing Program Execution ........................................................................... |
12-2-6 |
|
Terminating Program Execution ...................................................................... |
12-2-6 |
|
Configuring Parameter Variables and Inputting Their Values .......................... |
12-2-7 |
|
Using Subroutines ........................................................................................... |
12-2-8 |
12-3 |
Debugging a Program ........................................................................ |
12-3-1 |
|
Debugging After an Error Message Appears ................................................... |
12-3-1 |
|
Debugging a Program Following Unexpected Results ................................... |
12-3-1 |
|
Modifying an Existing Program to Create a New One ..................................... |
12-3-2 |
|
Searching for Data Inside a Program .............................................................. |
12-3-5 |
12-4 |
Managing Files .................................................................................... |
12-4-1 |
|
Renaming a File .............................................................................................. |
12-4-1 |
|
Deleting a Program ......................................................................................... |
12-4-1 |
|
Changing the File Type ................................................................................... |
12-4-2 |
12-5 |
User-defined Functions ..................................................................... |
12-5-1 |
|
Creating a New User-defined Function ........................................................... |
12-5-1 |
|
Executing a User-defined Function ................................................................. |
12-5-3 |
|
Editing a User-defined Function ...................................................................... |
12-5-4 |
|
Deleting a User-defined Function .................................................................... |
12-5-4 |
12-6 |
Program Command Reference .......................................................... |
12-6-1 |
|
Using This Reference ...................................................................................... |
12-6-1 |
|
Program Application Commands ..................................................................... |
12-6-2 |
|
Application Command List ............................................................................ |
12-6-15 |
20050501
10
Contents
12-7 Including ClassPad Functions in Programs .................................... |
12-7-1 |
Including Graphing Functions in a Program .................................................... |
12-7-1 |
Using Conics Functions in a Program ............................................................. |
12-7-1 |
Including 3D Graphing Functions in a Program .............................................. |
12-7-2 |
Including Table & Graph Functions in a Program ............................................ |
12-7-2 |
Including Recursion Table and Recursion Graph Functions in a Program ...... |
12-7-3 |
Including List Sort Functions in a Program ..................................................... |
12-7-3 |
Including Statistical Graphing and Calculation Functions in a Program .......... |
12-7-4 |
Chapter 13 Using the Spreadsheet Application
13-1 |
Spreadsheet Application Overview ................................................... |
13-1-1 |
|
Starting Up the Spreadsheet Application ........................................................ |
13-1-1 |
|
Spreadsheet Window ...................................................................................... |
13-1-1 |
13-2 Spreadsheet Application Menus and Buttons ................................. |
13-2-1 |
|
13-3 Basic Spreadsheet Window Operations ........................................... |
13-3-1 |
|
|
About the Cell Cursor ...................................................................................... |
13-3-1 |
|
Controlling Cell Cursor Movement .................................................................. |
13-3-1 |
|
Navigating Around the Spreadsheet Window ................................................. |
13-3-2 |
|
Hiding or Displaying the Scrollbars ................................................................. |
13-3-4 |
|
Selecting Cells ................................................................................................ |
13-3-5 |
|
Using the Cell Viewer Window ........................................................................ |
13-3-6 |
13-4 |
Editing Cell Contents ......................................................................... |
13-4-1 |
|
Edit Mode Screen ............................................................................................ |
13-4-1 |
|
Entering the Edit Mode .................................................................................... |
13-4-2 |
|
Basic Data Input Steps .................................................................................... |
13-4-3 |
|
Inputting a Formula ......................................................................................... |
13-4-4 |
|
Inputting a Cell Reference ............................................................................... |
13-4-6 |
|
Inputting a Constant ........................................................................................ |
13-4-8 |
|
Using the Fill Sequence Command ................................................................. |
13-4-8 |
|
Cut and Copy ................................................................................................ |
13-4-10 |
|
Paste .............................................................................................................. |
13-4-11 |
|
Specifying Text or Calculation as the Data Type for a Particular Cell ........... |
13-4-13 |
|
Using Drag and Drop to Copy Cell Data within a Spreadsheet .................... |
13-4-14 |
|
Using Drag and Drop to Obtain Spreadsheet Graph Data ............................ |
13-4-16 |
13-5 Using the Spreadsheet Application with the eActivity |
|
|
|
Application .......................................................................................... |
13-5-1 |
|
Drag and Drop ................................................................................................. |
13-5-1 |
13-6 |
Using the Action Menu ....................................................................... |
13-6-1 |
|
Spreadsheet [Action] Menu Basics ................................................................. |
13-6-1 |
|
Action Menu Functions .................................................................................... |
13-6-4 |
20050501

11
Contents
13-7 Formatting Cells and Data ................................................................. |
13-7-1 |
Standard (Fractional) and Decimal (Approximate) Modes .............................. |
13-7-1 |
Plain Text and Bold Text .................................................................................. |
13-7-1 |
Text and Calculation Data Types ..................................................................... |
13-7-1 |
Text Alignment ................................................................................................. |
13-7-2 |
Number Format ............................................................................................... |
13-7-2 |
Changing the Width of a Column .................................................................... |
13-7-3 |
13-8 Graphing .............................................................................................. |
13-8-1 |
Graph Menu .................................................................................................... |
13-8-1 |
Graph Window Menus and Toolbar ................................................................. |
13-8-8 |
Basic Graphing Steps .................................................................................... |
13-8-11 |
Other Graph Window Operations .................................................................. |
13-8-13 |
Chapter 14 Using the Setup Menu
14-1 |
Setup Menu Overview ........................................................................ |
14-1-1 |
14-2 |
Using the Setup Menu ........................................................................ |
14-2-1 |
|
Specifying a Variable ....................................................................................... |
14-2-2 |
|
Initializing All Setup Menu Settings ................................................................. |
14-2-3 |
14-3 |
Setup Menu Settings .......................................................................... |
14-3-1 |
|
Basic Format Dialog Box ................................................................................. |
14-3-1 |
|
Graph Format Dialog Box ............................................................................... |
14-3-4 |
|
3D Format Dialog Box ..................................................................................... |
14-3-6 |
|
Presentation Dialog Box .................................................................................. |
14-3-7 |
|
Communication Dialog Box ............................................................................. |
14-3-8 |
Chapter 15 Configuring System Settings
15-1 System Setting Overview ................................................................... |
15-1-1 |
Starting Up the System Application ................................................................. |
15-1-1 |
System Application Window ............................................................................ |
15-1-1 |
System Application Menus and Buttons .......................................................... |
15-1-2 |
15-2 |
Managing Memory Usage .................................................................. |
15-2-1 |
|
Memory Usage Sheets .................................................................................... |
15-2-1 |
|
Deleting Memory Usage Data ......................................................................... |
15-2-3 |
15-3 Using the Reset Dialog Box ............................................................... |
15-3-1 |
|
15-4 |
Initializing Your ClassPad .................................................................. |
15-4-1 |
15-5 |
Adjusting Display Contrast ............................................................... |
15-5-1 |
15-6 |
Configuring Power Properties ........................................................... |
15-6-1 |
|
Power Saving Mode ........................................................................................ |
15-6-1 |
|
Auto Power Off ................................................................................................ |
15-6-1 |
|
Configuring Power Properties ......................................................................... |
15-6-2 |
20050501

12
Contents
15-7 |
Specifying the Display Language ..................................................... |
15-7-1 |
15-8 |
Specifying the Font Set ...................................................................... |
15-8-1 |
15-9 |
Specifying the Alphabetic Keyboard Arrangement ......................... |
15-9-1 |
15-10 |
Optimizing “Flash ROM” .................................................................. |
15-10-1 |
15-11 |
Specifying the Ending Screen Image ............................................. |
15-11-1 |
15-12 |
Adjusting Touch Panel Alignment .................................................. |
15-12-1 |
15-13 |
Viewing Version Information ........................................................... |
15-13-1 |
Chapter 16 Performing Data Communication
16-1 |
Data Communication Overview ......................................................... |
16-1-1 |
|
Connectable Devices and Transferable Data ................................................. |
16-1-1 |
|
Using the ClassPad Communication Application ............................................ |
16-1-3 |
16-2 |
Connecting the ClassPad to Another Device ................................... |
16-2-1 |
|
Connecting to Another ClassPad Unit ............................................................. |
16-2-1 |
|
Connecting to an EA-200 Data Analyzer ........................................................ |
16-2-2 |
|
Connecting to a Computer (USB) ................................................................... |
16-2-3 |
16-3 |
Configuring Communication Parameters ........................................ |
16-3-1 |
|
Wakeup ........................................................................................................... |
16-3-2 |
16-4 |
Transferring Data to Another ClassPad Unit .................................... |
16-4-1 |
|
Selecting Data for Transfer ............................................................................. |
16-4-3 |
|
Sending a Screenshot of the Current Display Contents ................................. |
16-4-5 |
|
Communication Standby ................................................................................. |
16-4-6 |
|
Interrupting an Ongoing Data Communication Operation ............................... |
16-4-6 |
Appendix
1 |
Resetting and Initializing the ClassPad ............................................. |
α-1-1 |
2 |
Deleting an Application ....................................................................... |
α-2-1 |
3 |
Power Supply ........................................................................................ |
α-3-1 |
4 |
Number of Digits and Precision ......................................................... |
α-4-1 |
5 |
Specifications ....................................................................................... |
α-5-1 |
6 |
Character Code Table .......................................................................... |
α-6-1 |
7 |
System Variable Table ......................................................................... |
α-7-1 |
8 |
Command and Function Index ........................................................... |
α-8-1 |
9 |
Graph Types and Executable Functions ........................................... |
α-9-1 |
10 |
Error Message Table .......................................................................... |
α-10-1 |
20050501
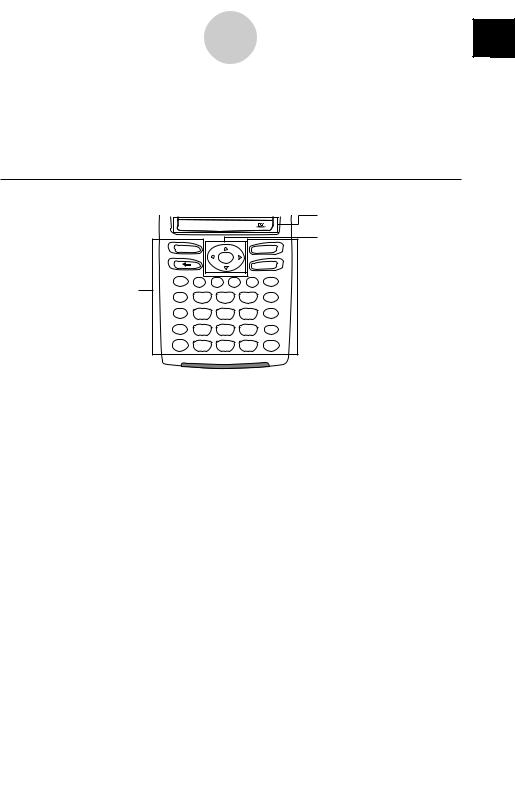
0-1-1
About This User’s Guide
About This User’s Guide
This section explains the symbols that are used in this user’s guide to represent keys, stylus operations, display elements, and other items you encounter while operating your ClassPad.
ClassPad Keypad and Icon Panel |
|
|
|
|
|
s m M r S h |
2Icon panel |
||||
|
|||||
|
|
|
|
|
3Cursor key |
Keyboard |
|
|
|
ON/OFF |
|
|
|
|
|
|
Clear |
= |
x |
y |
z |
^ |
÷ |
1Keypad |
7 |
8 |
|
9 |
|
( |
|
|
|||
) |
4 |
5 |
|
6 |
− |
, |
1 |
2 |
|
3 |
+ |
(–) |
0 |
. |
|
EXP |
EXE |
1Keypad
ClassPad keypad keys are represented by illustrations that look like the keys you need to press.
Example 1: Key within text
Press the kto show the soft keyboard.
Example 2: A series of key operations c2+3-4+10E
When you see something like the above, simply press the keys in the indicated sequence, from left to right.
2Icon panel
An operation that requires tapping an icon on the icon panel is indicated by an illustration of the icon.
Example 1: Tap mto display the application menu.
Example 2: Tap  to cancel an ongoing operation.
3Cursor key
Operation of the cursor key is represented by arrow buttons that indicate which part of the cursor key you need to press: f, c, d, e.
Example 1: Use d or e to move the cursor around the display.
Example 2: dddd
The above example means that you should press d four times.
20050501
0 |
0-1-2
About This User’s Guide
On-screen Keys, Menus, and Other Controllers
4Menu bar
5Toolbar
Tabs
6Soft keyboard
4Menu bar
Menu names and commands are indicated in text by enclosing them inside of brackets.
The following examples show typical menu operations.
Example 1: Tap the Omenu and then tap [Keyboard].
Example 2: Tap [Analysis], [Sketch], and then [Line].
20050501

0-1-3
About This User’s Guide
5Toolbar
Toolbar button operations are indicated by illustrations that look like the button you need to tap.
Example 1: Tap $ to graph the functions.
Example 2: Tap ( to open the List Editor window.
6Soft keyboard
Key operations on the soft keyboards that appear when you press the kkey are indicated by illustrations that look like the keyboard keys.
You can change from one keyboard type to another by tapping one of the tabs along the top of the soft keyboard.
Example 1: baa/gw
Example 2: ) Ngce*fw
Important!
•If a procedure in this User’s Guide requires use of a soft keyboard, press the kkey to display the soft keyboard. The kkey operation is not included as one of the procedure steps. For more details about how to input data on the ClassPad, see “1-6 Input”.
Page Contents
Three-part page numbers are centered at the top of each page. The page number “1-4-2”, for example, indicates Chapter 1, Section 4, page 2.
Note
1-4-2 Built-in Applications
Starting a Built-in Application
Perform the steps below to start a built-in application.
u ClassPad Operation
(1) On the icon panel, tap mto display the application menu.
Scroll up button
Scrollbar
Scroll down button
Application Menu
(2)If you cannot see the icon of the application you want on the menu, tap the scroll buttons or drag the scroll bar to bring other icons into view.
(3)Tap an icon to start its application.
Tip
•You can also start the Main application by tapping Mon the icon panel. See “1-3 Using the Icon Panel” for details.
Application Menu Operations
The following describes the various types of operations you can perform while the application menu is on the display.
•Starting an application
See “Starting a Built-in Application” above.
•Displaying applications according to group (Additional Applications, All Applications) See “Using Application Groups” on page 1-4-3.
•Moving or swapping icons
See “Moving an Icon” on page 1-4-3, and “Swapping Two Icons” on page 1-4-4.
•Deleting an application
See “Deleting an Application” on page α-2-1.
20040801212
Display examples shown in this User’s Guide are intended for illustrative purposes only.
The actual text and values that appear on display may differ from the examples shown in this User’s Guide.
20040801355

1
Chapter
Getting Acquainted
1-1 General Guide
1-2 Turning Power On and Off
1-3 Using the Icon Panel
1-4 Built-in Applications
1-5 Built-in Application Basic Operations
1-6 Input
1-7 Variables and Folders
1-8 Using the Variable Manager
20050501

1-1-1 General Guide
1-1 General Guide
Front
1
3
6
7
8
9
Back
# $
smMrSh 

Keyboard |
|
|
ON/OFF |
|
|
|
|
|
Clear |
= |
x |
y |
z ^ |
÷ |
( |
7 |
8 |
9 |
|
) |
4 |
5 |
6 |
− |
, |
1 |
2 |
3 |
+ |
(–) |
0 |
. |
EXP |
EXE |
|
|
|
|
0 |
Side
@
2
4 !
5
P
20050501

1-1-2
General Guide
General Guide
The numbers next to each of the items below correspond to the numbers in the illustration on page 1-1-1.
Front
1Touch screen
The touch screen shows calculation formulas, calculation results, graphs and other information. The stylus that comes with the ClassPad can be used to input data and perform other operations by tapping directly on the touch screen.
2Stylus
This stylus is specially designed for performing touch screen operations. The stylus slips into a holder on the right side of the ClassPad for storage when it is not in use. For more information, see “Using the Stylus” on page 1-1-4.
3Icon panel
Tapping an icon executes the function assigned to it. See “1-3 Using the Icon Panel” for details.
4okey
Press this key to toggle ClassPad power on and off. See “1-2 Turning Power On and Off” for details.
5ckey
•Pressing this key while inputting data clears all of the data you have input up to that point. For details, see “Input Basics” on page 1-6-3.
•Pressing the ckey while a calculation operation is in progress interrupts the calculation. For details, see “Pausing and Terminating an Operation” on page 1-5-10.
6Cursor key (fcde)
Use the cursor key to move the text cursor, selection highlighting, and other selection tools around the display.
7kkey
Press this key to toggle display of the soft keyboard on and off. For details, see “Using the Soft Keyboard” on page 1-6-1.
8Kkey
•Pressing this key while inputting numeric, expression, or text data deletes one character to the left of the current cursor position. For details, see “Input Basics” on page 1-6-3.
•Pressing the Kkey while a calculation operation is in progress pauses the calculation. For details, see “Pausing and Terminating an Operation” on page 1-5-10.
20050501

1-1-3
General Guide
9Keypad
Use these keys to input the values and operators marked on them. See “1-6 Input” for details.
0Ekey
Press this key to execute a calculation operation.
Side
!3-pin data communication port
Connect the data communication cable here to communicate with another ClassPad unit or a
CASIO Data Analyzer. See “Chapter 16 – Performing Data Communication” for details.
@4-pin mini USB port
Connect the data communication cable here to exchange data with a computer. See “Chapter 16 – Performing Data Communication” for details.
Back
#Battery compartment
Holds the four AAA-size batteries that power the ClassPad. For details, see “Power Supply” on page α-3-1.
$P button
Press this button to reset the ClassPad. For details, see “Performing the RAM Reset Operation” on page α-1-2.
20050501
Loading...