


CARVIN ENGINEERING DATA |
MTS3200 |
GUITAR HEAD |
OPERATING MANUAL |
MTS3212 |
COMBO GUITAR AMP |
MTS3200
FEATURES MTS3212 CELESTION SPEAKERS
Congratulations on your purchase of the MTS3200 all tube amplifier. Carvin has been building tube guitar amplifiers since 1949. They have been used by top professionals like; Frank Zappa, Steve Vai, Craig Chaquico, Allan Holdsworth, Larry Carlton, Chet Atkins and other great musicians. You will discover that these amplifiers represent a significant sound improvement over conventional tube amplifiers. Spend time with your new MTS3200 head or your MTS3212 combo and get to know it’s many sounds.
TECHNICAL DESIGN OF THE MTS3200
The MTS3200 design criteria was to build an all-tube guitar amp that sounded better than anything else on the market. This meant that the MTS3200 was going to be totally new from the ground up and that it was going to be an all tube design with no IC’s or transistors.
HIGH IMPEDANCE GUITAR INPUT
Carvin has long known about the effects of miss-loading a guitar pickup which can cause high frequency loss. The MTS3200 guards against this loss with its ultra high input impedance. Also, we considered the capacitance of the average shielded guitar cable which can reduce the high frequency response of your guitar pickups. Unlike other amplifiers, we purposely avoided adding capacitance anywhere in the preamp to control high frequency oscillations. Instead, we controlled oscillations through careful component layout and lead placement allowing its shimmering highs to be reproduced.
CLEAN AND OVERDRIVE CHANNELS
The equalization of the clean and overdrive channel is designed to offer clarity to your instrument. Special mud-cutting circuits eliminate the unwanted sounds in the 500 to 700 Hz range which normally take away the tone definition of your instrument. You will also take notice of the clean channels PRESENCE switch which adds acoustic voicing to your instrument. This switch boosts only the guitars very highest harmonics which are in the 10k Hz range instead of the normal 3K Hz of a bright switch. The PRESENCE control on the lead channel is designed to adjust the “edge” on your sound. It’s dynamic range allows for super-smooth sounds or an edge for
For your records, you may wish to record the following information.
Serial No._____________________ Invoice Date_______________
RECEIVING INSPECTION—read before getting started
INSPECT YOUR AMP FOR ANY DAMAGE which may have occurred during shipping. If any damage is found, please notify the shipping company and CARVIN immediately.
SAVE THE CARTON & ALL PACKING MATERIALS. In the event you have to re-ship your unit, always use the original carton and packing material. This will provide the best possible protection during shipment. CARVIN and the shipping company are not liable for any damage caused by improper packing.
SAVE YOUR INVOICE. It will be required for warranty service if needed in the future. SHIPMENT SHORTAGE. If you find items missing, they may have been shipped separate-
ly. Please allow several days for the rest of your order to arrive before inquiring.
RECORD THE SERIAL NUMBER on the enclosed warranty card or below on this manual for your records. Keep your portion of the card and return the portion with your name and comments to us.
your lead channel to reach out.
DYNAMIC 5881 POWER TUBES
Your amp is equipped with 5881 power tubes because of their smooth distortion, responsive sound and reliability. The compression characteristics of these “soft clip” power tubes respond to the dynamic range of lead guitar playing. These tubes react even to the most subtle touch—if you play soft, the tubes remain clean and if you increase your attack they respond accordingly.
TONE CONTROLS
The T-Bridge passive BASS, MID and TREBLE tone controls offer a wide range of tone settings. Take full advantage by setting them where they sound best. Your sound may not be at center 5 on the dial. These controls will not affect or color your sound when set at extreme settings, nor do they interact with each other. The greater range of these controls comes from the high impedance 1 meg sealed pots (most guitar amps use 250k pots). The frequency of the bass control is set at 80 Hz while the mid control is set at 650 Hz. The treble control is set at a very high 11k Hz giving the MTS3200 it’s dynamic highs.
REVERB
The FS22 footswith for the long tailed REVERB system in the MTS3200 switches only the reverb “send” leaving the tail of the reverb to decay naturally, the way it’s done in the studio. A special pre filter eliminates the spring “boing” normally heard in other systems giving it a “lush” sound. The all tube reverb system offers vibrant clarity with full depth reminiscent of the sixties tube amps. Guitar Player magazine rated this system as one of the best they have heard.
MODEL MTS3200 HEAD SPECS: MODEL MTS3212 COMBO SPECS:
RMS Power: |
50 or 100 watts |
Speakers: |
2 Celestion G12T-75 speakers |
Output Impedance: |
4, 8 & 16Ω |
RMS Power: |
50 or 100 watts |
Input Impedance: |
100,000 ohms |
Output Impedance: |
4, 8 & 16Ω |
Tone Controls: |
BASS: 80Hz |
Input Impedance: |
100,000 ohms |
Both Channels: |
MID: 600-700Hz |
Tone Controls: |
BASS: 80Hz |
|
TREBLE: 11k Hz |
Both Channels: |
MID: 600-700Hz |
Ch 1 Sensitivity: |
1mV for clipping |
|
TREBLE: 11k Hz |
Ch 2 Sensitivity: |
16mV for full output |
Ch 1 Sensitivity: |
1mV for clipping |
Channels: |
2—switching |
Ch 2 Sensitivity: |
16mV for full output |
Voiced Line Out: |
1.5 VAC @ 100 watts RMS |
Channels: |
2—switching |
Preamp Tubes: |
5—12AX7’s (dual stage) |
Voiced Line Out: |
1.5 VAC @ 100 watts RMS |
Power Amp Tubes: |
4—5881’s (power pentode) |
Preamp Tubes: |
5—12AX7’s (dual stage) |
USA Model: |
120VAC, 300VA |
Power Amp Tubes: |
4—5881’s (power pentode) |
USA Fuse: |
3A 250V slow blow, 5 x 20mm |
USA Model: |
120VAC, 300VA |
Export Model: |
230VAC, 300VA |
USA Fuse: |
3A 250V slow blow, 5 x 20mm |
Export Fuse: |
1.5A 250V slow blow, 5 x 20mm |
Export Model: |
230VAC, 300VA |
Cabinet Size: |
24.25W x 10.5H x 9.5”D |
Export Fuse: |
1.5A 250V slow blow, 5 x 20mm |
Cabinet: |
7-ply poplar wood |
Cabinet Size: |
26W x 10.25D x 17.5”H |
Net Weight: |
35 lbs |
Cabinet: |
7-ply poplar wood |
Warranty: |
One Year |
Net Weight: |
55 lbs |
Options: |
CV3200 cover, FS22 footswitch |
Warranty: |
One Year |
|
|
Options: |
CV3212 cover, FS22 footswitch |
76-32000B 07/05
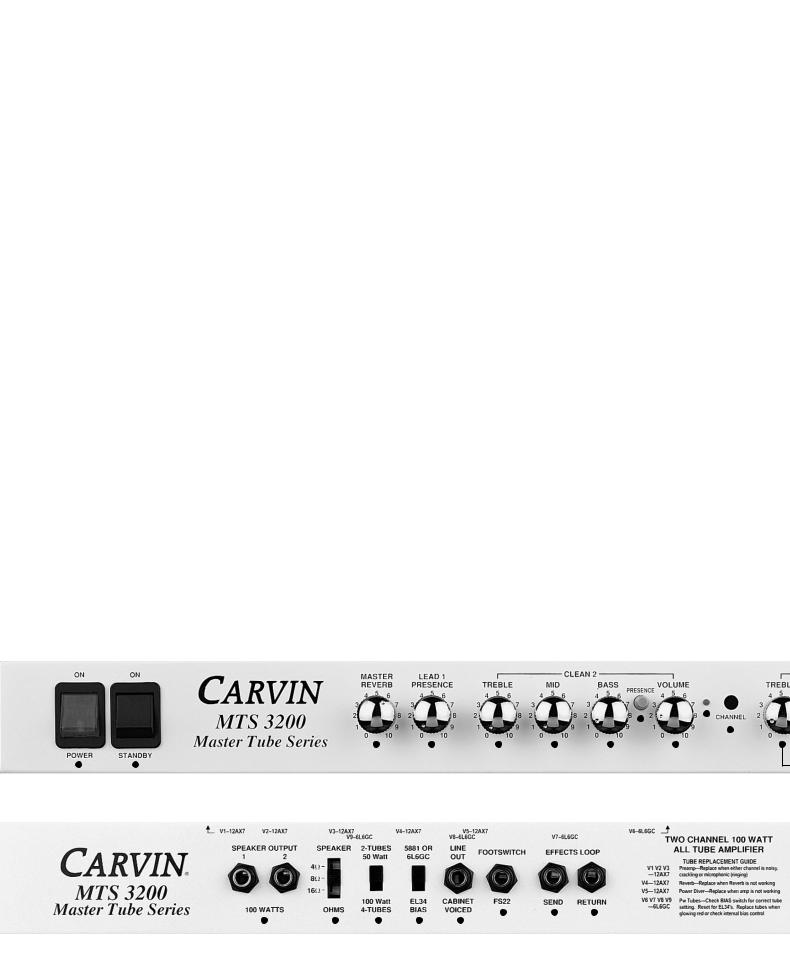
MTS3200 FRONT & REAR PANEL CONTROLS
GETTING STARTED QUICKLY
If you are like most players, you probably want to plug in your new amp and get started playing it right away. You can read the rest of the manual later to learn the finer points of operating your amp. In order to get started you will need your MTS3200 amp, a 120 or 230 AC grounded power outlet, your instrument and a standard guitar cord. With the amp turned off, you may now plug it into the proper AC voltage.
Now turn all the volume and drive controls off and set tone controls at their mid center position. If you have purchased the FS22 foot switch, plug it into the rear foot switch jack for switching the channels and reverb. Note: The channel SELECT button must be in the OUT position (CH 1) for the FS22 to function (a hum will be heard if it’s in the wrong position).
Now, turn the power switch and standby switch ON. Allow 60 seconds for the tubes to warm up. Gradually raise the volume controls and re-adjust the tone controls and your ready to go. The brass knobs can feel hot after the amp has been on awhile. This is normal because brass conducts heat while plastic does not. This will not cause a problem for the controls. Please call if you feel your amp is malfunctioning. Occasionally tubes are damaged in shipping.
FRONT PANEL
1. GUITAR INPUT
A standard 1/4” input jack feeds both channels through using the SELECT switch. Use a professional quality guitar cord no longer than 25 feet. Typical cable capacitance should be under 50pf—the longer the cord, the greater the capacitance (you can measure this with a capacitance meter). A long cable with high capacitance will reduce the overall treble response from your pickups.
2. CHANNEL SELECT
Set the channel SELECT switch to the desired channel. The LED’s next to the volume controls will let you see what channel is functioning. Use channel 2 for clean playing. Use channel 1 for overdrive/sustain. For the FS22 foot switch to function, set the channel SELECT to the “ OUT” channel 1 position.
LEAD CHANNEL 1
3. LEAD CHANNEL INDICATOR
The red LED will illuminate when the LEAD channel is selected.
4. LEAD VOLUME
The volume of the lead channel is to be used as a master level control. For partial clean output, set the VOLUME control to 10 and turn the DRIVE nearly off—under 1. By reducing the guitar volume, you can use this channel as an alternate clean channel.
5. LEAD DRIVE
For mild tube saturation, set the DRIVE control between 1 & 2. For some of the best saturation, set the control between 4 & 6. For full blown overdrive, set the control between 6 and 10 (your guitar volume should be turned all the way up). Because the MTS3200 has been “Hot Rodded” with so much gain in the DRIVE control, you will have an abundance of guitar feedback. However, if feedback is a problem, reduce the amount
MTS3200 Head as shown
MTS3212 Combo front & rear panels reversed
of DRIVE or move the guitar to the side or away from the speaker(s).
6. LEAD—BASS, MID & TREBLE
To start off with, set the BASS, MID & TREBLE controls at their center (5) position. These controls are to be set according to the type of pickups used (dual or single coil). It’s normal to decrease the BASS at higher playing levels. Try the PRESENCE control also when adjusting the treble.
7. LEAD PRESENCE
Channel 1 features it’s own LEAD PRESENCE control for added clarity. It’s frequency range is set at the mid range of the tonal spectrum. Careful adjustment with the TREBLE control will make this feature very useful.
CLEAN CHANNEL 2
8. CLEAN CHANNEL INDICATOR
The red LED will illuminate when the CLEAN channel is selected.
9. CLEAN VOLUME
Channel switching from the Lead channel into Channel 2 gives you crisp, clean playing. Thanks to special mud-cutting circuits that work between the frequencies of 500 and 700 Hz, your guitar tones will be full and vibrant.
10. CLEAN PRESENCE
For added clarity, the CH 2 PRESENCE switch increases only the highest guitar harmonics in the 8-10k Hz range which is ideal for acoustic guitars. A normal bright switch works only in the 3k Hz range leaving your sound somewhat flat. Single or dual coil pickups will determine the need for this switch.
11. CLEAN—BASS, MID & TREBLE CONTROLS
You can start at 5 on the dial for each of the tone controls. However, these settings do not represent a normalize (flat) sound. You need to set them where they sound best! Most musicians like to reduce the MID’S between 1 and 4 for deeper bass and crisper highs. If your sound is too bright with single coil pickups, you may want to keep the PRESENCE switch off.
MASTER SECTION
12. MASTER REVERB
Set the REVERB control for the desired amount (this works in both channels).
13. STANDBY SWITCH
Use the STANDBY SWITCH If you are taking a break. This turns the high voltage off, increasing the life of your power tubes while keeping the power and preamp tube filaments on for immediate use.
14. POWER SWITCH & INDICATOR
The power switch is to be utilized as the master ON/OFF switch. As the amp is turned on, the RED portion of the power switch will illuminate as your ON indicator.
|
|
|
|
|
|
|
|
|
|
|
|
|
|
|
|
|
|
|
|
|
|
|
|
|
|
|
|
|
|
|
|
|
|
|
|
|
|
|
|
|
|
|
|
|
|
|
|
|
|
|
|
|
|
|
|
|
|
|
|
|
|
|
|
|
|
|
|
|
|
|
|
|
|
|
|
|
|
|
|
|
|
|
|
|
|
|
|
|
|
|
|
|
|
|
|
|
|
|
|
|
|
|
|
|
|
|
|
|
|
|
|
|
|
|
|
|
|
|
|
|
|
|
|
|
|
|
|
|
|
|
|
|
|
|
|
|
|
|
|
14 |
|
13 |
|
|
|
|
|
|
|
|
|
|
|
|
10 |
|
|
|
|
|
|
|
|
|
|||
|
|
|
|
|
|
|
|
|
|
|
|
|
|
|
|
|
|
|
|
|
|
|
|
|
|
|
|
|
|
|
|
|
|
|
|
|
|
|
|
|
|
|
|
|
|
|
|
|
|
|
|
|
|
|
|
|
|
|
|
|
|
|
|
|
|
|
|
|
|
|
|
|
|
|
|
|
|
|
|
|
|
|
|
|
|
|
|
|
|
|
|
|
|
|
|
|
16 |
|
17 |
|
18 |
|
19 |
|
20 |
|
21 |
|
|||||||
|
|
|
|
|
|
|
|
|
|
|
|
|
|
|
|
|
|
|
|
|
|
 Loading...