


CARVIN ENGINEERING DATA KB1000 HEAD/KB1010 COMBO/KB1015 COMBO OPERATING MANUAL
KB1000
Congratulations on your purchase of the KB1000 series amp. The KB1000 combines a 7-channel stereo line mixer, 4-band EQ, Direct Out box and a stereo / bi-ampable power amp with crossover into one compact package. Your new amp inherits Carvin’s rugged DCM power amp technology with features including power amp limiters, high current Speakon™ speaker connectors, 1’ Titanium Drivers for the KB1010 and the KB1015 combos, and thermal/short circuit protection. This manual covers the KB1000 head the KB1010 and KB1015 combo amplifiers.
GETTING STARTED QUICKLY
If you are like most players, you probably want to plug in your new amp and get started playing right away. However, with a full-featured amp like the KB1000, it is important to set it up correctly for optimum results. Before you start, be sure your amp is plugged into the correct AC voltage.
1.With the amp turned off, set the POWER AMP 1 & 2 levels to “5” and set the MAIN level to “0” to start. Adjust volume with the MAIN level.
2. Set the X-OVER switch to the “OUT” position. “IN” if you are using the KB1015 cabinet.
3. Make sure the BRIDGE switch (rear) is set to the “OUT”position.
4. Set the LOW, LOW MID, HI MID and HIGH tone controls to their center “0” position. Adjust later after you are more familiar with the amp.
5. Plug your keyboard stereo outputs into one of the INPUT jack pairs 1 thru 7. Mono signals should be plugged into the right (R) input jack which will be fed to both LEFT and RIGHT outputs of the amp. Start with the INPUT LEVEL controls at about “3”.
6. Now, turn the amp ON.
7. With your keyboard output set to 5, start playing. Check to be sure the red PK LED next to the INPUT LEVEL CONTROL is not flashing (very dim flashing is OK) or unwanted distortion will result. Turn down your keyboard’s output level if your instrument causes input clipping or turn down the AMP I or AMP 2 levels on the amp. If you hear no sound and the green SIG LED does not light, turn up your keyboard’s output level or check your connection.
8. Gradually raise the MAIN POWER AMP level. Re-adjust according to the desired volume. Never try to get full power by pushing the INPUT LEVEL controls to maximum while keeping the AMP 1 & 2 and MAIN levels below 5, they should be set to 10.
9.Biamping the KB1015 combo or any large stack requires careful balancing of the AMP 1 & 2 controls. These controls power the woofer and 1” Titanium HF Driver independently. Double check to see that the speakers are plugged into the correct amp outputs. If the cables are reversed your amp will not perform correctly.
10.Need more output? The KB1000 is a powerful 1000w amp. Adding more speakers is the best way to substantially increase output. Every time you double your speakers, your acoustic output goes up by a factor of four. This is far more efficient than trying to add 4 times the power because speakers become less efficient when driven hard. Bridging your amp into 4 ohms gives you maximum output. However, the high power of this amp can damage your speakers. The amp will go into “protect” if loaded below 4 ohms in the bridged mode. Hopefully, this will help you get started. Have fun exploring the features and sounds of the KB1000.
DESIGNED FOR TOURING
Every KB1000 is made from heavy-duty 16 gauge steel that is galvanized before being painted to prevent rust. All internal cabling is neatly tied and harnessed. Every circuit card is MIL SPEC, double-sided, through-hole plated, fire retardant FR-4 glass epoxy. This insures that the solder flows on the top, bottom and through each hole of every component, preventing components from shaking loose. Toroid transformers are used as they are the engineer’s choice for greater power supply current while reducing weight and magnetic “hum” fields. Every KB model is made in the USA.
KB1015
KB1010
RECEIVING INSPECTION
INSPECT YOUR UNIT FOR ANY DAMAGE which may have occurred during shipping. If any damage is found, please notify the shipping company and CARVIN immediately. SAVE THE CARTON & ALL PACKING MATERIALS. In the event you have to reship your unit, always use the original carton and packing material. This will provide the best possible protection during shipment. CARVIN and the shipping company are not liable for any damage caused by improper packing. SAVE YOUR INVOICE. It will be required for warranty service if needed in the future. SHIPMENT SHORTAGE. If you find items missing, they may have been shipped separately. Please allow several days for the rest of your order to arrive before inquiring. RECORD THE SERIAL NUMBER on the enclosed warranty card or below on this manual for your records. Keep your portion of the card and return the portion with your name and comments to us. You may register your warranty online @carvin.com/registration
USA customers register online at: www.carvin.com/registration
All other countries register online at: www.carvinworld.com/registration
KB1000 SPECIFICATIONS:
Output Power |
|
|
8Ω |
THD < 1% |
225/225w |
4Ω |
THD < 1% |
350/350w |
2Ω |
THD < 1% |
500/500w |
8Ω Bridged |
THD < 1% |
700w |
4Ω Bridged |
THD < 1% |
1000w |
THD |
Less than .5% at 1k Hz |
Frequency Response |
20 Hz to 20k Hz |
Channels 1 - 7 |
Level controls, signal and peak LEDs, stereo/mono auto input |
|
switching, DI mute on channel 6 and 7. |
Input Impedance |
>10kΩ |
Amp EQ. |
LOW ±15dB @ 50Hz |
|
LO MID±15dB @ 300Hz |
|
HI MID±15dB @ 2.5kHz |
|
HIGH ±15dB @ 10kHz |
Crossover |
12dB per Octave Sweepable100Hz to 1kHz |
• Stereo XLR direct output with level control and ground lift switch • Front panel master volume and independent power amp columes with protection and peak indi
cators • Front panel headphone jack • Two 1/4”, one Speakon™ and binding post speaker outputs for each channel, plus a bridge out Speakon™ jack • Rear panel
1/4” balance line output jacks
AC Requirements |
120VAC 60 Hz or 230VAC 50 Hz optional model |
Power Requirements |
1200VA |
Dimensions: |
KB1000: 19”W x 10”D x 3.5”H |
|
KB1010: 23.5”W x 18”D x 21.5”H |
|
KB1015: 21.75”W x 15.25”D x 31.25”H |
Weight: |
KB1000 Head: 30 Lbs, KB1010: 72 Lbs, KB1015: 97 Lbs. |
Warranty |
One year parts and labor |
For your records, record the following information.
76-72000B 0705 Serial No._____________________ Invoice Date_______________
1 |
2 |
3 |
8 |
10 |
11 |
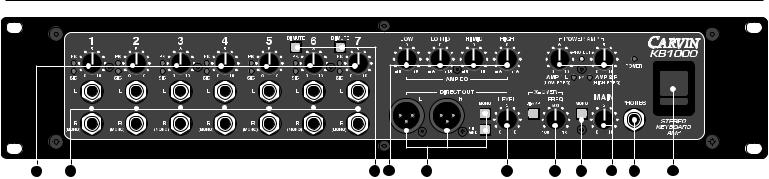
FRONT PANEL FEATURES
1. INPUT LEVELS AND MIXING 1-7
The KB1000 has 7 inputs which are combined to produce a single stereo or mono output. The INPUT LEVEL control is used to set the input level and how much signal is mixed. To make sure you have plenty of headroom for mixing, the keyboard output levels should be set so that turning the INPUT LEVEL to at least “7”, preferably “10” will not cause clipping. The red CLIP LED indicates when the input is close to clipping. To avoid clipping, reduce the keyboard level first, then turn down the INPUT LEVEL knob if the clipping persists. The green SIG LED indicates a signal is present at the input ONLY when the INPUT LEVEL is turned up.
2. INPUT JACKS
Two 1/4” phone jacks are provided on each of the 7 channels to accommodate both stereo and mono instruments. Plugging mono sources into the “R” jack of an INPUT will send signal to both LEFT and RIGHT outputs. You can double the amount of inputs by choosing to run in “MONO” mode and plugging into all 14 (1-7, L&R) input jacks, without regard to stereo assignment. Adjust keyboard output levels to mix L&R inputs accordingly.
3. AMP EQ CONTROLS
The AMP EQ tone controls consist of a LOW, LO MID, HI MID and HIGH controls. These controls DO NOT affect the DIRECT OUT XLRs. Since most of the tone shaping is done within the keyboard itself, the AMP EQ controls are designed to accomodate for differences in speakers and acoustic environments. The LOW control affects the lowest frequencies. Excessive “BOOMINESS” can be reduced by turning the LOW control down while turning it up can add fullness to your sound. The LO MID control adjusts frequencies in the 300Hz range adding extra punch when needed. The HI MID control adjusts frequencies in the 2.5kHz range allowing you to “cut through” on a crowded sound stage. The HIGH control knob is designed to cut or boost the highest frequencies. Usually a “dead” room will will require a boost from the HIGH control while a “live” room with a lot of reflective surfaces will invite you to reduce the HIGH control. Note: boosting the high frequencies can result in increased hiss. This is normal. The AMP EQ is a sound shaping tool which may require some practice to get the best results. Listen to the results and experiment with different settings.
4. DIRECT OUT XLRs
The DIRECT OUT XLRs are balanced outputs that get their signal directly from INPUTs 1-7. These outputs are very useful when connecting to the main mixing board for live performances or recording. Use the DIRECT OUT LEVEL control to set the output. The MONO switch is used to combine the LEFT and RIGHT INPUTS so that both L-R DIRECT OUT XLR jacks receive the same mono signal. NOTE: THE DIRECT OUT MONO SWITCH DOES NOT AFFECT THE STEREO OR MONO OUTPUT OF THE POWER AMP. A LIFT GND switch is also available on the DIRECT OUT XLR jacks. Set this switch for the lowest hum/noise when using this output. When the LIFT GND switch is depressed, the signal ground is lifted from these jacks thus eliminating any ground loops between the KB1000 and the gear it’s feeding. NOTE: THE AMP EQ, POWER
AMP 1&2 AND MAIN LEVEL CONTROLS DO NOT AFFECT THE DIRECT OUT SIGNAL.
5. DIRECT OUT LEVEL
The DIRECT OUT LEVEL control sets the output for the DIRECT OUT XLRs ONLY. It will not affect the volume coming out of the amp speakers or the rear line outs. Communicate with the mixing engineer to set the proper level.
for specific frequencies to be utilized to their fullest potential. Subwoofers will be more efficient at reproducing low frequencies with less distortion. Full range enclosures will not have to work as hard reproducing the lowest frequencies which consume the most power. Stereo
(L-R) separation from the power amps is no longer possible, but is retained at the DIRECT OUT XLRs and PHONES jack. NOTE: BI-AMPING DOES NOT NECESSARILY DELIVER THE MOST VOLUME FROM YOUR SYSTEM.
8. OUTPUT CONTROL GROUP–MAIN, AMP 1L, AMP 2R
The output group controls the volume and amp output levels. The POWER AMP 1 & 2 CONTROLS adjust the volume to the individual amps. The MAIN control sets the overall volume. Try setting the MAIN control to 5 as a starting point.
FULL RANGE MONO (KB1010) AND STEREO: For KB1010 operation push the MONO (MAIN) switch IN. Turn up the AMP 1L knob on the KB1010 until the desired volume level is reached. If your are connecting a pair of speakers for stereo use, be sure to release the MONO (MAIN) switch. Turn up the AMP 1L & AMP 2R knobs until the desired volume level and left and right balance is reached.
BIAMP CONTROL(combos): To set the balance, bring up the AMP 1L (LOW FREQ) knob until the desired volume level is reached. Now bring up the AMP 2R (HIGH FREQ) knob until the desired balance has been achieved.
BRIDGE mode, use only the AMP 1L control, as the AMP 2R control becomes ineffective. If either of the red PK LEDs flash for AMP1 or AMP2, reduce the POWER AMP 1 or 2 volume or, engage the LIMITER switch on the rear panel.
9. MONO (MAIN) SWITCH
With the MONO switch in the “OUT” position, the KB1000 will preserve stereo imaging from the INPUT JACKS to the POWER AMP 1(L) & 2(R) outputs. Setting the MONO switch to the “IN” position will send the combination of both LEFT and RIGHT signals to both POWER AMP OUTPUTS. Helpful if only one speaker cabinet is used, or if stereo imaging is not important.
NOTE: THE MONO (MAIN) SWITCH DOES NOT AFFECT THE STEREO OR MONO OUTPUT OF XLR DIRECT OUTS.
10. PHONES JACK
A PHONES jack is provided for practicing or monitoring. The MAIN knob controls the volume. The phones jack does not interrupt the amplifier output. To listen to the PHONES output without sound from the speakers, turn down the POWER AMP 1&2 controls. A high-current headphone amp drives this output for any pair of headphones.
REAR PANEL FEATURES
11. POWER / (RESET)
Push the upper portion of the POWER SWITCH to turn the amplifier on. If the POWER LED is on but no sound is coming out of the speakers, the amp may have gone into one of its protection modes with the PROTECT LED ON. To reset the amp, turn the power off for one minute and then turn the amp back on. If the problem persists, check for; a) The speaker impedance is too low for the bridge output (4 ohm min.) or normal outputs (2 ohms min. per amp) b) bad speaker cable, c) damaged speaker or d) blocked rear fan cooling vents.
6. DI MUTE SWITCHES (ON INPUTS 6&7)
Inputs 6 and 7 feature DI MUTE switches. When pressed “IN”, signals from inputs 6 and 7 will be REMOVED from the DIRECT OUT XLRs, but will still be heard through the AMP 1&2 speaker outputs, PHONES jack and rear LINE OUT jacks. This is useful for listening to “click” tracks, monitor feeds or other sources WITHOUT sending these signals to the DIRECT OUT XLRs and to the house system.
12. COOLING VENTS
The rear vents cool the internal power amps. Provide a minimum of 3” clearance for adequate ventilation. Blocking the air flow to these vents will cause the amp to thermally protect and turn the speaker relays off. The PROTECT LED on the front panel will light. If this happens, clear the obstruction first, keep the power on, allowing the amp to cool. The amp will engage the speaker relays when cooling conditions return to normal.
7. ELECTRONIC X-OVER (BI-AMPING)
When the BI-AMP switch is pressed “IN”, the amp is in the bi-amp mode. This means all frequencies BELOW the X-OVER FREQ are sent to the POWER AMP 1 OUTPUT, while frequencies ABOVE the X-OVER FREQ are sent to the POWER AMP 2 OUTPUT. To select the crossover frequency, rotate the FREQ control knob until the desired frequency is obtained. Try 800Hz. A bi-amped system gives the user greater control over the tone. This allows speakers designed
13. LIMITER SWITCH
The KB1000 features distortion-free, optoislator power amp limiters. Limiters help prevent power amp clipping by reducing peaks before they reach the amp. To use this feature, press “IN” the LIMITER switch.
 Loading...