


B5
Carvin B5, AC50, B4, Bass Maintenanc, AC40 Owner's Manual
...
Congratulations on your Carvin bass purchase.
With proper care Carvin basses will last a
lifetime.
n IMPORTANT
Within several days of receiving your bass, it
may require a truss rod adjustment, especially
if your local weather is either very dry or very
humid. If it is very dry, chances are your neck
will start to acquire too much forward bow. If it
is raining or very humid, the neck may become
backbowed, causing string buzzing. Please refer
to the 2-way truss rod adjustment instructions.
n STRINGS
Your Carvin bass is equipped with a high quality
set of Carvin strings. For replacement strings,
please order from our catalog. If you change
to considerably lighter or heavier strings, you
may need to adjust the truss rod in the neck to
maintain good string action. For long string
life, keep the strings clean with a soft dry cloth.
Replace strings regularly to avoid dead strings
which can cause intonation problems.
n 2-WAY TRUSS ROD ADJUSTMENT
Carvin basses come with a 2-way adjustable
truss rod, allowing you to add the proper
amount of forward bow to necks with a reverse
bow condition. You can check the neck yourself
for the proper amount of forward bow. You will
need a straightedge about 24” long and a feeler
gauge set. Tune the bass to the proper pitch
and place the straightedge edgewise on the
center of the fingerboard so that it is resting
on the first and last fret. Now take the feeler
gauge set and check for clearance at the 7th fret.
Viewing from the tip of the headstock (with the
frets facing away from you), the truss rod nut
must be turned left (counter clockwise) if there is
less than .010” clearance at the 7th fret. If more
than .020” clearance, the truss rod nut must be
turned clockwise. The optimum forward bow is
.015”. Turning the nut to the right (clockwise)
will reduce the amount of forward bow. To make
adjustments use the 4mm hex wrench provided
with your bass. A 5/32” hex wrench will also
work. Turn the nut 1/10 of a turn and recheck.
Do Not force or over tighten the truss rod nut!
Note: If you have just received your Carvin
bass and the string action is very low with
buzzing frets, then chances are the neck needs
adjusting because of a backbowed condition
sometimes caused during shipping. If this is
the case then remove the truss rod cover with
a small phillips screwdriver. Turn the truss rod
counter clockwise until you have .015” forward
bow. This is about the thickness of 2 business
cards or playing cards.
If you don’t have a straightedge or feeler
gauge set you can achieve great results by
pressing one of your outside strings down at
the first fret and 24th fret and having a friend
slide 2 stacked playing cards between the 7th
fret and the bottom of the string. The 2 cards
should slide under without lifting the string up.
Adjust the truss rod accordingly.
MAINTENANCE AND ADJUSTMENTS FOR CARVIN BASSES
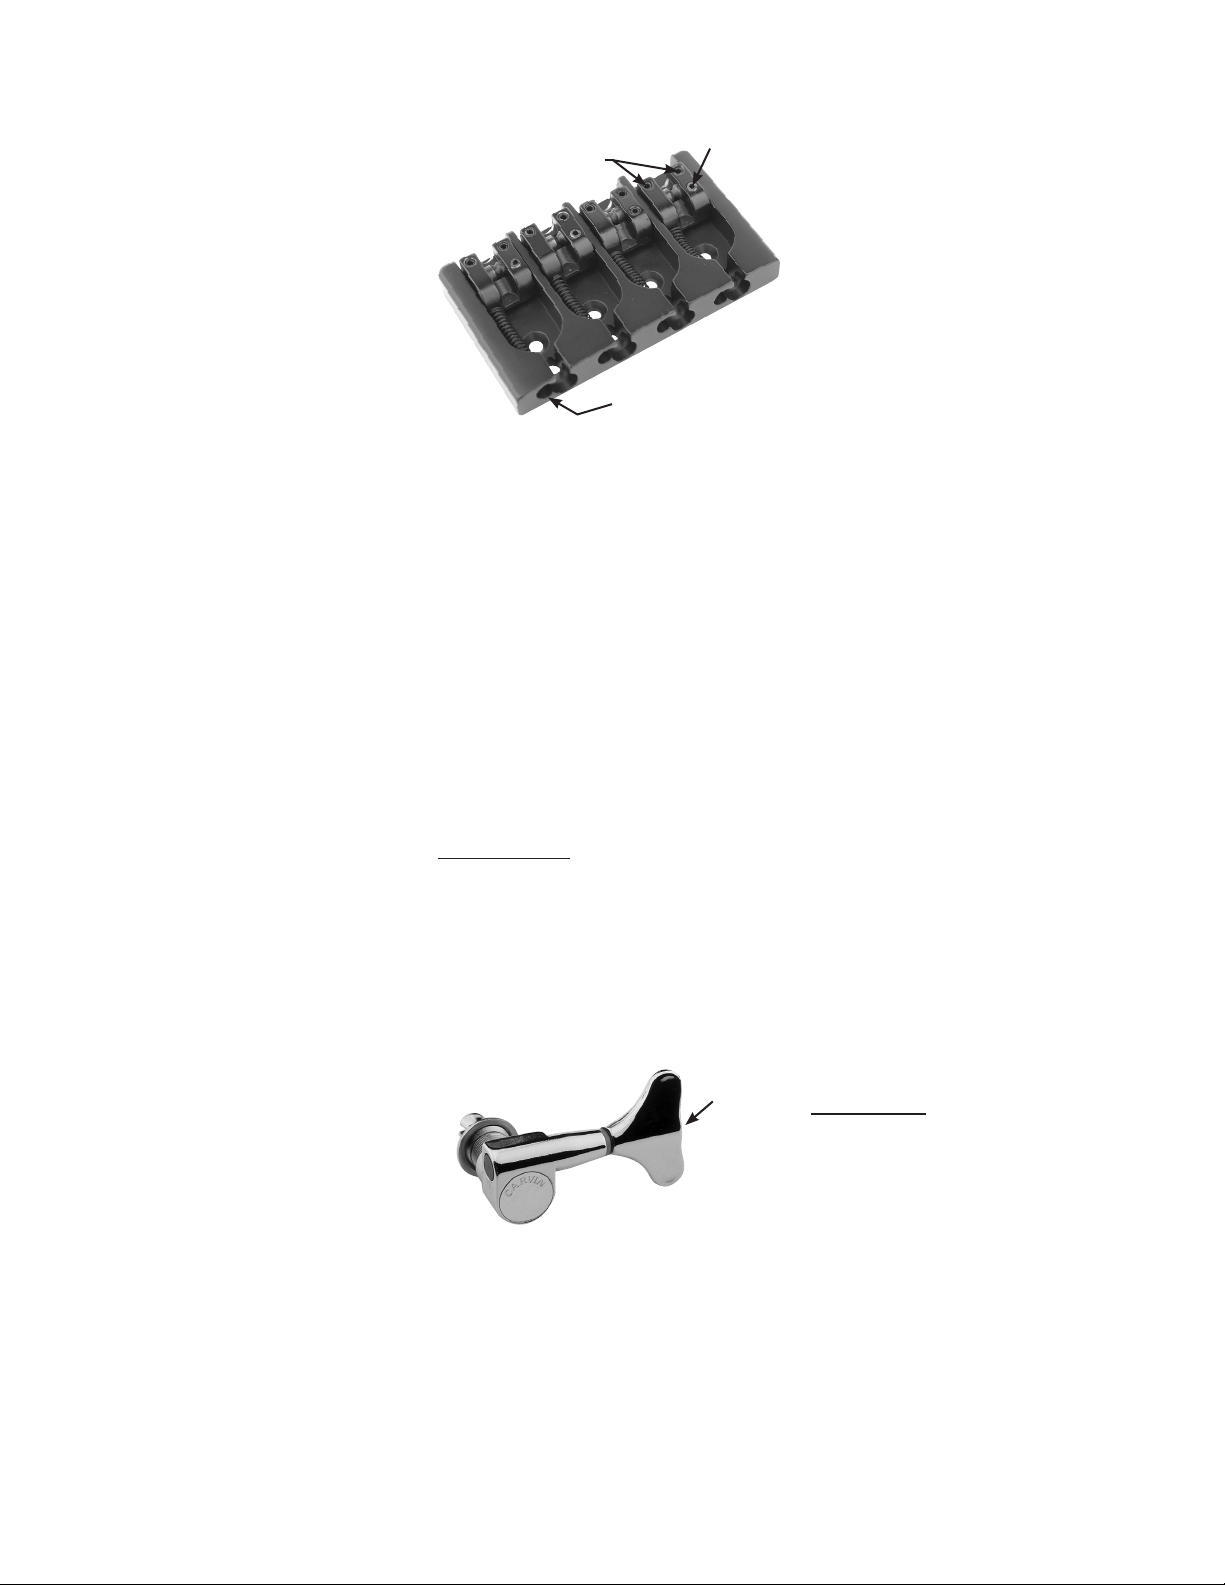
n BRIDGE ADJUSTMENTS
Each Carvin bass is set for best possible
playing action for the average bassist. We
set our basses up for
3
/32” clearance at the
24th fret. If this dimension is much greater or
less than this when you first receive your bass
then your neck will probably require a truss
rod adjustment. Bassists with a light playing
style can possibly lower the action slightly. All
bassist with a hard playing style will probably
need to raise the action slightly. Use a 1/16”
allen wrench to raise or lower saddles.
n CLEANING AND POLISHING
For all Carvin basses with a gloss finish,
use any good quality automobile wax or guitar
polish. To avoid scratching the finish use a
clean soft cloth. Do not get wax on ebony or
rosewood fingerboards.
For Carvin basses with the natural tung oil
finish, apply a good furniture oil such as “Old
English” lemon oil and wipe off the excess.
This should be done at least twice a year.
Ebony and rosewood fingerboards should be
oiled with lemon oil twice a year.
WARNING
• Your bass is constructed of seasoned solid wood
and dried to specific moisture requirements.
• If you live in a desert, high mountain or a
cold winter region, you will experience dry
and extreme weather conditions from time to
time, which can cause your wood and finish
to crack. You can prevent cracking by storing
your bass in it’s case and by not subjecting it
to extreme heat or cold.
• If you live in humid regions such as the
Southeastern United States, or near the ocean,
you should take extra precautions and keep
your instrument in its case or gig bag as much
as possible.
• Do not leave your bass and case in direct sunlight
or in your car when it is hot. Heat build up in the
case can damage the instrument.
• Carvin does not warranty cracks or neck
warpage due to extreme weather conditions,
improper storage or misuse.
n PREMIUM CARVIN TUNING KEYS
Carvin premium bass tuners are designed to
keep your Carvin bass in perfect tune. They
feature a very smooth feel with extra fine 20:1
gear ratio. You can adjust the tension of the
Carvin tuning keys with the phillips screwdriver.
Just tighten or loosen the screw on the end of
the button until the desired tension is obtained.
Tension
Adjustment
n RECOMMENDED PICKUP HEIGHT
After you have the neck and bridge heights
properly adjusted follow these recommend
pickup clearances. All dimensions are measured
from bottom of string to top of pickup.
PICKUP CHOICES:
-SP2 Soap bar humbucker neck 3/32”
-SP2 Soap bar humbucker bridge 1/16”
-H50S J-type humbucker neck 3/32”
-H50S J-type humbucker bridge 1/16”
-J99 J-type Singlecoil neck 1/8”
-J99 J-type Singlecoil bridge 3/32”
-HB2 Alnico 5 humbucker neck 5/32”
-HB2 Alnico 5 humbucker bridge 1/8”
n STRINGING YOUR BASS
You have the choice of feeding your strings
through the rear feed through holes on the back
of the bass or through the T-slots on top of the
bridge. Either way produces great tone. Pull the
string forward until the ball end of the string comes
to a stop. Pull the end of the string past the tuning
key string post and cut the string so that it extends
about 2” past the center of the string post. Now
stick the end of the string into the hole on top of
the string post and wind it around the string post
by turning the tuning key button. Keep the string
wrapping underneath each prior wrap so that the
final wrap is on the bottom of the post.
n INTONATION
Carvin presets the string saddles for accurate
intonation. Use your guitar tuner to fine tune your
intonation. With the aid of your electronic tuner,
tune each string to the proper pitch. Now check
your G string tuning at the 12th and 24th fret. If
the tuner shows sharp at the 12th or 24th fret, then
adjust the G string bridge saddle slightly further
away from the neck. If the tuner shows flat, adjust
the saddle towards the neck. Move the saddle 1/32”
(about the thickness of a dime). Retune the open G
string perfectly and recheck the tuning at the 12th
and 24th fret. If the tuning is perfect, you are done
intonating the G string. If it is still sharp, then keep
moving the string saddle further away from the
neck until your intonation is perfect. Repeat this
procedure for each string.
76-00005D 0808
12340 World Trade Drive, San Diego, CA 92128
(800) 854-2235
www.carvin.com
c
Intonation adjusting screw
#1 phillips screwdriver
Height adjustment screws
1/16” allen wrench
Lockdown screw for side to side saddle adjustment
1/16” allen wrench
 Loading...