


SYSTXCCUID01-V
Infinity™Control
Homeowner’s
Guide
Zone Control
The New Feeling of Comfort

CONGRATULATIONS!
Your decision to choose the
Carrier Infinity
™
Control puts you
in a select group of homeowners
who understand the value of
precise comfort control and
appreciate the simplicity of
an easy-to-use, intuitive, user
interface.
We sincerely appreciate you
putting your trust in Carrier.
Carrier has been delivering
the finest indoor comfort
equipment since 1902. Your
new Infinity Control offers yet
another example of the high
quality comfort technology for
which we are recognized.
Please take a few moments to
review this manual…set up a
comfort schedule that makes
sense for your lifestyle…then
relax and enjoy the comfort!
Current Zone
Zone Button
used to page
through zones.
Room Temperature
Day & Time
Time Period
displays the com-
fort schedule’s active period.
Left Button provides accessary
status.
Hold/Unoccupied Button
maintains desired temperature
indefinitely or activates
“unoccupied” comfort settings.
Time (+\-) Button
Schedule Button
used to
access and exit the comfort
schedule.
Vacation Button
activates/deactivates vacation
comfort settings.
Scroll Button used to move
up and down the screen
during scheduling and setup.
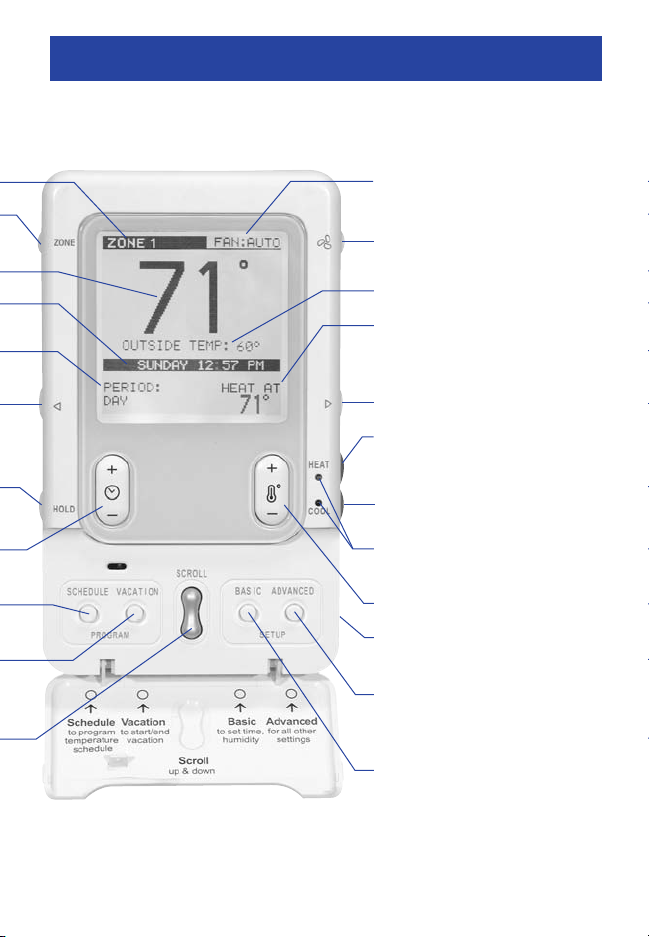
Fan Setting
Fan Button
“medium,” “low,” or “auto”
fan mode.
Outside Temperature
Desired Heating/Cooling
Temperature
chooses “high,”
Right Button
system status.
Heat Button selects heating
operation.
Cool Button selects cooling
operation.
Heat/Cool LEDs indicate
heating or cooling operation.
Temp (+\-) Button
Off Button
on and off.
Advanced Setup Button
provides access to
customizable features.
Basic Setup Button provides
access to current day, time
and desired humidity level.
provides
turns the system

TABLE OF CONTENTS 1
QUICK GUIDE INSTRUCTIONS . . .2
BASIC SETUP . . . . . . . . . . . . . . . . . .6
Set Day, Time & Humidity . . . . . .6
NORMAL OPERATION . . . . . . . . . .7
Turn System On/Off . . . . . . . . . . . .7
Heating . . . . . . . . . . . . . . . . . . . . . .7
Auxiliary Heat . . . . . . . . . . . . . . . . .7
Emergency Heat . . . . . . . . . . . . . .7
Cooling . . . . . . . . . . . . . . . . . . . . . .9
Auto . . . . . . . . . . . . . . . . . . . . . . .9
Adjust Current Temperature . . .9
Adjust Heating Temperature .9
Adjust Cooling Temperature 10
Adjust Fan Speed . . . . . . . . . . . . .11
Hold Current Temperature . . . .11
Unoccupied Function
& Settings . . . . . . . . . . . . . . . . . . . .12
Vacation Function & Settings .12
Check System Status
(Right Button) . . . . . . . . . . . . . . . . . . . .13
Accessory Status (Left Button) 14
Resetting Accessory Usage
Indicator . . . . . . . . . . . . . . . . . . . . .14
Accessory Maintenance Pop-Up
Messages . . . . . . . . . . . . . . . . . . . . . .15
Service Pop-Up Messages
Keyboard Lock-Out . . . . . . . . . . .16
PROGRAMMABLE FEATURES,
SETUP & OPERATION . . . . . . . . . .17
Backlighting . . . . . . . . . . . . . . . . . .17
Determining Your Comfort
Schedule . . . . . . . . . . . . . . . . . . . . . . . .17
Programming Your Comfort
Schedule . . . . . . . . . . . . . . . . . . . . .18
. . . . .16
One Schedule for All Days . . . .18
Weekdays Schedule . . . . . . . . .20
Weekend Schedule . . . . . . . . . .21
Daily Schedule . . . . . . . . . . . . . . .22
Copy Day . . . . . . . . . . . . . . . . . . . .23
Copying a Zone Schedule . . . .24
Programming Fan Speed . . . .25
ZONE FEATURES, SETUP &
OPERATION . . . . . . . . . . . . . . . . . .27
Checking Zone Status . . . . . . .27
Naming Your Zones . . . . . . . . . .27
Programming Each Zone . . . . .27
Fresh Air Ventilation . . . . . . . . . .28
ADVANCED SETUP . . . . . . . . . . . .29
Accessory Maintenance
Reminders . . . . . . . . . . . . . . . . . . .29
Lighting . . . . . . . . . . . . . . . . . . . . . .30
Heating Humidity . . . . . . . . . . . . .31
Cooling Humidity . . . . . . . . . . . .32
Vacation . . . . . . . . . . . . . . . . . . . .33
Unoccupied . . . . . . . . . . . . . . . . .34
Zone Names . . . . . . . . . . . . . . . . .35
SMART SENSOR OPERATION . .36
GLOSSARY . . . . . . . . . . . . . . . . . . .38
QUICK GUIDE INSTRUCTIONS 2
This guide provides the basic operations for setting up and
™
operating your Infinity
Control.
Set Day, Time & Desired Humidity
Flip down the door at the base of the
1
Infinity
™
Control.
2 Press the BASIC button.
3 Adjust the highlighted HOUR setting
using the TIME (+\-) button.
4 Press SCROLL to highlight MINUTE.
5 Adjust the MINUTE setting using the TIME (+\-) button.
6 Press SCROLL to highlight DAY.
7 Adjust the current DAY setting, using the TIME (+\-) button,
until the correct day is displayed.
8 Press SCROLL to highlight HUMIDITY.
9 Press the red HEAT button to set the heating humidity.
10 Adjust the desired heating humidity using either (+\-)
button.
11 Press the blue COOL button to set the cooling humidity.
12 Adjust the desired cooling humidity using either (+\-)
button.
13 Press BASIC or close the door to exit.
Adjust Heating Temperature
Press the red HEAT button. Heating is confirmed when the
1
red LED adjacent to the red HEAT button is lit.

QUICK GUIDE INSTRUCTIONS 3
2 Press the ZONE button until the name of the zone you wish
to control appears on the upper left screen. Selecting “ALL
ZONES” allows you to select one temperature for the entire
home. Press the ZONE button for three seconds to activate
the “ALL ZONES” feature.
3 Use the TEMP (+\-) button to select your desired temperature,
which will be displayed on the lower right. An override time will
be displayed on the lower left. Please note an override time will
not appear if programming has been turned off.
4 You can change the override time in 15-minute increments by
pressing the TIME (+\-) button until the desired override time is
selected.
- OR -
Press the HOLD button to override the schedule indefinitely.
Adjust Cooling Temperature
Press the blue COOL button. Cooling is confirmed when
1
the blue LED adjacent to the blue CL button is lit.
2 Press the ZONE button until the name of the zone you wish
to control appears on the upper left screen. Selecting “ALL
ZONES” allows you to select one temperature for the entire
home. Press the ZONE button for three seconds to activate
the “ALL ZONES” feature.
3 Use the TEMP (+\-) button to select your desired tempera-
ture, which will be displayed on the lower right. An override
time will be displayed on the lower left. Please note an
override time will not appear if programming has been
turned off.
QUICK GUIDE INSTRUCTIONS 4
4 You can change the override time to 15-minute increments
by pressing the TIME (+\-) button until the desired override
time is selected.
- OR -
Press the HOLD button to override the schedule
indefinitely.
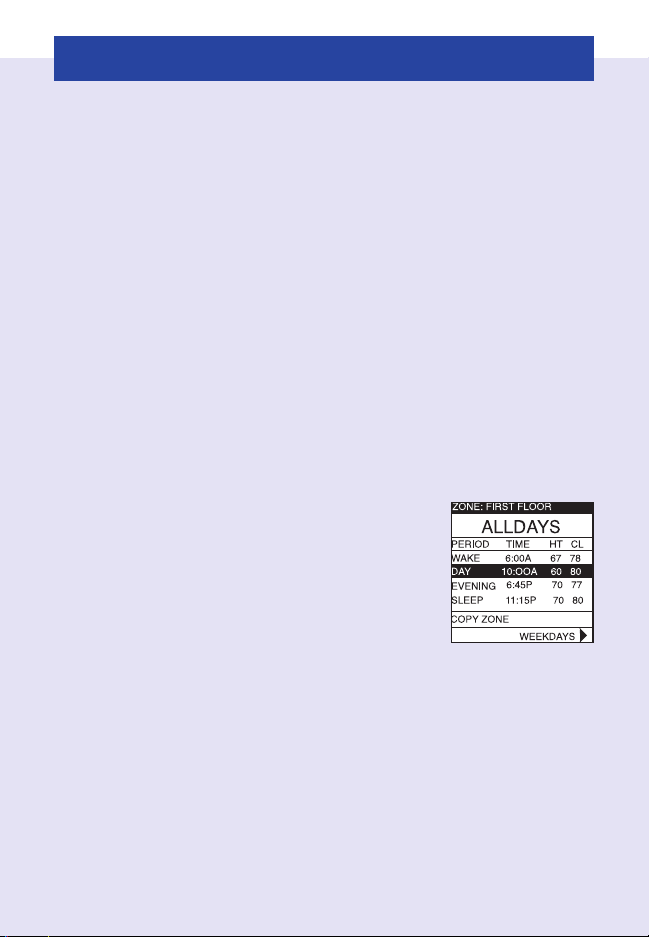
Quick Programming Instructions
These instructions will guide you through creating one comfort
schedule that will repeat every day. For more details on programming, or to create customized schedules for the week,
weekend, or each day, refer to PROGRAMMABLE FEATURES,
SETUP & OPERATION on pages 17 - 26 of this manual.
One Schedule for All Days
Flip down the door at the bottom of the
1
control.
2 Press the SCHEDULE button.
3 Press the ZONE button until the name of
the zone you wish to program appears
on the upper left screen. Selecting “ALL ZONES” allows you
to create one schedule for the entire home.
4 Press either the LEFT or RIGHT button repeatedly until
“ALLDAYS” is displayed.
5 The WAKE time period will be highlighted. Set the start time
for this time period using the TIME (+/-) button.
6 Press the red HEAT button. Heating temperature will begin
flashing.

QUICK GUIDE INSTRUCTIONS 5
7 Set the heating temperature using the TEMP (+\-) button.
8 Press the blue COOL button. Cooling temperature will begin
flashing.
9 Set the cooling temperature using the TEMP (+\-) button.
10 Set the remaining periods, “DAY,” “EVENING,” AND “SLEEP” by
using the SCROLL button to select a time period, then follow
steps 5 – 9 to select temperature and time settings.
11 Exit the scheduling mode by either closing the door or press-
ing the SCHEDULE button.
- OR -
12 To create a custom schedule for the remaining zones, press
the ZONE button to select the next zone you wish to program.
Then, repeat steps 4 - 10 in this section.
Pop-up Messages
Your Infinity™Control provides important and useful maintenance
and service reminders via pop-up messages on the display.
Accessory Maintenance Reminders: An accessory reminder lets
you know when it’s time for maintenance of your air filter, humidifier
pad, UV lamp or ventilator. When an accessory reminder pop-up
message appears, perform the accessory maintenance yourself
OR contact your dealer/contractor.
Service Reminders: When a service reminder pop-up message
appears, contact your dealer/contractor.
See ACCESSORY MAINTENANCE OR SERVICE POP-UP MESSAGES
on pages 14 - 15 in this manual for additional information.
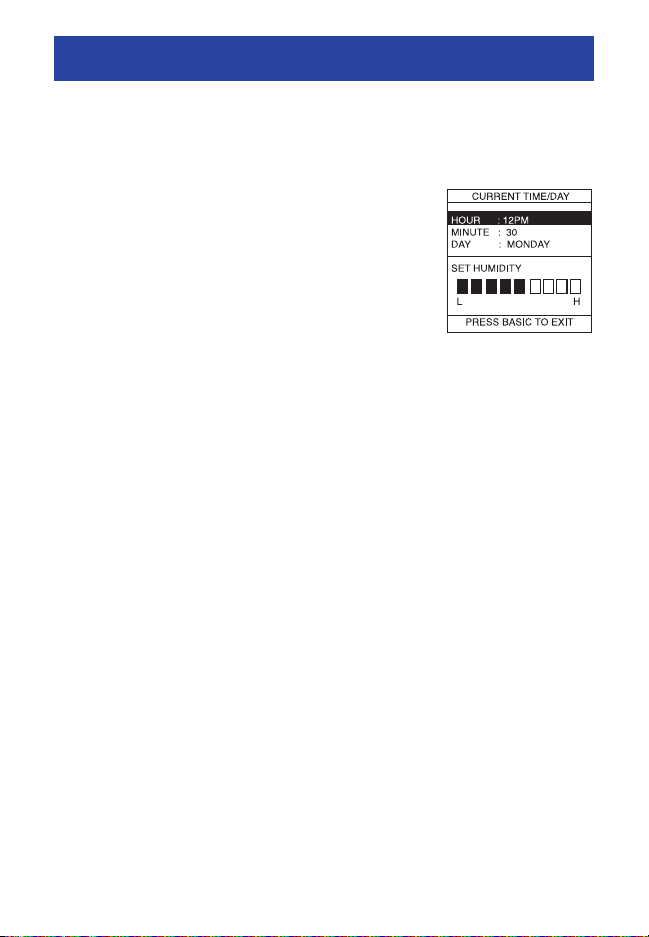
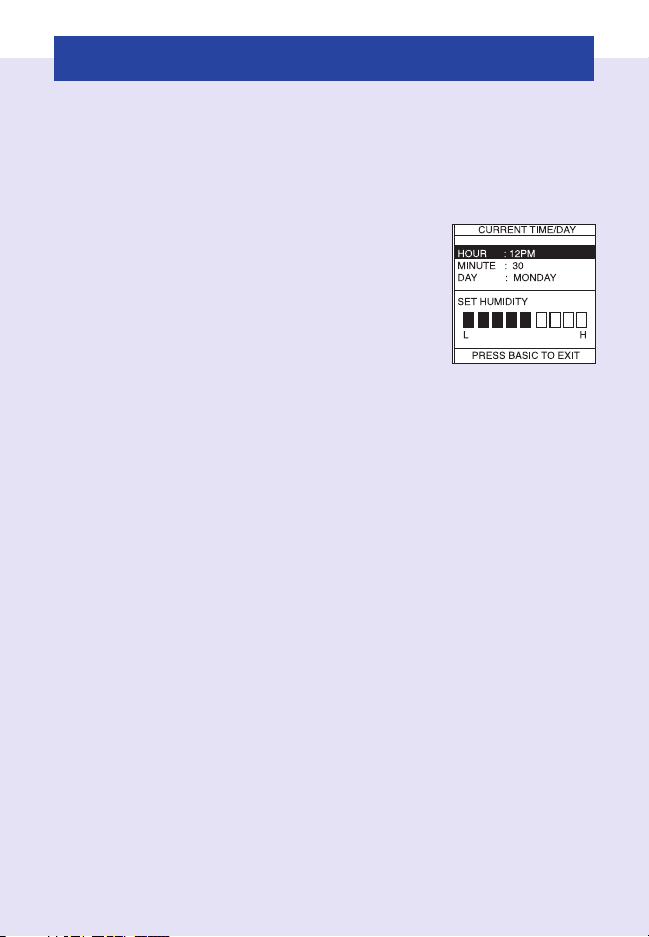
BASIC SETUP 6
Set Day, Time & Desired Humidity
1
Flip down the door at the base of the Infinity™Control.
2 Press the BASIC button.
3 Adjust the highlighted HOUR setting
using the TIME (+\-) button.
4 Press SCROLL to highlight MINUTE.
5 Adjust the MINUTE setting using the TIME
(+\-) button.
6 Press SCROLL to highlight DAY.
7 Adjust the current DAY setting, using the TIME (+\-) button,
until the correct day is displayed.
8 Press SCROLL to highlight HUMIDITY.
9 Press the red HEAT button to set the heating humidity.
10 Adjust the desired heating humidity using either (+/-) button.
11 Press the blue COOL button to set the cooling humidity.
12 Adjust the desired cooling humidity using either (+/-) button.
13 If a ventilator has been installed, press scroll to highlight
FRESH AIR.
14 Adjust your desired FRESH AIR setting using the TEMP (+/-)
button. For a description of fresh air settings, see FRESH AIR
VENTILATION on page 28 in this manual.
15 Press the BASIC button to exit.
- OR -
If you need to readjust one of your settings, use the SCROLL
button to highlight the desired setting, then make your changes.
16 Close the door.
NOTE: You can exit at any time. When exiting, you will be
prompted
to save your changes, “NO” to revert back to previous settings.
to save changes if you have made any. Select “YES”
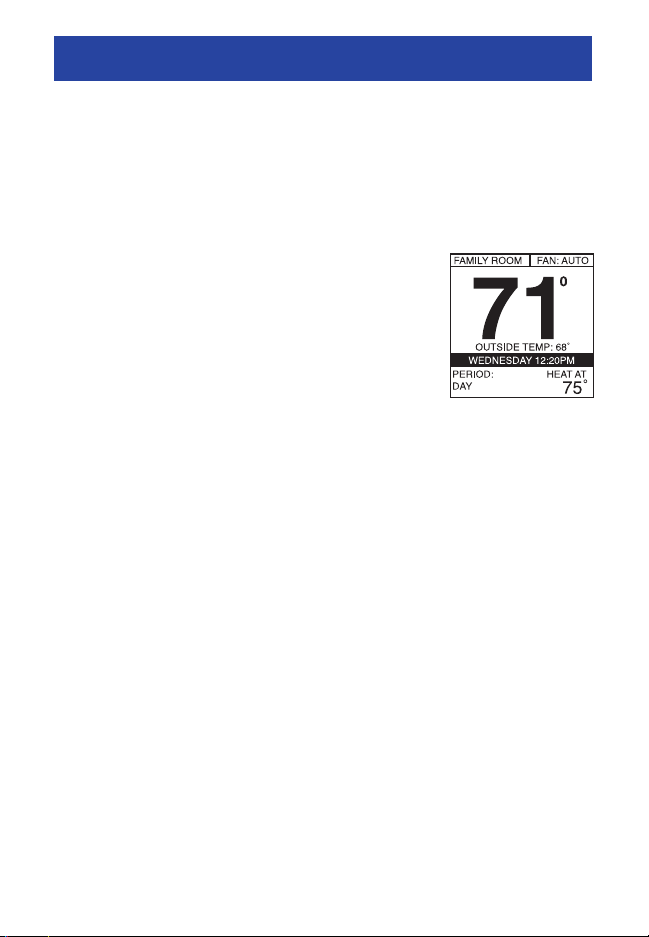
NORMAL OPERATION 7
Turn System On/Off
The OFF button is used to turn the system both on and off.
Heating
To select heating, press the red HEAT button.
Heating is confirmed when the red LED adjacent to the red HEAT button is lit. Heating is
operating when the red LED is gradually pulsing on and off. (The LEDs can be turned off.
For details, see ADVANCED SETUP – LIGHTING on page 30.) The heating temperature will
appear in the lower right screen with the text,
“HEAT AT.”
Auxiliary Heat
Auxiliary heat is staged electric heating included with many heat
pump systems. Auxiliary heat is automatically activated by the system when it’s too cold for the heat pump to effectively heat your
home. Auxiliary heat operation is confirmed when the red LED
adjacent to the red HEAT button is lit, gradually pulsing on, then
off. (The LEDs can be turned off. For details, see ADVANCED
SETUP – LIGHTING on page 30.) The text, “AUXILIARY HEAT
ACTIVE” will appear below the room temperature.
Emergency Heat
Emergency heat is staged electric heating included with many
heat pump systems. Emergency heat is activated either when the
heat pump has malfunctioned and heating is required, or when
the homeowner manually activates emergency heat. Emergency

NORMAL OPERATION 8
heat is manually activated by pressing the red HEAT button for
four seconds. To activate Emergency Heat, press the red HEAT
button for four seconds. If your system is a heat pump with
electric heat, then the display will show the three choices:
SYSTEMIN CONTROL (the system will choose the type and
amount of heat needed for conditions)
HEATPUMP ONLY (only the heat pump will be used for heating)
ELECTRIC HEAT ONLY (only electric heat will be used for
heating)
If your system is a Hybrid Heat™ system (heat pump with gas or
oil furnace), then the display will show the three choices:
HYBRID HEAT™ (the system will choose the type and amount of
heat needed for conditions)
FURNACE ONLY (only the furnace will be used for heating)
HEATPUMP ONLY (only the heat pump will be used for heating)
Scroll the highlight to your choice using the scroll button under
the door, then press the left side button to save your selection
and exit.
To deactivate Emergency Heat, press the red HEAT button for four
seconds and choose SYSTEM IN CONTROL or HYBRID HEAT,
depending on your type of heating equipment.
NORMAL OPERATION 9
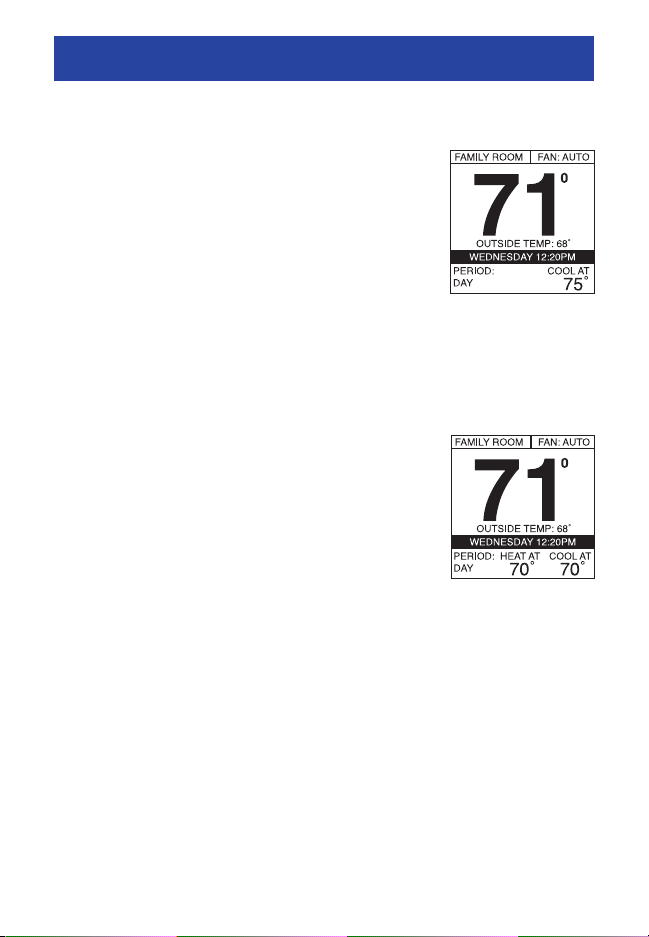
Cooling
To select cooling, press the blue COOL button.
Cooling is confirmed when the blue LED adjacent to the blue COOL button is lit. Cooling is
operating when the blue LED is gradually pulsing on and off. (The LEDs can be turned off.
For details, see ADVANCED SETUP – LIGHTING on page 30.) The programmed cooling
temperature will appear in the lower right screen with the text,
“COOL AT.”
Auto
The AUTO function allows your Infinity™Control
to automatically switch between heating and
cooling operation to maintain your comfort during transitional heating and cooling seasons.
To select AUTO operation, press the red HEAT
and blue COOL buttons simultaneously. The red
and blue LEDs will light up, and both heating
and cooling temperatures will be displayed.
Adjust Heating Temperature
The Infinity™Control allows you to adjust your indoor temperature
at any time, overriding your programmed settings.
1 Press the red HEAT button. Heating is confirmed when the
red LED adjacent to the red HEAT button is lit.

NORMAL OPERATION 10
2 Press the ZONE button until the name of the zone you wish
to control appears on the upper left screen. Selecting “ALL
ZONES” allows you to select one temperature for the entire
home. Press the ZONE button for three seconds to activate
the “ALL ZONES” features.
3 Use the TEMP (+\-) button to select your desired temperature,
which will be displayed on the lower right. An override time will
be displayed on the lower left. Please note an override time will
not appear if programming has been turned off.
4 You can change the override time in 15-minute increments by
pressing the TIME (+\-) button until the desired override time is
selected.
- OR -
Press the HOLD button to override the schedule indefinitely.
Adjust Cooling Temperature
Press the blue COOL button. Cooling is confirmed when the
1
blue LED adjacent to the blue COOL button is lit.
2 Press the ZONE button until the name of the zone you wish to
control appears on the upper left screen. Selecting “ALL
ZONES” allows you to select one temperature for the entire
home. Press the ZONE button for three seconds to activate
the “ALL ZONES” feature.
3 Use the TEMP (+\-) button to select your desired temperature,
which will be displayed on the lower right. An override time
will be displayed on the lower left. Please note an override
time will not appear if programming has been turned off.
4 You can change the override time in 15-minute increments
by pressing the TIME (+\-) button until the desired override
time is selected.
 Loading...