


48P2,P3,P4,P5030-100 Gas Heating/Electric Cooling Units with COMFORTLINK™ Controls
User’s Information Manual
NOTE TO INSTALLER:
This manual should be left with the equipment owner.
WARNING: If the information in this manual is not followed exactly, a fire or explosion may result causing property damage, personal injury or loss of life.
—Do not store or use gasoline or other flammable vapors and liquids in the vicinity of this or any other appliance.
—WHAT TO DO IF YOU SMELL GAS
•Do not try to light any appliance.
•Do not touch any electrical switch; do not use any phone in your building.
•Immediately call your gas supplier from a neighbor’s phone. Follow the gas supplier’s instructions.
•If you cannot reach your gas supplier, call the fire department.
—Installation and service must be performed by a qualified installer, service agency or the gas supplier.
 WARNING
Improper installation, adjustment, alteration, service or maintenance can cause injury or property damage. Refer to this manual. For assistance or additional information consult a qualified installer, service agency, or the gas supplier.
 WARNING
Before performing recommended maintenance, be sure main power switch to unit is turned off and lockout tag is installed. Electrical shock could cause personal injury.
Your combination heating/cooling rooftop unit is equipped with an automatic direct spark ignition system and induceddraft power combustion blower.
 WARNING
Burners will light automatically. Do not attempt to light by hand; personal injury may result.
TO LIGHT UNIT
 DANGER
1.Do not turn off the electrical power to unit without first turning off the gas supply.
2.Before attempting to start the gas heating section, familiarize yourself with all the procedures that must be followed.
3.Never attempt to manually light the burners on the unit with a match, lighter, or any other flame. If the electric sparking device fails to light the burners, refer to the shutdown procedures, then call your dealer as soon as possible.
If you do not follow these instructions exactly, a fire or explosion may result, causing property damage, injury, or loss of life.
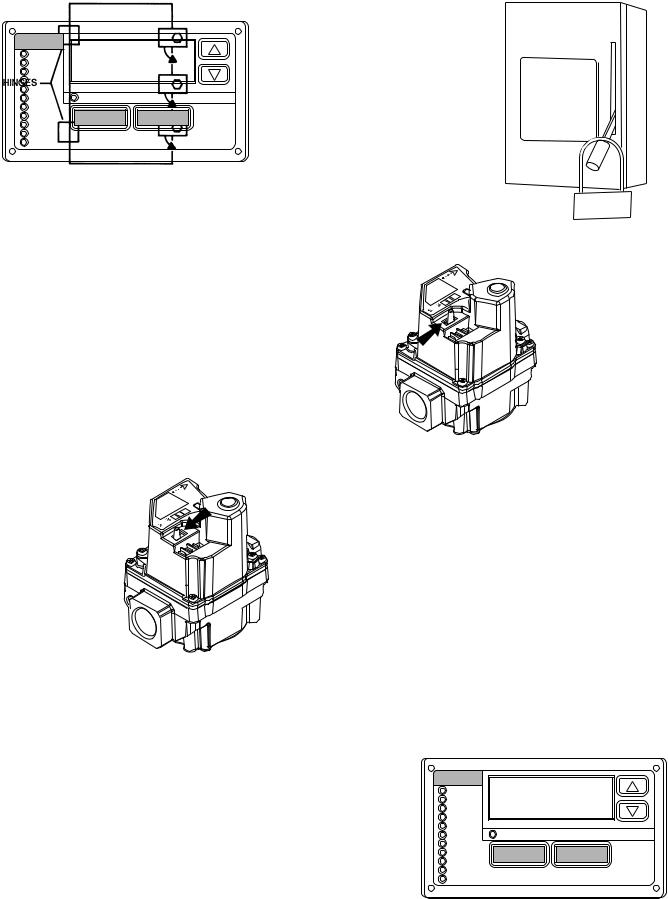
See Fig. 1 for location of gas valve(s). Refer to Fig. 2 while proceeding with the following steps.
1.Turn off the unit demand for cooling or heating by using the scrolling marquee. The scrolling marquee is located in the control box at the compressor end of the unit.
a.Push the ESCAPE key unit a blank display screen is shown.
b.Push the  key until the SERVICE TEST LED is lit.
c.Push the ENTER key. The display will show STOP.
d.Push the ENTER key again. The NO/YES display will flash.
e.Push the 
 or
or 
 key to toggle the display to YES and then push ENTER . The unit will be locked off from heating, cooling or any operation. The controls will still function and the display will still operate.
2.Close the field-installed manual gas shutoff valve.
3.Turn off the electrical power to the unit using the optional disconnect or the field-installed disconnect and lock off using proper lockout and tag-out procedures.
4.Open the burner section hinged access door.
5.Move the switch on the gas valves to the OFF position and wait 5 minutes.
NOTE: If this is the first installation of the unit, the gas flue hoods must be installed before operating unit. These must be installed for the unit to run properly.
6.Move the switch on the gas valves to the ON position.
7.Close the burner section hinged access door.
8.Turn on the electrical supply to the units.
9.Open the field-installed manual gas valve.
Manufacturer reserves the right to discontinue, or change at any time, specifications or designs without notice and without incurring obligations.
Catalog No. 04-53480054-01 |
Printed in U.S.A. |
Form 48P-1SO |
Pg 1 |
4-09 |
Replaces: New |

LIMIT
SWITCH
NO. 2
FLUE OUTLET
SECTION 2
GAS VALVE
FLUE
OUTLET
SECTION 1
GAS VALVE
LIMIT
SWITCH
NO. 1
NOTE: High heat consists of sections 1 and 2. Low heat consists of section 1 only.
LIMIT
SWITCH
NO. 1
FLUE FLUE OUTLET OUTLET
SECTION 2
SECTION 1
GAS VALVE |
GAS VALVE |
LIMIT
SWITCH 
NO. 2
NOTE: High heat consists of sections 1-3. Low heat consists of sections 1 and 2 only.
030-050 SIZES
a48-8445a
LIMIT
SWITCH
NO. 1
FLUE
OUTLET
SECTION 1
GAS VALVE
LIMIT
SWITCH
NO. 2
055-100 SIZES LOW HEAT
Fig. 1 — Heat Section Details
a48-8445b
FLUE
OUTLET
SECTION 2
GAS VALVE
FLUE
OUTLET
SECTION 3
GAS VALVE
10.Using the scrolling marquee, enable the unit to run using the following procedure:
a.Push the ESCAPE key unit a blank display screen is shown.
b.Push the  key until the SERVICE TEST LED is lit.
c.Push the ENTER key. The display will show STOP.
d.Push the ENTER key again. The NO/YES display will flash.
e.Push the 
 or
or  key to toggle the display to NO
and then push ENTER . The unit will return to
normal operation and exit SERVICE TEST mode.
11.To test the operation of the gas section, use the scrolling marquee Service Test routine to energize the gas outputs and to turn on the gas. Refer to the unit Controls, StartUp, Operation, Service and Troubleshooting literature for more information.
12.For normal operation, make sure that units with a conventional thermostat are set to heating control temperature. On VAV (variable air volume) and constant volume units with a space temperature sensor, make sure that the set points are at the normal heat set points.
NOTE: High heat consists of sections 1-3. Low heat consists of sections 1 and 2 only.
055-100 SIZES HIGH HEAT
Fig. 1 — Heat Section Details (cont)
a48-8446
 WARNING
If the main burners fail to light or the blower fails to start, shut down gas heating section and call your dealer for service. Failure to follow these requirements could result in serious personal injury.
2
MAIN
MODE |
|
ON |
Run Status |
|
|
|
|
|
Service Test |
|
|
Temperature |
|
|
Pressures |
|
|
Setpoints |
|
|
Inputs |
Alarm Status |
|
Outputs |
ESCAPE ENTER |
|
Configuration |
|
|
Time Clock |
|
|
Operating Modes |
|
|
Alarms |
|
OFF |
|
|
|
|
STEP 1 |
STEP 2 |
LOCK-OUT
TAG
STEP 3
a48-8297
STEP 4 |
STEP 5 |
a48-8298
STEP 6 |
STEP 7 |
|
MODE |
|
|
Run Status |
|
|
Service Test |
|
|
Temperature |
|
|
Pressures |
|
|
Setpoints |
|
|
Inputs |
Alarm Status |
|
Outputs |
ESCAPE ENTER |
|
Configuration |
|
|
|
|
|
Time Clock |
|
|
Operating Modes |
|
|
Alarms |
|
STEP 8 |
STEP 9 |
STEP 10 |
Fig. 2 — To Light Unit
3
 Loading...