


NETWORK CAMERA
User’s Manual
VB-C50i |
VB-C50iR |
Please read this User’s Manual carefully before operation.
Be sure to read the “a Safe Use of Equipment” section before using this equipment. Store this manual in a readily accessible location for future reference.

Introduction
Thank you for purchasing the Canon Network Camera VB-C50i/VB-C50iR (referred to hereafter as the VB-C50i/VB-C50iR).
This User’s Manual describes how to set up and use the VB-C50i/VB-C50iR. Read this manual carefully before using the VB-C50i/VB-C50iR to ensure effective operation. In particular make sure that you read the “a Safe Use of Equipment” in this manual, as well as the supplied CD-ROM ReadMe file.
For the latest information (firmware, software, manual and the hardware and software requirements, etc.) please refer to our WebView Product web page: http://www.canon.com/ webview
Exclusion of Liability
If the Product is connected to a recording device (for example a VCR), Canon Inc. accepts no responsibility whatsoever for any financial losses that may be incurred as a result of the loss of recorded information or images, regardless of the internal or external cause of the loss.
On Copyrights
Videos, images or sounds taken or recorded with your VB-C50i/VB-C50iR may not be utilized or published, without consent of copyright holders, if any, except in such a way as permitted for personal use under relevant copyright law.
Notes
1.The unauthorized transfer of all or any part of the contents of this Manual is forbidden.
2.The contents of this Manual are subject to change without notice.
3.Every effort has been made to ensure that this Manual is flawless. However, if you find any oversights, please let us know.
4.Notwithstanding the above, Canon accepts no responsibility for any effects resulting from the use of this Manual.
Trademark Notices
●Canon and Canon logo are registered trademarks of Canon Inc.
●Microsoft and Windows are registered trademarks of Microsoft Corporation in the United States and other countries.
●Windows is legally recognized as Microsoft Windows Operating System.
●Java and all Java-based marks are trademarks or registered trademarks of Sun Microsystems, Inc. in the United States and other countries.
●Other brand or product names in this manual may be trademarks or registered trademarks of their respective companies.
This product uses software based on the GNU General Public License (GPL), GNU Lesser General Public License (LGPL) and the BSD License. For each of the licenses, see GPL.txt, LGPL.txt and COPYING.txt in the LICENSE folder on the CD-ROM.
If you require the source code for a program based on GPL or LGPL, please see the following web site:
WebView Product web page: http://www.canon.com/webview
Alternatively contact either the place of purchase or your nearest Canon Sales Company.
ii
Introduction
Usage Notice of Audio
*Features related to audio transmission (audio sent from camera servers to viewers) written in this manual can be only used with the Model Names “PT-50iNv” and “PT-50iNRv” of the VB-C50i/VB-C50iR.
Please refer to P.1-11 to confirm the Model Name of your VB-C50i/VB-C50iR.
●The audio and video may be out of sync.*
●The audio stream may be interrupted according to the performance of your PC and the network environment.
●You cannot record audio with the viewer software.*
●You can receive audio using the Viewer for PC or the Admin Viewer.*
●You can send audio and video to up to 50 clients. However, if there are a large number of clients, the audio stream may be interrupted.*
●The audio stream may be interrupted if you use a proxy server.
●The audio stream may be interrupted if you use anti-virus software.
Request concerning disclosure of live videos and audio
With respect to the disclosure of live videos and audio, we request that sufficient consideration be given to matters of privacy and rights not to be photographed. Canon considers the following points concerning such matters when it operates camera sites for which it has been responsible to install and operate:
●We take measures such as adding limitations on zoom magnifications so that people cannot make special specifications.
●When videos are taken of specific buildings, interiors and the like, we install the camera only after receiving approval from the administrator.
Please note that the operator of the camera site and not Canon has full responsibility regarding the disclosure of live videos and audio.
■European Union (and EEA) only.
This symbol indicates that this product is not to be disposed of with your
household waste, according to the WEEE Directive (2002/96/EC) and your
national law. This product should be handed over to a designated collection point, e.g., on an authorized one-for-one basis when you buy a new similar product or to an authorized collection site for recycling waste electrical and
electronic equipment (EEE). Improper handling of this type of waste could have a possible negative impact on the environment and human health due to potentially hazardous substances that are generally associated with EEE. At the same time, your cooperation in the correct disposal of this product will contribute to the effective usage of natural resources.
For more information about where you can drop off your waste equipment for recycling, please contact your local city office, waste authority, approved WEEE scheme or your household waste disposal service.
For more information regarding return and recycling of WEEE products, please visit www.canon-europe.com/environment.
(EEA: Norway, Iceland and Liechtenstein)
© Copyright 2006 CANON INC.
ALL RIGHTS RESERVED
iii
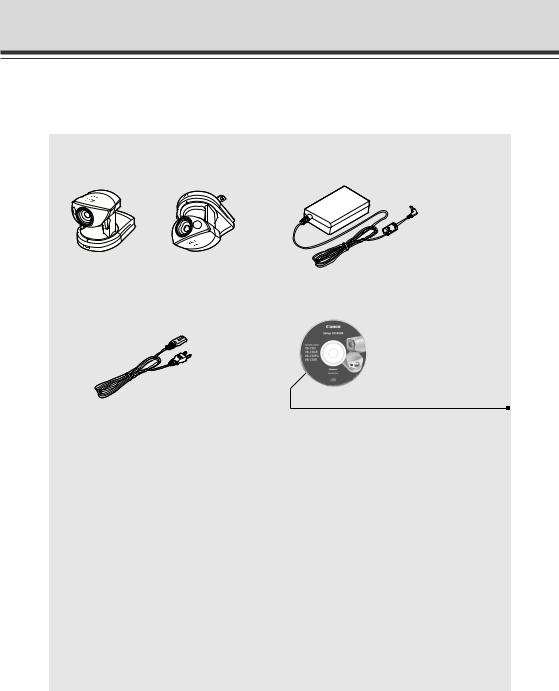
Package Contents
The VB-C50i/VB-C50iR package contains the following items. If any of these items is missing,
please contact the retailer from which you purchased the product.
1. VB-C50i main unit |
2. AC adapter PA-V16 |
(or VB-C50iR main unit) |
(NTSC model only) |
3. AC cable (1 meter/3 ft.) |
4. CD-ROM |
(NTSC model only) |
|
*The cable length may differ depending on the country in which the product was purchased.
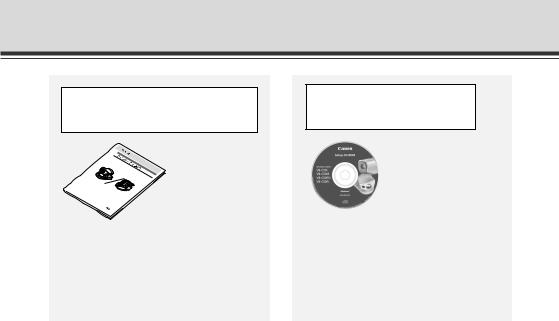
5.User’s Manual (This document)
6.Warranty card (NTSC model only)
CD-ROM contents
ReadMe-J.txt (Japanese text containing precautions etc. other than those in this document)
ReadMe-E.txt (English text containing precautions etc. other than those in this document)
VBSetup.exe (Initial settings tool → P.2-7)*
MANUAL folder (PDF versions of this document and the Viewer software User’s Manual)*
vbfiles folder (File system sets of sample pages etc.)
LICENSE folder (License documents for software built into the VB-C50i/VB-C50iR)
VBTools folder (Bundled software installer set)* SOUND folder (Sound sample files for Audio
Playback)
*For the latest information such as the bundled software and manual, please refer to our WebView Product web page: http://www.canon.com/webview
iv

Contents
Introduction ............................................................................ |
ii |
Package Contents .................................................................. |
iv |
How to Read This Manual...................................................... |
ix |
a Safe Use of Equipment...................................................... |
x |
Maintenance .............................................................................................................. |
xv |
Chapter 1 Before Using the VB-C50i/VB-C50iR |
|
Features of the VB-C50i/VB-C50iR .............................................................. |
1-2 |
Hardware and Software Requirements ....................................................... |
1-4 |
Viewer Software ....................................................................................................... |
1-4 |
VB Initial Setup Tool ................................................................................................. |
1-5 |
VB Administration Tools ........................................................................................... |
1-5 |
VBCollector .............................................................................................................. |
1-5 |
Multipoint Recording Software for Monitoring Use (Sold separately) ...................... |
1-8 |
System Components and Their Operation ................................................. |
1-9 |
Multi-Terminal Module VB-EX50 (Sold Separately) .................................. |
1-12 |
Chapter 2 Setting Up |
|
Setup Workflow ............................................................................................. |
2-2 |
1. Set Up the Camera .................................................................................... |
2-4 |
Using a Tripod .......................................................................................................... |
2-4 |
Using the Wide Converter ........................................................................................ |
2-5 |
2. Connect the Camera to the Network ....................................................... |
2-6 |
Turning the Power ON and OFF .............................................................................. |
2-6 |
3. Perform Initial Settings for the Camera .................................................. |
2-7 |
4. Check Operation of the Camera ............................................................ |
2-10 |
5. Install the Software ................................................................................. |
2-11 |
Viewer Software Overview ......................................................................... |
2-12 |
Viewer Software Types .......................................................................................... |
2-12 |
Features of the Viewer Software ............................................................................ |
2-12 |
Chapter 3 Basic Settings |
|
What Can I Do on Each of the Settings Pages? ......................................... |
3-2 |
Accessing the Settings Title Page ............................................................... |
3-3 |
Settings Title Page ........................................................................................ |
3-4 |
Setting Up the Administrator Password and Ethernet etc. |
|
(System and Network) ....................................................................... |
3-5 |
Setting Camera Control, Image Size and Quality (Camera and Video) .... |
3-7 |
Presetting Best Shot (Preset) .................................................................... |
3-13 |
v

Contents
Setting Up the HTTP, Camera and Audio Servers (Server) ..................... |
3-16 |
Setting User Access Privileges (Access Control) ................................... |
3-21 |
Setting the Date and Time (Date and Time) .............................................. |
3-24 |
Setting Up Name Server Address and Mail etc. (Miscellaneous) ........... |
3-26 |
Using the Administration Tools (Administration Tools) .......................... |
3-29 |
Chapter 4 VB Administration Tools
Overview of VB Administration Tools ......................................................... |
4-2 |
Installing the VB Administration Tools ...................................................................... |
4-2 |
VBAdmin Startup Panel ........................................................................................... |
4-3 |
Panorama Creation Tool .......................................................................................... |
4-3 |
View Restriction Tool ................................................................................................ |
4-3 |
Preset Setting Tool ................................................................................................... |
4-3 |
Schedule Setting Tool .............................................................................................. |
4-4 |
Log Viewer ............................................................................................................... |
4-4 |
Admin Viewer ........................................................................................................... |
4-4 |
Starting Up VB Administration Tools .......................................................... |
4-5 |
Panorama Creation Tool ............................................................................... |
4-7 |
Panorama Creation Tool Display Screen ................................................................. |
4-8 |
Capturing Panorama Pictures .................................................................................. |
4-9 |
Updating/Deleting Panorama Pictures ................................................................... |
4-10 |
Reconnecting .......................................................................................................... |
4-11 |
Opening a Panorama Picture from a Picture File/Saving |
|
a Panorama Picture as a Picture File ......................................................... |
4-11 |
Displaying Connection Information ......................................................................... |
4-11 |
View Restriction Tool .................................................................................. |
4-12 |
View Restriction Tool Display Screen .................................................................... |
4-13 |
Setting View Restrictions ....................................................................................... |
4-15 |
Preset Setting Tool ...................................................................................... |
4-18 |
Preset Setting Tool Display Screen ........................................................................ |
4-19 |
Setting Presets ....................................................................................................... |
4-21 |
Preset Tour ............................................................................................................. |
4-24 |
Schedule Setting Tool ................................................................................. |
4-27 |
Schedule Setting Tool Display Screen (Toolbar) .................................................... |
4-28 |
Normal Schedule ................................................................................................... |
4-29 |
Special Schedule ................................................................................................... |
4-33 |
Resetting Schedule Settings .................................................................................. |
4-37 |
Setting Up Service ................................................................................................. |
4-38 |
Timer Setting Tool .................................................................................................. |
4-39 |
Motion Detection Setting Tool ................................................................................ |
4-42 |
Night Mode Setting Tool ......................................................................................... |
4-52 |
External Device Input Setting Tool ......................................................................... |
4-54 |
External Device Output Setting Tool ...................................................................... |
4-57 |
vi
Contents |
|
|
|
|
|
Log Viewer ................................................................................................... |
4-62 |
Viewing the Log ..................................................................................................... |
4-63 |
Admin Viewer .............................................................................................. |
4-65 |
Starting Up Admin Viewer ...................................................................................... |
4-66 |
Operating External Devices and Motion Detection ................................................ |
4-66 |
Enabling/Disabling View Restrictions ..................................................................... |
4-68 |
Operating a Camera .............................................................................................. |
4-68 |
Camera-Specific Functions .................................................................................... |
4-70 |
Sending and Receiving Audio ................................................................................ |
4-71 |
Shade Correction ................................................................................................... |
4-73 |
Auto Reconnection Function .................................................................................. |
4-73 |
Restoring the Default Exposure and Focus Settings When Closing the Admin Viewer .. |
4-74 |
Chapter 5 Creating Web Pages for Video Distribution |
|
Web Pages for Video Distribution ............................................................... |
5-2 |
Viewer Overview ........................................................................................... |
5-4 |
Viewer for Java ........................................................................................................ |
5-4 |
Viewer for PC ........................................................................................................... |
5-5 |
Viewing Sample Pages ................................................................................. |
5-6 |
Using the Viewer for Java to Distribute Videos .......................................... |
5-7 |
Using the Viewer for Java to Create a Web Page ................................................... |
5-7 |
Saving Web Page Data ............................................................................................ |
5-8 |
Example of Using the Viewer for Java to Create a Web Page ................................ |
5-9 |
Viewer for Java Parameters ................................................................................... |
5-17 |
Using the Viewer for PC to Distribute Videos ........................................... |
5-21 |
Setting Up the Web Server .................................................................................... |
5-21 |
Creating wvh Files ................................................................................................. |
5-22 |
Example of a Web page Using the Viewer for PC ................................................. |
5-23 |
Distributing Videos Using a Browser Only ............................................... |
5-24 |
Displaying the Live Video at Access as a Still Picture ........................................... |
5-24 |
Displaying a Specified Number Of Live Video Frames As a Video at Access ....... |
5-24 |
Displaying Live Video from a Specified Angle as Still Pictures .............................. |
5-25 |
Example of Video Distribution Using One Global Address .................... |
5-26 |
Distributing Still Images to a Mobile Phone ............................................. |
5-27 |
Camera Control by Position Specification .............................................................. |
5-28 |
Overwriting Sample Pages .................................................................................... |
5-28 |
Chapter 6 Using the Picture Recording Function |
|
Using the Still Picture Recording Function |
|
Linked to an External Device ........................................................... |
6-2 |
Sample Application Combining a Door-opening Sensor .......................................... |
6-2 |
Using the Audio Playback/Recording Function |
|
Linked to an External Device ........................................................... |
6-4 |
Sample Application Combining a Speaker, Microphone and Door-opening Sensor .... |
6-4 |
vii

Contents
Using the Still Picture Recording Function |
|
with a Predetermined Schedule ....................................................... |
6-6 |
Sample Application Using a Timer ........................................................................... |
6-6 |
Using the Motion Detection Function with a Predetermined Schedule ... |
6-8 |
Sample application in combination with a warning device ....................................... |
6-8 |
Using VBCollector ...................................................................................... |
6-11 |
Installing VBCollector ............................................................................................. |
6-12 |
Starting Up VBCollector ......................................................................................... |
6-13 |
Registering a Server .............................................................................................. |
6-13 |
Registering Tasks ................................................................................................... |
6-16 |
Executing and Canceling Tasks ............................................................................. |
6-18 |
Details Displayed on the Task View ....................................................................... |
6-20 |
Starting/Stopping the Service ................................................................................ |
6-20 |
Automatic Downloading by Notification .................................................................. |
6-21 |
Viewing Recorded Images and Playing Back Recorded Audio .............................. |
6-23 |
Viewing Logs .......................................................................................................... |
6-32 |
Setting Retention Period and Disk Space .............................................................. |
6-36 |
Chapter 7 Appendix
Troubleshooting ............................................................................................ |
7-2 |
Log Messages ............................................................................................... |
7-4 |
The VB-C50i/VB-C50iR Log Messages ................................................................... |
7-4 |
The VBCollector Log Messages ............................................................................ |
7-12 |
Specifications ............................................................................................. |
7-16 |
External Device I/O Terminals ................................................................................ |
7-17 |
System Configuration ................................................................................ |
7-18 |
Example of Basic System Configuration - Viewing Videos Using a Viewer ........... |
7-18 |
Viewer Software Functions .................................................................................... |
7-18 |
Sample Network Configurations ............................................................... |
7-19 |
Sample LAN Environment Configuration ............................................................... |
7-19 |
Sample Configuration in an ISP Environment ........................................................ |
7-19 |
Upgrading the Firmware Remotely ........................................................... |
7-20 |
Restoring the Factory Default Settings .................................................... |
7-21 |
Restoring the Factory Default Settings from the Administration |
|
Tools Page via a Web Browser ................................................................. |
7-21 |
Restoring the Factory Default Settings from the Reset Switch .............................. |
7-22 |
Initializing the Camera Head Position ....................................................... |
7-23 |
Factory Default Settings ............................................................................ |
7-25 |
Data Capacity of Recorded Pictures and Audio ...................................... |
7-27 |
Amount of Memory ................................................................................................. |
7-27 |
Frame Sizes ........................................................................................................... |
7-27 |
Amount of Audio Data ............................................................................................ |
7-28 |
Index ............................................................................................................ |
7-29 |
viii
How to Read This Manual
For information about setting up the VB-C50i/VB-C50iR
NETWORK |
CAMERA |
Read this manual |
||
User’s |
|
|
||
Manual |
carefully before |
|||
|
||||
|
|
|
||
VB-C50i |
|
|
using the VB-C50i/ |
|
VB- |
|
|
||
|
C50iR |
|
|
|
VB-C50iR.
User’s Manual (This document)
For information about
using the Viewer
Viewer Software
User’s Manual
(Viewer-E.pdf)
This manual describes how to use the Viewer for Java and the Viewer for PC.
Sections where the user should refer to this manual are indicated by the dicon accompanied by the relevant page number.
ix
a Safe Use of Equipment
aAn exclamation point, within a triangle, is intended to alert the user to the presence of important operating and maintenance (servicing) instructions in the literature
accompanying the equipment. a Important Warnings
a CAUTION:
TO REDUCE THE RISK OF ELECTRIC SHOCK, DO NOT REMOVE COVER (OR BACK). NO USER-SERVICEABLE PARTS INSIDE. REFER SERVICING TO QUALIFIED SERVICE PERSONNEL.
The serial number of this equipment may be found on the bottom of the VB-C50i/ VB-C50iR. No others have the same serial number as yours.
You should record the number and other vital information here and retain this book as a permanent record of your purchase to aid identification in case of theft.
Date of Purchase Dealer Purchased from Dealer Address
Dealer Phone No.
Model No. VB-C50i or VB-C50iR
Serial No.
For Users in the UK (PA-V16)
When replacing the fuse only a correctly rated approved type should be used and be sure to re-fit the fuse cover.
The AC adapter can be connected to the VB-C50i/VB-C50iR from a standard AC power outlet. Please check your instruction manual to make sure that your VB-C50i/VB-C50iR is compatible with this adapter.
–The socket-outlet should be installed near the equipment and should be easily accessible.
–Unplug the apparatus from the wall outlet before cleaning or maintaining.
a Important Operational Instructions
a WARNING:
TO REDUCE THE RISK OF ELECTRIC SHOCK, DO NOT EXPOSE THIS EQUIPMENT TO RAIN OR MOISTURE.
a CAUTION:
TO REDUCE THE RISK OF ELECTRIC SHOCK AND TO REDUCE ANNOYING INTERFERENCE, USE THE RECOMMENDED ACCESSORIES ONLY.
x
a Safe Use of Equipment
FDA regulation
This Network Camera has not been evaluated by the Food and Drug Administration
(FDA) for use as a medical device. When incorporated into a system with medical applications, FDA regulations may apply. Therefore, please consult your legal advisor to determine whether FDA regulations apply.
FCC NOTICE
Network Camera, Model Name: PT-50iNv, PT-50iP, PT-50iNRv, PT-50iPR
This device complies with Part 15 of the FCC Rules. Operation is subject to the following two conditions: (1) This device may not cause harmful interference, and (2) this device must accept any interference received, including interference that may cause undesired operation.
Note: This equipment has been tested and found to comply with the limits for a Class B digital device, pursuant to Part 15 of the FCC Rules. These limits are designed to provide reasonable protection against harmful interference in a residential installation. This equipment generates, uses and can radiate radio frequency energy and, if not installed and used in accordance with the instructions, may cause harmful interference to radio communications. However, there is no guarantee that interference will not occur in a particular installation. If this equipment does cause harmful interference to radio or television reception, which can be determined by turning the equipment off and on, the user is encouraged to try to correct the interference by one or more of the following measures:
-Reorient or relocate the receiving antenna.
-Increase the separation between the equipment and receiver.
-Connect the equipment into an outlet on a circuit different from that to which the receiver is connected.
-Consult the dealer or an experienced radio/TV technician for help.
Use of shielded cable is required to comply with class B limits in Subpart B of Part 15 of FCC Rules.
Do not make any changes or modifications to the equipment unless otherwise specified in the manual. If such changes or modifications should be made, you could be required to stop operation of the equipment.
Canon U.S.A. Inc.
One Canon Plaza, Lake Success, NY 11042, U.S.A. Tel No. (516) 328-5600
Canadian Radio Interference Regulations
This Class B digital apparatus complies with Canadian ICES-003.
Réglementation canadienne sur les intérferences radio
Cet appareil numérique de la classe B est conforme à la norme NMB-003 du
Canada.
Dieses Produkt ist zum Gebrauch im Wohnbereich, Geschäftsund Gewerbebereich sowie in Kleinbetrieben vorgesehen.
xi

a Safe Use of Equipment
a IMPORTANT SAFETY INSTRUCTIONS
In these safety instructions, the word “equipment” refers to the Canon Network Camera VB-C50i/VB-C50iR and all its accessories.
1.Read Instructions - All the safety and operating instructions should be read before the equipment is operated.
2.Retain Instructions - The safety and operating instructions should be retained for future reference.
3.Heed Warnings - All warnings on the equipment and in the operating instructions should be adhered to.
4.Follow Instructions - All operating and maintenance instructions should be followed.
5.Cleaning - Unplug this equipment from the wall outlet before cleaning.
Wipe the equipment with a clean soft cloth. If necessary, put a cloth in diluted neutral detergent and wring it well before wiping the equipment with it. Finally, clean the equipment with a clean dry cloth. Do not use benzene, thinner or other volatile liquids or pesticides as they may damage the product’s finish. When using chemically-treated cleaning cloths, observe those precautions accordingly.
6.Accessories - Do not use accessories not recommended in this manual as they may be hazardous. Always use specified connection cables. Connect devices correctly.
7.Water and Moisture - Hazard of electric shock - Do not use the equipment near water or in rainy/moist situations. Do not put a heater near this equipment.
8.Placing or Moving - Do not place on an unstable cart, stand, tripod, bracket or table. The equipment may fall, causing serious injury to a child or adult, and
serious damage to the
equipment. An equipment and cart combination should be moved with care.
Quick stops, excessive force, and uneven surfaces may cause the equipment and cart combination to overturn.
9.Power Sources - The PA-V16 AC adapter should be operated only from the type of power source indicated on the marking label. If you are not sure of the type of power supply to your home, consult your equipment dealer or local power company.
10.Polarization - The PA-V16 AC adapter is equipped with a polarized 2-prong plug (a plug having one blade wider than the other).
The 2-prong polarized plug will fit into the power outlet only one way. This is a safety feature. If you are unable to insert the plug fully into the outlet, try reversing the plug. If the plug still fails to fit, contact your electrician to replace your obsolete outlet. Do not defeat the safety purpose of the polarized plug.
11.Power Cord Protection - Power cords should be routed so that they are not likely to be walked on or pinched by items placed upon or against them. Pay particular attention to plugs and the point from which the cords exit the equipment.
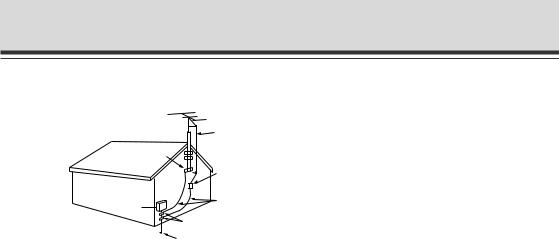
12.Outdoor Antenna Grounding - If an outside antenna is connected to the equipment, be sure the antenna is grounded so as to provide some protection against voltage surges and built-up static charges. Section 810 of the National Electrical Code, ANSI/NFPA No.701984, provides information with respect to proper grounding of the mast and supporting structure, grounding of the lead-in wire to an antenna discharge unit, size of grounding conductors, location of antenna, antenna discharge unit, connection to grounding electrodes, and requirements for the grounding electrode. See figure 1.
xii
a Safe Use of Equipment
fig-1
EXAMPLE OF ANTENNA GROUNDING AS
PER NATIONAL ELECTRICAL CODE
|
ANTENNA |
|
|
LEAD IN WIRE |
|
GROUNDING |
ANTENNA |
|
DISCHARGE |
||
CLAMP |
UNIT (NEC |
|
|
SECTION 810-20) |
|
ELECTRIC |
GROUNDING |
|
CONDUCTORS |
||
SERVICE |
||
(NEC SECTION |
||
EQUIPMENT |
||
810-21) |
||
|
||
|
GROUNDING CLAMPS |
|
|
POWER SERVICE |
|
|
GROUNDING ELECTRODE |
|
|
SYSTEM |
|
NEC — NATIONAL ELECTRIC CODE |
(NEC ART 250. PART H) |
13.Lightning - For added protection of this equipment during a lightning storm, or when it is left unattended and unused for long periods of time, disconnect it from the wall outlet and disconnect the antenna. This will prevent damage to the equipment due to lightning and power-line surges.
14.Power Lines - An outside antenna system should not be located in the vicinity of overhead power lines or other electric light or power circuits, or where it can fall into such power lines or circuits. When installing an outside antenna system, extreme care should be taken to keep from touching such power lines or circuits as contact with them might be fatal.
15.Overloading - Do not overload wall outlets and extension cords as this can result in a risk of fire or electric shock.
16.Object and Liquid Entry - Never push objects of any kind into this equipment through openings as they may touch dangerous voltage points or short out parts that could result in a fire or electric shock. Be careful not to spill liquid of any kind onto the equipment.
17.Servicing - Do not attempt to service this equipment yourself as opening or removing covers may expose you to dangerous voltage or other hazards. Refer all servicing to qualified personnel.
18.Damage Requiring Service - Disconnect this equipment from the wall outlet and all power sources including batteries, and refer servicing to qualified service personnel under the following conditions.
a.When the power-supply cord or plug is damaged.
b.If any liquid has been spilled onto, or objects have fallen into, the equipment.
c.If the equipment has been exposed to rain or water.
d.If the equipment does not operate normally even if you follow the operating instructions.
Adjust only those controls that are covered by the operation instructions. Improper adjustment of other controls may result in damage and will often require extensive work by a qualified technician to restore the equipment to its normal operation.
e.If the equipment has been dropped or the cabinet has been damaged.
f.When the equipment exhibits a distinct change in performance. This indicates a need for service.
19.Replacement Parts - When replacement parts are required, be sure the service technician has used replacement parts that are specified by Canon or that have the same characteristics as the original part. Unauthorized substitutions may result in fire, electric shock or other hazards.
20.Safety Check - Upon completion of any service or repairs to this equipment, ask the service technician to perform safety checks to determine that the equipment is in safe operating order.
21.Do not install the equipment in the following locations as this can cause a fire or electric shock:
-Hot locations
-Close to a fire
-Very humid or dusty locations
xiii

a Safe Use of Equipment
-Locations exposed to direct sunlight
-Locations exposed to salt spray
-Close to flammable solvents (alcohol, thinners, etc.)
22.When any of the following occurs, immediately switch OFF the equipment, unplug it from the main power supply and contact your nearest Canon supplier. Do not continue to use the equipment as this can cause a fire or electric shock.
-The equipment emits any smoke, heat, abnormal noise, or unusual odor.
-A metal object falls into the equipment.
-The equipment is damaged in some way.
23.Please observe the following when using the equipment. Failure to do so can result in a fire or electric shock.
-Do not use flammable sprays near the equipment.
-Do not subject the equipment to strong impacts.
24.Make sure the power line and network cable are implemented in a safe manner accordingly to the related technical regulations.
25.Focusing on the direct sunlight, halogen lamp or any other high-intensity lamp for a long time may cause damage to the image sensor.
For CA, USA only
Included lithium battery contains Perchlorate Material – special handling may apply. See www.dtsc.ca.gov/hazardouswaste/perchlorate/ for details.
xiv
a Safe Use of Equipment
 Notes on Using the Motion Detection Function, Automatic Note Tracking and VBCollector
The Motion Detection Function, Automatic Tracking (→ P.4-42) and VBColletor (→ P.6-11) are not suited to applications where high levels of reliability are required. Therefore, we recommend that you not use these functions for monitoring or other purposes if consistently high levels of reliability are required. Canon accepts no liability whatsoever for faults resulting from the use of the Motion Detection, Automatic Tracking and VBCollector.
Maintenance
Cleaning the Equipment
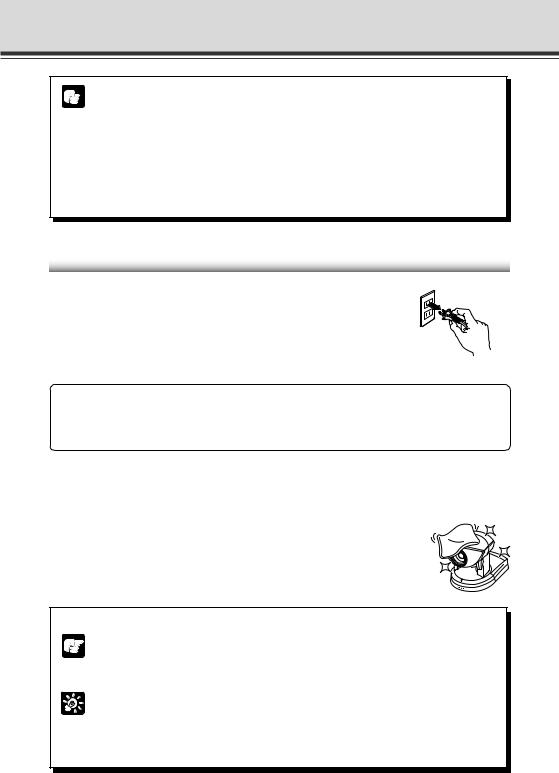
1. Unplug the AC adapter from the wall outlet.
2.Carefully wipe the equipment with a soft cloth that has been moistened with water or a mild detergent.
a WARNING:
Do not use flammable solvents such as alcohol, benzene or thinners.
The use of such substances can cause a fire or electric shock.
3.Wipe with a dry cloth.
4.When you have finished, plug the AC adapter back in to the wall outlet.
Cleaning the Lens
Use a commercially available lens cleaner to remove any soiling from the lens.
● The auto-focus may not function correctly if the surface of the lens is dirty.
● Scratches on the surface of the lens will cause image defects.
Icons Used in This Instruction Manual
Indicates important information that must be observed or actions that are prohibited
during an operation. These notes must be read to prevent possible faults or damage
Note
to the equipment.
Indicates supplementary information or a reference to an operation. Users are advised
to read these memos.
Tip
dRefer to the PDF manual on the supplied CD-ROM.
xv
xvi

Chapter
Before Using the
VB-C50i/VB-C50iR
This chapter describes the features of the VB-C50i/VB- C50iR, the hardware and software requirements, and the name and functions of the system components.

Features of the VB-C50i/VB-C50iR
The VB-C50i/VB-C50iR is a system that distributes live videos via the Internet or an intranet. It can be used in a wide range of applications, such as distributing live videos from a Web site or monitoring. The system is configured for the VB-C50i/VB-C50iR and viewer software. Please use the supplied viewer software for viewing videos distributed by the VB-C50i/VB-C50iR and controlling cameras (→ P.1-4, 2-12).
Broadband Video Distribution function
The VB-C50i/VB-C50iR is capable of capturing videos at up to 30 fps (NTSC)/25 fps (PAL). Motion-JPEG type is used to compress video images. For networking, auto-negotiation between Ethernet 100Base-TX/10Base-T is provided and a leased line or ADSL can also be used through a router. Since video quality and the frame rate can be freely set, videos can be distributed under conditions that best suit the network bandwidth.
* Please refer to P.1-11 to confirm whether your VB-C50i/VB-C50iR is PAL model or NTSC model.
Concurrent video is distributed up to 50 clients
Up to 50 clients can view video at the same time from a single VB-C50i/VB-C50iR.
Camera and video distribution server functions housed in a single unit
The camera capable of full pan, tilt, and zoom functions and its server functions for distributing videos through a network are compactly housed in a single unit. By simply connecting a LAN cable and a power supply, the unit can distribute live videos from any location* where it is installed.
*The unit cannot be installed in locations subject to direct sunlight, high temperatures, high humidity, or other adverse conditions (→ P.xiii, xiv).
High-performance 26x zoom and wide angle photographic range
The camera section is equipped with a 26x zoom lens. Furthermore, since the VB-C50i provides a pan angle of 200 degrees (100 degrees each to the left and right) and a tilt angle of 120 degrees (90 degrees up and 30 degrees down), and the VB-C50iR provides a pan angle of 340 degrees (170 degrees each to the left and right) and a tilt angle of 100 degrees (10 degrees up and 90 degrees down), the VB-C50i/VB-C50iR are capable of shooting wide areas.
Can be mounted on ceilings, etc. (VB-C50iR)
The VB-C50iR includes a mounting plate, enabling it to be mounted in a variety of locations including ceilings*. The shape of the camera head has been designed so that pan and tilt operations are still possible when mounted upside down.
*The unit cannot be installed in locations subject to direct sunlight, high temperatures, high humidity, or other adverse conditions (→ P.xiii, xiv).
Remote camera control from the viewer
The VB-C50i/VB-C50iR come with two types of viewer software: the Viewer for PC and the Viewer for Java. The viewers give you full remote control of the camera angle (pan and tilt) and zoom magnification of the VB-C50i/VB-C50iR, allowing you to view videos with plenty of ambiance.
Panorama picture creation functions and settings
The entire photographic range of the camera can be created and saved as a panorama picture. The saved panorama pictures can then be easily used to visually set view restrictions and presets.
Shade Correction function
If the background of an image is bright, making the subject difficult to see, you can adjust the
1-2

Features of the VB-C50i/VB-C50iR
contrast of the darker areas to make it easier to see. Unlike backlight compensation, the shade correction feature allows image processing without adversely affecting the existing lighter regions.
Camera Position Preset function
If often-used camera angles (camera head aim and zoom position) and related items are saved in advance as presets, the camera can be controlled from the viewer by simply selecting a desired preset. Up to 20 presets can be stored.
View Restriction function
You can set restrictions on camera angle specifications and zoom magnifications to prevent viewers from seeing certain camera angles. For example, if the VB-C50i/VB-C50iR is showing camera footage on the Internet, it is possible to distribute videos while protecting privacy (→ P.iii, “Request concerning disclosure of live videos and audio”).
More powerful security functions
The destinations for video distributions can be restricted based on passwords. Up to 50 clients can be registered.
Using preset schedules or links with external devices to record pictures or audio*
Using the Multi-Terminal Module (→ P.1-12), you can set picture and audio recording* based on ON/OFF input from an external device and from previously-set schedules. If VBCollector is used, images and sound recorded* by the VB-C50i/VB-C50iR can be automatically collected so that you can view the images and play back the audio data* on a PC.
* Only available with two particular models (→ P.iii)
Audio Playback
Using the Multi-Terminal Module (→ P.1-12), you can connect a speaker with amp to the camera. Then, you can register your favorite audio files or sample files recorded on a CD-ROM and play the registered files based on ON/OFF input from an external device and from previously-set schedules.
Audio transmission
Using the Multi-Terminal Module (→ P.1-12), you can connect a microphone* and speaker with amp to the camera and then send and receive audio* via the Viewer.
* Only available with two particular models (→ P.iii)
Night mode shooting
Using the built-in infrared light (effective lighting range: approx. 3m [9.8ft.]), you can take pictures even in darkness.
* When using a dome housing with the VB-C50i/VB-C50iR, the infrared light cannot be used.
Motion detection function and automatic tracking function
You can perform external device control, video and audio recording* by detecting changes in the image caused by motion of people or objects. Automatic tracking of moving objects is also available. * Only available with two particular models (→ P.iii)
Service settings with schedule function
You can start up motion detection and external device services by setting up a visual and easy- to-understand schedule in the calendar.
Using Before VB the C50i/VBC50iR-
1-3
Hardware and Software Requirements
For the latest information (firmware, software, manual and the hardware and software
requirements, etc.) please refer to our WebView Product web page:http://www.canon.com/
webview
Viewer Software (→ dViewer Software User’s Manual)
The viewer software that is supplied with the VB-C50i/VB-C50iR lets you view the video captured
by the VB-C50i/VB-C50iR and control the camera.
Viewer for Java Ver. 3.6
Operating System/ |
Windows 2000 (SP4)/Microsoft Internet Explorer 6.0 (SP1), Netscape 7.1 or 7.2 |
Web Browser |
Windows XP (SP1a)/Microsoft Internet Explorer 6.0 (SP1), Netscape 7.1 or 7.2 |
|
Windows XP (SP2)/Microsoft Internet Explorer 6.0 (SP2), Netscape 7.1 or 7.2 |
|
Windows Server 2003 Standard Edition |
|
/Microsoft Internet Explorer 6.0, Netscape 7.1 or 7.2 |
|
Windows Server 2003 Standard Edition (SP1) |
|
/Microsoft Internet Explorer 6.0 (SP1), Netscape 7.1 or 7.2 |
Java VM |
MSVM Release 5.0.0.3810 (Java VM provided by Microsoft) |
|
Java Plug-in 1.4.2 (Java VM provided by Sun Microsystems) |
|
|
*Java VM must be installed beforehand. If the Java VM provided by Microsoft has not been installed, please access Sun Microsystems Website to download the Java VM provided by Sun Microsystems.
*This viewer may not run stably on operating systems and Web browsers other than those listed above.
Viewer for PC Ver. 3.6
Operating System/ Windows 2000 (SP4)/Microsoft Internet Explorer 6.0 (SP1), Netscape 7.1 or 7.2 Web Browser Windows XP (SP1a)/Microsoft Internet Explorer 6.0 (SP1), Netscape 7.1 or 7.2
Windows XP (SP2)/Microsoft Internet Explorer 6.0 (SP2), Netscape 7.1 or 7.2 Windows Server 2003 Standard Edition
/Microsoft Internet Explorer 6.0, Netscape 7.1 or 7.2 Windows Server 2003 Standard Edition (SP1)
/Microsoft Internet Explorer 6.0 (SP1), Netscape 7.1 or 7.2
* Must be installed from the supplied CD-ROM (→ P.2-11).
● The manual for the viewer software is on the supplied CD-ROM (Viewer-E.pdf).
Note ● Although older versions of viewers can be used, some of the features are different. Therefore, we recommend you to use the latest version.
1-4
Hardware and Software Requirements
VB Initial Setup Tool Ver. 2.1 (→ P.2-7)
This tool is for performing initial settings for the VB-C50i/VB-C50iR.
Operating System/ Windows 2000 (SP4)/Microsoft Internet Explorer 6.0 (SP1) Web Browser Windows XP (SP1a)/Microsoft Internet Explorer 6.0 (SP1)
Windows XP (SP2)/Microsoft Internet Explorer 6.0 (SP2)
Windows Server 2003 Standard Edition/Microsoft Internet Explorer 6.0
Windows Server 2003 Standard Edition (SP1)/Microsoft Internet Explorer 6.0 (SP1)
VB Administration Tools Ver. 2.2 (→ P.4-2)
This tool lets you create panorama pictures from the VB-C50i/VB-C50iR and then easily use them to visually set view restrictions and presets. You can also set schedules with this tool.
Operating System/ Windows 2000 (SP4)/Microsoft Internet Explorer 6.0 (SP1) Web Browser Windows XP (SP1a)/Microsoft Internet Explorer 6.0 (SP1)
Windows XP (SP2)/Microsoft Internet Explorer 6.0 (SP2)
Windows Server 2003 Standard Edition/Microsoft Internet Explorer 6.0
Windows Server 2003 Standard Edition (SP1)/Microsoft Internet Explorer 6.0 (SP1)
* Must be installed from the supplied CD-ROM (→ P.2-11).
VBCollector Ver. 3.0 (→ P.6-11)
This tool is for collecting and viewing pictures and audio recorded* by the VB-C50i/VB-C50iR on
a PC.
* Only available with two particular models (→ P.iii)
Operating System/ |
Windows 2000 (SP4)/Microsoft Internet Explorer 6.0 (SP1) |
Web Browser |
Windows XP (SP2)/Microsoft Internet Explorer 6.0 (SP2) |
|
Windows Server 2003 Standard Edition/Microsoft Internet Explorer 6.0 |
|
Windows Server 2003 Standard Edition (SP1)/Microsoft Internet Explorer 6.0 (SP1) |
Hard Disk |
Minimum 4 GB required for each camera server. 30 GB or larger recommended |
|
(NTFS format) |
|
|
*Must be installed from the supplied CD-ROM (→ P.2-11).
*Pictures saved in VBCollector version 2.1 or earlier cannot be viewed in VBCollector 3.0. During installation, you can choose whether to uninstall old versions of VBCollector (→ P.6-12).
*If you configure your system to record pictures per second with camera servers and perform the maximum of 16 tasks (→ P.6-17) at the same time, it is recommended that you use a desktop PC with Pentium 4 2.2 GHz and 512 MB RAM or greater.
*It is recommended that you configure to collect up to 10,000 still pictures/day per a camera server. If the total amount of still pictures exceeds this value, it may take several minutes to display all the pictures.
*Running VBCollector on a PC that is already running the Network Video Recorder VK-64/VK-16 (sold separately) is not recommended due to the high CPU load. They should be run on separate PCs.
Using Before VB the C50i/VBC50iR-
1-5

Hardware and Software Requirements
Using the VB-C50i/VB-C50iR with Windows XP SP2...
Note
If you use the VB Initial Setup Tool or VBCollector with Windows XP SP2, you will need to change your Windows firewall settings on your PC.
VB Initial Setup Tool
If you installed the VB Initial Setup Tool on a PC with Windows XP SP2 and try to launch the tool, you may encounter a “Windows Security Alert” dialog.
If the Windows Security Alert dialog appears, click “Unblock”. Once you click the Unblock button, the dialog box will not be displayed again.
Settings are now complete.
VBCollector
If you installed the VBCollector on a PC with Windows XP SP2 and used the Automatic Download by Notification function, please follow the procedures as described below.
After installation of the VBCollector:
1.From the Windows “Start” menu, launch the “Control Panel”.
2.In Control Panel, select “Windows Firewall”.
If Windows Firewall is not shown, select “Security Center” and then select “Windows Firewall”.
3.In the Windows Firewall dialog box, select the “Exception” tab and then click “Add Program”.
4.In the “Add a Program” dialog box, click “Browse”.
In the Browse dialog box, select the location where you installed the VBCollector and enter the file name as “VBCICSM.exe”.
5.In the Windows Firewall dialog box, your program is now listed. Make sure it is enabled (checked). Click “OK” to close the dialog box.
Settings are now complete.
If you finish setting the VB Initial Setup Tool (initial settings) or wish to stop the Automatic Download by Notification function using VBCollector, we recommend you to restore your Windows firewall settings on your PC.
1.Launch the Windows Firewall dialog box and then select the “Exception” tab (Refer to 1, 2 and 3 processes of the “VBCollector” for details).
2.Select a program you wish to restore and click “Delete”.
VB Initial Setup Tool: VB Initial Setup Tool Ver. 2.1 VBCollector: VBCICSM.exe
3.A confirmation dialog appears. Click “Yes” to delete the program.
1-6
Hardware and Software Requirements
Using the VB-C50i/VB-C50iR with Windows Server 2003...
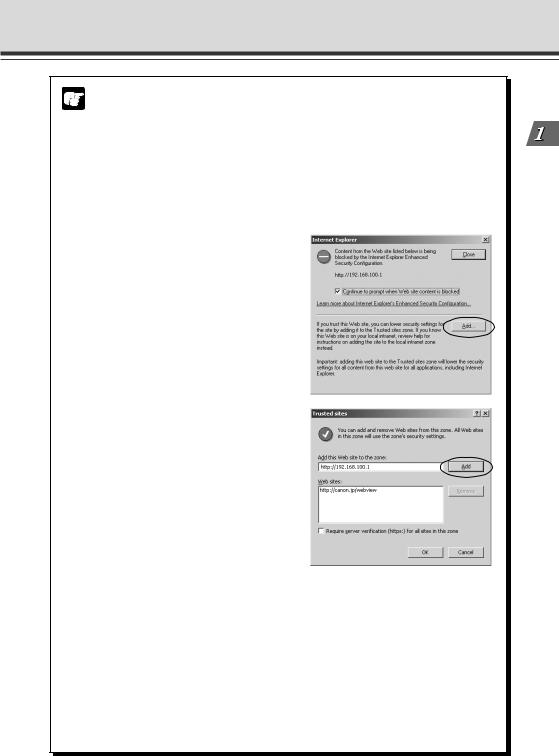
Note
With Windows Server 2003 Standard Edition running Microsoft Internet Explorer 6.0 and Windows Server 2003 Standard Edition (SP1) running Microsoft Internet Explorer 6.0 (SP1), the default security level for the Internet or intranet sites in Internet Explorer is “High”.
As a result, windows such as the settings window do not function normally unless you first register the site in the contents block dialog box that appears when you access the camera server top page (→ P.2-10). Register the site to ensure normal functioning.
1.When you access the camera server top page in Internet Explorer, the dialog box shown at right appears.
2.Click the [Add] button. The dialog box for adding Trusted sites then appears.
3.Enter the IP address of the VB-C50i/VB-C50iR in the “Add this Web site to the zone” box and then click the [Add] button to register the camera as a trusted site.
For more information on registering trusted sites, click “Learn more about Internet
Explorer’s Enhanced Security Configuration...” in the dialog box in step 1 and refer to the summary provided.
If you have enabled the Windows firewall settings with Windows Server 2003 Standard Edition (SP1), please refer to the “Using the VB-C50i/VB-C50iR with Windows XP SP2...” (→ P.1-6) and follow the instructions.
Using Before VB the C50i/VBC50iR-
1-7

Hardware and Software Requirements
Multipoint Recording Software for Monitoring Use (Sold separately)
Videos distributed from the VB-C50i/VB-C50iR can be recorded, and recorded video can be displayed with the software.
Network Video Recorder VK-64/VK-16 v1.2 (Viewer System Requirements)
|
Minimum |
CPU |
Pentium 4 2.2GHz or greater |
Operating System |
Windows 2000 Server (with SP4) |
|
Windows 2000 Professional (with SP4) |
|
Windows XP Professional (with SP2) |
|
Windows Server 2003 Standard Edition (with SP1) |
|
Windows Server 2003 R2 |
Memory |
1 GB RAM or greater |
|
For more than 16 Camera Servers, 1 GB or greater required. |
Hard Disk |
2GB HDD or greater |
Display |
1024 × 768 with 16 bit color |
|
A high performance video card is desirable. With PCI video cards, display performance |
|
may be reduced. |
|
|
Network Video Recorder VK-64/VK-16 v1.2 (Storage Server System Requirements)
|
Minimum |
CPU |
Pentium 4 2.2GHz or greater |
Operating System |
Windows 2000 Server (with SP4) |
|
Windows 2000 Professional (with SP4) |
|
Windows XP Professional (with SP2) |
|
Windows Server 2003 Standard Edition (with SP1) |
|
Windows Server 2003 R2 |
Memory |
1 GB RAM or greater |
|
For more than 48 Camera Servers, 1.5 GB or greater required. |
Hard Disk |
20 GB HDD or greater, SCSI or IDE, NTFS formatted |
|
|
The requirements for Storage Server will vary according to the environment you will use (number of Camera Servers, setting of recording frame rate etc.). Please contact dealers that handle Canon products for further information.
1-8
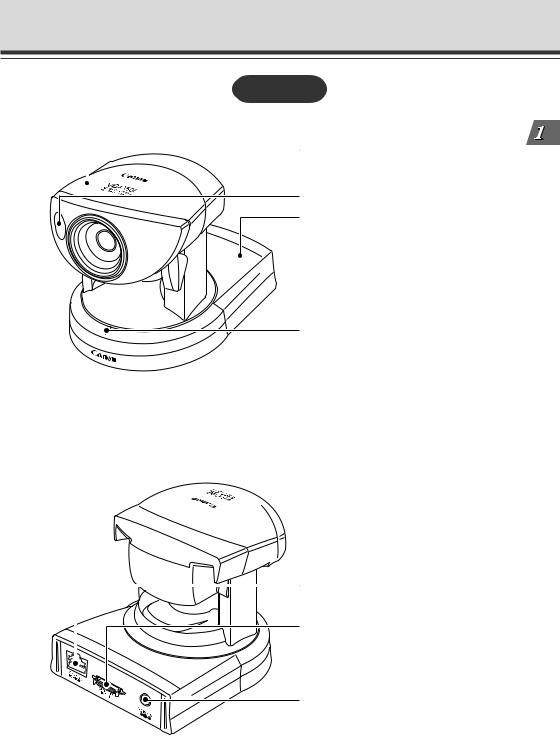
System Components and Their Operation
VB-C50i
Front
Camera head
Infrared light * Cannot be used inside
a dome housing.
Base
LAN status LED
The LED blinks during communication.
100Base-TX .......................... |
Green |
10Base-T ............................... |
Orange |
* You can set the LED to always light up even during communication. In this case, you can select from a green, orange or red light color. You can also set the LED not to light up (→ P.3-28).
Rear
100/10 BT Ethernet connector
(100Base-TX, 10Base-T Auto-Negotiation)
Multi-connector
You can connect the Multi-Terminal
Module VB-EX50 to the VB-C50i/VB-
C50iR via the connector (→ P.1-12).
Power connection socket
Using Before VB the C50i/VBC50iR-
1-9

System Components and Their Operation
VB-C50iR
Front
Mounting plate
LAN status LED
The LED blinks during communication.
100Base-TX .......................... |
Green |
10Base-T ............................... |
Orange |
*You can set the LED to always light up even during communication. In this case, you can select from a green, orange or red light color. You can also set the LED not to light up (→ P.3-28).
Base
Infrared light * Cannot be used inside a dome housing.
Camera head
Rear
Power connection socket
Multi-connector
You can connect the Multi-Terminal
Module VB-EX50 to the VB-C50i/VB-
C50iR via the connector (→ P.1-12).
 100/10 BT Ethernet connector
(100Base-TX, 10Base-T Auto-Negotiation)
1-10
System Components and Their Operation
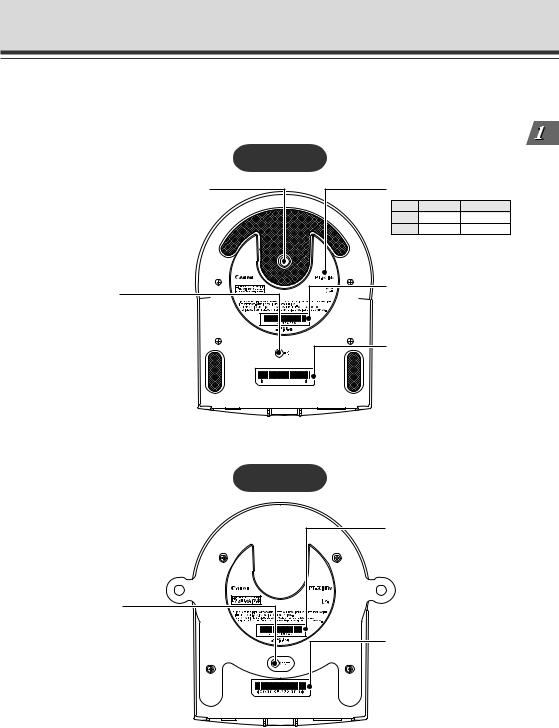
Bottom
On the bottom of the VB-C50i/VB-C50iR there are the MAC address required for network settings, a Reset switch that returns the factory default settings and the serial number.
VB-C50i
Screw hole for tripod mounting |
Model Name |
|
|
|
|
VB-C50i |
VB-C50iR |
|
NTSC |
PT-50iNv |
PT-50iNRv |
|
PAL |
PT-50iP |
PT-50iPR |
Reset switch |
|
Serial No. |
|
The serial number for this |
|
You can revert all settings of |
|
|
|
unit is shown here. |
|
the unit to the factory default |
|
|
|
|
|
settings by pressing this |
|
|
button with a thin-tipped |
|
MAC address |
object while turning on the |
|
The MAC address is |
power switch, and keeping |
0 0 0 0 8 5 0 1 F 1 6 2 |
required when setting the |
the button pressed for more |
|
IP address and making |
than five seconds after |
|
other network settings. |
turning on (→ P.7-22). |
|
Please make a note of it |
|
|
before installing this unit |
|
|
(→ P.2-8). |
VB-C50iR
Reset switch
You can revert all settings of the unit to the factory default settings by pressing this button with a thin-tipped object while turning on the power switch, and keeping the button pressed for more than five seconds after turning on (→ P.7-22).
Serial No.
The serial number for this unit is shown here.
MAC address
The MAC address is required when setting the IP address and making other network settings. Please make a note of it before installing this unit (→ P.2-8).
Using Before VB the C50i/VBC50iR-
1-11
Multi-Terminal Module VB-EX50 (Sold Separately)
Using the Multi-Terminal Module VB-EX50, you can connect external devices such as different kinds of sensors, a microphone* and speaker to the unit, and you can store image by sensor response, or send and receive* audio (→ P.7-17).
Please note that the Multi-Terminal Module VB-EX50 is an optional product and is therefore sold separately.
* Audio input is only available with two particular
models (→ P.iii).
Example of Use
With the Multi-Terminal Module, you can perform settings such as the following.
VB-C50iR
Sensor A
Sensor B
Multi-Terminal Module
 VB-EX50
Ethernet
●The door open-close sensor responds when the door is opened and with the VB-C50iR installed on the ceiling, you can photograph an image and monitor the scene every second for 3 seconds before the door opens and for 7 seconds after the door is opened (→ P.6-2).
Using a speaker with amp and microphone* connected to the camera, the Viewer
Administrator can converse with the person in front of the camera, hear and record*
Tip
the sounds in the background (→ P.3-19, 3-20). * Only available with two particular models (→ P.iii)
1-12

Chapter
Setting Up
This chapter explains how to set up the VB-C50i/VB-C50iR, run initial checks, and confirm that the camera’s images are displayed correctly.
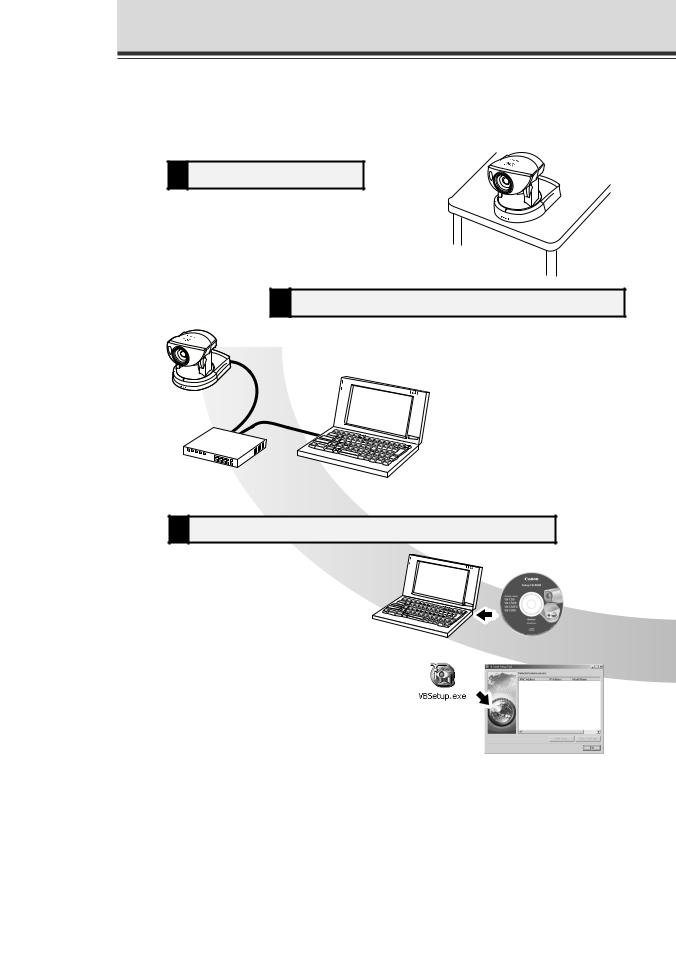
Setup Workflow
The flow for setting up and checking the camera’s images involves performing various settings after the device is set up and your PC and the network are connected via the hub. Then, check to see if you can display images from the camera.
1 Set up the camera
Set up the device.
Make sure the device is set up properly (→ P.2-4).
VB-C50i
2 Connect the camera to the network |
Connect the camera and your PC via the hub (→ P.2-6).
LAN cable
Hub
3 Perform initial settings for the camera
Insert the CD-ROM provided into your PC and perform initial settings following instructions on the screen (→ P.2-7).
Supplied CD-ROM
2-2
 Loading...