


Getting Started ENGLISH
Guide de mise en route FRANÇAIS
CEL-ST4JA2M0
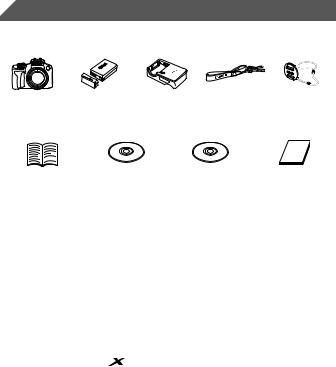
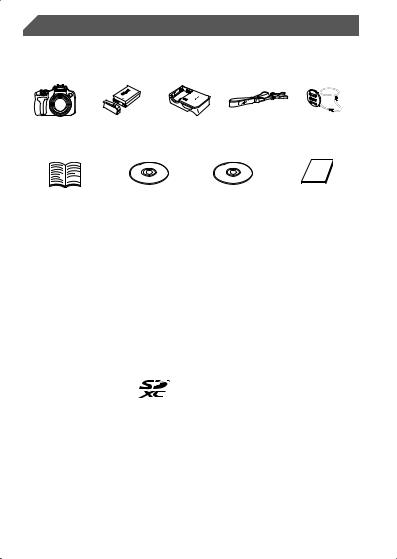
 Package Contents
Before use, make sure the following items are included in the package. If anything is missing, contact your camera dealer.
Camera |
|
Battery Pack |
Battery Charger |
Neck Strap |
Lens Cap |
||
|
|
NB-10L (with |
CB-2LCE |
NS-DC11*1 |
(with cord)*1 |
||
|
terminal cover) |
|
|
|
|
||
Getting Started |
DIGITAL CAMERA |
DIGITAL CAMERA |
Warranty System |
||||
Manuals Disk*2 |
Solution Disk*3 |
||||||
(This Guide) |
|
Booklet |
|||||
|
|
|
|
|
|||
*1 For attachment instructions, refer to the Camera User Guide on the DIGITAL CAMERA Manuals Disk.
*2 Contains manuals (=3).
*3 Contains software. For installation instructions, refer to the Camera User Guide, and for instructions on use, refer to the Software Guide.
 Compatible Memory Cards
No memory card is included. Purchase one of the following kinds of card as needed. These memory cards can be used, regardless of capacity. For details on the number of shots and recording time per memory card, refer to “Specifications” in the Camera User Guide.
•SD memory cards*
•SDHC memory cards*
•SDXC memory cards*
•Eye-Fi cards
*Conforms to SD specifications. However, not all memory cards have been verified to work with the camera.
About Eye-Fi Cards
This product is not guaranteed to support Eye-Fi card functions (including wireless transfer). In case of an issue with an Eye-Fi card, please check with the card manufacturer.
Also note that an approval is required to use Eye-Fi cards in many countries or regions. Without approval, use of the card is not permitted. If it is unclear whether the card has been approved for use in the area, please check with the card manufacturer.
2
 Viewing the Manuals
The following manuals are provided on the included DIGITAL CAMERA Manuals Disk. Adobe Reader is required to view the PDF manuals.
Camera User Guide
This guide covers the following topics.
Camera basics, from getting ready to shooting, playback, installing the included software, and importing images
Other instructions, about all camera features
Software Guide
This guide describes how to use the included software.
Insert the DIGITAL CAMERA Manuals Disk in the computer’s CD-ROM drive.
Follow the instructions displayed to view the manual.
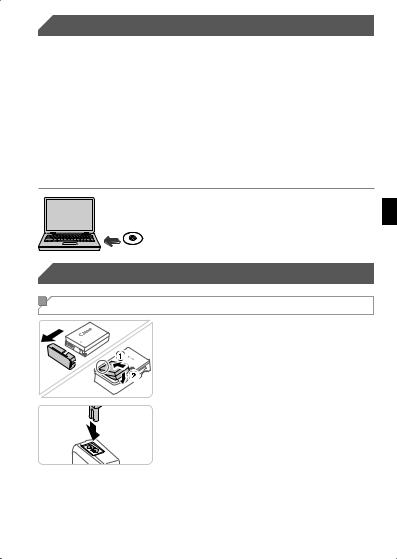
 Initial Preparations
Charging the Battery
1 Remove the battery cover and insert the battery.
After aligning the ▲ marks on the battery
and charger, insert the battery by pushing
it in ( ) and down (
 ).
).
2 Charge the battery.
Once you connect the power cord to the charger and plug the cord into a power outlet, the lamp will light up orange.
When charging is finished, the lamp turns
green. Remove the battery.
For details on charging time and the number of shots or recording time available with a fully charged battery, refer to “Specifications” in the Camera User Guide.
3
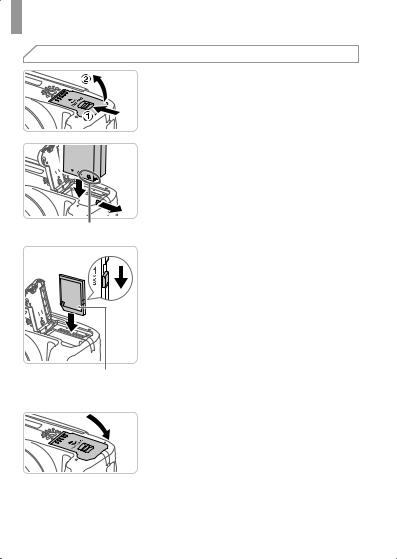
Initial Preparations
 Inserting the Battery and Memory Card
1 Open the cover.
Slide the cover ( ) and open it (
 ).
).
|
2 Insert the battery. |
|
While pressing the battery lock in the |
|
direction of the arrow, insert the battery |
|
as shown and push it in until it clicks into |
|
the locked position. |
|
To remove the battery, press the battery |
Terminals |
lock in the direction of the arrow. |
|
3 Check the card’s write-protect |
|
tab and insert the memory card. |
|
Recording is not possible on memory |
|
cards with a write-protect tab when the |
|
tab is in the locked (downward) position. |
|
Slide the tab up until it clicks into the |
|
unlocked position. |
|
Insert the memory card facing as shown |
|
until it clicks into the locked position. |
Label |
To remove the memory card, push it in |
|
until you feel a click, and then slowly |
|
release it. |
|
4 Close the cover. |
|
Lower the cover in the direction of the |
|
arrow and press it until it clicks into the |
|
closed position. |
4

Initial Preparations
 Using the Screen
Open the screen ( ) and rotate it toward
the lens 180° ( ).
).
Close the screen in this orientation ( ).
).
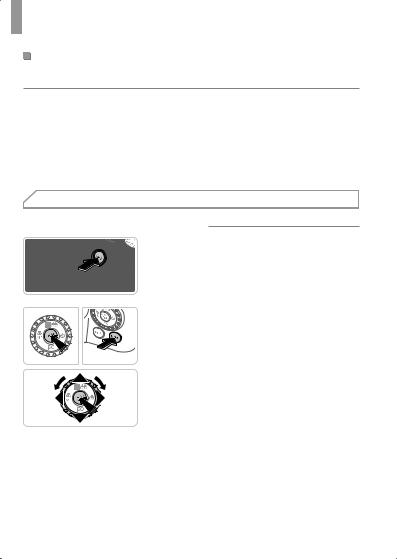
 Setting the Date and Time
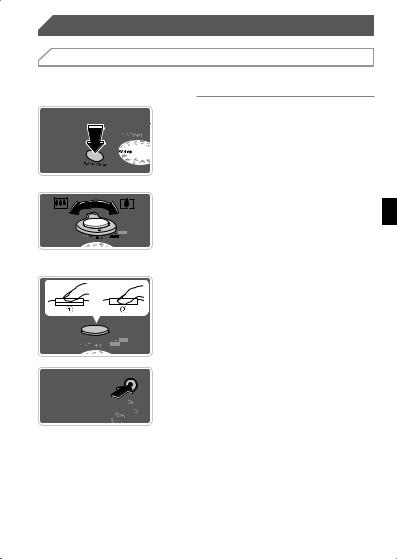
1 Turn the camera on.
Press the ON/OFF button.
The [Date/Time] screen is displayed.
2 Set the date and time.
Press the <q><r> buttons to choose an option.
Press the <o><p> buttons or turn the <5> dial to specify the date and time.
When finished, press the <m> button.
3 Set the local time zone.
Press the <q><r> buttons or turn the <5> dial to choose your local time zone.
Press the <m> button when finished. After a confirmation message, the setting screen is no longer displayed.
To turn off the camera, press the ON/OFF button.
5
Initial Preparations
Changing the Date and Time
To adjust the date and time once you have set it, do the following.
1Press the <n> button.
2Move the zoom lever to choose the [3] tab.
3Press the <o><p> buttons or turn the <5> dial to choose [Date/ Time], and then press the <m> button.
4Follow step 2 in “Setting the Date and Time” to adjust the settings.
5Press the <n> button.
 Display Language
The display language can be changed as needed.
1 Enter Playback mode.
Press the <1> button.
2 Access the setting screen.
Press and hold the <m> button, and then immediately press the <n> button.
Press the <o><p><q><r> buttons or turn the <5> dial to choose a language, and then press the <m> button.
6
 Trying the Camera Out
 Shooting
For fully automatic selection of the optimal settings for specific scenes, simply let the camera determine the subject and shooting conditions.
1 Turn the camera on and enter <A> mode.
Press the ON/OFF button. Set the mode dial to <A>.
2 Compose the shot.
To zoom in and enlarge the subject, move the zoom lever toward <i> (telephoto) as you watch the screen, and to zoom away from the subject, move it toward <j> (wide angle).
3 Shoot still images.
Press the shutter button lightly ( ).
).
The camera beeps twice after focusing, and AF frames are displayed to indicate image areas in focus. Press the shutter button all the way down ( ).
).
Shoot movies.
Press the movie button to start shooting, and press it again to stop.
7

Trying the Camera Out
 Viewing
1 Enter Playback mode.
Press the <1> button.
2 Browse through your images.
To view the previous or next image, press the <q><r> buttons or turn the <5> dial.
Movies are identified by a [
 ] icon. To play movies, go to step 3.
3 Play movies.
Press the <m> button to access the movie control panel, choose [  ] (either press the <q><r> buttons or turn the <5> dial), and then press the <m> button again.
To adjust the volume, press the <o><p> buttons.
Playback now begins, and after the movie is finished, [
 ] is displayed.
 Erasing the Images
To erase the image you chose in step 2, do the following. Note that erased images cannot be recovered.
1Press the <a> button.
2After [Erase?] is displayed, press the <q><r> buttons or turn the <5> dial to choose [Erase], and then press the <m> button.
8
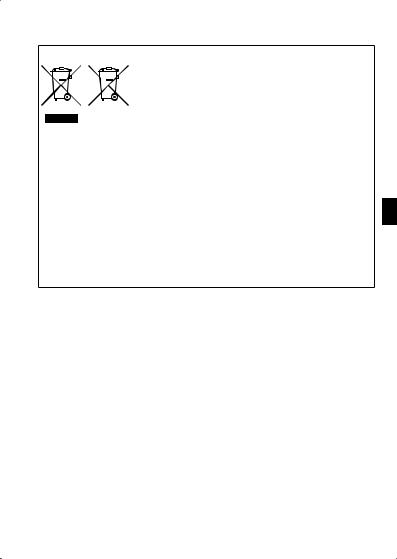
European Union (and EEA) only.
These symbols indicate that this product is not to be disposed of with your household waste, according to the WEEE Directive (2002/96/EC), the Battery Directive (2006/66/EC)
and/or your national laws implementing those Directives. If a chemical symbol is printed beneath the symbol shown
above, in accordance with the Battery Directive, this indicates that a heavy metal (Hg = Mercury, Cd = Cadmium, Pb =
Lead) is present in this battery or accumulator at a concentration above an applicable threshold specified in the Battery Directive.
This product should be handed over to a designated collection point, e.g., on an authorized one-for-one basis when you buy a new similar product or to an authorized collection site for recycling waste electrical and electronic equipment (EEE) and batteries and accumulators. Improper handling of this type of waste could have a possible impact on the environment and human health due to potentially hazardous substances that are generally associated with EEE.
Your cooperation in the correct disposal of this product will contribute to the effective usage of natural resources.
For more information about the recycling of this product, please contact your local city office, waste authority, approved scheme or your household waste disposal service or visit www.canon-europe.com/environment.
(EEA: Norway, Iceland and Liechtenstein)
CAUTION
RISK OF EXPLOSION IF BATTERY IS REPLACED BY AN INCORRECT TYPE.
DISPOSE OF USED BATTERIES ACCORDING TO LOCAL REGULATION.
CANON INC.
30-2, Shimomaruko 3-chome, Ohta-ku, Tokyo 146-8501, Japan
CANON EUROPA N.V.
Bovenkerkerweg 59-61, 1185 XB Amstelveen, The Netherlands
© CANON INC. 2012 |
PRINTED IN THE EU |
9
 Contenu du coffret
Vérifiez que les éléments suivants sont inclus dans le coffret avant d’utiliser l’appareil photo.
Si un élément venait à manquer, contactez le revendeur de l’appareil photo.
Appareil photo Batterie NB-10L |
Chargeur |
Courroie |
Cache de |
|||
(avec couvre- |
de batterie |
NS-DC11*1 |
l’objectif |
|||
|
bornes) |
CB-2LCE |
|
(avec cordon)*1 |
||
Guide de mise en |
CD-ROM |
|
|
CD-ROM |
Brochure sur le |
|
DIGITAL CAMERA |
DIGITAL CAMERA |
système de garantie |
||||
route (ce guide) |
||||||
Manuals Disk*2 |
Solution Disk*3 |
de Canon |
||||
|
||||||
*1 Pour obtenir des instructions pour la fixation, reportez-vous au Guide d’utilisation de l’appareil photo sur le CD-ROM DIGITAL CAMERA Manuals Disk.
*2 Contient les manuels (=3).
*3 Contient les logiciels. Pour obtenir des instructions sur l’installation, reportez-vous au Guide d’utilisation de l’appareil photo et pour des instructions concernant l’utilisation, consultez le Guide d’utilisation des logiciels.
 Cartes mémoire compatibles
Aucune carte mémoire n’est fournie. Achetez un des types de carte suivants, selon les besoins. Vous pouvez utiliser ces cartes mémoire, quelle que soit leur capacité. Pour en savoir plus sur le nombre de prises de vue et la durée d’enregistrement par carte mémoire, reportez-vous à la section « Caractéristiques » du Guide d’utilisation de l’appareil photo.
•Cartes mémoire SD*
•Cartes mémoire SDHC*
• Cartes mémoire SDXC*
• Cartes Eye-Fi
*Conformes aux spécifications SD. Le fonctionnement de toutes les cartes mémoire avec l’appareil photo n’a cependant pas été vérifié.
À propos des cartes Eye-Fi
La compatibilité de ce produit avec les fonctions des cartes Eye-Fi
(y compris le transfert sans fil) n’est pas garantie. En cas de problème avec une carte Eye-Fi, veuillez consulter le fabricant de la carte. Veuillez noter également que dans de nombreux pays ou régions,
l’utilisation de cartes Eye-Fi requiert un agrément. Sans agrément, l’usage de ces cartes n’est pas autorisé. En cas d’incertitude quant à l’agrément des cartes dans un lieu donné, veuillez consulter le fabricant de la carte.
2
 Visualisation des manuels
Vous pouvez trouver les manuels suivants sur le CD-ROM DIGITAL CAMERA Manuals Disk fourni. Adobe Reader est nécessaire pour visualiser les manuels.
Guide d’utilisation de l’appareil photo
Ce guide couvre les sujets suivants :
Principes de base de l’appareil photo, depuis la mise en route à la prise de photo, la lecture, l’installation des logiciels fournis et l’importation de photos
Autres instructions à propos de toutes les fonctions de l’appareil photo
Guide d’utilisation des logiciels
Ce guide explique comment utiliser les logiciels fournis.
Insérez le CD-ROM DIGITAL CAMERA Manuals Disk dans le lecteur de CD-ROM de l’ordinateur.
Suivez les instructions qui s’affichent
pour visualiser le manuel.
 Préparatifs initiaux
Chargement de la batterie
1 Retirez le couvercle du logement de la batterie et
insérez la batterie.
Après avoir aligné les symboles ▲ de la
batterie et du chargeur, insérez la batterie en l’enfonçant ( ), puis en l’abaissant (
 ).
).
2 Chargez la batterie.
Une fois que vous connectez le cordon d’alimentation au chargeur et branchez l’autre extrémité sur la prise secteur,
le témoin s’allume en orange.
Une fois la charge terminée, le témoin devient vert. Retirez la batterie.
Pour en savoir plus sur la durée de charge et le nombre de prises ou la durée d’enregistrement en cas de charge complète de la batterie, reportez-vous
à la section « Caractéristiques » du
Guide d’utilisation de l’appareil photo.
3
 Loading...