


Printer User Guide
Y P O C
ENGLISH
CDP-E063-010 |
© CANON INC. 2008 |

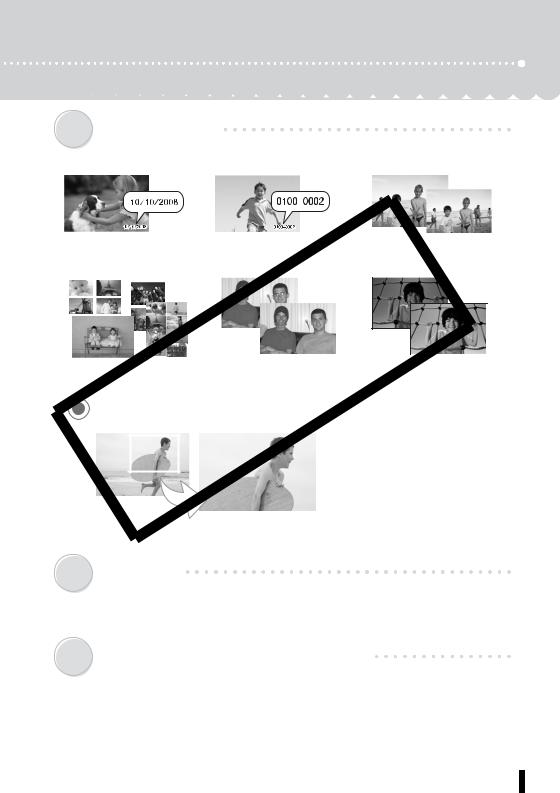
What You Can Do with Your SELPHY
Enjoy printing images with your SELPHY printer.
Creative Print (p. 40) 


Complete your favorite images using a variety of Creative Print functions.
|
|
|
|
|
|
|
|
|
|
|
|
|
|
|
|
|
|
|
|
|
|
|
|
|
|
|
|
|
|
|
|
|
|
|
|
|
|
|
|
|
|
|
|
|
|
|
|
|
|
|
|
|
|
|
|
|
|
|
|
|
|
|
|
|
|
|
|
|
|
|
|
|
|
|
|
|
|
|
|
|
|
|
|
|
|
|
|
|
|
|
|
|
|
|
|
|
|
|
|
|
|
|
|
|
|
|
|
Add Frames (p. 42) |
Add Clip Art |
Create a Calendar |
Print a Picture |
|||||
|
Stamps (p. 43) |
(p. 45) |
Diary (p. 47) |
|||||
Add a Speech |
|
P |
Print a Movie (p. 53) |
|
Print with Effects |
Create ID hotos |
|||
Bubble (p. 48) |
(p. 50) |
|
(p.Y51) |
|
C |
|
|
|
|
Print with Gold or Silver Effects (pp. 42, 43) |
|
|||
Use a gold orOsilver print supporting cartridge for printing with gold or silver effects. |
||||
|
|
|
Print with gold or silver effects on |
|
|
|
|
frames or clip art stamps. |
|
More creative decoration by using a computer (p. 88).
Print desired frames and text with gold or silver effects using the supplied software, Ulead Photo Express LE.
Add (update) frames and clip art stamps to the printer from a computer with the supplied software, SELPHY Contents Utility.
2
Print Settings (p. 54)
|
|
|
|
|
|
|
|
|
|
|
|
|
|
|
|
|
|
|
|
|
|
|
|
|
|
|
|
|
|
|
|
|
|
|
|
|
|
|
|
|
|
|
|
|
|
|
|
|
|
|
|
|
|
|
|
|
|
|
|
|
|
|
|
|
|
|
|
|
|
|
|
|
|
|
|
|
|
|
|
|
|
|
|
|
|
|
|
|
|
|
|
|
|
|
|
|
|
|
|
|
|
|
|
Print the Date (p. 55) |
Print the Image Number |
|
|
|
|
|
|
|
|||||||||||||||||
|
|
Add Borders to an Image |
|
||||||||||||||||||||||
|
|
|
|
|
|
|
|
|
|
|
|
|
(p. 55) |
|
|
|
|||||||||
|
|
|
|
|
|
|
|
|
|
|
|
|
|
|
(p. 55) |
|
|||||||||
|
|
|
|
|
|
|
|
|
|
|
|
|
|
|
|
|
|
|
|
|
|
|
|
||
|
|
|
|
|
|
|
|
|
|
|
|
|
|
|
|
|
|
Y |
|
|
|||||
|
|
|
|
|
|
|
|
|
|
|
|
|
|
|
|
|
|
|
|
||||||
|
|
|
|
|
|
|
|
|
|
|
|
|
|
|
|||||||||||
|
|
|
|
|
|
|
|
|
|
|
|
|
|
|
|
|
|
||||||||
|
|
|
|
|
|
|
|
|
|
|
|
|
|
||||||||||||
|
|
|
|
|
|
|
|
|
|
|
|
|
|
|
|
|
|
|
|
|
|
|
|
||
|
|
|
|
|
|
|
O |
|
|
rint after Adjusting the |
|
||||||||||||||
Print after Selecting a |
|
Print after Correcting |
|
|
|
||||||||||||||||||||
Page Layout (p. 57) |
|
Red-Eye (p. 55) |
|
|
Brightness (p. 58) |
|
|||||||||||||||||||
|
|
|
Trimming Images (p. 33)P |
|
|||||||||||||||||||||
C |
|
|
|
|
|
|
You can enlarge and print a portion |
|
|||||||||||||||||
|
|
|
|
|
|
|
|
|
|
|
|
|
|
|
|
|
|
|
|
||||||
|
|
|
|
|
|
|
|
|
|
|
|
|
|
|
|
|
|
|
of an image. |
|
|||||
|
|
|
|
|
|
|
|
|
|
|
|
|
|
|
|
|
|
|
|
|
|
|
|
|
|
|
|
|
|
|
|
|
|
|
|
|
|
|
|
|
|
|
|
|
|
|
|
|
|
|
|
|
|
|
|
|
|
|
|
|
|
|
|
|
|
|
|
|
|
|
|
|
|
|
|
|
|
Reprint (p. 70)
You can reprint without inserting a memory card after saving the printing history.
Add Favorite Images and Print (pp. 60, 62)
You can add favorite images in a memory card to the printer and print them without the need to reinsert the memory card.
3
Table of Contents
What You Can Do with Your SELPHY .......................................... |
2 |
||
Table of Contents............................................................................. |
|
|
4 |
About This Guide............................................................................. |
|
|
6 |
Conventions Used in this Guide........................................................... |
|
6 |
|
Getting Started.................................................................................. |
|
|
7 |
Check the Package Contents............................................................... |
|
8 |
|
|
|
Y |
|
Accessories (Sold Separately) ............................................................. |
|
9 |
|
Components Guide ............................................................................ |
|
|
10 |
|
P |
|
|
Preparing/Replacing/Storing the Easy hoto ack ................................ |
21 |
||
Placing/Connecting the Printer........................................................... |
|
27 |
|
O |
|
|
|
Printing Precautions ........................................................................... |
|
|
28 |
Printing from Memory Cards..................................................... |
|
29 |
|
Memory |
ards ................................................................ |
|
30 |
Compatible |
|
|
|
Insert Memory ard ........................................................................ |
|
|
31 |
Print Selected Images (Basic Print) ................................................... |
|
32 |
|
Print All Images .................................................................................. |
|
|
37 |
Print an Image Using |
amera Specified Settings (DPOF Print) ........ |
38 |
|
Selecting an Image during Auto Play for Printing (Auto Play)............ |
39 |
||
Creative Print ..................................................................................... |
|
|
40 |
Print Settings...................................................................................... |
|
|
54 |
Printing Favorite Images............................................................. |
|
59 |
|
Add Favorite Images to the Printer .................................................... |
|
60 |
|
Print Added Images............................................................................ |
|
|
62 |
Protect................................................................................................ |
|
|
63 |
Erase.................................................................................................. |
|
|
66 |
4
|
|
Table of Contents |
|
Reprinting ......................................................................................... |
|
|
69 |
Reprint................................................................................................ |
|
|
70 |
Printing from a Camera ............................................................... |
|
72 |
|
Print Images When Connected with a Camera .................................. |
73 |
||
Printing from a Mobile Phone (Wireless Printing)............. |
75 |
||
Infrared (IrDA) Wireless Printing ........................................................ |
|
76 |
|
|
|
Y |
|
Printing via Bluetooth ......................................................................... |
|
|
77 |
Printing from a Computer........................................................... |
|
79 |
|
|
P |
|
|
System Requirements........................................................................ |
|
|
80 |
Install the Printer Driver and Software |
............................................... |
82 |
|
Introduction to the Supplied rograms............................................... |
88 |
||
Appendix........................................................................................... |
|
|
98 |
Make Printer Settings......................................................................... |
|
|
99 |
Cleaning, |
|
|
|
Storing and arrying the Printer....................................... |
103 |
||
Safety PrecautionsO........................................................................... |
|
105 |
|
Handling Precautions ....................................................................... |
|
|
107 |
Specifications ................................................................................... |
|
|
109 |
Troubleshooting ........................................................................... |
|
|
111 |
You Think There is a Problem.......................................................... |
|
112 |
|
Error Messages................................................................................ |
|
|
116 |
Index ................................................................................................. |
|
|
122 |
5
About This Guide
Before using your printer for the first time, please read through the Safety Precautions (p. 105) and the Handling Precautions (p. 107).
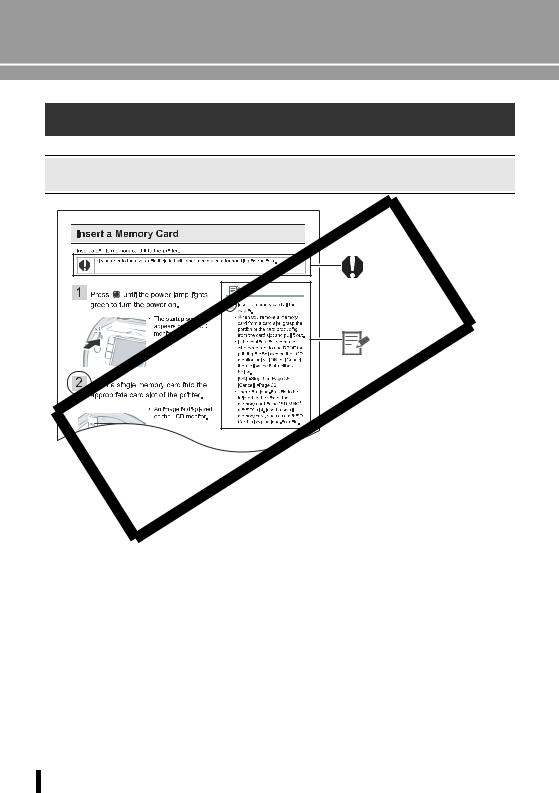
Conventions Used in this Guide
|
|
Y |
|
|
This mark denotes issues that |
|
|
may affect the printer's operation. |
|
P |
|
O |
This mark denotes additional |
|
|
|
topics that complement the basic |
|
|
operating procedures. The |
C |
|
number refers to the |
|
corresponding step. |
|
|
|
|
z Use the "Easy Photo Pack" which is an ink and paper integrated cartridge in the SELPHY ES series. This is referred to as "Easy Photo Pack" or "cartridge" in this guide.
z This printer can be used with various types of media, such as, SD* memory cards or MultiMedia ards (p. 30).
These types of media are referred to as "memory cards" in this guide.
* SD is an acronym for Secure Digital.
z General "camera" descriptions in this guide refer to digital cameras or digital camcorders compatible with the SELPHY ES3. The explanations in this guide use Canon digital cameras.
z In this guide, the screen shots from the LCD monitor show a "P" for the Postcard-size ink and paper integrated cartridge.
z Illustrations and screen examples shown in this guide may differ slightly from the actual printer.
6

Getting Started
Y P O C
Getting Started  7
7
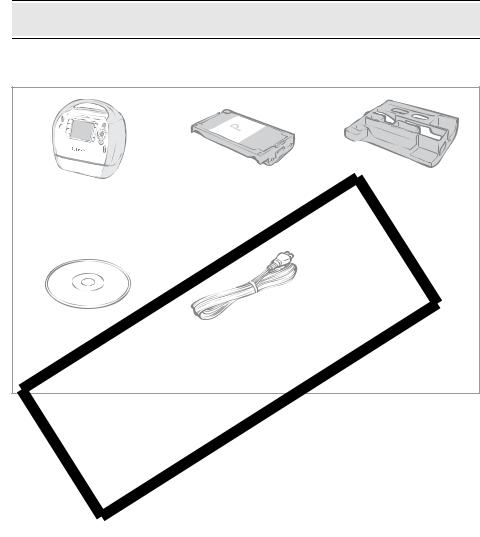
Check the Package Contents
The package contains the following accessories. If there is anything missing, please contact the store where you purchased this product.
Main Printer Unit |
5 Print Trial Cartridge |
Cleaner Unit |
|
(Postcard size) |
(Inserted prior to shipment) |
|
• |
Beginner's Guide |
|
• |
Warranty Card |
|
• |
"Canon Customer Support" |
|
|
Leaflet |
Compact Photo Printer |
ower CordSELPHY |
|
Solution Disk |
P |
|
|
||
O |
|
|
C |
|
|
8  Getting Started
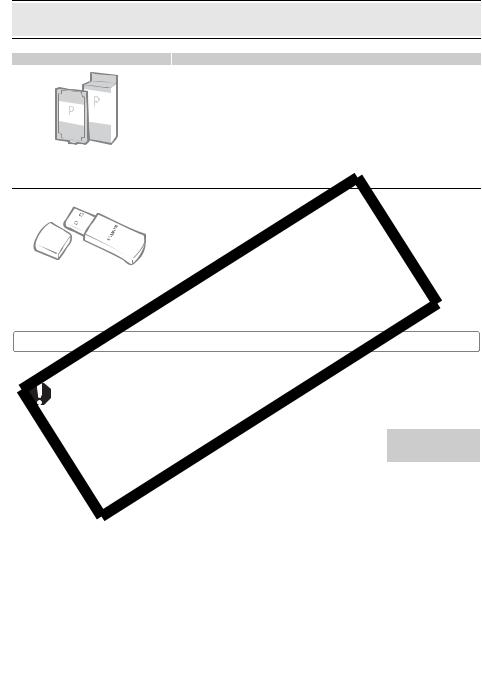
Accessories (Sold Separately)
Ink and paper integrated cartridge.
The cartridge differs depending on the paper size and ink type.
Please refer to the Easy Photo Pack table below.
Easy Photo Pack
You can print wirelessly from a Bluetooth-enabled mobile phone (p. 77).
|
Bluetooth Unit BU-30 |
Y |
||||||
|
|
|
|
|||||
|
|
|
|
|
|
|
|
|
|
|
|
O |
|
|
|||
|
Easy Photo Packs |
|
|
|
||||
|
|
|
|
P |
||||
|
|
Thin lines/texts may be unclear or defaced when printing with the gold or silver print supporting |
||||||
|
|
C |
|
|
|
|||
|
|
cartridge (Easy Photo Pack E-P20G/E-P20S). |
|
|
||||
|
Paper Size |
|
Ink Type |
Name |
No. of |
Color of |
||
|
|
(Product No.) |
Sheets |
Cartridge |
||||
|
|
|
|
|
|
|||
|
|
|
|
olor |
|
Easy Photo Pack E-P100 |
100 |
Green |
|
|
|
|
|
|
|
||
|
|
|
|
Easy Photo Pack E-P50 |
50 |
|||
|
|
|
|
|
|
|
||
|
Postcard size |
|
|
|
|
|
||
|
|
Color/ |
Easy Photo Pack E-P20G |
20 |
Gold |
|||
|
(100 x 148mm) |
|
Gold |
|||||
|
|
|
|
|
||||
|
(4 x 6 in.) |
|
|
|
|
|
|
|
|
|
Color/ |
Easy Photo Pack E-P20S |
20 |
Silver |
|||
|
|
|
|
|||||
|
|
|
|
Silver |
||||
|
|
|
|
|
|
|
||
|
|
|
|
|
|
|
|
|
|
|
|
|
BW |
Easy Photo Pack E-P25BW |
25 |
Gray |
|
|
|
|
|
|
|
|
|
|
|
L size |
|
|
|
Easy Photo Pack E-L100 |
100 |
|
|
|
(89 x 119mm) |
|
Color |
|
|
|
Blue |
|
|
|
|
Easy Photo Pack E-L50 |
50 |
||||
|
(3.5 x 4.7 in.) |
|
|
|
|
|||
|
|
|
|
|
|
|
|
|
|
Card size |
|
|
|
Easy Photo Pack E-C25 |
25 |
|
|
|
(54 x 86mm) |
|
Color |
|
|
|
Orange |
|
|
|
|
Easy Photo Pack E-C25L* |
25 |
||||
|
(2.1 x 3.4 in.) |
|
|
|
|
|||
|
|
|
|
|
|
|
|
|
* Card-size label sheet.
Getting Started  9
9
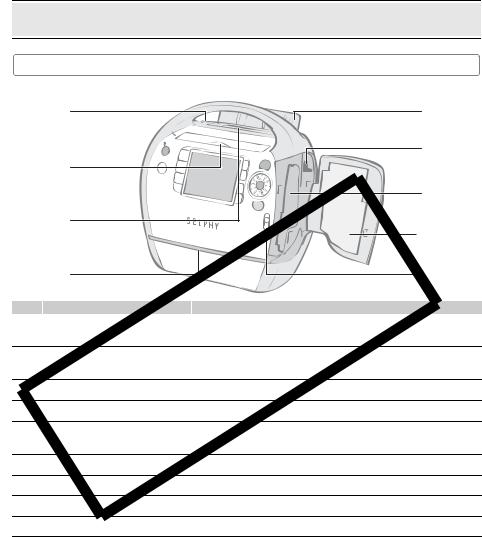
Components Guide
Front View
|
1 |
|
|
5 |
|
2 |
|
|
6 |
|
|
|
|
|
|
|
|
|
7 |
|
3 |
|
|
8 |
|
|
|
Y |
|
|
4 |
|
9 |
|
|
|
|
||
1 |
Print Output Receptacle |
ress to manually open the output receptacle cover. |
||
|
Button |
O |
|
|
2 |
|
|
||
Card Slot Cover |
pen to insert a memory card or card adapter with a |
|||
|
|
|
memory card inserted. |
|
3 |
Print Output Receptacle |
Paper is deposited here after printing. |
|
|
C |
Paper projects from this slot while printing is in progress. |
|||
4 |
Paper-Handling Slot |
|||
5 |
Print Output Receptacle |
pens automatically when printing starts. |
|
|
|
over |
|
|
|
6 |
artridge Lever |
Slide down to eject the Easy Photo Pack. |
|
|
7 |
artridge |
ompartment |
Insert the Easy Photo Pack into this compartment. |
|
8 |
Cartridge Cover |
Open to replace the Easy Photo Pack. |
|
|
9 |
Cartridge Cover Lever |
Slide up to open the cartridge cover. |
|
|
10  Getting Started
Components Guide
|
1 |
|
|
|
|
|
|
|
4 |
||
|
|
|
|
|
|
|
|||||
|
2 |
|
|
|
|
|
|
|
|
|
|
|
|
|
|
|
|
|
|
|
|
|
|
|
3 |
|
|
|
|
|
|
|
|
5 |
|
|
|
|
|
|
|
|
|
||||
|
|
|
|
|
|
|
|
|
|
|
|
|
|
|
|
|
|
|
|
|
|
|
|
1 |
Carrying Handle |
|
Used for carrying the printer (p. 104). |
||||||||
|
|
|
|
|
|
|
|
|
|
|
|
2 |
Air Vents |
|
|
|
Dissipates heat inside the printer and prevents overheating. |
||||||
|
|
|
|
|
|
|
|
|
|
|
|
3 |
AC IN (Power Input) Terminal |
|
Connects to the power cord. |
||||||||
|
|
|
|
|
|
|
Y |
||||
4 |
USB Terminal for PC |
|
For USB connection to your C using a commercially |
||||||||
|
Connection |
|
|
|
available USB cable. |
||||||
|
|
|
|
|
|
|
|
|
|
|
|
5 |
USB Terminal for Camera |
|
Connects to a camera using the interface cable, or |
||||||||
|
Connection |
|
|
|
P |
||||||
|
|
|
|
Bluetooth unit (sold separately). |
|||||||
|
|
|
O |
||||||||
C |
|
|
|
|
|
|
|
||||
Getting Started  11
11
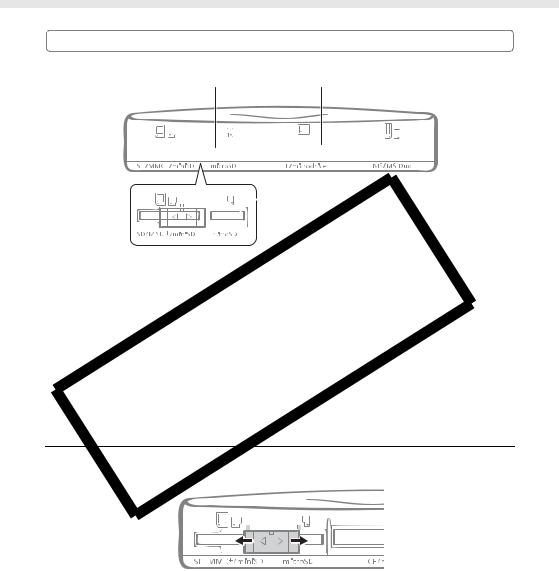
Components Guide
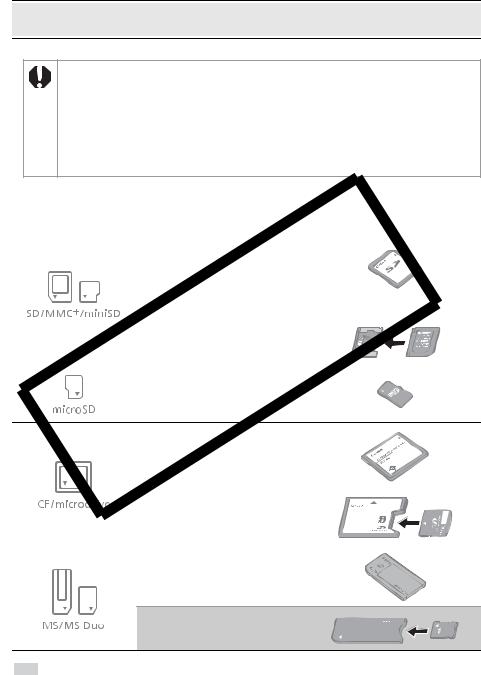
Card Slot
1 |
|
|
|
4 |
|
|
2 


 5
5
About the Slot over
|
|
|
|
|
|
|
3 |
|
|
|
|
|
|
|
|
|
|
|
|
|
|
|
|
|
|
|
|
|
|
|
|
|
|
|
|
|
|
|
|
|
|
|
|
|
|
|
|
1 |
Sliding Slot Cover |
Slide to use the SD/MMC+/miniSD slot or the microSD slot. |
|||||
2 |
SD/MMC+/miniSD Slot |
Insert a memory card such as SD memory card or |
|||||
|
|
|
|
|
MultiMediaCard (p. 30). |
||
|
|
|
|
|
|
|
Y |
3 |
microSD Slot |
|
|
|
Insert a memory card such as microSD card (p. 30). |
||
|
|
|
|
|
|
|
|
4 |
CF/microdrive Slot |
Insert a memory card such as CompactFlash card or |
|||||
|
|
|
|
|
Microdrive (p. 30). |
||
|
|
|
|
|
P |
||
5 |
MS/MS Duo Slot |
Insert a memory card such as Memory Stick or Memory |
|||||
|
|
|
|
|
Stick Duo (p. 30). |
||
|
|
O |
|||||
C |
|
|
|
||||
Slide the slot cover right or left to use the "SD/MMC+/miniSD" slot or "microSD" slot.
12  Getting Started
Components Guide
|
1 |
|
|
|
|
|
|
|
|
|
|
|
|
|
|
|
|
|
|
|
10 |
||
|
|
|
|
|
|
|
|
|
|
|
|
|
|
|
|
|
|
|
|||||
|
2 |
|
|
|
|
|
|
|
|
|
|
|
|
|
|
|
|
|
|
|
|
|
|
|
|
|
|
|
|
|
|
|
|
|
|
|
|
|
|
|
|
|
|
|
|
|
|
|
3 |
|
|
|
|
|
|
|
|
|
|
|
|
11 |
|||||||||
|
|
|
|
|
|
|
|
|
|
|
|
|
|
|
|
|
|
|
|
|
|
12 |
|
|
4 |
|
|
|
|
|
|
|
|
|
|
|
|
|
|
|
|
|
|
|
|
||
|
|
|
|
|
|
|
|
|
|
|
|
|
|
|
|
|
|
|
|
|
|
13 |
|
|
|
|
|
|
|
|
|
|
|
|
|
|
|
|
|
|
|
|
|
|
|
||
|
5 |
|
|
|
|
|
|
|
|
|
|
|
|
|
|
||||||||
|
|
|
|
|
|
|
|
|
|
|
|
|
|
|
|||||||||
|
|
|
|
|
|
|
|
|
|
|
|
|
|
|
|
|
|
|
|
|
|
14 |
|
|
6 |
|
|
|
|
|
|
|
|
|
|
|
|
|
|
|
|||||||
|
|
|
|
|
|
|
|
|
|
|
|
|
|
|
|
||||||||
|
|
|
|
|
|
|
|
|
|
|
|
|
|
|
|
|
|
|
|
|
|
15 |
|
|
7 |
|
|
|
|
|
|
|
|
|
|
|
|
|
|
|
|
|
|
|
|
||
|
|
|
|
|
|
|
|
|
|
|
|
|
|
||||||||||
|
|
|
|
|
|
|
|
|
|
|
|
|
|
|
|
|
|
|
|
|
|||
|
|
|
|
|
|
|
|
|
|
|
|
|
|
|
|
|
|
|
|
|
|||
|
|
|
|
|
|
|
|
|
|
|
|
|
|
|
|
|
|
|
|
|
|
|
|
|
8 |
|
|
|
|
|
|
|
|
|
|
|
|
|
16 |
||||||||
|
|
|
|
|
|
|
|
|
|
|
|
|
|
||||||||||
|
|
|
|
|
|
|
|
|
|
||||||||||||||
|
9 |
|
|
|
|
|
|
|
|
|
|
|
17 |
||||||||||
|
|
|
|
|
|
|
|
|
|
|
|||||||||||||
|
|
|
|
|
|
|
|
|
|
|
|
|
|
|
|
|
|
|
|
|
|
|
|
|
|
|
|
|
|
|
|
|
|
|
|
|
|
|
|
|
|
|
|
|
|
|
|
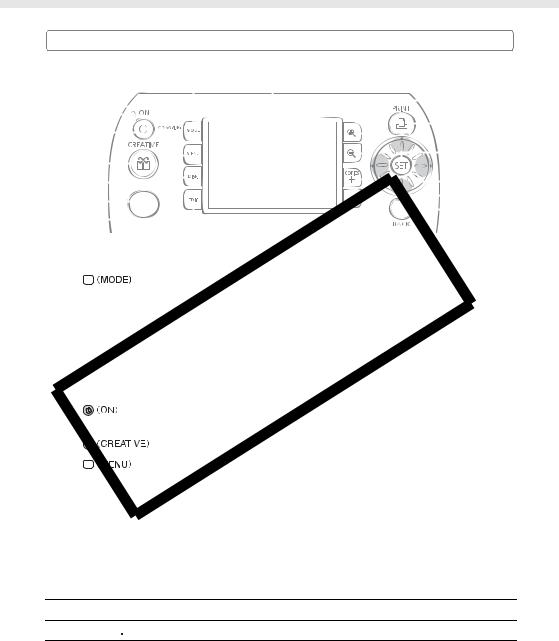
1 |
|
|
|
|
|
Button |
Displays the mode menu (p. 18). |
||||||||||||||||
|
|
|
|
|
|
|
|
|
|
|
|
|
|
|
|
|
|
|
|
|
|
|
|
2 |
Saving Lamp |
|
|
|
|
Indicates the status of the built-in memory. |
|||||||||||||||||
|
|
|
|
|
|
|
|
|
|
|
Blinks orange: Adding images in the printer. |
||||||||||||
|
|
|
|
|
|
|
|
|
|
|
|
Y |
|||||||||||
3 |
Power Lamp |
|
|
|
|
Indicates the printer status. |
|||||||||||||||||
|
|
|
|
|
|
|
|
|
|
|
Lights green: ower on / communicating infrared data |
||||||||||||
|
|
|
|
|
|
|
|
|
|
|
Blinks green: rinting |
||||||||||||
|
|
|
|
|
|
|
|
|
|
|
Blinks green (fast): Communicating with Bluetooth / |
||||||||||||
|
|
|
|
|
|
|
|
|
|
|
PDirect rint |
||||||||||||
4 |
|
|
|
Button |
Turns the printer's power on when pressed until the power |
||||||||||||||||||
|
|
|
|
|
|
|
|
|
|
|
lamp lights green. |
||||||||||||
|
|
|
|
|
|
|
O |
||||||||||||||||
5 |
|
|
|
|
|
|
|
|
|
|
|
|
|
|
|
|
|
|
|
|
|
|
|
|
|
|
|
|
|
Button |
Displays the Creative Print menu (p. 40). |
||||||||||||||||
|
|
|
|
|
|
|
|
|
|
|
|
|
|
|
|
|
|
|
|
|
|
|
|
6 |
|
|
|
|
|
Button |
Displays the main menu (displayed menu items differ |
||||||||||||||||
|
|
|
|
|
|
|
|
|
|
|
depending on the print mode). |
||||||||||||
C Print All Images (p. 37) |
|||||||||||||||||||||||
|
|
|
|
|
|
|
|
|
|
|
DPOF Print (p. 38) |
||||||||||||
|
|
|
|
|
|
|
|
|
|
|
Auto Play (p. 39) |
||||||||||||
|
|
|
|
|
|
|
|
|
|
|
Print Settings (p. 54) |
||||||||||||
|
|
|
|
|
|
|
|
|
|
|
Printer Setup (p. 99) |
||||||||||||
|
|
|
|
|
|
|
|
|
|
|
Add to Favorites (p. 60) |
||||||||||||
|
|
|
|
|
|
|
|
|
|
|
Protect (p. 63) |
||||||||||||
|
|
|
|
|
|
|
|
|
|
|
Erase (p. 66) |
||||||||||||
7 Infrared Data Receiver
8 


 Button
Getting Started  13
13
Components Guide
|
|
|
|
|
|
|
|
|
|
|
9 |
|
|
|
|
|
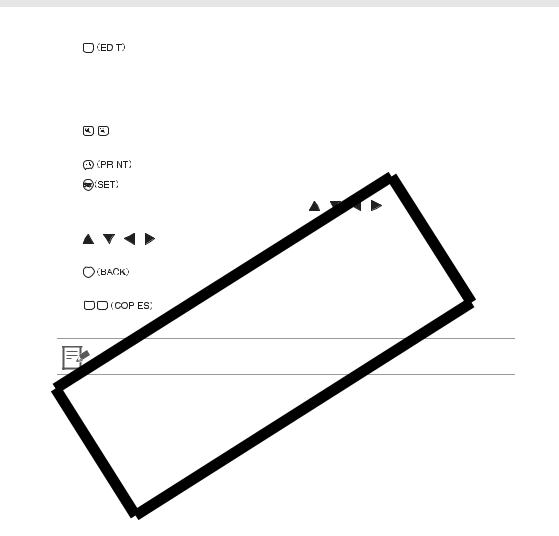
Button |
Displays the editing menu. |
|
||
|
|
|
|
|
|
|||||
|
|
|
|
|
|
|
|
|
Trimming (p. 33) |
|
|
|
|
|
|
|
|
|
|
Page Layout (p. 35) |
|
|
|
|
|
|
|
|
|
|
Select by date (p. 36) |
|
|
|
|
|
|
|
|
|
|
|
|
10 |
LCD Monitor |
|
Displays images, setting screens, and error messages. |
|||||||
|
|
|
|
|
|
|
|
|
||
11 |
|
|
|
|
(Enlarge, Reduce) |
Displays an enlarged or reduced view of the image (p. 15). |
||||
|
Button |
|
|
|
||||||
|
|
|
|
|
|
|
|
|
|
|
12 |
|
|
|
|
|
|
Button |
Starts printing. |
|
|
|
|
|
|
|
|
|||||
|
|
|
|
|
|
|
|
|
|
|
13 |
|
|
|
|
|
Button |
|
Confirms settings. |
|
|
|
|
|
|
|
|
|
|
|
|
|
14 |
Easy-Scroll Wheel |
Used instead of , , , |
(excluding some |
|||||||
|
|
|
|
|
|
|
|
|
functions) (p. 20). |
|
|
|
|
|
|
|
|
|
|
|
|
15 |
, , , |
(Up, Down, |
Used for selecting images, shifting items, changing setting |
|||||||
|
Left, Right) Buttons |
Y |
||||||||
|
value, moving trimming frames, etc. |
|||||||||
16 |
|
|
|
|
|
Button |
Returns to the previous screen. |
|
||
|
|
|
|
|
|
|
|
|
Cancels printing. |
|
17 |
|
|
|
|
|
|
|
|
P |
|
|
|
|
|
|
|
|
Button |
Specifies the number of prints for a selected image. |
||
The LCD monitorOmay be covered with a thin plastic film for protection against scratches during shipment. If so, remove the film before using the printer.
C
14  Getting Started
Components Guide
LCD Monitor
Multi View and Single View
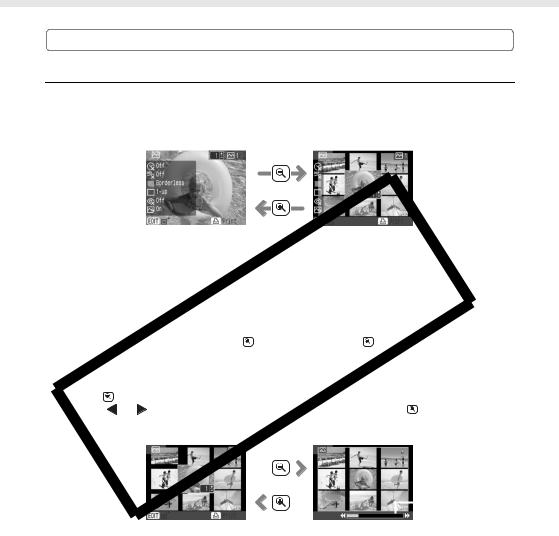
zThe screen that displays the first time you turn the printer on is called "Multi View".
zWhen pressing  in Multi View, a single image will be displayed. This screen is called "Single View". Press
  to return to Multi View.
Single View Multi View
z When turning on the power again, the last screen selected before turning off the power ("Multi View" or "Single View") will be displayed.
z Single View is used for the screen samples in this guide.
Enlarged View |
|
|
Y |
||||||
You can enlarge an image by pressing |
in Single View. |
ress |
to return to Single View. |
||||||
Switching the View to 9 Images at a Time |
|
|
|
|
|
||||
|
|
P |
|
|
|||||
Pressing |
in Multi View displays a set of 9 images, and a jump bar appears below the images. |
||||||||
Press the |
or |
buttons to display the previous or next images. Press |
to return to Multi |
||||||
View. |
|
O |
|
|
|
|
|
||
|
|
|
|
|
|
|
|||
C |
|
|
|
|
|
|
Jump Bar |
||
|
|
|
|
|
|
||||
|
|
|
|
|
|
|
|
|
|
|
|
Multi View |
|
|
9 Image View |
|
|
||
Getting Started  15
15
Components Guide
Information Views
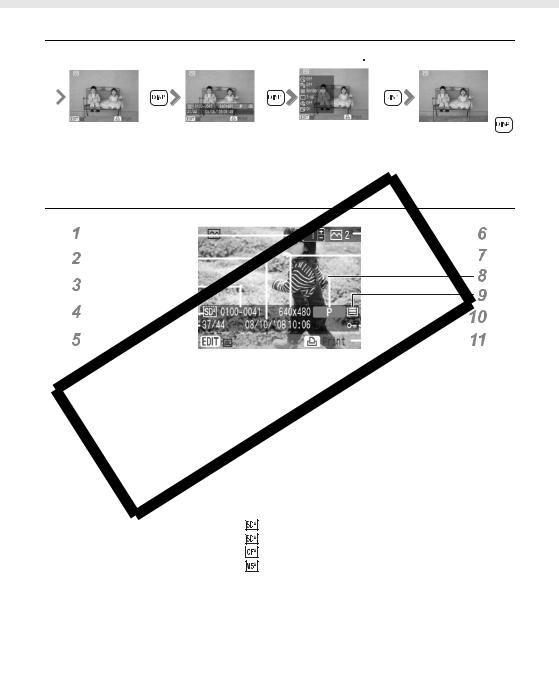
You can switch the image information views by pressing 


 .
.
|
Operation |
|
Image |
|
Print settings |
|
No information |
|
|
commands |
|
information |
|
|
|
|
|
|
(Default setting) |
|
|
|
|
|
|
|
|
|
|
|
|
|
|
|
|
No information displays only in Single View or Enlarged View.
Sample View of the LCD Monitor
|
|
|
|
|
|
|
|
|
|
|
|
|
|
|
|
|
|
|
|
|
|
|
|
|
|
|
|
|
Y |
|
|||||
|
|
|
|
|
|
|
|
||||||||||
|
|
|
|
|
|
|
|
|
|
|
|
||||||
|
|
|
|
|
|
|
|
|
|
|
|
||||||
|
|
|
|
|
|
|
|
|
|
|
|
||||||
|
|
|
|
|
|
|
|
|
|
|
|
|
|
|
|
||
|
|
|
|
|
|
|
|
||||||||||
|
|
|
|
|
|
|
|
|
|
|
|
|
|
|
|
||
|
|
|
|
|
|
P |
|||||||||||
|
|
|
|
|
|
|
Image information |
||||||||||
|
|
|
|
|
|
|
|
|
|
|
|
|
|
|
|
|
|
|
|
|
|
|
|
|
|
|
|
|
|
|
|
|
|
|
|
C |
Displays the number of copies for the displayed image. |
||||||||||||||||
1 |
Number of opies for the |
||||||||||||||||
|
Displayed ImageO |
||||||||||||||||
2 |
Time and Date |
Displays the date and time the image was shot. |
|||||||||||||||
3 |
File Number |
Displays the image number. |
|||||||||||||||
|
|
|
|
|
|
|
|
|
|
|
|
|
|
|
|
|
|
4 |
Memory Card |
Displays the slot in which a memory card is inserted (only |
|||||||||||||||
|
|
|
|
|
|
when the print mode is Normal). |
|||||||||||
:SD/MMC+/miniSD slot
:microSD slot
:CF/microdrive slot
:MS/MS Duo slot
5 |
Number of Displayed Image/ |
Displays the number of the currently displayed image, and |
|
Total Number of Images |
the total number of images on a memory card (or built-in |
|
|
memory). |
|
|
|
6 |
Total Number of Copies |
Displays the total number of images to print. |
|
|
|
7 |
Recording Pixels |
Displays the recording pixels or time counter for movies |
|
|
(only when the print mode is Normal). |
|
|
|
16  Getting Started
Components Guide
|
|
|
|
|
|
|
|
|
|
|
8 |
Paper Type |
Displays the paper type. |
|
|||||||
|
|
P |
: Postcard size |
|
||||||
|
|
L |
: L size |
|
||||||
|
|
C |
: Card size |
|
||||||
|
|
C Label |
: Card size full-sized label sheet |
|||||||
|
|
G |
: Postcard size (supporting gold printing) |
|||||||
|
|
S |
: Postcard size (supporting silver printing) |
|||||||
|
|
BW |
: Postcard size (black and white) |
|||||||
|
|
|
|
|
|
|
|
|
||
9 |
Paper Status |
Displays the remaining amount of paper in the cartridge. |
||||||||
|
|
|
|
|
: 1/2 full or more (the trial cartridge is different |
|||||
|
|
|
|
|
||||||
|
|
|
|
|
from the commercially available Easy Photo |
|||||
|
|
|
|
|
||||||
|
|
|
|
|
Pack and |
|
|
|
|
does not display). |
|
|
|
|
|
: About 1/4 full or more. |
|||||
|
|
|
|
|
: About 1/8 full or more. |
|||||
|
|
|
|
|
||||||
|
|
|
|
|
Y |
|||||
|
|
|
|
|
||||||
|
|
|
|
|
: The cartridge is empty. |
|||||
|
|
No Display |
: The status is unknown. |
|||||||
|
|
|
|
|
|
|
|
|
||
10 |
Protect |
Displays when the image is protected (Favorite print mode |
||||||||
|
|
P |
||||||||
|
|
only). |
|
|
|
|
|
|
||
11 |
Operation Guides |
Displays operation guides. Follow the instructions to |
||||||||
|
|
proceed. |
|
|
|
|
|
|
||
|
O |
|
||||||||
C |
|
|
|
|
|
|
|
|
|
|
Getting Started  17
17
Components Guide
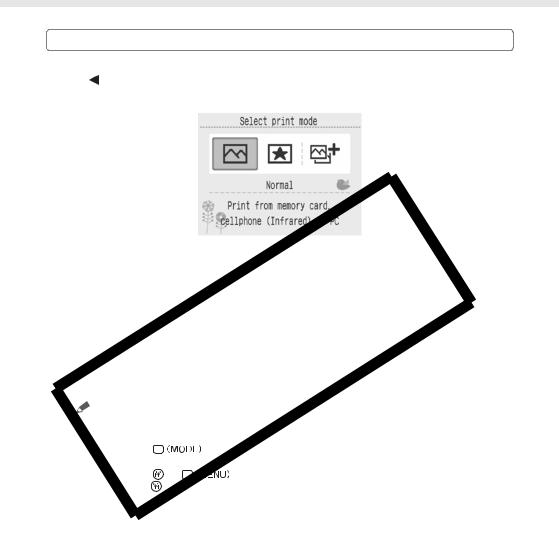
Switching the Print Mode
You can display the mode menu by pressing 


 .
.
Press  or
or  to select the print mode and press
  . A screen to select images in each mode (or printing history) is displayed.
|
|
|
|
|
|
|
|
|
|
|
|
|
|
Mode |
|
|
Y |
||
|
|
|
|
|
|
Description |
|||
Normal (pp. 32, 75, 79) |
|
Print images from a memory card, mobile phone (cellphone |
|||||||
|
|
|
|
|
|
|
|
|
P |
|
|
|
|
|
|
|
|
(Infrared)) or personal computer. |
|
Favorite (p. 62) |
|
Select images saved in the built-in memory of the printer in [Add |
|||||||
|
|
|
|
|
|
|
|
to Favorites] (p. 60) and print. |
|
Reprint (p. 70) |
|
Select images you wish to reprint from the printing history list |
|||||||
|
|
|
|
|
|
|
|
and print. |
|
|
|
|
|
|
|
|
|
||
|
|
|
|
|
|
|
|
||
|
|
C |
|
||||||
|
|
|
|
• You can print without inserting a memory card if you have added images to the favorites or |
|||||
|
|
|
|
printing history. |
|
|
|||
|
|
|
|
• The mode menu can be displayed anytime, except when the printer is connected to a camera or |
|||||
|
|
|
|
when a BluetoothOunit is inserted. |
|||||
|
|
|
|
• Pressing |
|
displays the image selection screen (or the printing history) in the selected |
|||
|
|
|
|
mode. |
|
|
|
||
|
|
|
|
• Pressing |
or |
|
displays the Creative Print menu or the main menu in the selected |
||
|
|
|
|
mode. If |
|
|
is pressed while in Reprint, the Creative Print menu will not be displayed. |
||
|
|
|
|
|
|
|
|
|
|
18  Getting Started
Components Guide
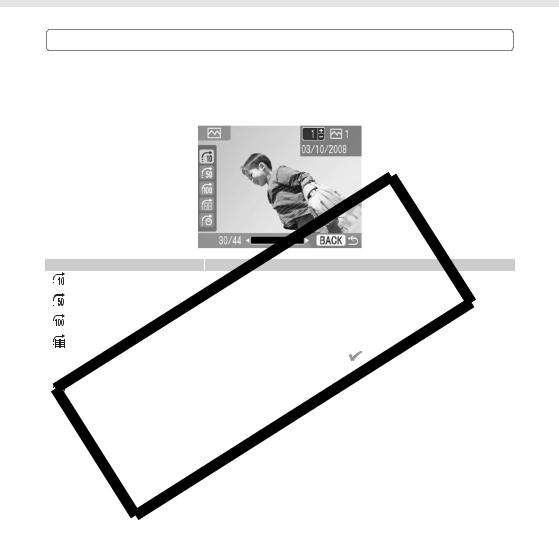
The Jump Function
Pressing  in Single View or in the Creative Print image selection screen, if the print mode is Normal or Favorite, displays the Jump screen.
Press  or
or  to select a search key, then press
  or
or  to jump to an image matching the search key.
Jump 10 Images |
Y |
|
Jumps ahead 10 images. |
|
|
|
|
|
Jump 50 Images |
P |
|
Jumps ahead 50 images. |
|
|
Jump 100 Images |
Jumps ahead 100 images. |
|
O |
|
|
Jump Selected Images |
Jumps to the images that you have set a number of copies for, |
|
|
or that you have marked with |
in [Add to Favorites], [Protect] |
|
or [Erase]. |
|
Jump Selected date |
Jumps to the newest image of each shooting day. |
|
C |
|
|
Getting Started  19
19
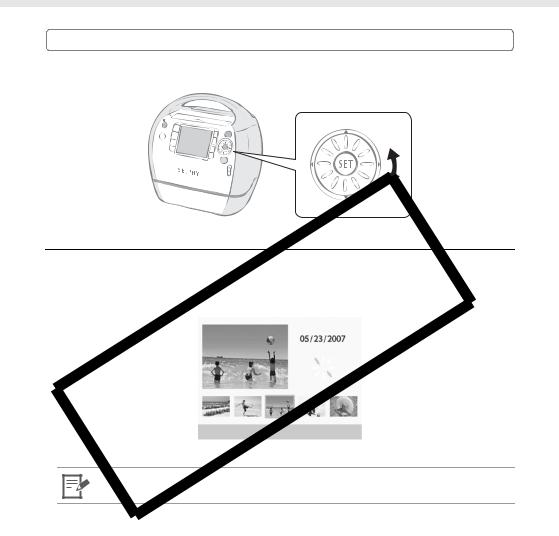
Components Guide
You can select images or menu items and rotate the trimming frame or the image just by turning the Easy-Scroll Wheel instead of pressing  ,
,  ,
,  or
or  .
.
When the print mode is Normal or Favorite, giving theYEasy-Scroll Wheel a quick turn in Single View or in the Creative Print image selection screen, for example, will display 5 images at the bottom of the screen. You can scroll throughPthe images one at a time by turning the wheel and select the image which is displayed enlarged at the upper left corner.
O
CIf there are less than 5 images on a memory card (or built-in memory of the printer), the Image
Scroll display will not appear on the screen.
20  Getting Started
Preparing/Replacing/Storing the Easy Photo Pack
Replace the Easy Photo Pack with the size of the paper you wish to print.
Preparing the Easy Photo Pack
An ink and paper integrated cartridge is used in this printer (p. 9). Prepare a cartridge (Easy Photo Pack) with the size of paper you wish to print.
• When opening a cartridge, check the contents. If something seems to be damaged, contact the dealer for assistance.
• Some cartridges are not supported depending on the printing type. Check the table below.
|
|
|
|
|
|
|
|
|
|
|
Creative Print |
|
|
|
|
|
|
|
|
|
Print All |
|
Y |
|
|
|
|||||
|
|
Basic Print |
Images |
DPOF Print |
Auto Play |
|
|
|
|
|
|
|
|
||
Color |
|
{ |
|
{ |
{ |
{ |
{ |
{ |
{ |
{ |
{ |
{ |
{ |
{ |
|
BW |
|
|
|
|
P |
– |
– |
– |
{* |
|
|
||||
|
{ |
|
{ |
{ |
{ |
– |
– |
{ { |
|||||||
Gold/Silver |
– |
|
– |
– |
– |
{ |
{ |
– |
– |
– |
– |
– |
– |
||
{ : Available |
|
O |
|
|
|
|
|
|
|
|
|||||
– |
: Not available |
|
|
|
|
|
|
|
|
|
|||||
|
|
|
|
|
|
|
|
|
|
|
|
|
|||
* |
Cannot be used with Sepia, B/W, Positive Film, Lighter Skin, Darker Skin. |
|
|
|
|
|
|
||||||||
|
: Frames |
|
|
|
|
|
|
|
|
|
|
|
|
|
|
|
: |
lip Art |
|
|
|
|
|
|
|
|
|
|
|
|
|
|
: |
alendar |
|
|
|
|
|
|
|
|
|
|
|
|
|
|
: Multi Layout |
|
|
|
|
|
|
|
|
|
|
|
|
||
|
: Speech Bubble |
|
|
|
|
|
|
|
|
|
|
|
|
||
|
: Image Effects |
|
|
|
|
|
|
|
|
|
|
|
|
||
|
: ID Photo |
|
|
|
|
|
|
|
|
|
|
|
|
|
|
C: Movie Print |
|
|
|
|
|
|
|
|
|
|
|||||
Getting Started  21
21
Preparing/Replacing/Storing the Easy Photo Pack
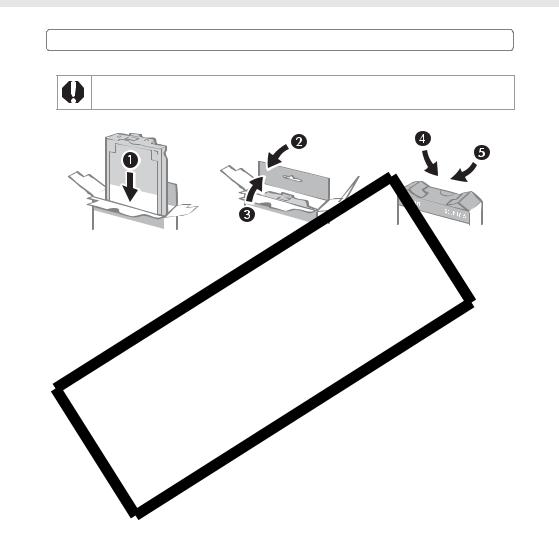
Inserting the Easy Photo Pack into the Printer
•Do not touch the ink sheet of the cartridge, or pull out the ink sheet or papers.
There may not be enough ink left for the allotted sheets, or paper jams or poor printing may result.
•Do not handle the cartridge with wet or sweaty hands.
•Please use only cartridges specified for use with the SELPHY ES series (Cartridges for the CP series cannot be used).
•Do not apply excessive force to the cartridge.
The paper may come out from under the clips. In this case, push the paper back under the clips.
|
|
|
|
|
|
|
|
|
|
|
|
|
|
|
|
|
|
|
|
|
|
|
|
|
|
|
|
|
|
|
|
|
|
|
|
|
|
|
|
|
|
|
|
|
|
|
Ink sheet |
|
|
|
|
|
|
|
|
|
|
|
|
|
Clip |
||||
|
|
|
|
|
|
|
|
|
|
|
|
|
|
|
|
Y |
|||||
1 |
|
|
|
|||||||
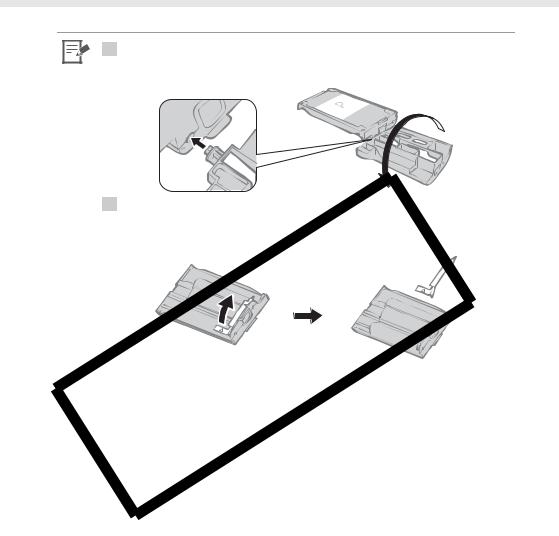
Check that the ink sheet is tight and that the paper is correctly |
||||||||||
|
|
|
P |
|||||||
|
|
|||||||||
|
|
loaded in the cartridge. |
|
|
|
|
|
|
||
|
|
O |
|
|
|
|
|
|
||
2 |
|
|
|
|
|
|
||||
Slide the cartridge cover lever up to open the cartridge cover. |
||||||||||
|
C |
|
|
|
|
|
|
|||
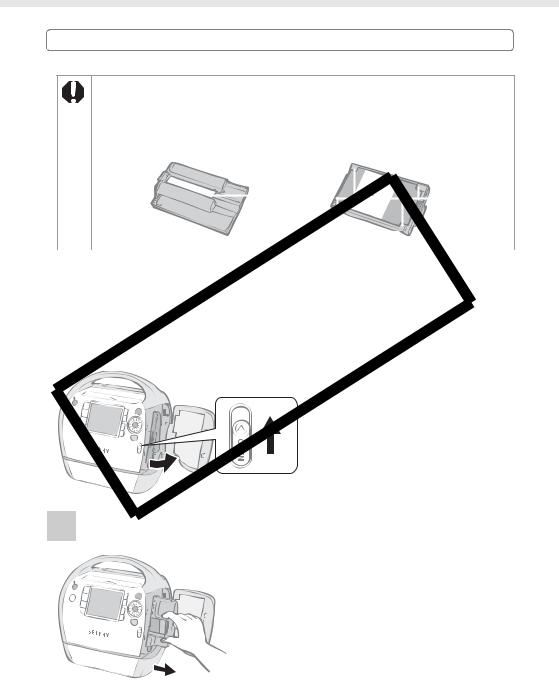
3 If there is a cleaner unit inside the printer, grasp it and remove it.
22  Getting Started
Preparing/Replacing/Storing the Easy Photo Pack
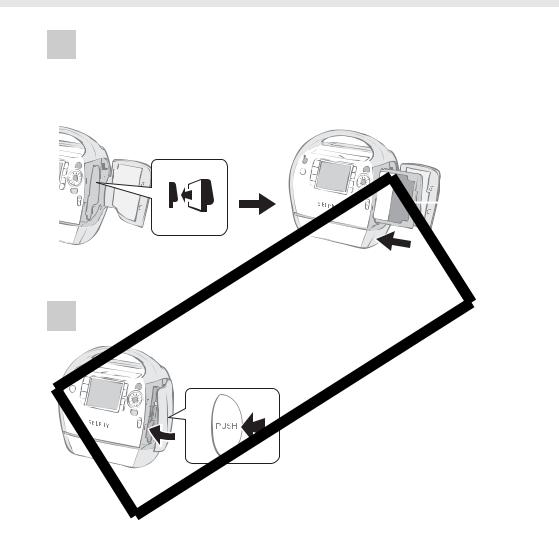
4 Make sure that the cartridge is oriented as shown by the direction indicator on the inside of the printer, and insert the cartridge until it clicks into place.
Direction |
|
|
|
Protective paper |
|||
indicator |
|||
Y
5 |
P |
Press the area marked USH to close the cartridge cover. |
|
|
O |
C |
|
Getting Started  23
23
Preparing/Replacing/Storing the Easy Photo Pack
1 • When inserting the cartridge into the printer, if the ink sheet is so slack it catches, insert the cleaner unit and turn it slowly to take up the slack.
• It will not be possible to use all the paper for printing if you overwind the ink sheet.
4 • The colored paper on the top side of the cartridge is protective paper. Load the cartridge with this paper still in place.
• Some cartridges have an orange colored stopper on the backside. Remove the stopper then
insert the cartridge into the printer. |
Y |
|
|
P |
|
O |
|
C |
|
24  Getting Started
Preparing/Replacing/Storing the Easy Photo Pack
Replacing the Easy Photo Pack
Replace the Easy Photo Pack when paper has run out, or if another sheet size is required.
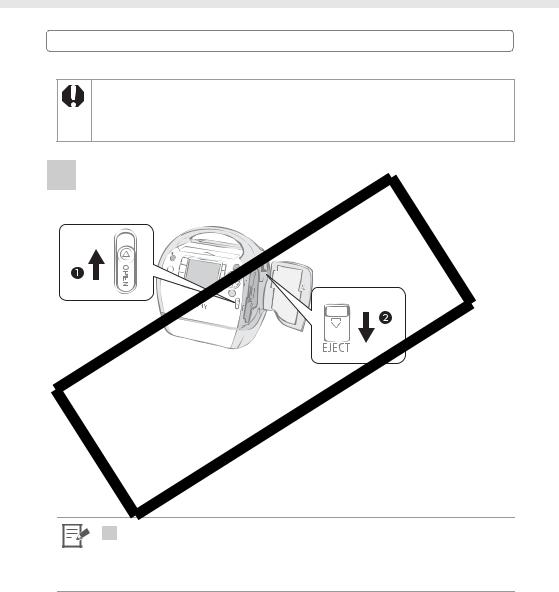
•Do not remove the Easy Photo Pack while paper is being fed into or ejected from the printer, or while printing is in progress.
•When replacing the Easy Photo Pack, remove all paper from the print output receptacle.
•Do not reuse empty Easy Photo Packs. Attempting to reuse an empty Easy Photo Pack may result in malfunction or damage to the printer.
1Push and slide the cover lever up to open the cartridge cover ( ), then push and slide the cartridge lever down (
 ).
).
|
Y |
|
|
O |
|
|
• Eject the Easy Photo Pack.P |
|
|
C |
|
2 |
||
Remove the Easy Photo Pack. |
||
|
|
|
3 |
Replace the Easy Photo Pack following the procedures in inserting |
|
|
the Easy Photo Pack into the printer (p. 22). |
3• You can check the type of the Easy Photo Pack and the amount of remaining paper (ink) loaded in the printer, by the icons displayed in the print confirmation, printing or standby screens (p. 17).
•After power is turned on, or immediately after the cartridge cover is opened or closed, the status icon is not displayed. This icon is displayed when one sheet has been printed.
Getting Started  25
25
Preparing/Replacing/Storing the Easy Photo Pack
Storing Easy Photo Packs
When storing the Easy Photo Pack, return it to its original package.
Y P O C
26  Getting Started
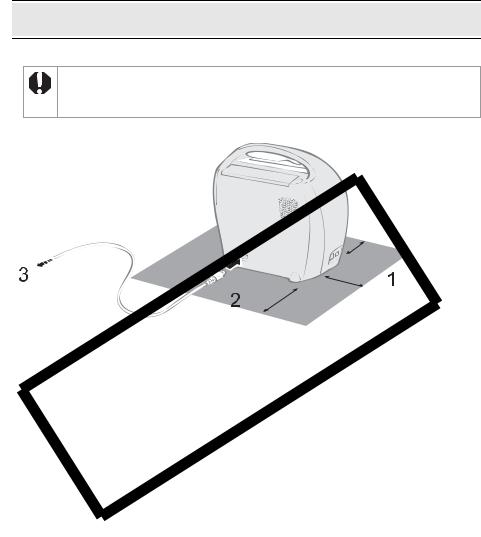
Placing/Connecting the Printer
Set up and connect your SELPHY printer in the following manner for safe use.
•Do not place the equipment on an unstable or tilted surface. There is risk that the equipment may fall and cause injury.
•Be sure to select a safe place to avoid tripping over the power cord.
•Do not block the air vents on the back of the printer.
Leave more than 15 cm (6 in.) of clearance at the front and back of the equipment and 10 cm (4 in.) of clearance on both sides.
|
|
|
|
|
|
15 cm |
||
|
|
|
|
|
|
(6 in.) |
||
|
|
|
|
|
|
|
||
|
|
|
|
|
|
10 cm |
|
|
To power outlet |
|
|
|
|||||
|
|
15 cm |
(4 in.) |
|||||
|
|
|||||||
|
|
|
|
|
||||
|
|
|
|
|
(6 in.) |
|
|
|
|
|
|
|
|
Y |
|||
1 |
|
|||||||
Place the printer on a flat surface. |
|
|
|
|||||
|
|
|
P |
|||||
|
|
|
||||||
2 |
|
|||||||
onnect the supplied power cord to the printer. |
||||||||
|
|
Insert the plugOinto a power outlet. |
|
|
|
|||
|
|
|
|
|
||||
3 |
|
|
|
|||||
|
|
C |
|
|
|
|
|
|
|
|
|
|
|
|
|
|
|
Getting Started  27
27
Printing Precautions
These cautions apply to Printing from Memory Cards, Printing Favorite Images, Reprinting, Printing from a Camera, Wireless Printing, and Printing from a Computer.
zDo not eject the Easy Photo Pack or open the cartridge cover right after turning the power on or while printing. It may result in equipment damage.
zDuring the printing operation, paper is temporarily output from the printer. Do not touch the paper until printing ends. This could impede printing, or may result in equipment damage.
zDo not allow 50 or more sheets to accumulate in the print output receptacle while printing.
zDo not close the print output receptacle cover when printing. If closed accidentally, press the print output receptacle button to open the cover.
zIf the printer overheats, it will temporarily stop operating. The printer will resume normal printing as soon as it cools down (This will occur if the room is unusually warm or you are printing continuously).
zDo not print on printed paper.
Y P O C
28  Getting Started
Printing from Memory
Cards
|
|
Y |
|
|
Print images from a memory card that is inserted |
||
|
into the printer. |
|
|
|
|
|
|
|
O |
|
|
|
• Make sure that a camera or computer is not connected to the printer. |
|
|
|
• This printer supports image data conforming to the Design rule for Camera File system |
|
|
|
(Exif compliant) and DP F (Ver.1.00) standard. |
|
|
|
• Images that have been editedPon a computer might not be displayed or printed |
|
|
|
C |
|
|
|
successfully. |
|
|
|
• An image that has been taken by a mobile phone, depending on the size of the image |
|
|
|
when the image was taken, might not be displayed or printed successfully. |
|
|
|
• Movies cannot be played back on this printer. |
|
|
Printing from Memory Cards  29
29
Compatible Memory Cards
About Compatible Memory Cards
•Operation with all memory cards listed below cannot be guaranteed.
•Do not add labels or stickers to memory cards. The memory card may get stuck inside the card slot and may not be removed.
•Use a memory card formatted with your camera. Images from a memory card formatted with a computer may not be recognized.
•For memory cards requiring an adapter, be sure to first insert the memory card into the adapter before inserting the adapter into the appropriate card slot. If you insert the memory card into a card slot without first inserting it into an adapter, you may not be able to remove the memory card from the printer.
Slot |
|
Memory Cards |
|
|
SD Memory Card |
|
|
|
miniSD Card |
|
|
|
SDHC Memory Card |
|
|
|
miniSDHC Card |
|
|
|
MultiMediaCard |
|
|
|
MMCplus Card |
|
|
|
HC MMCplus Card |
|
|
|
|
|
|
|
MMCmobile Card |
Y |
|
|
MMCmicro Card |
||
|
O |
|
|
|
RS-MMC Card*1 |
|
|
|
microSD Card |
|
|
|
microSDHCPCard |
||
C |
*2 |
|
|
|
ompactFlash Card |
|
|
|
Microdrive |
|
|
|
|
|
|
|
xD-Picture Card |
|
|
|
|
|
|
Memory Stick
Memory Stick PRO
Memory Stick Duo
Memory Stick PRO Duo
Memory Stick micro
: You need to use the specific adapter for the card. Please purchase the specific adapter.
*1 Reduced-Size MultiMediaCard is referred to as "RS-MMC."
*2 Purchase the CompactFlash Card Adapter for xD-Picture Card.
30  Printing from Memory Cards
 Loading...