


DS700

Photo Printing Guide

Exif Print
This printer supports Exif 2.2 (also called “Exif Print”).
Exif Print is a standard for enhancing the communication between digital cameras and printers. By connecting
to an Exif Print-compliant digital camera, the camera’s image data at the time of shooting is used and
optimized, yielding extremely high quality prints.
International ENERGY STAR
®
Program
As an ENERGY STAR
®
Partner, Canon Inc. has determined that this product meets the ENERGY STAR
guidelines for efficiency.
The International ENERGY STAR
®
Office Equipment Program is a global program that promotes
energy saving through the use of computer and other office equipment.
The program backs the development and dissemination of products with functions that effectively reduce
energy consumption. It is an open system in which business can participate voluntarily. The targeted products
are office equipment such as computers, monitors, printers, faxes and copiers.
Their standards and logos are uniform among participating nations.
Power Requirements
Never use a power supply voltage other than that supplied in the country of purchase. Using the incorrect
voltage could cause a fire or electric shock. The correct power supply voltages and frequencies are as follows:
AC 110-120 V, 50/60 Hz
AC 220-240 V, 50/60 Hz
Trademark No tices
• Canon is a registered trademark of Canon Inc.
• BJ and SELPHY are trademarks of Canon Inc.
•Microsoft
®
and Windows
®
are registered trademarks of Microsoft Corporation in the U.S. and other
countries.
• Apple, Mac, Macintosh are trademarks of Apple Computer, Inc., registered in the U.S. and other countries.
• Compact Flash is a trademark of SanDisk Corp.
• Microdrive is a trademark of IBM Corp.
• Memory Stick, MagicGate Memory Stick, Memory Stick PRO and Memory Stick Duo are trademarks of Sony
Corp.
• SD (Secure Digital) Memory Card is a trademark of Toshiba Corp., Matsushita Electric Industrial Co., Ltd,.
and SanDisk Corp.
• miniSD Card is a trademark of SD Association.
• MultiMediaCard is a trademark of Infineon Technologies AG.
• SmartMedia is a trademark of Toshiba Corp.
• xD-Picture Card is a trademark of Fuji Photo Film Co., Ltd.
• All other trademarks and registered trademarks appearing in this Quick Start Guide are the property of their
respective owners.
Copyright
©
2004 CANON INC.
All rights reserved. No part of this publication may be transmitted or copied in any form whatsoever without the
express written permission.

1
Contents
Easy Setup Instructions.................................................................................. 3
Unpack the Printer ........................................................................................................3
Preparing the Printer.....................................................................................................4
Installing the Print Head ...............................................................................................5
Installing an Ink Tank....................................................................................................6
Printer Parts and Their Function......................................................................7
Printer ..........................................................................................................................7
Buttons on the Remote Control......................................................................................8
Menu Screen...............................................................................................................11
Preparation When Using the Printer with the TV............................................13
Displaying a Photo on TV.............................................................................................13
Using a Memory Card..................................................................................................15
Loading Paper.............................................................................................................18
Enjoy Photos on TV and Printing —Basic— ...................................................21
Viewing and Printing from the TV Overview .................................................................21
Enjoy Photos on TV and Printing —Advanced—.............................................26
Selecting Various Print Option—Print Studio—............................................................26
Handy Functions and Settings.....................................................................................33
Printing Photographs Directly from a Digital Camera ....................................39
Connecting to a Digital Camera ...................................................................................39
Direct Printing from PictBridge-compatible Digital Cameras ........................................41
Printing Photographs Directly from a Canon Bubble Jet Direct Compatible
Digital Camera ............................................................................................................43
Printing Photos with Infrared Compatible Mobile Phones .............................44
Requirements for Infrared Communication with the Mobile Phone...............................44
Setting the Media Type, Page Size, and Layout............................................................44
Performing Infrared Printing........................................................................................46
Printing with the computer...........................................................................49
Installing the Printer Driver .........................................................................................49
How to View the User’s Guide......................................................................................54
Printing Maintenance...................................................................................55
When Printing Becomes Faint or Colors are Incorrect...................................................55
Replacing an Ink Tank .................................................................................................60

2
Introduction
This Photo Printing Guide uses the following symbols to indicate important information.
Always observe the instructions indicated by these symbols.
Instructions that, if ignored, could result in death or serious personal injury
caused by incorrect operation of the equipment. These must be observed for
safe operation.
Instructions that, if ignored, could result in personal injury or material damage
caused by incorrect operation of the equipment. These must be observed for
safe operation.
Also read the Safety Precautions. Observe the warnings and cautions to avoid
personal injury or damage to the printer.
Troubleshooting........................................................................................... 64
Nothing is Displayed on TV/Image is Poor ...................................................................64
The Remote Control is not Working..............................................................................65
A Message is Displayed on TV .....................................................................................65
Handling Error Messages ............................................................................................67
Paper Does Not Feed Properly .....................................................................................68
Printing is Blurred/Colors are Wrong/White Streaks appear........................................69
Printed Surface is Scratched or Ink Blots.....................................................................70
Printer Does Not Start or Printer Stops During Print Jobs .............................................72
Cannot Print Properly from the Digital Camera.............................................................73
Cannot Install the Printer Driver ..................................................................................75
Appendix ..................................................................................................... 76
Specifications.............................................................................................................76
Safety Precautions......................................................................................................78
Regulatory Information ...............................................................................................80
Easy Setup Instructions
3
Easy Setup Instructions
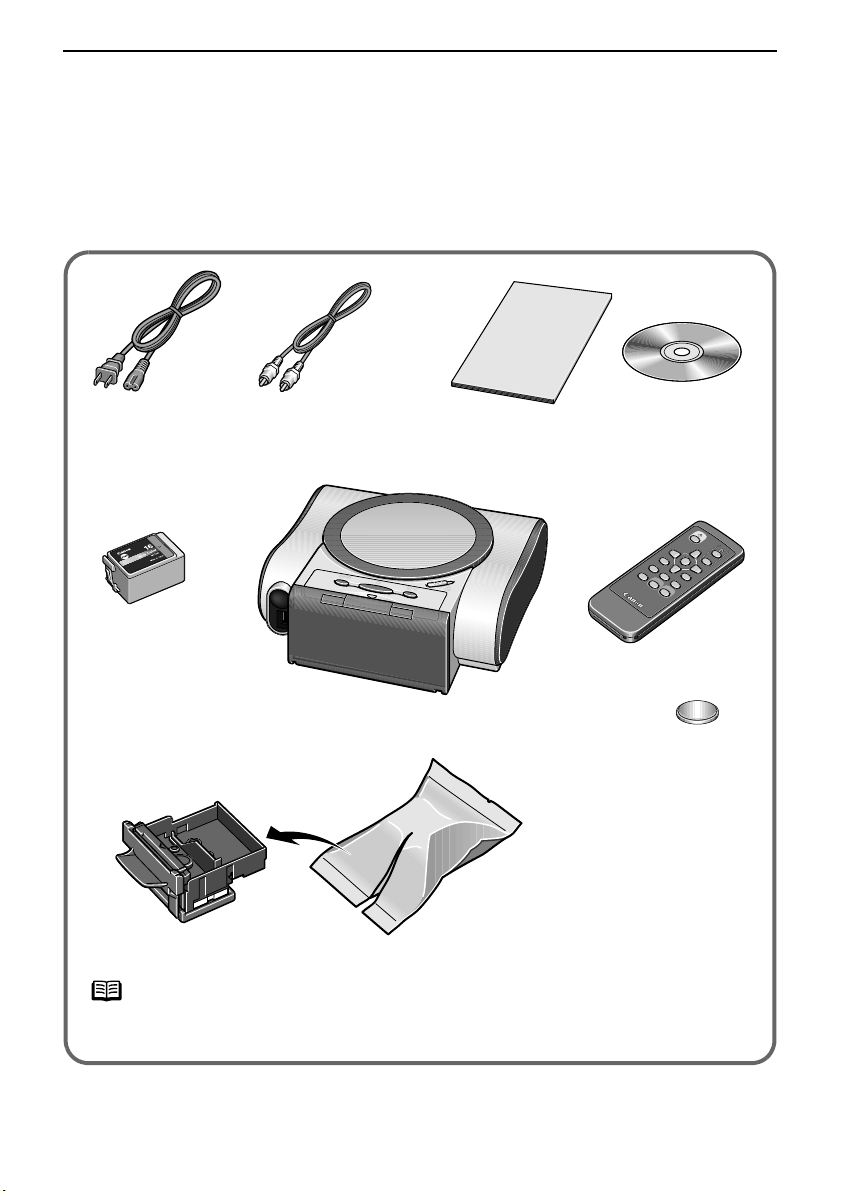
Unpack the Printer
Check that all the following items are in the box. If anything is missing or is
damaged, contact a Canon service representative.
note
See “Using the Remote Control” on page 9 for instructions on setting the lithium coin
cell battery in the remote control.
Documentation and Setup Software &
User’s Guide CD-ROM
Print Head
Power Cord
Ink Tank
BCI-16 Color
Lithium coin
cell battery
Remote Control
Video Cable (RCA)
Printer
Easy Setup Instructions
4
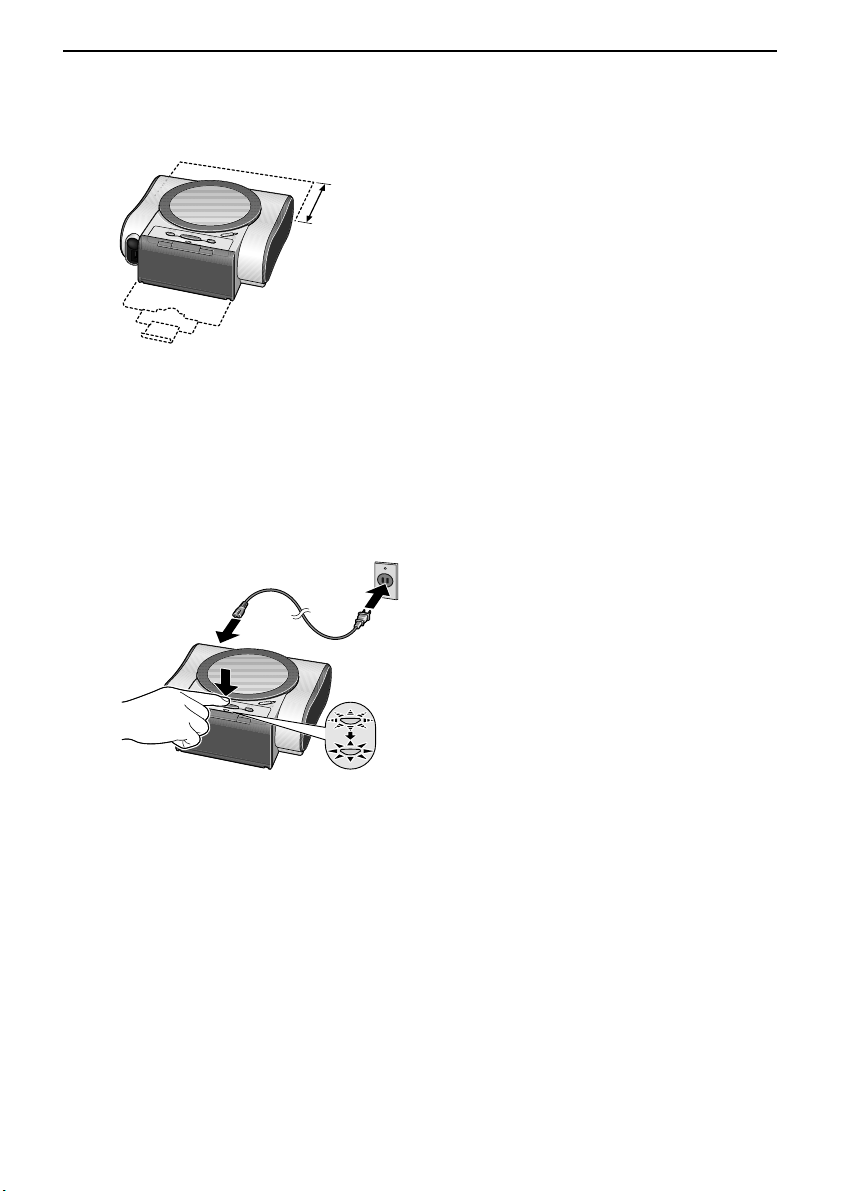
Preparing the Printer
1
Place the printer on a flat surface.
2
Remove the tape from the printer.
The tape position is subject to change.
3
Plug the power cord into the back of the printer and connect the other
end to a power outlet.
4
Press the POWER button. The printer will initialize.
Warning
• Never attempt to plug the power cord into the power outlet or unplug the power
cord when your hands are wet.
• Never damage, modify, stretch, or excessively bend or twist the power cord. Do not
place heavy objects on the power cord.
• Never use any power supply other than the standard power supply available in the
country of purchase. Using the incorrect voltage and frequency could cause a fire or
electric shock.
• Always push the plug all the way into the power outlet.
Important
* During printing, part of the sheet is ejected
from the back of the printer.
Leave at least 8cm (3.1in), clear space at the
back of the printer.
*

Easy Setup Instructions
5
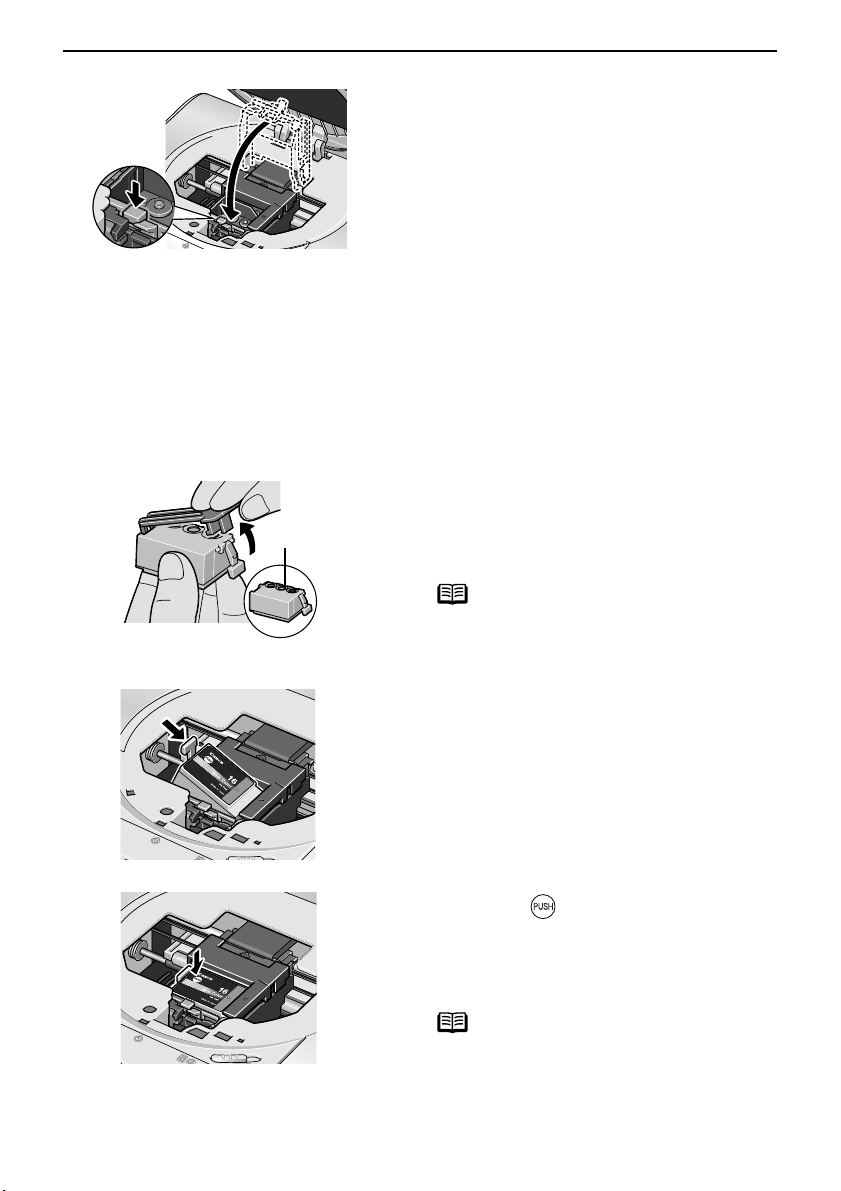
Installing the Print Head
1
Slide the cover open switch toward
the right to open the cover.
The print head holder moves to the
center.
2
Press the lock button, then raise
the lock lever.
Do not touch internal parts other than
the lock lever.
print head nozzles
3
Remove the protective cap from the
print head.
note
• Do not touch the print head nozzles.
• Do not attempt to reattach the
protective cap once it has been
removed.
4
Place the print head in the holder.
print head
print head holder
Easy Setup Instructions
6
Installing an Ink Tank
Caution
• For safety reasons, store an ink tank out of the reach of small children.
• Do not drop or shake an ink tank as this may cause the ink to leak out and stain your
clothes and hands.
5
Lock the print head into place by
lowering the lever.
Press down the lock button until it
clicks.
Do not touch the lock lever once the
print head has been installed.
1
Take out the ink tank.
2
Hold the ink tank as shown in the
diagram and remove the protective
cap.
note
• Do not touch the ink port.
• Do not attempt to reattach the protective
cap once it has been removed.
Ink ports
3
Insert the ink tank slant into the
slot aligning the
X
mark with the
W
mark.
4
Press the until it clicks into
place.
5
Close the cover.
note
Wait until the preparatory operation is
complete: it takes about 80 seconds.
Printer Parts and Their Function
7
Printer Parts and Their Function
This section describes the components of the printer, the remote control and the
menus displayed when using the printer with a TV.
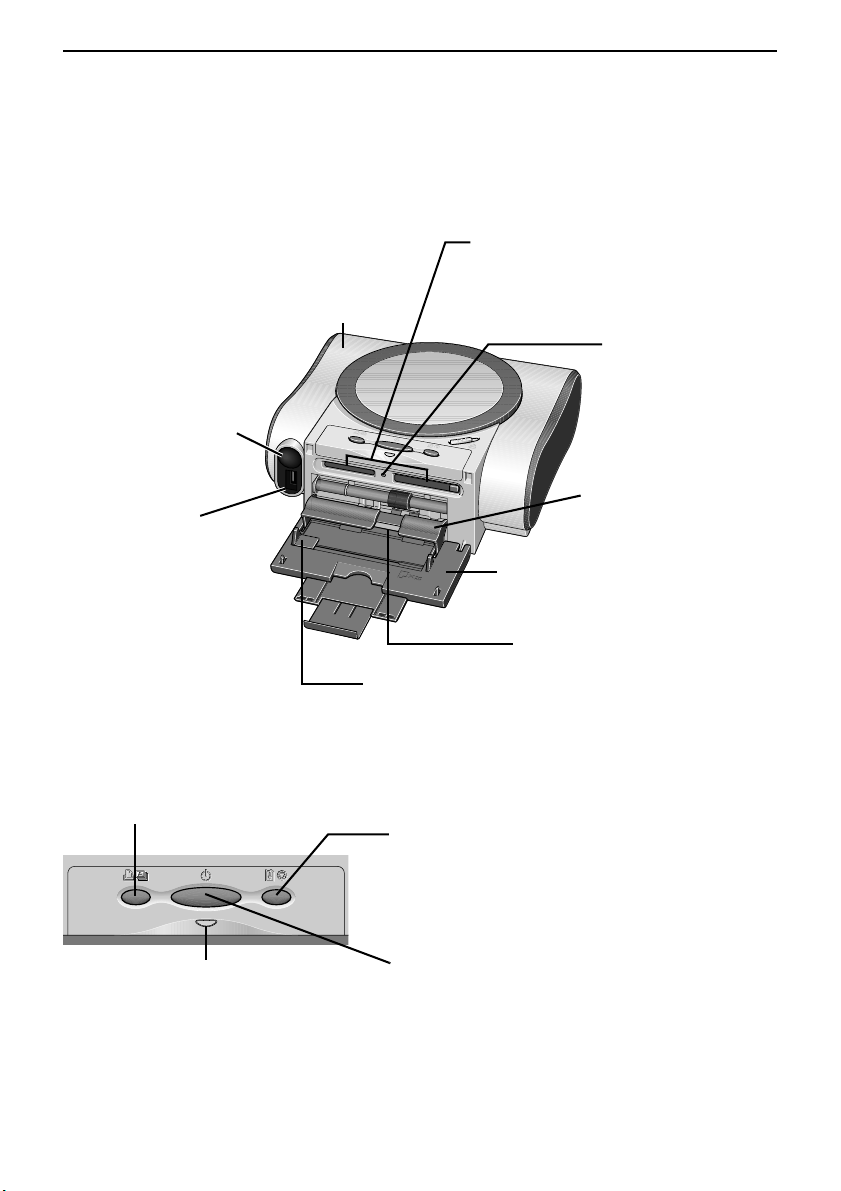
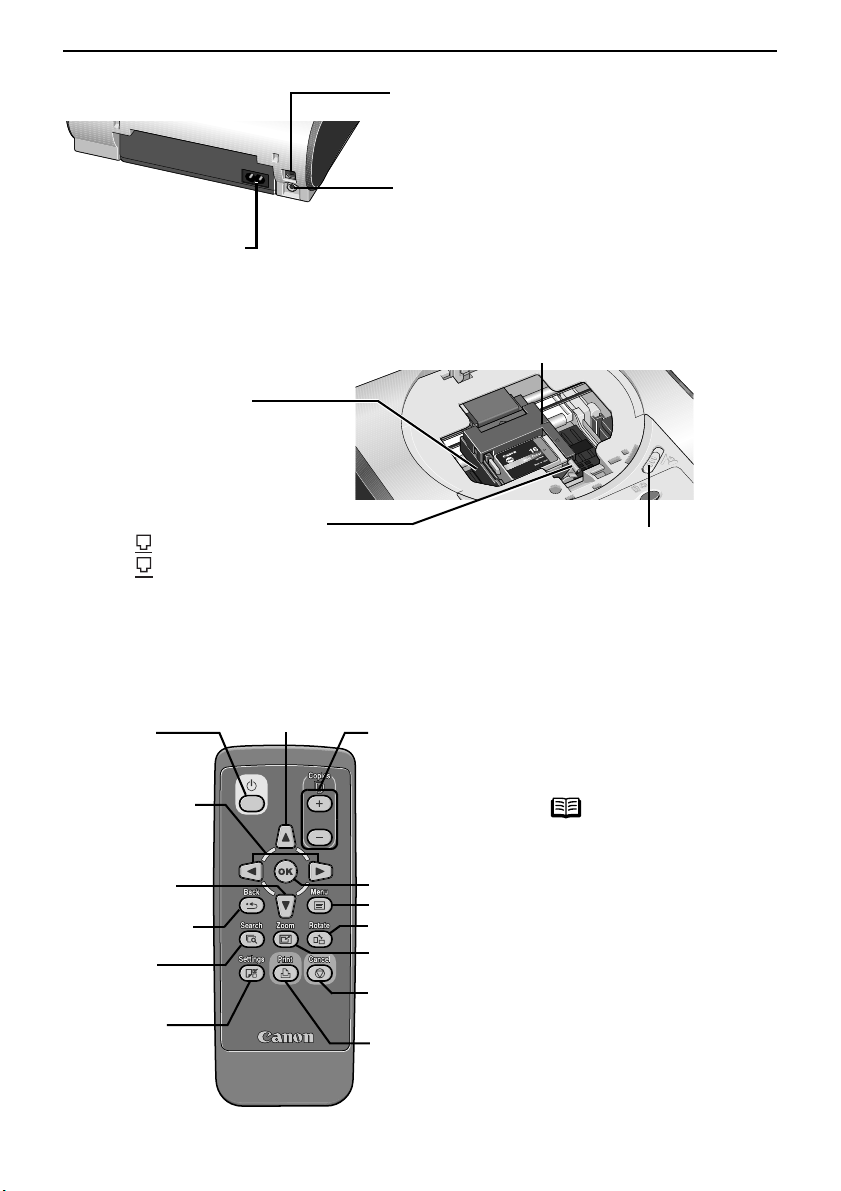
Printer
Cover
Open to replace the
ink tank or remove
jammed paper.
Front View
Paper Support
Open and pull out before printing to
support paper.
Paper Guide
When loading paper, ensure that the left edge
just touches this guide.
Paper Output Tray
The printed paper will
be ejected.
Card Slot
Set the memory card from a digital
camera here. For instructions, See
“Using a Memory Card” on page 15.
Indicator Lamp
This lamp will turn
on when the memory
card is set. It will
blink while reading
or writing from the
card.
Remote control receiver/
Infrared port
Receives the button
signal from the remote
control or data sent from
the mobile phone via
infrared communication.
Direct Print Port
Connects the printer to a
digital camera or digital
video camcorder. For
instructions, See
“Printing Photographs
Directly from a Digital
Camera” on page 39.
Operation Panel
Print All Button
Prints each of all photos.
See “How to Print All Photos without Connecting to TV” on page 30.
POWER Lamp
Off: the printer is turned off.
Green: the printer is ready to print.
Flashing green: the printer is preparing to print, or is currently printing.
Flashing orange: an error has occurred and the printer is not ready to print.
Flashing orange and green alternately: an error has occurred
that may require a service call.
RESUME/CANCEL Button
Press to resume printing once an error has
been resolved. The printer will then initialize
ready for printing.
Also, to cancel printing in progress, press
this button.
POWER Button
Press to turn the printer on or off.
Auto Sheet Feeder
Load paper here.
Printer Parts and Their Function
8
Buttons on the Remote Control
The Function of Buttons on the Remote Control
Rear V
i
ew
USB Port
Connects the printer to a computer through a
USB interface.
Video Out Terminal
Connects the printer to TV via the supplied
video cable.
Power Cord Connection
Connector used to connect
the supplied power cord.
Cover open switch
Slide it toward the right to
open the cover.
Inside the Printer
Print Head Lock Lever
Locks the print head into the holder.
Once the print head is installed,
do not touch this lever.
Paper Thickness Lever
Move to the right when printing.
Move to the left if ink smudges or the printed
surface is stained.
See “Inappropriate paper type used” on page 70.
Print Head Holder
Install the print head here.
(1) Power
Button
(6) Copies [+][–]
Buttons
(2) WXButtons
(7) OK Button
(3) Back Button
(4) Search
Button
(9) Rotate Button
(5) Settings
Button
(10) Zoom Button
(11) Cancel Button
(12) Print Button
(2) S Button
(2) T Button
(8) Menu Button
(1) Power Button
Press to turn the printer on
or off.
note
Works as the POWER button
on the printer.
(2) WXST Buttons
Press to select an item in
menus or options, or print
settings.
(3) Back Button
Allows you to return to the
previous step.
Printer Parts and Their Function
9
Using the Remote Control
(
4
)S
earc
h
B
utton
Looks up target photos in the memory card
using the shooting date as the search key.
See “Searching for Photos with the Shooting
Date—Search” on page 35.
(5) Settings Button
Allows you to set the Paper Size, Paper Type,
Bordered/Borderless printing, printing with
the date, etc. See “Specifying the Paper and
Other Settings” on page 33.
(6) Copies [+][–] Buttons
Specifies the number of copies to print in
such as the print confirmation screen.
(7) OK Button
Allows you to make a selection. For example,
selecting a photo to be printed, selecting a
menu item or other setting.
(8) Menu Button
Displays menu options on TV.
(9) R
otate
B
utton
Rotates the photo displayed on TV 90
degrees.
This button is effective even if you are
displaying a slide show, or zooming a photo.
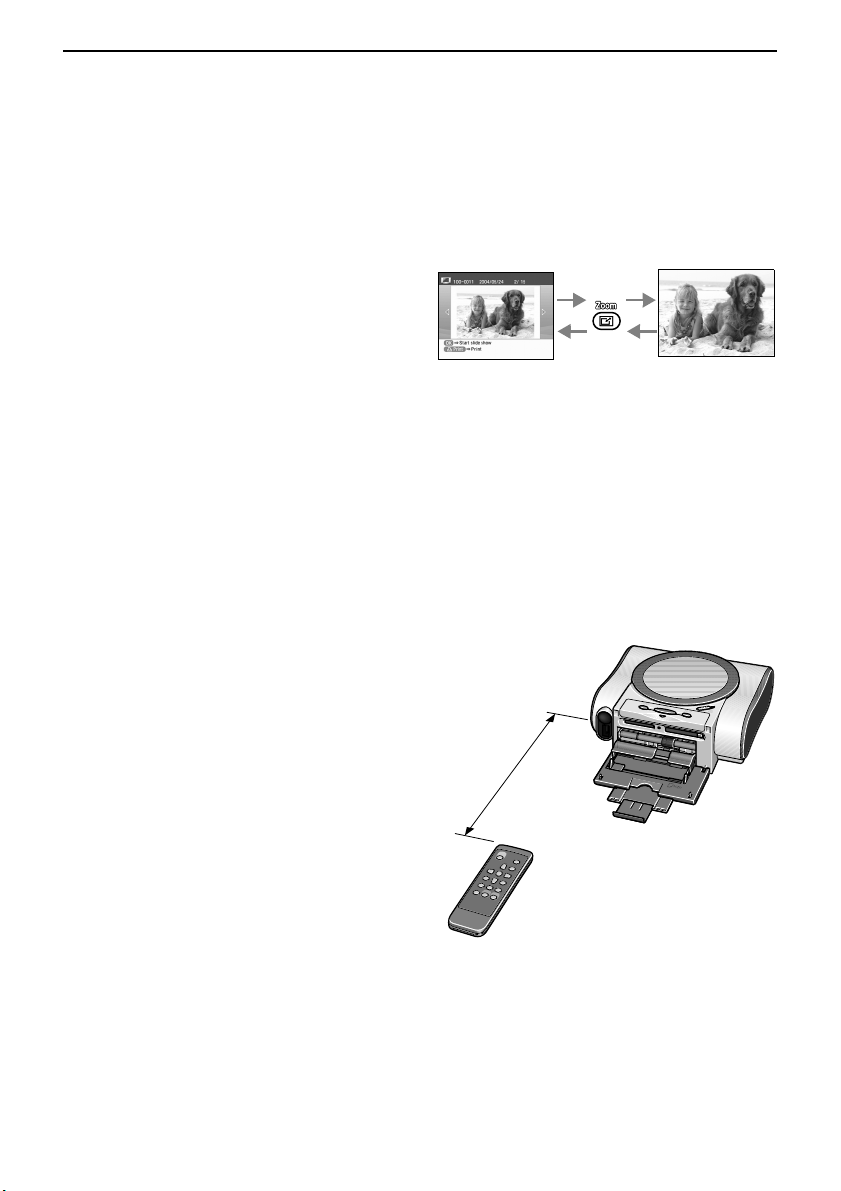
(10) Zoom Button
Press to enlarge or reduce the photo being
displayed.
(11) Cancel Button
Press to cancel the settings you have made.
If this button is pressed during printing, the
printer aborts printing.
(12) Print Button
Press to start printing according to the
settings displayed on TV.
Operating the Remote Control
When you operate the remote control,
make sure of the following:
• Use the remote control within a
distance of approximately 13.1 feet/
4 m from the remote control receiver
on the printer.
• Use the remote control within an angle
of 30 degrees from right to left or up
and down, aiming at the remote control
receiver on the printer.
13.1 feet/
4 m
Printer Parts and Their Function
10
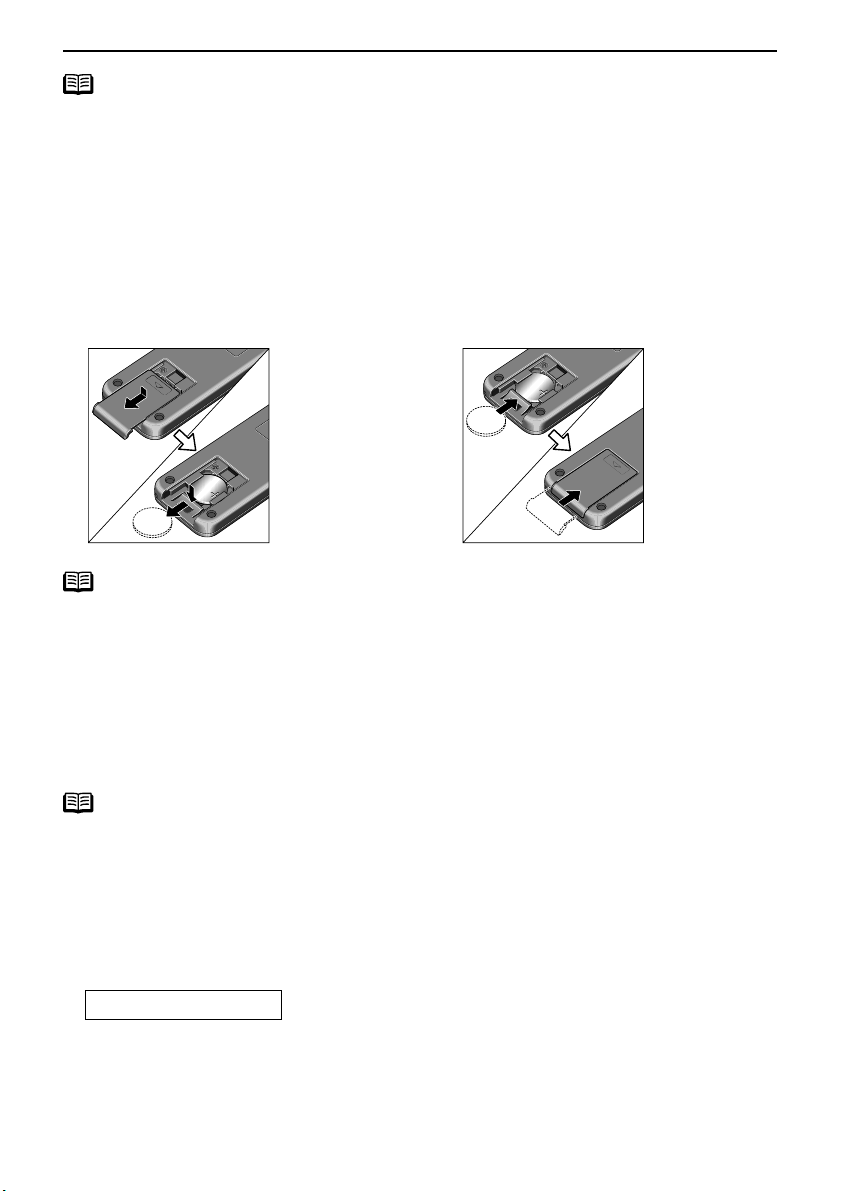
note
Setting or Replacing the Battery
Set the battery in the remote control first.
Replace the battery in the remote control when the remote control becomes inoperative or its
effective range becomes shorter.
The lithium coin cell battery CR2025 is available for this remote control. Purchase the
commercial battery for replacement.
note
Using the Remote Control
• The remote control may operate improperly if strong light such as sunlight or inverted
fluorescent light hits the remote control receiver.
Keep the remote control away more than 19.69inch/50cm from inverted fluorescent light.
• Do not drop or apply strong impact on the remote control.
• Keep out of direct sunlight, high temperature, and fire.
• Do not disassemble or modify the remote control.
• Do not handle the remote control with wet hands.
note
Using a Battery
• The lithium coin cell battery CR2025 is available for this remote control.
• Do not use other types of battery.
• Place the battery with its positive (+) ends facing up. Never place the battery with its
negative (–) end facing up.
• Remove the battery from the remote control if it will not be used for a long period of time.
• See “Safety Precautions” on page 78 for additional cautions.
1 Remove the cover from the back of the
remote control.
2 Push down the battery stopper tab and
remove the battery from the remote
control.
3 Replace the new battery with its positive
(+) ends facing up.
4 Replace the cover.
CLASS1 LED PRODUCT
Printer Parts and Their Function
11
Menu Screen
The following menu can be selected when a memory card is inserted in the memory
card slot and the printer and the TV are connected.
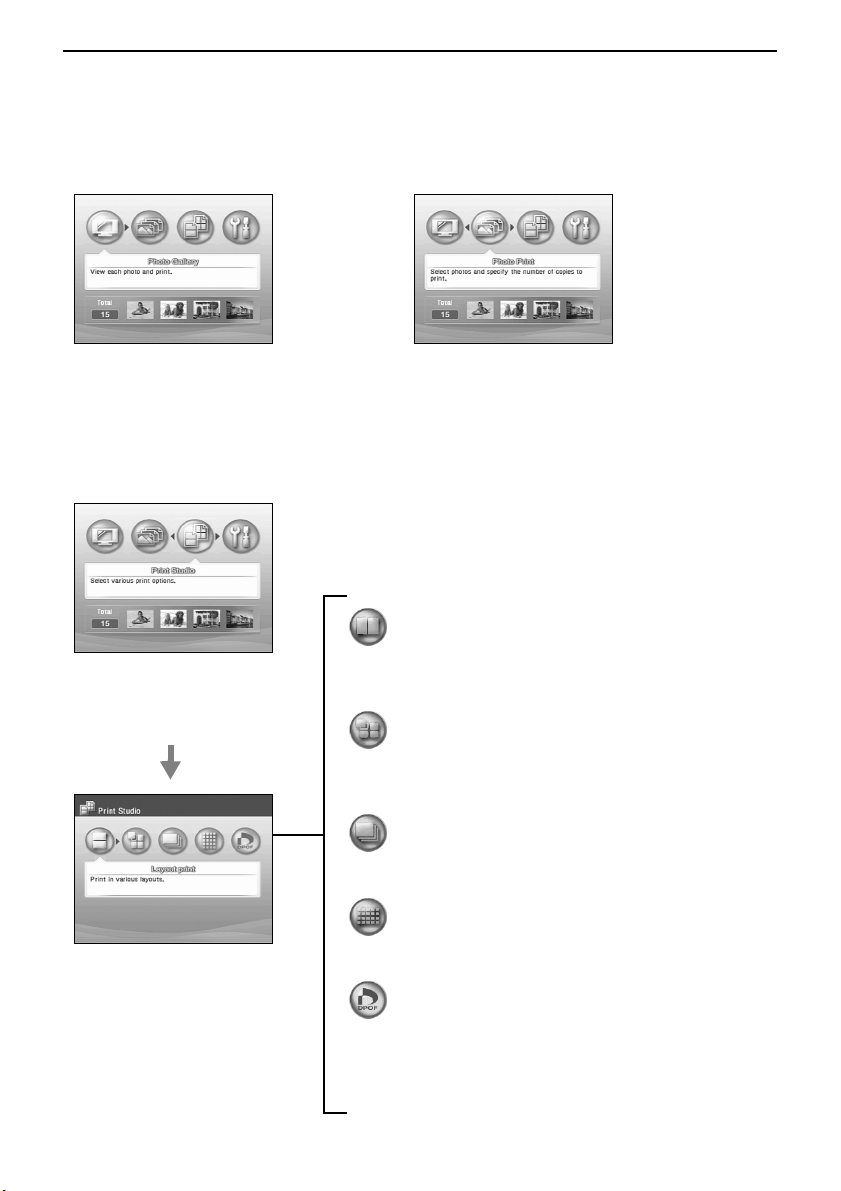
You can select the following functions in each menu.
Photo Gallery
View each photo and print.
You can automatically display photos (slide
show) on the full TV screen.
See “Viewing Each Photo on TV and
Printing—Photo Gallery” on page 21.
Photo Print
Select photos and specify the number of copies
to print.
See “Specifying the number of copies to print
for each photo —Photo Print” on page 24.
Print Studio
Select to display
the following menus.
Layout print
Prints the specified photo in the specified layout
(Borderless or Bordered ×2/×4/×8/half).
See “Specifying the Layout” on page 26.
Sticker print
Prints stickers from a favorite photo.
See “Printing Stickers from a Favorite Photo” on
page 28.
Print all
Prints all photos.
See “Printing All Photos” on page 30.
Print index
Prints an index of all photos.
See “Printing a Photo List—Print Index” on page 31.
DPOF print
Prints according to the DPOF settings, if
available.
See “Printing According to the settings Made on
the Camera —DPOF Printing” on page 32.
Printer Parts and Their Function
12
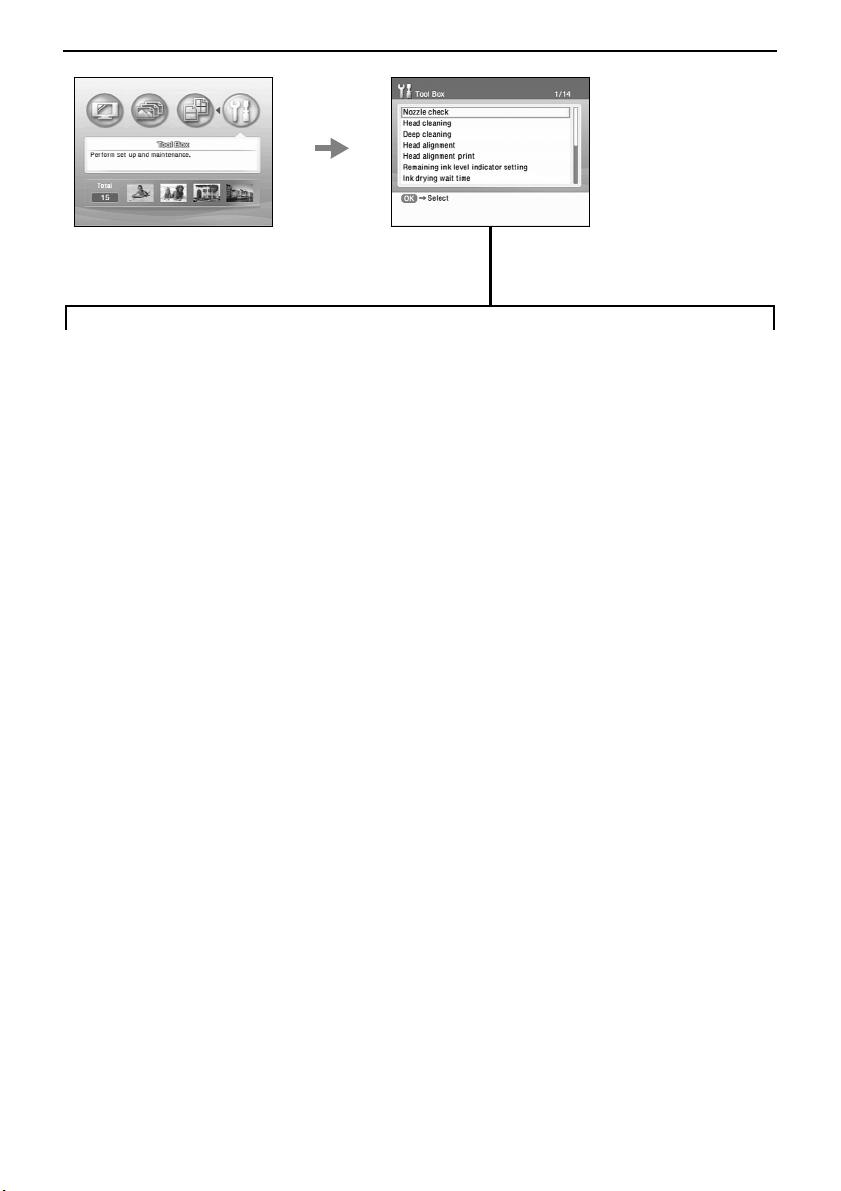
Tool Box
Displays the following menus.
Nozzle check
Prints a nozzle check pattern to ensure that
ink is output correctly.
See “Printing the Nozzle Check Pattern” on
page 56.
Head cleaning
Cleans the print head when nozzles are
clogged.
See “Print Head Cleaning” on page 57.
Deep cleaning
If print quality does not improve after
standard head cleaning, use Deep Cleaning.
See “Print Head Deep Cleaning” on page 58.
Head alignment
Align the print head.
See “Aligning the Print Head” on page 59.
Head alignment print
Prints the current settings of the print head
position.
See “Printing the current setting of the print
head position” on page 60.
Remaining ink level indicator setting
Specifies whether to display the remaining
ink level in the print confirmation screen.
See “Accompanied by ink tank icon with '?'”
on page 66.
Ink drying wait time
Sets time to dry ink on the printing surface.
Set longer time in case print surface
becomes dirty.
See “Sets time to dry ink on the printing
surface.” on page 71.
Ink counter reset
Resets the ink counter so that it is correctly
synchronized with the actual ink level when
the ink tank is replaced.
See “Resetting the Ink Counter” on page 62.
Date display format
Changes the format of date printing.
See “Setting the Date Display Format” on
page 36.
Color adjust
Adjusts the brightness, contrast and color
hue of the photo at printing.
See “When the color is different from what
is displayed on the TV or when it is not
printed with your favorite color” on page 69.
Display photo received via infrared
Specifies whether to display a photo on TV
when it is sent from a mobile phone via the
infrared communication.
See “Printing a Photo by Displaying it on TV”
on page 47.
Infrared print
Selects media type and layout when you
print a photo sent from a mobile phone via
the infrared communication.
See “Setting the Media Type, Page Size, and
Layout” on page 44.
Reset
Returns the settings other than languages
and the print head position to the factory
settings.
See “Resetting All Settings” on page 38.
Languages
Sets the language displayed on TV.
See “Changing the Language Displayed” on
page 37.
Preparation When Using the Printer with the TV
13
Preparation When Using the Printer
with the TV
Displaying a Photo on TV
This section describes the method to connect the printer to the TV with the attached
video cable (RCA) and to turn on/off the printer and TV.
Connecting to TV
1
Check the following before connecting the printer to the TV.
• Both the printer and the TV are turned off.
• A battery is installed in the remote control.
See “Using the Remote Control” on page 9.
• Print head and ink tank are installed in the printer.
See “Easy Setup Instructions” on page 3.
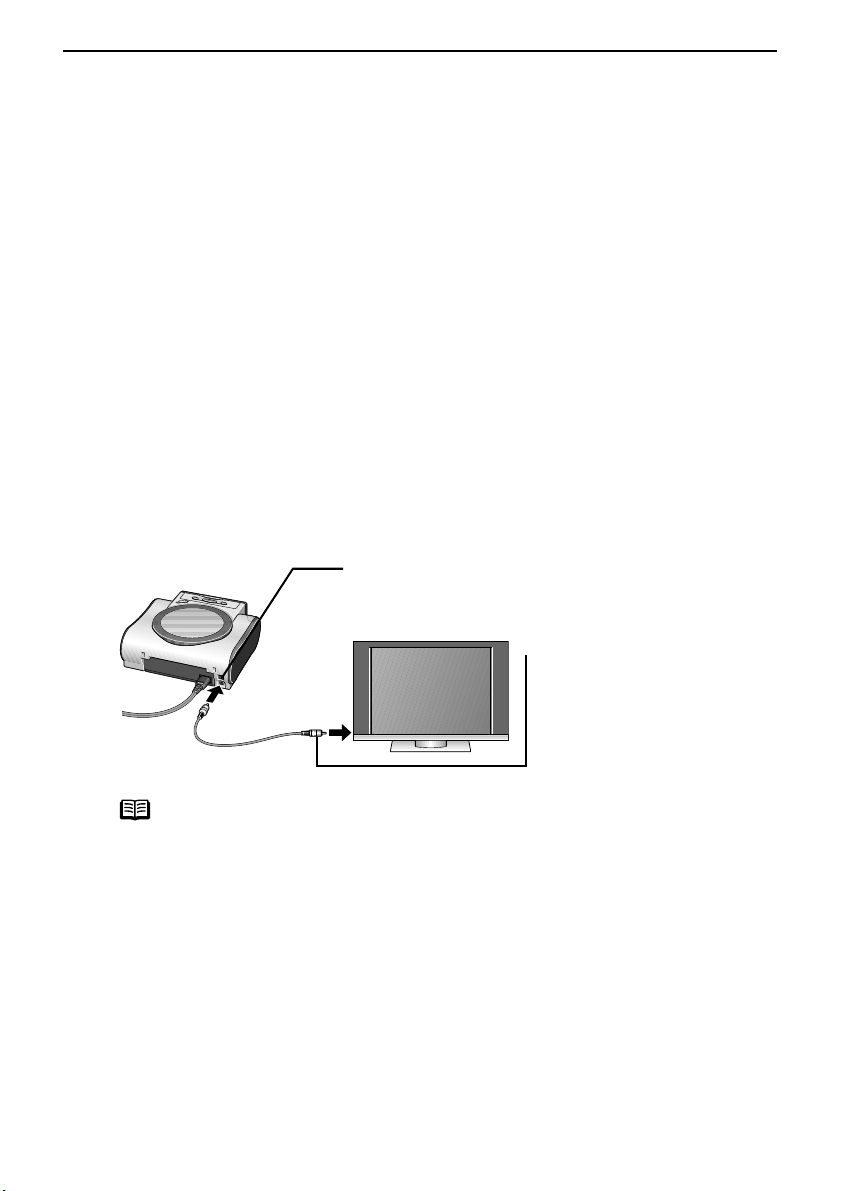
2
Connect TV to the printer
.
note
See the TV manual for the location of the video input terminal and the instruction on
selecting the video input.
(1) Ensure that the printer is turned off and connect the
attached video cable to the video out terminal
(2) Ensure that the TV is turned
off and connect the
attached video cable to the
video input terminal.
Preparation When Using the Printer with the TV
14
Turning on TV and the Printer for Displaying the Menu Screen
Follow the procedure below to turn on TV and the printer.
1
Connect to TV.
See “Connect TV to the printer.” on page 13.
2
Turn on TV and the printer.
(1) Turn on TV.
(2) Press the POWER button.
The POWER lamp flashes while the printer warms
up and changes to steady (non-flashing) green
when the printer is ready.
(3) Select the video input mode.
The menu screen appears on the TV screen.
See “Viewing Each Photo on TV and Printing—Photo Gallery” on page 21 for the
instruction on selecting among menus and displaying a photo stored in a memory card.
Turning off TV and the printer
Follow the procedure below to turn off TV and the printer.
1
Check the following before turning off TV and the printer.
• The Indicator lamp of the memory card is not flashing.
* Data in the memory card may be damaged if you remove the memory
card or turn off the printer when the Indicator lamp is flashing.
• The POWER lamp is not flashing in green.
• The printer is not printing.
2
Turn off TV and the printer.
(1) Turn off the printer by pressing the POWER button.
(2) Turn TV off.
(3) Unplug the connected video cable.
* Unplug the video cable after turning off TV and the printer.
note
• You can turn the printer on by pressing the POWER button on the remote control.
• If the POWER lamp changes to orange and begins flashing, refer to the section
“Handling Error Messages” on page 67.
note
• You can also turn off the printer by pressing
the POWER button on the remote control.
• Before unplugging the power cord, turn off
the printer and ensure that the green lamp
has gone out.
Preparation When Using the Printer with the TV
15
Using a Memory Card
Let's take a look at different types of memory cards and how to insert and remove
them.
Memory Cards Supported by this printer
Supported memory cards are as follows:
Important
• This printer supports JPEG (DCF/CIFF/Exif 2.21 or earlier/JFIF), TIFF (Exif compliant),
and DPOF (Ver. 1.00 compliant).
• Photos stored in a memory card not supported by the digital camera may fail in
loading or be damaged. For types of memory cards supported by the digital camera,
refer to your digital camera user’s manual.
• Use the digital camera to format a memory card. Memory card data formats may not
be compatible with computer-specific formats.
• Images edited on the computer may result in improper printing.
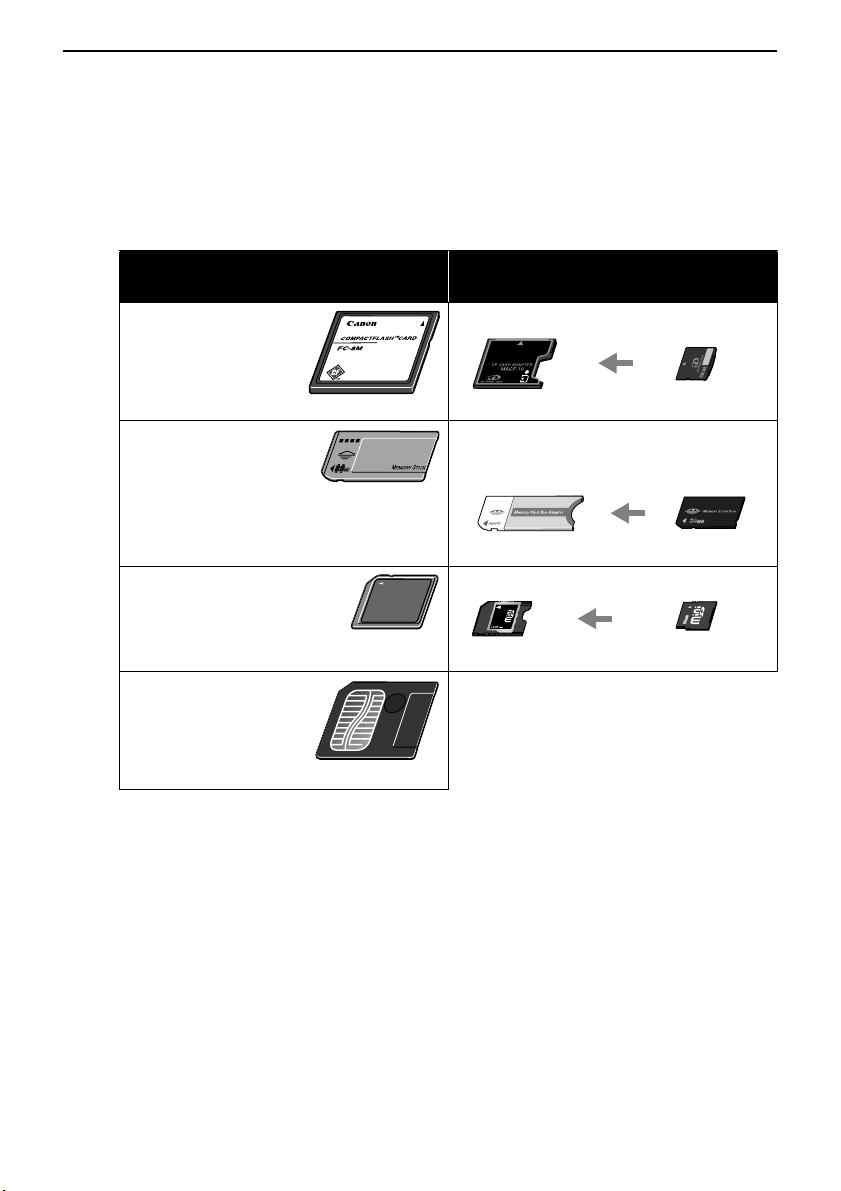
Memory Cards which can be inserted
directly
Memory Cards which can be used
through a special adapter
• CompactFlash (CF)
card
• Microdrive
* Supports TYPE I/
TYPE II (3.3V)
• xD-Picture Card
•Memory Stick
• Memory Stick PRO
• MagicGate Memory
Stick
•Memory Stick Duo
•Memory Stick PRO Duo
• MagicGate Memory Stick Duo
• SD Memory Card
•Multimedia Card
• miniSD Card
• SmartMedia
* Supports 3.3V
card only (1 MB
and 2 MB cards
not supported)
*1
Purchase the Compact Flash Card Adapter for
xD-Picture Card separately.
*2
Use the special adapter supplied with the
card.
*1
*2
*2
Preparation When Using the Printer with the TV
16
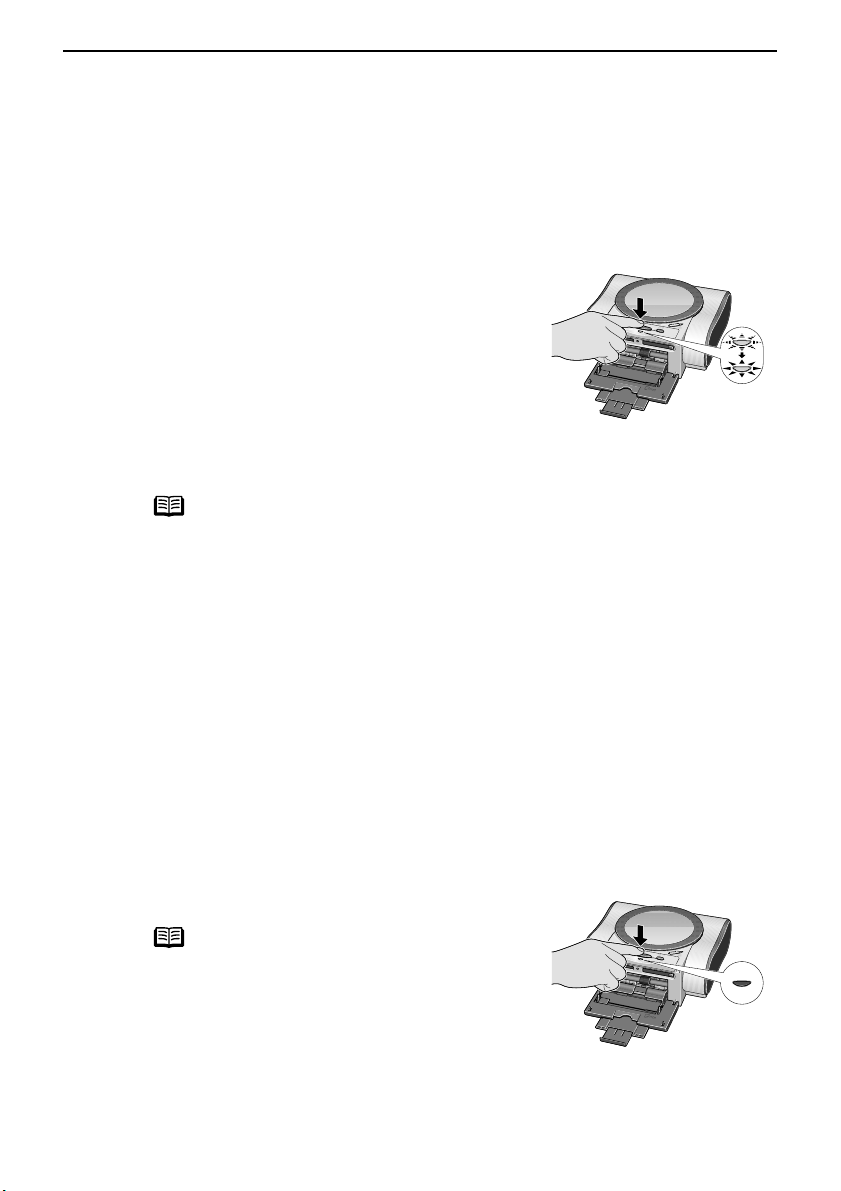
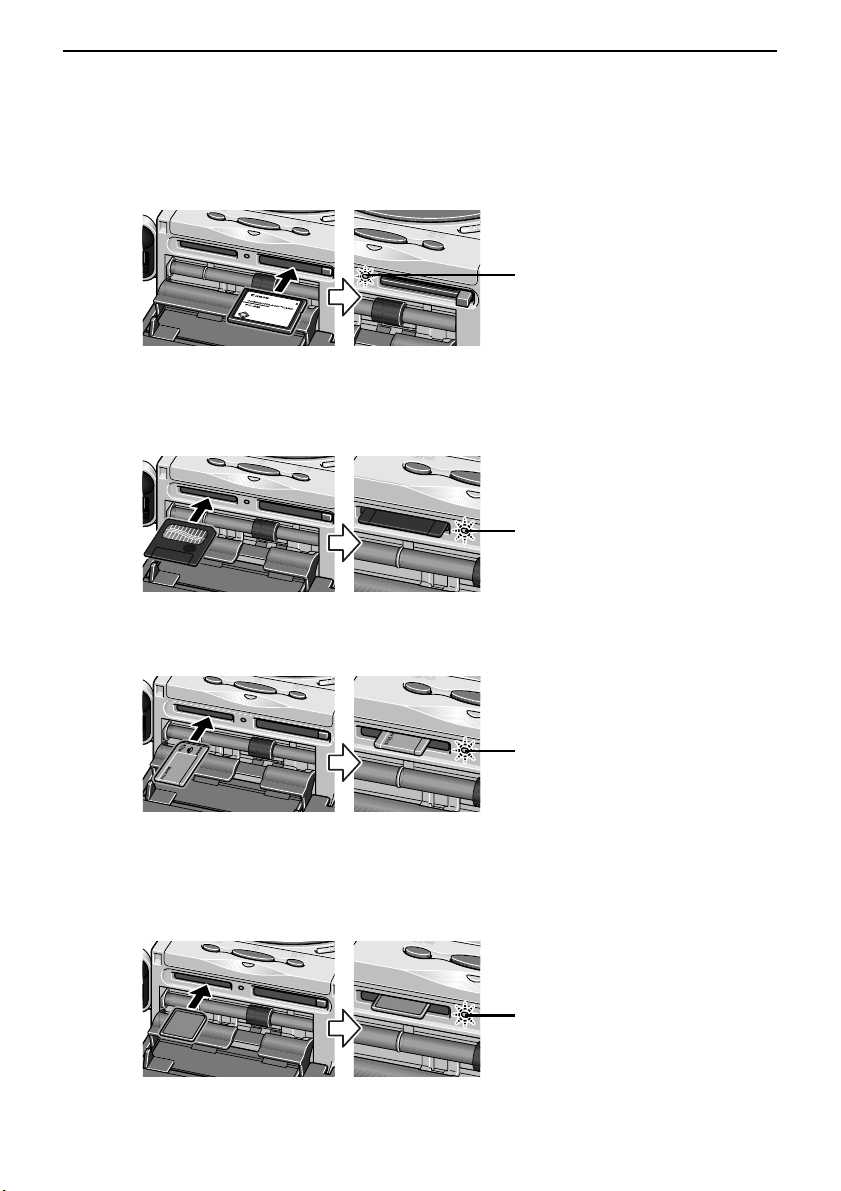
Inserting a Memory Card
Important
Insert only a single type of memory card.
• If you use a Compact Flash (CF) card or Microdrive
Insert it as far as it will go into the slot on the right as shown.
* For xD-Picture Card, use the compliant adapter.
• If you use a SmartMedia card
Insert it into the slot on the upper left until it stops with its end projecting
as shown.
• If you use a Memory Stick/Memory Stick PRO/Magic Gate Memory Stick
Insert it into the slot on the lower left until it stops with its end projecting
as shown.
* For Memory Stick Duo/Memory Stick PRO Duo/MagicGate Memory Stick Duo, use
the special adapter.
• If you use an SD card or Multimedia card
Insert it into the slot on the lower left until it stops with its end projecting
as shown.
* For a miniSD Card, use the special adapter.
Turn on
Turn on
Turn on
Turn on
Preparation When Using the Printer with the TV
17
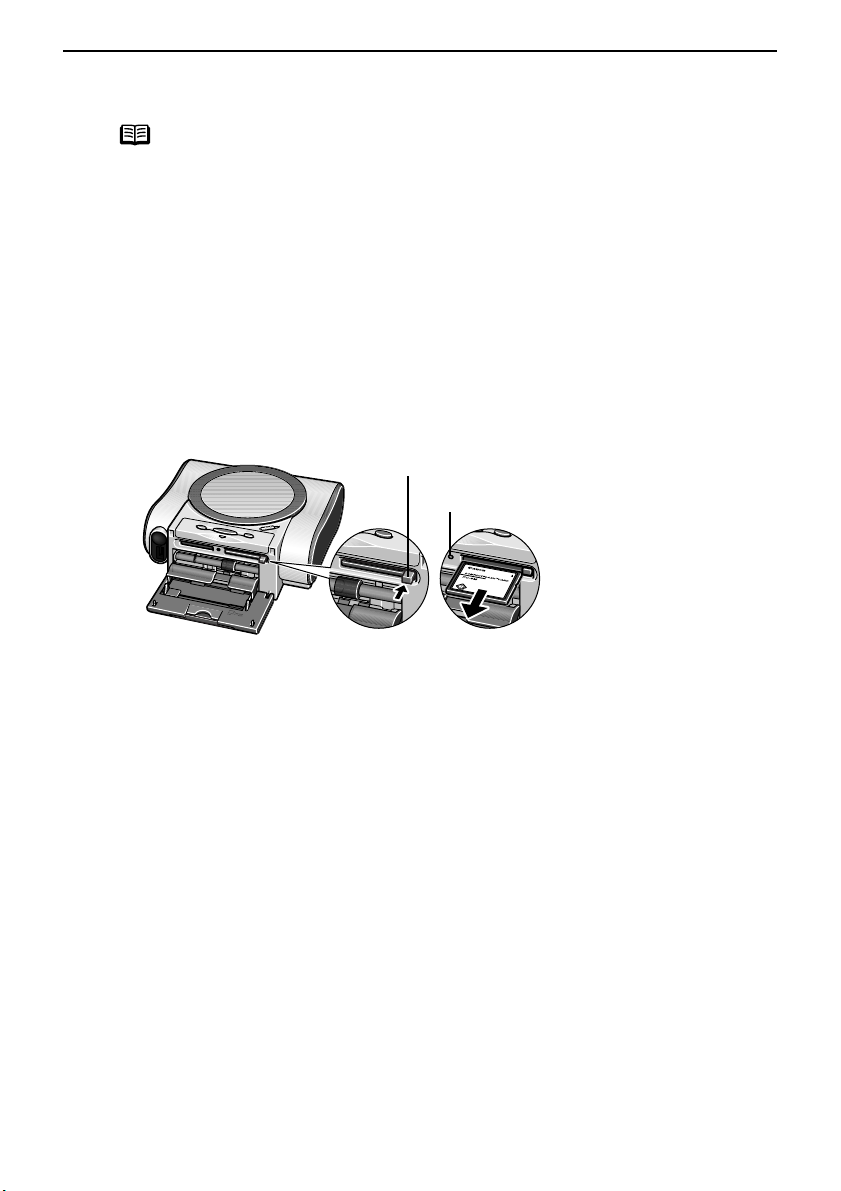
Removing a Memory Card
note
If you use the printer connected to your computer, follow the instructions for removal
of the memory card from the computer. For the procedure, refer to the on-screen User’s
Guide.
1
Ensure that the Indicator lamp is not flashing, then remove the memory
card.
Important
Removing the memory card or turning off the printer while the Indicator lamp is
flashing can damage the data stored in the memory card.
• If you use CompactFlash (CF) card/Microdrive/xD-Picture card
Ensure that the Indicator lamp is not flashing, then press the card eject
button to remove the memory card.
• If you use other cards
Ensure that the Indicator lamp is not flashing, then hold the exposed
portion of the memory card with your fingers to remove the memory card.
Card eject button
Indicator lamp
Preparation When Using the Printer with the TV
18
Loading Paper
Print Media to Avoid
Do not use the following types of paper. Using such paper will not only
produce unsatisfactory results, but can also cause the printer to jam or
malfunction.
• Folded, curled or wrinkled paper
• Damp paper
• Paper that is too thin (less than 64 gsm or 17 lb)
• Paper that is too thick* (more than 105 gsm or 28 lb)
* non-Canon branded paper
•Picture postcards
• Postcards with an affixed photo or sticker
Loading the Print Media
note
Refer to “Media Types for Card Direct Printing” on page 20 for compatible paper.
1
Turn on the printer.
(1) Press the POWER button.
2
Flatten the four corners of the paper before loading it.
note
If paper is curled, gently bend the corners in the opposite direction until the paper
becomes completely flat.
(2) Open the paper support.

Preparation When Using the Printer with the TV
19
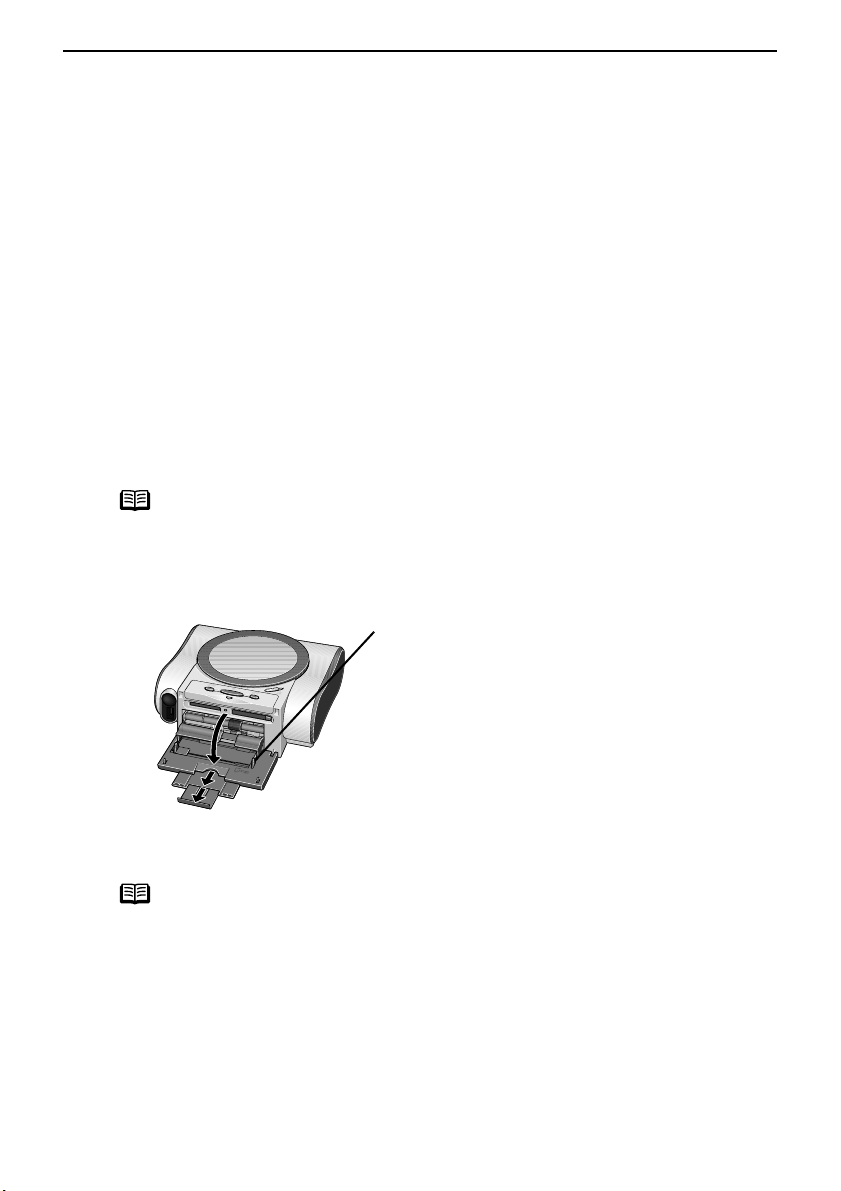
3
Prepare to load paper.
(1) Slide the cover open switch toward the right to open the cover.
(3) Close the cover.
4
Load the paper.
note
• Do not stack more than 10 sheets in the paper output tray.
• Do not touch the printed surface until the ink dries. For specific drying times, refer
to the instructions packaged with your media.
(2) Ensure that the paper thickness lever is set to
the right.
note
Set the lever on the left only if ink smudges or
the printed surface is stained.
Important
* During printing, part of sheet is
ejected from the back of the
printer.
Leave at least 8cm (3.1 in) clear
space at the back of the printer.
(1) Insert the paper into the paper support with print side
facing up.
When loading the credit card sized paper, load sheets
in the portrait position (feed from the short side)
(2) Align the paper with the right edge of the paper
support and insert the paper until it is fully inserted.
(3) Slide the paper guide
against the left side
of the stack of paper.
*
• 101.6 × 152.4mm/
4"×6" paper
• Photo stickers
Shorter margin
Preparation When Using the Printer with the TV
20
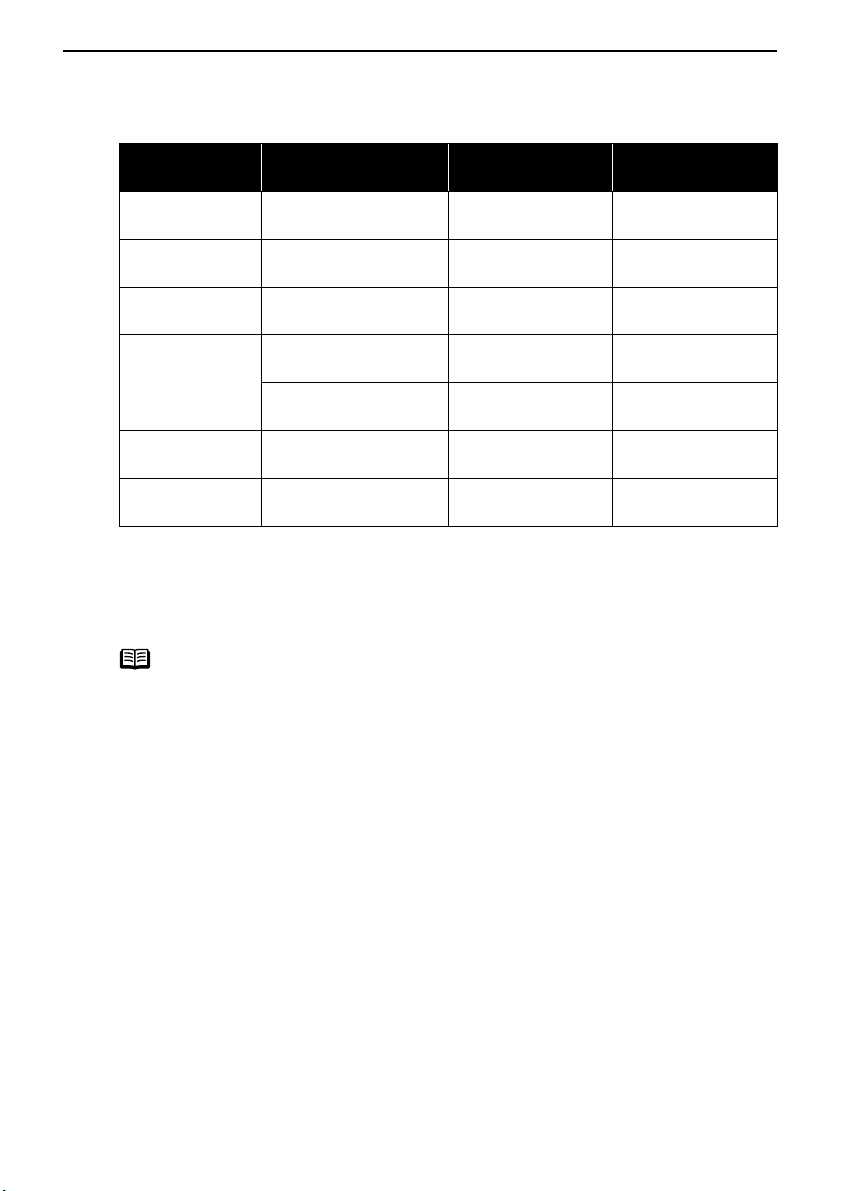
Media Types for Card Direct Printing
*Select Sticker print from Print Studio when you print. See “Printing Stickers from a
Favorite Photo” on page 28.
You can print a photo taken with a mobile phone by selecting Sticker as the paper
size in Infrared print. See “Printing on Photo Stickers” on page 45.
note
For instructions on how to display and set these settings, See “Specifying the Paper
and Other Settings” on page 33.
Media Type Paper support
Load Limit
Page size Media type
Photo Paper Pro 101.6×152.4 mm/
4"×6": up to 20 sheets
[101.6×152.4 mm]/
[4"×6"]
[Photo Paper Pro]
Photo Paper Plus
Glossy
101.6×152.4 mm/
4"×6": up to 20 sheets
[101.6×152.4 mm]/
[4"×6"]
[Photo Paper Plus
Glossy]
Photo Paper Plus
Semi-gloss
101.6×152.4 mm/
4"×6": up to 20 sheets
[101.6×152.4 mm]/
[4"×6"]
[Photo Paper Plus
Glossy]
Glossy Photo
Paper
101.6×152.4 mm/
4"×6": up to 20 sheets
[101.6×152.4 mm]/
[4"×6"]
[Glossy Photo Paper]
Credit Card:
up to 20 sheets
[Credit Card] [Glossy Photo Paper]
Matte Photo
Paper
101.6×152.4mm/
4"×6": up to 20 sheets
[101.6×152.4mm]/
[4"×6"]
[Matte Photo Paper]
Photo Stickers 101.6×152.4 mm/
4"×6": up to 1 sheet
—* —

Enjoy Photos on TV and Printing —Basic—
21
Enjoy Photos on TV and Printing
—Basic—
Viewing and Printing from the TV Overview
You can display photos stored in a memory card on TV by connecting printer and TV
and inserting the memory card in the printer. You can print your favorite photos one
by one, or display a list of the photos and specify the number of copies to print for
each photo listed.
Viewing Each Photo on TV and Printing—Photo Gallery
note
Displays photos stored in a memory card on TV.
You can display one photo at a time or display photos automatically (slide show).
1
Connect the printer to TV.
See “Connect TV to the printer.” on page 13.
2
Turn on TV and the Printer and display the Menu Screen.
See “Turning on TV and the Printer for Displaying the Menu Screen” on page
14.
(1) Turn TV on.
(2) Turn on the printer.
(3) Select the video input mode.
The menu screen appears on the TV screen.
note
The Menu screen is displayed when TV and the printer are connected and turned on.
Change the language displayed on the Menu screen.
* See “Changing the Language Displayed” on page 37.
3
Loading the Paper.
See “Loading Paper” on page 18.
4
Install the memory card in the card slot.
See “Inserting a Memory Card” on page 16.
The menu screen is displayed.
Enjoy Photos on TV and Printing —Basic—
22
note
Menu Screen
The Menu screen is displayed when TV and the printer are connected and turned on.
Tool Box is the only available menu at the moment. All menu options can be viewed
when a memory card with stored photos is inserted into the printer card slot.
Press the Menu button to display the Menu screen if the other screen is displayed.
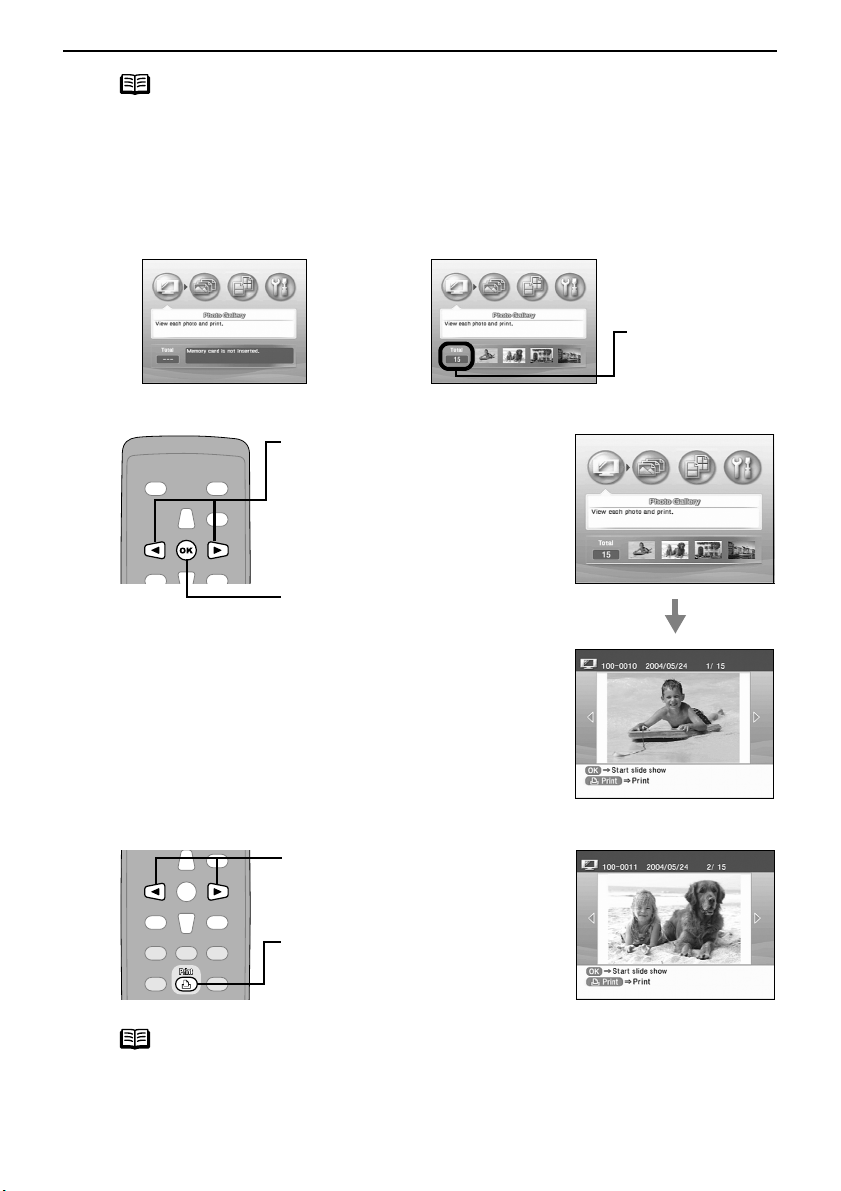
5
Select Photo Gallery.
6
Select the photo to print.
note
When many photos are stored in a memory card, it is convenient to search for photos
to display or print using the shooting date as the search key.
See “Searching for Photos with the Shooting Date—Search” on page 35.
• The menu displayed when the
power is on.
• The menu displayed when a
memory card is set.
The number of
photos stored in
the memory card.
(1) Use the WX buttons to select
Photo Gallery.
(2) Press the OK button.
The stored photo is displayed
on TV.
(3) Press the X button and the W
button to display the next
photo and the previous photo,
respectively.
(1) Using the WX buttons, select
the image to print.
(2) Press the Print button.
The print confirmation screen
is displayed.
Enjoy Photos on TV and Printing —Basic—
23
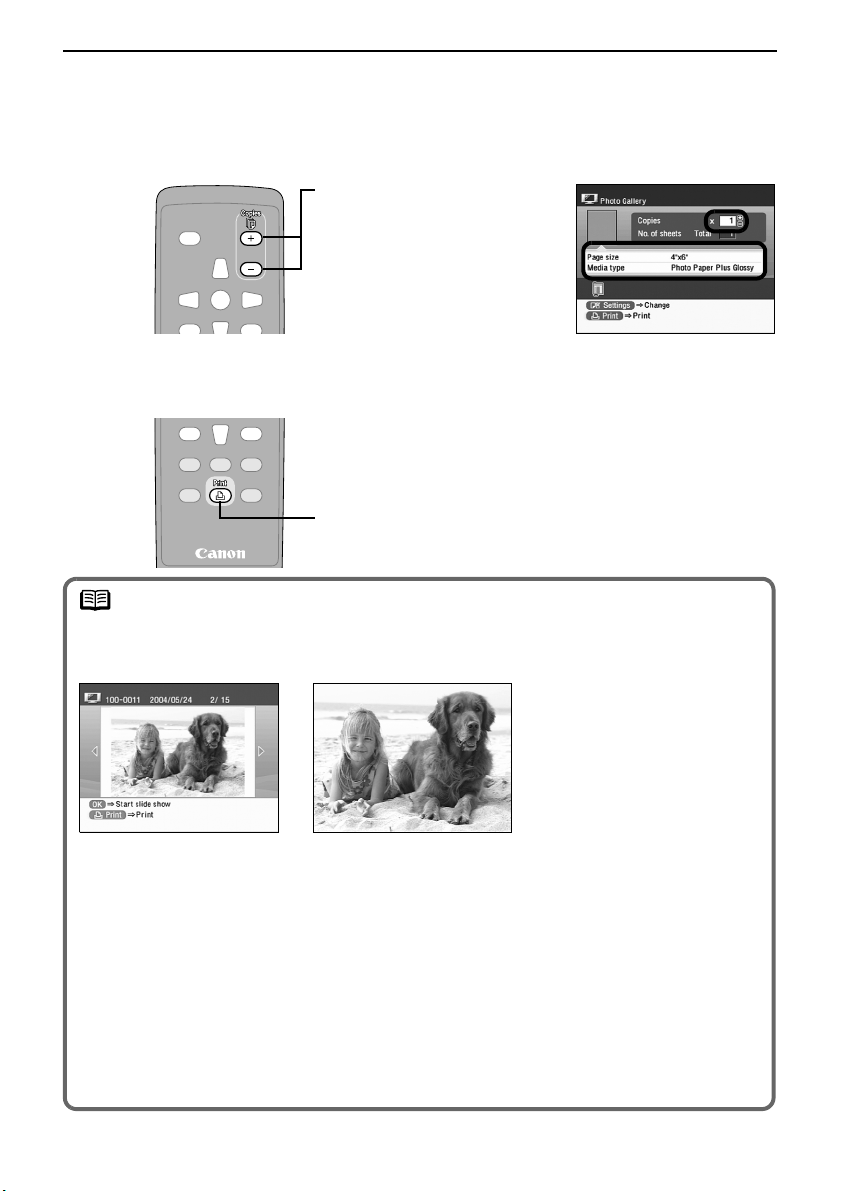
7
Confirm the settings.
(1) Confirm the Page size and Media type.
To change any of the settings, press the Settings button.
See “Specifying the Paper and Other Settings” on page 33.
8
Start printing.
(1) Ensure that the paper is loaded in the print confirmation screen.
(2) Press the Copies +/Copies –
buttons to specify the
number of copies to print.
(2) Press the Print button.
note
Displaying Photos Automatically at the Full TV Screen—Slide Show
You can automatically display photos stored in a memory card at the full TV screen.
1 Start a photo gallery to
display photos stored in
a memory card.
2 Press the OK button.
The confirmation
message is displayed.
3 Select Yes and then
press the OK button.
The slide show is started
and the photos are
switched automatically
at a certain interval.
Press the OK button to
stop switching photo
during the slide show.
Press the OK button
again to restart the slide
show.
4 Press the Cancel button
or the Back button.
It stops the slide show
and returns to the Photo
Gallery screen.
Enjoy Photos on TV and Printing —Basic—
24
Specifying the number of copies to print for each photo
—Photo Print
You can display 9 photos stored in a memory card on the TV screen at a time
and specify the number of copies to print for each photo.
1
Prepare to print.
(1) Connect TV to the printer and turn them on.
See “Connect TV to the printer.” on page 13.
(2) Load the paper
See “Loading Paper” on page 18.
(3) Insert the memory card into the card slot.
See “Inserting a Memory Card” on page 16.
The menu screen is displayed.
Press the Menu button if the screen other than the menu screen appears on the
screen.
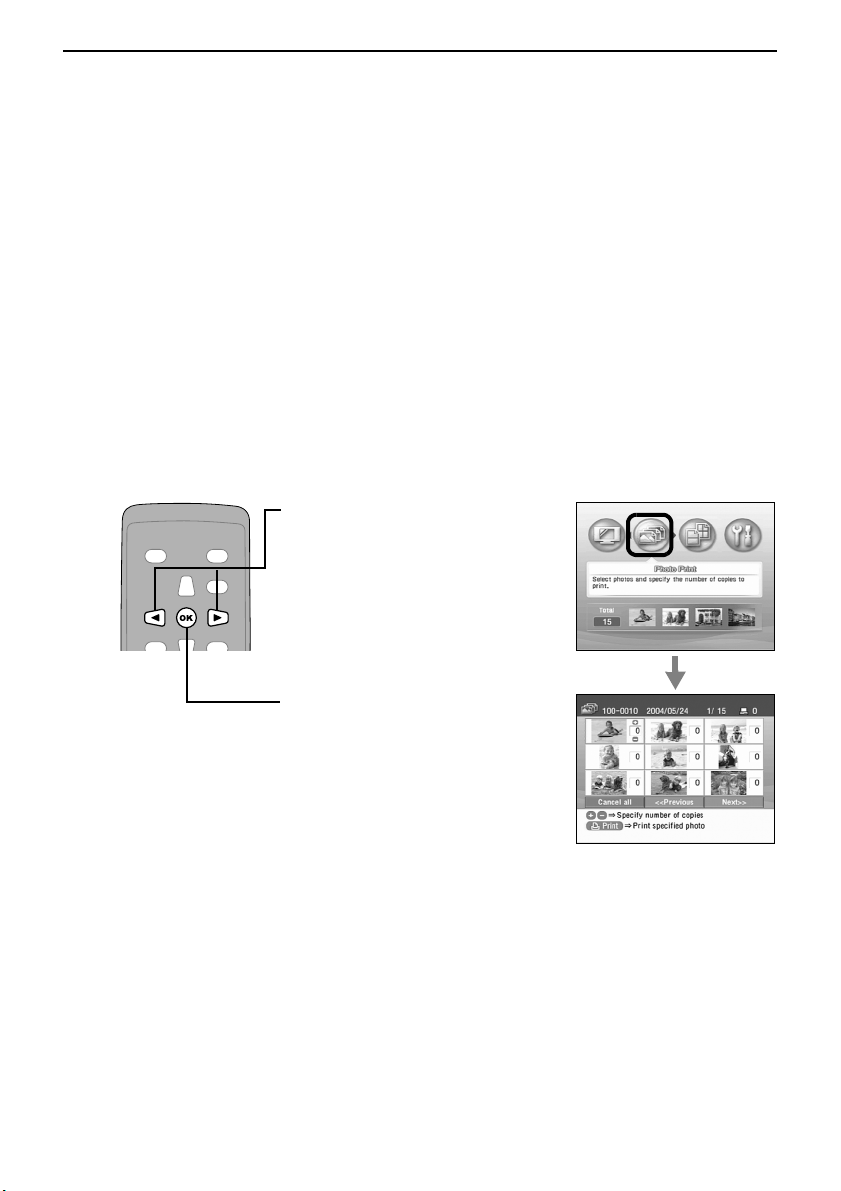
2
Select Photo Print.
(1) Use the WX buttons to select
Photo Print.
(2) Press the OK button.
The screen for specifying the
number of images is displayed.
Enjoy Photos on TV and Printing —Basic—
25
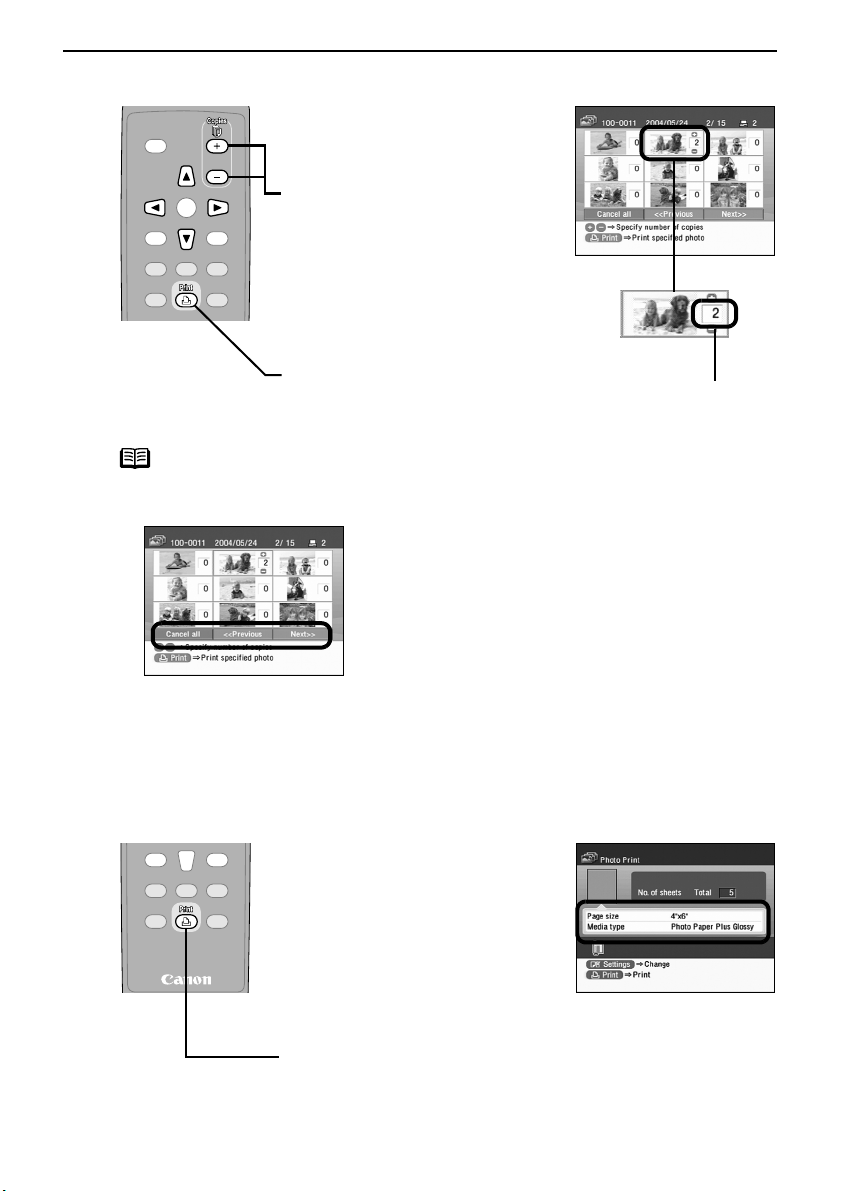
3
Specify the number of copies to print.
note
• Place the cursor on the Cancel all, Previous, or Next button displayed at the bottom
of the screen and press the OK button to:
• When many photos are stored in a memory card, it is convenient to search for
photos to display or print using the shooting date as the search key.
See “Searching for Photos with the Shooting Date—Search” on page 35.
4
Start printing.
(1) Use the WXST buttons,
select the photo you wish to
print.
(2) Use the Copies +/Copies –
buttons to specify the number
of copies to print.
(3) Repeat steps 1 and 2 and
specify the number of copies
for each photo you wish to
print.
(4) Press the Print button.
The print confirmation screen
is displayed.
Number of copies
to print
Cancel all
Reset the specify the number of copies to print for
all photos.
<< Previous
Display the previous page if more than 10 photos
are stored in the memory card.
Next >>
Display the next page if more than 10 photos are
stored in the memory card.
(1) Confirm the Page size and
Media type.
To change any of the settings,
press the Settings button.
See “Specifying the Paper and
Other Settings” on page 33.
(2) Ensure that the paper is loaded
in the print confirmation
screen.
(3) Press the Print button.
The specified number of copies
for each image will be printed.
 Loading...