


User’s Guide
ENG QT5-0546-V05

Getting Help from Canon
Help Us Help You Better
Before you contact Canon, please record the following information.
Serial Number (located on the inside of the product):
Model Number (located on the front of the product):
Setup CD-ROM number (located on the CD-ROM):
Purchase Date:
Customer Technical Support Sequence*
1.Internet - www.canontechsupport.com
For quick and comprehensive self-help in an intuitively guided interactive troubleshooting environment, the place to start is our helpful tech support web site. In addition, the latest driver downloads, answers to frequently asked questions, product information, and “where to buy” instructions are found here.
2.Email Tech Support - www.canontechsupport.com
For individual attention to a special issue, try emailing our friendly technical support representatives, specially trained to communicate quick, easy, and logical solutions to your inquiries within 24 hours.
3.Toll-Free Live Tech Support - (1-800-828-4040)
This option provides live telephone technical support, free of service charges, Monday-Saturday (excluding holidays), during your product’s 1 year limited warranty period. Telephone Device for the Deaf (TDD) support is available at (1-866- 251-3752).
4.Extended Service and Support - www.canonesp.com
Canon CarePAK Extended Service Plan is a cost-attractive and easy-to-use extended service program that provides up to three full years of service and support coverage at a very attractive price. CarePAK offers toll-free Canon technical support and includes Canon’s superb InstantExchange product replacement program. For further information about extending your Canon service and support, call (1-800-385-2155), or visit our Web site at www.canonesp.com. CarePAK must be purchased during your product’s warranty period.
For more information and updated program specifics, please visit our web site at www.canontechsupport.com.
*Support program specifics are subject to change without notice.
Disclaimer
Canon Inc. has reviewed this manual thoroughly in order that it will be an easy-to-use guide to your Canon MP180/MP160. All statements, technical information and recommendations in this manual and in any guides or related documents are believed reliable, but the accuracy and completeness thereof are not guaranteed or warranted, and they are not intended to be, nor should they be understood to be, representation or warranties concerning the products described. Specifications are subject to change without notice.
As an ENERGY STAR® partner, Canon Inc. has determined that this product meets the ENERGY STAR® guidelines for energy efficiency.
This machine supports Exif 2.21 (also called “Exif Print”). Exif Print is a standard for enhancing the communication between digital cameras and printers. By connecting to an Exif Print-compliant digital camera, the camera’s image data at the time of shooting is used and optimized, yielding extremely high quality prints.
About Consumables
Consumables (ink tanks / FINE Cartridges) are available for 5 years after production has stopped.
Trademark Notices
•Windows is a registered trademark of Microsoft Corporation in the United States and other countries.
•Macintosh and Mac are trademarks of Apple Computer, Inc., registered in the United States and other countries.
•CompactFlash is a registered trademark of SanDisk Corporation.
•MEMORY STICK and Memory Stick DUO are registered trademarks of Sony Corporation.
•SmartMedia is a registered trademark of Toshiba Corporation.
•MultiMediaCard is a trademark of the MultiMediaCard Association.
•xD-Picture Card is a trademark of Fuji Photo Film Corporation.
•SD, miniSD and SD Secure Digital are trademarks of SD Association.
Copyright ©2006 CANON INC.
All rights reserved. No part of this publication may be transmitted or copied in any form whatsoever without expressed written permission from Canon Inc.
1

Table of Contents |
|
|
Safety Precautions ........................................... |
3 |
|
Reading The Document.................................... |
8 |
|
|
Symbols Used In This Guide .......................... |
8 |
Legal Limitations On Use Of Your Product |
|
|
And Use Of Images .......................................... |
9 |
|
1 |
Before Printing ....................................... |
10 |
|
Machine Parts And Their Functions.............. |
10 |
|
Turning The Machine ON/OFF ..................... |
14 |
|
Setting Documents ....................................... |
15 |
|
General Paper Guidelines ............................ |
16 |
|
Recommended Paper................................... |
17 |
|
Loading Paper .............................................. |
23 |
2 |
Copying................................................... |
26 |
|
Making Copies.............................................. |
26 |
|
Changing The Copy Settings (MP180)......... |
28 |
|
Advanced Copy Functions............................ |
32 |
3 Printing From A Memory Card |
|
|
|
(MP180) ................................................... |
36 |
|
Using A Memory Card .................................. |
36 |
|
Printing Photograph...................................... |
39 |
|
Print Settings ................................................ |
48 |
4 Reading From And Writing |
|
|
|
To A Memory Card (MP180) .................. |
49 |
|
Setting Up The Card Slot As |
|
|
The Memory Card Drive Of The Computer... |
49 |
5 Printing From Your Computer .............. |
51 |
|
|
Printing With Windows.................................. |
51 |
|
Printing With Macintosh ................................ |
54 |
6 |
Scanning Images.................................... |
57 |
|
About Scanning Images................................ |
57 |
|
Scanning Methods........................................ |
57 |
7 |
Printing Photographs Directly |
|
|
From A Digital Camera .......................... |
60 |
|
Printing Photographs Directly |
|
|
From A PictBridge-Compliant Device ........... |
60 |
8 Changing The Machine Settings |
|
|
|
(MP180) ................................................... |
64 |
|
Changing The Settings ................................. |
64 |
|
PRINT SETTINGS........................................ |
64 |
|
PICTBRIDGE SET........................................ |
65 |
|
OTHERS....................................................... |
65 |
|
RESTORE DEFAULT................................... |
66 |
|
SAVE CONFGURATION.............................. |
66 |
|
LOAD CONFGURATION.............................. |
66 |
9 |
Routine Maintenance ............................ |
67 |
|
Replacing A FINE Cartridge ......................... |
67 |
|
When Printing Becomes Faint Or |
|
|
Color Is Incorrect .......................................... |
75 |
|
Printing The Nozzle Check Pattern .............. |
76 |
|
FINE Cartridge Cleaning .............................. |
78 |
|
FINE Cartridge Deep Cleaning..................... |
78 |
|
Aligning The FINE Cartridge......................... |
79 |
|
Cleaning Your Machine ................................ |
81 |
10 |
Troubleshooting .................................... |
85 |
|
An Error Message Is Displayed |
|
|
On The LCD/LED ......................................... |
86 |
|
Cannot See The Display |
|
|
On The LCD/LED ......................................... |
88 |
|
Ink Does Not Come Out/Printing Is Blurred/ |
|
|
Colors Are Wrong/White Streaks/ |
|
|
Straight Lines Are Misaligned/ |
|
|
Cannot Print To End Of Job ......................... |
89 |
|
Back Of Paper Is Smudged/ |
|
|
Paper Does Not Feed Properly/ |
|
|
Printed Surface Is Scratched........................ |
92 |
|
Paper Jams .................................................. |
94 |
|
Cannot Print Properly |
|
|
From A Photo Index Sheet (MP180) ............ |
95 |
|
An Unintended Language is Displayed |
|
|
on the LCD (MP180)..................................... |
95 |
|
Cannot Print Properly |
|
|
From The Digital Camera ............................. |
96 |
|
Cannot Install The MP Driver ....................... |
98 |
|
Cannot Connect To PC Properly .................. |
99 |
|
Problems With Scanning ............................ |
100 |
|
An Error Message Appears |
|
|
On The Screen ........................................... |
103 |
|
For Windows Users .................................... |
106 |
|
If You Cannot Solve The Problem .............. |
107 |
11 |
Appendix .............................................. |
108 |
|
Printing Area............................................... |
108 |
|
Uninstalling The On-screen Manual ........... |
111 |
|
Transporting The Machine.......................... |
112 |
|
Specifications ............................................. |
113 |
Regulatory Information................................. |
117 |
|
|
FCC Notice (U.S.A. Only)........................... |
117 |
|
Canon U.S.A., INC. |
|
|
LIMITED WARRANTY (USA Only)............. |
118 |
Users In Canada .......................................... |
121 |
|
|
Customer Technical Supports .................... |
121 |
Index............................................................ |
122 |
|
2

 Safety Precautions
Please read the safety warnings and cautions provided in this guide to ensure that you use your machine safely. Do not attempt to use the machine in any way not described in this guide.
Warning |
You may cause an electric shock/fire or damage the machine if you ignore any of |
|
these safety precautions. |
|
|
Location |
Do not place the machine close to flammable solvents such as alcohol or thinners. If |
|
flammable substances come into contact with electrical parts inside the machine, it may |
|
result in fire or electrical shock. |
|
|
Power supply |
Never attempt to plug or unplug the machine from the power supply when your hands are |
|
wet. This may result in electrical shock. |
|
|
|
Always push the plug all the way into the power outlet. If the prongs of the power plug |
|
come into contact with metal objects, it may result in fire or electrical shock. |
|
|
|
Never damage, modify, stretch or excessively bend or twist the power cord. Do not place |
|
heavy objects on the power cord. These actions may cause electrical damage and result in |
|
fire or electrical shock. |
|
|
|
Never plug the machine into a power socket that is shared with other equipment (extension |
|
lead/cord, 2- or 3-way adapter, etc.). This may result in fire or electrical shock. |
|
|
|
Plug the machine into a standard 100-240 V AC, 50/60 Hz (depending on your local |
|
electrical requirements), two-prong* grounded outlet. Operate the machine only from the |
|
type of power source indicated on the machine's label or a fire, electrical shock, or |
|
malfunction may occur. If you are unsure of the type of power available, consult your local |
|
power company. |
|
* The shape of the plug and outlet may vary depending on the country of purchase. |
|
|
|
Do not allow the power cord to be near objects that emit heat. The outer cover of the power |
|
cord may melt resulting in fire or electrical shock. |
|
|
|
Never use the machine if the power cord is bundled or knotted. Knots in the cord may |
|
result in fire or electrical shock. |
|
If you detect smoke, unusual smells or strange noises around the machine, immediately |
|
unplug the machine at the power supply and contact your local authorized Canon dealer or |
|
the Canon help line. |
|
Using the machine in such conditions may result in fire or electrical shock. |
|
|
|
Periodically, unplug the machine and use a dry cloth to wipe off any dust or dirt collected |
|
on the plug and the power outlet. |
|
|
|
If the machine is placed at a location exposed to a lot of dust, smoke, or high humidity, the |
|
dust collected on the plug absorbs moisture and may cause insulation failure and fire. |
|
|
Maintenance |
Do not service the machine yourself except as specifically described in this guide. If further |
|
servicing is required, contact your local authorized Canon dealer or the Canon help line. |
|
|
|
When storing the machine, choose a location where the machine is not exposed to dust. |
|
Dust accumulation may prevent the machine from operating properly. |
|
|
|
Use a damp cloth to clean the machine. Never use flammable solvents such as alcohol, |
|
benzene or thinners. If flammable solvents come in contact with electrical components |
|
inside the machine, it could cause a fire or electrical shock. |
|
|
|
Always turn OFF the power and unplug the machine from the power outlet before cleaning |
|
the machine. |
|
If you leave ON or accidentally switch the machine ON while cleaning it, it may result in |
|
injury or damage the machine. |
|
|
3

Handling |
Do not attempt to disassemble or modify the machine. There are no user serviceable parts |
|
inside the machine. |
|
The machine contains high-voltage components. Never attempt any maintenance |
|
procedure not described in this guide. Incorrect maintenance procedures may damage the |
|
machine, or cause a fire or electrical shock. |
|
|
|
Do not drop paper clips, staples, or other metal objects inside the machine. Also do not |
|
spill water, liquid, or flammable substances inside the machine. If these items come into |
|
contact with high-voltage parts inside the machine, it may result in fire or electrical shock. |
|
If these items are dropped or spilled in the machine, turn OFF the power and unplug the |
|
power cord immediately with dry hands. Then contact your local authorized Canon dealer |
|
or the Canon help line. |
|
|
|
Do not use flammable sprays near the machine. |
|
This could cause a fire or electrical shock if the spray comes into contact with electrical |
|
components inside the machine. |
|
|
|
There are high-voltage components inside the machine. If you are looking inside the |
|
machine to clear paper jams etc., do not allow metal objects such as jewelry to come into |
|
contact with the inside of the machine. Contact may result in burns or electrical shock. |
|
|
Others |
When setting the machine near electric products with fluorescent lighting, separate the |
|
machine at least 5.9 inches (15 cm) from electric products equipped with fluorescent |
|
lighting. If you place it near to them, the machine may malfunction as a result of the noise |
|
emitted by the fluorescent lighting. |
|
|
|
When turning OFF the power, be sure to press [ON/OFF] and confirm that the Alarm Lamp |
|
has shut off. If you pull the power plug out of the wall outlet while the Alarm Lamp is on, the |
|
FINE Cartridge is not protected, and you may not be able to print later. |
|
|
Caution |
You may cause injury or damage the machine if you ignore any of these safety |
|
precautions. |
|
|
Location |
Do not block or cover the ventilation port or any openings on the machine with objects, as |
|
it may cause the inside of machine to overheat and cause a fire. |
|
|
|
Place the machine on a flat, stable, vibration-free surface that is strong enough to support |
|
its weight. If the machine topples over, it may result in injury. (For the weight of the |
|
machine, see “Appendix” on page 108. |
|
|
|
Do not use or store the machine outdoors. |
|
|
|
Do not install the machine near devices that contain magnets or generate magnetic fields, |
|
such as speakers. |
|
|
|
To ensure proper ventilation, make sure the machine is approximately 4 inches (10 cm) |
|
away from walls and other equipment. |
|
|
|
Do not install the machine in a location that is very humid or dusty, in direct sunlight, |
|
outdoors, or close to a heating source. |
|
Installing in such a location may result in fire or electrical shock. |
|
To avoid the risk of fire or electrical shocks, install the machine in a location with an |
|
ambient temperature range of 41ºF to 95ºF (5ºC to 35ºC) and humidity of 10% to 90% |
|
(condensation free). |
|
|
|
Do not place the machine on a thick rug or carpet. |
|
If fibers or dust come inside the machine, it could cause a fire. |
|
|
4

Power supply |
Never remove the plug by pulling on the cord. |
|
Pulling on the power cord may damage the cord and cause a fire or electrical shock. |
|
|
|
When turning OFF the power, be sure to press [ON/OFF] or unplug the machine. |
|
However, if the machine is unplugged during printing, the FINE Cartridge is not protected |
|
with the cap that prevents the ink from drying. This may affect the print quality of the |
|
machine when printing later. |
|
|
|
During electrical storms, turn OFF the power and disconnect the power cord from the |
|
power outlet. |
|
|
|
Do not use an extension cord as this may result in fire or electrical shock. |
|
|
|
Ensure that the area around the power outlet is kept clear at all times so you can easily |
|
unplug the power cord if necessary. Otherwise you will be unable to disconnect the power |
|
plug in case of an emergency, and it may result in fire or electrical shock. |
|
|
|
Never use a power supply source other than the one rated for the machine in the country |
|
where you purchased the machine as it may result in fire or electrical shock. |
|
The operating requirement of this machine is as follows: |
|
100-240 V AC, 50/60 Hz (depending on local electrical requirements) |
|
|
|
Do not plug the machine into the same circuit as appliances such as an air conditioner, |
|
television, or copier. These devices generate electrical noise which may interfere with your |
|
machine’s operation. |
|
|
|
Whenever you turn OFF the power and unplug the machine, wait at least five seconds |
|
before you plug it in again. |
|
|
|
Use only the power cord that came with the machine. Using a different power cord may |
|
cause electric leakage or damage to the machine. |
Turn OFF the power and unplug the machine in the following conditions:
zWhen the power cord or plug is damaged or frayed.
zIf liquid has spilled into the machine.
zIf the machine has been exposed to rain or water.
zIf the machine does not operate normally when you have followed the instructions in the guides included with your machine.
zIf the machine does not operate normally when you have followed the instructions provided in “Troubleshooting” on page 85.
zIf the machine has been dropped or damaged.
zIf the machine exhibits a distinct change in performance, indicating a need for servicing.
Turn OFF the power and disconnect the power cord if the machine will not be used for a long period such as during holidays.
The socket-outlet shall be installed near the equipment and shall be easily accessible.
5
Handling |
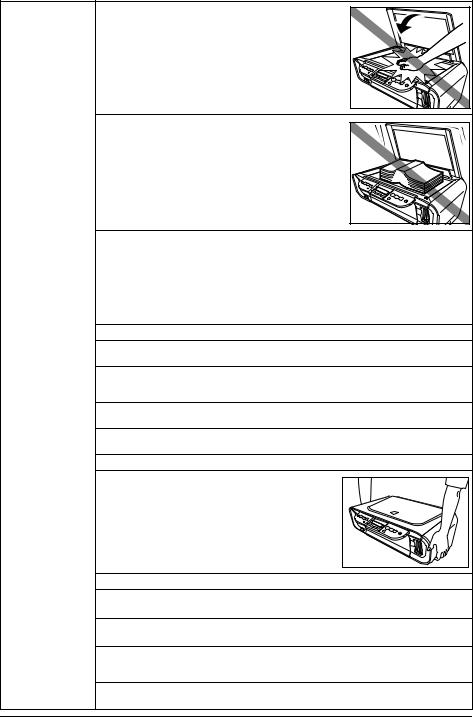
Close the Document Cover gently to avoid catching your |
|
hand. Failing to do so may result in personal injury. |
Do not press down hard on the Document Cover when using the Platen Glass to scan thick books. This may damage the Platen Glass and Document Cover, and/or result in personal injury.
Do not place the following objects on top of the machine. If such objects come into contact with internal electrical components, the machine may short-circuit, resulting in fire or electrical shock.
zMetal objects such as jewelry and watches
zContainers of water or other liquids such as glasses, vases, or pot plants
If water does spill inside the machine, turn OFF the power immediately by pressing the [ON/ OFF], and disconnect the power cord. Then, contact your local authorized Canon dealer or the Canon help line.
Do not touch the high-voltage electrical parts as this may result in electrical shock.
Do not place heavy objects on top of the machine as these may topple over and result in injury.
When removing paper jammed in the machine, be careful not to get ink on your hands or clothing. If ink gets on your hands or clothing, wash them soon in running water. If you use hot water, the ink may adhere and become difficult to remove.
After printing, do not touch the electrical contacts of the FINE Cartridge. They will be hot and may result in burns or electrical shock.
Do not subject the machine to strong physical shock or vibration. This can damage the machine’s components.
Before moving the machine, turn OFF the power and unplug the machine.
When moving the machine, carry the machine at both ends.
A distinct change in performance may indicate a need for servicing.
Do not insert your hands into the machine while it is printing.
Parts inside the machine are moving and this may result in injury.
Do not turn the machine upside down.
Ink may leak out and stain clothing or the surrounding area.
Adjust only those controls that are covered by the instructions in the guides since improper adjustment of other controls may result in damage and require extensive repair by a qualified technician to restore the product to normal operation.
When storing or transporting the machine, do not tilt it, stand it on its side, or turn it upside down. Doing so may cause ink to leak out.
6

FINE Cartridges (Ink |
For safety reasons, store FINE Cartridges (Ink Cartridges) out of the reach of small |
Cartridges) |
children. |
|
If a child ingests any ink, consult a doctor immediately. |
|
|
|
Do not shake FINE Cartridges (Ink Cartridges). |
|
Ink may leak out and stain clothing or the surrounding area. |
|
|
|
Never touch the nozzle and the gold terminal. |
|
|
7

Reading The Document
Symbols Used In This Guide
Please read the list below of symbols used in this guide. The following symbols are used to indicate important instructions. Be sure to obey these instructions.
Warning |
Indicates a warning concerning operations that may lead to death or |
||
|
|
|
injury to persons if not performed correctly. In order to use the machine |
|
|
|
safely, always pay attention to these warnings. |
Caution |
Indicates a caution concerning operations that may lead to injury to |
||
|
|
|
persons or damage to property if not performed correctly. In order to use |
|
|
|
the machine safely, always pay attention to these cautions. |
Important |
Indicates operational warnings and restrictions. Be certain to read these |
||
|
|
|
items to operate the machine correctly, and to avoid damage to the |
|
|
|
machine. |
Note |
Indicates notes for operation or additional explanations. Reading these is |
||
|
|
|
highly recommended. |
|
|
|
Indicates the description of MP180. |
|
|
|
Indicates the description of MP160. |
|
|
|
Read this when the machine is connected to a Windows system. |
|
|
|
|
|
|
|
Read this when the machine is connected to a Macintosh system. |
|
|
|
|
8
Legal Limitations On Use Of Your Product And Use Of Images
It may be unlawful to make copies of, scan, print or use reproductions of the following documents. The list provided is non-exhaustive. When in doubt, check with a legal representative in your jurisdiction.
zPaper money
zMoney orders
zCertificates of deposit
zPostage stamps (canceled or uncanceled)
zIdentifying badges or insignias
zSelective service or draft papers
zChecks or drafts issued by governmental agencies
zMotor vehicle licenses and certificates of title
zTraveler’s checks
zFood stamps
zPassports
zImmigration papers
zInternal revenue stamps (canceled or uncanceled)
zBonds or other certificates of indebtedness
zStock certificates
zCopyrighted works/works of art without permission of copyright owner
9
Chapter 1
Before Printing
Machine Parts And Their Functions
This section provides the name and location of the main components of this machine, and also describes their functions.
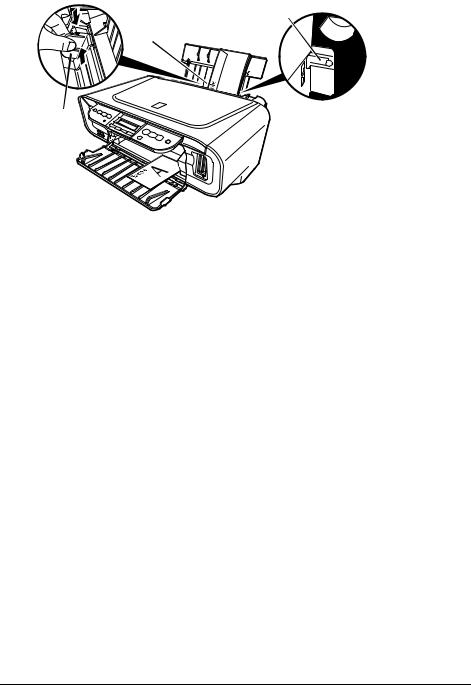
Machine
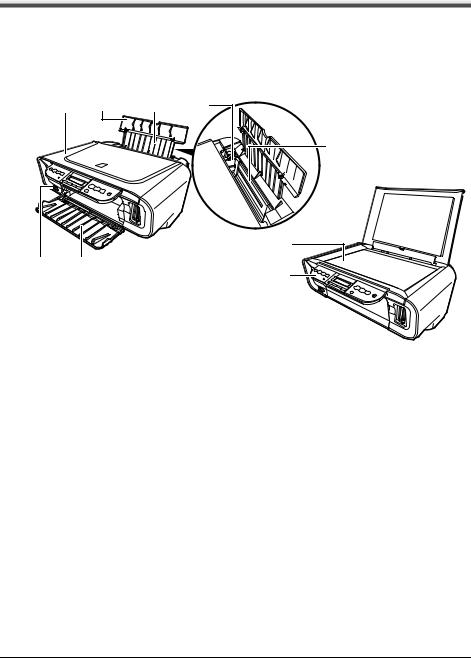
z Exterior
(1) |
(2) |
(3) |
(4) |
(5)
(8)
(7) (6)
(9)
(1)Document Cover
Covers the Platen Glass. Open this cover when loading a document on the Platen Glass.
(2)Paper Support
Supports paper loaded in the Auto Sheet Feeder. Open it before loading paper.
(3)Paper Support Extension
Supports paper loaded in the Auto Sheet Feeder. Pull it out before loading paper.
(4)Paper Guide
When loading paper, ensure the left edge of the paper just touches this guide.
(5)Auto Sheet Feeder
Load paper here. Paper feeds automatically, one sheet at a time.
(6)Paper Output Tray
Printouts are output to this tray. Open the tray before you start copying or printing. When not being used, keep it closed in the machine.
(7)Direct Print Port
Used to connect a PictBridge-compliant device to the machine when printing images directly from the device.
(8)Platen Glass
Used to load a document to be processed.
(9)Operation Panel
Displays the operational status of the machine. It is also used to change or check the settings of each function. For details, see page 12.
10 |
Before Printing |
Chapter 1 |
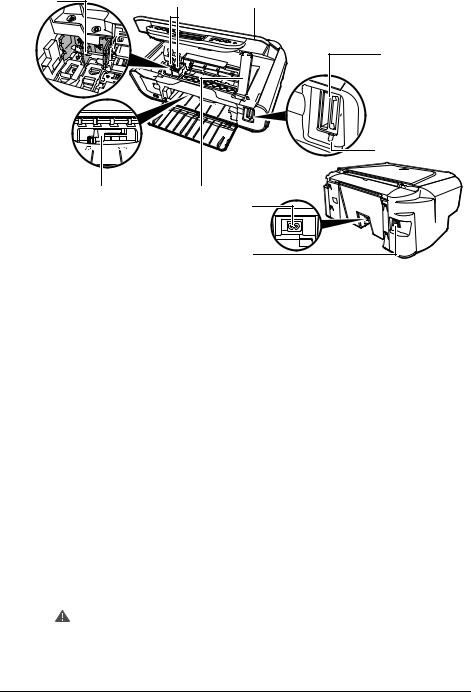
z Rear view and interior
(10) |
(16) |
(11)(12)
(13)
(14)
(15)
(17)
(18)
(10)FINE Cartridge Holder
Install the FINE Cartridges here.
(11)FINE Cartridges (Ink Cartridges)
Replaceable cartridge that comprises an integrated Print Head and ink tank.
FINE Cartridges are available in two types, Color (on the right) and Black (on the left).
(12)Scanning Unit
Used to scan a document.
(13)Card Slots (MP180)
Insert a memory card or card adapter containing a memory card into these slots for photo printing. The machine is equipped with two kinds of Card Slot.
(14)Access Lamp (MP180)
Lights when a memory card is inserted into the Card Slots. This lamp flashes while the machine is reading data from the memory card.
(15)Scanning Unit Support
Used to hold the Scanning Unit being opened.
(16)Paper Thickness Lever
Used to adjust the gap between the FINE Cartridge and surface of the printing paper. Move the lever to the correct position for the media being used.
(17)Power Connector
Used to connect the power cord to the machine.
(18)USB Port
Used to connect a computer to the machine when printing from or scanning to the computer.
Important While the machine is printing from or scanning images to the computer, or the computer is in the sleep mode or standby mode, do
not disconnect and connect the USB cable.
Chapter 1 |
Before Printing |
11 |

Operation Panel
This section describes the buttons on the Operation Panel, and their functions and locations.
(1) |
(2) |
(3) |
(4) |
(5) |
|
(6) |
(7) |
(8) |
(9) |
||||||||||||
|
|
|
|
|
|
|
|
|
|
|
|
|
|
|
|
|
|
|
|
|
|
|
|
|
|
|
|
|
|
|
|
|
|
|
|
|
|
|
|
|
|
|
|
|
|
|
|
|
|
|
|
|
|
|
|
|
|
|
|
|
|
|
|
|
|
|
|
|
|
|
|
|
|
|
|
|
|
|
|
|
|
|
|
|
|
|
|
|
|
|
|
|
|
|
|
|
|
|
|
|
|
|
|
|
|
|
|
|
|
|
|
|
|
|
|
|
|
|
|
|
|
|
|
|
|
|
|
|
|
|
|
(10) |
(11) |
(12) |
(13) |
(14) |
(1)[Photo Index Sheet] Button
Switches the machine to Photo Index Sheet mode.
(2)[COPY] Button
Switches the machine to copy mode.
(3)[SCAN] Button
Switches the machine to scan mode. In scan mode, the machine scans a document to your computer according to the settings selected. To use this button, the machine must be connected to a computer.
(4)[MEMORY CARD] Button
Switches the machine to memory card mode.
(5)LCD (Liquid Crystal Display)
Displays messages, menu selections, and the operational status.
(6)[Black] Button
Starts black & white copying.
(7)[Color] Button Starts color copying.
(8)[Stop/Reset] Button
Cancels operations and returns the machine to standby mode.
(9)[ON/OFF] Button
Turns the machine ON and OFF. Before turning ON the machine, make sure the Document Cover is closed.
(10)Alarm Lamp
Lights if an error occurs, or when the paper or ink runs out.
(11)[Menu] Button
Accesses the settings to customize operation of your machine.
(12)[  (–)] and [
  (+)] Buttons
Scroll through menu selections, and increase or decrease the number of copies or the image file number.
(13)[OK] Button
Selects or confirms settings. Also, press this button to return to standby mode after correcting paper jams and other errors that interrupt the printing.
(14)[Back] Button
Allows you to return to the pervious screen.
12 |
Before Printing |
Chapter 1 |

(1) (2) |
(3) |
(4) |
(5) |
(6) |
(7) |
(8) |
(9) |
(10) |
||||||||||||||
|
|
|
|
|
|
|
|
|
|
|
|
|
|
|
|
|
|
|
|
|
|
|
|
|
|
|
|
|
|
|
|
|
|
|
|
|
|
|
|
|
|
|
|
|
|
|
|
|
|
|
|
|
|
|
|
|
|
|
|
|
|
|
|
|
|
|
|
|
|
|
|
|
|
|
|
|
|
|
|
|
|
|
|
|
|
|
|
|
|
|
|
|
|
|
|
|
|
|
|
|
|
|
|
|
|
|
|
|
|
|
|
|
|
|
|
|
|
|
|
|
|
|
|
|
|
|
|
|
|
|
|
|
|
|
|
|
|
|
|
|
|
|
|
|
|
|
|
|
|
|
|
|
|
|
|
|
|
|
|
|
|
|
|
|
|
|
|
|
|
|
|
|
|
|
|
|
|
|
|
|
|
|
|
|
|
|
|
|
|
|
|
|
|
|
|
|
|
|
|
|
|
|
|
|
|
|
|
|
|
|
|
|
|
|
|
|
|
|
|
|
|
|
|
|
|
|
|
|
|
(11) |
(12) |
(13) |
(14) |
(1)[  (Maintenance)] Button Accesses the Maintenance menu.
(2)[Fit to Page] Button
Enables/disables the Fit-to-Page copying.
(3)Fit-to-Page Lamp
Lights when Fit-to-Page copying is enabled.
(4)[SCAN] Button
Opens the MP Navigator to scan a document to your computer according to the settings selected. To use this button, the machine must be connected to a computer.
(5)Alarm Lamp
Lights if an error occurs, or when the paper or ink runs out.
(6)LED (Light Emitting Diode)
Displays the number of copies, Maintenance menu selections or the operational status.
(7)[Black] Button*
Starts black & white copying. Also, press this button to confirm settings or operations.
(8)[Color] Button*
Starts color copying. Also, press this button to confirm settings or operations.
(9)[Stop/Reset] Button
Cancels operations and returns the machine to standby mode.
(10)[ON/OFF] Button
Turns the machine ON and OFF. Before turning ON the machine, make sure the Document Cover is closed.
(11)Black/Color Ink Lamp
Lights when a Black/Color FINE Cartridge is empty.
(12)Paper Lamp
Displays the selected paper size and type for copying.
(13)[Paper] Button
Switches the paper size and type for copying.
(14)[+] Button
Increases the number of copies.
*In the software applications or manuals, [Black] and/or [Color] buttons are collectively called “[Start]” or “[OK]”.
Chapter 1 |
Before Printing |
13 |
Turning The Machine ON/OFF
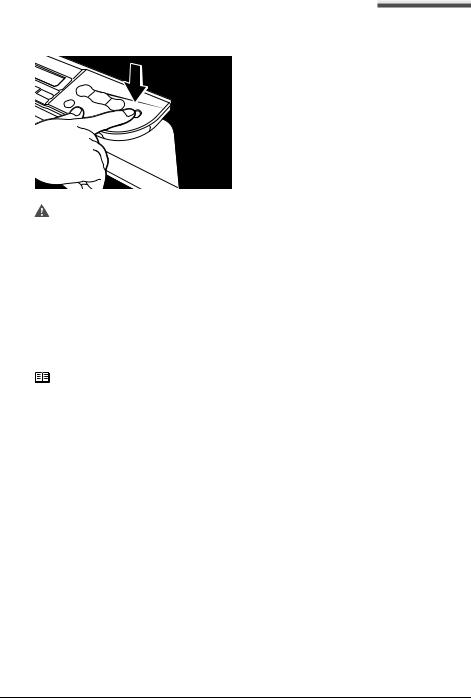
1 Press [ON/OFF] to turn the machine ON and OFF. Before turning ON the machine, make sure the Document Cover is closed.
Important z Always press [ON/OFF] before disconnecting the power cord. This ensures the FINE Cartridge is covered to prevent it from drying out.
zIf the machine is not used for an extended period of time, we recommend making black & white and color prints/copies or performing FINE Cartridge cleaning about once every month to prevent degradation of the FINE Cartridge. (See page 78)
zThe FINE Cartridge has many nozzles in order to produce highdefinition prints. In the same way that the tip of a felt-tip or marker pen will naturally dry out over time and become unusable even with the cap in place, the nozzles might become clogged. Periodically printing or performing FINE Cartridge cleaning can help to prevent this kind of clogging.
Note |
z The power cannot be turned OFF with [ON/OFF] while the machine is |
|
operating. |
zYour machine performs a FINE Cartridge cleaning every time you plug in the machine. This ensures optimum print quality but also consumes a small amount of ink during the cleaning process. We recommend turning OFF the power with [ON/OFF].
14 |
Before Printing |
Chapter 1 |
Setting Documents
Document Requirements
The documents you load on the Platen Glass for copying or scanning must meet these requirements:
Document |
z All types of paper documents |
Type |
z Photographs |
|
z Books, catalogs or magazines |
Size (W x L) |
z Max. 8 1/2 in. x 11 3/4 in. (216 mm x 297 mm) |
Thickness |
z Max. 3/4 in. (20 mm) |
Loading Documents
To copy or scan a document, set it on the Platen Glass.
z Make sure any glue, ink, or correction fluid on the document is completely dry before loading.
1
2
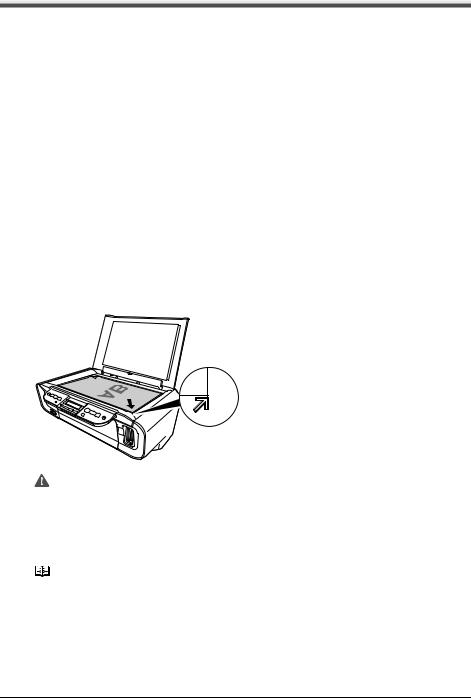
Lift the Document Cover.
Load your document.
zPlace your document face down on the Platen Glass.
zAlign the upper left corner of your document with the alignment mark on the lower right corner of the Platen Glass.
Important z Do not place any objects weighing more than 4.4 lb / 2 kg on the Platen Glass.
zDo not press or put weight on the original with pressure exceeding 4.4 lb / 2 kg.
Doing so may cause the scanner to malfunction or the Platen Glass to break.
Note |
The machine cannot scan the area within approximately 1/16 in. (2 mm) |
|
of the front and right edges of the Platen Glass. |
Chapter 1 |
Before Printing |
15 |
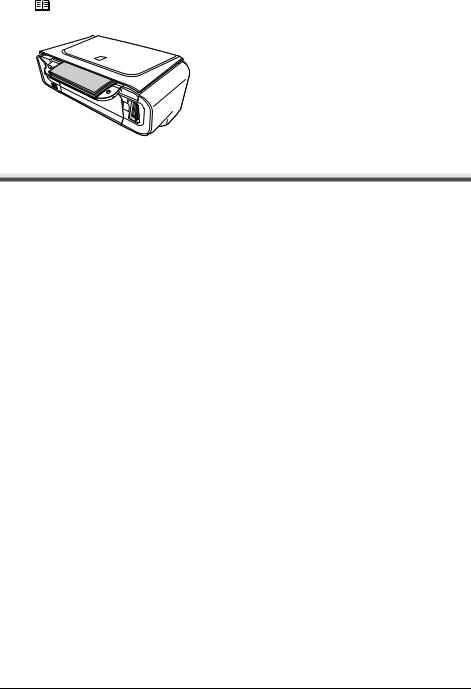
3 Gently close the Document Cover.
Note |
Thick documents (Max. 3/4 in./20 mm), such as books, can also be |
|
scanned. |
General Paper Guidelines
Paper Types You Cannot Use
Do not use:
zFolded, creased, curled, or wrinkled paper
zEnvelopes with double flaps, or with pressure seals
zMoist paper
zPaper with holes (e.g. punched holes)
zVery thin paper (less than 17 lb. or 64 g/m2)
zVery thick paper (more than 28 lb. or 105 g/m2) other than genuine Canon paper
zPostcards with photographs or stickers adhered to them
zEnvelopes made with embossed or treated surfaces
Handling Paper
zHold the paper as close as possible to its edges and try not to touch the print surface. The print quality will deteriorate if the print surface is damaged or becomes dirty.
zDo not touch the print surface until the ink has dried.
zSome paper may curl and the print surface may smudge if you have used a large amount of ink for printing. Paper that tends to curl is not recommended for printing photographs or graphics. Use it for printing mainly text.
zIf the paper is curled, uncurl (flatten) it before printing.
zPlace the paper back into its packet when not using it, and store out of direct sunlight in a place where the temperature and humidity are low.
zIf the printed area is traced with a highlight pen or paint-stick or stained with water or sweat, ink may blur.
16 |
Before Printing |
Chapter 1 |

Recommended Paper
The following paper is recommended for use with your machine. Please be sure to follow the guidelines and meet the requirements when loading paper in the Auto Sheet Feeder.
Paper Type |
Load Limit |
Paper Thickness |
Printer Driver Setting |
|
|
Lever Position |
For [Media Type] |
Plain paper |
Approx. 100 sheets (17 lb. or 64 g/m2) |
Left |
[Plain Paper] |
Envelopes |
Approx. 10 envelopes |
Right |
[Envelope] |
|
|
|
|
Canon Genuine Media
Canon recommends that you use genuine Canon paper to insure optimal print quality.
Paper Type |
Model |
Load Limit |
Paper |
Printer Driver Setting |
|
|
|
Thickness |
For [Media Type] |
|
|
|
Lever |
|
|
|
|
Position |
|
Super White Paper |
SW-201 |
Approx. 100 sheets |
Left |
[Plain Paper] |
|
|
(Letter/A4) |
|
|
|
|
|
|
|
High Resolution |
HR-101N |
Approx. 80 sheets |
Left |
[High Resolution Paper] |
Paper |
|
(Letter/A4) |
|
|
|
|
|
|
|
Glossy Photo |
GP-401/ |
10 sheets (Letter/A4) |
Left |
[Glossy Photo Paper] |
Paper |
GP-501 |
20 sheets |
|
|
|
|
(4" x 6"/Credit Card) |
|
|
|
|
|
|
|
Matte Photo Paper |
MP-101 |
10 sheets (Letter/A4) |
Left |
[Matte Photo Paper] |
|
|
20 sheets (4"x6") |
|
|
|
|
|
|
|
Photo Paper Plus |
PP-101D |
1 sheet (Letter/A4/5" x |
Left |
[Photo Paper Plus Double |
Double Sided |
|
7") |
|
Sided] |
|
|
|
|
|
Photo Paper Plus |
PP-101 |
10 sheets |
Left |
[Photo Paper Plus Glossy] |
Glossy |
|
(Letter/A4/5" x 7") |
|
|
|
|
20 sheets (4" x 6") |
|
|
|
|
|
|
|
Photo Paper Plus |
SG-101/ |
10 sheets (Letter/A4) |
Left |
[Photo Paper Plus Glossy] |
Semi-gloss |
SG-201 |
10 sheets (8" x 10")*1 |
|
|
|
|
20 sheets (4" x 6") |
|
|
|
|
|
|
|
Photo Paper Pro |
PR-101 |
10 sheets |
Left |
[Photo Paper Pro] |
|
|
(Letter/A4/8" x 10") |
|
|
|
|
20 sheets (4" x 6"/Wide) |
|
|
|
|
|
|
|
Photo Stickers |
PS-101 |
1 sheet |
Left |
[Photo Paper Plus Glossy] |
|
|
|
|
|
T-Shirt Transfers |
TR-301 |
1 sheet |
Right |
[T-Shirt Transfers] |
|
|
|
|
|
*1 SG-201 only |
|
|
|
|
zIf the paper does not feed properly, fan the sheets prior to loading them (up to 10) in the Auto Sheet Feeder. Fanning the sheets will prevent them from sticking together.
Chapter 1 |
Before Printing |
17 |

Selecting The Correct Paper
This section describes the characteristics and intended use of each paper applicable to this machine. Refer to this section and select the paper most suitable for your purpose of printing.
Paper Type |
Size |
Purpose |
Guidelines And Restrictions |
Plain paper |
Letter (8 1/2 in. x 11 in./ |
Printing from your |
17 lb.–28 lb. (64 g/m2–105 g/m2) |
|
215.9 mm x 279.4 mm) |
computer/photo |
The machine supports the paper |
|
Legal (8 1/2 in. x 14 in./ |
printing/copying |
sizes shown on the left in portrait |
|
215.9 mm x 355.6 mm) |
|
orientation. |
|
A4 (8 1/4 in. x 11 3/4 in./ |
|
You can use regular copier paper, |
|
210 mm x 297 mm) |
|
cotton bond paper, or typical |
|
A5 (5 7/8 in. x 8 1/4 in./ |
|
letterhead. |
|
148 mm x 210 mm) |
|
Your machine does not require |
|
B5 (7 1/8 in. x 10 1/8 |
|
special inkjet paper. |
|
in./182 mm x 257 mm) |
|
Legal-size paper can only be |
|
|
|
used when printing from your |
|
|
|
computer. |
|
|
|
We do not recommend using plain |
|
|
|
paper for photo printing. |
|
|
|
|
Envelopes |
US Commercial No. 10 |
Printing from your |
You may be able to load other |
|
(9 1/2 in. x 4 1/8 in./241 |
computer |
envelopes, but Canon cannot |
|
mm x 105 mm) |
|
guarantee consistent |
|
European DL (8 5/8 in. |
|
performance. |
|
x 4 3/8 in./220 mm x |
|
Do not use the following types of |
|
110 mm) |
|
envelopes since they may cause |
|
|
|
problems: |
|
|
|
Envelopes with windows, holes, |
|
|
|
perforations, cutouts, double |
|
|
|
flaps, pressure seals, and peel-off |
|
|
|
sealing strips. |
|
|
|
Envelopes made with embossed |
|
|
|
or treated surfaces. |
|
|
|
Sealed envelopes. |
|
|
|
Envelopes with letters enclosed. |
|
|
|
Remove each envelope from the |
|
|
|
Paper Output Tray as soon as it is |
|
|
|
printed. |
|
|
|
|
18 |
Before Printing |
Chapter 1 |
Canon Genuine Media
Canon recommends that you use genuine Canon paper to insure optimal print quality.
Paper Type |
Size |
Purpose |
Guidelines And Restrictions |
High |
Letter (8 1/2 in. x 11 in./ |
Printing from your |
This type of paper provides better |
Resolution |
215.9 mm x 279.4 mm) |
computer/photo |
color reproduction than plain paper. |
Paper |
A4 (8 1/4 in. x 11 3/4 in./ |
printing/copying |
It is suitable for printing business |
|
210 mm x 297 mm) |
|
documents that feature graphics |
|
|
|
and for photographs. |
|
|
|
Load the paper with the whiter side |
|
|
|
facing up. |
|
|
|
If the paper curls, remove each |
|
|
|
sheet as it is delivered in the Paper |
|
|
|
Output Tray. |
|
|
|
|
Glossy |
Letter (8 1/2 in. x 11 in./ |
Printing from your |
This paper is thicker than High |
Photo Paper |
215.9 mm x 279.4 mm) |
computer/photo |
Resolution Paper and has a glossy |
|
A4 (8 1/4 in. x 11 3/4 in./ |
printing/copying |
surface to produce near |
|
210 mm x 297 mm) |
|
photographic quality printouts. |
|
4" x 6" (4 in. x 6 in./ |
|
By using borderless printing, you |
|
101.6 mm x 152.4 mm) |
|
can print without any white borders. |
|
Credit Card |
|
Do not touch the printing surface |
|
(54 x 86 mm) |
|
until the ink has dried. |
|
|
|
Load the paper with the whiter side |
|
|
|
facing up. |
|
|
|
Do not use the loading support |
|
|
|
sheet included with this paper. |
|
|
|
If the ink takes a long time to dry, |
|
|
|
remove each sheet as soon as it is |
|
|
|
printed. |
|
|
|
|
Matte Photo |
Letter (8 1/2 in. x 11 in./ |
Printing from your |
This paper is thick and has a matte |
Paper |
215.9 mm x 279.4 mm) |
computer/photo |
finish. |
|
A4 (8 1/4 in. x 11 3/4 in./ |
printing |
This is matte water-resistant paper |
|
210 mm x 297 mm) |
|
and provides superior color |
|
4" x 6" (4 in. x 6 in./ |
|
reproduction. |
|
101.6 mm x 152.4 mm) |
|
It is suitable for a variety of printing |
|
|
|
purposes such as paper crafts, |
|
|
|
calendars and matte photographs. |
|
|
|
By using borderless printing, you |
|
|
|
can print without any white borders. |
|
|
|
Load the paper with the whiter side |
|
|
|
facing up. |
|
|
|
Do not touch the printing surface |
|
|
|
until the ink has dried. |
|
|
|
Remove each sheet from the Paper |
|
|
|
Output Tray as soon as it is printed. |
|
|
|
|
Chapter 1 |
Before Printing |
19 |

Paper Type |
Size |
Purpose |
Guidelines And Restrictions |
Photo Paper |
Letter (8 1/2 in. x 11 in./ |
Printing from your |
This is a thick paper with a glossy |
Plus Double |
215.9 mm x 279.4 mm) |
computer/photo |
water-resistant coating and provides |
Sided |
A4 (8 1/4 in. x 11 3/4 in./ |
printing |
superior color reproduction. |
|
210 mm x 297 mm) |
|
It is ideal for printing high-quality |
|
5" x 7" (5 in. x 7 in./ |
|
photographs. |
|
127.0 mm x 177.8 mm) |
|
Both sides of the paper can be |
|
|
|
printed on. |
|
|
|
Load one sheet at a time in the |
|
|
|
Auto Sheet Feeder when manually |
|
|
|
making double-sided prints. |
|
|
|
Remove each sheet from the Paper |
|
|
|
Output Tray as soon as it is printed. |
|
|
|
|
Photo Paper |
Letter (8 1/2 in. x 11 in./ |
Printing from your |
This is a thick paper with a glossy |
Plus Glossy |
215.9 mm x 279.4 mm) |
computer/photo |
water-resistant coating and |
|
A4 (8 1/4 in. x 11 3/4 in./ |
printing |
provides superior color |
|
210 mm x 297 mm) |
|
reproduction. |
|
4" x 6" (4 in. x 6 in./ |
|
It is ideal for printing high-quality |
|
101.6 mm x 152.4 mm) |
|
photographs. |
|
5" x 7" (5 in. x 7 in./127 |
|
By using borderless printing, you |
|
mm x 177.8 mm) |
|
can print without any white borders. |
|
|
|
Load the paper with the glossy side |
|
|
|
facing up. |
|
|
|
Remove each sheet from the Paper |
|
|
|
Output Tray as soon as it is printed. |
|
|
|
|
Photo Paper |
Letter (8 1/2 in. x 11 in./ |
Printing from your |
This is a matte water-resistant |
Plus Semi- |
215.9 mm x 279.4 mm) |
computer/photo |
paper and provides superior color |
gloss |
A4 (8 1/4 in. x 11 3/4 in./ |
printing |
reproduction. |
|
210 mm x 297 mm) |
|
It is ideal for printing high-quality |
|
4" x 6" (4 in. x 6 in./ |
|
photographs. |
|
101.6 mm x 152.4 mm) |
|
By using borderless printing, you |
|
8" x 10" (8 in. x 10 in./ |
|
can print without any white borders. |
|
203.2 mm x 254.0 mm) |
|
Load the paper with the glossy side |
|
|
|
facing up. |
|
|
|
Remove each sheet from the Paper |
|
|
|
Output Tray as soon as it is printed. |
|
|
|
|
20 |
Before Printing |
Chapter 1 |
Paper Type |
Size |
Purpose |
Guidelines And Restrictions |
Photo Paper |
Letter (8 1/2 in. x 11 in./ |
Printing from your |
This is a thick paper with a treated |
Pro |
215.9 mm x 279.4 mm) |
computer/photo |
surface that enhances gloss and |
|
A4 (8 1/4 in. x 11 3/4 in./ |
printing/copying |
provides superior color reproduction |
|
210 mm x 297 mm) |
|
and good lightfastness. |
|
4" x 6" (4 in. x 6 in./ |
|
It is ideal for printing high-quality |
|
101.6 mm x 152.4 mm) |
|
photographs. |
|
Wide (4 in. x 7.1 in./ |
|
By using borderless printing, you |
|
101.6 mm x 180.6mm) |
|
can print without any white borders. |
|
8" x 10" (8 in. x 10 in./ |
|
For 4" x 6" paper, by printing the |
|
203.2 mm x 254.0 mm) |
|
image beyond the perforations, you |
|
|
|
can then trim the borders to |
|
|
|
produce a photograph without any |
|
|
|
white borders. |
|
|
|
Do not trim the borders before |
|
|
|
printing. |
|
|
|
Load the paper with the glossy side |
|
|
|
facing up. |
|
|
|
For 4" x 6" cards, remove the cards |
|
|
|
from the Paper Output Tray before |
|
|
|
the count reaches 20. |
|
|
|
For other than 4" x 6" cards, |
|
|
|
remove the paper from the Paper |
|
|
|
Output Tray before the count |
|
|
|
reaches 10. |
|
|
|
For additional information on Photo |
|
|
|
Paper Pro, see page 22. |
|
|
|
|
Photo |
4" x 6" (4 in. x 6 in./ |
Printing from your |
This is a peel-and-stick sheet that |
Stickers |
101.6 mm x 152.4 mm) |
computer/copying |
allows you to make original photo |
|
|
|
stickers using your own |
|
|
|
photographs. |
|
|
|
On each sheet, you can print 16 |
|
|
|
photo stickers with excellent |
|
|
|
printing qualities. |
|
|
|
Load only one sheet at a time with |
|
|
|
the glossy side up. Printing on the |
|
|
|
reverse side can stain the inside of |
|
|
|
the machine or your clothes. |
|
|
|
Place the sheet in portrait |
|
|
|
orientation in such a manner that |
|
|
|
the top margin is larger than the |
|
|
|
bottom margin. For more |
|
|
|
information, refer to the instructions |
|
|
|
on the back of the sheet package. |
|
|
|
If a sheet is curled, uncurl it before |
|
|
|
loading. |
|
|
|
Remove each sheet from the Paper |
|
|
|
Output Tray as soon as it is printed. |
|
|
|
Do not use a sheet if any stickers |
|
|
|
are becoming unstuck or are |
|
|
|
missing from the sheet. |
|
|
|
|
|
|
|
|
Chapter 1 |
Before Printing |
21 |

Paper Type |
Size |
Purpose |
Guidelines And Restrictions |
T-Shirt |
A4 (8 1/4 in. x 11 3/4 in./ |
Printing from your |
This paper is used to produce iron- |
Transfers |
210 mm x 297 mm) |
computer |
on transfers. |
|
|
|
Use mirror printing to print the |
|
|
|
image onto the T-Shirt Transfer. |
|
|
|
T-Shirt Transfers can only be used |
|
|
|
when printing from your computer. |
|
|
|
Load the paper with the side that |
|
|
|
does not have green lines facing up. |
|
|
|
If the T-Shirt Transfer is curled, |
|
|
|
flatten it by curling it in the opposite |
|
|
|
direction. |
|
|
|
The T-Shirt Transfer should be |
|
|
|
used as soon as it is printed. |
|
|
|
Refer to the manuals supplied with |
|
|
|
the T-Shirt Transfer for details on |
|
|
|
how to use this paper. |
|
|
|
|
z Photo Paper Pro Guidelines
zDo not touch the print surface until the ink is dry (approx. 30 minutes). Colors in dark images may appear indistinct at first, but will become clearer after approx. 30 minutes.
zImages may smudge if you place them in an album before the ink is completely dry. It is recommended that you allow the ink to dry for 24 hours.
zDo not attempt to dry the ink with a hair dryer or by exposing printouts to direct sunlight.
zDo not store or display printouts in hot, damp, or humid conditions. Never expose them to heat or direct sunlight.
zStore printouts in photo albums, photo frames, or presentation binders to protect them from direct exposure to air or sunlight.
zDo not mount printouts in an adhesive-type album as you may not be able to remove them.
zBe aware that some types of clear plastic folders and albums may cause the edges of the paper to turn yellow.
22 |
Before Printing |
Chapter 1 |
Loading Paper
Loading Paper
Follow this procedure:
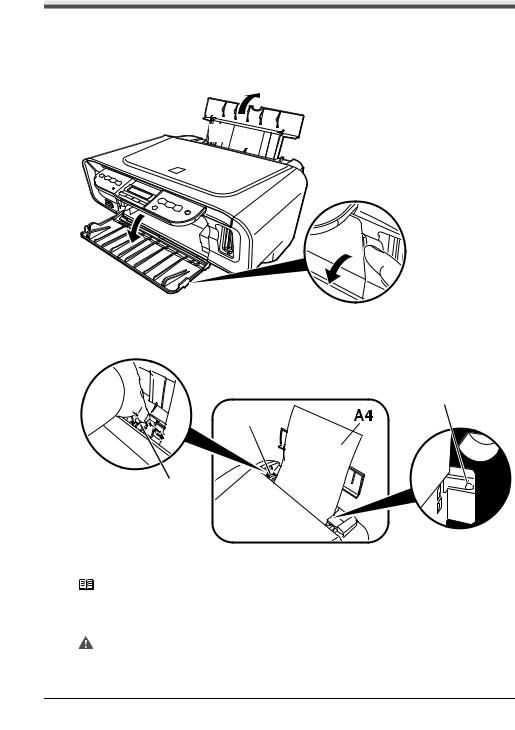
1 Open the Paper Support (1), then pull out the Paper Support Extension (2).
(1)
(2)


2 Place a stack of paper (print side up) in the Auto Sheet Feeder (1), pinch the Paper Guide (A) and adjust it to the left side of the stack (2).
(B)
(2)
(1)
(A)
z Set the Paper Thickness Lever to the correct position for the paper. (See page 17)
Note |
Set the Lever to the left for most paper. When the Lever is set to the right, |
|
the confirmation message appears before the machine starts printing. |
|
(MP180) |
Important |
Make sure the stack does not exceed the Load Limit Mark (B). |
Chapter 1 |
Before Printing |
23 |

Loading Envelopes
Follow this procedure:
1
2
Open the Paper Support, then pull out the Paper Support Extension.
Prepare the envelopes for loading.
Important z Press down firmly on the edges of the envelopes to make the folds crisp. Also, press firmly on the area that corresponds to the edges of
the back flap.
zRemove any curling by holding the edges diagonally and bending them gently.
zIf the edges of the envelope are inflated or curled, place the envelope on a flat surface. With a pen, press down while moving it from the center toward the edges of the envelope.
z Ensure that no curl or puff exceeds 1/8 in. (3 mm).
24 |
Before Printing |
Chapter 1 |
3 Place the stack of envelopes (print side up) in the Auto Sheet Feeder (1), pinch the Paper Guide (A) and adjust it to the left side of the stack (2).
(B)
(2)
 (1)
(1) 
(A)
zLoad the envelopes in the Auto Sheet Feeder with the short side down.
zSet the Paper Thickness Lever to the right.
 Important Make sure the stack does not exceed the Load Limit Mark (B).
Chapter 1 |
Before Printing |
25 |

Chapter 2
Copying
Making Copies
This section describes the basic procedure to make copies.
1 Load the paper in the Auto Sheet Feeder.
|
|
Note |
|
For details on paper, see page 17. |
||||||
2 |
Press [COPY]. |
|
|
|
||||||
3 |
Use [ ] or [ |
] to select the number of copies (max. 99 copies). |
||||||||
|
Ex: |
|
|
|
|
|
|
|
|
|
|
100% |
A4 |
STD |
03 |
|
|||||
|
|
|
|
|
|
|
PLAIN |
|
|
|
|
|
|
|
|
|
|
|
|
||
|
|
|
|
|
|
|
|
|
||
|
|
Note |
|
For the maximum load limit for the paper you are using in the Auto Sheet |
||||||
|
|
|
|
|
|
|
Feeder, see page 17. |
|||
4 Adjust the settings for your document as necessary.
Note |
z To select the paper size and type, see page 28. |
|
z To select the image quality, see page 29. |
|
z To select the scanning exposure, see page 29. |
|
z To select the copy ratio, see page 30. |
5 Load the document on the Platen Glass.
Note |
For details on how to load documents, see page 15. |
6 Press [Color] for color copying, or [Black] for black & white copying.
The machine starts copying.
Note |
To cancel copying, press [Stop/Reset]. |
26 |
Copying |
Chapter 2 |

1
2
Load the paper in the Auto Sheet Feeder. (See page 23)
Press [+] repeatedly to select the number of copies (max. 20 copies).
Note |
By pressing [+] repeatedly, <F> will be displayed. The number of copies |
|
will be set as 20. |
3 Press [Paper] repeatedly to select the paper size and type.
The Paper Lamp indicates the selected paper size and type.
A4 or Letter Photo Paper/A4 or Letter Plain Paper/4"x6" Photo Paper
4
5
Load the document on the Platen Glass.
Note |
For details on how to load documents, see page 15 |
Press [Color] for color copying, or [Black] for black & white copying.
The machine starts copying.
zTo make high speed copies:
(1)Press and hold down [Color] or [Black] for longer than 2 seconds. The LED flashes once.
(2)Release the button.
The machine starts high speed copying.
Note |
z High speed copying is only available when A4 or Letter plain paper is |
|
selected as the paper size and type. |
zHigh speed copying is suitable for text-only documents. If the quality is not as good as expected, try normal copying.
zWhen you want to make 10 to 19 copies, set the same number for pieces of paper. In this case, the machine will stop copying in an error. Press [Stop/Reset] to release the error.
zTo cancel copying, press [Stop/Reset].
Chapter 2 |
Copying |
27 |
Changing The Copy Settings (MP180)
Setting The Paper Size And Type
For copying using the Operation Panel, you need to set the size and type of paper loaded in the Auto Sheet Feeder.
Note |
The asterisk < >on the LCD indicates the current setting. |
Follow this procedure: |
|
1
2
3
Press [COPY].
Press [Menu] repeatedly until <PAGE SIZE> appears.
2.PAGE SIZE
W |
A4 |
X |
Use [ ] or [
 ] to select the paper size, then press [OK].
8.5"x11"/A4/B5/A5/4"x6"/5"x7"/CREDIT CARD SIZE
Note |
Some of these are not available depending on the country of purchase. |
4 Press [Menu] repeatedly until <MEDIA TYPE> appears.
3.MEDIA TYPE
W  PLAIN PAPER
X
5 Use [ ] or [
 ] to select the paper type.
PLAIN PAPER/PHOTO PAPER PRO/PHOTO PAPER PLUS/MATTE PHOTO PAPR/ GLOSSY
Note |
In order to obtain optimal quality print results, when copying photographs, |
|
use Canon-recommended Photo Paper Pro or Photo Paper Plus Glossy. |
For details on paper, see page 17.
6 Press [OK].
28 |
Copying |
Chapter 2 |
 Loading...