


 Loading...
PUB. DIE-295
Digital Video Camcorder
Instruction Manual
Y


 P O C
P O C
PAL
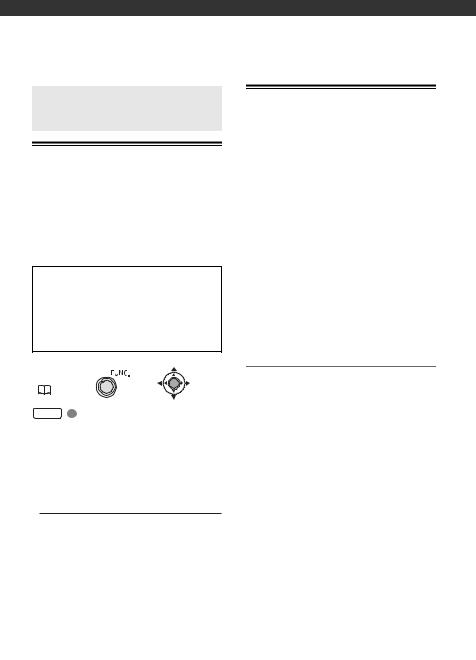
Cleaning the Video Heads
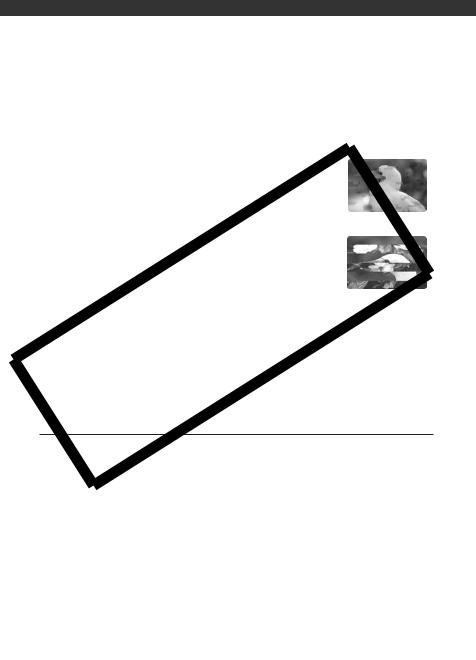
Digital video camcorders record video signals onto the tape in very thin lines (as thin as 1/8 the width of a hair). The following anomalies may appear if the video heads become dirty even a little.
• Mosaic or other blocky video artifacts (Fig. 1) or banding |
|
||
(Fig. 2) appear on the picture during playback. |
|
||
• Sound becomes distorted, or there is no sound during |
|
||
playback. |
|
|
|
• The message “HEADS DIRTY, USE CLEANING CASSETTE” |
Fig. 1 |
||
appears. |
|
|
|
If such symptoms appear, clean the video heads with the |
|
||
|
P |
|
|
Canon DVM-CL Digital Video Head Cleaning Cassette* or a |
|
||
commercially available dry cleaning cassette. |
|
|
|
If the symptoms reappear shortly after the cleaning, the |
|
||
videocassette may be defective. Stop using it. |
|
Fig. 2 |
|
O |
Y |
||
* Availability differs from area to area. |
|
||
Video heads may become dirty under the following conditions: |
|
||
• When using the camcorder in humid or hot places. |
|
||
C |
|
|
|
• When using cassettes with damaged or dirty tapes.
• When using the camcorder in dusty places.
• When using the video heads for a long time without cleaning them.
 NOTES
NOTES
•Before you make important recordings, clean the video heads and make a test recording first. We also recommend cleaning the video heads after use, before storing the camcorder.
•Do not use wet type cleaning cassettes as this may damage the camcorder.
•Even after cleaning the video heads you may not be able to play back correctly tapes that were recorded with dirty video heads.
2

Important Usage Instructions
WARNING!
TO REDUCE THE RISK OF ELECTRIC SHOCK, DO NOT REMOVE COVER (OR BACK). NO USER SERVICEABLE PARTS INSIDE. REFER SERVICING TO QUALIFIED SERVICE PERSONNEL.
WARNING!
TO REDUCE THE RISK OF FIRE OR ELECTRIC SHOCK, DO NOT EXPOSE THIS PRODUCT TO RAIN OR MOISTURE.
|
|
|
|
|
|
CAUTION: |
ONLY |
|
|
TO REDUCE THE RISK OF ELECTRIC SHOCK AND TO REDUCE ANNO ING |
|
|
INTERFERENCE, USE THE RECOMMENDED ACCESSORIES |
. |
|
|
|
|
CAUTION: |
P |
|
|
DISCONNECT THE MAINS PLUG FROM THE SU LY SOCKET WHEN NOT IN USE. |
|
|
|
The Mains plug is used as the disconnect device. The Mains plug shall remain readily operable to disconnect the plug in case ofOan accident.
While using the compact power adapter, do not wrap it or cover it with a piece of cloth, and do not place it in confined narrow spaces. Heat may build up, the plastic case may deform and it could result in electric shock
Cor fire.
A-590E identification plate is located on the bottom.
Using any device other than the Compact Power Adapter CA-590E may damage the camcorder.
European Union (and EEA) only.
This symbol indicates that this product is not to be disposed of with your household waste, according to the WEEE Directive (2002/96/EC) and your national law. This product should be handed over to a
designated collection point, e.g., on an authorized one-for-one basis when you buy a new similar product or to an authorized collection site for recycling waste electrical and electronic equipment (EEE). Improper
 handling of this type of waste could have a possible negative impact on the environment and human health due to potentially hazardous substances that are generally associated with EEE. At the same time, your cooperation in the correct disposal of this product will contribute to the effective usage of natural resources. For more information about where you can drop off your waste equipment for recycling, please contact your local city office, waste authority, approved WEEE scheme or your household waste disposal service. For more information regarding return and recycling of WEEE products, please visit
www.canon-europe.com/environment. (EEA: Norway, Iceland and Liechtenstein)
3
Table of contents
Introduction ______________________________
8About this Manual
9 Getting to Know the Camcorder |
|
|||
9 |
Supplied Accessories |
Y |
||
|
|
|||
10 |
Components Guide |
|
|
|
13 |
Screen Displays |
|
|
|
Preparations |
P |
|||
_____________________________ |
||||
15 |
Getting Started |
|
|
|
15 |
Charging the Battery ack |
|
|
|
17 |
Installing the Backup Battery |
|
|
|
17 |
Preparing the Wireless Controller ( |
only) |
||
|
and Accessories |
|
|
|
19 |
Basic |
peration of the Camcorder |
|
|
19 |
Operating Modes |
|
|
|
19 |
Joystick and Joystick Guide |
|
|
|
20 |
Using the Menus |
|
|
|
22 |
First Time Settings |
|
|
|
C22 hanging the Language |
|
|
||
22Changing the Time Zone
23Setting the Date and Time
23 Getting Ready to Start Recording
23 Opening the Lens Cover and Adjusting the LCD Screen 25 Inserting and Removing a Tape
4
Table of contents
Video ____________________________________
26 |
Basic Recording |
|
26 |
Shooting Video |
Y |
28 |
|
|
Zooming: Optical, Advanced and Digital Zoom |
||
30 |
Quick Start Function |
|
31 |
Reviewing the Last Scene Recorded |
|
31 |
P |
|
Basic Playback |
|
|
31 |
Playing Back Video |
|
33 |
Returning to a re-marked osition |
|
33 |
Locating the Beginning of a Recording Date |
|
34 |
O |
|
Locating the End of the Last Scene |
||
34 |
n-Screen Displays (Data Code) |
|
35 |
Advanced Function |
|
C |
|
|
35 |
: Special Scene Recording Programs |
|
37 |
Flexible Recording: Changing the Shutter Speed |
|
38 |
L D Video Light |
|
38 |
Self Timer |
|
39 |
Audio Recording Mode |
|
40 |
Audio Playback Modes |
|
41 |
Manual Focus Adjustment |
|
42 |
Manual Exposure Adjustment |
|
42White Balance
43Image Effects
44Digital Effects
5
External Connections _______________________
46 Connecting to a TV or VCR
47 Connection Diagrams
48 Playback on a TV Screen
48 |
Copying your Recordings to an External Video Recorder |
|
49 |
Audio Dubbing |
|
|
|
Y |
|
P |
|
51 Connecting to a Computer |
||
51 |
PC Connection Diagram |
|
52 |
Transferring Video Recordings |
|
|
O |
|
C |
|
|
6

Table of contents
Additional Information ______________________
53 Appendix: Menu Options Lists
53 |
FUNC. Menu |
|
Y |
54 |
Setup Menus |
|
|
|
|
||
54 |
Camera Setup (Advanced Zoom, Image Stabilizer, etc.) |
||
55 |
VCR Setup (Recording Mode, TV Type, etc.) |
||
55 |
|
P |
|
Audio Setup (Audio Mode, Wind Screen, etc.) |
|||
56 |
Display Setup (LCD Brightness, Language, etc.) |
||
57 |
System Setup (Beep, ower Save, etc.) |
||
58 |
Date/Time Setup |
|
|
59 |
O |
|
|
Trouble? |
|
|
|
59 |
Troubleshooting |
|
|
61 |
List of Messages |
|
|
63 |
Do’s and Don’ts |
|
|
63 |
Handling Precautions |
|
|
65 |
Maintenance/ thers |
|
|
67 |
Using the Camcorder Abroad |
|
|
68 |
General Information |
|
|
68 |
System Diagram |
|
|
69 |
Optional Accessories |
|
|
C72 Specifications |
|
|
|
75 |
Index |
|
|
7
Introduction
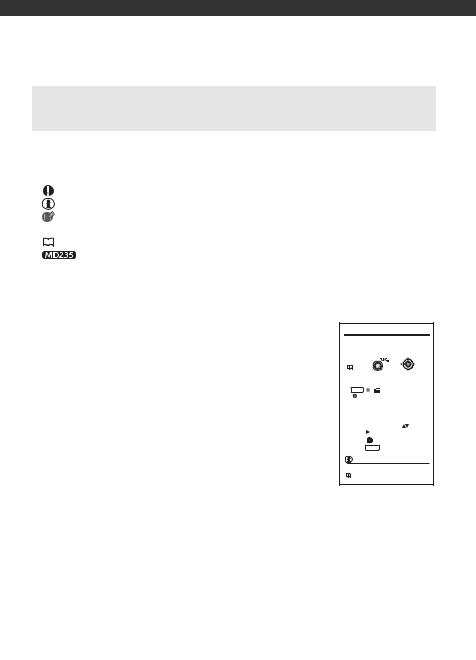
About this Manual
Thank you for purchasing the Canon MD235/MD216/MD215/MD205. Please read this manual carefully before you use the camcorder and retain it for future reference. Should your camcorder fail to operate correctly, refer to Troubleshooting ( 59).
59).
Conventions Used in this Manual
• |
|
|
|
IMPORTANT: Precautions related to the camcorder’s operation. |
|
• |
|
|
|
NOTES: Additional topics that complement the basic operating procedures. |
|
|
|
|
|
|
Y |
• |
|
|
|
POINTS TO CHECK: Restrictions or requirements regarding the function |
|
|
described. |
|
|||
• |
|
|
|
: Reference page number. |
|
• |
|
|
|
: Text that applies only to the model(s) shown in the icon. |
|
|
|
|
|
|
P |
• “Screen” refers to the LCD and the viewfinder screen.
• The photos included in the manual are simulated pictures taken with a still camera. Note that unless indicated otherwise, illustrations in this manual refer to the 
model.
Buttons and switches to be operated
|
FUNC. |
|
|
|
( |
30) |
|
Brackets [ ] and capital letters are used to refer to menu |
1 Open the date and time setup |
||
|
screen. |
|
|
options as they are displayed on screen. In tables in this |
|
FUNC. |
[ MENU] |
manual the default value is shown in boldface. |
|
[ DATE/TIME SETUP] |
|
|
[DATE/TIME] |
||
For example [ON]O, [ FF]. |
|
Blinking arrows will be displayed |
|
|
around the first field of the date. |
||
|
2 Change each field of the date and |
||
|
|
time with the joystick ( ) and |
|
|
|
move ( ) to the next field. |
|
|
3 Press ( |
) to start the clock. |
|
Names of buttons and switches other than the joystick |
4 Press FUNC. to close the menu. |
||
|
|
|
|
are indicated within a “button” frame. |
|
NOTES |
|
C |
|
|
|
For example FUNC. . |
You can also change the date format |
||
|
|
|
|
8
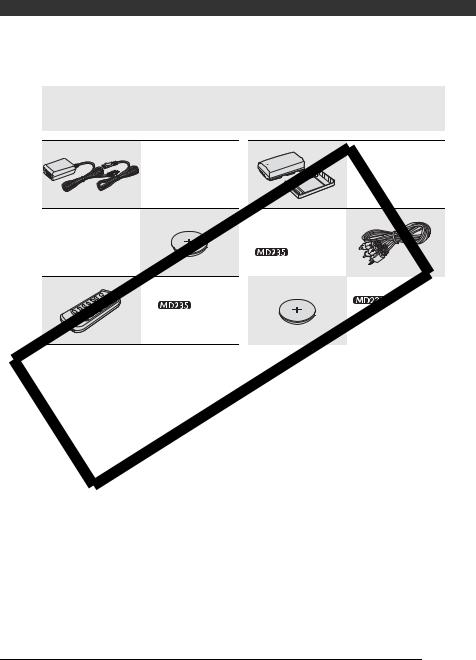
Supplied Accessories
CA-590E Compact Power |
|
Adapter |
BP-2L5 Battery Pack |
(incl. power cord) |
|
|
|
Y |
|
Lithium Button Battery |
|
STV-250N Stereo Video |
|
(CR1616) |
|
Cable |
|
|
( |
incl. ferrite core) |
|
|
P |
Lithium Button |
|
|
WL-D85 |
|
|
O |
|
Battery (CR2025) for |
|
Wireless Controller |
|
Wireless Controller |
|
C |
|
|
|
9
Introduction
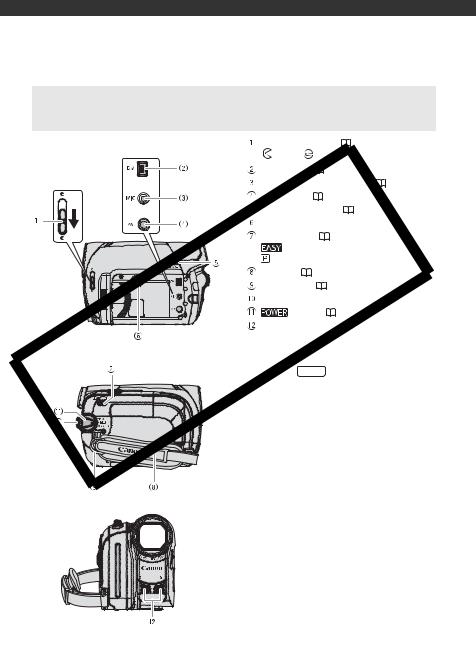
Components Guide
Left side view |
Lens cover switch ( |
26) |
|
||
( open, |
closed) |
|
|
||
|
|
|
|||
|
DV terminal ( |
|
47, 51) |
|
|
|
MIC (microphone) terminal ( |
39) |
|||
|
AV terminal ( |
|
47) |
|
|
|
Y |
||||
|
CHARGE indicator ( |
15) |
|
||
|
Speaker |
|
|
|
|
|
Mode switch ( |
27) |
|
|
|
|
Easy recording |
|
|
||
|
P |
|
|
||
|
Recording programs |
|
|||
|
Grip belt ( |
18) |
|
|
|
|
Strap mount ( |
|
71) |
|
|
|
Lock button |
|
|
|
|
|
O |
switch ( |
19) |
||
|
|
|
|||
|
|
|
Stereo microphone |
|
|
Right side view |
|
Names of buttons and switches other than the |
|||
|
joystick are indicated within a “button” frame |
||||
C |
|||||
(for example FUNC. ). |
|
||||
|
|
|
|||
Front view
10

Back view |
|
|
Joystick ( |
19) |
|
|
|
|
|
|
|
|
FUNC. button ( |
|
20, 53) |
|
|
||
|
|
|
D.EFFECTS button ( |
44) |
|
||||
|
|
|
Remote sensor ( |
18) |
|
||||
|
|
|
Viewfinder ( |
28) |
|
|
|
||
|
|
|
Dioptric adjustment lever ( |
28) |
|
||||
|
|
|
QUICK START button ( |
30) |
|
||||
|
|
|
Start/Stop button ( |
26) |
|
|
|||
|
|
|
DC IN terminal ( |
|
15) |
|
|
||
|
|
|
Backup battery compartment ( |
17) |
|||||
|
|
|
Serial number/ |
|
|
|
|
|
|
|
|
|
Battery attachment unit ( |
15) |
|
||||
|
|
|
LCD screen ( |
|
23) |
|
|
|
|
|
|
|
Y |
||||||
Top view |
|
|
Cassette compartment ( |
25) |
|
||||
|
|
Cassette compartment cover ( |
25) |
||||||
|
|
|
Zoom lever ( |
|
28) |
|
|
|
|
|
|
PO EN/EJECT |
switch ( |
25) |
|
||||
|
O |
Tripod socket ( |
|
18) |
|
|
|
||
|
BATT. (battery release) switch ( |
15) |
|||||||
|
|
|
|
|
|
|
|
||
C |
|
|
|
|
|
|
|
|
|
Names of buttons and switches other than the joystick are indicated within a “button” frame
FUNC. ).
Bottom view
11
Introduction
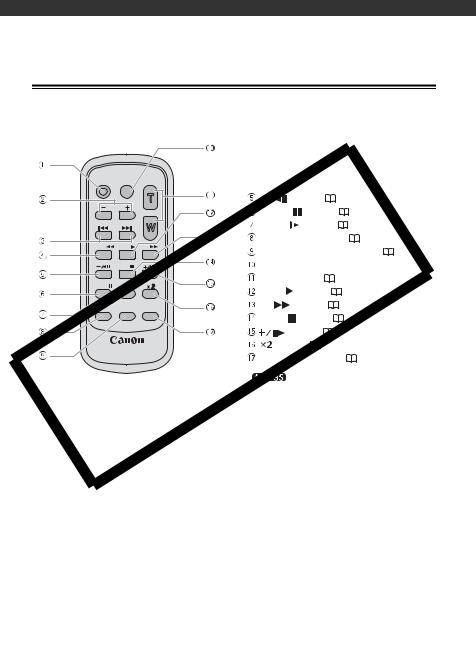
 Wireless Controller WL-D85
START/
STOP PHOTO ZOOM
 START/STOP button (
 26)
26)
 CARD –/+ buttons*
 DATE SEARCH
 /
/ 
 buttons (
  33)
33)  REW
REW  button (
  31)
31)
|
|
|
|
|
button ( |
31) |
|
CARD |
|
|
PAUSE |
button ( |
|
31) |
|
|
|
|
|
|
|||
DATE SEARCH |
|
|
SLOW |
button ( |
|
31) |
|
|
|
|
|
AUDIO DUB. button ( |
49) |
||
REW |
PLAY |
FF |
|
ZERO SET MEMORY button ( 33) |
|||
|
|
|
|
||||
|
STOP |
|
|
HOTO button* |
|
|
|
PAUSE |
SLOW |
|
|
Zoom buttons ( |
28) |
|
|
|
|
|
button ( |
31) |
|||
|
|
|
|
|
|||
|
ZERO SET |
|
|
FFLAYbutton ( 31) |
|||
AUDIO DUB. MEM RY |
TV SCREEN |
|
|||||
|
|
|
|
|
button ( |
31) |
|
|
|
|
|
|
button ( |
31) |
|
|
|
|
|
button ( 31) |
|
|
|
WIRELESS C NTR LLER WL-D85 |
STOP |
|
57) |
||||
|
|
|
|
TV SCREEN button ( |
|||
|
|
|
* |
|
Still images cannot be recorded or |
||
O |
|
|
|
|
|||
C |
|
|
|
|
|
||
played back using this model. Please disregard these buttons.
12
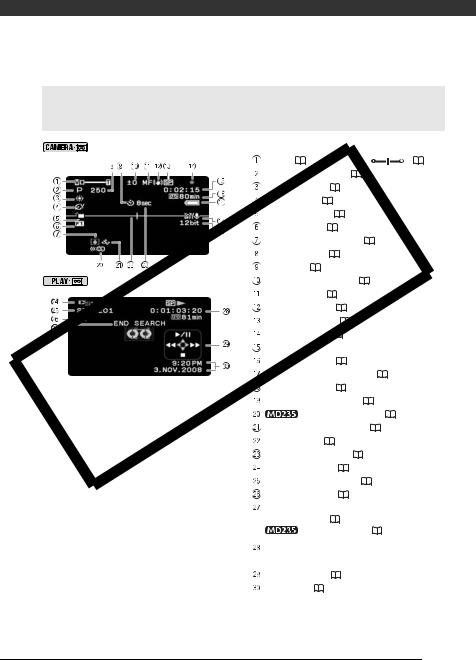
|
|
Zoom ( |
28), Exposure |
|
( |
42) |
|||
|
|
Recording program ( |
35) |
|
|
||||
|
|
White balance ( |
42) |
|
|
|
|
||
|
|
Image effect ( |
43) |
|
|
|
|
||
|
|
LCD video light ( |
38) |
|
|
|
|
||
|
|
Digital effects ( |
44) |
|
|
|
|
||
|
|
Condensation warning ( |
|
66) |
|
|
|||
|
|
Shutter speed ( |
37) |
|
|
|
|
||
|
|
Self timer ( |
38) |
|
|
|
|
|
|
Playing Movies |
|
Exposure adjustment ( |
|
42) |
|
|
|||
|
|
Manual focus ( |
41) |
|
|
|
|
||
|
|
YImage stabilizer ( 54) |
|
||||||
|
|
Recording mode ( |
55) |
|
|
|
|||
|
|
Tape operation ( |
14) |
|
|
|
|
||
|
|
Time code (hours : minutes : seconds) |
|
||||||
|
P |
14) |
|
|
|
|
|||
O |
Remaining tape ( |
|
|
|
|
||||
Remaining battery charge ( |
14) |
|
|||||||
Wind screen off ( |
56) |
|
|
|
|
||||
Audio recording mode ( |
|
39) |
|
|
|||||
|
Remote sensor off ( |
57) |
|
||||||
C |
|
|
|
||||||
|
Backup battery warning ( |
17) |
|
||||||
|
Level marker ( |
|
57) |
|
|
|
|
||
|
Recording reminder ( |
14) |
|
|
|||||
|
Operating mode ( |
19) |
|
|
|
|
|||
|
|
|
|
|
|
||||
|
|
Audio playback mode ( |
|
40) |
|
|
|||
|
|
Speaker volume ( |
32) |
|
|
|
|
||
|
|
Search function display |
|
|
|
|
|||
|
|
END SEARCH ( |
34)/ |
|
|
|
|
||
|
|
|
DATE SEARCH ( |
33) |
|
||||
|
|
Playback time |
|
|
|
|
|
|
|
|
|
(hours : minutes : seconds : frames) |
|
||||||
|
|
Joystick guide ( |
19) |
|
|
|
|
||
|
|
Data code ( |
34) |
|
|
|
|
||
13
Introduction
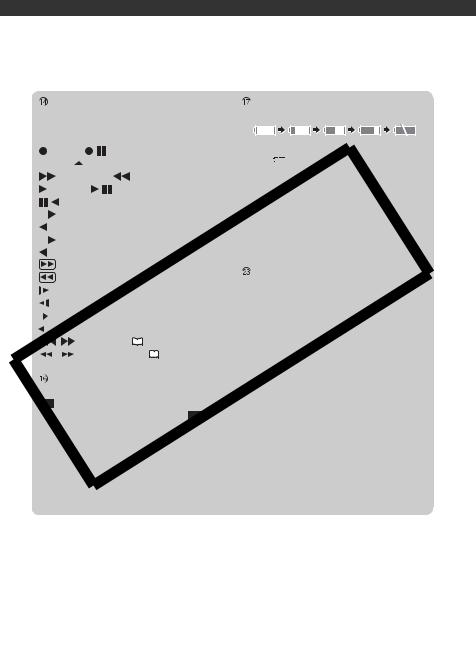
|
Tape operation |
|
|
|
|
|
|
|
|
|
Remaining battery charge |
|||||||
Note that some playback and search modes are |
|
|
|
|||||||||||||||
|
|
|
||||||||||||||||
only available when using the wireless controller |
|
|
|
|||||||||||||||
(not included with all models). |
|
|
|
|
|
|
||||||||||||
|
Record, |
Record pause, |
|
|
• When |
starts flashing in red replace the |
||||||||||||
|
Stop, |
|
|
Eject, |
|
|
|
|
|
|
|
|
||||||
|
|
|
|
|
|
|
|
|
|
|||||||||
|
|
|
|
|
|
|
|
|
|
|
battery pack with a fully charged one. |
|||||||
|
|
|
Fast forward, |
Rewind, |
|
|||||||||||||
|
|
|
|
• When you attach an empty battery pack, the |
||||||||||||||
|
Playback, |
Playback pause, |
|
|||||||||||||||
|
|
power may turn off without displaying the icon. |
||||||||||||||||
|
|
|
Reverse playback pause, |
|
|
|||||||||||||
|
|
|
|
|
• Depending on the conditions under which the |
|||||||||||||
x1 |
Playback (normal speed), |
|
|
|||||||||||||||
|
|
camcorder and the battery pack are used, the |
||||||||||||||||
|
x1 Reverse playback (normal speed), |
|
||||||||||||||||
|
|
actual battery charge may not be indicated |
||||||||||||||||
x2 |
Playback (double speed), |
|
|
|||||||||||||||
|
|
accurately. |
|
|
||||||||||||||
|
x2 Reverse playback (double speed), |
|
|
|
||||||||||||||
|
|
|
|
|
|
|||||||||||||
|
|
|
Fast forward playback, |
|
|
|
|
|
|
Recording reminder |
||||||||
|
|
|
Rewind playback, |
|
|
|
|
|
|
|||||||||
|
|
|
|
|
|
|
|
The camcorder counts from 1 to 10 seconds when |
||||||||||
|
|
Slow playback, |
|
|
|
|
|
|
|
|
||||||||
|
|
|
|
|
|
|
|
|
|
you start recording. This is helpful to avoid scenes |
||||||||
|
|
|
|
|
|
|
|
|
|
|
|
|
|
|
||||
|
|
Slow reverse playback, |
|
|
|
|
|
that areYtoo short. |
||||||||||
|
|
|
|
|
|
O |
|
|
||||||||||
|
Frame advance, |
|
|
|
|
P |
||||||||||||
|
Frame reverse, |
|
|
|
|
|
|
|
||||||||||
|
/ |
|
|
Date search ( |
|
|
33), |
|
||||||||||
|
|
|
|
|
||||||||||||||
|
|
/ |
|
|
Zero set memory ( |
|
|
33) |
||||||||||
|
|
|
|
|
||||||||||||||
|
|
C |
|
|
|
|
|
|||||||||||
|
Remaining tape |
|
|
|
|
|
|
|
|
|
|
|
|
|||||
Indicates the remaining time of the tape in minutes. |
|
|
||||||||||||||||
|
|
moves during recording. When the tape |
|
|
||||||||||||||
reaches its end, the display changes to “ |
|
END”. |
|
|
||||||||||||||
• When the time left is less than 15 seconds, the remaining tape time may not appear.
• Depending on the type of tape, the remaining time displayed may not be correct. In any case, you will be able to record on the tape the number of minutes that appears on the cassette’s label (for example, 85 minutes).
14
Preparations
This chapter describes basic operations, such as navigating the menus, and first time settings to help you learn more about your camcorder.
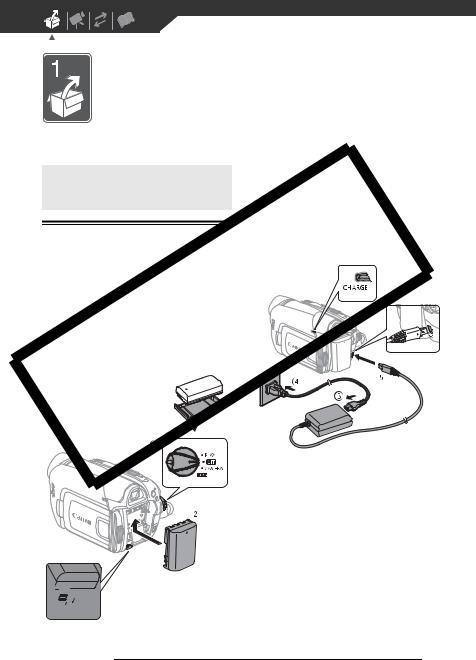
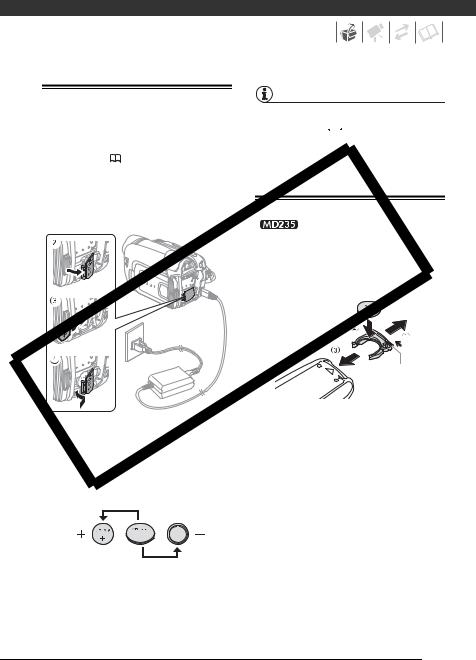
Getting Started |
|
1 Turn off the camcorder. |
|
|
2 Attach the battery pack to the |
||
|
|
||
|
|
camcorder. |
|
|
|
Press the battery pack lightly and |
|
Charging the Battery Pack |
|
slide it up until it clicks. |
|
|
CHARGE |
|
|
|
|
|
|
|
|
indicator |
|
The camcorder can be powered with a |
|
|
|
battery pack or directly using the |
|
DC IN |
|
compact power adapter. Charge the |
|
terminal |
|
battery pack before use. |
|
Y |
|
For approximate charging times and |
|
|
|
recording/playback times with a full |
|
|
|
battery pack, refer to the tables on |
|
|
|
page 70. |
P |
|
|
|
|
|
|
Remove the battery |
|
|
|
terminal cover before |
|
|
|
attaching theObattery |
|
||
C |
|
|
|


 BATT. switch
15
Preparations
|
|
|
• You can also use the compact |
|
on aircraft and ships, DC-AC inverters, |
|||
|
|
|
power adapter without attaching a |
|
etc. |
|||
|
|
|
battery pack. |
|
|
|
|
|
|
|
|
• When the compact power adapter |
|
NOTES |
|||
|
|
|
is connected, even if a battery is |
|
|
|
|
|
|
|
|
• The CHARGE indicator also serves as a |
|||||
|
|
|
attached its power will not be |
|||||
|
|
|
consumed. |
|
|
rough estimate of the battery charge |
||
|
|
|
|
|
|
status. |
||
|
|
ONCE THE BATTERY IS FULLY CHARGED |
|
Continuously on: Battery pack fully |
||||
|
|
|
charged. |
|||||
|
|
|
|
|
|
Two quick flashes at 1-second intervals: |
||
|
|
|
|
|
|
|||
|
1 Disconnect the compact power |
|
Battery pack at least 50% charged. If |
|||||
|
|
|
adapter from the camcorder. |
|
the indicator flashes quickly but not |
|||
|
2 Unplug the power cord from the |
|
exactly in this pattern, refer to |
|||||
|
|
Troubleshooting ( |
|
59). |
||||
|
|
|
power outlet and the compact |
|
One flash at 1-second intervals: Battery |
|||
|
|
|
power adapter. |
|
|
|||
|
|
|
|
|
pack less than 50% charged. |
|||
|
|
|
|
|
|
|||
|
|
|
|
|
• We recommend that you prepare battery |
|||
|
|
TO REMOVE THE BATTERY PACK |
|
|
packs 2 to 3 times longer than you think |
|||
|
|
|
|
|||||
|
|
|
|
Y |
||||
|
|
|
|
|
|
you might need. |
||
|
Press BATT. to release the battery |
|
|
|
|
|||
|
pack. Slide the battery pack down |
|
|
|
|
|||
|
and then pull it out. |
P |
||||||
|
|
|
|
|
|
|||
|
|
|
IMPORTANT |
|
|
|
|
|
|
|
|
O |
|
|
|
|
|
|
• You may hear some noise from the |
|
|
|
|
|||
|
|
|
compact power adapter during use. |
|
|
|
|
|
|
|
|
This is not a malfunction. |
|
|
|
|
|
|
• We recommend charging the battery |
|
|
|
|
|||
Cpack in temperatures between 10 °C |
|
|
|
|
||||
and 30 °C. Outside the temperature range of 0 °C to 40 °C, charging will not start.
• Do not connect to the camcorder’s DC IN terminal or to the compact power adapter any electrical equipment that is not expressly recommended for use with this camcorder.
• To prevent equipment breakdowns and excessive heating, do not connect the supplied compact power adapter to voltage converters for overseas travels or special power sources such as those
16
Installing the Backup Battery |
|
NOTES |
|
|
|
The battery life of the backup battery is |
|||
The backup battery (lithium button battery |
about one year. |
flashes in red when |
||
the lithium button battery is not installed, |
||||
CR1616) allows the camcorder to retain |
||||
or when it needs to be replaced. |
||||
the date, time ( 23) and other |
||||
|
|
|
||
camcorder settings while the power |
|
|
|
|
source is disconnected. Connect a power |
|
|
|
|
source to the camcorder when replacing |
Preparing the Wireless Controller |
|||
the backup battery to retain the settings. |
||||
|
( |
Y |
||
|
only) and Accessories |
|||
P |
|
|||
|
First, insert the supplied lithium button |
|||
|
battery (CR2025) into the wireless |
|||
|
controller. |
|
||
O |
|
Tab |
||
|
|
|
||
|
1 Press the tab in the direction of |
|||
1 If a battery pack is attached, |
|
the arrow and pull out the battery |
||
|
holder. |
|
||
remove it first. |
|
|
||
|
|
|
||
C2 Open the backup battery cover. |
2 Place the lithium button battery |
|||
|
|
with the + side facing up. |
||
3 Insert the backup battery with the |
3 Insert the battery holder. |
|
+ side facing out. |
||
|
4 Close the cover.
17
Preparations
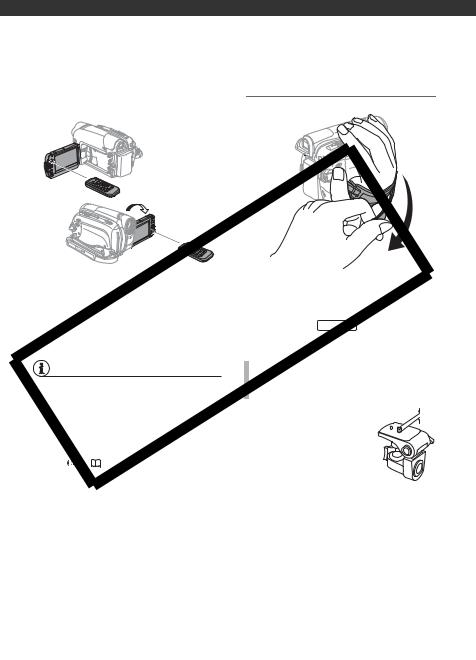
 TO USE THE WIRELESS CONTROLLER Accessories
|
|
|
Y |
|
Point the controller at the |
P |
|||
camcorder’s remote sensor when |
Fasten the grip belt. |
|||
you press the buttons. |
|
Adjust the grip belt so that you can |
||
|
O |
|||
You can rotate the LCD panel 180 |
reach the zoom lever with your index |
|||
degrees to use the wireless controller |
finger, and the Start/Stop button with |
|||
from the front of the camcorder. |
|
your thumb. |
||
C |
|
WHEN YOU MOUNT THE CAMCORDER ON A |
||
NOTES |
|
|
||
• The wireless controller may not work |
TRIPOD |
|||
properly when the remote sensor is |
Do not leave the viewfinder |
|||
situated under strong light sources or |
exposed to direct sunlight |
|||
direct sunlight. |
|
|||
|
as it may melt (due to |
|||
• If the wireless controller does not work, |
||||
concentration of the light by |
||||
check that [WL.REMOTE] is not set to |
||||
the lens). Do not use tripods |
||||
[OFF |
] ( 57). Otherwise, replace |
|||
with fastening screws |
||||
the battery. |
|
|||
|
longer than 5.5 mm. Doing |
|||
|
|
|
||
|
|
|
so may damage the camcorder. |
|
18
|
|
|
|
|
|
|
|
|
|
|
|
|
|
|
|
|
|
|
|
|
|
|
|
|
|
|
|
|
|
|
|
|
|
|
|
|
|
|
|
|
Basic Operation of the |
|
|
|
|
|
|
|
|
|
|
Joystick and Joystick Guide |
|||||||
|
Camcorder |
|
|
|
|
|
|
|
|
|
|
|
Use the joystick to operate the |
||||||
|
|
|
|||||||
|
|
|
camcorder's menus. |
||||||
|
|
||||||||
|
|
||||||||
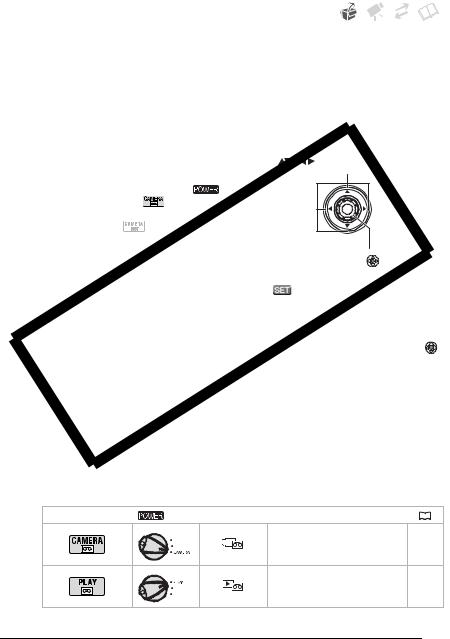
Operating Modes
|
Push the joystick up, down, left or right |
||
|
( |
, |
) to select an item or change |
The camcorder’s operating mode is |
settings. |
|
|
|
|
|
|
determined by the position of the |
Y |
||
|
|||
switch. In the manual, |
indicates that |
|
|
a function is available in the operating |
|
||
mode shown and |
indicates that the |
|
|
function is not available. When no |
|
||
operating mode icons are given, the |
ress the joystick itself ( ) to save the |
||
function is available in both operating |
|||
settings or confirm an action. On menu |
|||
modes. |
|
||
|
screens, this is indicated by the icon |
||
|
|
||
|
|
. |
|
|
|
The joystick can also be used in |
|
|
Pcombination with the joystick guide to |
||
C |
operate additional functions. Press ( ) |
||
|
|
||
|
|
to display/hide the joystick guide (when |
|
|
|
recording, the joystick guide will appear |
|
Oonly when the mode switch is set to |
|||
 ). The functions that appear on the joystick guide will change depending on the operating mode.
Operating mode |
switch Icon display |
Operation |
|
|
|
Recording movies.
26
Playing movies.
31
19
Preparations
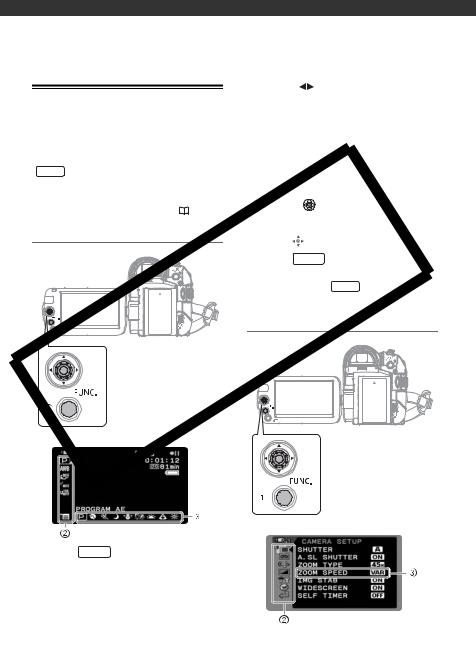
Using the Menus |
3 Select ( |
) the desired setting |
||
|
from the available options at the |
|||
|
|
bottom bar. |
||
Many of the camcorder’s functions can |
• The selected option will be |
|||
highlighted in light blue. Menu |
||||
be adjusted from the menus that open |
||||
items not available will appear |
||||
after pressing the FUNC. button |
|
|||
|
grayed out. |
|||
( FUNC. ). |
|
|||
|
• With some settings you will need to |
|||
For details about the available menu |
||||
make further selections and/or |
||||
options and settings, refer to the |
|
|||
|
press ( ). Follow the additional |
|||
appendix Menu Options Lists ( |
53). |
|||
Y |
||||
|
|
operation guides that will appear |
||
Selecting a FUNC. Menu Option |
|
on the screen (such as the joystick |
||
|
|
icon |
, small arrows, etc.). |
|
|
P |
|||
|
4 |
ress FUNC. to save the settings |
||
|
|
and close the menu. |
||
|
|
ou can press FUNC. to close the |
||
|
|
menu at any time. |
||
O |
|
|||
|
Selecting an Option from the Setup Menus |
|||
C |
|
|
|
|
1 Press FUNC. .
2 Select ( ) the icon of the function you want to change from the left side column.
Menu items not available will appear grayed out.
20
1 Press FUNC. . |
|
|
Abbreviation of Menu Selections in this |
||||||
2 Select ( |
) the |
icon and press |
Manual |
|
|||||
( ) to open the setup menus. |
In this manual, the |
arrow is used to |
|||||||
3 Select ( |
|
|
|
||||||
) the desired menu from |
abbreviate menu selections. Below is |
||||||||
the left side column and press |
an example of changing a setting using |
||||||||
( |
). |
|
|
|
the setup menus. |
|
|||
The title of the selected menu |
|
FUNC. |
|
|
|||||
appears on top of the screen and |
|
[ |
MENU] |
|
|||||
under it the list of settings. |
|
[ |
DISPLAY SETUP/ ] |
||||||
4 Select ( |
) the setting you want |
|
[LANGUAGE] |
|
|||||
to change and press ( |
). |
|
Desired language |
|
|||||
|
FUNC. |
|
|
||||||
• An orange frame will indicate the |
|
|
|
||||||
For selections in the FUNC. menu, the |
|||||||||
|
menu item currently selected. |
||||||||
|
Menu items not available will |
abbreviated form will always show the |
|||||||
|
appear grayed out. |
|
initial default value. In recording mode, |
||||||
• To return to the menu selection |
its icon will appear on the left side |
||||||||
|
screen, select ( |
) [ |
RETURN] |
columnYwhen you first open the menu. |
|||||
|
and press ( ). |
|
|
If the setting was changed, the icon of |
|||||
5 Select ( |
) the desired option and |
the currently selected option will appear |
|||||||
press ( ) to save the setting. |
instead. |
|
|||||||
|
|
|
|
P |
|
||||
6 Press FUNC. . |
|
|
|
FUNC. |
|
|
|||
|
|
|
[ |
IMAGE EFFECT OFF] |
|||||
You can press FUNC. to close the |
|
||||||||
|
Desired image effect |
||||||||
menu at any time. |
|
|
|
||||||
|
|
|
FUNC. |
|
|
||||
|
|
O |
|
|
|||||
NOTES |
|
|
|
||||||
|
|
|
|
|
|
|
|||
Instead of steps 1 and 2, you can also |
|
|
|
|
|||||
keep |
FUNC. |
pressed down for more than |
|
|
|
|
|||
C |
|
|
|
|
|
||||
1 second to open the setup menus screen |
|
|
|
|
|||||
directly.
21
Changing the Time Zone
Change the time zone to match your location. The default setting is Paris or Singapore, depending on the region of purchase.
The language for on-screen and menu |
FUNC. |
|||||
displays can be changed. The list of |
||||||
available languages depends on the |
( |
20) |
||||
region where you purchased the |
|
FUNC. |
||||
camcorder. |
|
|
||||
|
|
[ |
MENU] |
|||
|
|
Default value |
||||
Language Set A |
|
|
[ |
DATE/TIME SETUP] |
||
|
|
[T.ZONE/DST] |
||||
Czech, German, Greek, English , Spanish, |
Desired time zone* |
|||||
French, Italian, Hungarian, Polish, Romanian, |
||||||
FUNC. |
||||||
Turkish, Russian, Ukrainian, Arabic and |
|
|||||
Persian. |
|
|
|
Y |
||
|
|
* To adjust for daylight saving time, select the |
||||
Language Set B |
|
|
time zone with the mark next to the |
|||
English , Malay, Simplified Chinese, Traditional |
area. |
|||||
Chinese and Thai. |
|
P |
||||
|
|
|
||||
|
|
|
|
World Time Zones |
||
|
. |
|
|
nce you have set the time zone, date |
||
( |
20) |
|
|
and time, you do not need to reset the |
||
|
|
|
|
clock every time you travel to another |
||
FUNC. |
O |
|
||||
|
|
time zone. Select the time zone to |
||||
[ |
MENU] |
|
|
match the local time at your |
||
[ |
DISPLAY SETUP/ ] |
|
destination, referring to the date and |
|||
[LANGUAGE] |
|
time displayed on the screen. |
||||
FUNC |
|
|
|
|||
Desired language |
|
|
|
|||
FUNC.
 NOTES
NOTES
• If you changed the language by mistake, follow the  mark next to the menu item to change the setting.
• The display  that appears in some menu screens refers to the name of the button on the camcorder and will not change, regardless of the language selected.
22
Setting the Date and Time |
Getting Ready to Start |
|
|
Recording |
|
FUNC. |
Opening the Lens Cover and Adjusting |
|
( 20) |
||
the LCD Screen |
||
|
1Open the date and time setup screen.
|
FUNC. |
[ MENU] |
Before you start recording, open the |
||
|
lens cover. |
||||
[ |
DATE/TIME SETUP] |
||||
|
Y |
||||
[DATE/TIME] |
|
||||
Blinking arrows will be displayed |
|
||||
around the first field of the date. |
|
||||
2 Change each field of the date and |
|
||||
time with the joystick ( ) and |
|
||||
move ( ) to the next field. |
|
||||
3 Press ( |
) to start the clock. |
|
|||
|
|
||||
4 Press FUNC. to close the menu. |
Move the lens cover switch down to |
||||
|
|
|
|||
|
|
P |
|||
|
NOTES |
|
|
to open the lens cover. |
|
|
|
|
|
||
You can also change the date format |
Rotating the LCD Panel |
||||
|
|
||||
( |
58). |
|
Open the LCD panel 90 degrees. |
||
|
|
O |
|
||
C |
You can rotate the panel 90 degrees |
||||
downward. |
|||||
|
180° |
||||
|
|
||||
23

Preparations
the LCD screen simultaneously. Rotating the LCD panel 180 degrees can be useful in the following cases:
•When you wish to include yourself in the picture when recording with the self timer.
• To allow the camcorder to be operated with the wireless controller from the front.
LCD Backlight
You can set the brightness of the LCD screen to normal or bright.
FUNC.
(  20)
20)
FUNC.
[ |
MENU] |
|
[ |
|
SETUP/ ] |
[BACKLIGHT] |
Desired option |
|
FUNC.
|
|
P |
|
|
|
NOTES |
|
|
|
• This setting does not affect the |
|
|
|
brightness of the recording or the |
|
|
O |
||
|
|
viewfinderDISPLAYscreen. |
|
Subject can monitor the |
• Using the [BRIGHT] setting will shorten |
||
the effective usage time of the battery |
|||
LCD screen |
|
||
C |
pack. |
||
|
|||
NOTES |
|
|
|
About the L D and viewfinder screen: The screens are produced using extremely high-precision manufacturing techniques, with more than 99.99% of the pixels operating to specification. Less than 0.01% of the pixels may occasionally misfire or appear as black, red, blue or green dots. This has no effect on the recorded image and does not constitute a malfunction.
24
Loading...