


 Loading...
Laser Beam Printer
User's Guide
IMPORTANT:
Read this manual carefully before using your printer. |
ENG |
Save this manual for future reference. |
LBP3200
Laser Printer
User's Guide


 Manuals for the Printer
The manuals for this printer are divided as follows. Please refer to them for detailed information.
|
Guides with this symbol are PDF manuals included on the accompanying CD-ROM. |
|
CD-ROM |
||
|
||
|
|
•Installation
•Connecting to a Computer
•Printing Methods
•Basic Operations
•Troubleshooting
Getting Started Guide
User’s Guide
(This Manual)
CD-ROM
CD-ROM
•To view the manual in PDF format, Adobe Reader/Adobe Acrobat Reader is required. If Adobe Reader/Adobe Acrobat Reader is not installed on your system, please download it from the Adobe Systems Incorporated website.
•The printer illustration on the cover may differ slightly from your printer.


 How This Manual Is Organized
Chapter 1 |
Before You Start Using This Printer |
|
|
Chapter 2 |
Loading and Delivering Paper |
|
|
Chapter 3 |
Setting Up the Printing Environment |
|
|
Chapter 4 |
Printing a Document |
|
|
Chapter 5 |
Routine Maintenance |
|
|
Chapter 6 |
Troubleshooting |
|
|
Chapter 7 |
Appendix |
|
|
Considerable effort has been made to ensure that this manual is free of inaccuracies and omissions. However, as we are constantly improving our products, if you need an exact specification, please contact Canon.

Contents
Preface . . . . . . . . . . . . . . . . . . . . . . . . . . . . . . . . . . . . . . . . . . . . . . . . . . . . . . . . . vii How To Use This Manual . . . . . . . . . . . . . . . . . . . . . . . . . . . . . . . . . . . . . . . . . . . vii
Symbols Used in This Manual . . . . . . . . . . . . . . . . . . . . . . . . . . . . . . . . . . . . . vii Buttons Used in This Manual . . . . . . . . . . . . . . . . . . . . . . . . . . . . . . . . . . . . . . vii Illustrations Used in This Manual . . . . . . . . . . . . . . . . . . . . . . . . . . . . . . . . . . . viii Displays Used in This Manual . . . . . . . . . . . . . . . . . . . . . . . . . . . . . . . . . . . . . viii Abbreviations Used in This Manual . . . . . . . . . . . . . . . . . . . . . . . . . . . . . . . . . . ix
Legal Notices . . . . . . . . . . . . . . . . . . . . . . . . . . . . . . . . . . . . . . . . . . . . . . . . . . . . . x
FCC (Federal Communications Commission) . . . . . . . . . . . . . . . . . . . . . . . . . . x EMC Directive (220 - 240 V model) . . . . . . . . . . . . . . . . . . . . . . . . . . . . . . . . . . xi Laser Safety (120 V/220 - 240 V models). . . . . . . . . . . . . . . . . . . . . . . . . . . . . xii International Energy Star-Program . . . . . . . . . . . . . . . . . . . . . . . . . . . . . . . . . xiii Trademarks. . . . . . . . . . . . . . . . . . . . . . . . . . . . . . . . . . . . . . . . . . . . . . . . . . . . xiii Copyright . . . . . . . . . . . . . . . . . . . . . . . . . . . . . . . . . . . . . . . . . . . . . . . . . . . . . xiii Disclaimers. . . . . . . . . . . . . . . . . . . . . . . . . . . . . . . . . . . . . . . . . . . . . . . . . . . . xiv Legal Limitations on the Usage of Your Product and the Use of Images . . . . . xiv
Important Safety Instructions . . . . . . . . . . . . . . . . . . . . . . . . . . . . . . . . . . . . . . . xv
Installation . . . . . . . . . . . . . . . . . . . . . . . . . . . . . . . . . . . . . . . . . . . . . . . . . . . . xv Power Supply . . . . . . . . . . . . . . . . . . . . . . . . . . . . . . . . . . . . . . . . . . . . . . . . . . xvi Handling . . . . . . . . . . . . . . . . . . . . . . . . . . . . . . . . . . . . . . . . . . . . . . . . . . . . . xvii Maintenance and Inspections . . . . . . . . . . . . . . . . . . . . . . . . . . . . . . . . . . . . . xix Consumables . . . . . . . . . . . . . . . . . . . . . . . . . . . . . . . . . . . . . . . . . . . . . . . . . . xx
Chapter 1 Before You Start Using This Printer
Features and Benefits . . . . . . . . . . . . . . . . . . . . . . . . . . . . . . . . . . . . . . . . . . . . 1-2
Parts and Their Functions . . . . . . . . . . . . . . . . . . . . . . . . . . . . . . . . . . . . . . . . . 1-4
Front View. . . . . . . . . . . . . . . . . . . . . . . . . . . . . . . . . . . . . . . . . . . . . . . . . . . . 1-5
Rear View . . . . . . . . . . . . . . . . . . . . . . . . . . . . . . . . . . . . . . . . . . . . . . . . . . . . 1-6
Internal View. . . . . . . . . . . . . . . . . . . . . . . . . . . . . . . . . . . . . . . . . . . . . . . . . . 1-7
Plugging the Power Cord . . . . . . . . . . . . . . . . . . . . . . . . . . . . . . . . . . . . . . . . . 1-8
Turning the Printer ON/OFF . . . . . . . . . . . . . . . . . . . . . . . . . . . . . . . . . . . . . . 1-11
Turning the Printer ON . . . . . . . . . . . . . . . . . . . . . . . . . . . . . . . . . . . . . . . . . 1-11
Turning the Printer OFF . . . . . . . . . . . . . . . . . . . . . . . . . . . . . . . . . . . . . . . . 1-12
Connecting to a Computer . . . . . . . . . . . . . . . . . . . . . . . . . . . . . . . . . . . . . . . 1-13
ii

Chapter 2 Loading and Delivering Paper
Paper Requirements . . . . . . . . . . . . . . . . . . . . . . . . . . . . . . . . . . . . . . . . . . . . . .2-2
Usable Paper . . . . . . . . . . . . . . . . . . . . . . . . . . . . . . . . . . . . . . . . . . . . . . . . . .2-2
Paper Size . . . . . . . . . . . . . . . . . . . . . . . . . . . . . . . . . . . . . . . . . . . . . . . . .2-2
Paper Type . . . . . . . . . . . . . . . . . . . . . . . . . . . . . . . . . . . . . . . . . . . . . . . . .2-3
Abbreviation of Paper Size. . . . . . . . . . . . . . . . . . . . . . . . . . . . . . . . . . . . .2-5
Printable Area . . . . . . . . . . . . . . . . . . . . . . . . . . . . . . . . . . . . . . . . . . . . . . . . .2-6
Unusable Paper . . . . . . . . . . . . . . . . . . . . . . . . . . . . . . . . . . . . . . . . . . . . . . . .2-7
Storing Paper . . . . . . . . . . . . . . . . . . . . . . . . . . . . . . . . . . . . . . . . . . . . . . . . . .2-8
Paper Source . . . . . . . . . . . . . . . . . . . . . . . . . . . . . . . . . . . . . . . . . . . . . . . . . . . .2-9
Paper Source Type. . . . . . . . . . . . . . . . . . . . . . . . . . . . . . . . . . . . . . . . . . . . . .2-9 Paper Capacity for Paper Source. . . . . . . . . . . . . . . . . . . . . . . . . . . . . . . . . .2-10
Paper Delivery Area. . . . . . . . . . . . . . . . . . . . . . . . . . . . . . . . . . . . . . . . . . . . . .2-11
Paper Delivery Area Type . . . . . . . . . . . . . . . . . . . . . . . . . . . . . . . . . . . . . . .2-11
Face-down Delivery Area. . . . . . . . . . . . . . . . . . . . . . . . . . . . . . . . . . . . .2-11 Face-up Delivery Slot. . . . . . . . . . . . . . . . . . . . . . . . . . . . . . . . . . . . . . . .2-12
Paper Capacity for Paper Delivery Area . . . . . . . . . . . . . . . . . . . . . . . . . . . .2-12 Selecting the Paper Delivery Area . . . . . . . . . . . . . . . . . . . . . . . . . . . . . . . . .2-13
Switching into the Face-up Delivery Slot . . . . . . . . . . . . . . . . . . . . . . . . .2-13 Switching into the Face-down Delivery Area . . . . . . . . . . . . . . . . . . . . . .2-13
Printing on Plain Paper / Heavy Paper / Label / Transparency . . . . . . . . . . .2-14
Loading Paper . . . . . . . . . . . . . . . . . . . . . . . . . . . . . . . . . . . . . . . . . . . . . . . .2-14
Loading Paper in the Cassette . . . . . . . . . . . . . . . . . . . . . . . . . . . . . . . .2-15 Setting Paper in the Manual Feed Slot. . . . . . . . . . . . . . . . . . . . . . . . . . .2-21
Setting Printer Driver and Printing . . . . . . . . . . . . . . . . . . . . . . . . . . . . . . . . .2-23
Printing on Envelope. . . . . . . . . . . . . . . . . . . . . . . . . . . . . . . . . . . . . . . . . . . . .2-27
Loading Envelope . . . . . . . . . . . . . . . . . . . . . . . . . . . . . . . . . . . . . . . . . . . . .2-27
Loading Envelope in the Cassette . . . . . . . . . . . . . . . . . . . . . . . . . . . . . .2-28 Setting Envelope in the Manual Feed Slot . . . . . . . . . . . . . . . . . . . . . . . .2-35
Setting Printer Driver and Printing . . . . . . . . . . . . . . . . . . . . . . . . . . . . . . . . .2-37
Printing on Custom Paper . . . . . . . . . . . . . . . . . . . . . . . . . . . . . . . . . . . . . . . .2-40
Loading Custom Paper . . . . . . . . . . . . . . . . . . . . . . . . . . . . . . . . . . . . . . . . .2-40 Setting Printer Driver and Printing . . . . . . . . . . . . . . . . . . . . . . . . . . . . . . . . .2-43
Chapter 3 Setting Up the Printing Environment
Introduction . . . . . . . . . . . . . . . . . . . . . . . . . . . . . . . . . . . . . . . . . . . . . . . . . . . . .3-2
After Installing the Printer . . . . . . . . . . . . . . . . . . . . . . . . . . . . . . . . . . . . . . . .3-2 Steps for Printing to be Followed Each Time . . . . . . . . . . . . . . . . . . . . . . . . . .3-2 Required System Environment . . . . . . . . . . . . . . . . . . . . . . . . . . . . . . . . . . . .3-2
Installing the CAPT Software . . . . . . . . . . . . . . . . . . . . . . . . . . . . . . . . . . . . . . .3-4
For Windows 98/Me . . . . . . . . . . . . . . . . . . . . . . . . . . . . . . . . . . . . . . . . . . . . .3-4
Installing from the CD-ROM . . . . . . . . . . . . . . . . . . . . . . . . . . . . . . . . . . . .3-4 Installing with Plug and Play . . . . . . . . . . . . . . . . . . . . . . . . . . . . . . . . . . .3-8
iii

For Windows 2000 . . . . . . . . . . . . . . . . . . . . . . . . . . . . . . . . . . . . . . . . . . . . 3-16
Installing from the CD-ROM . . . . . . . . . . . . . . . . . . . . . . . . . . . . . . . . . . 3-16 Installing with Plug and Play. . . . . . . . . . . . . . . . . . . . . . . . . . . . . . . . . . 3-18
For Windows XP. . . . . . . . . . . . . . . . . . . . . . . . . . . . . . . . . . . . . . . . . . . . . . 3-22
Installing from the CD-ROM . . . . . . . . . . . . . . . . . . . . . . . . . . . . . . . . . . 3-22 Installing with Plug and Play. . . . . . . . . . . . . . . . . . . . . . . . . . . . . . . . . . 3-24
After Completing Installation (Canon LBP3200 Group) . . . . . . . . . . . . . . . . 3-28 Printing a Test Page . . . . . . . . . . . . . . . . . . . . . . . . . . . . . . . . . . . . . . . . . . . . . 3-32 Using the Printer on a Network . . . . . . . . . . . . . . . . . . . . . . . . . . . . . . . . . . . 3-35
Setting the Print Server . . . . . . . . . . . . . . . . . . . . . . . . . . . . . . . . . . . . . . . . 3-36
For Windows 98/Me . . . . . . . . . . . . . . . . . . . . . . . . . . . . . . . . . . . . . . . . 3-36 For Windows 2000/XP . . . . . . . . . . . . . . . . . . . . . . . . . . . . . . . . . . . . . . 3-40
Installation on the Clients . . . . . . . . . . . . . . . . . . . . . . . . . . . . . . . . . . . . . . . 3-45
Installing from [Add Printer Wizard] . . . . . . . . . . . . . . . . . . . . . . . . . . . . 3-45 Installing from [Windows Explorer]. . . . . . . . . . . . . . . . . . . . . . . . . . . . . 3-47
Uninstalling the CAPT Software . . . . . . . . . . . . . . . . . . . . . . . . . . . . . . . . . . . 3-49
Chapter 4 Printing a Document
Printing from an Application. . . . . . . . . . . . . . . . . . . . . . . . . . . . . . . . . . . . . . . 4-2 Canceling a Print Job . . . . . . . . . . . . . . . . . . . . . . . . . . . . . . . . . . . . . . . . . . . . 4-6 Specifying the Printing Preferences . . . . . . . . . . . . . . . . . . . . . . . . . . . . . . . . 4-7
For Windows 98/Me . . . . . . . . . . . . . . . . . . . . . . . . . . . . . . . . . . . . . . . . . . . . 4-7
Displaying the [Document Properties] Dialog Box from the Application. . . . 4-7 Displaying the [Printer Properties] Dialog Box from the [Printers] Folder . . . 4-9
For Windows 2000/XP . . . . . . . . . . . . . . . . . . . . . . . . . . . . . . . . . . . . . . . . . 4-10
Displaying the [Document Properties] Dialog Box from the Application. . . 4-11 Displaying the [Document Properties] Dialog Box from the [Printers] Folder . . 4-12 Displaying the [Printer Properties] Dialog Box from the [Printers] Folder . . 4-14
Using the Printing Functions . . . . . . . . . . . . . . . . . . . . . . . . . . . . . . . . . . . . . 4-16
For Windows 98/Me . . . . . . . . . . . . . . . . . . . . . . . . . . . . . . . . . . . . . . . . . . . 4-16
[Page Setup] Sheet . . . . . . . . . . . . . . . . . . . . . . . . . . . . . . . . . . . . . . . . 4-17
[Finishing] Sheet. . . . . . . . . . . . . . . . . . . . . . . . . . . . . . . . . . . . . . . . . . . 4-20
[Quality] Sheet . . . . . . . . . . . . . . . . . . . . . . . . . . . . . . . . . . . . . . . . . . . . 4-21
[General] Sheet . . . . . . . . . . . . . . . . . . . . . . . . . . . . . . . . . . . . . . . . . . . 4-22
[Details] Sheet . . . . . . . . . . . . . . . . . . . . . . . . . . . . . . . . . . . . . . . . . . . . 4-22
[Sharing] Sheet. . . . . . . . . . . . . . . . . . . . . . . . . . . . . . . . . . . . . . . . . . . . 4-23
For Windows 2000/XP . . . . . . . . . . . . . . . . . . . . . . . . . . . . . . . . . . . . . . . . . 4-23
[Page Setup] Sheet . . . . . . . . . . . . . . . . . . . . . . . . . . . . . . . . . . . . . . . . 4-24
[Finishing] Sheet. . . . . . . . . . . . . . . . . . . . . . . . . . . . . . . . . . . . . . . . . . . 4-27
[Quality] Sheet . . . . . . . . . . . . . . . . . . . . . . . . . . . . . . . . . . . . . . . . . . . . 4-28
[General] Sheet . . . . . . . . . . . . . . . . . . . . . . . . . . . . . . . . . . . . . . . . . . . 4-29
[Sharing] Sheet. . . . . . . . . . . . . . . . . . . . . . . . . . . . . . . . . . . . . . . . . . . . 4-30
[Ports] Sheet. . . . . . . . . . . . . . . . . . . . . . . . . . . . . . . . . . . . . . . . . . . . . . 4-30
[Advanced] Sheet . . . . . . . . . . . . . . . . . . . . . . . . . . . . . . . . . . . . . . . . . 4-31
iv

[Security] Sheet . . . . . . . . . . . . . . . . . . . . . . . . . . . . . . . . . . . . . . . . . . . .4-31 [Paper Selection] Sheet . . . . . . . . . . . . . . . . . . . . . . . . . . . . . . . . . . . . . .4-32
Printing Multiple Pages on One Sheet . . . . . . . . . . . . . . . . . . . . . . . . . . . . . .4-32 Scaling Print Output. . . . . . . . . . . . . . . . . . . . . . . . . . . . . . . . . . . . . . . . . . . .4-33
Scaling a Document Automatically . . . . . . . . . . . . . . . . . . . . . . . . . . . . .4-34 Scaling a Document Manually . . . . . . . . . . . . . . . . . . . . . . . . . . . . . . . . .4-35
Specifying a Custom Paper Size . . . . . . . . . . . . . . . . . . . . . . . . . . . . . . . . . .4-36 Specifying the Print Quality . . . . . . . . . . . . . . . . . . . . . . . . . . . . . . . . . . . . . .4-41 Specifying the Toner Density . . . . . . . . . . . . . . . . . . . . . . . . . . . . . . . . . . . . .4-42 Specifying the Image Refinement . . . . . . . . . . . . . . . . . . . . . . . . . . . . . . . . .4-43 Viewing the Printer Settings / Restoring the Default Settings . . . . . . . . . . . .4-44
Viewing the Printer Settings . . . . . . . . . . . . . . . . . . . . . . . . . . . . . . . . . . .4-44 Restoring the Default Settings . . . . . . . . . . . . . . . . . . . . . . . . . . . . . . . . .4-45
Printer Status Window. . . . . . . . . . . . . . . . . . . . . . . . . . . . . . . . . . . . . . . . . . . .4-46
Using the Printer Status Window . . . . . . . . . . . . . . . . . . . . . . . . . . . . . . . . . .4-46
Displaying the Printer Status Window . . . . . . . . . . . . . . . . . . . . . . . . . . . . . .4-47
Closing the Printer Status Window . . . . . . . . . . . . . . . . . . . . . . . . . . . . . . . .4-48
Setting Preferences . . . . . . . . . . . . . . . . . . . . . . . . . . . . . . . . . . . . . . . . . . .4-48
Network Printer Status. . . . . . . . . . . . . . . . . . . . . . . . . . . . . . . . . . . . . . . . . .4-50
Chapter 5 Routine Maintenance
Replacing the Toner Cartridge . . . . . . . . . . . . . . . . . . . . . . . . . . . . . . . . . . . . . .5-2
Before Replacing the Toner Cartridge . . . . . . . . . . . . . . . . . . . . . . . . . . . . . . .5-2 Replacing the Toner Cartridge . . . . . . . . . . . . . . . . . . . . . . . . . . . . . . . . . . . . .5-6 Cleaning. . . . . . . . . . . . . . . . . . . . . . . . . . . . . . . . . . . . . . . . . . . . . . . . . . . . .5-12 Precautions for Handling the Toner Cartridge . . . . . . . . . . . . . . . . . . . . . . . .5-13 Storing the Toner Cartridge . . . . . . . . . . . . . . . . . . . . . . . . . . . . . . . . . . . . . .5-15
Cleaning the Printer . . . . . . . . . . . . . . . . . . . . . . . . . . . . . . . . . . . . . . . . . . . . .5-16
Moving the Printer . . . . . . . . . . . . . . . . . . . . . . . . . . . . . . . . . . . . . . . . . . . . . . .5-18
Moving the Printer . . . . . . . . . . . . . . . . . . . . . . . . . . . . . . . . . . . . . . . . . . . . .5-19
Handling the Printer . . . . . . . . . . . . . . . . . . . . . . . . . . . . . . . . . . . . . . . . . . . . .5-22
Precautions for Handling the Printer . . . . . . . . . . . . . . . . . . . . . . . . . . . . . . .5-22 Precaution for Storing the Printer. . . . . . . . . . . . . . . . . . . . . . . . . . . . . . . . . .5-23
Chapter 6 Troubleshooting
When You Have Trouble Printing . . . . . . . . . . . . . . . . . . . . . . . . . . . . . . . . . . . .6-2 Paper Jams . . . . . . . . . . . . . . . . . . . . . . . . . . . . . . . . . . . . . . . . . . . . . . . . . . . . .6-3 Service Error Display . . . . . . . . . . . . . . . . . . . . . . . . . . . . . . . . . . . . . . . . . . . .6-14
When a Fixing Unit Error Appears . . . . . . . . . . . . . . . . . . . . . . . . . . . . . . . . .6-15 When a Scanner Error or Service Error Appears . . . . . . . . . . . . . . . . . . . . .6-16
Print Quality Problems . . . . . . . . . . . . . . . . . . . . . . . . . . . . . . . . . . . . . . . . . . .6-17 When Nothing is Printed. . . . . . . . . . . . . . . . . . . . . . . . . . . . . . . . . . . . . . . . . .6-21
v

Installation Problems. . . . . . . . . . . . . . . . . . . . . . . . . . . . . . . . . . . . . . . . . . . . 6-22
When Uninstallation Fails. . . . . . . . . . . . . . . . . . . . . . . . . . . . . . . . . . . . . . . 6-23 Uninstalling the USB Class Driver . . . . . . . . . . . . . . . . . . . . . . . . . . . . . . . . 6-24 Installing by Selecting the USB Port (Windows 98/Me Only) . . . . . . . . . . . . 6-27 Problems During Network Installation . . . . . . . . . . . . . . . . . . . . . . . . . . . . . 6-31
Miscellaneous Problems . . . . . . . . . . . . . . . . . . . . . . . . . . . . . . . . . . . . . . . . . 6-32
Chapter 7 Appendix
Specifications. . . . . . . . . . . . . . . . . . . . . . . . . . . . . . . . . . . . . . . . . . . . . . . . . . . 7-2
Hardware Specifications. . . . . . . . . . . . . . . . . . . . . . . . . . . . . . . . . . . . . . . . . 7-2
Software Specifications . . . . . . . . . . . . . . . . . . . . . . . . . . . . . . . . . . . . . . . . . 7-3
Dimensions of Each Part. . . . . . . . . . . . . . . . . . . . . . . . . . . . . . . . . . . . . . . . . . 7-4
Optional Accessories . . . . . . . . . . . . . . . . . . . . . . . . . . . . . . . . . . . . . . . . . . . . 7-5
Network Adapter . . . . . . . . . . . . . . . . . . . . . . . . . . . . . . . . . . . . . . . . . . . . . . |
7-5 |
NetSpot Device Installer . . . . . . . . . . . . . . . . . . . . . . . . . . . . . . . . . . . . . . . . . . 7-7
Index . . . . . . . . . . . . . . . . . . . . . . . . . . . . . . . . . . . . . . . . . . . . . . . . . . . . . . . . . . 7-8
Location of the Serial Number . . . . . . . . . . . . . . . . . . . . . . . . . . . . . . . . . . . . 7-11
vi
Preface
Thank you for purchasing the Canon LASER SHOT LBP3200.
Please read this manual thoroughly before operating the printer in order to familiarize yourself with its capabilities, and to make the most of its many functions.
After reading this manual, store it in a safe place for future reference.
How To Use This Manual
Symbols Used in This Manual
The following symbols are used in this manual to explain procedures, restrictions, handling precautions, and instructions that should be observed for safety.
WARNING |
Indicates a warning concerning operations that may lead to death or |
|
injury to persons if not performed correctly. |
|
In order to use the printer safely, always pay attention to these warnings. |
CAUTION |
Indicates a caution concerning operations that may lead to injury to |
|
persons, or damage to property if not performed correctly. |
|
In order to use the printer safely, always pay attention to these cautions. |
IMPORTANT |
Indicates operational requirements and restrictions. |
|
Be sure to read these items carefully in order to operate the printer |
|
correctly, and to avoid damage to the printer. |
NOTE |
Indicates a clarification of an operation, or contains additional |
|
explanations for a procedure. |
|
Reading these notes is highly recommended. |
Buttons Used in This Manual
The following button names are a few examples of how buttons to be pressed are expressed in this manual:
• Buttons on Computer Operation Screens: [Button Name]
Example: |
[OK] |
|
[Details] |
vii
Illustrations Used in This Manual
Illustrations used in this manual are for the 220 V model unless otherwise specified. For the 120 V model, a cover is attached to the face-down delivery area.
A5 B5
EXEC A4
LGL LTR
ON
OFF
Displays Used in This Manual
Screen shots of the computer operation screen used in this manual are those taken when the LASER SHOT LBP3200 has operated for Windows 2000.
The buttons which you should press are marked with a  as shown below.
When multiple buttons can be pressed on the screen shot of computer operation screen, all buttons are marked. Select the button which suits your needs.
5 Click [Install a Printer Driver].
Click this button for operation.
viii

Abbreviations Used in This Manual
In this manual, product names and model names are abbreviated as follows:
Microsoft® Windows® 95 operating system: |
Windows 95 |
Microsoft® Windows® 98 operating system: |
Windows 98 |
Microsoft® Windows® Millennium Edition operating system: |
Windows Me |
Microsoft® Windows® 2000 operating system: |
Windows 2000 |
Microsoft® Windows® XP operating system: |
Windows XP |
Microsoft® Windows® operating system: |
Windows |
LASER SHOT LBP3200: |
LBP3200 |
ix

Legal Notices
FCC (Federal Communications Commission)
Laser Beam Printer, Model F187900
■120 V model
This device complies with part 15 of the FCC Rules. Operation is subject to the following two conditions: (1) This device may not cause harmful interference, and (2) this device must accept any interference received, including interference that may cause undesired operation.
This equipment has been tested and found to comply with the limits for a class B digital device, pursuant to Part 15 of the FCC rules. These limits are designed to provide reasonable protection against harmful interference in a residential installation. This equipment generates, uses and can radiate radio frequency energy and if not installed and used in accordance with the instructions, may cause harmful interference to radio communications. However, there is no guarantee that interference will not occur in a particular installation.
If this equipment does cause harmful interference to radio or television reception, which can be determined by turning the equipment off and on, the user is encouraged to try to correct the interference by one or more of the following measures:
•Reorient or relocate the receiving antenna.
•Increase the separation between the equipment and receiver.
•Connect the equipment into an outlet on a circuit different from that to which the receiver is connected.
•Consult the dealer or an experienced radio/TV technician for help.
Use of shielded cable is required to comply with class B limits in Subpart B of Part 15 of FCC Rules.
Do not make any changes or modifications to the equipment unless otherwise specified in the manual. If such changes or modifications should be made, you could be required to stop operation of the equipment.
Canon U.S.A. Inc.
One Canon Plaza, Lake Success, NY 11042, U.S.A.
Tel No. (516) 328-5600
x

■220 - 240 V model
This equipment has been tested and found to comply with the limits for a Class A digital device, pursuant to Part 15 of the FCC Rules. These limits are designed to provide reasonable protection against harmful interference when the equipment is operated in a commercial environment. This equipment generates, uses, and can radiate radio frequency energy and if not installed and used in accordance with the instruction manual, may cause harmful interference to radio communications.
Operation of this equipment in a residential area is likely to cause harmful interference, in which case the user will be required to correct the interference at his own expense.
•Use of shielded cable is required to comply with Class A limits in Subpart B of Part 15 of FCC Rules.
Do not make any changes or modifications to the equipment unless otherwise specified in the manual. If such changes or modifications should be made, you could be required to stop operation of the equipment.
EMC Directive (220 - 240 V model)
"This equipment has been tested in a typical system to comply with the technical requirements of EMC Directive."
•Use of shielded cable is necessary to comply with the technical requirements of EMC Directive.
The product is in conformity with the EMC directive at nominal mains input 220 - 240 V, 50 Hz although the rated input of the product is 220 - 240 V, 50/60 Hz.
C-tick marking  on the rating label means that we declare the product is in conformity with the relevant requirements at nominal mains input 240 V, 50 Hz although the rated input of the product is 220 - 240 V, 50/60 Hz.
xi
Laser Safety (120 V/220 - 240 V models)
Laser radiation could be hazardous to the human body. For this reason, laser radiation emitted inside this printer is hermetically sealed within the protective housing and external cover. No radiation can leak from the printer in the normal operation of the product by the user.
This printer is classified as a Class 1 laser product under IEC60825-1:1993, EN60825-1:1994, and as for the U.S.A., it is classified as Class 1 under the Code of Federal Regulations, 1040.10 of Title 21.
This printer has been classified under IEC60825-1:1993, EN60825-1:1994 and conforms to the following classes:
CLASS 1 LASER PRODUCT LASER KLASSE 1
APPAREIL A RAYONNEMENT LASER DE CLASSE 1 APPARECCHIO LASER DI CLASSE 1
PRODUCTO LASER DE CLASE 1 APARELHO A LASER DE CLASSE 1 (220 - 240 V model only)
 CAUTION
Performance of procedures other than those specified in this manual may result in hazardous radiation exposure.
xii

International Energy Star-Program
As an ENERGY STAR Partner, Canon Inc. has determined that this product meets the ENERGY STAR Program for energy efficiency.
The International ENERGY STAR Office Equipment Program is an international program that promotes energy saving through the use of computers and other office equipment.
The program backs the development and dissemination of products with functions that effectively reduce energy consumption. It is an open system in which business proprietors can participate voluntarily.
The targeted products are office equipment, such as computers, displays, printers, facsimiles, and copiers. The standards and logos are uniform among participating nations.
Trademarks
Canon, the Canon Logo, LASER SHOT, and LBP are trademarks of Canon Inc.
Adobe® Acrobat is a trademark of Adobe Systems Incorporated.
Microsoft and Windows are trademarks of Microsoft Corporation in the U.S. and other countries.
Other product and company names herein may be the trademarks of their respective owners.
Copyright
Copyright 2003 by Canon Inc. All rights reserved.
No part of this publication may be reproduced or transmitted in any form or by any means, electronic or mechanical, including photocopying and recording, or by any information storage or retrieval system without the prior written permission of Canon Inc.
xiii

Disclaimers
The information in this manual is subject to change without notice.
CANON INC. MAKES NO WARRANTY OF ANY KIND WITH REGARD TO THIS MATERIAL, EITHER EXPRESS OR IMPLIED, EXCEPT AS PROVIDED HEREIN, INCLUDING WITHOUT LIMITATION, THEREOF, WARRANTIES AS TO MARKETABILITY, MERCHANTABILITY, FITNESS FOR A PARTICULAR PURPOSE OF USE OR AGAINST INFRINGEMENT OF ANY PATENT. CANON INC. SHALL NOT BE LIABLE FOR ANY DIRECT, INCIDENTAL, OR CONSEQUENTIAL DAMAGES OF ANY NATURE, OR LOSSES OR EXPENSES RESULTING FROM THE USE OF THIS MATERIAL.
Legal Limitations on the Usage of Your Product and the Use of Images
Using your product to scan, print or otherwise reproduce certain documents, and the use of such images as scanned, printed or otherwise reproduced by your product, may be prohibited by law and may result in criminal and/or civil liability. A non-exhaustive list of these documents is set forth below. This list is intended to be a guide only. If you are uncertain about the legality of using your product to scan, print or otherwise reproduce any particular document, and/or of the use of the images scanned, printed or otherwise reproduced, you should consult in advance with your legal advisor for guidance.
•Paper Money
•Money Orders
•Certificates of Deposit
•Postage Stamps (canceled or uncanceled)
•Identifying Badges or Insignias
•Selective Service or Draft Papers
•Checks or Drafts Issued by Governmental Agencies
•Motor Vehicle Licenses and Certificates of Title
•Travelers Checks
•Food Stamps
•Passports
•Immigration Papers
•Internal Revenue Stamps (canceled or uncanceled)
•Bonds or Other Certificates of Indebtedness
•Stock Certificates
•Copyrighted Works/Works of Art without Permission of Copyright Owner
xiv
Important Safety Instructions
Please read these "Important Safety Instructions" thoroughly before operating the printer.
As these instructions are intended to prevent injury to the user or other persons or destruction of property, always pay attention to these instructions. Also, since it may result in unexpected accidents or injuries, do not perform any operation unless otherwise specified in the manual. Improper operation or use of this machine could result in personal injury and/or damage requiring extensive repair that may not be covered under your Limited Warranty.
Installation
 WARNING
•Do not install the printer near alcohol, paint thinner, or other flammable substances. If flammable substances come into contact with electrical parts inside the printer, it may result in a fire or electrical shock.
•Do not place the following items on the printer. If these items come into contact with a high-voltage area inside the printer, it may result in a fire or electrical shock.
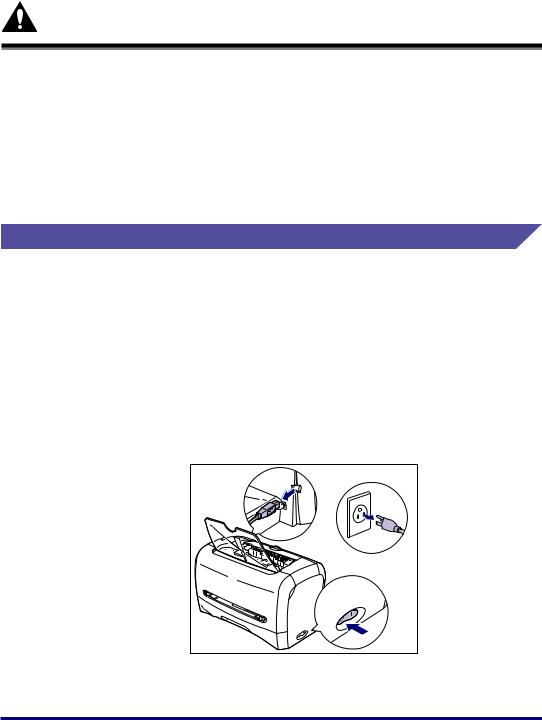
If these items are dropped or slipped inside the printer, immediately turn OFF the power switch a, and disconnect the USB cable b if you use it. Then, unplug the power plug from the AC power outlet c, and contact your local authorized Canon dealer.
-Necklaces and other metal objects
-Cups, vases, flowerpots, and other containers filled with water or liquids
b |
|
|
|
|
c |
a |
|
ON |
|
|
|
|
OF |
F |
|
|
xv

 CAUTION
•Do not install the printer in unstable locations, such as unsteady platforms or inclined floors, or in locations subject to excessive vibrations, as this may cause the printer to fall or tip over, resulting in personal injury.
•Never block the ventilation slots on the printer. The vantilation slots are provided for proper ventilation of working parts inside the printer. Blocking the vantilation slots can cause the printer to overheat, resulting in a fire. Never place the printer on a soft surface, such as a sofa or rug.
•Do not install the printer in the following locations:
-A damp or dusty location
-A location exposed to smoke and steam such as cookeries and humidifiers.
-A location exposed to rain or snow.
-A location near water faucets or water
-A location exposed to direct sunlight
-A location subject to high temperatures
-A location near open flames
•When installing the printer, gently lower the printer onto the floor or other machine to avoid catching your hands, as this may result in personal injury.
•When connecting the USB cable, connect it properly according to this manual. If not connected properly, this may result in malfunction or electrical shock.
•When moving the printer, follow the instructions in this manual to hold it correctly. Failure to do so may cause you to drop the printer, resulting in personal injury.
Power Supply
 WARNING
•Do not damage or modify the power cord. Also, do not place heavy objects on the power cord, or pull on or excessively bend it, as this could cause electrical damage and result in a fire or electrical shock.
•Keep the power cord away from a heat source; failure to do this may cause the power cord coating to melt, resulting in a fire or electrical shock.
•Do not plug or unplug the power plug with wet hands, as this may result in electrical shock.
•Do not plug the power cord to a multiplug power strip, as this may cause a fire or electrical shock.
•Do not bundle up or tie the power cord in a knot, as this may result in a fire or electrical shock.
•Insert the power plug completely into the AC power outlet, as failure to do so may result in a fire or electrical shock.
•Do not use power cords other than the power cord provided, as this may result in a fire or electrical shock.
•As a general rule, do not use extension cords or plug extension cords to a multiple power strip. If extension cords must be used or plugged to a multiple power strip, however, use them observing the following points on user's own authority. If you use extension cords improperly, this may result in a fire or electrical shock.
xvi

-Do not connect one extension cord to another.
-Make sure that the voltage of the power plug is the one indicated in the rating label (attached on the back of the printer) when you use the printer.
-Use an extension cord that allows the current value greater than the necessary one indicated in the rating label (attached on the back of the printer).
-When you use an extension cord, untie the cord binding, and insert the power plug completely into the extension cord outlet to ensure a firm connection between the power cord and the extension cord.
-Periodically check that the extension cord is not overheated.
 CAUTION
•Do not use power supplies with voltages other than those specified herein, as this may result in a fire or electrical shock.
•Always grasp the power plug when unplugging the power cord. Pulling on the power cord may expose or snap the core wire, or otherwise damage the power cord. If the power cord is damaged, this could cause current to leak, resulting in a fire or electrical shock.
•Leave sufficient space around the power plug so that it can be unplugged easily. If objects are placed around the power plug, you will be unable to unplug it in an emergency.
Handling
 WARNING
•Do not attempt to disassemble or modify the printer. There are high-temperature and high-voltage components inside the printer which may result in a fire or electrical shock.
•Electrical equipment can be hazardous if not used properly. To avoid injury, do not allow children access to the interior of any electrical product and do not let them touch any electrical contacts or gears that are exposed.
•If the printer makes strange noises, or emits smoke, heat or unusual smells, immediately turn OFF the power switch, and disconnect the USB cable if you use it. Then, unplug the power plug from the AC power outlet, and contact the shop that you purchased this printer.
•Do not use highly flammable sprays near the printer. If gas from these sprays comes into contact with the electrical components inside the printer, it may result in a fire or electrical shock.
•To avoid damage to the power cord and creating a fire hazard, always turn OFF the power switch, and disconnect the USB cable when moving the printer. Otherwise, the power cord or USB cable may be damaged, resulting in a fire or electrical shock.
xvii
•Do not drop paper clips, staples, or other metal objects inside the printer. Also, do not spill water, liquids, or flammable substances (alcohol, benzene, paint thinner, etc.) inside the printer. If these items come into contact with a high-voltage area inside the printer, it may result in a fire or electrical shock. If these items are dropped or slipped inside the printer, immediately turn OFF the power switch, and disconnect the USB cable if you use it. Then, unplug the power plug from the AC power outlet, and contact the shop that you purchased this printer.
•When connecting or disconnecting the USB cable while the power plug is plugged into the AC power outlet, do not touch the metal part of the connector. This may lead to an electrical shock.
 CAUTION
•Do not place heavy objects on the printer, as they may tip over or fall resulting in personal injury.
•Turn OFF the power switch for safety when the printer will not be used for a long period of time such as overnight. Also, turn OFF the power switch on the right of the printer and unplug the power plug for safety when the printer will not be used for an extended period of time such as during consecutive holidays.
•The laser beam can be harmful to human bodies. Since radiation emitted inside the printer is completely confined within protective housings and external covers, the laser beam cannot escape from the printer during any phase of user operation. Read the following remarks and instructions for safety.
-Never open covers other than those instructed in this manual.
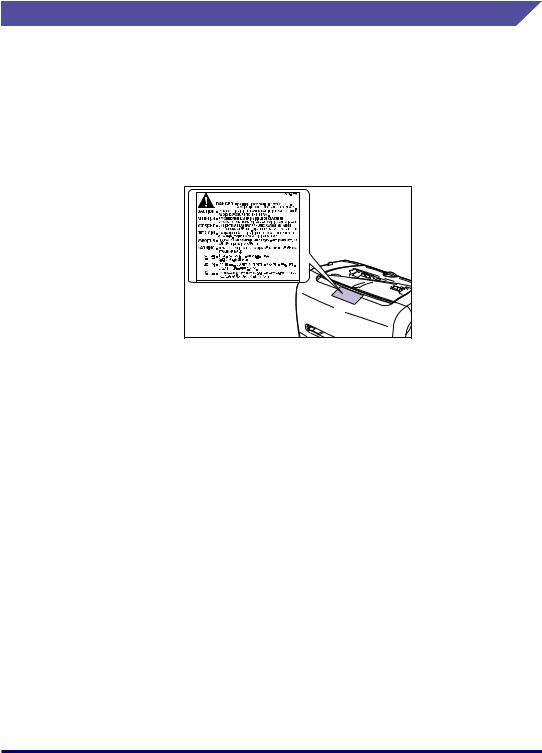
-Do not remove the caution label attached to the cover of the laser scanner unit.
-If the laser beam escapes from the printer, exposure may cause serious damage to your eyes.
xviii

Maintenance and Inspections
 WARNING
•When cleaning the printer, first turn OFF the power switch, disconnect the USB cable, then unplug the power plug. Failure to observe these steps may result in a fire or electrical shock.
•Clean the printer using a slightly dampened cloth with a mild detergent mixed with water. Do not use alcohol, benzene, paint thinner, or other flammable substances. Check detergent for flammability prior to use. If flammable substances come into contact with a high-voltage area inside the printer, it may result in a fire or electrical shock.
•There are some areas inside the printer which are subject to high-voltages. When removing jammed paper or when inspecting the inside of the printer, do not allow necklaces, bracelets, or other metal objects to touch the inside of the printer, as this may result in burns or electrical shock.
•Do not burn or throw a used toner cartridge into open flames, as this may cause the toner remaining inside the cartridge to ignite, resulting in burns or a fire.
•Unplug the power plug from the AC power outlet regularly, and clean the area around the base of the power plug's metal pins and the AC power outlet with a dry cloth to ensure that all dust and grime is removed. If the power plug is plugged for a long period of time in a damp, dusty, or smoky location, dust can build up around the power plug and become damp. This may cause a short circuit and result in a fire.
 CAUTION
•Never attempt to service this printer yourself, except as explained in this manual. There are no user serviceable parts inside the printer. Adjust only those controls that are covered in the operating instructions. Improper adjustment could result in personal injury and/or damage requiring extensive repair that may not be covered under your Limited Warranty.
•The fixing unit and its surroundings inside the printer may become hot during use. When removing jammed paper or when inspecting the inside of the printer, do not touch the fixing unit and its surroundings, as doing so may result in burns or electrical shock.
•When removing jammed paper or replacing the toner cartridge, take care not to allow the toner to come into contact with your hands or clothing, as this will dirty your hands or clothing. If they become dirty, wash them immediately with cold water. Washing with warm water will set the toner and make it impossible to remove the toner stains.
xix

•When removing paper which has become jammed inside the printer, remove the jammed paper gently to prevent the toner on the paper from scattering and getting into your eyes or mouth. If the toner gets into your eyes or mouth, wash them immediately with cold water and immediately consult a physician.
•When loading paper or removing jammed paper, take care not to cut your hands on the edges of the paper.
•When removing a used toner cartridge from the toner cartridge slot, remove the cartridge carefully to prevent the toner from scattering and entering your eyes or mouth. If the toner enters your eyes or mouth, wash them immediately with cold water and immediately consult a physician.
Consumables
 WARNING
•Do not throw a used toner cartridge into open flames, as this may cause toner remaining inside the cartridge to ignite and result in burns or a fire.
•Do not store a toner cartridge or copy paper in places exposed to open flames, as this may cause the toner or paper to ignite and result in burns or a fire.
 CAUTION
Keep toner and other consumables out of the reach of small children. If these items are ingested, consult a physician immediately.
xx

Before You Start Using This Printer 1
CHAPTER
This chapter describes the major features and basic functions of this printer.
Features and Benefits. . . . . . . . . . . . . . . . . . . . . . . . . . . . . . . . . . . . . . . . . . . . . . . . . . . . 1-2
Parts and Their Functions. . . . . . . . . . . . . . . . . . . . . . . . . . . . . . . . . . . . . . . . . . . . . . . . . 1-4
Front View. . . . . . . . . . . . . . . . . . . . . . . . . . . . . . . . . . . . . . . . . . . . . . . . . . . . . . . . . . . . . . . . . . .1-5
Rear View . . . . . . . . . . . . . . . . . . . . . . . . . . . . . . . . . . . . . . . . . . . . . . . . . . . . . . . . . . . . . . . . . . .1-6
Internal View . . . . . . . . . . . . . . . . . . . . . . . . . . . . . . . . . . . . . . . . . . . . . . . . . . . . . . . . . . . . . . . . .1-7
Plugging the Power Cord . . . . . . . . . . . . . . . . . . . . . . . . . . . . . . . . . . . . . . . . . . . . . . . . . 1-8
Turning the Printer ON/OFF . . . . . . . . . . . . . . . . . . . . . . . . . . . . . . . . . . . . . . . . . . . . . . 1-11
Turning the Printer ON . . . . . . . . . . . . . . . . . . . . . . . . . . . . . . . . . . . . . . . . . . . . . . . . . . . . . . . .1-11
Turning the Printer OFF . . . . . . . . . . . . . . . . . . . . . . . . . . . . . . . . . . . . . . . . . . . . . . . . . . . . . . .1-12
Connecting to a Computer . . . . . . . . . . . . . . . . . . . . . . . . . . . . . . . . . . . . . . . . . . . . . . . 1-13
1-1

1
Before You Start Using This Printer
Features and Benefits
■High Performance Printing System "CAPT"
LBP3200 is equipped with the latest CAPT (Canon Advanced Printing Technology) software supporting Windows 98/Me and Windows 2000/XP. As this system batch-processes the print data in a computer instead of a printer, it enables high-speed printing, making full use of the features of a computer. It shortens the time period over which the computer is freed. The information, such as out of paper, the remaining time of printing and the estimated time of print completion, appears on the display in real time.
■USB Interface Equipped as Standard
The USB (Universal Serial Bus) interface with which the peripheral devices can be connected using one connector is equipped as standard.
■High-speed Printing & Extra-High-definition Image Printing
18-sheet-a-minute high-speed printing minimizes your stress of waiting for print completion. LBP3200 is equipped with a printer engine of 600 dpi resolution. By adopting Canon's own new Automatic Image Refinement, an 2400 dpi-equivalent x 600 dpi extra-high-definition image can be obtained. The gray scale adopting the dither method produces delicate images such as photographs and graphics beautifully.
■Supporting Various Networks
If you use this printer as a network printer, the status is displayed in both the server and client computers. You can perform job operations from both of them.
■Supporting Various Type of Materials
Various types of materials, such as plain paper, envelops (Envelope C5, Envelope COM10, Envelope DL, Envelope Monarch), labels, transparencies, can be used for this printer. Although this printer is for A4-size paper, its reduction mode can reduce a document of larger size, such as A3 and B4, to A4 size to print.
It can also produce a print of custom paper size.
■Low Power Consumption and Quick Startup
Canon's own "On-demand Fixing System" achieves low power consumption and quick startup. This innovative technology heats the fixing heater instantaneously only at printing, and saves warm-up time. So, LBP3200 is always in standby status and ready to print. Furthermore, the average power consumption at standby status is only about 7 W.
■Compact & Quiet Design
The compact design of this printer saves space in your home or office.
Quiet during print and noiseless in standby status allow you to use this printer without concerning with neighbourhood even at night.
1-2 Features and Benefits

■Easy Maintenance & Printer Status Window
Uniting toner with a photosensitive drum, the toner cartridge for LBP3200 can be easily replaced.
The Printer Status Window that is displayed during print allows you to make exact judgements by graphics and sound, improving the operability of this printer.
1
Before You Start Using This Printer
Features and Benefits |
1-3 |
1
Before You Start Using This Printer
Parts and Their Functions
This section describes the name and function of each part in order for you to use this printer properly to make full use of the functions.
 CAUTION
Never block the ventilation slots on the printer. The vantilation slots are provided for proper ventilation of working parts inside the printer. Blocking the vantilation slots can cause the printer to overheat, resulting in a fire.
 NOTE
NOTE
For the 120 V model, a cover is attached to the face-down delivery area.
A5
B5 |
EXEC |
|
|
A4 |
LGL |
|
|
LTR |
ON
OFF
1-4 Parts and Their Functions
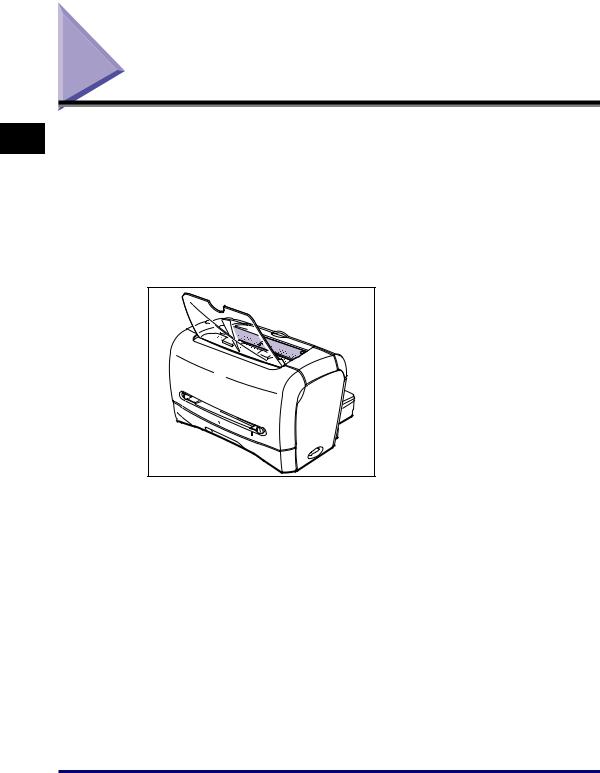
Front View
b
a
c
h
g f
A5
B5 |
EXEC |
|
|
LGL |
|
|
A4 |
|
|
|
LTR |
|
ON |
d |
OFF |
|
e
aFace-down Delivery Tray
Allows paper to be delivered straight.
bFace-down Delivery Area
Delivers paper with the printing surface face down. (See p. 2-11.)
cDelivery Selection Cover
Switches between face-up delivery and face-down delivery. (See p. 2-13.)
dPower Switch
Turns ON/OFF the printer. (See p. 1-11.)
eCassette
Allows you to load a maximum of 250 sheets of plain paper (64 g/m2). (See p. 2-9.)
fManual Feed Slot
Used when printing paper one by one manually. (See p. 2-9.)
gPaper Guide
Align this paper guide with the width of the paper so that paper is delivered straight.
hFront Cover
Opened when replacing the toner cartridge or removing paper jams.
1
Before You Start Using This Printer
Parts and Their Functions |
1-5 |
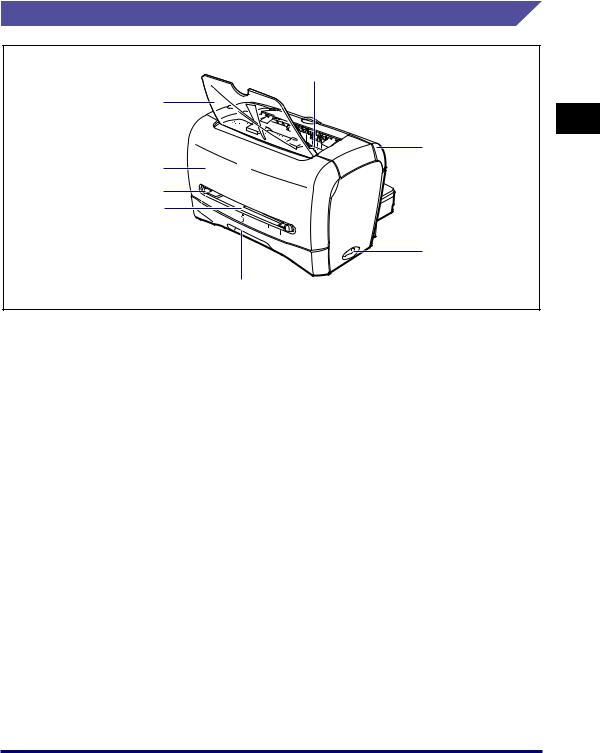
Rear View
|
|
b |
1 |
|
|
This Printer |
a |
c |
|
||
|
d |
|
Start Using |
|
e |
You |
|
|
Before |
g |
f |
|
|
aPower Socket
Connected to the supplied power cord. (See p. 1-8.)
bFace-up Delivery Slot
Delivers paper with the printing surface face up. (See p. 2-12.)
cPower Indicator
Lights up when the printer is ON.
dVentilation Slot
Cools the insides of the printer. Do not block the ventilation slot.
eUSB Connector
Connected to the USB cable. The USB cable is connected to the USB port on the computer. (See p. 1-14.)
fRating Label
The serial number for printer identification is indicated on this label. The number is required for receiving service or repairs. The current value indicated in this rating label shows the average power current consumption.
gCassette Protective Cover
Prevents dirt and dust from entering into the cassette.
1-6 Parts and Their Functions
Internal View
a
b
|
ON |
|
OFF |
a Toner Cartridge Guide |
b Black Film |
When setting the toner cartridge, push it while |
Do not peel off this film. |
aligning the projection at each side of the toner |
|
cartridge with this guide. (See p. 5-5.) |
|
1
Before You Start Using This Printer
Parts and Their Functions |
1-7 |
Loading...