


MF5630
Table of contents
 Loading...
Series
Please read this guide before operating this equipment.
After you finish reading this guide, store it in a safe place
for future reference.
Manuals for the Machine
The manuals for this machine are divided as follows. Please refer to them for detailed information.
Depending on the system configuration and product purchased, some manuals may not be needed.
Guides with this symbol are printed manuals.
• Setting Up the Machine
• Software Installation
Guides with this symbol are PDF manual included on the
CD-ROM
accompanying CD-ROM.
Set-Up Sheet
• Introduction on Use
• Copying and Printing Instructions
• Troubleshooting
• Fax Instructions
• Troubleshooting
• Software Installation and Instructions
• Scanning and PC Faxing Instructions
• Troubleshooting
Quick Reference Guide
User’s Guide
(This Manual)
Facsimile Guide
Only for the MF5650 model.
Software Guide
CD-ROM
CD-ROM
• To view the manual in PDF format, Adobe Reader/Adobe Acrobat Reader is required. If Adobe Reader/Adobe Acrobat Reader is not installed on your
system, please download it from the Adobe Systems Incorporated website.
• Considerable effort has been made to ensure that this manual is free of inaccuracies and omissions. However, as we are constantly improving our
products, if you need an exact specification, please contact Canon.

Model Name
F145600 (imageCLASS MF5630)
F145602 (imageCLASS MF5650)
Copyright
Copyright © 2004 by Canon, Inc. All rights reserved. No part of this publication
may be reproduced, transmitted, transcribed, stored in a retrieval system, or
translated into any language or computer language in any form or by any
means, electronic, mechanical, magnetic, optical, chemical, manual, or
otherwise, without the prior written permission of Canon, Inc.
Trademarks
Canon® is a registered trademark, and UHQ™ is a trademark of Canon Inc.
®
is a registered trademark.
IBM
®
Microsoft
Other brand and product names may be trademarks or registered trademarks
of their respective companies.
and Windows® are registered trademarks of Microsoft Corporation.
As an ENERGY STAR
®
Partner, Canon has determined
that the machine meets the Energy Star guidelines for
energy efficiency.
Super G3 is a phrase used to
describe the new generation of fax machines that use
ITU-T V.34 standard 33.6Kbps* modems. Super G3
High Speed Fax machines allow transmission time of
approx. 3 seconds* per page which results in reduced
telephone line charges.
* Approx. 3 seconds per page fax data transmission time based on Canon FAX
Standard Chart No.1, (Standard Mode) at 33.6Kbps modem speed. The Public
Switched Telephone Network (PSTN) currently supports 28.8Kbps modem speeds or
lower, depending on telephone line conditions.

Contents
Preface. . . . . . . . . . . . . . . . . . . . . . . . . . . . . . . . . . . . . . . . . . . . . . . . . . . . . . . . . . . . . . . . . . . . . . . . . . vii
How to Use This Manual . . . . . . . . . . . . . . . . . . . . . . . . . . . . . . . . . . . . . . . . . . . . . . . . . . . . . . . . . vii
Symbols Used in This Manual. . . . . . . . . . . . . . . . . . . . . . . . . . . . . . . . . . . . . . . . . . . . . . . . . vii
Keys Used in This Manual. . . . . . . . . . . . . . . . . . . . . . . . . . . . . . . . . . . . . . . . . . . . . . . . . . . . vii
Messages Displayed in the LCD . . . . . . . . . . . . . . . . . . . . . . . . . . . . . . . . . . . . . . . . . . . . . . . vii
Illustrations Used in This Manual. . . . . . . . . . . . . . . . . . . . . . . . . . . . . . . . . . . . . . . . . . . . . . .viii
Chapter 1 Introduction
Customer Support . . . . . . . . . . . . . . . . . . . . . . . . . . . . . . . . . . . . . . . . . . . . . . . . . . . . . . . . . . . . . 1-1
Main Components of the Machine . . . . . . . . . . . . . . . . . . . . . . . . . . . . . . . . . . . . . . . . . . . . . . . . . 1-1
Operation Panel. . . . . . . . . . . . . . . . . . . . . . . . . . . . . . . . . . . . . . . . . . . . . . . . . . . . . . . . . . . . . . . 1-4
Standby Display . . . . . . . . . . . . . . . . . . . . . . . . . . . . . . . . . . . . . . . . . . . . . . . . . . . . . . . . . . . . . . . 1-5
Energy Saver Mode . . . . . . . . . . . . . . . . . . . . . . . . . . . . . . . . . . . . . . . . . . . . . . . . . . . . . . . . . . . . 1-6
Setting the Energy Saver Mode Manually . . . . . . . . . . . . . . . . . . . . . . . . . . . . . . . . . . . . . . . 1-6
Restoring from the Energy Saver Mode Manually. . . . . . . . . . . . . . . . . . . . . . . . . . . . . . . . . 1-6
Chapter 2 Paper Handling
Print Media Requirements . . . . . . . . . . . . . . . . . . . . . . . . . . . . . . . . . . . . . . . . . . . . . . . . . . . . . . . 2-1
Printing Areas . . . . . . . . . . . . . . . . . . . . . . . . . . . . . . . . . . . . . . . . . . . . . . . . . . . . . . . . . . . . 2-2
Loading Paper . . . . . . . . . . . . . . . . . . . . . . . . . . . . . . . . . . . . . . . . . . . . . . . . . . . . . . . . . . . . . . . . 2-3
Loading Paper in the Cassette . . . . . . . . . . . . . . . . . . . . . . . . . . . . . . . . . . . . . . . . . . . . . . . 2-3
Loading Paper in the Multi-Purpose Feeder . . . . . . . . . . . . . . . . . . . . . . . . . . . . . . . . . . . . . 2-6
Loading an Envelope in the Multi-Purpose Feeder . . . . . . . . . . . . . . . . . . . . . . . . . . . . . . . . 2-7
Specifying the Paper Size and Type (Common for Cassette and Multi-Purpose Feeder) . . . . . . . 2-8
Specifying the Paper Size . . . . . . . . . . . . . . . . . . . . . . . . . . . . . . . . . . . . . . . . . . . . . . . . . . . 2-8
Specifying the Paper Type . . . . . . . . . . . . . . . . . . . . . . . . . . . . . . . . . . . . . . . . . . . . . . . . . . . 2-9
Orientation of the Document and the Paper Loading . . . . . . . . . . . . . . . . . . . . . . . . . . . . . . 2-9
Selecting the Paper Output Area . . . . . . . . . . . . . . . . . . . . . . . . . . . . . . . . . . . . . . . . . . . . . . . . . 2-10
Paper Type and Paper Output Area. . . . . . . . . . . . . . . . . . . . . . . . . . . . . . . . . . . . . . . . . . . 2-10
Face Down Paper Output Area . . . . . . . . . . . . . . . . . . . . . . . . . . . . . . . . . . . . . . . . . . . . . . 2-11
Face Up Paper Output Area . . . . . . . . . . . . . . . . . . . . . . . . . . . . . . . . . . . . . . . . . . . . . . . . 2-11
Chapter 3 Document Handling
Document Requirements . . . . . . . . . . . . . . . . . . . . . . . . . . . . . . . . . . . . . . . . . . . . . . . . . . . . . . . . 3-1
Problem Documents . . . . . . . . . . . . . . . . . . . . . . . . . . . . . . . . . . . . . . . . . . . . . . . . . . . . . . . 3-1
Scanned Area of a Document . . . . . . . . . . . . . . . . . . . . . . . . . . . . . . . . . . . . . . . . . . . . . . . . . . . . 3-2
Setting Up Documents. . . . . . . . . . . . . . . . . . . . . . . . . . . . . . . . . . . . . . . . . . . . . . . . . . . . . . . . . . 3-2
Placing a Document on the Platen Glass . . . . . . . . . . . . . . . . . . . . . . . . . . . . . . . . . . . . . . . 3-2
Loading Documents in the ADF. . . . . . . . . . . . . . . . . . . . . . . . . . . . . . . . . . . . . . . . . . . . . . . 3-3
The Paper Path of the ADF . . . . . . . . . . . . . . . . . . . . . . . . . . . . . . . . . . . . . . . . . . . . . . . . . . 3-5
iv

Chapter 4 Printing from Your Computer
Before Printing . . . . . . . . . . . . . . . . . . . . . . . . . . . . . . . . . . . . . . . . . . . . . . . . . . . . . . . . . . . . . . . . 4-1
Printing Documents . . . . . . . . . . . . . . . . . . . . . . . . . . . . . . . . . . . . . . . . . . . . . . . . . . . . . . . . . . . . 4-1
Canceling Printing . . . . . . . . . . . . . . . . . . . . . . . . . . . . . . . . . . . . . . . . . . . . . . . . . . . . . . . . . 4-2
More Information . . . . . . . . . . . . . . . . . . . . . . . . . . . . . . . . . . . . . . . . . . . . . . . . . . . . . . . . . . . . . . 4-2
Chapter 5 Copying
Documents You Can Copy . . . . . . . . . . . . . . . . . . . . . . . . . . . . . . . . . . . . . . . . . . . . . . . . . . . . . . . 5-1
Making Copies . . . . . . . . . . . . . . . . . . . . . . . . . . . . . . . . . . . . . . . . . . . . . . . . . . . . . . . . . . . . . . . . 5-1
Setting Enlarging/Reducing . . . . . . . . . . . . . . . . . . . . . . . . . . . . . . . . . . . . . . . . . . . . . . . . . . . . . . 5-2
Enlarging/Reducing Using Preset Copy Ratios . . . . . . . . . . . . . . . . . . . . . . . . . . . . . . . . . . . 5-2
Enlarging/Reducing Using Custom Copy Ratios . . . . . . . . . . . . . . . . . . . . . . . . . . . . . . . . . . 5-2
Improving Copied Image . . . . . . . . . . . . . . . . . . . . . . . . . . . . . . . . . . . . . . . . . . . . . . . . . . . . . . . . 5-3
Adjusting the Image Quality (Resolution). . . . . . . . . . . . . . . . . . . . . . . . . . . . . . . . . . . . . . . . 5-3
Adjusting the Exposure (Density). . . . . . . . . . . . . . . . . . . . . . . . . . . . . . . . . . . . . . . . . . . . . . 5-3
Special Features. . . . . . . . . . . . . . . . . . . . . . . . . . . . . . . . . . . . . . . . . . . . . . . . . . . . . . . . . . . . . . . 5-4
Collate Copy. . . . . . . . . . . . . . . . . . . . . . . . . . . . . . . . . . . . . . . . . . . . . . . . . . . . . . . . . . . . . . 5-4
2 on 1 Copy . . . . . . . . . . . . . . . . . . . . . . . . . . . . . . . . . . . . . . . . . . . . . . . . . . . . . . . . . . . . . . 5-6
Reserve Copy . . . . . . . . . . . . . . . . . . . . . . . . . . . . . . . . . . . . . . . . . . . . . . . . . . . . . . . . . . . . 5-8
Chapter 6 Scanning
Before Scanning. . . . . . . . . . . . . . . . . . . . . . . . . . . . . . . . . . . . . . . . . . . . . . . . . . . . . . . . . . . . . . . 6-1
Scanning Methods . . . . . . . . . . . . . . . . . . . . . . . . . . . . . . . . . . . . . . . . . . . . . . . . . . . . . . . . . . . . . 6-1
More Information . . . . . . . . . . . . . . . . . . . . . . . . . . . . . . . . . . . . . . . . . . . . . . . . . . . . . . . . . . . . . . 6-2
Chapter 7 System Monitor
Checking the Status of the Jobs Stored in the Machine. . . . . . . . . . . . . . . . . . . . . . . . . . . . . . . . . 7-1
Confirming and Deleting a Fax Job . . . . . . . . . . . . . . . . . . . . . . . . . . . . . . . . . . . . . . . . . . . . 7-1
Confirming Transmission Results. . . . . . . . . . . . . . . . . . . . . . . . . . . . . . . . . . . . . . . . . . . . . . 7-2
Confirming and Deleting a Copy Job . . . . . . . . . . . . . . . . . . . . . . . . . . . . . . . . . . . . . . . . . . . 7-2
Confirming and Deleting a Print Job . . . . . . . . . . . . . . . . . . . . . . . . . . . . . . . . . . . . . . . . . . . 7-3
Confirming and Deleting a Report Job. . . . . . . . . . . . . . . . . . . . . . . . . . . . . . . . . . . . . . . . . . 7-3
Chapter 8 Maintenance
Periodic Cleaning . . . . . . . . . . . . . . . . . . . . . . . . . . . . . . . . . . . . . . . . . . . . . . . . . . . . . . . . . . . . . . 8-1
Cleaning the Exterior . . . . . . . . . . . . . . . . . . . . . . . . . . . . . . . . . . . . . . . . . . . . . . . . . . . . . . . 8-1
Cleaning the Scanning Area . . . . . . . . . . . . . . . . . . . . . . . . . . . . . . . . . . . . . . . . . . . . . . . . . 8-1
Cleaning the ADF Area . . . . . . . . . . . . . . . . . . . . . . . . . . . . . . . . . . . . . . . . . . . . . . . . . . . . . 8-2
When to Replace the Cartridge . . . . . . . . . . . . . . . . . . . . . . . . . . . . . . . . . . . . . . . . . . . . . . . . . . . 8-3
Print Yield. . . . . . . . . . . . . . . . . . . . . . . . . . . . . . . . . . . . . . . . . . . . . . . . . . . . . . . . . . . . . . . . 8-4
Handling and Storing the Cartridge . . . . . . . . . . . . . . . . . . . . . . . . . . . . . . . . . . . . . . . . . . . . 8-4
Replacing the Cartridge . . . . . . . . . . . . . . . . . . . . . . . . . . . . . . . . . . . . . . . . . . . . . . . . . . . . . . . . . 8-6
Repacking and Transporting Your Machine . . . . . . . . . . . . . . . . . . . . . . . . . . . . . . . . . . . . . . . . . . 8-9
Carrying the Machine by the Sides . . . . . . . . . . . . . . . . . . . . . . . . . . . . . . . . . . . . . . . . . . . . 8-9
Transporting the Machine by Car. . . . . . . . . . . . . . . . . . . . . . . . . . . . . . . . . . . . . . . . . . . . . 8-10
v

Chapter 9 Troubleshooting
Clearing Jams . . . . . . . . . . . . . . . . . . . . . . . . . . . . . . . . . . . . . . . . . . . . . . . . . . . . . . . . . . . . . . . . 9-1
Removing Jammed Paper from Inside the Machine . . . . . . . . . . . . . . . . . . . . . . . . . . . . . . . 9-1
Removing Jammed Paper from the ADF. . . . . . . . . . . . . . . . . . . . . . . . . . . . . . . . . . . . . . . . 9-6
LCD Messages . . . . . . . . . . . . . . . . . . . . . . . . . . . . . . . . . . . . . . . . . . . . . . . . . . . . . . . . . . . . . . . 9-8
Paper Feeding Problems . . . . . . . . . . . . . . . . . . . . . . . . . . . . . . . . . . . . . . . . . . . . . . . . . . . . . . . 9-10
Copying Problems . . . . . . . . . . . . . . . . . . . . . . . . . . . . . . . . . . . . . . . . . . . . . . . . . . . . . . . . . . . . 9-13
Print Quality Problems . . . . . . . . . . . . . . . . . . . . . . . . . . . . . . . . . . . . . . . . . . . . . . . . . . . . . . . . . 9-14
Printing Problems. . . . . . . . . . . . . . . . . . . . . . . . . . . . . . . . . . . . . . . . . . . . . . . . . . . . . . . . . . . . . 9-16
Scanning Problems . . . . . . . . . . . . . . . . . . . . . . . . . . . . . . . . . . . . . . . . . . . . . . . . . . . . . . . . . . . 9-16
General Problems . . . . . . . . . . . . . . . . . . . . . . . . . . . . . . . . . . . . . . . . . . . . . . . . . . . . . . . . . . . . 9-17
If You Cannot Solve the Problem . . . . . . . . . . . . . . . . . . . . . . . . . . . . . . . . . . . . . . . . . . . . . . . . . 9-18
Chapter 10 Machine Settings
Accessing the Machine Settings . . . . . . . . . . . . . . . . . . . . . . . . . . . . . . . . . . . . . . . . . . . . . . . . . 10-1
Menu Descriptions . . . . . . . . . . . . . . . . . . . . . . . . . . . . . . . . . . . . . . . . . . . . . . . . . . . . . . . . . . . . 10-1
PAPER SETTINGS . . . . . . . . . . . . . . . . . . . . . . . . . . . . . . . . . . . . . . . . . . . . . . . . . . . . . . . 10-1
COMMON SETTINGS. . . . . . . . . . . . . . . . . . . . . . . . . . . . . . . . . . . . . . . . . . . . . . . . . . . . . 10-2
COPY SETTINGS . . . . . . . . . . . . . . . . . . . . . . . . . . . . . . . . . . . . . . . . . . . . . . . . . . . . . . . . 10-4
PRINTER SETTINGS . . . . . . . . . . . . . . . . . . . . . . . . . . . . . . . . . . . . . . . . . . . . . . . . . . . . . 10-5
TIMER SETTINGS . . . . . . . . . . . . . . . . . . . . . . . . . . . . . . . . . . . . . . . . . . . . . . . . . . . . . . . 10-5
Chapter 11 Appendix
Specifications. . . . . . . . . . . . . . . . . . . . . . . . . . . . . . . . . . . . . . . . . . . . . . . . . . . . . . . . . . . . . . . . 11-1
Index . . . . . . . . . . . . . . . . . . . . . . . . . . . . . . . . . . . . . . . . . . . . . . . . . . . . . . . . . . . . . . . . . . . . . . 11-3
vi

Preface
Thank you for purchasing the Canon imageCLASS MF5600 Series. Please read this manual thoroughly before
operating the machine in order to familiarize yourself with its capabilities, and to make the most of its many
functions. After reading this manual, store it in a safe place for future reference.
How to Use This Manual
Symbols Used in This Manual
The following symbols are used in this manual to explain procedures, restrictions, handling
precautions, and instructions that should be observed for safety.
Indicates a warning concerning operations that may lead to death or injury to persons
WARNING
CAUTION
IMPORTANT
NOTE
Keys Used in This Manual
The following symbols and key names are a few examples of how keys to be pressed are expressed in
this manual. The operation panel keys on the machine are indicated within brackets.
Press [Start].
if not performed correctly. In order to use the machine safely, always pay attention to
these warnings.
Indicates a caution concerning operations that may lead to injury to persons, or
damage to property if not performed correctly. In order to use the machine safely,
always pay attention to these cautions.
Indicates operational requirements and restrictions. Be sure to read these items
carefully in order to operate the machine correctly, and to avoid damage to the
machine.
Indicates a clarification of an operation, or contains additional explanations for a
procedure. Reading these notes is highly recommended.
Press [Image Quality].
Messages Displayed in the LCD
The following are a few examples of how messages in the LCD are expressed in this manual. The
messages are indicated within angle brackets.
• If <MEMORY FULL> is displayed, the machine cannot scan the documents.
• <2ON1> appears in the LCD.
vii
Illustrations Used in This Manual
Unless otherwise mentioned, illustrations used in this manual are those taken when no optional
equipment is attached to the imageCLASS MF5650.
The model imageCLASS MF5650 is used for illustration purposes in this manual. When there is any
difference between MF5630 and MF5650, it is clearly indicated in the text, e.g., "Only for the MF5650
model."
viii

Introduction
This chapter describes the main components, the operation panel and the standby display of the machine. It also
explains how to set the energy saver function.
Customer Support
Your machine is designed with the latest technology to provide trouble-free operation. If you encounter
a problem with the machine's operation, tr y to solve it by using the information in Chapter 9,
"Troubleshooting." If you cannot solve the problem or if you think your machine needs servicing,
contact your local authorized Canon dealer or the Canon help line.
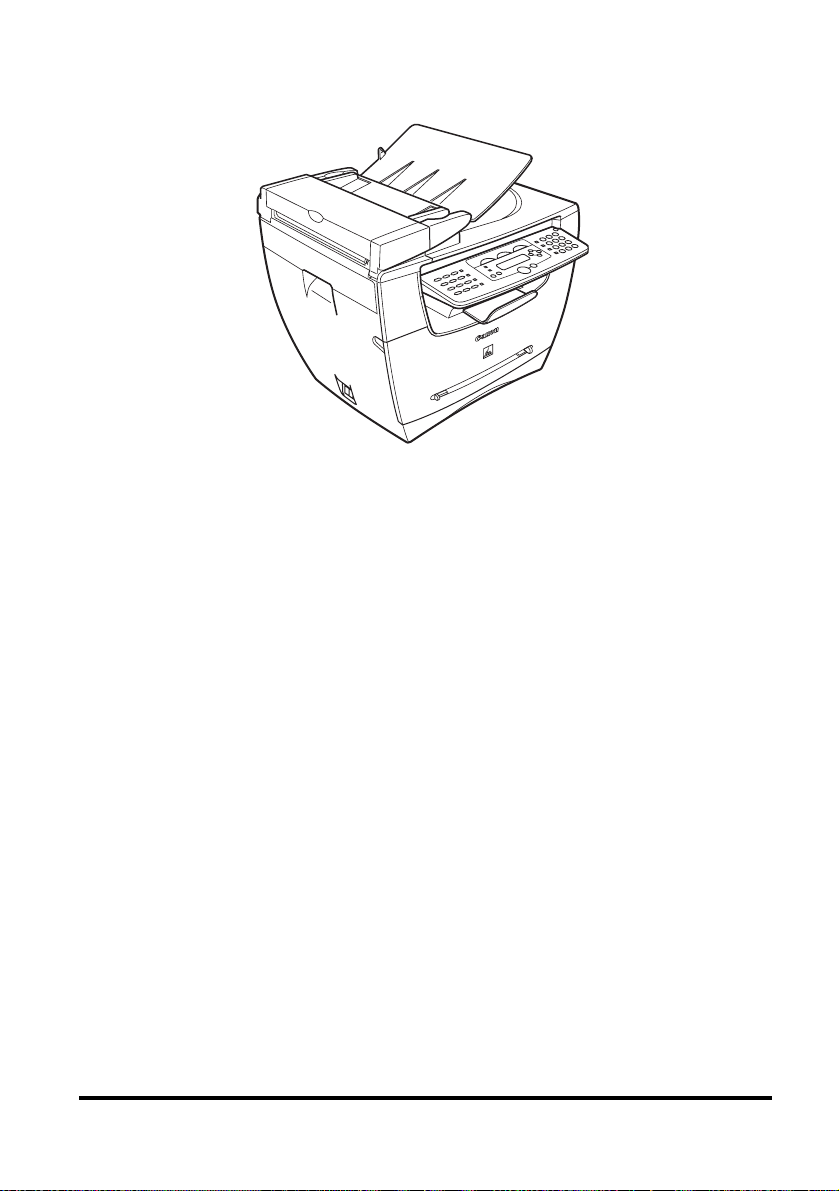
Main Components of the Machine
This section describes the main components of the machine.
Fron t V iew
ab
c
d
e
f
g
jk
h
i
1
CHAPTER
LINE EXT.
ADF (Automatic Document Feeder)
a
Holds documents and feeds them automatically i nto the scanning
unit.
b Document feeder tray
Place documents.
c Document out put tray
Documents come out here.
d Document guides
Adjust to the width of documents.
1-1
e Operation panel
f Output tray
g Front cover
h Multi-purpose feeder
1
Controls the machine.
Outputs printouts.
Open it when you install the cartridge, or remove jammed paper.
Used when printing paper one by one m anually.
i Cassette
Holds the paper supply.
j Telephone line jack
Connect the telephone cable. (Only for the MF5650 model.)
k External device jack
Connect an external device. (Only for the MF5650 model.)
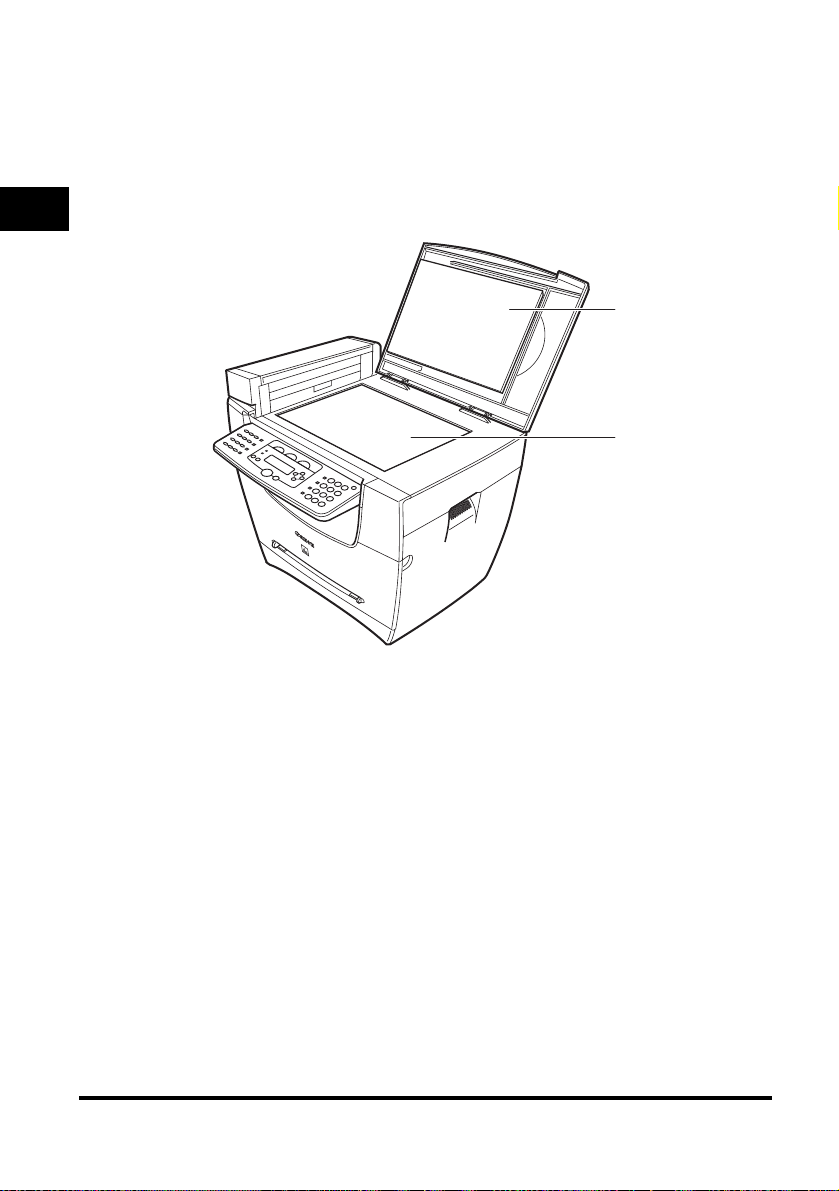
Introduction
a Platen glass cover
Open it when you place documents on the platen glass for copying
or scanning.
b Platen glass
Place documents.
a
b
1-2
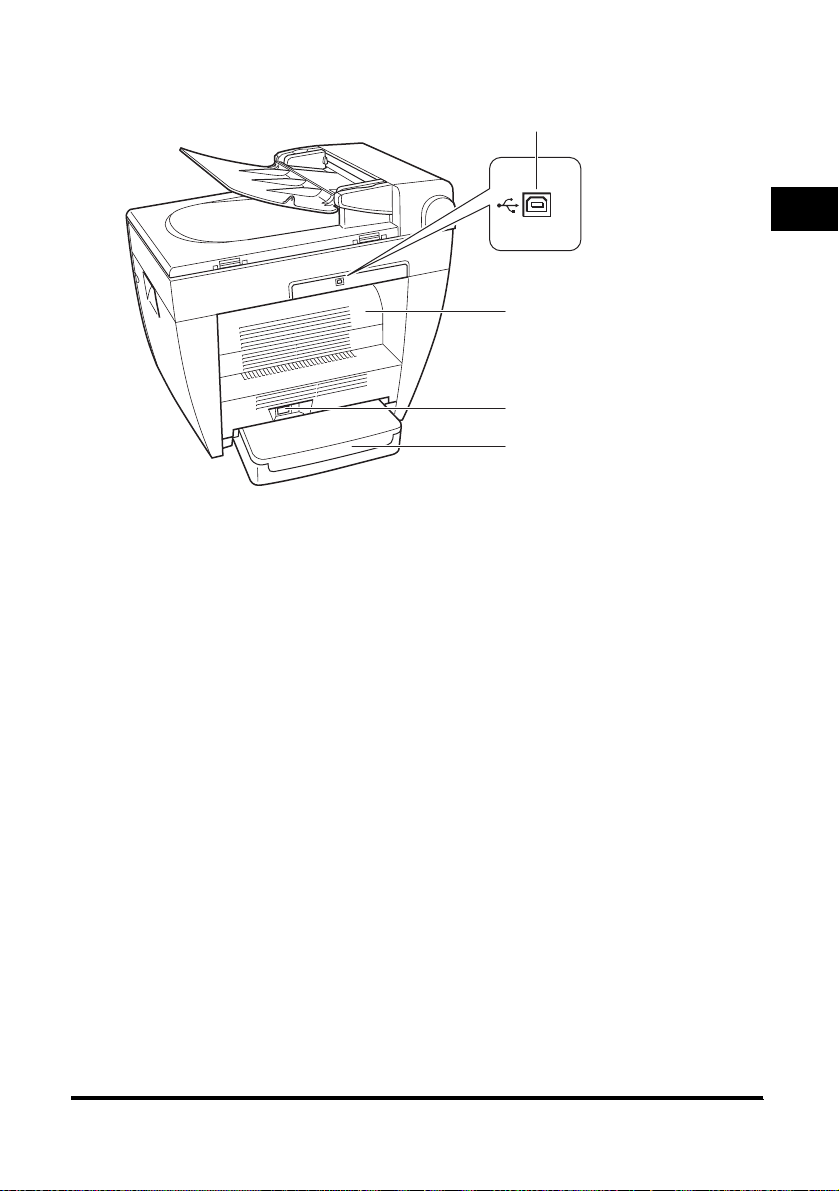
Rear View
a
1
a
USB port
Connect the USB (Universal Serial Bus) cable.
b Face up cover
Open it when you output paper face up, or remove jammed paper.
b
c
d
c Power socket
Connect the power cord.
d Extension cover
Protects paper supply in the cassette from dirt and dust.
Introduction
1-3
Operation Panel
This section describes keys used when making copies, scanning and setting the Menu.
For keys not described here, see Chapter 1, "Introduction," in the Facsimile Guide.
■ MF5650
cde fghi j
b
1
a
Introduction
01 02 03
04
07
10
a In Use/Memory indicator
Lights green during copying or when the copy job is stored in the
memory.
b Alarm indicator
Flashes red when the machine has a problem such as a paper jam.
(The error message is displayed in the LCD.)
c COPY key
Switches the standby display to the Copy mode.
d FAX key
Switches the standby display to the Fax mode.
e SCAN key
Switches the standby display to the Scan mode.
f Menu key
Customizes the way your machine operates.
g [ (-)] or [ (+)] keys
Scroll through the selections so you can see other settings.
h Enlarge/Reduce key
Sets an enlargement or reduction ratio of the copy.
i Exposure key
Adjusts the copy exposure.
j Energy Saver key
Sets or cancels the energy saver mode manually. The key lights
green when the energy saver mode is set, and goes off when the
mode is canceled.
05
08
11 12
Redial/
Pause
Coded
06
Dial
Directory
09
R
Hook
COPY
k
FAX
mon
SCAN
Menu
GHI
PQ
OK
1
4
S
R
7
T
DEF
ABC
23
MNO
JKL
5
WXYZ
TUV
8
0
pqr sl
k Status Monitor key
Checks the status of copy, fax, print and report jobs.
l Clear key
Clears an entry in the LCD.
m LCD
Displays messages and prompts during operation. Also
displays selections, text, and numbers when specifying
settings.
n Start key
Starts copying.
o Stop/Reset key
Cancels copying and other operations, and returns to the
standby display.
p OK key
Determines the contents you set or register.
q Collate/2on1 key
Sorts copies in order of pages or reduces two documents to fit
on a single sheet.
r Image Quality key
Adjusts the quality of printout.
s Numeric keys
Enter copy quantity and other numerical values.
6
9
1-4
■ MF5630
y
COPY
SCAN
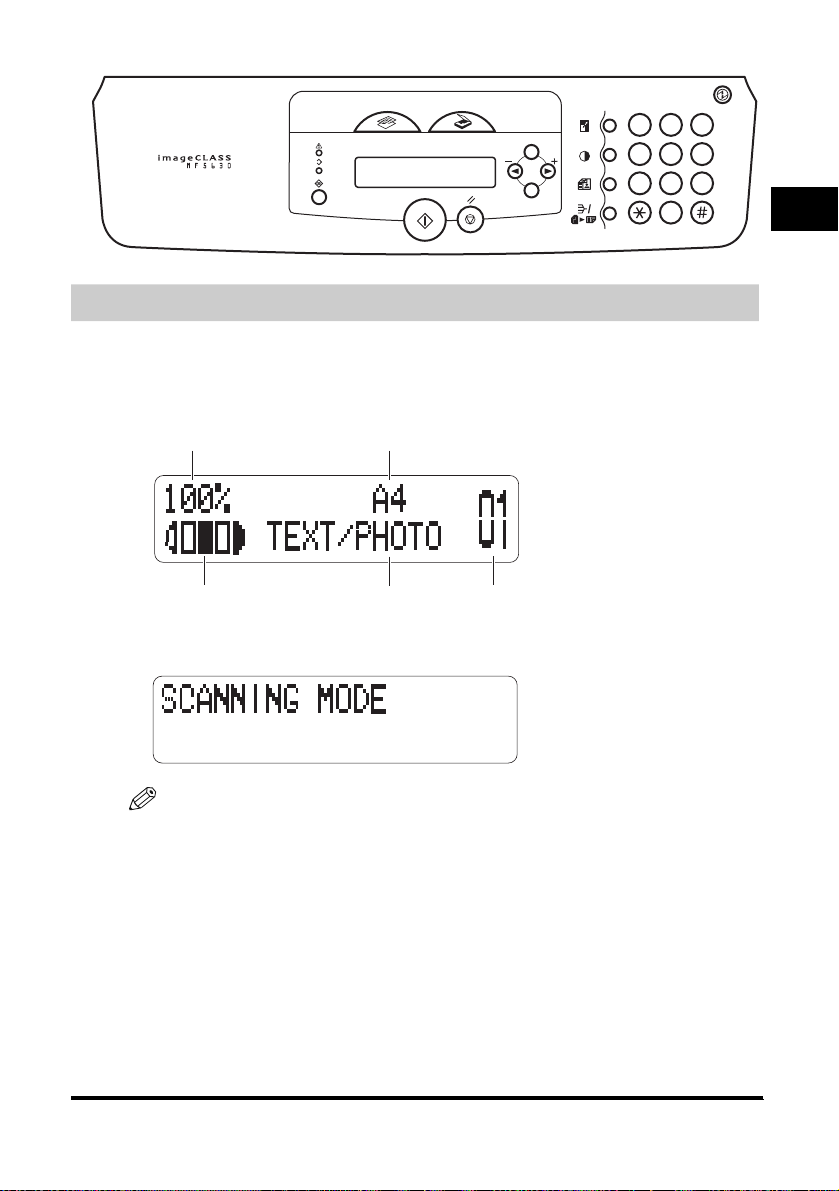
Standby Display
The standby display differs depending on which mode is selected.
The standby display in the Copy or Scan mode is as follows:
■ Copy Mode
Copy ratio
Exposure Copy
■ Scan Mode
Paper size
Image
quality
quantit
Menu
1
23
5
4
7
OK
6
8
9
0
1
Introduction
NOTE
•
When the machine is plugged in, the LCD displays <INITIALIZING> for a while, then the standby display appears.
•
The standby display in the Fax mode appears only with the MF5650 model. (See Chapter 1, "Introduction," in the
Facsimile Guide.)
1-5

Energy Saver Mode
This machine provides an energy saver function. When no operations are performed for about 5
minutes, the machine automatically enters the energy saver mode.
NOTE
•
The time until the machine enters the energy saver mode can be specified in a range of 3 minutes to 30 minutes.
1
Introduction
You can also turn off the energy saver function. For details on the energy saver mode settings, see <4. ENERGY
SAVER> of "Menu Descriptions," on p. 10-5.
•
The energy saver function does not activate when the machine is in t he following conditions:
- When printing out copies, faxes* or other pages
- When sending or receiving faxes*
- When scanning
- While a copy job is saved in the memory or when the collate copy or other functions are operating, or when the
In Use/Memory indicator lights up
- When paper jams occur
- When an error code appears and the Alarm indicator flashes
- When no paper is loaded in the cassette
- When paper is loaded in the multi-purpose feeder
- When the message <TONER SUPPLY LOW> appears*
*Only for the MF5650 model.
•
The machine will be restored from the energy saver mode in the following condit ions:
- When receiving print jobs from your computer
- When receiving faxes*
- When you pick up the handset of the telephone connected to the machine*
- When receiving a call*
*Only for the MF5650 model.
Setting the Energy Saver Mode Manually
1
Press [Energy Saver].
The LCD is turned off and the Energy Saver key lights up.
NOTE
Right after the machine is restored from the energy saver mode, or right after copying finishes, wait about 2
seconds before pressing [Energy Saver].
Restoring from the Energy Saver Mode Manually
1
Press [Energy Saver].
The Energy Saver key goes off and the machine enters the standby mode.
NOTE
The machine can be restored from the energy saver mode immediately. However, it may vary according to room
temperature and circumstances.
1-6
Paper Handling
This chapter describes the print media you can use with this machine, how to load them, and where to print out the
document s.
Print Media Requirements
For high-quality copies, we recommend using paper and transparencies recommended by Canon.
Some types of paper available at office supply stores may not be suitable for this machine. If you have
any questions about paper and transparencies, contact your local authorized Canon dealer or the
Canon help line.
■ Paper Storage
In order to prevent paper jams, follow this procedure below:
• To prevent moisture buildup, store remaining paper wrapped tightly in its original package. Store
paper in a dry location, out of direct sunlight.
• To prevent curling, store paper flat, not upright.
• If the paper is curled, uncurl it before loading it in the cassette or multi-purpose feeder. Failure to do
so will cause paper creases and a paper jam.
■ Unacceptable Paper
Do not copy on the following types of copy stock. Doing so may result in paper jams.
• Severely curled or wrinkled paper
• Transparencies designed for full-color copiers or printers
• Paper which has already been copied using a digital full-color copier (Do not copy on the reverse
side.)
• Paper which has been printed on using a ther mal transfer printer (Do not copy on the reverse side.)
IMPORTANT
Never attempt to make copies on full-color transparencies. Doing so may result in product malfunction.
2
CHAPTER
■ Acceptable Paper
Cassette/Multi-Purpose Feeder
Paper Size A4, B5, A5, Executive, Letter, Legal*, Envelope*: COM10, Monarch, DL, ISO-C5
Paper Weight 64 g/m2 to 128 g/m
Paper Type Plain paper, Recycled paper, Heavy paper, Transparency, Envelope
* Only for the multi-purpose feeder.
2
2-1
NOTE
•
The printing speed may become slower than usual depending on the paper size, the paper type, and the number
of sheets you specify.
This is because the machine's safety funct ion works to prevent the failure due to heat.
•
Some types of paper may not feed properly into the cassette or the multi-purpose feeder.
Printing Areas
Please note that the term "printing area" represents both the recommended area for optimum print
quality and the entire area where the machine can technically print from your computer.
Printing area (light shade): Canon recommends that you print within this area.
2
■ Paper
MAX. 5 mm MAX. 5 mm
MAX. 5 mm
Paper Handling
Feeding
direction
MAX. 5 mm
■ Envelope
MAX. 5 mm
MAX. 5 mm
MAX. 5 mm
Feeding
direction
MAX. 5 mm
NOTE
Copying areas are a little larger than printing areas.
2-2
Loading Paper
This section describes how to load paper in the cassette and the multi-purpose feeder.
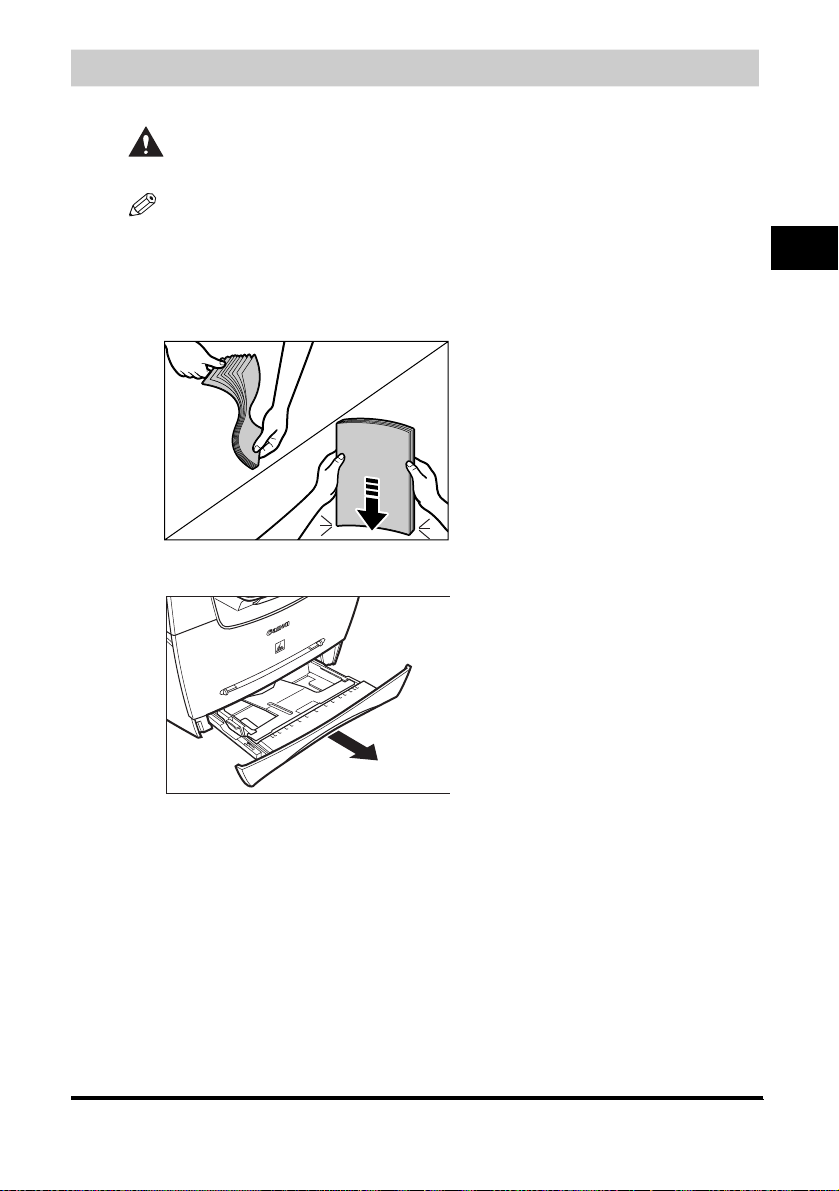
CAUTION
When loading paper, take care not to cut your hands on the edges of the paper.
NOTE
•
The paper in the multi-purpose feeder is fed prior to the paper in the cassette.
•
The cassette holds up to approximately 250 sheets of 64 g/m2 paper.
Loading Paper in the Cassette
1
Fan the paper stack first, then tap the edges on a flat surface to even the stack.
2
Pull out the cassette completely.
2
Paper Handling
2-3
3
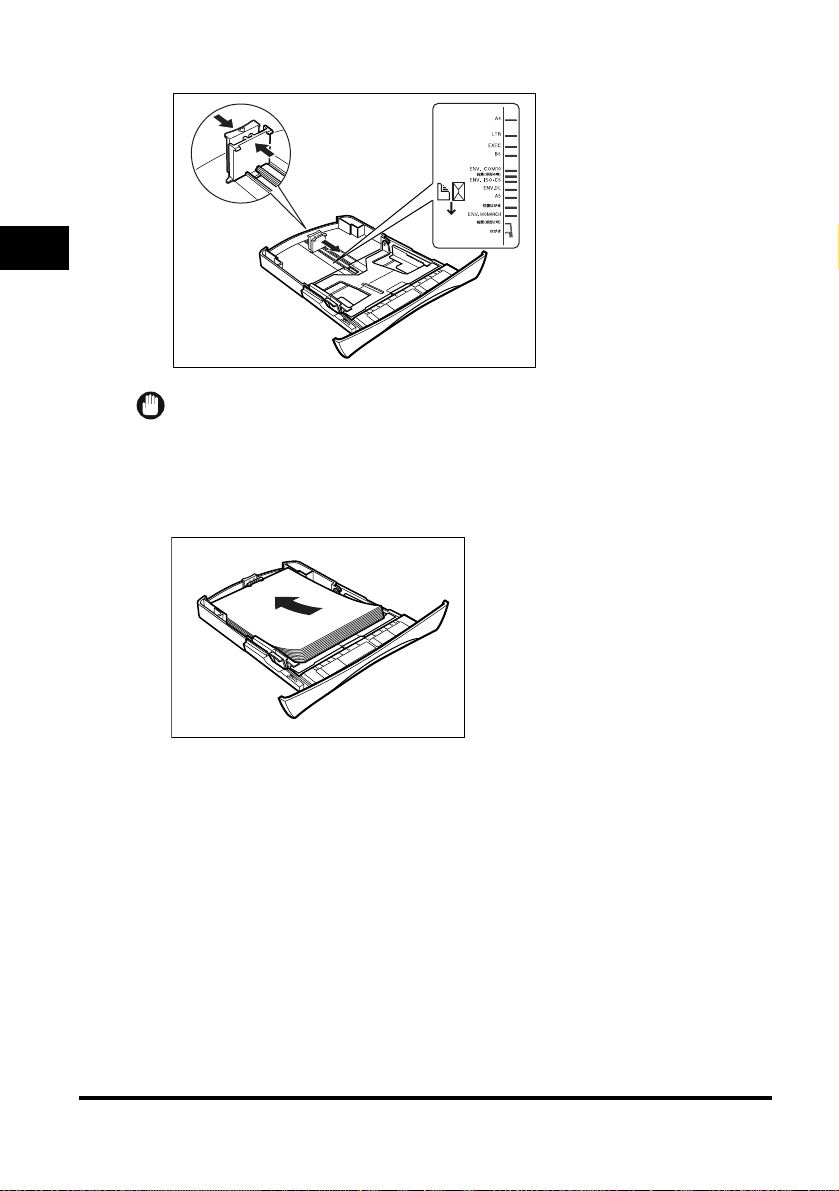
While holding the lock release lever on the paper guide at the rear of the cassette, slide the paper guide to
the mark indicating the desired paper size.
2
Paper Handling
IMPORTANT
If the paper guide is not adjusted correctly for the size of t he paper, the quality of your printouts may be adversely
affect ed.
4
Load the paper stack in the cassette with the print side down.
When you load paper with a logo on, position the paper with the print side down (logo side) and load it so that the
top of the paper feeds first in the cassette.
2-4
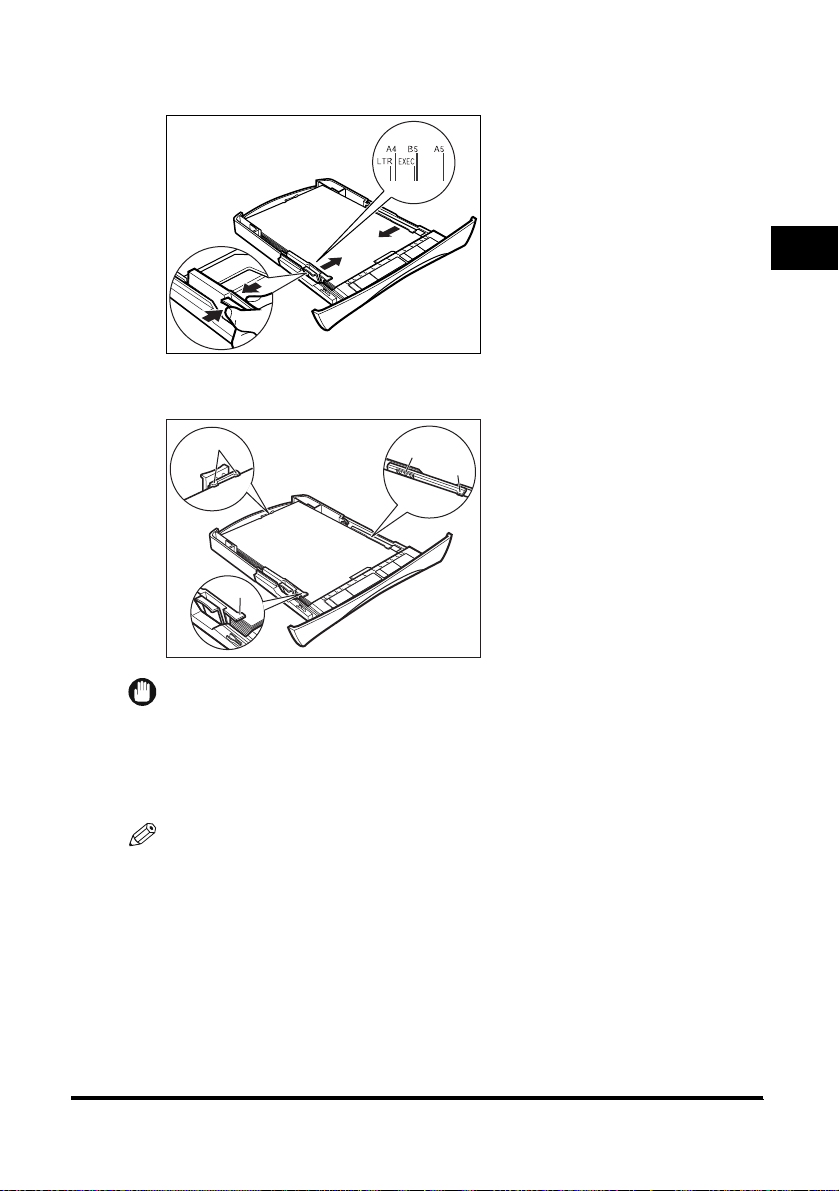
5
While holding the lock release lever on the paper guide on either side of the cassette, slide the paper
guide to the mark indicating the desired paper size.
The paper guides on the sides of the cassette move together.
2
Make sure the paper stack does not exceed the load limit mark (A) and it is loaded under the hooks (B) on the
paper guides.
B
B
A
B
IMPORTANT
•
Do not load different size and type of paper at the same time.
•
Do not load extra paper when there is still paper left in the cassette.
If you load extra paper while making copies, remove the loaded paper first.
Then put it together with the extra paper and tap the edges. After that, reload it in the cassette.
6
Insert the cassette into the machine.
NOTE
If you do not completely inser t the cassette into the machine, paper jams may occur.
7
Specify the size and t he type of the paper you load.
For details on how to specify the paper size and type, see "Specifying the Paper Size and Type (Common for
Cassette and Multi-Purpose Feeder)," on p. 2-8.
Paper Handling
2-5
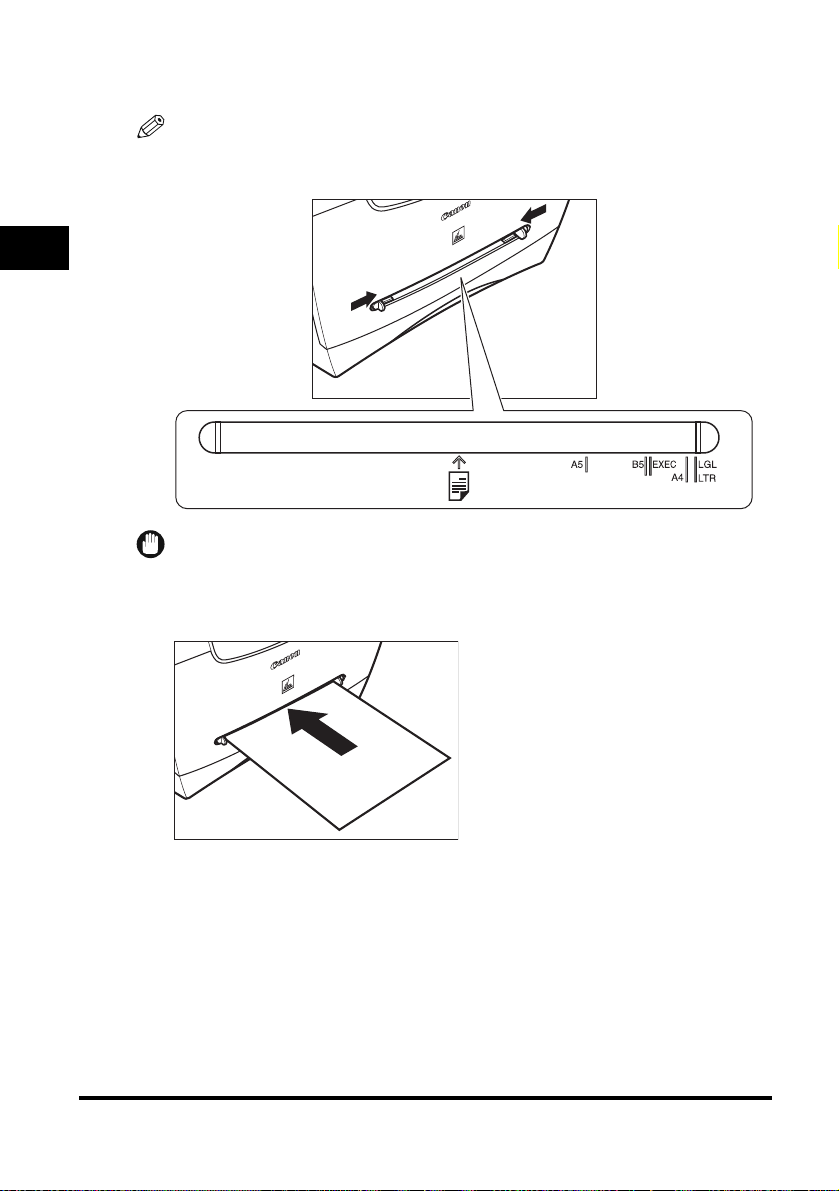
Loading Paper in the Multi-Purpose Feeder
Use the multi-purpose feeder when you want to copy or print on the different paper which is in the
cassette. Load paper one by one in the multi-purpose feeder.
NOTE
The paper in the multi-purpose feeder is fed prior to the paper in the cassette.
1
Slide the paper guides to the mark of the desired paper size.
2
Paper Handling
IMPORTANT
If the paper guides are not adjusted correctly for the size of the paper, the quality of your printouts may be
adversely affected.
2
Insert the paper square into the multi-purpose feeder with the print side up.
2-6
NOTE
When you load paper with a logo on, position the paper with the print side up (logo side) and inser t it so that the
top of the paper feeds first in the multi-purpose feeder.
3
Specify the size and t he type of the paper you load.
For details on how to specify the paper size and type, see "Specifying the Paper Size and Type (Common for
Cassette and Multi-Purpose Feeder)," on p. 2-8.
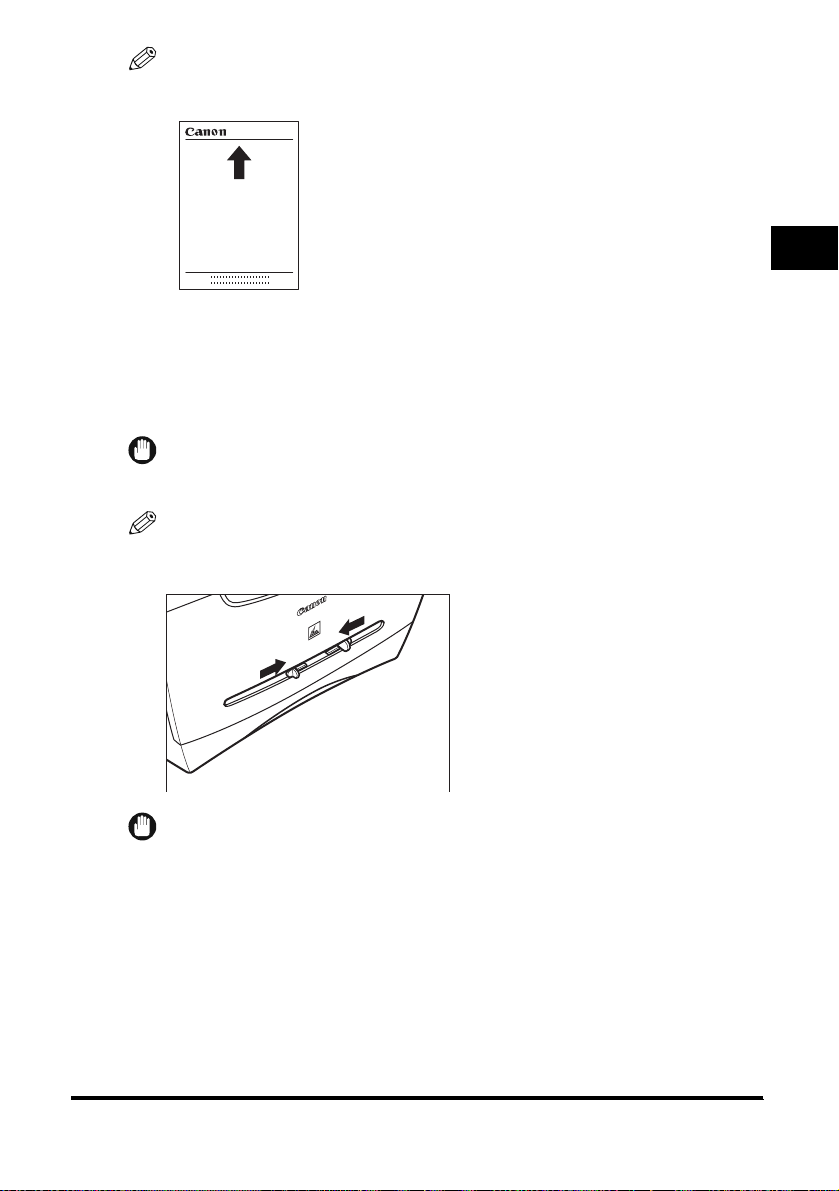
Loading an Envelope in the Multi-Purpose Feeder
Use the multi-pur pose feeder when you want to copy or print an envelope one by one.
IMPORTANT
The recommended envelopes are COM10, MONARCH, DL, and ISO-C5. Using other envelopes may affect the
quality of the printout.
NOTE
The envelope in the multi-purpose feeder is fed prior to the paper in the cassette.
1
Slide the paper guides to fit the size of the envelope you want to load.
2
Paper Handling
IMPORTANT
If the paper guides are not adjusted correctly for the size of the envelope, the quality of your printouts may be
adversely affected.
2-7

2
Insert the envelope square into the multi-purpose feeder with the print side up and the right edge (i.e.,
closer to the stamp) first.
If the envelope to be loaded has a flap on the short edge, this edge must enter the machine first. Not loading it
this way will result in a paper jam.
2
3
Specify the size and the type of the paper you load.
Paper Handling
For details on how to specify the paper size and type, see "Specifying the Paper Size and Type (Common for
Cassette and Multi-Purpose Feeder)," on p. 2-8.
Specifying the Paper Size and Type (Common for Cassette and Multi-Purpose Feeder)
Specifying the Paper Size
At the factory, the paper size has already been set to <A4>. Each time you change the paper size you
load in the cassette or the multi-purpose feeder, it is necessary to specify the paper size according to
the following.
1
Press [Menu].
2
Press [ (-)] or [ (+)] to select <PAPER SETTINGS> ➞ press [OK].
3
Press [ (-)] or [ (+)] to select <CASSETTE> or <MP TRAY> ➞ press [OK].
4
Press [ (-)] or [ (+)] to select <PAPER SIZE> ➞ press [OK].
5
Press [ (-)] or [ (+)] to select the appropriate paper size ➞ press [OK].
You can select from the following paper sizes: A4, B5, A5, EXECUTIV (Executive), COM10, MONARCH, DL,
ISO-C5, LTR (Letter), and LGL (Legal).
2-8
NOTE
Select <COM10>, <MONARCH>, <DL>, or <ISO-C5> for envelopes.
6
Press [Stop/Reset] to return to the standby display.

Specifying the Paper Type
<PLAIN PAPER> is selected as the default paper type. When using paper other than plain paper, you
can specify the paper type according to the following. Specifying the paper type can prevent poor copy
quality, or the printout not being printed correctly.
1
Press [Menu].
2
Press [ (-)] or [ (+)] to select <PAPER SETTINGS> ➞ press [OK].
3
Press [ (-)] or [ (+)] to select <CASSETTE> or <MP TRAY> ➞ press [OK].
4
Press [ (-)] or [ (+)] to select <PAPER TYPE> ➞ press [OK].
5
Press [ (-)] or [ (+)] to select the appropriate paper type ➞ press [OK].
You can select from the following paper types:
- Plain paper (64 g/m2 to 90 g/m2): <PLAIN PAPER>, <PLAIN PAPER L>*
- Heavy paper (91 g/m2 to 128 g/m2): <HEAVY PAPER>, <HEAVY PAPER H>*
- Transparency: <TRANSPARENCY>
- Envelope: <HEAVY PAPER>, <HEAVY PAPER H>*
*1 If paper curls excessively when printed with <PLAIN PAPER> selected, select <PLAIN PAPER L>.
*2 If print fixing is not sufficient when printed with <HEAVY PAPER> selected, select <HEAVY PAPER H>.
6
Press [Stop/Reset] to return to the standby display.
2
1
2
Orientation of the Document and the Paper Loading
When you load or place a document in the ADF or on the platen glass, the orientation of the document
and the orientation of the paper in the cassette or in the multi-purpose feeder are as shown below.
Platen glassADF
Document
Document
2
Paper Handling
Paper
Cassette Multi-
purpose
feeder
Copy
2-9

Selecting the Paper Output Area
Face down paper output delivers paper with the printed side down on the output tray. Face up paper
output delivers paper with the printed side up from the output area. Select the area depending on your
purpose by opening or closing the face up cover.
Open the face up cover for face up paper output, or close the face up cover and pull out the output tray
for face down paper output.
2
Paper Handling
IMPORTANT
Do not open or close the face up cover while copying and printing.
Paper Type and Paper Output Area
Select the suitable paper output area depending on the paper type and your purpose.
Paper Type Paper Output Area The Number of Output Sheets
Plain Paper
Recycled Paper
Heavy Paper
Transparencies
Envelopes
face up 1 sheet
face down approx. 60 sheets (64 g/m2 to 75 g/m2)
face up 1 sheet
face down approx. 30 sheets (64 g/m2 to 75 g/m2)
face up 1 sheet
face down approx. 30 sheets (75 g/m2 to 128 g/m2)
face up 1 sheet
face down 10 sheets
face up 1 sheet
face down 10 sheets
2-10
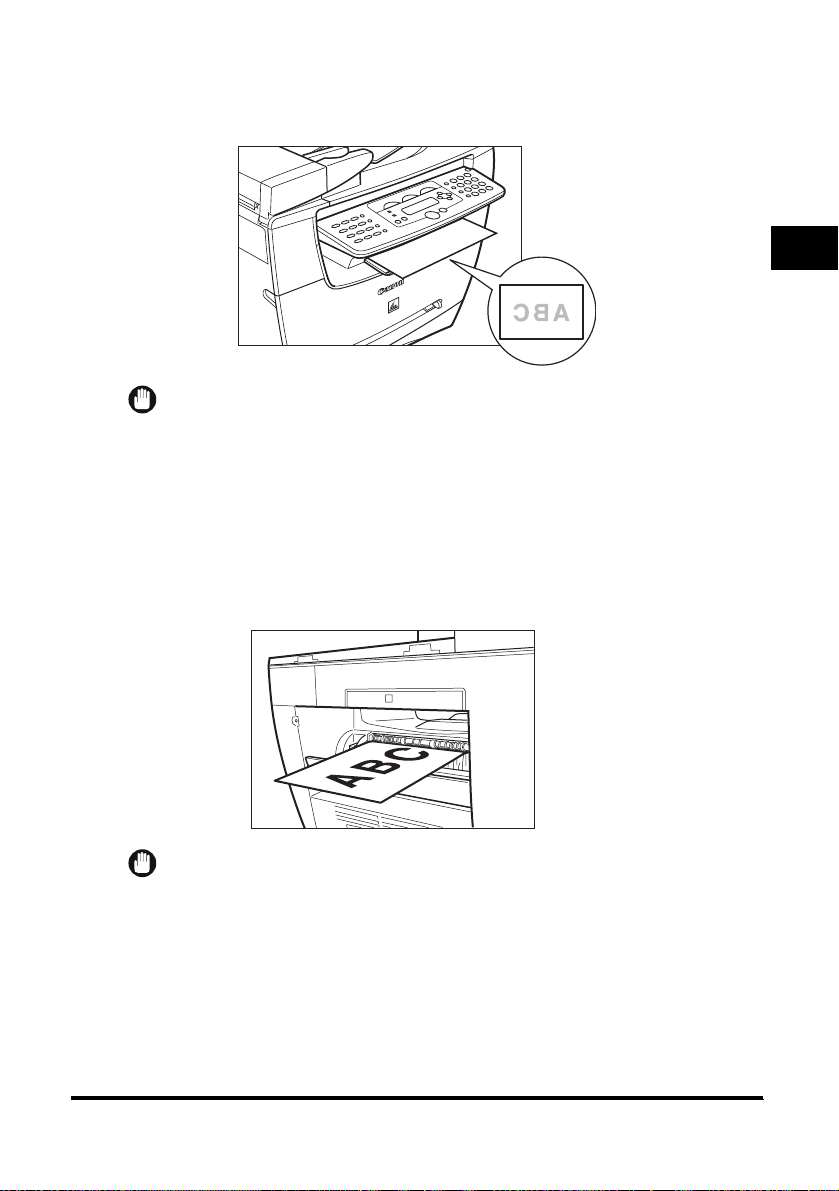
Face Down Paper Output Area
The paper is delivered with the printed side down on the output tray.
Paper is stacked in printed order.
Close the face up cover, and pull out the output tray.
2
IMPORTANT
•
Do not place the delivered paper back on the output tray. Doing so may result in paper jams.
•
Do not place objects other than paper on the output tray. Doing so may result in paper jams.
Face Up Paper Output Area
The paper is delivered with the printed side up from the face up paper output at the rear of the
machine.
This way is convenient for printing on transparencies, or envelopes which tend to curl, because the
paper is delivered straight through out of the machine.
Open the face up cover.
• Remove the delivered paper one by one.
IMPORTANT
•
Do not pull the paper forcibly.
•
This machine has no face up output tray. Remove the delivered paper with your hand.
•
Do not place an object in fr ont of the face up paper output to prevent a paper jam.
Paper Handling
2-11
Loading...