


 Loading...
User’s Guide
Table of Contents
|
Introduction |
2 |
|
|
|
|
|
|
|
|
|
|
|
|
|
|
|
|
|
|
|
|
|
|
|
|
|
|
|
|
|
|
Before Using Your Machine |
6 |
|
|
|
|
|
|
|
|
|
|
|
|
|
|
|
|
|
|
|
|
|
|
|
|
|
|
|
|
|
|
|
|
|
|
|
|
|
|
|
|
|
|
|
|
|
|
|
|
|
|
|
|
|
|
|
|
|
|
|
|
|
|
Copying |
18 |
|
|
|
|
|
|
|
|
|
|
|
|
|
|
|
|
|
|
|
|
|
|
|
|
|
|
|
|
|
|
|
|
|
|
|
|
|
|
|
|
|
|
|
|
|
|
|
|
|
|
|
|
|
|
|
|
|
|
|
|
|
|
Sending Faxes |
19 |
|
|
|
|
|
|
|
|
|
|
|
|
|
|
|
|
|
|
|
|
|
|
|
|
|
|
|
|
|
|
|
|
|
|
|
|
|
|
|
|
|
|
|
|
|
|
|
|
|
|
|
|
|
|
|
|
|
|
|
|
|
|
Receiving Faxes |
28 |
|
|
|
|
|
|
|
|
|
|
|
|
|
|
|
|
|
|
|
|
|
|
|
|
|
|
|
|
|
|
|
|
|
|
|
|
|
|
|
|
|
|
|
|
|
|
|
|
|
|
|
|
|
|
|
|
|
|
|
|
|
|
Settings and Activity Reports |
37 |
|
|
|
|
|
|
|
|
|
|
|
|
|
|
|
|
|
|
|
|
|
|
|
|
|
|
|
|
|
|
|
|
|
|
|
|
|
|
|
|
|
|
|
|
|
|
|
|
|
|
|
|
|
|
|
|
|
|
|
|
|
|
Routine Maintenance |
43 |
|
|
|
|
|
|
|
|
|
|
|
|
|
|
|
|
|
|
|
|
|
|
|
|
|
|
|
|
|
|
|
|
|
|
|
|
|
|
|
|
|
|
|
|
|
|
|
|
|
|
|
|
|
|
|
|
|
|
|
|
|
|
Troubleshooting |
53 |
|
|
|
|
|
|
|
|
|
|
|
|
|
|
|
|
|
|
|
|
|
|
|
|
|
|
|
|
|
|
|
|
|
|
|
|
|
|
|
|
|
|
|
|
|
|
|
|
|
|
|
|
|
|
|
|
|
|
|
|
|
|
Specifications |
66 |
|
|
|
|
|
|
|
|
|
|
|
|
|
|
|
|
|
|
|
|
|
|
|
|
|
|
|
|
|
|
|
|
|
|
|
|
|
|
|
|
|
|
|
|
|
|
|
|
|
|
|
|
|
|
|
|
|
|
|
|
|
|
Appendix |
67 |
|
|
|
|
|
|
|
|
|
|
|
|
|
|
|
|
|
|
|
|
|
|
|
|
|
|
|
|
|
|
|
|
|
|
|
|
|
|
|
|
|
|
|
|
|
|
|
|
|
|
|
|
|
|
|
|
|
|
|
|
|
|
|
|
|
|
|
|
|
|
|
|
|
|
|
|
|
|
|
|
|
|
|
|
|
|
|
|
|
|
|
|
|
|
|
|
|
|
|
|
|
|
|
|
|
|
|
|
|
|
|
|
|
|
|
|
|
|
|
|
|
|
|
|
|
|
|
|
|
|
|
|
|
|
|
|
|
|
|
|
|
|
|
|
|
|
|
|
|
|
|
|
|
|
|
|
|
|
|
|
|
|
|
|
|
|
|
|
|
|
|
|
|
|
|
|
|
|
|
|
|
|
|
|
|
|
|
|
|
|
|
|
|
|
|
|
|
|
|
|
|
|
|
|
|
|
|
|
|
|
|
|
|
|
|
|
|
|
|
|
|

Getting Help from Canon
Help Us Help You Better
Before you contact Canon, please record the following information.
Serial Number (located on the inside of the product):_________________________________________
Model Number (located on the front of the product): _________________________________________
Setup CD-ROM number (located on the CD-ROM): __________________________________________
Purchase Date: ______________________________________________________________________
Customer Technical Support Sequence*
1.Internet — www.canontechsupport.com
For quick and comprehensive self-help in an intuitively guided interactive troubleshooting environment, the place to start is our helpful tech support web site. In addition, the latest driver downloads, answers to frequently asked questions, product information, and “where to buy” instructions are found here.
2.Email Tech Support — www.canontechsupport.com
For individual attention to a special issue, try emailing our friendly technical support representatives, specially trained to communicate quick, easy, and logical solutions to your inquiries within 24 hours.
3.Toll-Free Live Tech Support — (1-800-828-4040)
This option provides live telephone technical support, free of service charges, MondaySaturday (excluding holidays), during your product’s 1 year limited warranty period. Telephone Device for the Deaf (TDD) support is available at (1-866-251-3752).
4.Extended Service and Support — www.canonesp.com
Canon CarePAK Extended Service Plan is a cost-attractive and easy-to-use extended service program that provides up to three full years of service and support coverage at a very attractive price. CarePAK offers toll-free Canon technical support and includes Canon’s superb InstantExchange product replacement program. For further information about extending your Canon service and support, call (1-800-385-2155), or visit our Web site at www.canonesp.com. CarePAK must be purchased during your product’s warranty period.
For more information and updated program specifics, please visit our web site at www.canontechsupport.com.
* Support program specifics are subject to change without notice.

Copyright
This manual is copyrighted by Canon U.S.A., Inc. with all rights reserved. Under the copyright laws, this manual may not be reproduced in any form, in whole or in part, without the prior written consent of Canon U.S.A., Inc.
© 2007 Canon U.S.A., Inc.
Disclaimer
Canon U.S.A., Inc. has reviewed this manual thoroughly in order that it will be an easy-to-use guide to your Canon FAX-JX200/JX201. All statements, technical information and recommendations in this manual and in any guides or related documents are believed reliable, but the accuracy and completeness thereof are not guaranteed or warranted, and they are not intended to be, nor should they be understood to be, representation or warranties concerning the products described.
Specifications are subject to change without notice.
Trademarks
Canon is a registered trademark of Canon Inc.
All other product and brand names are trademarks of their respective owners.
About Consumables
Consumables (ink tanks / FINE Cartridges) are available for 5 years after production has stopped.
International ENERGY STAR® Program
As an ENERGY STAR® Partner, Canon Inc. has determined that this product meets the ENERGY STAR guidelines for efficiency.
IMPORTANT SAFETY INSTRUCTIONS
When using your telephone equipment, basic safety precautions should always be followed to reduce the risk of fire, electric shock and injury to persons, including the following:
1.Do not use this product near water, for example, near a bath tub, wash bowl, kitchen sink or laundry tub, in a wet basement or near a swimming pool.
2.Avoid using this product during an electrical storm. There may be a remote risk of electric shock from lightning.
3.Do not use this product to report a gas leak in the vicinity of the leak.
SAVE THESE INSTRUCTIONS
1

Introduction
Useful Information
z Replacing a FINE Cartridge
When the ink in the FINE Cartridge starts to run out, the machine will switch to memory reception of faxes.
See “Printing a Document in Memory” on page 34
See “Replacing a FINE Cartridge” on page 45
See “Aligning the FINE Cartridge” on page 48
z One-touch and Coded Dial Numbers
You can register One-touch and Coded Dial numbers in your fax machine to make sending faxes easier and faster.
See “Registering One-touch Speed Dialing Numbers and Names” on page 13 See “Registering Coded Speed Dialing Numbers and Names” on page 14
z Different Ways to Receive Faxes
There are several different ways to receive faxes using this machine. Select the one that most suits your needs.
See “Setting the Receive Mode” on page 29
z Deleting Faxes from the Memory
When the ink level is low faxes will be received into the memory. Once 30 transmissions have been received reception will no longer be possible, so be sure to print out and delete unnecessary faxes from the memory.
See “Printing All Unprinted Documents in Memory” on page 35
See "Deleting All Printed Documents from Memory" on page 36
z Clearing Documents and Paper Jams
In the unlikely event that your machine jams you will need to remove the jammed paper.
See “Paper Jams” on page 53
z Setting the telephone line type
To send a fax or make a telephone call, you need to set the telephone line type setting properly on the machine. If you are unsure of your telephone line type, contact your telephone company.
See “Setting the TEL LINE TYPE” on page 10
z Receiving to Memory Temporarily (AUTO PRINT OFF)
Received faxes will not be printed automatically. To print received faxes, press [ON/OFF] again to disable <AUTO PRINT OFF>.
See “Receiving to Memory Temporarily” on page 32
2 Introduction

Reading the Documentation
This guide provides detailed information on how to set up, operate, maintain, and troubleshoot your fax.
Please read the list below to become familiar with the symbols, terms, and abbreviations used in this guide.
Warning
Indicates a warning concerning operations that may lead to death or injury to persons if not performed correctly. In order to use the machine safely, always pay attention to these warnings.
Caution
Indicates a caution concerning operations that may lead to injury to persons or damage to property if not performed correctly. In order to use the machine safely, always pay attention to these cautions.
 Important
Indicates operational warnings and restrictions. Be certain to read these items to operate the machine correctly and to avoid damage to the machine.
 Note
Note
Indicates notes for operation or additional explanations. Reading these is highly recommended.
(see page xx) |
Indicates a page number that you can refer to for more information on the |
|
|
|
topic of the previous sentence or paragraph. |
default |
A setting that remains in effect unless you change it. |
|
document |
The original sheet(s) of paper you send, receive, or copy with your fax. |
|
menu |
A list of settings from which you select an item to set up or change. A |
|
|
|
menu has a title which appears on the LCD. |
[{] and [}] buttons |
Used to select an item in a menu. Press [}] to select the next item, and |
|
|
|
press [{] to select the previous item. |
transaction number |
When you send or receive a document, your fax automatically assigns the |
|
|
|
document a unique transaction number. A transaction number is a four- |
|
|
digit number that will help you keep track of documents you send and |
|
|
receive. |
TX/RX NO. |
TX/RX NO. is the abbreviation used for “transaction number.” |
|
TX |
Denotes Transmission. |
|
RX |
Denotes Reception. |
|
|
|
LCD display. The contents of the LCD display may vary depending on the |
|
TRANSMITTING OK |
|
|
current settings. |
|
In addition, this guide uses brackets to identify the buttons you press when performing different functions: [Stop].
 Note
Note
This guide contains information for four Canon models. Please note that the illustrations of the fax in this guide may differ from your model. Instructions for specific models are labelled with the fax names.
Introduction 3

 Safety Precautions
Please read the safety warnings and cautions provided in this manual to ensure that you use the machine safely. Do not attempt to use the machine in any way not described in this manual.
Warning
This product emits low level magnetic flux. If you use a cardiac pacemaker and feel abnormalities, please move away from this product and consult your doctor.
Warning
You may cause an electric shock, fire, or damage the machine if you ignore any of these safety precautions.
Choosing a location |
Do not place the machine close to flammable solvents such as alcohol or thinners. |
Power supply |
Never attempt to plug in or unplug the machine from the power supply when your hands are |
|
wet. |
|
Always push the plug all the way into the power outlet. |
|
Never damage, modify, stretch or excessively bend or twist the power cord. Do not place |
|
heavy objects on the power cord. |
|
Never plug the machine into a power socket that is shared with other equipment (extension |
|
lead/cord, 2- or 3-way adapter, etc.). |
|
Never use the machine if the power cord is bundled or knotted. |
|
If you detect smoke, unusual smells or strange noises around the machine, immediately |
|
unplug the machine at the power supply and call for service. |
|
Periodically, unplug the machine and use a dry cloth to wipe off any dust or dirt collected on |
|
the plug and the power outlet. |
|
If the machine is placed at a location exposed to a lot of dust, smoke, or high humidity, the |
|
dust collected on the plug absorbs moisture and may cause insulation failure and fire. |
|
If you hear thunder, disconnect the power supply of the machine and refrain from using it. |
|
Leaving the machine plugged in may cause fire, electric shock, or damage to the machine, |
|
depending on the thunder storm. |
|
Never use a power supply source other than the one rated for the machine in the country of |
|
where you purchased the machine. |
|
AC 100-240 V, 50/60 Hz |
Cleaning the machine |
Use a damp cloth to clean the machine. Never use flammable solvents such as alcohol, |
|
benzene or thinners. |
|
If flammable solvents come in contact with electrical components inside the machine, it |
|
could cause a fire or electric shock. |
|
Always unplug the machine from the power outlet before cleaning the machine. |
|
If you accidentally switch the machine on while cleaning it, you could injure yourself or |
|
damage the machine. |
Maintaining the machine |
Do not attempt to disassemble or modify the machine. There are no user serviceable parts |
|
inside the machine. |
|
The machine contains high-voltage components. Never attempt any maintenance |
|
procedure not described in this guide. |
Working around the |
Do not use highly flammable sprays near the machine. |
machine |
This could cause a fire or electric shock if the spray comes into contact with electrical |
|
components inside the machine. |
Caution
You may cause injury or damage the machine if you ignore any of these safety precautions.
4 |
Safety Precautions |

Choosing a location |
Do not install the machine in a location that is unstable or subject to excessive vibration. |
|
Do not install the machine in locations that are very humid or dusty, in direct sunlight, |
|
outdoors, or close to a heating source. |
|
To avoid the risk of fire or electric shocks, install the machine in a location with an ambient |
|
temperature range of 59°F to 81.5°F (15°C to 27.5°C) and humidity of 20% to 80% |
|
(condensation free). |
|
Do not place the machine on a thick rug or carpet. |
|
Do not place the machine with its back attached to the wall. |
Power supply |
Ensure that the area around the power outlet is kept clear at all times so you can easily |
|
unplug the power cord if necessary. |
|
Never remove the plug by pulling on the cord. |
|
Do not use an extension lead/cord. |
Working around the |
Never put your hands or fingers in the machine while it is printing. |
machine |
Do not place any object on the machine. |
|
Do not place metal objects (paper clips, staples, etc.) or containers of flammable solvents |
|
(alcohol, thinners, etc.) on top of the machine. |
|
If any foreign object (metal or liquid) fall into the machine, unplug the power cord and call |
|
for service. |
|
Do not transport or store the machine on a slant, vertically or upside-down, as the ink may |
|
leak and damage the machine. |
FINE Cartridge |
For safety reasons, store FINE Cartridges out of the reach of small children. |
|
If a child ingests any ink, consult a doctor immediately. |
|
Do not shake the FINE Cartridge. |
|
Ink may leak out and stain clothing or the surrounding area. |
|
Never touch the electrical contacts on a FINE Cartridge after printing. The metal parts may |
|
be very hot and could cause burns. |
|
Do not throw FINE Cartridges into fire. |
Legal Limitations
It may be unlawful to make copies of, scan, print, or use reproductions of the following documents. The list provided is non-exhaustive. When in doubt, check with a legal representative in your jurisdiction.
zPaper money
zMoney orders
zCertificates of deposit
zPostage stamps (canceled or uncanceled)
zIdentifying badges or insignias
zSelective service or draft papers
zChecks or drafts issued by governmental agencies
zMotor vehicle licenses and certificates of title
zTraveler’s checks
zFood stamps
zPassports
zImmigration papers
zInternal revenue stamps (canceled or uncanceled)
zBonds or other certificates of indebtedness
zStock certificates
zCopyrighted works/works of art without permission of copyright owner
Safety Precautions |
5 |
Before Using Your Machine
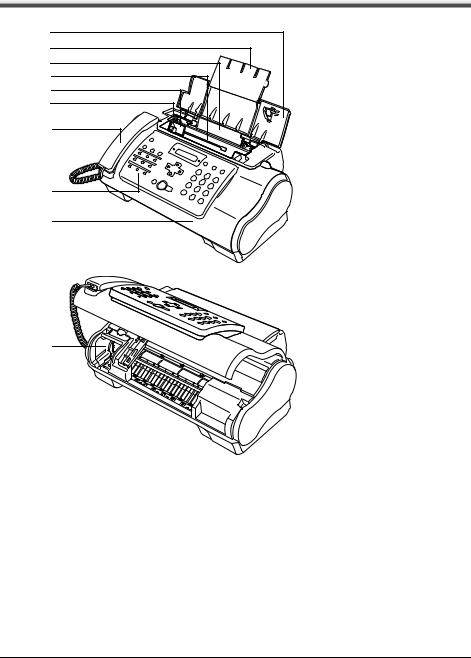
Main Components and Their Functions
(1) |
(2) |
(3) |
(4) |
(5) |
(6) |
(7) |
(8)
(9)
(10)
(1)Document Cover
(2)Paper Support
(3)Multi-Purpose Tray
(4)Document Tray
(5)Document Guide
(6)Paper Guide
(7)Handset
(8)Operation Panel
(9)Printer Cover
(10)Cartridge Holder
6 |
Before Using Your Machine |

Operation Panel
(1) |
(2) |
(3) |
(4)(5) (6) (7)(8) |
(9) |
||||||||||||||
|
|
|
|
|
|
|
|
|
|
|
|
|
|
|
|
|
|
|
|
|
|
|
|
|
|
|
|
|
|
|
|
|
|
|
|
|
|
|
|
|
|
|
|
|
|
|
|
|
|
|
|
|
|
|
|
|
|
|
|
|
|
|
|
|
|
|
|
|
|
|
|
|
|
|
|
|
|
|
|
|
|
|
|
|
|
|
|
|
|
|
|
|
|
|
|
|
|
|
|
|
|
|
|
|
|
|
|
|
|
|
|
|
|
|
|
|
|
|
|
|
|
|
|
|
|
|
|
|
|
|
|
|
|
|
|
|
|
|
|
|
|
|
|
|
|
|
|
|
|
|
|
|
|
|
|
|
|
|
|
|
|
|
|
|
|
|
|
|
|
|
|
|
|
|
|
|
|
|
|
|
|
|
|
|
|
|
|
|
|
|
|
|
|
|
|
|
|
|
|
|
|
|
|
|
|
|
|
|
|
|
|
|
|
|
|
|
|
|
|
|
|
|
|
|
|
|
|
|
(10) |
(11) |
(12) (13) |
(14) (15)(16)(17)(18) |
(19) |
||
(1) |
[Maintenance] (see page 43) |
(10) One-Touch Speed Dialing button |
|||||
(2) |
[ON/OFF] (see page 8) |
|
(see page 13) |
|
|||
(11) |
[Pause] (see page 23) |
||||||
(3) |
[Receive Mode/Resolution] (see |
||||||
|
page 18, page 20, page 29) |
(12) |
[Space] (see page 9) |
||||
(4) |
[Menu] (see page 10) |
(13) |
[Clear] (see page 10) |
||||
(5) |
Ink Lamp (see page 43) |
(14) |
[Hook] (see page 19) |
||||
(6) |
[Caller History] (see page 22) |
(15) |
[Start/Copy] |
|
|||
(7) |
LCD (Liquid Crystal Display) |
(16) |
[Directory] (see page 22) |
||||
(8) |
[Coded] (see page 14) |
(17) |
[Stop] |
|
|||
(9) |
[Redial] (see page 23) |
(18) Tone (see page 9, page 23) |
|||||
|
|
|
|
(19) Numeric buttons (see page 9) |
|||
Before Using Your Machine |
7 |

Turning the Machine ON and OFF
Turn on the machine before starting printing.
Turning on the Machine
Before turning on the machine, confirm that the FINE Cartridge is set into place.
 Note
Note
If preparatory operations are not yet finished, follow the Easy Setup Instructions to complete them.
1 To turn on the machine, press [ON/OFF].
[ON/OFF] flashes green for a while, and then turns on.
 Note
Note
zIf an error message is displayed on the LCD, see “LCD Messages” on page 62.
zThe LCD will turn itself off if inactive for more than 5 minutes, press any button on the Operation Panel except for [ON/OFF] to restore the display.
Turning off the Machine
1To turn off the machine, press [ON/OFF] about a few seconds.
The machine is off after <SHUTTING DOWN....> is displayed on the LCD.
 Important
zAlways press [ON/OFF] before disconnecting the power cord. This ensures the FINE Cartridge is covered to prevent it from drying out.
zIf the machine is not used for an extended period of time, we recommend making copies or performing FINE Cartridge cleaning about once every month to prevent degradation of the FINE Cartridge.
zThe FINE Cartridge has many nozzles in order to produce high-definition prints. In the same way that the tip of a felt-tip or marker pen will naturally dry out over time and become unusable even with the cap in place, the nozzles might become clogged. Periodically printing or performing FINE Cartridge cleaning can help to prevent this kind of clogging.
zIf you change to another telephone line, turn off the machine before unplugging the telephone line cable.
 Note
Note
The power cannot be turned OFF with [ON/OFF] while the machine is operating.
8 |
Before Using Your Machine |
Guidelines for Entering Numbers, Letters, and Symbols
When you come to a step that requires you to enter a name or number, see the table below to determine which numeric button to press for the letter you want.
Button |
Uppercase Letter |
Lowercase Letter |
Number Mode |
|
Mode (:A) |
Mode (:a) |
(:1) |
1 |
|
|
|
ABC |
|
|
|
2 |
|
|
|
DEF |
|
|
|
3 |
|
|
|
GHI |
|
|
|
4 |
|
|
|
JKL |
|
|
|
5 |
|
|
|
MNO |
|
|
|
6 |
|
|
|
PQRS |
|
|
|
7 |
|
|
|
TUV |
|
|
|
8 |
|
|
|
WXYZ |
|
|
|
9 |
|
|
|
OPER |
|
|
|
0 |
|
|
|
Symbols |
|
|
|
# |
|
|
|
Tone |
|
|
|
|
Uppercase letter |
Lowercase letter |
Number mode |
|
mode (:A) |
mode (:a) |
(:1) |
 Note
Note
After 120 seconds of no operation panel input, the fax returns to standby mode and any unregistered changes are lost.
z Entering Numbers, Letters, and Symbols
1 Press [ ] to switch between the letter and number mode.
_ |
:A |
2 Use the numeric buttons to enter characters.
z Press repeatedly until the character you want appears.
C |
:A |
zTo enter a character that is under the same button as the previous entry:
(1)Press []], then press the same numeric button.
zTo enter a space:
(1)Press []] or press [Space].
Before Using Your Machine |
9 |

zTo delete a character:
(1)In number mode, press [[]. In uppercase or lowercase mode, use [[] or []] to move the cursor under the incorrect letter. Then press [Space].
zTo delete an entire entry:
(1)Press [Clear].
3 Continue entering other letters or numbers using the numeric buttons.
4 When you have finished entering characters, press [Start/Copy] to register the entry.
Setting the TEL LINE TYPE
Before using your fax, make sure it is set for the telephone line type of your telephone system. If you are unsure of your telephone line type, check with your local telephone company.
1 Press [Menu].
2 Use [{] or [}] to select <DATA REGSTRATION>, then press [Start/Copy] twice. The LCD displays <DATE & TIME>.
3 Use [{] or [}] to select <TEL LINE TYPE>, then press [Start/Copy]. The LCD displays <TOUCH TONE>.
4 Use [{] or [}] to select the telephone line type, then press [Start/Copy].
You can select <TOUCH TONE> or <ROTARY PULSE>.
5 Press [Stop].
Setting ends and the fax returns to standby mode.
10 |
Before Using Your Machine |
Registering Sender Information
You can register sender information (Transmit Terminal Identification (TTI)) in your machine so that your name, your fax/telephone number, and the date and time of transmission are printed in small type at the top of each page to be received. Thus, whenever you send a fax from this machine, the recipient receiving the fax knows who sent it, and when it was sent.
Below is an example of how your sender information would print on a fax sent from your machine:
12/20/2006 15:33 |
FAX 123 4567 |
YOUR NAME DESTINATION ID |
001 |
|||||||||||||||||
03 01 |
|
|
|
|
|
|
|
|
|
|
|
|
|
|
|
|
|
|||
(A) |
|
|
|
|
|
|
|
|
|
|
|
|
|
|
|
|
|
|
|
|
|
|
|
|
|
|
THE SLEREXE COMPANY LIMITED |
|
|
|
|||||||||||
|
|
|
|
|
|
|
|
|||||||||||||
(B) |
|
|
|
|
|
|
||||||||||||||
|
|
|
|
|
|
|||||||||||||||
|
|
|
|
|
|
SAPORS LANE•BOOLE•DORSET•BH25 8ER |
|
|
|
|||||||||||
|
|
|
|
TELEPHONE BOOLE (945 13) 51617 – FAX 1234567 |
|
|
|
|||||||||||||
Our Ref. 350/PJC/EAC
(C) |
(D) |
(E) |
(A)Date and time of transmission
(B)Your fax/telephone number
You can select <FAX> or <TEL> to be displayed in front of the number. See “FAX/TEL No. MARK” on page 38.
(C)Your name
(D)Displays the name of the destination when sending from one-touch or coded speed dialing.
(E)Page number
Entering the Date and Time
1
2
Press [Menu].
Use [{] or [}] to select <DATA REGSTRATION>, then press [Start/Copy] three times.
12/20/2006 13:30
3 Use the numeric buttons to enter the date and time (in 24-hour format). Enter only the last two digits of the year.
z Precede single digits with a zero, then press [Start/Copy].
4 Press [Stop].
Registration ends and the fax returns to standby mode.
Before Using Your Machine |
11 |

Registering Your Fax/Telephone Number and Name
This information appears at the top of each document you send.
1
2
3
4
Press [Menu].
Use [{] or [}] to scroll through the menus and select <DATA REGSTRATION>, then press [Start/Copy] twice. The LCD displays <DATE & TIME>.
Use [{] or [}] to select <UNIT TELEPHONE #>, then press [Start/Copy].
Enter your fax number (up to 20 digits) using the numeric buttons, then press [Start/ Copy] twice (see page 9).
You can enter a space to make your number easier to read.
TEL= |
123 xxxx |
5 Enter your name (up to 24 letters) using the numeric buttons, then press [Start/ Copy] (see page 9).
CANON : A
6 Press [Stop].
Registration ends and the fax returns to standby mode.
Setting Daylight Saving Time (Summer Time)
Some countries adopt the daylight saving time (summer time) system that shifts the clock time forward or back at certain periods of the year.
You can set your machine to automatically change the time by registering the day and time that daylight saving time (summer time) begins and ends.
1
2
3
4
Press [Menu].
Use [{] or [}] to select <DATA REGSTRATION>, then press [Start/Copy].
Use [{] or [}] to select <SYSTEM SETTINGS>, then press [Start/Copy].
Use [{] or [}] to select <DAYLGHT SAV TIME>, then press [Start/Copy]. The LCD displays <ON>.
5
6
Use [{] or [}] to select <ON> or <OFF>, then press [Start/Copy].
If you cancel by selecting <OFF> in step 5, press [Stop] to return to standby mode. If you select <ON> in step 5, use [{] or [}] to select <START DATE/TIME>, then press [Start/Copy] twice. The LCD displays <APRIL>.
7 Use [{] or [}] to select the month in which the summer time starts, then press [Start/Copy] twice. The LCD displays <FIRST WEEK>.
12 |
Before Using Your Machine |

8
9
Use [{] or [}] to select the week in which the summer time starts, then press [Start/Copy] twice. The LCD displays <SUNDAY>.
Use [{] or [}] to select the day in which the summer time starts, then press [Start/ Copy] twice.
TIME 02:00
10
11
12
13
Use the numeric buttons to enter the time at which the summer time will take effect, then press [Start/Copy]. The LCD displays <END DATE/TIME>.
Use [{] or [}] to select <END DATE/TIME>, then press [Start/Copy] twice. The LCD displays <OCTOBER>.
Repeat steps 7 to 9 to set the month, week, the day of the week, and time when the summer time ends.
Press [Stop].
Setting ends and the fax returns to standby mode.
Registering One-touch Speed Dialing Numbers and
Names
One-touch speed dialing allows you to dial a number by pressing a single button. Before you can use one-touch speed dialing, you must register the receiving number with your fax.
You can also register the name of the party; the name appears on the printout of the one-touch speed dialing list.
1
2
Press [Menu].
Use [{] or [}] to select <TEL REGISTRATION>, then press [Start/Copy]. The LCD displays <1-TOUCH SPD DIAL>.
3
4
Press [Start/Copy]. The LCD displays <01=>.
Use [{] or [}] to select the number of the one-touch speed dialing button (01-09) under which you want to register the number, then press [Start/Copy] twice.
If a number is already registered under this one-touch speed dialing button, the number is displayed on the LCD.
5 Enter the party’s number (up to 60 digits) using the numeric buttons, then press [Start/Copy] twice.
TEL=250xxx_
Before Using Your Machine |
13 |
6 Enter the party's name (up to 16 letters) using the numeric buttons, then press [Start/Copy] to register the name. (see page 9).
CANON :A
 Note
Note
To delete the name and number registered under the one-touch speed dialing button, press [Clear] and [Start/Copy] after you perform steps 1 to 4.
7 To assign additional one-touch speed dialing numbers, repeat from step 4. To finish, press [Stop].
Registering Coded Speed Dialing Numbers and
Names
Use coded speed dialing to dial a fax number at the press of three buttons. A fax/telephone number can be registered under each two-digit speed dialing code and you can register up to 60 locations. You can also register the name of the party the name appears on the printout of the coded speed dialing list.
1
2
Press [Menu].
Use [{] or [}] to select <TEL REGISTRATION>, then press [Start/Copy]. The LCD displays <1-TOUCH SPD DIAL>.
3 Use [{] or [}] to select <CODED SPEED DIAL>, then press [Start/Copy]. The LCD displays < 00>.
00>.
4 Use [{] or [}] to select the two-digit code (00-59) under which you want to register the number, then press [Start/Copy] twice.
If a number is already registered under this coded speed dialing code, the number is displayed on the LCD.
5 Enter the party’s number and name the same way you registered them for onetouch speed dialing.
See steps 5 to 6, “Registering One-touch Speed Dialing Numbers and Names” on page 13.
TEL=250xxx_
6 To assign additional coded speed dialing numbers, repeat from step 4. To finish, press [Stop].
 Note
Note
To delete the name and number registered under the coded speed dialing code, press [Clear] and [Start/ Copy] after you perform steps 1 to 4.
14 |
Before Using Your Machine |

Document Requirements
Types of Document You Can Scan
z Scanned Area |
z Size |
||||||||||||
The actual area scanned by the fax is |
You can load documents larger than 4.2 in. |
||||||||||||
shown below. |
(105 mm) wide and 4.2 in. (105 mm) long. |
||||||||||||
|
|
|
|
|
|
|
The maximum size of document that can be |
||||||
|
|
|
|
|
|
|
loaded is 8.5 in. (216 mm) wide by 16.0 in. |
||||||
|
|
|
|
|
|
|
(400 mm) long. |
||||||
|
|
|
|
|
|
|
|
|
|
|
|
|
|
|
|
|
|
|
|
|
|
Min. 4.2 in. |
|||||
|
|
|
|
|
|
|
|
(105 mm) |
|||||
|
|
|
|
|
|
0.12 ±0.12 in. |
|
|
|
|
|
|
|
|
|
|
|
|
|
Min. 4.2 in. |
|
|
|
|
|
||
|
|
|
|
|
|
(3.0 ±3.0 mm) |
|
|
|
|
|||
|
|
|
|
|
|
|
(105 mm) |
|
|
|
|
||
|
|
|
|
|
|
|
|
|
|
|
|
|
|
LTR/LGL
Max. 16.0 in (400 mm)
|
|
|
|
|
|
|
0.08 ±0.08 in. |
|
|
|
|
|
|
|
|
|
|
|
|
|
|
|
|
|
|
|
|
|
|
|
(2.0 ±2.0 mm) |
|
|
|
|
|
|
|
|
|
|
|
Max. 8.5 in. (216 mm) |
||||
|
|
|
|
|
|
|
|||||
0.08 |
|
±0.14 in. |
0.08 |
|
±0.14 in. |
||||||
|
|
||||||||||
(2.0 ±3.5 mm) |
(2.0 ±3.5 mm) |
|
|
|
|
||||||
 Note
Note
If you use documents smaller than letter size, align the document with the left Document Guide.
Problem Documents
zTo prevent document jams in the Document Tray, do not attempt to load the following types of documents into the fax:
- Wrinkled or creased paper |
- Curled or rolled paper |
||
- |
Torn paper |
- Carbon paper or carbon-backed paper |
|
- Coated paper or glossy paper |
- |
Onion skin or thin paper |
|
- |
Thick paper |
- |
Envelopes |
zRemove all staples, paper clips, etc. before loading the document into the Document Tray.
zMake sure any glue, ink, or correction fluid on the paper is completely dry before loading the document into the Document Tray.
zMake a photocopy of any document that will not feed into the fax so that you can then load the copy into the Document Tray.
Before Using Your Machine |
15 |
Paper Requirements
Your fax supports A4-, letter-, and legal-size paper in portrait orientation. You can use regular copier paper, cotton bond paper, or typical letterhead. Your fax does not require special ink jet paper. Always use paper without curls, folds, staples, or damaged edges. Look at the label on the package to see if the paper has a preferred side for printing.
 Note
Note
Be sure to test paper before purchasing large quantities.
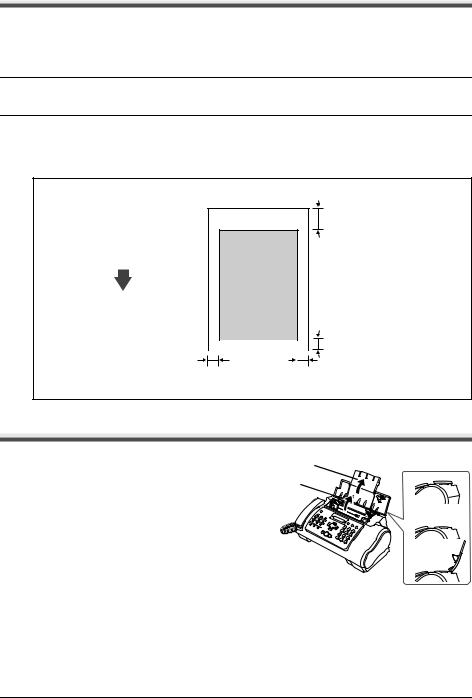
Printable Area
The shaded area below shows the printable area of letter/legal-size paper. Be sure to print within this area.
0.2 in. (5 mm)
FEED
DIRECTION
LTR/LGL
|
|
|
|
|
0.12 ±0.06 in. |
|
|
|
|
|
(3.0 ±1.5 mm) |
0.25 ±0.06 in. |
|
|
|||
|
|
||||
0.25 in. ~ |
|||||
(6.4 ±1.5 mm) |
(6.4 mm~) |
||||
Loading Documents and Paper
1 Open the Document Cover (1) and extend the Paper Support (2) to support the paper.
(2)
(1)
(1) 

(2) 
16 |
Before Using Your Machine |

2 Squeeze, then slide the Paper Guide to the left.
3 Insert the stack face up into the MultiPurpose Tray (1), and align the right edge of the stack with the right side of the MultiPurpose Tray. Then slide the Paper Guide (2) snugly against the left edge of the stack.
Be careful not to press the Paper Guide strongly |
(2) |
(1) |
|
against the stack, or the paper will not be fed |
|||
|
|
properly.
4 Adjust the Document Guide to the width of the document, and gently insert the top of the document face up into the Document Tray until you hear a beep.
z To avoid feeding problems, make sure the document meets the document requirements (see page 15).
 Note
Note
zFor a multipage document, the pages are fed one by one from the top of the stack.
zWait until all pages of your document have been scanned before starting a new job.
zMake sure you follow the procedure to load documents into the Document Tray. If the document is not loaded into the Document Tray correctly, it may not be fed into the fax properly; resulting in a jam, or in pages not being sent.
zIf you want to send a document with more than 20 (10 legal-size) pages, divide the document into sections and send each section in a separate transmission.
zFor multipage documents, tap the stack on a flat surface to even the edges before loading.
Before Using Your Machine |
17 |

Copying
Making Copies
One of the convenient features of the fax is its ability to make high quality copies. You can make up to 99 copies of one document at a time.
If you make copies of multiple documents at a time, the number of pages the fax can scan into memory is as follows:
z COPY STANDARD/COPY FINE/COPY DRAFT |
= 10 pages |
 Note
Note
zThe number of pages the fax can scan into memory is not affected by the scanning resolutions (see page 20).
z<COPY STANDARD> and <COPY FINE> result in the same resolution when making copies.
zIf MEMORY FULL appears on the LCD when making multiple copies, see “Copying Problems” on page 58.
 Note
Note
If paper jams, see “Troubleshooting” on page 53.
1 Load the document face up into the Document Tray.
See “Loading Documents and Paper” on page 16.
2
3
Press [Start/Copy]. The LCD displays <COPY PAGE 01>.
Press [Receive Mode/Resolution].
You can select <COPY STANDARD>, <COPY FINE>, or <COPY DRAFT>.
4 Enter the number of copies (up to 99) using the numeric buttons, then press [Start/ Copy].
To make a correction to the number of copies, press [Clear] and re-enter the number.
To stop copying anytime, press [Stop]. If the document does not eject, press [Start/Copy] for a few seconds, then the fax will feed out the document. See “Jams in the Document Tray” on page 53.
18 Copying
Sending Faxes
Sending Documents
Before you send a document, see “Documents Requirements” on page 15, and “Loading Documents and Paper” on page 16.
 Note
Note
zIf paper jams, see “Troubleshooting” on page 53.
zYou can send up to 20 A4-size (10 legal-size) pages at a time (based on the Canon FAX Standard Chart No.1, standard resolution). You cannot add pages while the fax is sending.
zThe fax stores the document temporally in memory when sending a document, however, when memory is full, it will send the document as it scans the document without storing document in memory.
Direct Sending
1Load the document face up into the Document Tray.
See “Loading Documents and Paper” on page 16.
You can set the scanning resolution and contrast (see page 20).
2Dial the receiving party’s fax number.
Use one of the dialing methods described in this chapter.
TEL= 3456xxxx
3 Press [Start/Copy].
The fax begins sending.
 Note
Note
zIf an error occurs during sending, the fax beeps intermittently for a few seconds and an error message appears on the LCD. If this happens, correct the problem and then press [Stop], then try sending the document again. See “LCD Messages” on page 62.
zThe fax automatically redials if the receiving party does not answer or if the line is busy. (You can specify the number of times it redials; see <AUTO REDIAL> on page 39.)
Manual Sending
If you would like to first speak with the person you are sending the document to, use manual sending.
1 Load the document face up into the Document Tray.
See “Loading Documents” on page 16.
You can set the scanning resolution and contrast (see page 20).
2 Pick up the Handset or press [Hook] and dial the receiving party’s fax number.
Use one of the dialing methods described in this chapter.
TEL= 3456xxxx
Sending Faxes |
19 |

3 If a person answers, converse normally, then ask them to press the start button on their fax. Press [Start/Copy] and hang up.
If you hear a high pitch tone, press [Start/Copy] and hang up.
 Note
Note
z If you pressed [Hook] in step 2, you need to pick up the Handset when a person answers the phone.
z The fax will beep if the Handset is not hang up properly. Make sure the Handset is seated properly in its cradle. If you do not want the fax to beep, disable the <OFFHOOK ALARM> setting (see page 38).
z If an error occurs during sending, the fax beeps intermittently for a few seconds and an error message appears on the LCD. If this happens, correct the problem then try sending the document again. See “LCD Messages” on page 62.
Canceling Sending
1 Press [Stop].
 Note
Note
zWhen you cancel sending, you may need to press and hold [Start/Copy] for a few seconds to feed out the document.
zYou can set whether or not the fax prints an <TX REPORT> (see page 38).
Adjusting the Quality of Your Documents
z Setting the Scanning Resolution
Resolution is a measure of the fineness or clarity of a printout. Low resolutions may cause text and graphics to have a jagged appearance, while higher resolutions provide smoother curves and lines, crisp text and graphics, and a better match to traditional typeface designs.
 Note
Note
Using a higher resolution will increase the output quality, but will slow down the scanning speed.
1 Load the document face up into the Document Tray.
See “Loading Documents and Paper” on page 16.
2 Press [Receive Mode/Resolution] to select the resolution.
You can select <FAX STANDARD>, <FAX FINE> or <FAX PHOTO>. After about 2 seconds, the fax returns to standby mode.
 Note
Note
You can change the resolution setting while the document is being scanned for sending. However, please note that your new setting will only affect the next page scanned.
z Setting the Scanning Contrast
Contrast is the difference in brightness between the lightest and darkest parts of a printed document. You can adjust the contrast your fax uses to send or copy documents, according to how light or dark your document is.
1 Press [Menu].
2 Use [{] or [}] to select <DATA REGSTRATION>, then press [Start/Copy] twice. The LCD displays <DATE & TIME>.
20 |
Sending Faxes |

3 Use [{] or [}] to select <SCAN CONTRAST>, then press [Start/Copy]. The LCD displays <STANDARD>.
4 Use [{] or [}] to adjust the scanning contrast, then press [Start/Copy].
You can select <STANDARD>, <DARKER> or <LIGHTER>.
5 Press [Stop].
Setting ends and the fax returns to standby mode.
Automatic Dialing
Sending a Document Using One-Touch Speed Dialing or Coded Speed Dialing Numbers
To use this feature you must first register numbers for one-touch speed dialing (see page 13) or coded speed dialing (see page 14).
1 Load the document face up into the Document Tray.
See “Loading Documents and Paper” on page 16.
You can set the scanning resolution and the contrast (see page 20).
2 Press the one-touch speed dialing button under which the number you wish to fax is registered.
01=CANON
-or-
Press [Coded] and enter the appropriate two-digit coded speed dialing code.
The registered name and number appear.
If you make a mistake, press [Stop]. Then press the correct one-touch speed dialing button or press [Coded] and re-enter the code.
 01=CANON
3 Press [Start/Copy].
The fax begins sending. -or-
After about 10 seconds of no operation panel input, the fax starts sending automatically.
Sending Faxes |
21 |

Sending a Document Using Directory Dialing
This feature is convenient when you know the other party’s name but cannot recall the one-touch speed dialing button or the code for coded speed dialing where the number is registered.
This procedure can also be used to look up the other party’s name and retrieve the number for dialing.
1 Load the document face up into the Document Tray.
See “Loading Documents and Paper” on page 16.
You can set the scanning resolution and the contrast (see page 20).
2
3
Press [Directory].
Press a numeric button to enter the first letter of the name of the party you are searching for.
 01=Canon CANADA
4 Press [{] or [}] to display the other names and numbers registered for the button letter group.
zThe names for one-touch speed dialing numbers are prefixed with two digits and the names for coded speed dialing numbers are prefixed with an asterisk ( ) and two digits.
zWhen you reach the last name and number registered for the letter group, you will return to the first name and number in the group.
zIf the LCD does not change after you press [{] or [}], this means only one name and number is registered for the button you just pressed.
zPress [Redial] to switch between the name and number on the LCD.
5 With the telephone number you want to dial displayed, press [Start/Copy] to start the document transmission.
Special Dialing
Sending a Document Using Caller History
If the <CALLER ID> setting is set to <ON>, the caller’s name and phone/fax number appear on the LCD when you receive a call (see page 41). The fax keeps up to 20 latest caller IDs in memory.
 Note
Note
The feature uses the Telcordia or the ETSI EN 300 778-1 protocol. Contact your local telephone company for detailed information.
22 |
Sending Faxes |
Loading...