


USER’S GUIDE
ENGLISH

How to use this User’s Guide
Before you use this user’s guide, read this list of symbols, terms and abbreviations to become familiar with them. A complete glossary of terms is included at the end of this guide.
• Document
The original sheet(s) of paper you send, receive or copy with your fax.
• Menu
A list of options or features from which you select an item to set up or change.
• Numeric buttons
The round buttons on the operation panel with digits 0 through 9,  and # on them.
• Arrow buttons
The buttons  used to display choices and change settings. These buttons also change the volume setting of the speaker.
• Stop button
Stop
Press  to cancel any operation or to cancel the selection of a menu item.
• Start/Copy button
Press Start/Copy to start an operation or register a setting.
• Transaction number
A number automatically assigned every time you send or receive a fax. Transaction numbers are 4-digit numbers that can help you keep track of the documents you send and receive.
• TX/RX NO. XXXX
Represents the transaction number when displayed on the LCD, where XXXX is the 4-digit transaction number.
• TX
Stands for transmit or send.
• RX
Stands for receive.
• NOTE
A note describes important points and helpful hints, or how to avoid minor difficulties.
As an ENERGY STAR Partner, Canon has determined that the FAX-B155 meets the ENERGY STAR guidelines for energy efficiency.
Trademarks
Canon and BJ are registered trademarks, and Bubble Jet is a trademark of Canon Inc.
Copyright
Copyright© 2000 by Canon Inc. All rights reserved. No part of this publication may be reproduced, transmitted, transcribed, stored in a retrieval system, or translated into any language or computer language in any form or by any means, electronic, mechanical, magnetic, optical, manual or otherwise, without the prior written permission of Canon Inc.
This CE Marking shows compliance of this equipment with Directive 73/23/EEC and Directive 89/336/EEC (as amended by Directive 92/31/EEC), both as amended by Directive 93/68/EEC.
Canon Inc./Canon Europa N.V.
(Europe Only)
ii
Welcome
Thank you for choosing the Canon FAX-B155 Bubble JetTM facsimile. The compact, upright design of the fax means it takes up less space in your work area. The bubble jet print mechanism uses cut-sheet plain paper, so you get crisp reproductions of your fax documents and copies.
The FAX-B155 has a number of features that make it ideal for small to mediumsized offices with a single telephone line.
Features
Plain paper
The fax accepts A4, letter, and legal size cut-sheet plain paper for crisp reproduction and faxes that are flat and easy to write on.
Automatic switching between fax and voice calls
The fax recognises incoming fax calls, and automatically switches to receive mode.
Automatic dialling
A variety of dialling methods allows you to register frequently used fax numbers and phone numbers and access them by pressing one or a few buttons.
Error Correction Mode (ECM) TX / RX
Automatically helps correct transmission errors due to system and telephone line noise.
Delayed transmission
Sends a fax automatically at a later time, for example, at night when telephone rates are lower.
360 dpi copy mode
Lets you make copies at 360 × 360 dpi.
iii

Notice for connection to telecommunication systems in the United Kingdom and the Republic of lreland
Approval Number 607721 (UK)
Your Canon FAX-B155 has been approved against the requirements of NTR3 for use in the UK and complies with the requirements of 91/263 EEC. The CE mark is applied in respect of the requirements of 73/23 EEC and 89/336 EEC. (UK)
It is intended for connection to analogue two wire public telecommunication networks.
Connect the supplied cable to this socket first, then to the telephone line.
There are two auxiliary sockets to which equipment approved for direct connection to the network may be connected. If required, a suitable adaptor, approved under Approval Number NS/G/23/L/100005 for direct and indirect connections
between the fax machine and any piece of approved telecommunications apparatus, is available from your Canon supplier. (UK)
This socket is intended for connection of an answering machine or similar device.
This socket is intended for connection of a telephone.
Voltage and current available at these sockets are determined by the network to which the line cable is connected. They will not normally exceed the limits for TNV as described in EN60950.
Canon recommends that any additional equipment connected in the installation is connected to one of these sockets. Do not connect additional equipment through parallel sockets elsewhere on the telephone line.
This equipment is not intended or recommended for making calls to emergency services.
iv
For your safety (Australia only)
To ensure safe operation the three-pin plug supplied must be inserted only into a standard three-pin power point which is effectively earthed through the normal household wiring.
Extension cords used with the equipment must be three-core and be correctly wired to provide connection to earth. Wrongly wired extension cords are a major cause of fatalities.
The power point shall be located near the equipment and shall be easily accessible.
The fact that the equipment operates satisfactorily does not imply that the power point is earthed and the installation is completely safe. For your safety, if in any doubt about the effective earthing of the power point, consult a qualified electrician.
Caution (New Zealand only)
1.This equipment may not necessarily provide for the effective hand-over of a call to or from a telephone connected to the same line.
2.The operation of this equipment on the same line as telephone or other equipment with audible warning devices or automatic ring detectors will give rise to bell tinkle or noise and may cause false tripping of the ring detector. Should such problems occur, the user is not to contact telecom faults service.
3.Should this equipment become physically damaged, disconnect immediately from the Telecom connection and power source and contact your nearest service agent.
4.To relocate this equipment, please;
1)Disconnect the equipment from the Telecom connection.
2)Disconnect the equipment from the power source.
3)Reconnect the equipment to the power source.
4)Reconnect the equipment to the Telecom connection.
5.If the supply cord of this equipment is damaged, it must be replaced by the special cord (Parts No.:HH2-1910).
6.Not all standard telephones will respond to incoming ringing when connected to the extension socket.
7.This device may be subject to ringing or bell tinkle when calls are made from another device on the same line. If this occurs, the problem should not be referred to the Telecom Faults service.
8.Please note when you connect an extension telephone to this device. If you use an extension telephone which has features such as ‘last number redial’, redial memory numbers may be lost.
v
Precautions
General _________________________________________
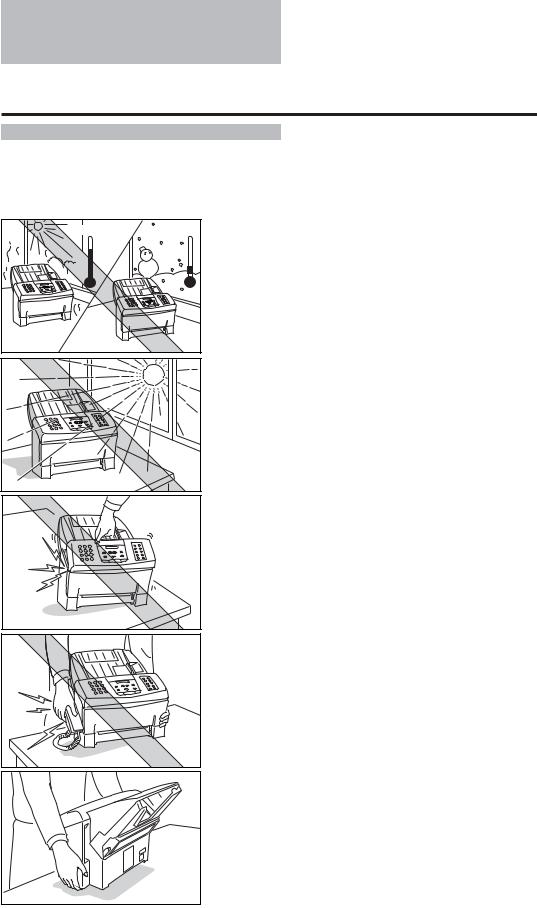
Make sure the place where you set up the fax satisfies the following conditions:
Over 32.5°C |
Under 10°C |
•Use the fax only within the following temperature and humidity ranges.
Ambient temperature: 10°C to 32.5°C
Ambient humidity:
10% to 80% RH (no condensation)
•Keep your fax out of direct sunlight, as this can damage the unit.
• Do not lift the fax by the operation panel.
•If you have installed the optional handset, do not lift the fax by the handset cradle.
• Hold the fax as shown when transporting.
vi
Precautions
• Place the fax on a level surface.
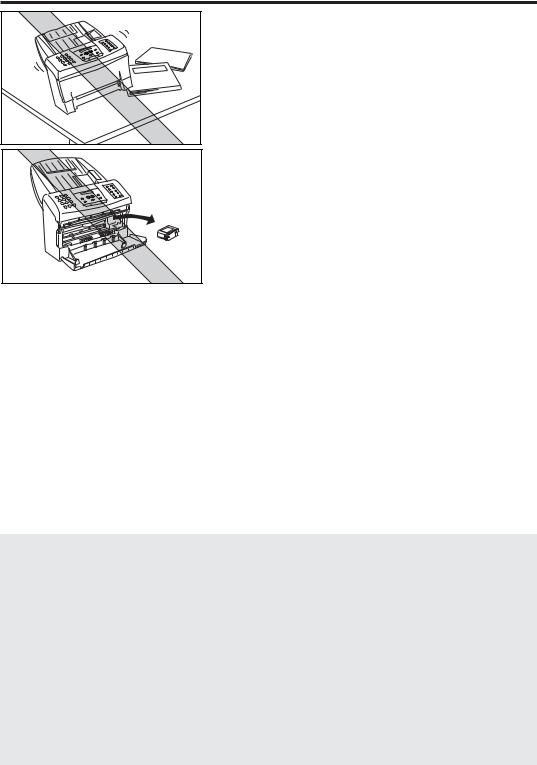
•Do not remove the BJ cartridge from the unit unless it needs to be replaced, or when transporting the fax. Removing the cartridge and leaving the print head unprotected will cause it to dry out and become unusable.
•Do not place the fax on the edge of a desk so as to prevent received documents from falling onto the floor.
•Certain table surfaces may prevent received documents from sliding out smoothly, resulting in paper jams. Do not place the fax on these types of tables.
•Do not install the fax near devices which contain magnets or generate magnetic fields.
•Do not subject the fax to strong physical shock or vibration.
•Keep the fax clean. Dust accumulation can prevent the fax from operating properly.
•Before you transport your fax, be sure to remove the BJ cartridge and recover the print head with the orange tape. After moving the fax, remove the orange tape and reload the BJ cartridge.
Others __________________________________________
Here are some other general precautions when using or working around the fax.
CAUTION
•Avoid installing your fax in places exposed to direct sunlight, dust, vibration, high temperature or humidity, or on unstable surfaces.
•To assure proper electrical contact, make sure the fax is firmly plugged in.
•Never pull on the cord to unplug the fax. Pull on the plug itself.
WARNING
•For cardiac pacemaker users:
This product emits low level electromagnetic waves. If you use a cardiac pacemaker and feel abnormalities, please move away from this product and consult your doctor.
•Do not overload the electrical outlet where the fax is plugged in.
•Never plug or unplug the fax when your hands are wet.
•For your safety, unplug the fax during electrical storms.
•If you have problems with the fax (smoke, odd smells or noises), immediately unplug the fax from the outlet. Keep the area around the outlet free from clutter so you can unplug the fax quickly in case of an emergency.
•Never use liquids or drink beverages around the fax. Liquids spilled on the fax can cause a fire or electrical shock. If you accidentally spill a liquid on the fax, unplug it immediately and call your Canon service representative.
•To avoid electrical shock from exposed power points, never disassemble the fax. There are no parts or switches in the fax that require adjustment.
vii

Table of Contents
INTRODUCTION
1. SETTING UP
2.PREPARING TO USE YOUR FAX
How to use this User’s Guide ........................................ |
ii |
Welcome........................................................................ |
iii |
Features ......................................................................... |
iii |
Notice for connection to telecommunication |
|
systems in the United Kingdom and |
|
the Republic of lreland ............................................... |
iv |
For your safety (Australia only) ..................................... |
v |
Caution (New Zealand only) .......................................... |
v |
Precautions ................................................................... |
vi |
General ...................................................................................................... |
vi |
Others ....................................................................................................... |
vii |
Unpacking ...................................................................... |
2 |
Removing the shipping materials .......................................................... |
4 |
Assembling the fax ........................................................ |
5 |
Attaching components ............................................................................ |
5 |
Attaching the optional handset .............................................................. |
6 |
Connecting the AC power cord .............................................................. |
6 |
Loading the paper .......................................................... |
7 |
Selecting the right kind of paper ........................................................... |
7 |
Loading the paper .................................................................................... |
7 |
Installing the BJ cartridge ............................................. |
9 |
BJ cartridge guidelines ........................................................................... |
9 |
Handling the BJ cartridge ..................................................................... |
10 |
Installing the BJ cartridge .................................................................... |
11 |
Connecting the phone line .......................................... |
14 |
Connecting to the wall jack .................................................................. |
14 |
Connecting a telephone ........................................................................ |
14 |
Connecting the optional handset ......................................................... |
15 |
Connecting an extension phone or |
|
answering machine (optional) ...................................................... |
15 |
Setting the TEL LINE TYPE .................................................................... |
16 |
Setting up to receive faxes .......................................... |
17 |
Selecting the receiving mode .............................................................. |
17 |
Fax Only Mode ........................................................................................ |
18 |
Fax/Tel Mode ........................................................................................... |
19 |
Manual Mode .......................................................................................... |
20 |
Ans. Machine Mode .............................................................................. |
21 |
Main components of the fax ....................................... |
24 |
Front view ................................................................................................ |
24 |
Rear view ................................................................................................. |
25 |
Fax controls — the Operation Panel ........................... |
26 |
Registering your name and number ........................... |
28 |
Moving through the main menus ......................................................... |
28 |
Entering a number .................................................................................. |
29 |
Entering a name ...................................................................................... |
30 |
Personalising your fax ........................................................................... |
32 |
Registering the date and time .............................................................. |
33 |
Registering your telephone/fax number and name .......................... |
34 |
viii

Table of Contents
3.HANDLING DOCUMENTS
4.MAKING COPIES
5.SENDING FAXES
6.RECEIVING FAXES
Registering One-touch Speed Dialling numbers |
|
and names ................................................................. |
36 |
Registering Coded Speed Dialling numbers |
|
and names ................................................................. |
38 |
Special dialling ............................................................. |
39 |
Registering the access type and the outside line access number .. |
40 |
Using alternative telephone networks (UK only) ....... |
42 |
Attaching the M label ............................................................................ |
42 |
Registering an alternative telephone network .................................. |
42 |
Sending with a registered long-distance service ............................. |
44 |
Registering speed dialling with the M button .................................... |
45 |
Preparing documents .................................................. |
48 |
Types of documents you can scan ...................................................... |
48 |
Loading the document ........................................................................... |
49 |
Setting the resolution and density ....................................................... |
51 |
Copying documents ..................................................... |
54 |
Preparing to send a document .................................... |
56 |
Sending methods .................................................................................... |
56 |
Dialling methods ..................................................................................... |
56 |
Sending documents ..................................................... |
57 |
Direct Sending ........................................................................................ |
57 |
Manual Sending ..................................................................................... |
57 |
Automatic Dialling .................................................................................. |
58 |
Memory Sending .................................................................................... |
59 |
Cancelling Sending ................................................................................ |
60 |
Redialling ................................................................................................. |
60 |
Messages displayed during sending .................................................. |
61 |
Clearing document jams (ejecting a document from the ADF) ....... |
62 |
Delayed Sending .......................................................... |
63 |
Sending other documents while the fax is set |
|
for Delayed Sending ...................................................................... |
64 |
Cancelling Delayed Sending ................................................................ |
65 |
Sequential Broadcasting ............................................. |
66 |
Sending a document to more than one location ............................... |
66 |
Receiving documents .................................................. |
68 |
Receiving documents in Manual Mode .............................................. |
68 |
Receiving documents in Fax Only Mode ............................................ |
69 |
Receiving documents in Fax/Tel Mode ............................................... |
69 |
Receiving documents in Ans. Machine Mode .................................. |
70 |
Receiving documents in memory ........................................................ |
71 |
Printing documents in memory ............................................................ |
72 |
Receiving while registering, copying or printing .............................. |
72 |
ix

Table of Contents
7.SETTINGS AND ACTIVITY REPORTS
8.SOLUTIONS TO COMMON PROBLEMS
Telstra FaxStream™ Duet (Australia only) |
................. 73 |
Setting the fax for Network Switch ..................................................... |
73 |
Operation for Network Switch System ............................................... |
74 |
Telecom FaxAbility (New Zealand only) ..................... |
75 |
Setting the fax Network ........................................................................ |
75 |
Operation for Network Switch System ............................................... |
76 |
Polling to receive faxes ................................................ |
77 |
Polling a fax machine ............................................................................ |
77 |
User menu settings ..................................................... |
80 |
Settings ........................................................................ |
83 |
How to change a setting ....................................................................... |
83 |
Activity reports ............................................................ |
89 |
How to print a report .............................................................................. |
89 |
Activity management report ................................................................. |
90 |
One-touch Speed Dialling list ............................................................... |
91 |
Coded Speed Dialling list ...................................................................... |
91 |
User’s data list ........................................................................................ |
92 |
TX (Sending) report ................................................................................ |
92 |
RX (Receiving) report ............................................................................. |
93 |
Multi-activity report ............................................................................... |
93 |
Memory clear report .............................................................................. |
94 |
Restricting use of the fax ............................................. |
95 |
Locking the fax ........................................................................................ |
95 |
Changing the access password .......................................................... |
96 |
Cancelling the restriction setting ........................................................ |
97 |
Paper jams .................................................................. |
100 |
Automatic Document Feeder (ADF) jams ......................................... |
100 |
Recording paper jams ......................................................................... |
101 |
Periodic care ............................................................... |
102 |
Cleaning the fax exterior ..................................................................... |
102 |
Cleaning the glass scanning window ............................................... |
102 |
Cleaning the printer area .................................................................... |
103 |
Cleaning the BJ cartridge print head ................................................ |
104 |
Replacing the BJ cartridge ................................................................. |
105 |
Frequently asked questions ...................................... |
106 |
TRANSMITTING ................................................................................... |
106 |
RECEIVING ............................................................................................. |
107 |
TELEPHONE ........................................................................................... |
109 |
COPYING ................................................................................................ |
109 |
PAPER LOADING PROBLEMS ............................................................ |
109 |
GENERAL ............................................................................................... |
110 |
Print quality problems ............................................... |
111 |
Error codes, messages and solutions ....................... |
112 |
In case of a power failure .......................................... |
115 |
During a power failure ......................................................................... |
115 |
x
Table of Contents |
|
Specifications ..................................................................................................... |
117 |
Appendix ............................................................................................................ |
119 |
Document sizes ....................................................................................................................................................... |
119 |
What happens when Fax/Tel Mode is selected ................................................................................................. |
120 |
Glossary .............................................................................................................. |
121 |
Index ................................................................................................................... |
125 |
xi
This page is intentionally blank.

1 |
SETTING UP |
|
|
Unpacking |
2 |
||
|
|||
|
Removing the shipping materials .......................................................... |
4 |
|
|
Assembling the fax ....................................................... |
5 |
|
|
Attaching components ............................................................................ |
5 |
|
|
Attaching the optional handset .............................................................. |
6 |
|
|
Connecting the AC power cord .............................................................. |
6 |
|
|
Loading the paper ......................................................... |
7 |
|
|
Selecting the right kind of paper ........................................................... |
7 |
|
|
Loading the paper .................................................................................... |
7 |
|
|
Installing the BJ cartridge ........................................... |
9 |
|
|
BJ cartridge guidelines ........................................................................... |
9 |
|
|
Handling the BJ cartridge ..................................................................... |
10 |
|
|
Installing the BJ cartridge .................................................................... |
11 |
|
|
Connecting the phone line......................................... |
14 |
|
|
Connecting to the wall jack .................................................................. |
14 |
|
|
Connecting a telephone ........................................................................ |
14 |
|
|
Connecting the optional handset ......................................................... |
15 |
|
|
Connecting an extension phone or |
|
|
|
answering machine (optional) ...................................................... |
15 |
|
|
Setting the TEL LINE TYPE .................................................................... |
16 |
|
|
Setting up to receive faxes ........................................ |
17 |
|
|
Selecting the receiving mode .............................................................. |
17 |
|
|
Fax Only Mode ....................................................................................... |
18 |
|
|
Fax/Tel Mode ........................................................................................... |
19 |
|
|
Manual Mode .......................................................................................... |
20 |
|
|
Ans. Machine Mode .............................................................................. |
21 |
|
|
|
|
1
UP SETTING
1
Unpacking
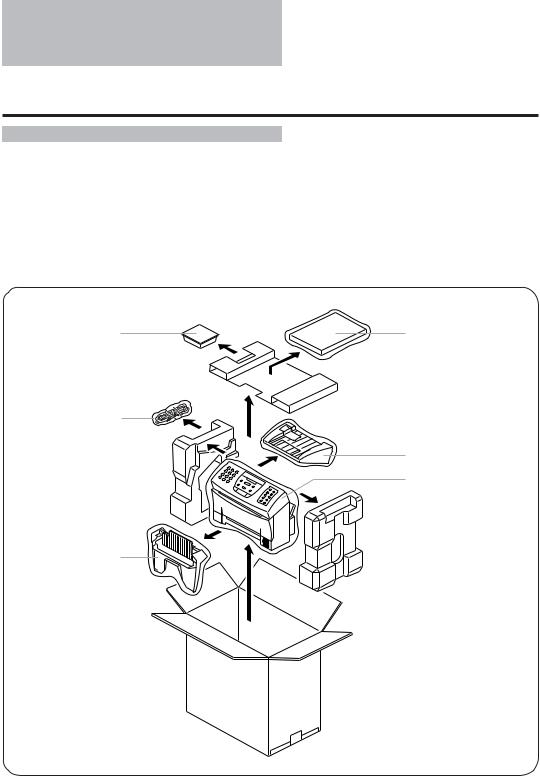
As you unpack the fax, save the carton and packing material in case you want to move or ship the unit in the future.
Carefully remove all items from the box.
It is best to have someone hold the box while you lift the fax and its protective packaging out of the carton.
BX-3 BJ FAX |
User’s Guide |
cartridge |
|
Power cord and
Telephone line
Paper tray cover
Main unit
Paper tray
2
Unpacking
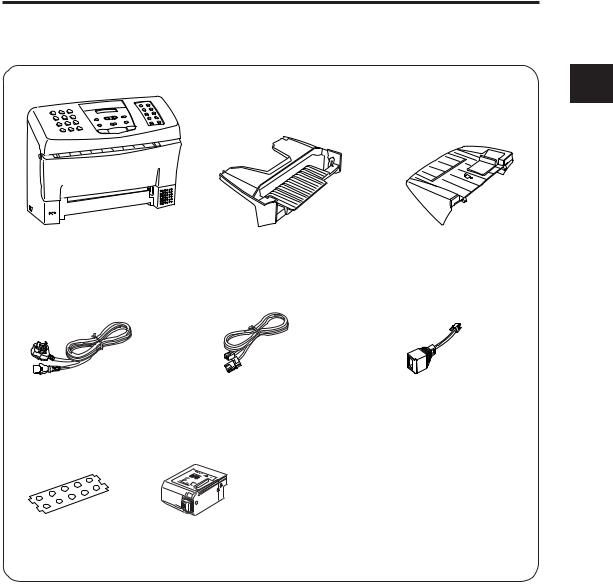
If any of these items are damaged or missing, notify your Canon dealer immediately.
1
UP SETTING
Main unit |
Paper tray |
Paper tray cover |
Power cord* |
Telephone line** |
B.T. adaptor |
|
|
|
|
(UK only) |
|
Miscellaneous |
|
|
|
• |
User’s Guide |
• Warranty |
|
|
(This manual) |
Registration Sheet |
|
• |
M Label |
(Australia only) |
|
|
(UK only) |
|
Faceplate |
• |
Warranty Card |
|
|
(UK only) |
|
|
(Attached to the unit) |
BX-3 BJ FAX cartridge |
|
|
|
|
||
*The shape of the power cord varies depending on the country of purchase.
**The shape of the telephone line varies depending on the country of purchase.
Depending on the country of purchase, the handset may be included with your fax.
3
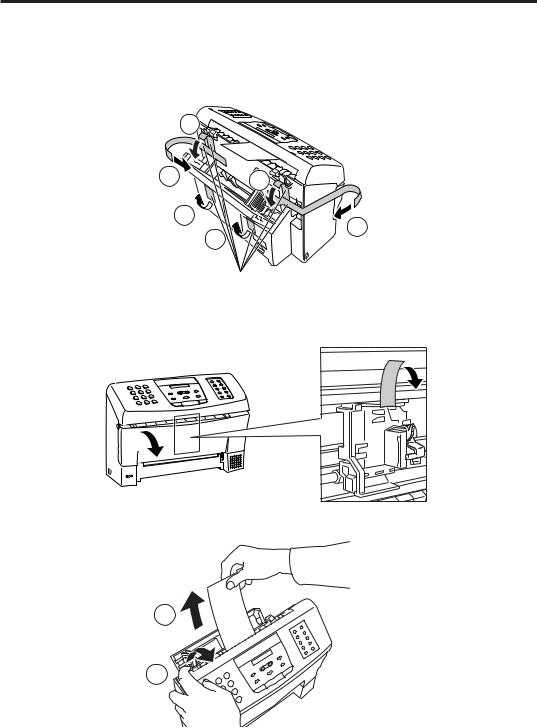
Removing the shipping materials ______________
Remove the shipping materials as shown below.
|
2 |
1 |
2 |
|
3 |
|
1 |
|
3 |
|
Remove these tapes |
Open the front cover
Remove this tape
2
Pull
1
Open
Be sure to also remove any shipping materials from the paper tray cover and the paper tray.
4
Assembling the fax
To see how the fax looks fully assembled, see Main components of the fax, p. 24.
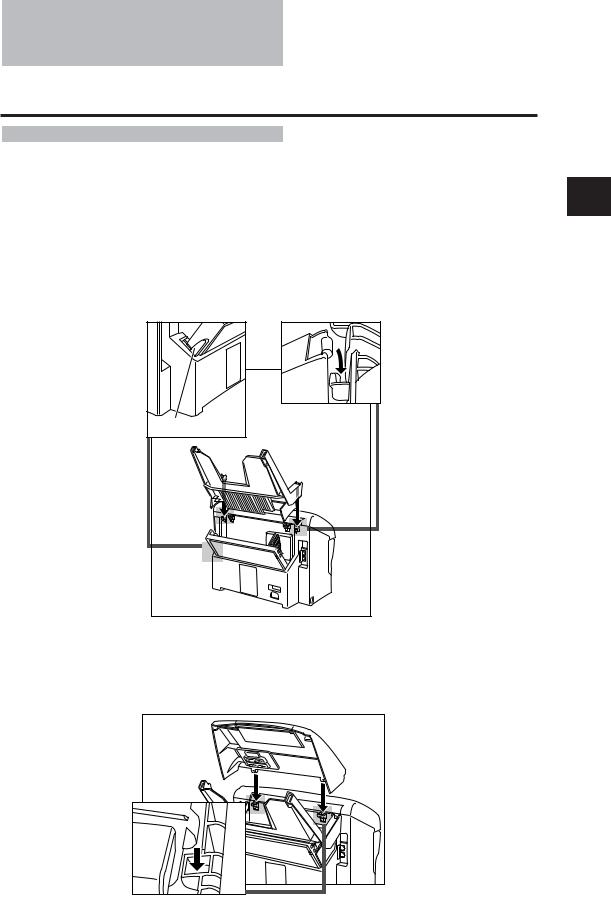
Attaching components ________________________
■ Paper Tray
Make sure the paper lever is in the position  . Then place the paper tray into the fax, making sure the two tabs fit in the appropriate slots on the fax.
 This symbol indicates the use of a function (envelope printing) not available with this model.
Paper lever |
■ Paper Tray Cover
Place the paper tray cover over the paper tray, making sure the two tabs fit in the appropriate slots on the fax.
1
UP SETTING
5
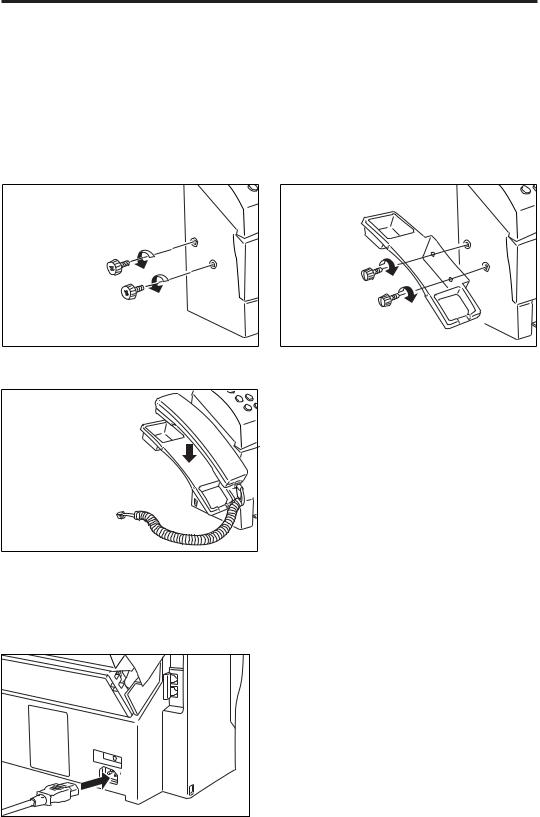
Attaching the optional handset* _______________
*Depending on the country of purchase, the handset may be included with your fax, or may be available as an option. Please note that the shape of your handset may differ from the one shown in this section. However, both handsets have exactly the same functions and performance.
1 |
Remove the screws on the left side of the |
2 |
Attach the handset cradle to the fax |
fax. |
using the screws provided with the |
handset. Do not use the screws originally attached to the fax.
3 Place the handset on its cradle.
Connecting the AC power cord ________________
Plug the fax into a 200–240 volt AC 50/60 Hz outlet.
1 |
Plug the power cord connector into the |
rear of the unit. |
6 |
2 |
Plug the other end of the power cord |
into a properly grounded AC outlet. |
There is no power switch on the fax. The power is on as long as the fax is plugged in.
Loading the paper
Selecting the right kind of paper ______________
The quality of the paper you use affects the print quality of the fax. Using paper that meets the following specifications will ensure the best possible printing results.
Quality Use plain bond, typewriter quality without curls, folds, or rough edges.
Weight |
64 g/m2 – 90 g/m2 |
Thickness 0.08 mm – 0.13 mm
Storage 18°C to 24°C, 40% to 60% relative humidity
Size |
A4, Letter, Legal |
•Test the plain bond paper you intend to use first to make sure printing results are satisfactory.
•Do not use punched or coloured paper.
•Do not use glossy paper.
•Ink drying time will vary depending on the type of paper.
•Using paper other than the above may cause jamming and/or blurred printing.
■Setting the paper size
The paper size setting determines the size of the recording paper in the paper tray. The factory setting is A4 size. If you want to use a paper size other than A4, you must change the PAPER SIZE setting. See FAX PRINTER, p. 88.
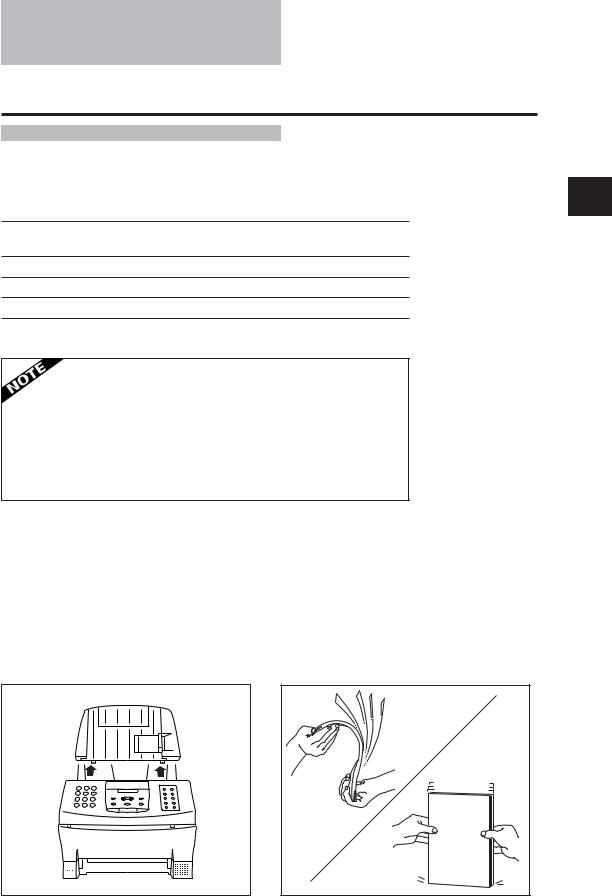
Loading the paper _____________________________
1 |
Remove the paper tray cover. |
2 |
Fan a small stack of up to 100 sheets (up |
|
to 10 mm thick). Tap the edge of the stack |
on a flat surface to even the stack.
1
UP SETTING
7

3 |
Align the right edge of the paper stack |
with the right edge of the paper tray and |
insert it halfway into the paper tray.
4 |
Holding the paper stack, squeeze and |
slide the paper guide until it touches |
the left edge of the stack of paper.
5 |
Insert the paper stack into the paper |
tray until it stops. |
A4 |
LTR |
A4 |
LTR |
Do not force the paper down into the fax.
Make sure the stack of paper does not exceed the paper limit mark on the right side of the paper tray.
6 Replace the paper tray cover.
•Make sure the stack of the paper is flat, held upright and aligned with the left paper guide.
•The top edge of the stack does not need to be even.
8
Installing the BJ cartridge
The first time you set up your fax, you have to install the BX-3 BJ FAX cartridge before you can begin receiving and copying documents.
BJ cartridge guidelines ________________________
Use only the Canon BX-3 BJ FAX cartridge with the FAX-B155.
The actual amount of ink that you use will vary depending on the print density of a page. If the majority of your printed output is graphics, you may need to change the ink cartridge more often than when you are receiving or copying text only.
You may need to replace the BJ cartridge when either of the following conditions exist:
Your printed output is not crisp and clear, and there are gaps in the characters (missing dots) even after you have cleaned the print head once or twice and you have removed and reinstalled the BJ cartridge.
You have been using the BJ cartridge for over one year.
• To ensure optimum print quality, Canon recommends the use of the cartridges designated by Canon. Canon accepts no liability or responsibility for damages caused by the use of any cartridge other than those designated by Canon.
•Canon makes numerous ink cartridges; the BX-3 BJ FAX cartridge is the only one designed to be used with the FAX-B155.
1
UP SETTING
9

Handling the BJ cartridge _____________________
•Leave the BJ cartridge in its packaging until you are ready to use it to prevent it from drying out.
•Store BJ cartridges out of the reach of children. The ink contains isopropyl alcohol 67-63-0.
•Replace the BJ cartridge after one year of use or if the print is not clear or is missing, even after trying five successive head cleanings.
•Never remove the BJ cartridge unless you are going to replace it. When left exposed, the cartridge print head dries out, making it unusable.
•Do not touch the print head area on
the BJ cartridge. Ink may leak out and cause stains.
• Never shake the BJ cartridge, especially after removing the protective tape from the print head.
If spilled, the ink is very difficult to clean. Therefore, always follow the above precautions and carefully handle the BJ cartridge.
10
Installing the BJ cartridge
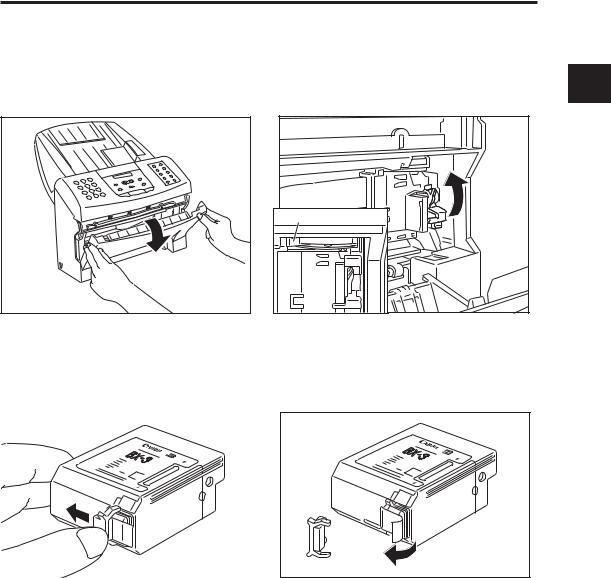
Installing the BJ cartridge _____________________
1 Open the front cover of the fax. |
2 Raise the green cartridge release lever. |
1 |
|
SETTINGUP |
|||
|
Thickness lever |
||
|
|
3 |
Remove the print head cap from the BJ |
cartridge. |
|
|
|
Make sure the paper thickness lever is set to the paper position (left position).
4 Pull off the protective orange tape. |
11
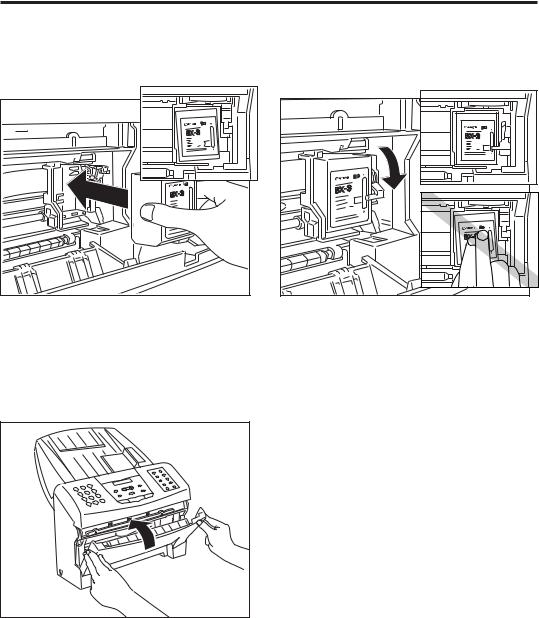
5 |
Insert the BJ cartridge. Align the slot in |
the cartridge with the yellow post in the |
fax.
6 |
Lower the cartridge release lever until |
you hear a click to lock the cartridge in |
place.
The yellow post (BJ cartridge guide) should be visible through the slot. The BJ cartridge tilts slightly to the left in the loaded position.
7 Close the front cover of the fax.
Make sure the arm on the cartridge release lever is aligned with the marking on the BJ cartridge.
If the lever movement is not smooth, release the lever and reload the cartridge.
To avoid cartridge misalignment and an error message appearing, do not press down on the cartridge or try to align it manually while raising and lowering the green lever.
12

Installing the BJ cartridge
8 |
The fax automatically prints a test page. |
The fax prints a test page every time you insert a BJ cartridge. |
|
T E S T P R I N T |
T h i s i s a t e s t s h e e t d e s i g n e d t o t e s t t h e p r i n t q u a l i t y o f t h i s u n i t . |
|
P l e a s e r e f e r |
t o t h e t e s t p a t t e r n s b e l o w . I f t h e y a r e n o t p r i n t e d c l e a r l y , y o u m a y w a n t |
t o c l e a n t h e |
p r i n t h e a d o f t h e i n k c a r t r i d g e . |
T o c l e a n t h e i n k c a r t r i d g e , p l e a s e p r e s s [ F U N C T I O N ] t h e n [ C L E A N I N G ] b u t t o n .
1
UP SETTING
When the BJ cartridge is properly installed, the test printout should look as shown above.
White streak |
If the printout has white streaks as shown above, try cleaning the print head. See Cleaning the BJ cartridge print head, p. 104.
If the problem persists after cleaning, try reinstalling the BJ cartridge.
You can turn off automatic test printing by changing the AUTO TEST PRINT setting. See SYSTEM SETTINGS, p. 88.
13
Connecting the phone line
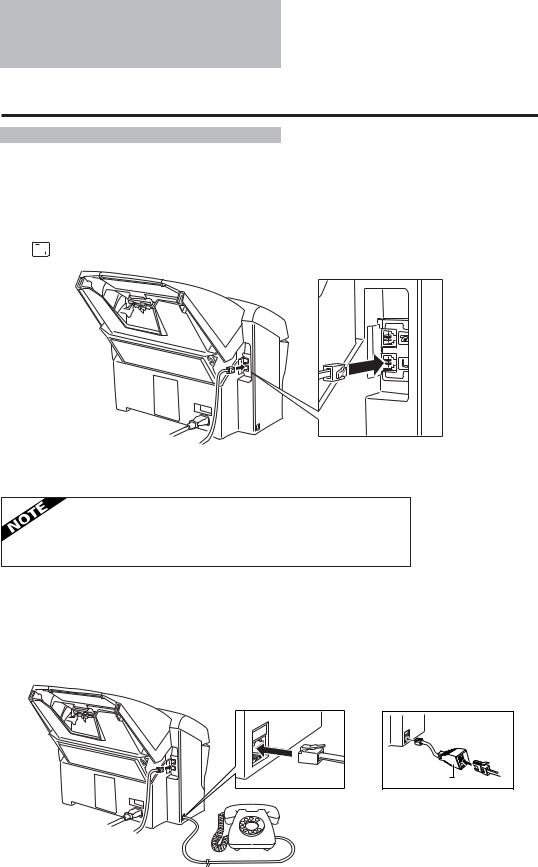
Connecting to the wall jack ___________________
1 |
Connect one end of the supplied telephone line to the jack marked |
|||
|
|
|
on the rear of the fax. |
|
|
|
|
||
|
|
|
||
2 Connect the other end of the line to your wall telephone jack.
To avoid electrical shock, connect the telephone line to the fax first.
Then connect the line to the wall telephone jack.
Connecting a telephone _______________________
1 Connect the end of the telephone cord to the jack.
B.T. adaptor |
UK only
Users in the UK only:
When you connect a telephone, be sure to connect the B.T. adaptor. Contact your Canon supplier for more information.
14
Connecting the phone line
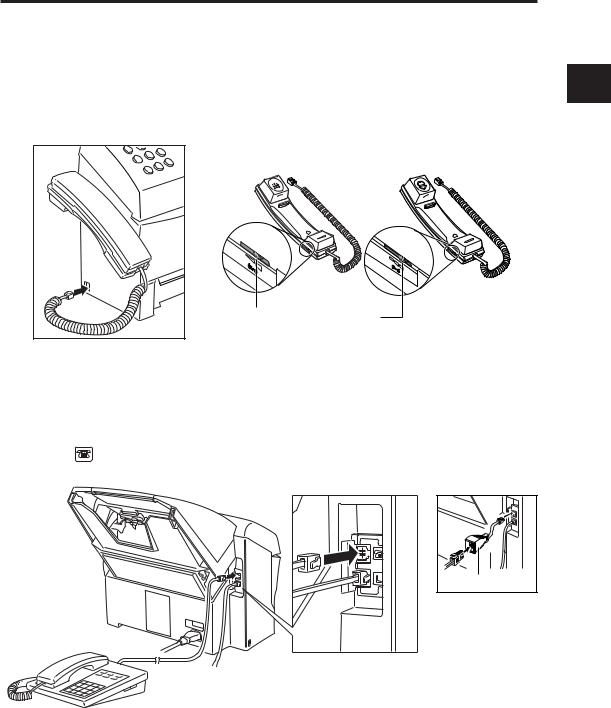
Connecting the optional handset* _____________
*Depending on the country of purchase, the handset may be included with your fax, or may be available as an option. Please note that the shape of your handset may differ from the one shown in this section. However, both handsets have exactly the same functions and performance.
1 Connect the handset’s modular jack to the handset jack on the fax.
Both handsets have exactly the same functions and performance.
RINGER VOLUME SWITCH
Adjust the volume of the ringer. Use a pen or other pointed object to adjust the switch to HIGH, LOW, or OFF.
Connecting an extension phone or answering machine (optional) _____________________________
1 |
Connect an extension phone or answering machine to the jack |
|
marked |
on the rear of the fax. |
|
B.T. adaptor |
UK only
Be sure to connect an extension phone if you want to use the INCOMING RING feature and you want it to ring when the fax receives a call. See pp. 68, 69 and 87.
If you connect an answering machine, refer to Ans. Machine Mode, p. 21.
Users in the UK only:
When you connect an extension phone or answering machine, be sure to connect the B.T. adaptor. Contact your Canon supplier for more information.
1
UP SETTING
15

Setting the TEL LINE TYPE* ___________________
Your fax is factory set to work with rotary pulse telephone lines**. If you have a tone line, you will need to change the telephone line setting as follows.
* TEL LINE TYPE cannot be set in Norway and Denmark.
** The factory setting for the UK, Australia, New Zealand and Singapore is TOUCH TONE.
1 Press [Function].
Function
Wait a second for TEL REGISTRATION to appear. SELECT MENU
TEL REGISTRATION
2
3
Use [ ] or [ ] to select USER SETTINGS. |
USER SETTINGS |
▼ |
|
Press [Start/Copy]. |
Start/Copy |
SET DATE
Use [ ] or [ ] to select TEL LINE TYPE. |
TEL LINE TYPE |
▼ |
|
Press [Start/Copy]. |
Start/Copy |
|
ROTARY PULSE |
4
5
6
Use [ ] or [
 ] to select TOUCH TONE.
TOUCH TONE
Press [Start/Copy]. |
Start/Copy |
|
DATA ENTRY OK
Press [Stop] to finish. |
Stop |
Users in the UK only:
Although this equipment can use either rotary pulse or touch tone, only the performance of the touch tone setting is subject to regulatory requirements for correct operation. It is therefore strongly recommended that the equipment is set to use touch tone for access to public or private emergency services. Touch tone also provides faster call set up.
16

Setting up to receive faxes
Selecting the receiving mode__________________
Before you set up the receiving mode on your fax, you should determine how you plan to use your fax:
Are you able to dedicate the use of one telephone line to the fax only to receive document transmissions from other fax machines? If yes, choose Fax Only Mode (see below).
Do you want to use your fax as both a telephone and fax, receiving documents automatically and ringing only for telephone calls? If yes, choose Fax/Tel Mode (see below).
Do you want to use your fax mainly as a telephone, and answer every call yourself, whether from a person or a fax unit? If yes, choose Manual Mode (see below).
Do you want to connect an answering machine to your fax and receive the other party’s document and also record the other party’s message? If yes, choose Ans. Machine mode (see below).
How you answer these questions will determine which receiving method you choose. If you are not satisfied with the mode you select, you can always change it at any time.
■ Fax Only Mode (See p. 18)
You may want to use this mode if you have two phone lines in your office, and plan to use one line for the fax and the other line for your telephone.
Set Fax Only Mode if you want to use your fax only to receive faxes automatically and do not intend to use it as a telephone.
■ Fax/Tel Mode (See p. 19)
If you only have one phone line in your office, you may be planning to use it for both fax and telephone communication. By setting this mode, you will be able to use your fax for both fax and telephone communication using only one phone line. You will need to have the optional handset or an extension phone connected to the fax so that when it rings to alert you of a call, you can answer the call. The fax will automatically receive faxes without ringing.
■ Manual Mode (See p. 20)
Use Manual Mode if you receive more telephone calls than faxes. By having a telephone or the optional handset connected to your fax, you can answer every call, whether from a person or from another fax unit. If you hear a slow beep, simply press [Start/Copy] on your fax and hang up the handset to receive the fax.
■ Ans. Machine Mode (See p. 21)
Use Ans. Machine Mode if you have an answering machine connected to the fax. This mode allows you to receive not only documents sent from other fax machines, but also messages from people calling when you are out.
1
UP SETTING
17

Fax Only Mode _________________________________
The fax is set up at the factory to Fax/Tel Mode. If you have a dedicated fax line, you need to set the mode to Fax Only.
■ Setting Fax Only Mode
When you set the fax to Fax Only Mode, the unit picks up every call and automatically treats it as a fax transmission.
The fax cannot receive automatically if you are making copies, printing reports, or registering information. See p. 72.
1
2
Press [Receive Mode] until “Fax Only Mode” |
Receive Mode |
|
|
||
|
|
||||
appears on the LCD. |
Fax Only Mode |
||||
|
|
||||
|
|
|
|
|
|
|
|
|
|
|
|
Press [Start/Copy]. |
Start/Copy |
|
|
|
|
|
|
|
|||
When this mode is set, the LCD will display the |
|
|
12:00 |
FaxOnly |
|
time and “FaxOnly”. |
|
|
|
|
|
■ Receiving documents in Fax Only Mode
When the fax is set to Fax Only Mode, it automatically receives documents whenever a call comes over the fax line.
1 Make sure the fax is set to “Fax Only Mode” (see above).
The fax assumes all incoming calls are from another fax machine sending a document. It receives the documents automatically.
18
 Loading...