


 Loading...
Canon New F-1

Film Speed Range |
Film Advance Lever |
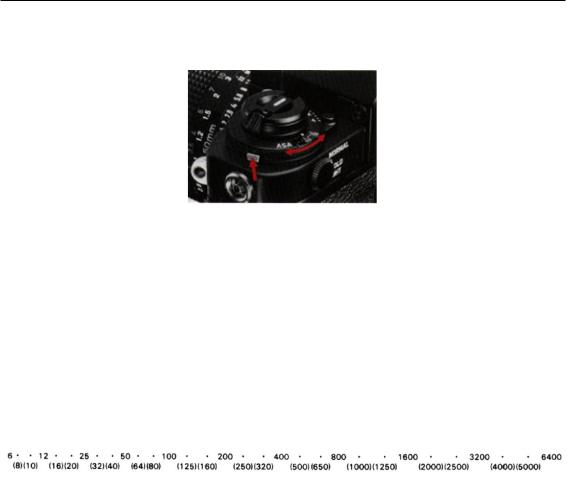
One of the widest ranges of any 35mm SLR, the ASA 6-6400 film speed provides plenty of latitude for push-processing films.
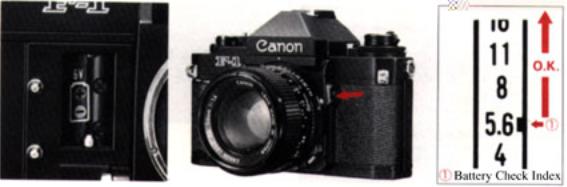
The ASA is clearly displayed in the window for easy reference.
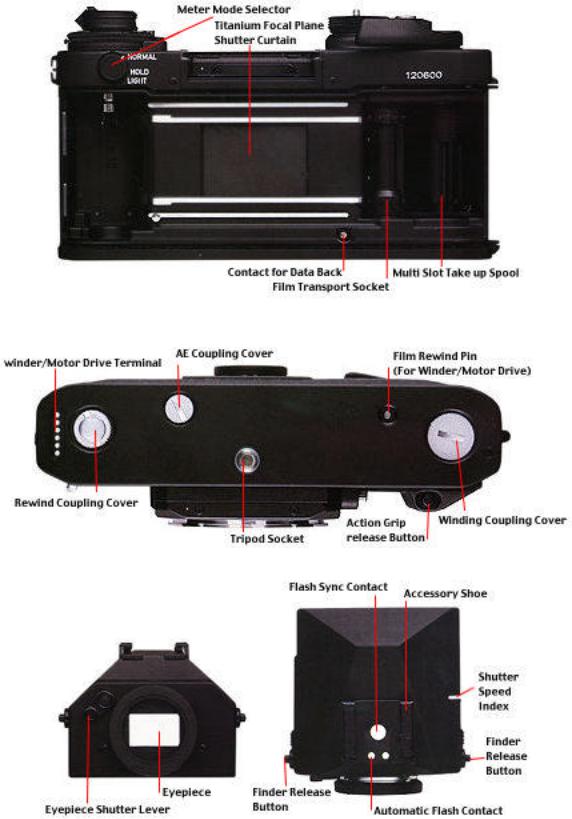
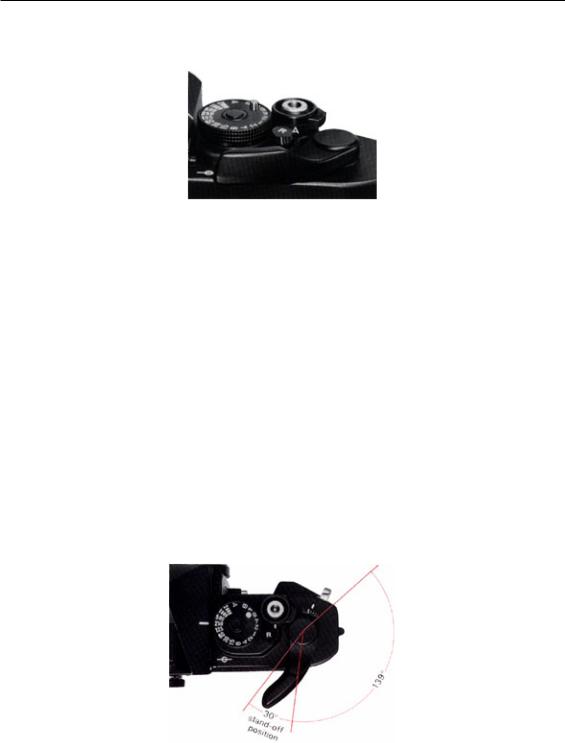
The film advance lever has a 30° stand-off angle for readiness in action photography. Contoured to fit the thumb for comfortable and efficient operation, the lever allows single or multiple stroke film advance.
Battery Check Button |
Safety Stopper |
Press this button to monitor the battery |
A safety lock eliminates all risk of |
condition. Power is sufficient if the |
accidentally opening the camera back and |
meter needle moves above the battery |
exposing the film. To open, |
check mark in the viewfinder. The buttonsimultaneously depress the stopper and
also serves to cancel the self-timer |
lift the rewind knob. |
exposure meter and viewfinder |
|
illumination, as well as to release the |
|
second shutter curtain during long |
|
exposures. |
|

Canon Breech-lock Mount
Exposure Compensation
The breech-lock mount is an exclusive feature which
assures total interchangeability of all Canon lenses and Exposure compensation up to +2EV is accessories. Lens change is effected in one swift motion. possible for special creative effects.
Calibrated in 1/3 EV increments, the dial is released by pressing the lock button.
Stop-down Slide |
Exposure Compensation |
A convenient feature which allows you to
check depth of field and perform stopped-down
metering with FL or non-fully coupled close-up accessories.
Exposure compensation up to +2EV is possible for special creative effects. Calibrated in 1/3 EV increments, the dial is released by pressing the lock button.
Eyepiece: |
Shutter Button/Self-timer |
Shutter The eyepiece shutter shuts out allThe multifunctional shutter button |
|
extraneous light. A useful safeguard |
provides a meter reading when depressed |
when taking long exposures or with |
gently and releases the shutter when fully |
self-timed |
depressed. To activate the selftimer, turn |
or remote-control photography. |
the outer ring to "S" and press the |
|
shutter. A beeping sound will issue for |
|
10 sees. before the shutter releases itself. |
|
Set the ring to "A" for normal shutter |
|
release and "L" to lock the shutter. |
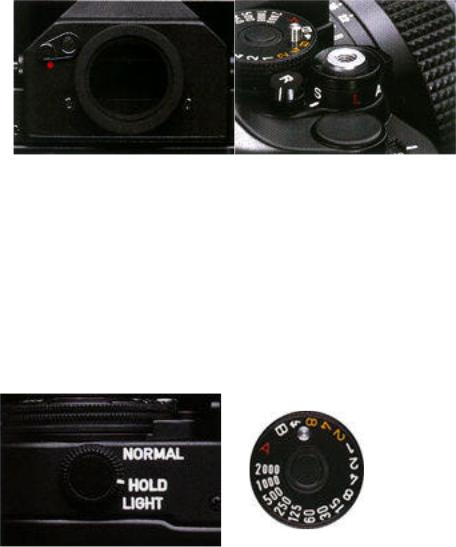
Meter Mode Selector |
Shutter Speed Dial |
An invaluable feature which helps you
in more ways than one. At HOLD, the meter operates for 16 sees., freeing both hands to adjust the camera. The same happens on LIGHT, but in addition the viewfinder display is illuminated. At NORMAL, the meter functions only while the shutter button is depressed, to save power.
Align the "A" mark with the index for aperture-priority AK. Full sec onds (2, 4 and 8 sec.) are color coded yellow for clear distinctior with faster speeds (plus " t" an~ B) which are in white.
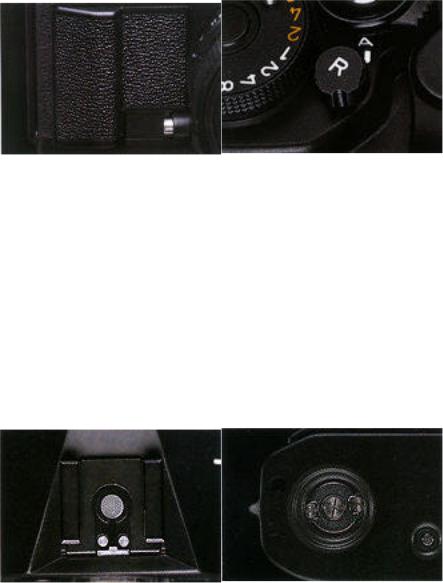
Contoured Action Grip |
Film Rewind/Multiple |
The specially shaped battery |
Exposure Lever |
|
compartment cover provides a firm actionTraditionally located on the base, Canon
grip for steadier shooting. Press the |
has relocated the film rewind lever on top |
release button underneath to remove the |
for easier access when using a tripod or |
cover and gain access to |
other accessories. For film rewind, turn |
the battery. |
the lever clockwise and depress. Do the |
|
same thing before cocking the shutter to |
|
take multiple exposures. Rapid sequence |
|
multiple exposures are also possible |
|
using either of the power drives |
Accessory Shoe
Located on top of the pentaprism viewfinders for direct mounting of all Speedlites. Special contacts permit automatic setting of the 1/90 sec. flash sync speed and flash aperture when in shutterpriority AE mode.
Winder/Motor Drive
Coupler
Remove the protective screw cap to connect either the AE Motor Drive FN or AE Power Winder FN. The power drives have a receptacle for storing the cap

CONTENTS CONTENTS
Contents
1 |
Attaching the Lens |
4 |
|
2 |
Battery |
6 |
|
|
2.1 |
Loading the Battery . . . . . . . . . . . . . . . . . . . . . . . . . . |
6 |
|
2.2 |
Checking the Battery . . . . . . . . . . . . . . . . . . . . . . . . . . |
7 |
3 |
Shutter Release and Self-timer/Lock Lever |
9 |
|
4 |
Holding the Camera |
11 |
|
5 |
Focusing |
12 |
|
6 |
Loading the Film |
14 |
|
7 |
Setting the ASA/ISO Film Speed |
15 |
|
8 |
Frame Counter |
16 |
|
9 |
Exposure |
18 |
|
10 |
Shutter |
19 |
|
11 |
How to Choose a Shutter Speed |
21 |
|
|
11.1 |
Freezing Motion . . . . . . . . . . . . . . . . . . . . . . . . . . . . . |
21 |
|
11.2 |
Blurring the Subject’s Motion . . . . . . . . . . . . . . . . . . . . . |
22 |
|
11.3 |
Panning . . . . . . . . . . . . . . . . . . . . . . . . . . . . . . . . . |
22 |
12 |
Aperture |
23 |
|
13 |
Exposure Modes |
25 |
|
|
13.1 |
Full-aperture Metering . . . . . . . . . . . . . . . . . . . . . . . . . |
25 |
|
13.2 |
Stopped-down Metering . . . . . . . . . . . . . . . . . . . . . . . . |
26 |
14 |
Meter Mode Selector |
27 |
|
15 |
Which viewfinder did you purchase? |
28 |
|
16 |
Eye-Level Finder FN |
29 |
|
|
16.1 |
Match-needle Metering . . . . . . . . . . . . . . . . . . . . . . . . . |
29 |
|
16.2 |
Stopped-down (Fixed-index) Metering . . . . . . . . . . . . . . . . |
32 |
17 |
AE Finder FN |
33 |
|
2
CONTENTS |
CONTENTS |
18 Aperture-priority AE |
33 |
18.1Stopped-down AE . . . . . . . . . . . . . . . . . . . . . . . . . . . . 35
18.2Match-needle Metering . . . . . . . . . . . . . . . . . . . . . . . . . 36
|
18.3 |
Stopped-down (Fixed-index) Metering . . . . . . . . . . . . . . . . |
36 |
19 |
Shutter-priority AE |
38 |
|
20 |
Meter Coupling Range |
41 |
|
21 |
Metering Sensitivity Areas |
42 |
|
22 |
Exposure Compensation |
45 |
|
23 |
Rewinding the Film |
50 |
|
24 |
Depth of Field |
52 |
|
25 |
Self-timer |
54 |
|
26 |
Multiple Exposures |
57 |
|
27 |
Exposure in Multiple Exposures |
60 |
|
28 |
Flash Photography |
61 |
|
|
28.1 |
AE Flash Photography with Speedlites 011A, 133A, 155A, 166A, |
|
|
|
177A, 188A, 199A, 533G and 577G. . . . . . . . . . . . . . . . . . . |
61 |
|
28.2 |
Slow-sync Flash Photography . . . . . . . . . . . . . . . . . . . . . |
62 |
|
28.3 |
General Flash Photography . . . . . . . . . . . . . . . . . . . . . . |
63 |
29 |
Shooting with Close-up Accessories |
65 |
|
30 |
System Accessories |
71 |
|
|
30.1 |
Canon AE Motor Drive FN . . . . . . . . . . . . . . . . . . . . . . |
71 |
|
30.2 |
Canon AE Power Winder FN . . . . . . . . . . . . . . . . . . . . . |
72 |
30.3Canon Film Chamber FN-100 . . . . . . . . . . . . . . . . . . . . . 73
30.4Canon Data Back FN . . . . . . . . . . . . . . . . . . . . . . . . . . 74
30.5Canon Wireless Controller LC-1 . . . . . . . . . . . . . . . . . . . . 75
31 Specification |
76 |
3
1 ATTACHING THE LENS
1Attaching the Lens
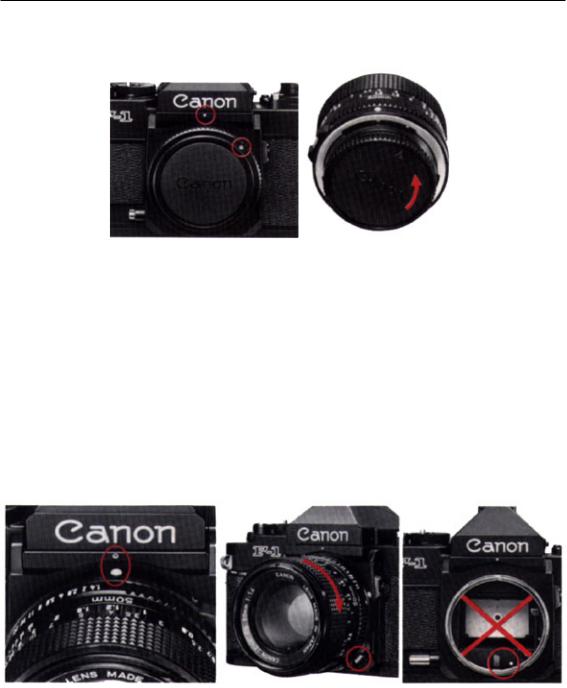
To remove the body cap, turn it counterclockwise until it stops and pull it o . To reattach, align the red dot on the cap with the camera’s red dot. Then lightly push the cap in and turn it fully clockwise.
Turn the rear lens cap in the direction of the arrow until it stops and pull it o . To reattach, align the arrow on the cap with the lens’ red dot. Then lightly push the cap in and turn it fully clockwise.
To mount the lens, align its red positioning point with the camera’s red dot and turn the lens in the direction of the arrow until it stops and the lens release button pops out. To remove the lens, turn it counterclockwise while pressing the lens release button.
CAUTION
Do not mount the lens if the red dot inside the camera mount and the red line on the stop-down slide are showing. In this case, push in the stopdown slide so that it locks in the normal (retracted) position and these warning marks can no longer be seen.
4

1 ATTACHING THE LENS
The following lenses cannot be mounted on the New Canon F-1:
FL |
19mm |
f/3.5 |
R |
100mm |
f/3.5 |
FL |
58mm |
f/1.2 |
R |
100mm |
f/2 |
R |
50mm |
f/1.8 |
FLP |
38mm |
f/2.8 |
R |
58mm |
f/1.2 |
|
|
|
Notes:
•Do not push the stop-down slide while advancing the film. Otherwise, it may be impossible to mount the lens.
•Do not press the lens release button while mounting the lens or it may not pop out, thus causing the lens to work incorrectly.
5
2 BATTERY
2Battery
2.1Loading the Battery
The action grip of the camera also serves as a battery chamber cover and therefore must be removed to load a battery. To do this, press the release button and lift up the grip.
Use one of the batteries listed below or an equivalent of another brand:
Lithium 6V |
Duracell PX 28L |
|
|
Alkaline - manganese 6V |
Eveready (UCAR) |
|
No. A544 IEC 4LR44 |
|
|
Silver Oxide 6V |
Eveready (UCAR) |
|
No. 544, |
|
Durqceli PX 28, |
|
IEC 4SR44 |
|
|
To ensure proper contact, wipe the battery terminals with a clean, dry cloth before loading. Load a new battery so that its terminals are in the directions indicated by the diagram inside the battery chamber. Insert the negative end first, then push down and insert the positive end. The camera will not function if the battery is loaded incorrectly.
Then slide the action grip’s tab into the guide hole as shown, and lower the grip until it locks in place.
6
2 BATTERY |
2.2 Checking the Battery |
2.2Checking the Battery
The battery can be checked with the shutter dial at any setting other than ”A”, and at any ASA/ISO film speed setting. With the shutter dial on ”B,” battery check is possible only after the film has been advanced. To check the battery, press the check button for about three seconds while looking in the viewfinder. Battery power is su cient when the meter needle is above the battery check index. The weaker the battery, the lower the needle. However, even if the battery is weak, exposure will still be correct as long as the shutter is released when you press the shutter button. If the meter needle rests at or below the index, the battery is almost exhausted. In this case, have a new battery ready.
With normal use the battery should last about one year. Battery po’wer may decrease, however, at temperatures below 0◦ C (32◦ F). In this case, load a new battery and keep the camera warm until you are ready to shoot. Do not throw the original battery away; keep it as a spare. Alternate the two batteries, keeping the one that is not in use warm. Although a battery may not perfomm well in the cold, it may work normally again at higher temperatures. Lithium batteries are recommended for use at low temperatures.
IMPORTANT
The New Canon F- 1 can be used even if the battery fails simply by removing the exhausted battery from the camera. The mechanically controlled shutter speeds are 1/2000 to 1/125 sec., ”S” (1/90 sec.) and ”B” (bulb).
Notes:
•Remove the battery if you do not expect to use the camera for about three weeks or longer.
•Do not try to take the battery apart and never dispose of it in fire.
7
2.2 Checking the Battery |
2 BATTERY |
Try to make a habit of checking the battery at the followingtimes:
•After loading a new battery.
•If the shutter won’t function with the selftimer/lock lever on ”A.”
•Before and after making many long exposures at slow speeds other than ”B.”
•When you are using the camera at low temperatures.
•Before shooting important events.
•When the camera is used frequently.
•After storing the camera for a long time.
•Before going on a trip.
The battery check button also serves to cancel the self-timer, meter reading, illumination of viewfinder information (”LIGHT” setting of meter mode selector), and shutter operation during long exposures. The circuit is cancelled the moment you press the button, and the second curtain will close when you remove your finger. The shutter will not be released if you press the shutter button while pressing the battery check button.
8
3SHUTTER RELEASE AND SELF-TIMER/LOCK LEVER
3Shutter Release and Self-timer/Lock Lever
The self-timer/lock lever of the camera has three settings. With the lever at ”A,” press the shutter button halfway to activate the meter. To release the shutter, gently press the shutter button all the way down. When the level is at ”L,” the shutter button is locked. It is advisable to turn the lock lever to ”L” when the camera is not in use to prevent accidental shutter release and battery consumption. With the lever at ”S,” the camera’s 10-second self-timer can be activated simply by pressing the shutter button. For further details on self-timer photography.
Shutter release is electromagnetic as long as there is a battery in the camera. Once the battery is removed, the camera switches to mechanical release, and only those speeds which are mechanically controlled can be used. The shutter button has a threaded socket in the center to accept a standard cable release.
IMPORTANT
The New F- 1 has a built-in safety circuit which prevents shutter release if the lens aperture ring is on the ”A” mark and a power drive is not attached.
First push the advance lever out to its 30◦ stand-o position To advance the film, turn the advance lever all the way to the right in one continuous 139◦ stroke or several short ones. This also cocks the shutter and prepares the diaphragm and
9

3 SHUTTER RELEASE AND SELF-TIMER/LOCK LEVER
mirror for the next shutter release. The film must be advanced fully to the next frame or the shutter will not release.
10

4HOLDING THE CAMERA
4Holding the Camera
The best way to prevent image blur from camera movement is to hold the camera as steady as possible, with your left hand supporting the camera and lens. Lightly rest your right index finger on the shutter button, and the tip of your thumb on the film advance lever or on the body. Wrap your other right fingers around the action grip. Then press your left elbow to your body and lightly press the camera against your cheek or forehead. For a vertical shot, steady at least one elbow against your body. Spread your feet slightly apart. one foot ahead of the other, and relax. Lean against a steady support if one is available.
There is, of course, no one correct way to hold the camera.
Experiment to find the most suitable way for you. Select a method that provides comfort in addition to stability. It may help to practice in front of a mirror. When shooting at a shutter speed of 1/30 sec. Or slower or with a telephoto lens, it is advisable to mount the camera on a tripod. If the tripod screw is especially long, be careful not to screw it in beyond the limit of the camera’s tripod socket.
11
5 FOCUSING
5Focusing
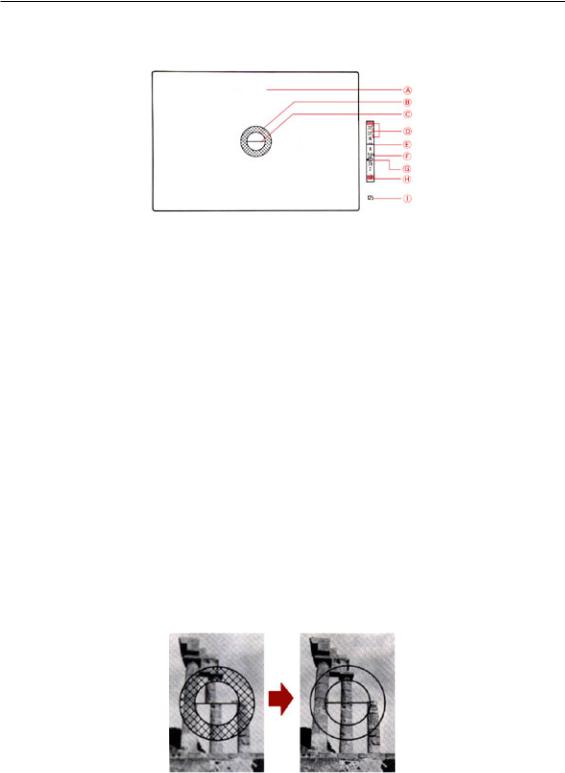
1.Laser-matte screen
2.Microprism rangefinder
3.New split rangefinder
4.Overexposure warning mark
5.Meter Needle
6.Stopped-down metering/battery check index
7.Aperture needle
8.Underexposure warning mark twhen using f/1.4 lens)
9.Shutter speed display
out of focus |
in focus |
12

5 FOCUSING
Turn the focusing ring of the lens as you look in the viewfinder until the main subject is sharp. The three focusing aids of the standard screen can be used alone or in combination according to the subject and your own preference.
Note:
The New Canon F- 1’s focusing screen, which makes precise focusing possible, also determines the metering sensitivity area. There are 13 types of focusing screens and three di erent metering areas optionally available to suit your particular focusing and metering requirements.
1. New Split Rangefinder
The new split-image rangefinder divides the subject in half horizontally and is especially useful for a subject which has vertical lines. The subject is in focus when the two halves merge to become one unbroken image. When using a lens with a maximum aperture of f/5.6 or smaller, one-half of the split-image rangefinder may take on,a slight color.
2. Microprism Rangefinder
When the subject is out of focus, the microprism ring breaks the subject into tiny fragments, causing a shimmering e ect. It is clear and steady when your subject is in focus.
3. Laser-matte Screen
The laser-matte screen appears fuzzy until the subject is -in focus. It is particularly e ective when you are using accessories for copying or close-ups.
Note:
Ten eyesight correction lenses from +3 to -4 diopters are available. They may make viewing and focusing easier if you are nearor farsighted. Choose the one closest to your eyeglass prescription, then make a practical test if possible.
13
6 LOADING THE FILM
6Loading the Film
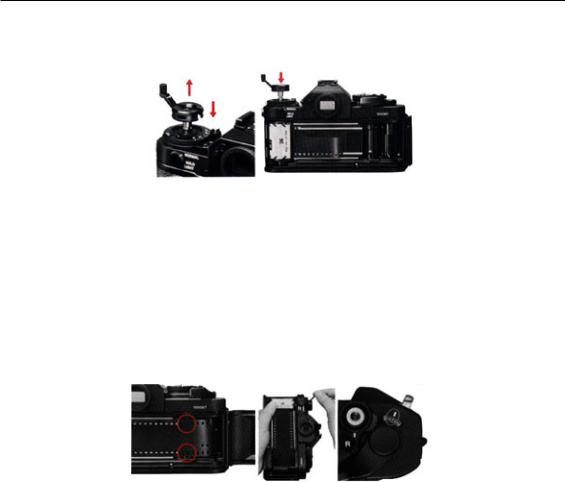
Pressing the safety stopper, pull up the rewind knob until the camera back pops open. Be sure to shield the film from direct sunlight while loading. Place the cartridge in the film chamber as shown. Then push down the rewind knob, turning it until it drops into its normal position.
Note:
Remove the plastic insert from the pressure plate before loading the first film cartridge.
Pull the film leader across the camera and insert the tip into any slot of the take-up spool.
Advance the film once. Make sure the sprocket teeth engage the film perforations. The film should be taut. If there is any slack, unfold the rewind crank and gently turn it in the direction of the arrow until it stops. Note that the rewind crank must be unfolded before you turn it; otherwise, the knob will turn freely. Then fold the rewind crank back in. Close the camera back.
Take several blank shots, releasing the shutter and advancing the film until the frame counter reaches ”1.” While doing this, keep an eye on the rewind knob. If it rotates in ,the direction of the arrow, the film is loaded correctly.
CAUTION
NEVER remove the camera’s rewind coupler cover from the baseplate when film is loaded in the camera. This will expose the film to light. It is not necessary to remove the coupler cover except for attaching the AE Motor Drive FN.
14
7SETTING THE ASA/ISO FILM SPEED
7Setting the ASA/ISO Film Speed
Turn the setting dial, while pressing the lock release button, until the desired film speed aligns with the index. The dial cannot be turned lower than ASA6 or higher than ASA6400. The table on the next page shows the ASA/ISO film speeds which can be set on the New Canon F-1. Figures in parentheses are intermediate speeds which are indicated by dots on the ASA/ISO dial.
ASA/ISOis a numerical rating of the film’s sensitivity to light. The higher the number, the faster the film and the more sensitive it is to a given amount of light as compared to a film with a lower number. The film manufacturer’s ASA/ISO rating can be found on the film cartridge, the carton, and the data sheet.
15
8 FRAME COUNTER
8Frame Counter
Each time you advance the film, the frame counter also advances to the next number. It can count up to 39 frames. The numbers 1, 12, 20, 24 and 36 are in orange, the latter four to call your attention to the fact that rolls with those numbers are or are almost finished. The frame counter automatically returns to ”S” when you open the camera back. During multiple exposures, the frame counter advances each time you wind the advance lever.
The New Canon F-1 will also accept bulk film loaded into standard cartridges. In this case. be sure to trim the leader as shown before loading it into the camera.
Memo Holder
The camera back has a memo holder. It conveniently holds the end of the film box as a reminder of the type of film in use and the rnumber of exposures.
16
8 FRAME COUNTER
17
9 EXPOSURE
9Exposure
The amount of light that exposes a frame is determined by the aperture and shutter speed. The size of the aperture controls the amount of light allowed to reach the film, while the shutter speed controls how long the light strikes the film. For the same exposure, a change in shutter speed requires an equal and opposite change in aperture, and vice versa. There are usually several combinations of shutter speed and aperture which will give the same exposure. If. for example, the meter indicates that exposure will be correct at f/4 and 1/60 sec., you usually have other combinations to choose from. Some of the combinations in this example include f/5.6 at 1/30 sec. and f/2.8 at 1/125 sec. The two main considerations involved in selecting one particular combination over the others are the subject’s motion and depth of field; each of these a ects the way a picture will look. You can control the e ect of a picture simply by choosing a certain shutter speed and aperture combination. The next three sections provide information which you may find useful whether you are using the camera manually or automatically with an AE accessory.
18
10 SHUTTER
10 Shutter
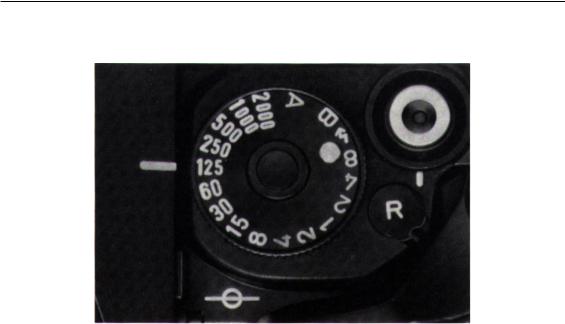
The New Canon F- 1 ’s hybrid shutter is electronically as well as mechanically controlled. Shutter speeds from 1/2000 to 1/125 sec., ” f ” 1/90 sec.) and ”B” (bulb) are mechanically governed, while 1/60 to 8 sees. are electronically controlled. With the AE Finder FN attached and the shutter dial on ”A,” shutter speeds from 1/1000 to 8 sees. are electronically controlled.
The shutter dial of the camera has settings from 2000 to 8, ”A,” ” f ,” and ”B.” The slow shutter speeds from 2 to 8 seconds are in yellow, while shutter speeds from 1 to 1/2000 sec. are in white. The white numbers are reciprocals of the true shutter speeds; ”125,” for example, indicates a speed of 1/125 sec. Intermediate settings on the dial cannot be used, and the dial cannot be turned between ”B” and ”A.” The red ”A” is for shooting in the aperture priority and stopped-down AE modes with the Canon AE Finder FN attached. For this setting, pull up the outer ring and turn the dial until ”A” is aligned with the index on the finder. A scale with shutter speeds from 8 to 1/1000 sec. will now be displayed below the field of view as long as the AE Finder FN is attached.
The ” t ” setting is for synchronized flash photography at an X sync. speed of 1/90 sec. It is not necessary to set the shutter dial to ” t ” when using a dedicated Canon Speedlite; once the Speedlite’s pilot lamp glows, the camera automatically switches to 1/90 sec. provided the shutter dial is not on ”B.”
When the shutter dial is set to ”B,” the shutter will remain open as long as you press the shutter button. The camera’s meter will not give a reading on ”B,” thus AE photography and match-needle metering are impossible. You will have to experiment or use a separate exposure meter to find the best exposure. It is advisable to use a tripod and locking cable release for long exposures.
Since ”B” is mechanically controlled, the battery will not be drained on this setting
19

10 SHUTTER
regardless of the exposure duration.
To cancel shutter operation during a long exposure, press the battery check button.
Mechanical Operation
There are several shutter speeds available with the New Canon F-1 even if the battery fails. In this case, remove the battery from the battery chamber. Shutter speeds from 1/2000 to 1/125 sec. , ”S” (1/90 sec.) and ”B,” which are all mechanically controlled, can be used. If the shutter dial is set to any speed between 1/60 and 8 secs., the camera switches automatically to 1/90 sec. when you press the shutter button.
IMPORTANT
The camera will not operate if you leave the exhausted baterry in the battery chamber.
20
11 HOW TO CHOOSE A SHUTTER SPEED
11 How to Choose a Shutter Speed
The shutter controls exposure by the length of time it remains open. The basic function of shutter speed is to provide correct exposure, but you can also use it to control the expression of your subject’s motion and to control the e ect of camera movement.
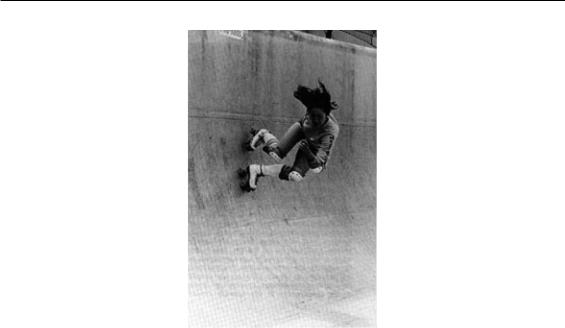
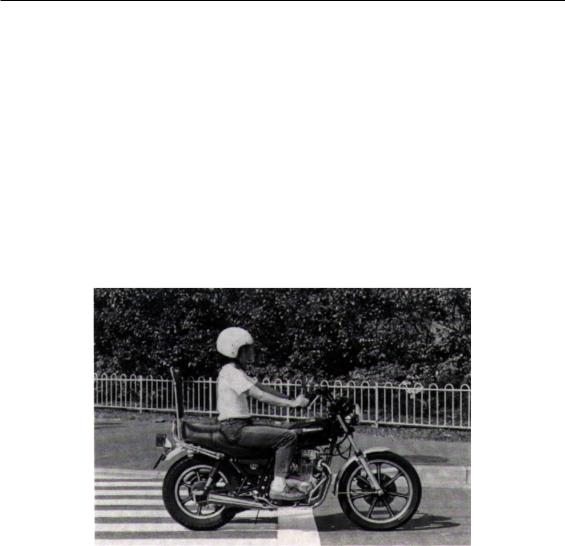
11.1Freezing Motion
The faster the subject is moving, the higher the shutter speed required to stop the action. To freeze the motion of a pedestrian, for example, choose a speed of at least 1/60 sec.; for a moving car, as fast as 1/1000 sec. The motion of the motorcycle in this photo was frozen at 1/2000 sec.
21
11.2 Blurring the Subject’s Motion11 HOW TO CHOOSE A SHUTTER SPEED
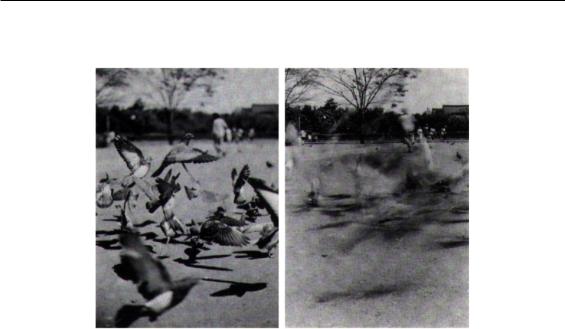
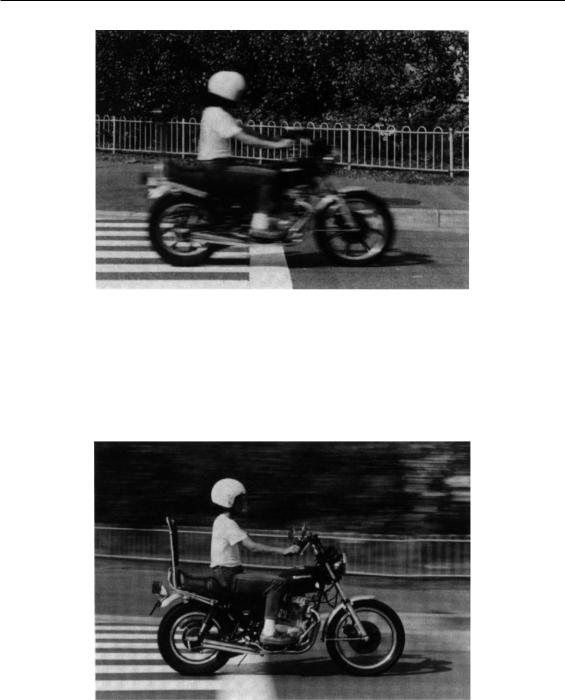
11.2Blurring the Subject’s Motion
Blurring part of the picture can give a convincing sense of action. To blur the subject, simply set a shutter speed which is too slow to freeze its action. In this photo it was blurred at 1/15 sec.
11.3Panning
You can blur the background while keeping the subject relatively sharp by ”panning.” Choose a shutter speed suitable for the subject’s motion and release the shutter as you follow the movement, turning the upper part of your body.
22
Loading...