


 Loading...
CanoCraft FS 3.6 


for CanoScan FS2710/CanoScan 2700F Film Scanner
Users Guide
Two Ways to Learn About CanoCraft FS 3.6
•Quick Start Jump right into scanning
•Steps 1-3 Methodical approach
How to Make Best Use of the Manuals
When you open the box
Printed Manual |
CanoScan FS2710 |
|
Getting Started
Describes operating procedure from set up and software installation to scanning and confirmation of operation. Please read before using the scanner for the first time.
After reading this guide and scanner is set up and ready for use.
Detailed information on care of the scanner and handling the
accompanying CD-ROM.
When using
Windows version.
Electronic Manual CanoCraft FS
Users Guide
Electronic Manual CanoScan FS2710
Product Guide
Detailed information on the scanner and the
CD-ROM.
Tells you how to get the best scanning results.
|
|
When using |
|
Guide |
Macintosh version. |
|
Plug-in module FS |
|
This |
Electronic Manual |
|
|
Users Guide |
|
|
|
Detailed information on how to use CanoCraft FS.
Detailed information on how to use Plug-in module FS.
After you have read this book |
|
When using the accompanying |
|
After you have read this book |
||
and mastered the use of |
|
|
and mastered the use of Plug- |
|||
|
application software. |
|
||||
CanoCraft FS |
|
|
in module FS |
|||
|
|
|
|
|
||
|
|
|
|
|
|
|
|
|
|
|
|
|
|
|
|
|
|
|
|
|
Electronic Manuals Manual for Each
Application Software
Tells you how to use Adobe Photoshop LE, Presto!
PhotoAlbum LE and Presto! Mr. Photo.
2

How to Use the Users Guide
This guide is the instruction manual for CanoCraft FS 3.6 scanning application software for use with Canon film scanners. In addition to functioning as a standalone application program on the Windows platform, CanoCraft FS also serves as a TWAIN driver in TWAIN-compliant application programs. With the exception of program starting and file saving, the basic procedures for using CanoCraft FS as a stand-alone program and TWAIN driver are virtually the same. This guide, therefore, illustrates the procedures using CanoCraft FS as a stand-alone application. To use the program as a TWAIN driver from within other applications, please supplement this guide with the Windows instruction manual and the guides accompanying your TWAIN-compliant applications.
How to Use this Guide
Quick Start
A digest of the complete CanoCraft FS operating procedures. Those who wish to jump into scanning should read this section.
Step 1 Basic Procedures
An explanation of how to install CanoCraft FS and the various program window names and functions. Be sure to read this section.
Step 2 |
Scanning |
A step-by-step explanation of the scanning process. Be sure to read this section.
Step 3 Adjusting Images
An explanation of how to adjust color balance and brightness. Read this section as required.
Other Functions
An explanation of CanoCraft FS’s preference, printer and fax settings. Read this section as required.
Editing
An explanation of CanoCraft FS’s image editing functions. Read this section as required.
CanoCraft FS Copy
An explanation of how to use CanoCraft FS Copy. Read this section as required.
Appendices
Look to this section for troubleshooting tips, instructions on how to adjust CanoCraft FS settings, a glossary and an index. Read this section as required.
3

Table of Contents |
|
CanoCraft FS Features................................................................................ |
9 |
Quick Start <Jump Right into Scanning> |
|
Quick Start <Jump Right into Scanning>................................................ |
11 |
Step 1 Basic Procedures |
|
Installing CanoCraft FS ............................................................................ |
15 |
Installing CanoCraft FS........................................................................................ |
15 |
Precautions When Connecting the Scanner to a Windows® 95 Computer .... |
16 |
Starting and Closing CanoCraft FS .......................................................... |
18 |
Starting CanoCraft FS from the Windows Desktop .......................................... |
18 |
Starting CanoCraft FS from Photoshop (TWAINCompliant Application) ...... |
19 |
Closing CanoCraft FS ........................................................................................... |
19 |
Program Window Names and Functions ................................................ |
20 |
CanoCraft FS Program Window ......................................................................... |
20 |
CanoCraft FS Copy Program Window ................................................................ |
21 |
Settings Display Area Pop-Up Menu .................................................................. |
22 |
CanoCraft FS Menu Commands .............................................................. |
23 |
Menu Bar Pull-Down Menus............................................................................... |
23 |
How to Find Out More About a Procedure You Don't Understand...... |
25 |
Step 2 Scanning |
|
Scanning Procedures ................................................................................ |
27 |
Selecting the Film Type ............................................................................ |
29 |
Selecting the Image Type ........................................................................ |
30 |
Determining the Image Format ......................................................................... |
31 |
Selecting Resolution and Magnification Settings .................................. |
32 |
About Resolution and Magnification ................................................................ |
32 |
Selecting a Scan Resolution Setting ................................................................... |
33 |
Selecting an Output Resolution Setting ............................................................ |
34 |
Procedures for Setting the Output Resolution ................................................. |
35 |
Determining the Input and Output Resolution and Output Magnification ... |
36 |
Previewing................................................................................................ |
37 |
Zooming an Image for Verification ............................................................... |
38 |
Rotating the Image to Change Its Orientation............................................. |
39 |
Rotate/Flip Dialog ........................................................................................... |
39 |
4

|
Table of Contents |
Adjusting Brightness and Coloring ......................................................... |
40 |
Selecting the Scan Area ........................................................................... |
41 |
Selecting the Scan Area ...................................................................................... |
41 |
Changing the Scan Area Selection ..................................................................... |
42 |
Unlocked State .......................................................................................... |
42 |
Locked State .............................................................................................. |
43 |
Fixing the Aspect Ratio ....................................................................................... |
45 |
Aspect Ratio Dialog ........................................................................................ |
45 |
Final Scan and Saving .............................................................................. |
46 |
Step 3 Adjusting Images |
|
To Obtain Better Images.......................................................................... |
50 |
Image Adjustment Commands ................................................................ |
52 |
Changing the Adjustment Mode ............................................................ |
54 |
Adjusting Brightness and Coloring (Easy Mode) .................................... |
55 |
Brightness Tab ..................................................................................................... |
55 |
Coloring Tab ........................................................................................................ |
56 |
Adjusting Highlights and Shadows (Easy Mode).................................... |
57 |
Adjusting a Histogram (Expert Mode) .................................................... |
58 |
How to Interpret a Histogram ....................................................................... |
59 |
How to Adjust a Histogram ........................................................................... |
59 |
Adjusting Brightness/Contrast (Expert Mode) ........................................ |
61 |
Adjusting Brightness....................................................................................... |
62 |
Adjusting Contrast .......................................................................................... |
62 |
Adjusting Gamma Values (Expert Mode) ............................................... |
63 |
Setting the Gamma Value Correctly .............................................................. |
64 |
Adjusting a Tone Curve (Expert Mode)................................................... |
65 |
How to Interpret the Tone Curve .................................................................. |
66 |
Adjusting a Tone Curve .................................................................................. |
66 |
Adjusting the Color Balance (Expert Mode) ........................................... |
67 |
Adjusting Threshold Settings (Easy/Expert Mode) ................................. |
69 |
Adjusting the Exposure Settings ............................................................. |
70 |
Adjusting the Focus ................................................................................. |
72 |
5

|
Table of Contents |
Other Functions |
|
CanoCraft FS Preference Settings ........................................................... |
74 |
Resetting Default Settings....................................................................... |
76 |
Default Categories and Settings .................................................................... |
76 |
Printing ..................................................................................................... |
77 |
Printer Setup ............................................................................................ |
78 |
Sending a Fax ........................................................................................... |
79 |
Fax Setup .................................................................................................. |
80 |
Selecting the Scanner .............................................................................. |
81 |
Scanner Self-Test ...................................................................................... |
82 |
Viewing Version Data .............................................................................. |
83 |
Editing |
|
Copying to the Clipboard ........................................................................ |
85 |
Copying an Image ........................................................................................... |
85 |
Clearing the Clipboard ................................................................................... |
85 |
Redoing an Edit........................................................................................ |
86 |
Undoing the Previous Action ......................................................................... |
86 |
Redoing an Action After the Undo Command ............................................. |
86 |
Undo All .......................................................................................................... |
86 |
Adjusting an Image.................................................................................. |
87 |
Sharpening an Image ..................................................................................... |
87 |
Blurring an Image ........................................................................................... |
88 |
Removing Noise .............................................................................................. |
89 |
Inverting an Image ......................................................................................... |
90 |
Formatting an Image ............................................................................... |
91 |
Find the Edges................................................................................................. |
91 |
Find Lines......................................................................................................... |
92 |
Pixelate ............................................................................................................ |
93 |
Posterize .......................................................................................................... |
94 |
Low Relief........................................................................................................ |
95 |
Halftone .......................................................................................................... |
96 |
Editing a Saved File .................................................................................. |
97 |
Procedures for Loading a Saved File ............................................................. |
97 |
Saving a File After Editing ............................................................................. |
98 |
Deleting a File after Editing........................................................................... |
99 |
6

|
Table of Contents |
Copying with CanoCraft FS Copy |
|
Displaying the Copy Window ................................................................ |
101 |
Procedures for Opening CanoCraft FS Copy ............................................... |
101 |
Copying .................................................................................................. |
102 |
Copying Procedures ...................................................................................... |
102 |
Adjusting CanoCraft FS Copy Settings .................................................. |
107 |
Changing the Printer Settings .......................................................................... |
107 |
Changing the Scanner Settings ........................................................................ |
108 |
Scan Resolution ............................................................................................. |
109 |
Film Type ....................................................................................................... |
109 |
Exposure ........................................................................................................ |
109 |
Focus .............................................................................................................. |
109 |
Adjust (Alt + A) ............................................................................................. |
110 |
Preferences .................................................................................................... |
110 |
Version Information ..................................................................................... |
110 |
Appendices |
|
Troubleshooting ..................................................................................... |
112 |
Problems with Software Installation ........................................................... |
112 |
Problems Starting Software Programs ........................................................ |
113 |
Problems with Scanning ............................................................................... |
114 |
Image Quality Problems ............................................................................... |
116 |
Problems Saving Images ............................................................................... |
117 |
Problems with Printing ................................................................................. |
117 |
Uninstalling CanoCraft FS...................................................................... |
118 |
Configuring CanoCraft FS...................................................................... |
120 |
CanoCraft FS Automatic Configuration ...................................................... |
120 |
CanoCraft FS Configuration ......................................................................... |
121 |
List of Film Types .................................................................................... |
124 |
Glossary .................................................................................................. |
126 |
Index ....................................................................................................... |
130 |
Customer Support Help Desk ................................................................ |
133 |
Trademarks
•Adobe® and Acrobat® are trademarks of Adobe Systems Incorporated.
•IBM, IBM PC/AT Series are trademarks of International Business Machines Corp., USA.
•Windows is a registered trademark of Microsoft Corporation in the United States and/or other countries.
•All other brand names and product names used in this manual are trademarks or registered trademarks of their respective holders.
7
Conventions Used in this Guide
The following symbols are used throughout the guide to indicate important information.
• This symbol indicates precautions or limitations you need to know. Ensure that you read all Important Notes to avoid errors.
 • This symbol indicates supplementary information. Reading these notes is recommended.
Names and Examples
CanoCraft FS 3.6 is generally referred to as CanoCraft FS in this guide. Although CanoCraft FS 3.6 is compatible with Windows® 95, Windows® 98 and Windows NT® 4.0, the screen-capture examples in this guide are taken from Windows® 95. References to Windows in this guide apply to all three versions above.
CanoCraft FS 3.6 may be used to operate CanoScan 2700F and CanoScan FS2710 film scanners. This guide presents the operating procedures using the CanoScan FS2710 as the primary example.
Button and Menu Conventions in the Text
• Buttons that appear in application windows are enclosed with a [ ] mark.
Example
Click [File] and select [Preview] or click the [Preview] button.
• Menu items are enclosed in square brackets [ ].
Example
Click the [Image Type] submenu and select [24bit Color]
• Screen messages are also enclosed in square brackets [ ].
8

CanoCraft FS Features
• Scanning Software that Can Perform Image Processing
Scanning Software that Can Perform Image Processing
CanoCraft FS is a scanning application that works with CanoScan FS2710 and CanoScan 2700F film scanners on the Windows 95/98 and Windows NT 4.0 platforms. Equipped with a broad array of image retouching functions in addition to its scanning and output features, the program also serves as a 32-bit TWAIN Driver that can be called from TWAIN-compliant applications.
• Simple User Interface
Set the parameters, preview the image, make a few adjustments if required and save the file: these four actions are simple to perform with the user-friendly program window. Perform essential functions using your choice of buttons, pulldown menus, pop-up menus or keyboard shortcuts.
• Large, Easy-to-Read Preview Window
Priority has been placed on making it easy to examine scans by maximizing the size of the preview window. Preview window sizes vary according to the monitor resolution and type of film being scanned.
• Canon ColorGear™ Color Management System
The proprietary Canon ColorGear color management system produces consistent results from input and output devices, reducing the need for time-consuming manual color correction.
• Help with How to Use the Program is Always at Hand
Need assistance with a scanning command? Click on the [?] mark in each window or dialog. Context-sensitive Help topics display on the screen. Select a topic or perform a key-word search to find your answer.
• Includes CanoCraft FS Copy Software
CanoCraft FS Copy works with your scanner and printer to instantly turn into an easy-to-use copier. The CanoCraft FS suite of programs includes CanoCraft FS Copy, which enables you to readily output the images that you scan directly to your printer.
9

Quick Start
Jump Right into Scanning
●
●
●
●
●
●
●
●
●
●
|
|
Quick Start |
<Jump Right into Scanning> |
|
|
This section briefly introduces CanoCraft FS to get you started scanning.
 • The procedures introduced in the Quick Start section are for CanoCraft FS as a stand-alone application (rather than a TWAIN driver).
•If you require more information about a procedure, consult the pages noted in the margin.
•Starting CanoCraft FS as a TWAIN driver from TWAIN-compliant applications, such as Photoshop LE, requires modification of the procedures discussed in this section.
|
|
|
|
|
|
|
|
|
|
|
|
|
|
|
|
|
|
|
|
|
|
|
|
|
|
|
|
|
|
|
|
|
|
|
|
|
|
|
|
|
|
|
|
|
|
|
|
|
|
|
|
|
|
|
|
|
p. 15 |
1. Install CanoCraft FS |
|
|
|
|
|
|
|
|
|
|
|
|
|
|
|
|
|
|
|||||||||||||||||||||||||||||||||||||||
Place the software CD-ROM from your CanoScan FS2710/2700F package into the CD-ROM drive. CD will auto-run and installation menu appears. Click [Install/Uninstall Software] from the menu and install CanoCraft FS.
• If you have an old version of CanoCraft FS, version 3.1 or 3.5, ensure that you delete (uninstall) it before you install version 3.6.
|
|
|
|
|
|
|
|
|
|
|
|
|
|
|
|
|
|
|
|
|
|
|
|
|
|
|
|
|
|
|
|
|
|
|
|
|
|
|
|
|
|
|
|
|
|
|
|
|
|
|
|
|
|
|
|
|
p. 18 |
2. Start CanoCraft FS |
|
|
|
|
|
|
|
|
|
|
|
|
|
|
|
|
|
|
|||||||||||||||||||||||||||||||||||||||
Double-click the [CanoCraft FS] icon in the [CanoCraft FS] folder or click the [Start] button on the Windows taskbar and select [Programs], [Canon CanoCraft FS] and [CanoCraft FS] in succession. The program window will display.
|
|
|
|
|
|
|
|
|
|
|
|
|
|
|
|
|
|
|
|
|
|
|
|
|
|
|
|
|
|
|
|
|
|
|
|
|
|
|
|
|
|
|
|
|
|
|
|
|
pp. 27-36 |
3. Select a Scanning Method |
|
|
|
|
|
|
|
|
|
|
|
||||||||||||||||||||||||||||||||||||||
Click the [Settings]  button, click the [Settings] menu or right-click the settings display area to select the image type and output resolution.
4. Insert the film. |
Electronic Manual |
11
Quick Start
|
|
|
|
|
|
|
|
|
|
|
|
|
|
|
|
|
|
|
|
|
|
|
|
|
|
|
|
|
|
|
|
|
|
|
|
|
|
|
|
|
|
|
|
|
|
|
|
|
|
|
|
|
|
|
|
|
|
|
p. 37 |
5. Preview Scan |
|
|
|
|
|
|
|
|
|
|
|
|
|
|
|
|
|
|
|
|
|||||||||||||||||||||||||||||||||||||||
|
|
Click the [Preview] |
|
|
|
|
|
|
|
|
button or click the [File] menu and select |
||||||||||||||||||||||||||||||||||||||||||||||||
|
|
[Preview]. |
|
|
|
|
|
|
|
|
|
|
|
|
|
|
|
|
|
|
|
|
|
|
|
|
|
|
|
|
|
|
|
|
|
|
|
|
|
|
|
|
|
||||||||||||||||
|
|
|
|
|
|
|
|
|
|
|
|
|
|
|
|
|
|
|
|
|
|
|
|
|
|
|
|
|
|
|
|
|
|
|
|
|
|
|
|
A progress bar will display and |
|||||||||||||||||||
|
|
|
|
|
|
|
|
|
|
|
|
|
|
|
|
|
|
|
|
|
|
|
|
|
|
|
|
|
|
|
|
|
|
|
|
|
|
|
|
the preview scan will begin. |
|||||||||||||||||||
|
|
|
|
|
|
|
|
|
|
|
|
|
|
|
|
|
|
|
|
|
|
|
|
|
|
|
|
|
|
|
|
|
|
|
|
|
|
|
|
Once the scan is complete, the |
|||||||||||||||||||
|
|
|
|
|
|
|
|
|
|
|
|
|
|
|
|
|
|
|
|
|
|
|
|
|
|
|
|
|
|
|
|
|
|
|
|
|
|
|
|
preview image will display in |
|||||||||||||||||||
|
|
|
|
|
|
|
|
|
|
|
|
|
|
|
|
|
|
|
|
|
|
|
|
|
|
|
|
|
|
|
|
|
|
|
|
|
|
|
|
the preview window. |
|||||||||||||||||||
|
|
|
|
|
|
|
|
|
|
|
|
|
|
|
|
|
|
|
|
|
|
|
|
|
|
|
|
|
|
|
|
|
|
|
|
|
|
|
|
Progress Bar |
|||||||||||||||||||
|
|
|
|
|
|
|
|
|
|
|
|
|
|
|
|
|
|
|
|
|
|
|
|
|
|
|
|
|
|
|
|
|
|
|
|
|
|
|
|
||||||||||||||||||||
|
|
|
|
|
|
|
|
|
|
|
|
|
|
|
|
|
|
|
|
|
|
|
|
|
|
|
|
|
|
|
|
|
|
|
|
|
|
|
|
The scan’s progress is indicated by the |
|||||||||||||||||||
|
|
|
|
|
|
|
|
|
|
|
|
|
|
|
|
|
|
|
|
|
|
|
|
|
|
|
|
|
|
|
|
|
|
|
|
|
|
|
|
length of the bar and a percentage |
|||||||||||||||||||
|
|
|
|
|
|
|
|
|
|
|
|
|
|
|
|
|
|
|
|
|
|
|
|
|
|
|
|
|
|
|
|
|
|
|
|
|
|
|
|
figure. To stop the preview scan, click |
|||||||||||||||||||
|
|
|
|
|
|
|
|
|
|
|
|
|
|
|
|
|
|
|
|
|
|
|
|
|
|
|
|
|
|
|
|
|
|
|
|
|
|
|
|
the [Cancel] button. |
|||||||||||||||||||
|
|
|
|
|
|
|
|
|
|
|
|
|
|
|
|
|
|
|
|
|
|
|
|
|
|
|
|
|
|
|
|
|
|
|
|
|
|
|
|
|
|
|
|
|
|
|
|
|
pp. 50-72 |
6. Adjust the Brightness and Coloring |
|
|
|
|
|
|
|||||||||||||||||||||||||||||||||||||||||||
Click the [Adjust]  button or click the [Image] menu and select [Adjust]. Adjust the shadows and highlights or coloring of the image (easy mode). In expert mode, the image’s brightness and coloring can be revised by adjusting gamma values, tone curve or the histogram.
Easy Mode |
Expert Mode |
12
Quick Start
|
|
|
|
|
|
|
|
|
|
|
|
|
|
|
|
|
|
|
|
|
|
|
|
|
|
|
|
|
|
|
|
|
|
|
|
|
|
|
|
|
|
|
|
|
|
|
|
|
|
|
|
|
|
|
|
|
p. 41 |
7. Specify the Scan Area |
|
|
|
|
|
|
|
|
|
|
|
|
|
|
|
|
|
||||||||||||||||||||||||||||||||||||||||
Click and drag the mouse cursor over the area of the preview scan that you wish to include in the final image.
|
|
|
|
|
|
|
|
|
|
|
|
|
|
|
|
|
|
|
|
|
|
|
|
|
|
|
|
|
|
|
|
|
|
|
|
|
|
|
|
|
|
|
|
|
|
|
|
|
|
|
|
|
|
|
|
|
p. 46 |
8. Scan and Save |
|
|
|
|
|
|
|
|
|
|
|
|
|
|
|
|
|
|
|
|
|||||||||||||||||||||||||||||||||||||
Click the [Save]  button or click the [File] menu and select [Save] to open the Save dialog. Specify the destination and name for the scanned image.
The selected scan area will be scanned with the specified brightness and coloring adjustments and saved to a file. During the scan, a bar indicates the progress of the procedure.
|
|
|
|
|
|
|
|
|
|
|
|
|
|
|
|
|
|
|
|
|
|
|
|
|
|
|
|
|
|
|
|
|
|
|
|
|
|
|
|
|
|
|
|
|
|
|
|
|
|
|
|
|
|
|
|
|
p. 77 |
9. Print |
|
|
|
|
|
|
|
|
|
|
|
|
|
|
|
|
|
|
|
|
|
|
|
|
|
||||||||||||||||||||||||||||||||
Click the [File] menu and select [Print] to output the scan results to a printer.
13

Step 1
Basic Procedures
●
●
●
●
●
●
●
●
●
●

Step 1 • Basic Procedures
Installing CanoCraft FS
Installing CanoCraft FS
After you have finished attaching the CanoScan FS2710 or 2700F film scanner to your computer, install the CanoCraft FS program with the following procedures.
Turn the scanner and computer power on in that order.
 Place the software CD-ROM that accompanied the scanner into the computer drive.
Click the [Install/Uninstall Software] option in the CD-ROM menu and select [Canon CanoCraft FS] and [CanoCraft FS] in succession.
Follow the on-screen instructions to complete the remaining steps.
Minimum computer system requirements for installing CanoCraft FS:
CPU: |
Windows® 95 |
486 or higher |
|
Windows® 98 |
MMX Pentium or higher |
|
Windows® NT |
Pentium or Higher |
Hard Disk: |
50 MB or more |
|
Main Memory (RAM): |
Windows® 95 |
16 MB or more |
|
|
(32 MB or more recommended) |
|
Windows® 98 |
32 MB or more |
|
Windows® NT |
(64 MB or more recommended) |
|
24 MB or more |
|
|
|
(40 MB or more recommended) |
Display: |
256 colors or more |
(65,000 or more recommended) |
Other: |
CD-ROM drive |
|
• If you are using an old version of CanoCraft FS, version 3.1 or 3.5, ensure that you delete (uninstall) it before you install version 3.6. (p. 118)
•Confirm that the scanner is correctly attached to the computer and always turn on the scanner and computer in that order before starting Windows.
•At least 50 megabytes of free space are required on the disk to which the program is being installed (5 megabytes for the application program and 45 megabytes for image files).
•CanoCraft FS 3.6 is for exclusive use with CanoScan FS2710/2700F film scanners. This program is not compatible with other Canon flatbed or sheet-fed scanners.
15
Step 1 • Basic Procedures
Precautions When Connecting the Scanner to a Windows® 95 Computer
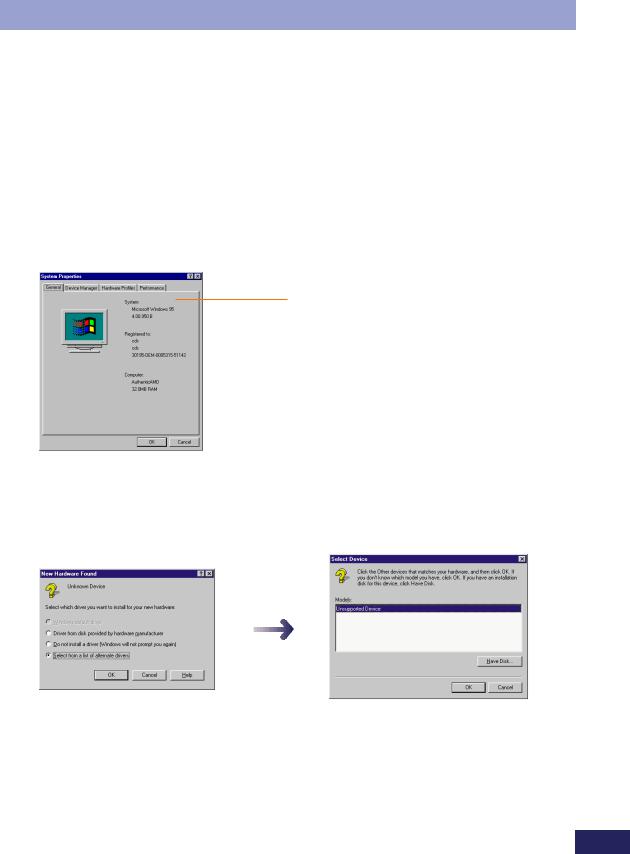
A driver installation dialog will display the first time you attach your scanner to a computer, turn on its power and start Windows. The contents of the dialog will vary according to your version of Windows® 95. You can check the Windows® 95 version in the System Properties dialog. Open the control panel, double-click the [System] icon and select the [General] tab.
This area will show the version number. Versions 4.00.950 and 4.00.950 A are old versions. Version 4.00.950B is the new version.
General Tab, System Properties Dialog
If yours is an old version of Windows® 95, select [Choose from the list] and click the [OK] button. In the next window that displays, select [Unsupported device] and click the [OK] button.
16

Step 1 • Basic Procedures
If your is the new version of Windows® 95, click the [Next] button without inserting anything into the drive. In the next window that displays, click the [Finish] button.
After you start Windows® 95, the scanner will display under the [Other Device] category. This is not a problem because CanoCraft FS is equipped with its own specialized driver for Canon film scanners.
• If the following message displays during installation, there is insufficient free space on the hard disk to install CanoCraft FS.
•Delete files off the disk to free sufficient space or change the drive setting to one with sufficient free space. (see previous page)
17
Step 1 • Basic Procedures
Starting and Closing CanoCraft FS
CanoCraft FS can be started from the Windows desktop or from within a TWAINcompliant applications as Photoshop LE.
Starting CanoCraft FS from the Windows Desktop
Plug in the scanner, turn on your computer and start Windows.
• Ensure that you turn the scanner power on before starting Windows. The scanner cannot be operated with CanoCraft FS if the scanner power is off when Windows is started.
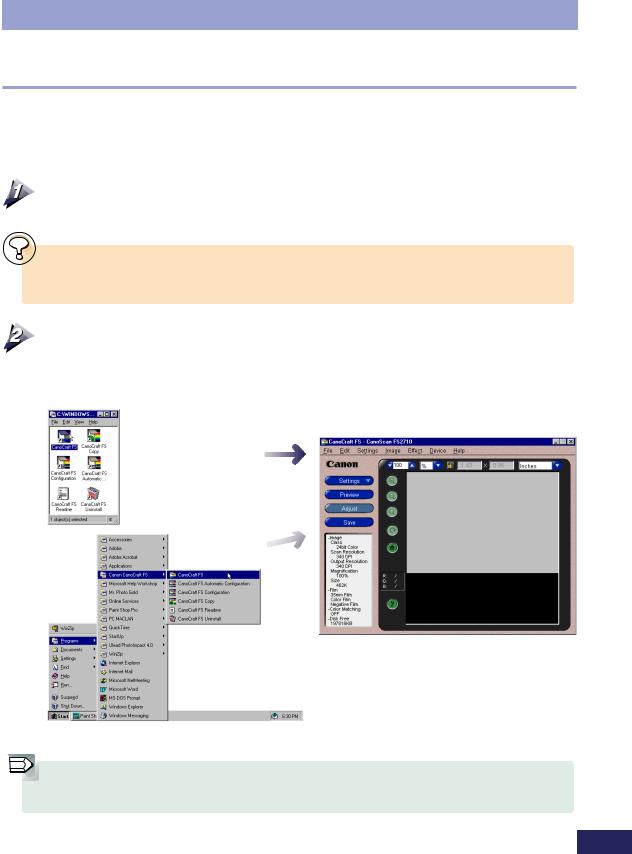
Double-click the [CanoCraft FS] icon in the [CanoCraft FS] folder or click the [Start] button on the Windows taskbar and select [Programs], [Canon CanoCraft FS] and [CanoCraft FS] in succession.
Double-click the CanoCraft FS icon in the CanoCraft FS folder
Click the Windows
[Start] button and CanoCraft FS Program Window select [Programs],
[Canon CanoCraft FS] and [CanoCraft FS]
 • The size of the program window will vary with the resolution of your monitor. The program window cannot be resized.
18

Step 1 • Basic Procedures
Starting CanoCraft FS from Photoshop (TWAINCompliant Application)
Turn on the computer and start Photoshop (TWAIN-compliant application). Select [File], [Import], [Select TWAIN Source] and [CanoScan FS2710]. Start CanoCraft FS by clicking [File], [Import] and [TWAIN...].
Adobe Photoshop 4.0 Example
CanoCraft FS Program Window
• Select TWAIN 32 if TWAIN 16 also displays in the menu. (TWAIN 16 is intended for use with Windows 3.1 and is incompatible with CanoCraft FS.)
•Please refer to the instruction manual accompanying each program for the detailed procedures for summoning CanoCraft FS from TWAIN-compliant applications.
Closing CanoCraft FS
To exit CanoCraft FS, click the close box in the window’s upper right or click the [File] menu and select [Exit].
You can exit by right-clicking the title bar and selecting [Exit] from the pull-down menu.
19
Step 1 • Basic Procedures
Program Window Names and Functions
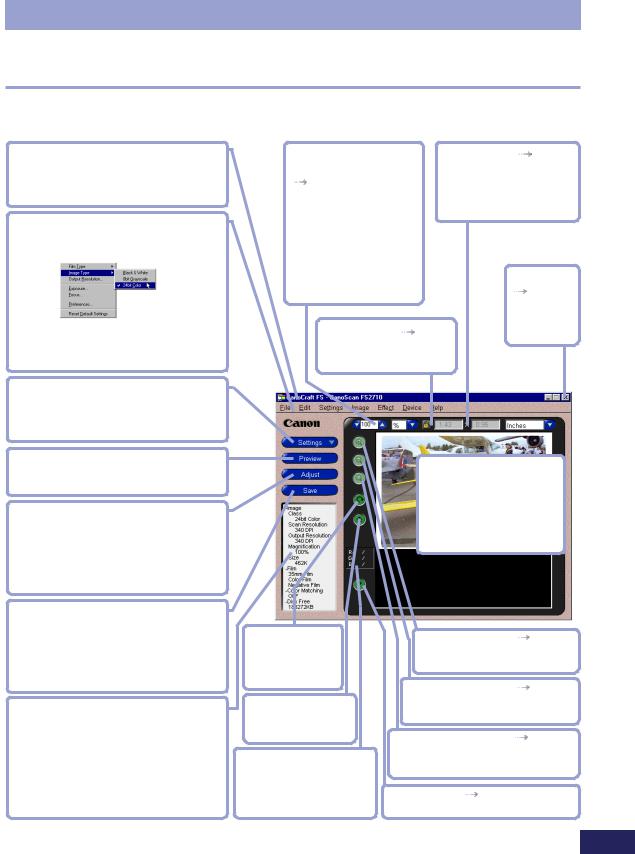
CanoCraft FS Program Window
Title Bar
Displays the window name. Click and drag this bar to move the window on the Windows desktop.
Menu Bar 
 p. 23
p. 23
All CanoCraft FS commands can be accessed from these pull-down menus.
Submenu
Pull-Down Menu
Options with an arrow contain further submenus.
Settings Button 
 pp. 29-36
Displays a pull-down menu of scan settings, such as image type and output resolution.
Preview Button 
 p. 37
p. 37
Performs the preview scan and displays the results in the preview window.
Adjust Button 
 pp. 55-69
Displays color correction dialogs, such as the coloring and brightness adjustments in easy mode, and the histogram and tone curve dialogs in expert mode.
Save Button 
 p. 46
p. 46
Scans the film and saves the image as a file in the specified location. This button is labeled [Scan] when CanoCraft FS is used within a TWAIN-compliant application.
Settings Display Area 
 p. 22
p. 22
Shows and sets various settings, such as the image type, scan resolution, output resolution, output magnification, the film type and ColorGear settings. Also displays the image file size and the remaining free space on the specified save disk.
Output Magnifica- |
Output Size p. 43 |
|
tion/Scan Resolution |
Displays the width and |
|
pp. 32-36 |
height of the output |
|
Sets and displays the |
image in inches, |
|
output magnification |
millimeters or pixels. |
|
and scan resolution. |
|
|
[%] selects and |
|
|
displays the output |
|
|
magnification and |
|
Close Box |
[DPI] the scan resolu- |
|
|
tion. |
|
p. 19 |
|
|
Closes |
Lock Button |
p. 42 |
CanoCraft |
FS. |
||
Locks the output size |
|
|
and file size. |
|
|
Preview Window
Displays the preview image. Use it to specify the scan area and view the results of image processing.
Rotate/Flip |
Zoom In Button |
p. 38 |
|
Button |
Expands the selected area |
||
Rotate or flip an |
|||
to fill the preview window. |
|||
image. |
|||
Zoom Out Button |
p. 38 |
||
|
|||
Eject Button |
Contracts the selected area |
||
Returns the film to |
to the size prior to zooming. |
||
the eject position. |
Zoom Reset Button |
p. 38 |
|
|
|||
RGB Values |
Returns a zoomed image to the |
||
original preview size. |
|
||
Displays the preand post- |
|
||
|
|
||
adjustment RGB values of |
Help Button p. 25 |
|
|
the area immediately |
|
||
Displays Help topics for CanoCraft FS. |
|||
beneath the mouse cursor. |
|||
20
Step 1 • Basic Procedures
CanoCraft FS Copy Program Window
Image Type Button |
p. 104 |
Title Bar |
|
Film Type Selection |
|||||
Select a copying method: color and |
Displays the window name. |
Button |
|
|
|||||
grayscale. Color button is available only |
Click and drag this bar to |
Select either 35 mm or |
|||||||
with the printer setting set to a color |
move the window on the |
IX240 film to match the |
|||||||
printer. |
|
|
Windows desktop. |
|
film in use. |
|
|
||
Brightness Slide Bar |
|
|
|
|
|
Close Box |
p. 106 |
||
p. 105 |
|
|
|
|
|
|
Closes CanoCraft FS |
||
Adjusts the copy |
|
|
|
|
|
Copy. |
|
|
|
density. The value |
|
|
|
|
|
|
|
|
|
displays to its right |
|
|
|
|
|
Negative/Positive Film |
|||
and will accept direct |
|
|
|
|
|
||||
|
|
|
|
|
Selection Button |
||||
input. |
|
|
|
|
|
|
|||
|
|
|
|
|
|
Select either negative or |
|||
|
|
|
|
|
|
|
|||
Printer Setup |
|
|
|
|
|
positive to match the |
|||
|
|
|
|
|
film in use. |
|
|
||
Button |
p. 107 |
|
|
|
|
|
|
|
|
|
|
|
|
|
|
|
|
||
Displays the printer |
|
|
|
|
|
10-Key Numeric |
|||
setup dialog. |
|
|
|
|
|
||||
|
|
|
|
|
|||||
|
|
|
|
|
Keypad |
p. 105 |
|||
|
|
|
|
|
|
|
|||
Scanner Setup |
|
|
|
|
|
Sets the number of |
|||
|
|
|
|
|
copies. |
|
|
||
Button |
p. 108 |
|
|
|
|
|
|
|
|
|
|
|
|
|
|
|
|
||
Sets the scan resolu- |
|
|
|
|
|
Stop Button |
p. 105 |
||
tion, file type, color |
|
|
|
|
|
||||
|
|
|
|
|
Halts copying. |
|
|||
balance, focus and |
|
|
|
|
|
|
|||
|
|
|
|
|
|
|
|
||
ColorGear settings. |
|
|
|
|
|
Help Button |
|
||
|
|
|
|
|
|
|
|
||
Printer Selection |
|
|
|
|
|
Displays Help topics for |
|||
|
|
|
|
|
CanoCraft FS Copy. |
||||
Button |
p. 107 |
|
|
|
|
|
|||
|
|
|
|
|
|
|
|
||
Specifies the name of |
|
|
|
|
|
Start Button |
p. 105 |
||
the currently con- |
|
|
|
|
|
||||
|
|
|
|
|
Starts copying. |
|
|||
nected printer. |
|
|
|
|
|
|
|||
|
|
|
|
|
|
|
|
||
Scanner Selection |
Paper Size Selection |
Reset Button |
Copy Number Display |
p. 105 |
|||||
Button |
|
Button |
|
Resets the |
Displays the number of copies |
||||
Select the scanner |
Select the size of paper to |
number of |
currently specified. Numbers can |
||||||
model in use. |
be output on the printer. |
copies to one. |
be input directly. |
|
|
||||
• Ensure that the scanner and printer power is turned on before starting Windows and CanoCraft FS Copy.
•CanoCraft FS Copy and CanoCraft FS cannot be run simultaneously.
•Color options in the image type panel are only available when a color printer is specified in the printer selection field.
21
Step 1 • Basic Procedures
Settings Display Area Pop-Up Menu
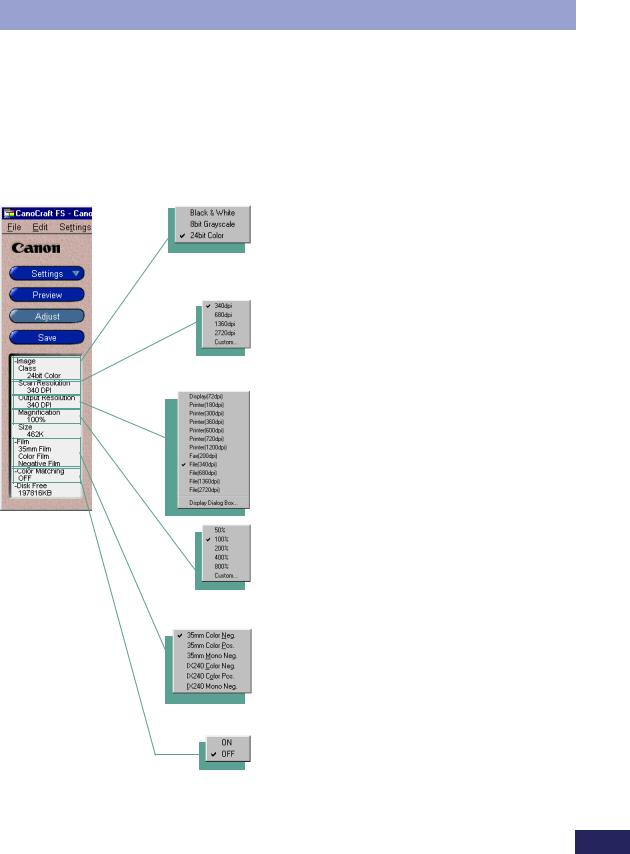
Right-clicking on the settings display area summons a pop-up menu, which can be used to change the adjustable settings.
Image Type

 p. 30
p. 30
The scanning mode can be set to black and white, 8-bit grayscale or 24-bit colour. If CanoCraft FS is started as a TWAIN driver from a TWAIN-compliant application, it can also be set to 12-bit grayscale or 36-bit colour. (This setting can also be adjusted with the Settings button.)
Scan Resolution 

 p. 33
p. 33
The scan resolution can be set to either 340, 680, 1360, or 2720 dpi. Adjusting the magnification setting allows custom resolution settings. (This setting can also be adjusted in the display box at the top of the preview window.)
Output Resolution 

 p. 34
p. 34
The output resolution settings can be selected from a list. Selecting [Display Dialog] enables items to be edited, added or deleted. (Items can also be edited, added or deleted via the [Settings] button or by clicking the [Settings] menu and selecting [Output Resolution].
Magnification 

 p. 35
p. 35
The output magnification can be set to either 50%, 100%, 200%, 400% or 800%. Adjusting the output magnification value in the display box at the top of the program window also allows custom magnification values. (It can also be adjusted with the output resolution setting at the top of the preview window.)
Film Type 

 p. 29
p. 29
You can select between 35 mm color negatives/color positives/monochrome negatives or IX240 color negatives/ color positives/monochrome negatives. Set this with the [Settings] button or the [Film Type] option on the Settings pull-down menu.
Color Matching 

 p. 75
p. 75
The ColorGear color management system can be turned on or off. A check mark indicates it is on, no check mark indicates off. Click to toggle between modes. (This setting can also be set with the Preferences dialog.
22
Step 1 • Basic Procedures
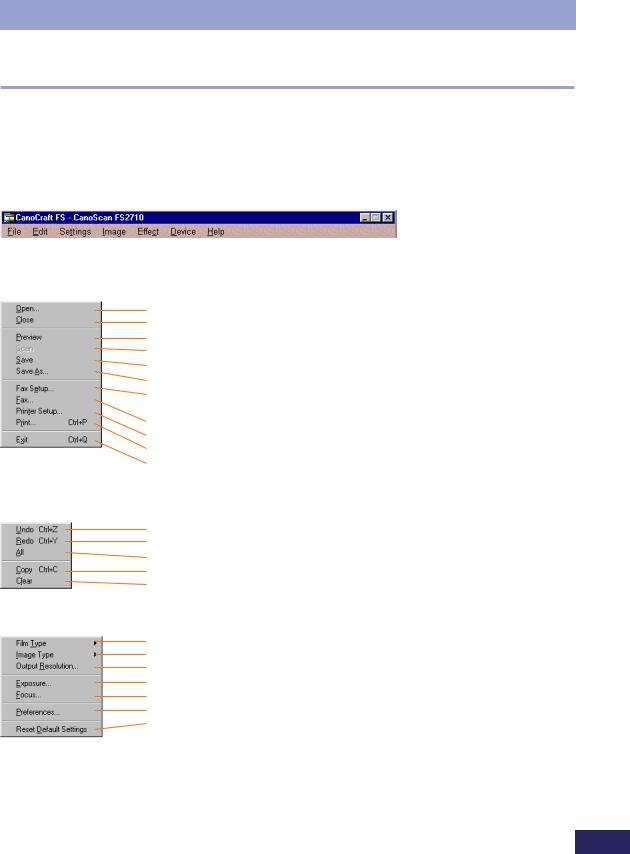
CanoCraft FS Menu Commands
Menu Bar Pull-Down Menus
All CanoCraft FS commands can be accessed from the pull-down menus on the menu bar.
Menu Bar
File (F)
Opens an existing file for display in the preview window Closes the image in the preview window
Performs a preview scan Performs a scan
Saves the scanned image
Saves the file under a different name
Sets facsimile transmission settings, such as document size, number of copies and resolution
Sends the scanned image as a fax
Sets printer settings, such as document size, coloring and printing method Prints the scanned image (shortcut key: Ctrl+P)
Closes CanoCraft FS (shortcut key: Ctrl+Q)
Edit (E)
Reverses the last action (shortcut key: Ctrl+Z)
Restores a reversed action (shortcut key: Ctrl+Y)
Reverses all actions
Copies the selection to the clipboard (shortcut key: Ctrl+C)
Deletes the clipboard contents
Settings (S)
Sets the film type
Sets the scanning mode
Sets, adds and deletes output resolution settings (shortcut key: Ctrl+R) Changes the scan speed and adjusts the exposure setting
Sets the autofocus/manual focus setting
Sets the preferences for automated functions when scanning or exiting Resets settings to the factory defaults
(The same menu can be displayed by clicking the [Settings] button.)
23

Step 1 • Basic Procedures
Image (I)
Selects the easy mode for adjusting color
Select the expert mode for adjusting color
Displays the color balance dialog (shortcut key: Alt+A
Rotates the scanned image
Fixes the aspect ratio (ratio of height to width) when selecting the scan area
Effect (E)
Sharpens the image
Softens the image
Deletes noise from the image
Inverts the colors of the image
Finds the edges of the image
Finds the vertical and horizontal lines of the image
Pixelates the image
Posterizes the image
Embosses the image
Converts the image to halftones
Device
Sets the scanner model (in a multiple scanner configuration)
Performs a self-test of the scanner
Checks the scanner version and SCSI ID
Help (H)
Displays an alphabetical list of Help topics (shortcut key: F1)
Displays the key-word search tab
Displays CanoCraft FS version information
24

Step 1 • Basic Procedures
How to Find Out More About a Procedure You Don't Understand
CanoCraft FS is equipped with a context-sensitive Help function that teaches procedures on-screen. If you do not understand a procedure while running CanoCraft FS, click the Help button  . Instructions will display in the Help window. You can also click on the Help menu to display topics or index tabs, which explain procedures and terminology and how to use the Help function.
Help Pull-Down Menu
Help Button
Help Button
Help Pull-Down Menu
Help Window |
|
|
|
|
Contents and Index Tabs |
|
|
|
|
||
|
|
|
|
||
|
|
|
|
||
|
|
|
|
25

Step 2
Scanning
●
●
●
●
●
●
●
●
●
●

Step 2 • Scanning
Scanning Procedures
Although scanning procedures vary according to the image type (color, grayscale or black and white), the basic procedures are the same. Read the following procedures as a guideline for scanning.
Set the film type. 
 p. 29
p. 29
Select a film type that matches the film in use from among the following options: 35 mm color negatives/color positives/monochrome negatives or IX240 color negatives/color positives/monochrome negatives.
Set the image type. 
 p. 30
p. 30
For colour images, select [24-bit colour]. For grayscale images, select [8-bit grayscale]. For black and white images, select [Black and White]. If CanoCraft FS has been started as a TWAIN driver from within a TWAINcompliant application program, you can also [36-bit colour] for colour images and [12-bit grayscale] for grayscale images.
Determine the image size and resolution. 
 pp. 32-36
Set the scan resolution, output resolution and magnification to suit your requirements for the printing size and monitor size of the image.
Insert the film.
(Refer to the Quick Start Guide or electronic manual.)
Initiate the preview scan. 
 p. 37
p. 37
Start off by previewing the image before initiating the final scan.
Adjust the color balance, halftone pattern or threshold values. 
 p. 40
p. 40
If the preview image did not reproduce as well as expected, adjust the coloring and brightness of a color image, or the shadows and highlights of a grayscale image, or the threshold of a black and white image.
Select the area of the image to be included in the final scan. 
 p. 41
p. 41
If you wish to crop the image, select the scan area by dragging the mouse cursor.
Save (scan) the image. 
 p. 46
p. 46
When CanoCraft FS is started from within Photoshop, the scanned image cannot be saved. To save, close CanoCraft FS and save the file using the save function in Photoshop.
27

Step 2 • Scanning
•24-bit color and 36-bit color images are expressed in varying values of each color: red, green and blue (RGB). 24-bit color images are expressed in 256 colors per RGB channel. 36-bit color images use 4096 colors. Use the 24-bit color setting for most images unless you require particularly fine color definition.
•Grayscale images are expressed in black, white or varying tones of gray. 8- bit grayscale images are expressed in 256 tones. 12-bit grayscale images use 4096 tones.
•Black and white images are expressed in just two colors, white or black. The threshold value determines the brightness value at which a particular pixel is set to black or white.
28
Step 2 • Scanning
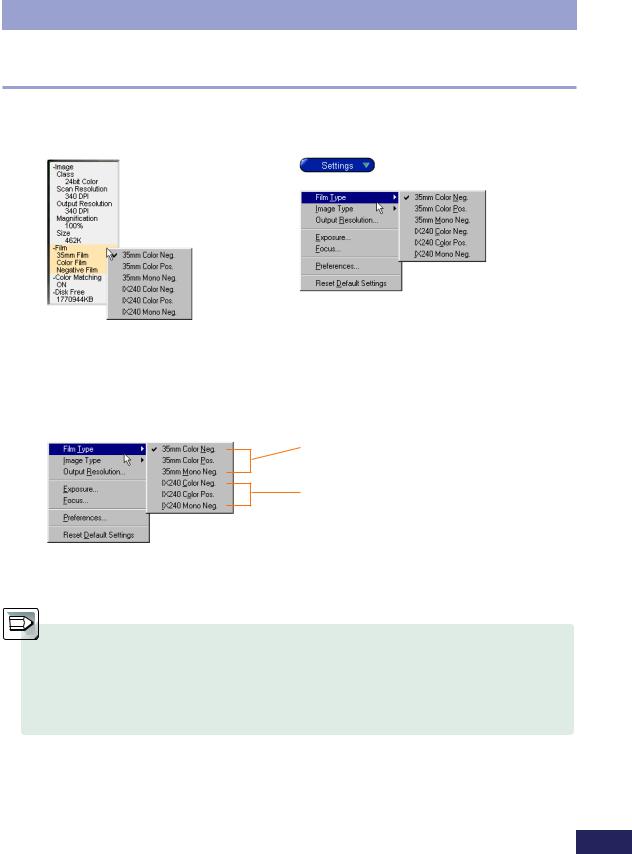
Selecting the Film Type
It is important to select the correct film type in the film type settings menu to obtain the correct color balance in the scanned image.
Right-click the settings display area.
Click the [Settings] button or [Settings] menu and [Film Type] submenu.
Position the mouse cursor over an option and click to select it. The menu will close and the new selection will appear in the settings display area.
Select from these options for 35 mm film. For mounted slides, select the 35 mm color positive setting.
Select from these options for IX240 film.
A check mark will appear beside the current selection in this menu.
•If you are scanning several films of the same type consecutively, this setting need only be set the first time.
•If the setting is saved, it can be used thereafter until it is changed.
•The current setting is displayed in the settings display area on the control panel.
29
Step 2 • Scanning
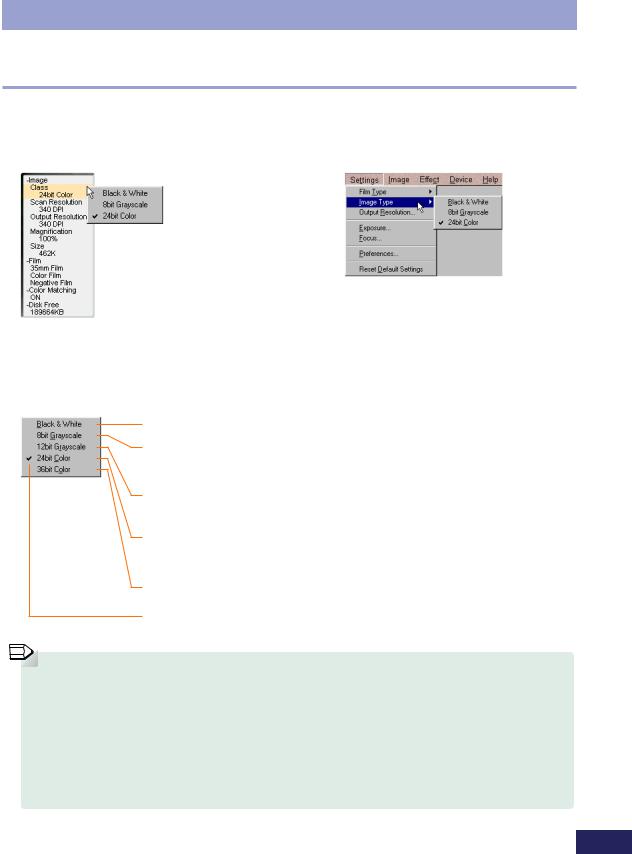
Selecting the Image Type
The image type setting is used to select between 24bit color, grayscale or black and white. Select an image type from the settings menu most suited to the type of film and the way in which it will be used.
Right-click the settings
display area Click the [Settings] button or click the [Settings] menu and select [Image Type].
Position the mouse cursor over an option and click to select it. The menu will close and the new selection will appear in the settings display area.
Scans at 8-bits per RGB channel. Use this setting for standard color images.
Scans at 12-bits per RGB channel when CanoCraft FS is started as a TWAIN driver from a TWAIN-compliant application. Use this setting for high-resolution color images.
Scans with 8-bit grayscale reproduction. Use this setting for standard grayscale images.
Scans with 12-bit grayscale reproduction when CanoCraft FS is started as a TWAIN driver from a TWAIN-compliant application. Use this setting when high-resolution grayscale images are required.
Scans with black and white, two-color reproduction.
A check mark will appear beside the selected setting.
 • The color image type setting cannot be selected when the film type is set to monochrome film.
•At 2720 dpi, 35 mm color film scanned at the 36-bit color setting yields a file approximately 58 megabytes. At the 24-bit color setting, it is approximately 29 megabytes; at the 12-bit grayscale setting, 19.6 megabytes; at the 8-bit grayscale setting, 9.8 megabytes; and at the black and white setting, 1.2 megabytes.
•The 12-bit grayscale and 36-bit color settings are not available with the CanoScan 2700F model.
30
Loading...