


BJC-250
USER
MANUAL
Canon

BJC-250
Contents
1 Introduction |
1.1 |
|||||||
|
|
|
|
|
|
|
|
|
|
|
Supplies and Accessories |
1.2 |
|||||
|
|
|
BJ Cartridges |
|
1.2 |
|||
|
|
|
Canon Specialty Papers |
1.4 |
||||
|
|
Getting Help From Canon |
1.5 |
|||||
|
|
|
Servicing the Printer |
1.6 |
||||
2 Using the Printer With Windows® |
2.1 |
|||||||
|
|
Installing the Printer Driver |
|
2.1 |
||||
|
|
Printing a Document |
2.2 |
|||||
|
|
Printer Setup Within Windows 95 |
2.3 |
|||||
|
|
|
Opening the Printer Properties Dialog Box in Windows 95 |
2.3 |
||||
|
|
|
Using the Printer Driver in Windows 95 |
2.3 |
||||
|
|
Printer Setup Within Windows 3.1 |
2.4 |
|||||
|
|
|
Accessing The Printer Options |
2.4 |
||||
|
|
The Windows Tabs |
2.5 |
|||||
|
|
|
Specifying Your Printer Options |
2.8 |
||||
|
|
|
Recommended Graphics Settings |
2.8 |
||||
|
|
|
Using the Setup Analyzer |
2.9 |
||||
|
|
|
Using Cartridge Detection |
2.10 |
||||
|
|
Printing Speed Verses Color |
2.11 |
|||||
|
|
|
For Quick Color Printing |
2.11 |
||||
|
|
|
For High Quality Color Printing |
2.11 |
||||
|
|
|
For Monochrome Printing |
2.11 |
||||
|
|
|
Other Ways to Improve Print Speed in Windows |
2.12 |
||||
3 Paper Handling |
3.1 |
|||||||
|
|
Selecting Paper Types |
3.2 |
|||||
|
|
|
Paper Guidelines |
3.4 |
||||
|
|
Setting the Paper Thickness Lever |
3.5 |
|||||
|
|
Printer Settings for Various Print Media |
3.6 |
|||||
|
|
Loading Paper |
3.7 |
|||||
|
|
|
Automatically Feeding Paper |
3.7 |
||||
|
|
|
|
|
|
|||
|
|
|
Manually Feeding Paper |
3.12 |
||||
|
|
Printing Envelopes |
3.14 |
|||||
|
|
Using Canon's Specialty Papers |
3.17 |
|||||
|
|
|
Specialty Paper Guidlines |
3.17 |
||||
|
|
|
High Resolution Paper HR-101 |
3.19 |
||||
Fabric Sheets FS-101 |
3.21 |
|
Printing on Banner Paper |
3.23 |
|
4 Maintaining the Printer |
4.1 |
|
Printer Guidelines |
4.2 |
|
Cleaning the Printer |
4.3 |
|
Printing the Test Pages |
4.4 |
|
Printing the Test Page from Windows |
4.5 |
|
Printing the Test Pages Using the Operator Panel |
4.6 |
|
Cleaning the Print Head |
4.6 |
|
Cleaning the Print Head from Windows |
4.6 |
|
Cleaning the Print Head Using the Operators Panel |
4.7 |
|
BJ Cartridge Guidelines |
4.8 |
|
BJ Cartridge Maintenance |
4.9 |
|
Replacing the BJ Cartridge |
4.10 |
|
Storing a BJ Cartridge |
4.15 |
|
Transporting the Printer |
4.17 |
|
5 Troubleshooting |
5.1 |
|
Identifying Your Printer Problem |
5.1 |
|
General Problems |
5.2 |
|
Clearing Paper Jams |
5.3 |
|
Technical Notes |
5.4 |
|
Appendix A |
Specifications |
A-1 |
Glossary |
|
G-1 |
Index |
|
I-1 |
FCC Regulations |
FCC-1 |
|
Introduction
Congratulations on your purchase of the Canon BJC-250 Series Color Bubble Jet™ Printer. We appreciate your choosing this printer to meet your printing needs.
The BJC-250 Series printers offer excellent print quality and fast print speed using both color and black inks. We are certain you will be satisfied with this advanced Bubble Jet technology.
This Chapter:
Lists the supplies and accessories you can purchase for the printer
Describes Canon's customer support services
1 of 1 |
4/9/98 2:55 PM |

Supplies and Accessories
Your BJC-250 Series printer supports excellent and unique print media options that will allow you to produce dazzling, professional, and fun presentations. All of these print media are specially designed and manufactured to work with your Canon color printer so you can produce the finest output possible.
Canon has an extensive dealer network equipped to offer you supplies as you need them. to find a dealer near you, call the Canon Referral Service at 1-800-848-4123.
If supplies are not available from your local dealer, you can order directly from Canon by calling 1-800-671-1090
BJ Cartridges
You can use the following Canon BJ cartridges with the BJC-250 Series printers:
oBC-05 Color BJ Cartridge
oBC-02 Black BJ Cartridge
oBC-06 Photo BJ Cartridge
oBC-09F Neon BJ Cartridge
Note that all these BJ cartridges contain both the Bubble Jet print head unit and ink.
Canon has more engineers dedicated to creating quality ink for providing the best results for output on Bubble Jet printers than any other organization. Canon does not prohibit the use of third-party inks and the use of thirdparty inks does not invalidate the product's limited warranty. However, Canon cannot guarantee the quality or performance of your printer when you are using inks from other suppliers.
Canon's limited warranty does not cover damage caused to Canon's Bubble Jet products that is attributable to the use of third party parts or supplies, including inks. The limited warranty remains in effect for its life once that

particular damage has been properly repaired.
For optimum printing results, Canon recommend that you use only Canon BJ cartridges
You can also purchase the optional Canon Photo Kit BC-06, which includes everything you need to produce photo-realistic images:
oBC-06 Photo BJ Cartridge
oSB-05 Ink Cartridge Storage Box
oCanon High Resolution Paper HR-101 (60 sheets)
See Chapter 4, Maintaining the Printer, for details on the BJ cartridges.
Canon Specialty Papers
Canon manufactures numerous specialty papers, including:
oGlossy Photo Paper GP-201
oBanner Paper
oHigh Resolution Paper HR-101
oT-Shirt Transfers TR-101
oGreeting Cards GC-101
oBubble Jet Paper LC-301 (water resistant)
oFabric Sheets FS-101
oCF-102 Transparencies
oBack Print Film BF-102
oHigh Gloss Film HG-101
See Chapter 3, Paper Handling, for details on Canon's Specialty Papers.

Getting Help From Canon
Canon Computer Systems, Inc. offers a full range of customer technical support options including*:
o24-hour, 7-day-a-week, toll free automated support for troubleshooting issues on most current products (1-800-423-2366)
oSpeak to a technician free of service charge (currently Monday through Friday, 8:00 a.m. to 10:00 p.m. EST and Saturday, 12:00 p.m. to 6:00 p.m. EST, excluding holidays)for products still under warranty** (1-757-413-2848)
oSpeak to a technician (currently $24.99) during holidays and days/hours not listed above regarding urgent product questions or for products no longer under warranty (1-800-423-2366)
oE-mail support via the Canon Computer Systems, Inc. Web site (www.ccsi.canon.com)
o24-hour, toll-free Fax Retrieval System (1-800-526-4345)
o24-hour Bulletin Board Service (1-757-420-2000)
*Support program specifies subject to change without notice. **Refer to individual product information for warranty details.
Canon Canada
Customer support for Canadian residents is available 24 hours a day (seven days a week) at 1-800-263-1121
In other countries contact your Canon Dealer.

Servicing the Printer
The Canon BJC-250 Series Color Bubble Jet Printers are designed with the latest technology to provide trouble-free operation. The warranty card that comes with the printer describes Canon's one year limited warranty for your Bubble Jet printer. Be sure to read the warranty information to find out about the different service options available to you.
Save your sales receipt for proof of purchase. In the event that your printer needs service, you will need your proof of purchase to obtain warranty service.
If you feel your BJC-250 Series Color Bubble Jet Printer needs servicing, you can contact Canon on the World Wide Web to locate the Canon Authorized Service facility (ASF) nearest you. If you do not have access to the Web, you can call Canon (see page 1-5)

Using the Printer With Windows
This Chapter describes how to use the printer with your windows applications. It includes:
oInstalling a printer driver
oPrinting a document
oPrinter setup within Windows 95
oPrinter setup within Windows 3.1
oThe Windows tabs
oPrinting speed versus color
Installing a Printer Driver
Before you can use any type of printer with your computer, you must install a printer driver. The printer driver tells the computer what kind of printer you are using. The printer driver also controls the various settings, such as print quality and paper type. You define these settings within the printer driver, and the printer driver then communicates the settings to both the computer and the printer.
You must install the BJC-250 Printer Driver for windows before you can use the printer with your computer. See your Quick Start Guide for instructions.
Printing a Document
This product describes the general steps required for printing from various Windows applications. The exact steps for printing a document may vary depending on the application program you are using. Refer to your software application's documentation for the exact printing procedure.
1
Start your |
Start the program you are using to create the document, and open the |
application. |
document you want to print. |
2
Make sure the Canon BJC-250 is selected as your default printer.
3
Choose Print Setup from the File menu.
Click on the Setup button if you want to make any adjustments as appropriate for printing your document. (See Print Setup Within Windows 95 or Printer Setup
Within Windows 3.1 for details.)
Select OK to close the Print Setup dialog box.

Choose Print
from the File |
After making any necessary changes to the printing parameters, select OK to |
|
start the print job. |
||
menu. |
||
|
2 of 2 |
4/9/98 3:46 PM |
Printer Setup Within Windows 95
You can use the printer with all your Windows 95 applications
Opening the Printer Properties Dialog Box in Windows 95
You can open the Properties dialog box in one of the following ways:
From within any Windows application, you can select the Print or Print Setup command.
From the Printers folder, you can select the printer and then select the Properties command from the File menu.
From the Printers folder, you can select the printer, click the right mouse button, and then select Properties from the drop down list.
Using the Printer Driver in Windows 95
The printing options are displayed on the following Windows 95 tabs:
General, Details, Paper, Graphics, Setting, and Control. See The Windows
Tabs section (page 2-5) for details.
For detailed information on any of the printing options, you can use Windows 95 on-line Help.
Use the right mouse button to click an item on the screen; then click the
What's This? command.
Click ? and then click an item.
Press F1

Printer Setup Within Windows 3.1
You can use your printer with all your Windows 3.1 applications.
Accessing the Printer Options
You can access the printing options from the Printers dialog box in the Control Panel, or you can select the Print Setup option available from the File menu of most applications that run in Windows.
If the Print Setup option does not appear in the file menu for your application, refer to the user's manual supplied with the application. It should provide information about changing the printer setup parameters.
In Windows 3.1, the printing options are displayed on these tabs: Paper, Graphics, Setting, and Control. See the next section, The Windows Tabs, for details.
The Windows Tabs
The BJ Series Printer Driver for Windows has several tabs from which you select you printing options and learn about your printer drivers well as your printer.
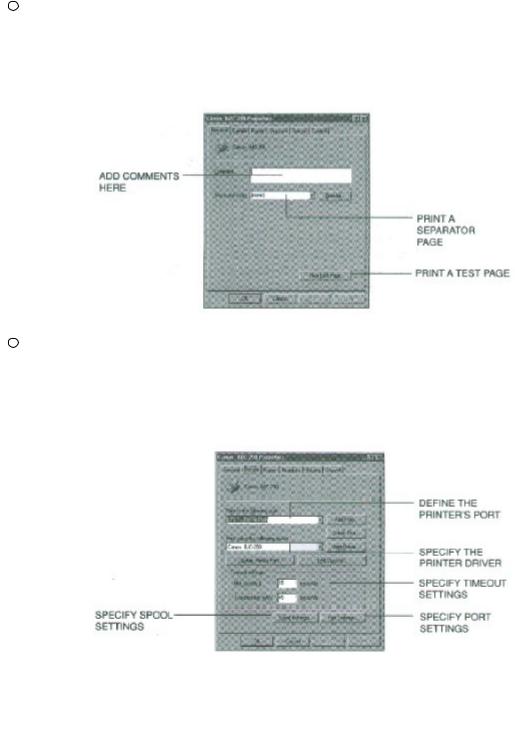
General (Windows 95 only)
This tab allows you to add comments regarding the printer driver and print test page or a separator page. (You see this tab when you open the Properties dialog box from the Printers folder, but not from within a Windows application.
Details (Windows 95 only)
This tab allows you to specify printer port settings, spool settings, and time-out settings. (You see this tab when you open the properties dialog box from the Printers folder, but not from within a Windows application.)
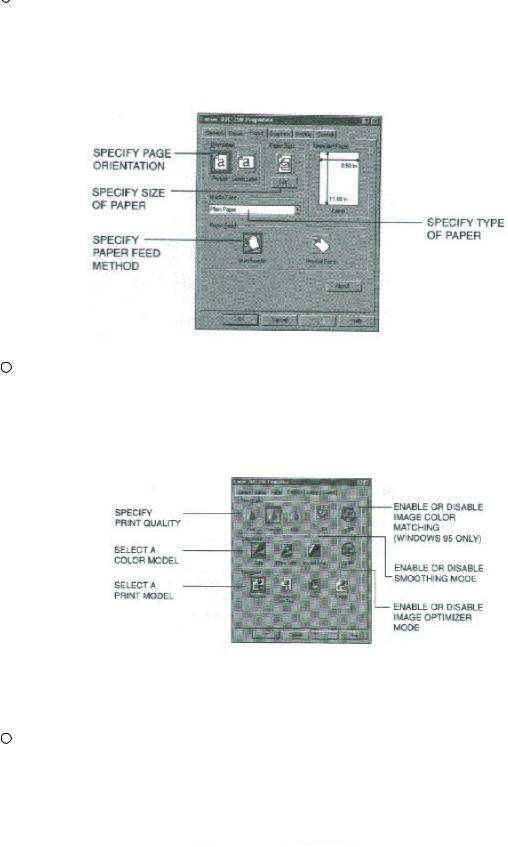
This tab allows you to specify page orientation, paper size, and type of print media. (The printing options on this tab are the same for both Windows 95 and Windows 3.1.)
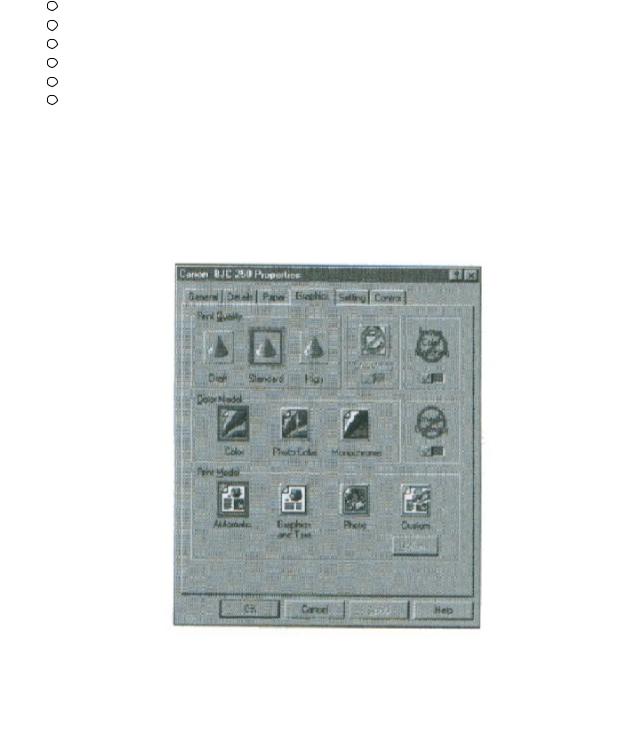
Graphics
This tab allows you to specify print quality, color model, and print model. (The printing options on this tab are the same for both Windows 95 and Windows 3.1. However, the Image Color Matching feature is available in Windows 95 only.)
Setting
This tab allows you to turn on or off the Setup Analyzer and Cartridge Detection. It also allows you to save up to four custom print settings.(The printing options on this tab are the same for both Windows 95 and Windows 3.1.)
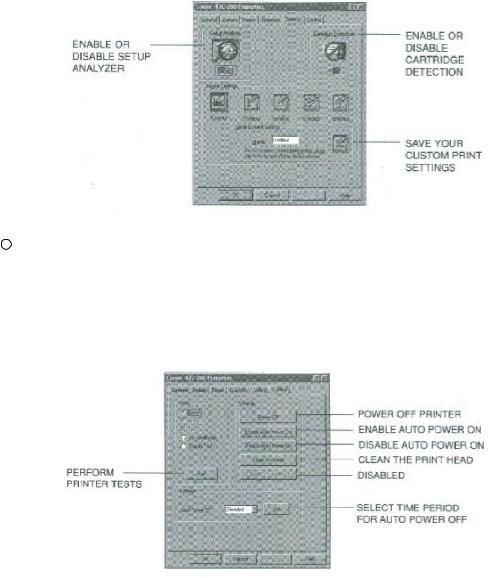
Control
This tab allows you to print test pages, turn off the printer, enable or disable the auto power on feature, and clean the print head. It also allows you to turn off the printer after a certain period of inactivity. (The printing options on this tab are the same for both Windows 95 and Windows 3.1.)
Specifying Your Printer Options
Be sure to use your on-line help to find out about the settings available for each printing options.
To move between the Windows tabs, click on any of the tabs. To save the settings and exit, click the OK button.
To cancel your settings selections on a tab, click the Cancel button. To save your settings without exiting, Click the Apply button.
To access the Help file, click on the Help button.
When you move the mouse cursor over one of the printing options, a help message appears at the bottom of the tab.
Recommended Graphics Settings
You can select the following printing options from the graphics tab to achieve the specified results.

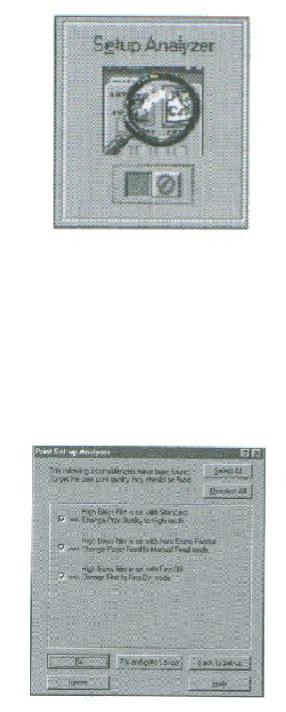
Using the Setup Analyzer
The Setup Analyzer allows the printer driver to evaluate your choice of choice of printing settings. On the Setting tab, click on the green check to enable the Setup Analyzer. Click on the red Ø symbol to disable it.
When you exit the printer driver and accept your printing settings by clicking the OK button, the Setup Analyzer (if enabled) checks to see if any of your settings are contrary to the recommended settings.
If there are no inconsistencies, a dialog box similar to this appears.
The inconsistencies appear with check boxes. You can use the dialog box buttons to select or deselect the inconsistencies, and/or fix or ignore the inconsistencies.
Using Cartridge Detection
Use Cartridge Detection if you want the driver to alert you when the installed BJ cartridge is not the correct choice to use with your Color Model setting. To enable Cartridge Detection, which is located on the Setting tab, click the green check. Click on the red Ø symbol to disable it.
If cartridge Detection cannot detect the cartridge type, it advises you to check that you printer is on-line and that the cables are secure.
If you choose the monochrome Color Model and you have a BC-05 Color BJ Cartridge installed, you'll see:
Performance Tip!
You now have a color cartridge installed in your printer. For faster printing speed, change the color cartridge to the monochrome cartridge.

Printing Speed Versus Color
The BJC-250 Printer Driver for Windows can interpret and translate the full spectrum of colors, up to 16.7 million colors. When printing in color, there is a significant increase in the amount of information that the driver has to interpret and translate. When printing with black ink only, the driver has only one color to interpret. By decreasing the amount of colors that the printer driver has to interpret, you can significantly decrease the time needed to translate the information. This will speed up the overall printing process.
For Quick Color Printing
In the BJC-250 Printer Driver for Windows, choose the following settings. These selections allow the printer driver to interpret and translate 256 colors, which will increase your printing speed. However, your print quality will not be optimized.
Media type--- |
Plain Paper |
Print Quality--- |
Standard |
Color Model--- |
Color |
Print Model--- |
Custom |
Color Selection---Fast Color
For High Quality Color Printing
Select the settings shown below to allow the printer driver to interpret and translate up to 16.7 million colors. Keep in mind that your print speed will be slower than with other setting combinations
Print Quality--- |
High |
Color Model--- |
Color |
Print Model--- |
Automatic |
For Monochrome Printing
Use the optional BC-02 Black BJ Cartridge to optimize the printer's performance when you are printing black text and graphics only.
In the BJC-250 Printer Driver for Windows, choose the following settings to tell your printer to print using black ink only.
Media Type--- |
Plain Paper |
Print Quality--- |
Standard; Smoothing is off |
Color Model--- |
Monochrome |
Print Model--- |
Automatic |

Other Ways to Improve Print Speed in Windows
To improve print speed, you can try the following:
Turn off the Print Manager in the Windows Control Panel (Windows 3.1 only).
This avoids the extra step of sending the print file to the Print Manager and may increase your printing speed by as much as 25%, depending on the computer you are using.
Add a permanent swap file in Windows 3.1.
Under the 386 Enhanced icon in the Windows Control Panel, add or create a permanent swap file that is from 4 MB to 9 MB. The computer will be able to prepare the print file faster. See your Windows documentation for instructions.
Avoid diffusion halftones.
In the Custom Settings dialog box, choose Diffusion only when printing final output or photographic images. Choosing a Halftone setting of Fine allows the documents to print as much as 20% faster because the computer does not need to compute to "best possible position" for each dot.
Avoid screen matched color.
In the Custom Settings dialog box, avoid Match as the Color Adjustment setting. The screen matching feature takes longer to process in the computer because it requires special information.
Avoid automatic settings.
Although the automatic settings are easy to use, the computer must interpret the printed page. This takes more time than if you select each setting.
Free up your memory.
Use only one software program at a time and unload any screen saving utilities or programs stored in Windows background; this frees up more memory for Windows processing.
Use Monochrome when possible.

If you will be printing text in black only, choose a Color Selection of Black and White rather than Grayscale. Print draft documents in Monochrome rather than Color, or use Draft print quality when printing in color.
Limit the number of colors on each page.
The computer will need to calculate and transmit fewer dots. Too many colors can make the image confusing and less effective as well as cause the print speed to slow down.
Use primary colors when printing presentation graphics.
Use Black, cyan, yellow, magenta, blue, green, and red when possible. The computer will need to calculate and transfer less dot information.
Use the Draft print quality.
The printer will need to image fewer dots.
Use Plain Paper as Media Type.
The print head will make only on pass for each printed line.
Use smaller graphics and more white space in your documents.
The computer will be able to prepare the print file faster.
Add RAM to your computer.
The computer will be able to prepare the print file faster.
Use a computer with a faster processor.
The computer will be able to prepare the print file faster.
 Loading...