


Copyright
This manual is copyrighted by Canon Computer Systems, Inc. (CCSI) with all rights reserved. Under the copyright laws, this manual may not be reproduced in any form, in whole or part, without the prior written consent of CCSI.
©1999 Canon Computer Systems, Inc.
Disclaimer
Canon Computer Systems, Inc. has reviewed this manual thoroughly in order that it will be an easy to use guide to your Canon BJC-1000 Series Color Bubble Jet Printer. All statements, technical information, and recommendations in this manual and in any guides or related documents are believed reliable, but the accuracy and completeness thereof are not guaranteed or warranted, and they are not intended to be, nor should they be understood to be, representations or warranties concerning the products described.
Your printer and the software media included with your printer have been sold to you subject to the limited warranties set forth in the warranty card and license agreement enclosed with the respective product. All software is licensed AS IS, as described in the license agreement enclosed with the software media. Further, CCSI reserves the right to make changes in the specifications of the products described in this manual at any time without notice and without obligation to notify any person of such changes.
Trademarks
Canon, BJ and BJC are registered trademarks and Bubble Jet is a trademark of Canon Inc.
All other product and brand names are registered trademarks, trademarks, or service marks of their respective owners.
ENERGY STAR® COMPLIANT
As an ENERGY STAR® Partner, Canon U.S.A., Inc. has determined that this product meets the ENERGY STAR® guidelines for energy efficiency.
ii

Using Your Documentation
The following documentation is supplied with the Canon BJC-1000 Series Color Bubble Jet™ Printer to help you efficiently use your new printer.
Quick Start Guide
This sheet describes the steps you follow to set up your printer and install the BJC-1000 Series Printer Driver for Windows®. You can follow the steps illustrated on this sheet to start printing in minutes.
User’s Manual
This manual offers detailed information on how to operate your printer. It includes printing operations, maintenance, troubleshooting, and specifications. Read this manual to master basic operations and when you need to know the specifications of the printer.
Conventions
This User’s Manual uses the following conventions to alert you to information that will help you operate the printer correctly and safely.
NNotes provide advice or suggestions regarding the use of the printer.
CCautions alert you to operations that could cause damage to your hardware or software, or cause injury to yourself.
Distinctive typefaces identify any commands you enter at your computer:
When you type something on your computer, it appears in this typeface: DIR/P.
The selections you make in Windows are shown in bold: Click OK.
iii

iv

Contents
1 |
Introduction ..................................................................................................... |
1-1 |
|
Supplies and Accessories .................................................................................... |
1-2 |
|
BJ Cartridges ................................................................................................ |
1-2 |
|
Canon Specialty Papers ............................................................................... |
1-3 |
|
Hardware and Software Requirements ............................................................. |
1-4 |
|
Canon Customer Care Center ........................................................................... |
1-5 |
|
Servicing the Printer .................................................................................... |
1-6 |
2 Using the Printer With Windows ............................................................... |
2-1 |
|
|
Using a Printer Driver......................................................................................... |
2-1 |
|
Printing a Document ......................................................................................... |
2-2 |
|
Printer Setup Within Windows 98 and Windows 95........................................ |
2-3 |
|
Opening the Printer Properties Dialog Box in Windows 98 and |
|
|
Windows 95 ............................................................................................. |
2-3 |
|
Using the Printer Driver in Windows 98 and Windows 95 ...................... |
2-3 |
|
Printer Setup Within Windows 3.1 ................................................................... |
2-4 |
|
Accessing the Printing Options ................................................................... |
2-4 |
|
The Windows Tabs ............................................................................................. |
2-5 |
|
Specifying Your Printing Options on the Windows Tabs........................... |
2-11 |
|
Recommended Print Mode Settings ................................................................. |
2-11 |
|
Plain Paper Print Jobs ................................................................................. |
2-12 |
|
High Resolution Paper Print Jobs .............................................................. |
2-12 |
|
Customizing the Print Mode ............................................................................. |
2-13 |
|
Executing a Print Job ......................................................................................... |
2-14 |
|
The BJ Background Monitor ...................................................................... |
2-15 |
|
BJ Backgrounder .......................................................................................... |
2-16 |
|
BJ Status Monitor ........................................................................................ |
2-16 |
|
Printing Speed Versus Color ............................................................................. |
2-17 |
|
Ways to Improve Print Speed in Windows ................................................ |
2-18 |
3 |
Paper Handling.................................................................................................. |
3-1 |
|
Selecting Paper Types.......................................................................................... |
3-2 |
|
Paper Guidelines .......................................................................................... |
3-5 |
|
Setting the Paper Thickness Lever ..................................................................... |
3-6 |
|
Printer Settings for Various Print Media ........................................................... |
3-7 |
|
Loading Paper ..................................................................................................... |
3-7 |
|
Automatically Feeding Paper ....................................................................... |
3-8 |
|
Auto Feed Guidelines ................................................................................... |
3-10 |
|
Printing on Envelopes......................................................................................... |
3-11 |
v

|
Using Canon’s Specialty Papers ......................................................................... |
3-15 |
|
Specialty Paper Guidelines........................................................................... |
3-15 |
|
Printing and Uncurling Back Print Film .................................................... |
3-16 |
|
Using the Cleaning Sheet for High Resolution Paper ............................... |
3-17 |
|
Printing on Fabric Sheets ............................................................................ |
3-20 |
|
Printing on Banner Paper ........................................................................... |
3-23 |
|
Loading Glossy Photo Paper ....................................................................... |
3-27 |
|
Loading Glossy Photo Cards ....................................................................... |
3-29 |
4 |
Maintaining the Printer ................................................................................ |
4-1 |
|
Printer Guidelines .............................................................................................. |
4-2 |
|
Cleaning the Printer ........................................................................................... |
4-3 |
|
Printing a Test Page ............................................................................................ |
4-5 |
|
Cleaning the Print Head .................................................................................... |
4-7 |
|
BJ Cartridge Guidelines ..................................................................................... |
4-8 |
|
Maintaining the BJ Cartridges .................................................................... |
4-9 |
|
Replacing the BJ Cartridge ................................................................................ |
4-11 |
|
Storing a BJ Cartridge ........................................................................................ |
4-16 |
|
Transporting the Printer .................................................................................... |
4-17 |
5 |
Troubleshooting ............................................................................................... |
5-1 |
|
Identifying Your Printer Problem ..................................................................... |
5-1 |
|
Basic Problems ................................................................................................... |
5-2 |
|
Cannot Install the Printer Driver ............................................................... |
5-4 |
|
An Error Message Appears .......................................................................... |
5-6 |
|
Print Job Will Not Start ............................................................................... |
5-9 |
|
Printing Halts ............................................................................................... |
5-10 |
|
Printout Is Unsatisfactory ........................................................................... |
5-10 |
|
Clearing Paper Jams ........................................................................................... |
5-13 |
|
Using the Purple Button .................................................................................... |
5-14 |
Appendix A Specifications ............................................................................... |
A-1 |
|
|
Printing Specifications ....................................................................................... |
A-1 |
|
Printable Area ..................................................................................................... |
A-3 |
|
BJ Cartridges ...................................................................................................... |
A-6 |
|
General ............................................................................................................... |
A-7 |
Appendix B Installing the Printer Driver for Windows 3.1 .................... |
B-1 |
|
Glossary .................................................................................................................... |
G-1 |
|
Index ......................................................................................................................... |
I-1 |
|
FCC Regulations ..................................................................................................... |
FCC-1 |
|
vi
Introduction 1
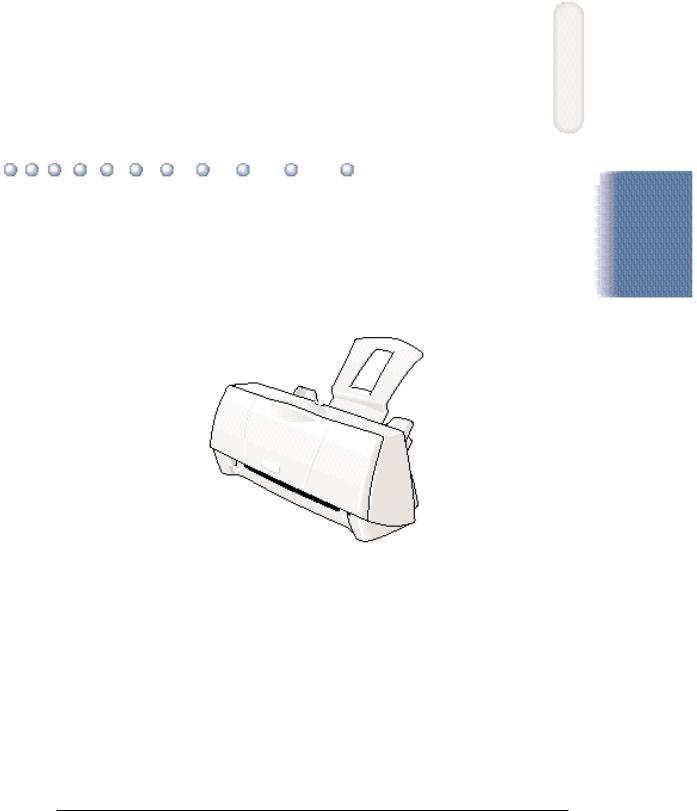
Congratulations on your purchase of the Canon BJC-1000 Series Color Bubble Jet Printer. We appreciate your choosing this printer to meet your printing needs.
The BJC-1000 Series printers offer excellent print quality and fast print speed using both color and black inks. We are certain you will be satisfied with this advanced Bubble Jet technology.
This chapter:
Lists the supplies, accessories, and options you can purchase for the printer
Lists hardware and software requirements
Describes Canon’s customer support services
Introduction
Chapter 1 |
Introduction 1-1 |

Supplies and Accessories
Your BJC-1000 Series printer supports excellent and unique print media options that will allow you to produce dazzling, professional, and fun presentations. All of these print media are specially designed and manufactured to work with your Canon Color Bubble Jet printer so you can produce the finest output possible.
Canon has an extensive dealer network equipped to offer you supplies as you need them. To find a dealer near you, call the Canon Referral Service at 1-800-848-4123.
If supplies are not available from your local dealer, you can order directly from Canon by calling 1-800-385-2155.
BJ® Cartridges
You can use the following BJ cartridges with the BJC-1000 Series printers:
BC-02 Black BJ Cartridge
BC-05 Color BJ Cartridge
BC-06 Photo BJ Cartridge
BC-09F Neon BJ Cartridge
NThese BJ cartridges contain both the Bubble Jet print head unit and ink.
The cartridge(s) that come with your printer depend on the printer model you purchased.
1-2 Introduction |
Chapter 1 |

|
Canon has more engineers dedicated to creating quality ink for providing |
|
|
|
the best results for output on Bubble Jet printers than any other |
|
|
|
organization. Canon does not prohibit the use of third-party inks and the |
|
|
N use of third-party inks does not invalidate the product’s limited warranty. |
|
||
|
However, Canon cannot guarantee the quality or performance of your |
Introduction |
|
|
printer when you are using inks from other suppliers. |
||
|
|
||
|
Canon’s limited warranty does not cover damage caused to Canon’s |
|
|
|
Bubble Jet products that is attributable to the use of third party parts or |
|
|
|
supplies, including inks. The limited warranty remains in effect for its |
|
|
|
life once that particular damage has been properly repaired. |
|
|
|
For optimum printing results, Canon recommends that you use Canon |
|
|
|
BJ cartridges. |
|
|
|
|
|
|
|
You can also purchase the optional Canon BC-06 Photo Kit, which |
|
|
|
includes everything you need to produce photo-quality images: |
|
|
|
BC-06 Photo BJ Cartridge |
|
|
|
SB-05 Ink Cartridge Storage Box |
|
|
|
Canon High Resolution Paper (60 sheets) |
|
|
|
See Chapter 4, Maintaining the Printer, for details on replacing |
|
|
|
BJ cartridges. |
|
|
Canon Specialty Papers
Canon offers numerous specialty papers, including:
Glossy Photo Paper
Banner Paper
Brilliant White Paper
High Resolution Paper
T-Shirt Transfers
Greeting Cards
Glossy Photo Cards
Bubble Jet Paper (water resistant)
Chapter 1 |
Introduction 1-3 |

Fabric Sheets
Transparencies
Back Print Film
High Gloss Film
See Chapter 3, Paper Handling, for details on Canon’s specialty papers.
Hardware and Software Requirements
sure you have the following computer requirements.)
computer with a 486 PC processor or better (Pentium® processor recommended)
Microsoft® Windows® 98, Windows 95, or Windows 3.1
8 megabytes (MB) of RAM
(16 MB or more recommended for high resolution printing)
40 MB hard disk space
Bi-directional, Centronics®-compatible parallel cable (IEEE 1284-compliant); a cable less than 6.6 feet in length is recommended
CD ROM drive (2x or better)
(If you do not have a CD ROM drive, you can download the printer driver from Canon’s Web site or BBS, or call the Canon Customer Care Center to order the Printer Setup on diskettes for a small shipping and handling fee. See the Canon Customer Care Center information below for numbers.)
Canon Creative has additional requirements. See the Canon Creative
Quick Start Guide for details.
1-4 Introduction |
Chapter 1 |

Canon Customer Care Center
Canon Computer Systems, Inc. offers a full range of customer technical support* options including:
24-hour, 7-day-a-week, toll-free automated support for troubleshooting |
Introduction |
Friday, 8:00 am–10:00 pm EST, excluding holidays) for products |
|
issues on most current products (1-800-423-2366) |
|
Speak to a technician free of service charge (currently Monday– |
|
still under warranty** (1-757-413-2848) |
|
Speak to a technician for a service charge (currently $24.99 per call) |
|
during holidays and days/hours not listed above regarding urgent |
|
product questions or for products no longer under warranty |
|
(1-800-423-2366) |
|
Or for a charge of $2.50 per minute, to a maximum of $25.00 per |
|
call (1-900-246-1200) |
|
E-mail support via the Canon Computer Systems, Inc. Web site |
|
(www.ccsi.canon.com) |
|
24-hour, toll-free Fax Retrieval System (1-800-526-4345) |
|
To download the latest drivers using your modem, 24-hour Bulletin |
|
Board Service (1-757-420-2000) |
|
*Support program specifics subject to change without notice. |
|
**Refer to individual product information for warranty details. |
|
Canada |
|
Canada, 24 hours a day, 7 days a week (1-800-263-1121) |
|
In other countries, please contact your Canon dealer. |
|
Chapter 1 |
Introduction 1-5 |
Servicing the Printer
The Canon BJC-1000 Series Color Bubble Jet Printers are designed with the latest technology to provide trouble-free operation. The Warranty Card that comes with the printer describes Canon’s limited warranty for your Bubble Jet printer. Be sure to read the warranty information to find out about the different service options available to you.
NSave your sales receipt for proof of purchase. In the event that your printer needs service, you will need your proof of purchase to obtain warranty service.
If you feel your BJC-1000 Series Color Bubble Jet Printer needs servicing, contact Canon on the World Wide Web to locate the Canon Authorized Service Facility (ASF) nearest you. If you do not have access to the Web, you can call Canon (see page 1-5).
1-6 Introduction |
Chapter 1 |

Using the Printer With Windows 2
This chapter describes how to use the printer with your Windows applications. It includes:
Using a printer driver
Printing a document
Printer setup within Windows 98 and Windows
Printer setup within Windows 3.1
The Windows tabs
Recommended Print Mode settings
Customizing the Print Mode
Executing a print job
Printing speed versus color
Using a Printer Driver
Before you can use any type of printer with your computer, you must install software that allows the printer and computer to communicate; the software is called a printer driver. The printer driver tells the computer what kind of a printer you are using. The printer driver also controls the various settings, such as print quality and paper type. You define these settings within the printer driver, and the printer driver then communicates the settings to both the computer and the printer.
NYou must install the BJC-1000 Series Printer Driver for Windows before you can use the printer with your computer. If you are using Windows 98 or Windows 95, see your Quick Start Guide for instructions. If you are using Windows 3.1, see Appendix B for instructions.
the Printer |
Windows |
Using |
With |
Chapter 2 |
Using the Printer With Windows 2-1 |
Printing a Document
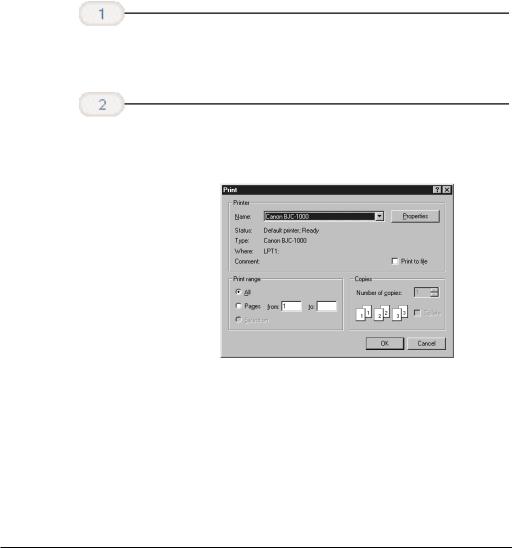
This procedure describes the general steps required for printing from various Windows applications. The exact steps for printing a document may vary depending on the application program you are using. Refer to your software application’s documentation for the exact printing procedure.
Start your application.
Make sure the Canon BJC-1000 Series is selected as your default printer.
Start the program you are using to create the document, and open the document you want to print.
Choose Print or Print Setup from the File menu. You will see a screen similar to this:
Click on the Properties (or Setup) button if you want to make any adjustments as appropriate for printing your document. (See Printer Setup Within Windows 98 and Windows 95 or Printer Setup Within Windows 3.1 for details.)
After making any necessary changes to the printing parameters, click OK to start the print job.
2-2 Using the Printer With Windows |
Chapter 2 |

Printer Setup Within Windows 98 and
Windows 95
You can use the printer with all your Windows 98 and Windows 95 applications.
Opening the Printer Properties Dialog Box in Windows 98 and Windows 95
You can open the Properties dialog box in one of the following ways:
From within any
Print Setup command
From the Printers the Properties
From the Printers
mouse button, and then select Properties from the drop down list.
Using the Printer Driver in Windows 98 and Windows 95
The printing options are displayed on the following Windows 98 and Windows 95 tabs: General, Details, Main, Paper, Features, and Maintenance. See The Windows Tabs section (page 2-5) for details. (You may also see a Sharing tab if your printer is being shared by a Network.)
NFor detailed information on any of the printing options, you can use the Windows 98 and Windows 95 online Help:
Use the right mouse button to click an item on the screen; then click the What’s This? command.
Click ? and then click an item.
Press F1.
the Printer |
Windows |
Using |
With |
Chapter 2 |
Using the Printer With Windows 2-3 |

Printer Setup Within Windows 3.1
You can use the printer with all your Windows 3.1 applications.
Accessing the Printing Options
You can access the printing options from the Printers dialog box in the Control Panel, or you can select the Print Setup option available from the File menu of most applications that run in Windows.
NIf the Print Setup option does not appear in the File menu for your application, refer to the user’s manual supplied with the application. It should provide information about changing the printer setup parameters.
In Windows 3.1, the printing options are displayed on these tabs: Main, Paper, Features, and Maintenance. See the next section, The Windows Tabs, for details.
NIn Windows 3.1, these tabs may be arranged differently than shown here. However the settings are the same.
If you have not installed the BJC-1000 Series Printer Driver for Windows 3.1, see Appendix B for instructions.
2-4 Using the Printer With Windows |
Chapter 2 |
The Windows Tabs
The BJC-1000 Series Printer Driver for Windows has several tabs from which you can select your printing options. Be sure to use the Windows help features to learn more about using these settings.
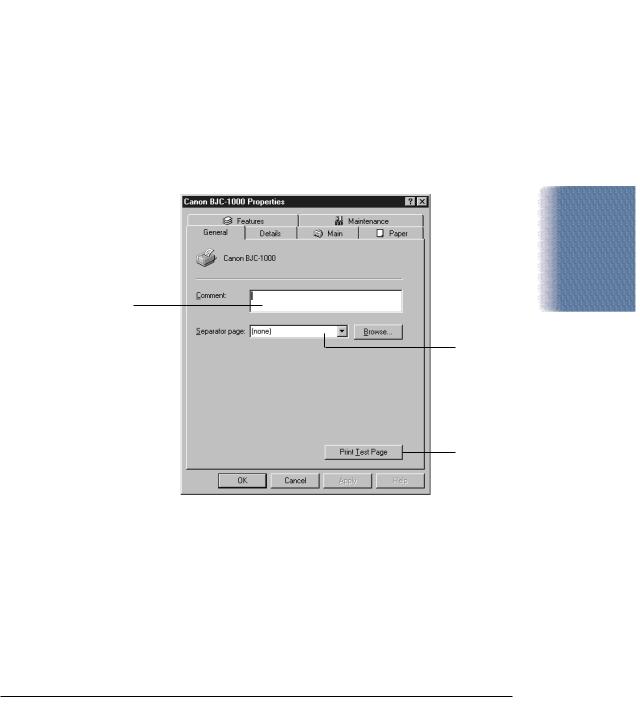
General (Windows 98 and Windows 95 only)
This tab allows you to add comments regarding the printer driver and print a test page or a separator page. (You see this tab when you open the Properties dialog box from the Printers folder, not from within a Windows application.)
the Printer |
Windows |
Using |
With |
ADD
COMMENTS
HERE
PRINT A
SEPARATOR
PAGE
PRINT A
TEST PAGE
Chapter 2 |
Using the Printer With Windows 2-5 |
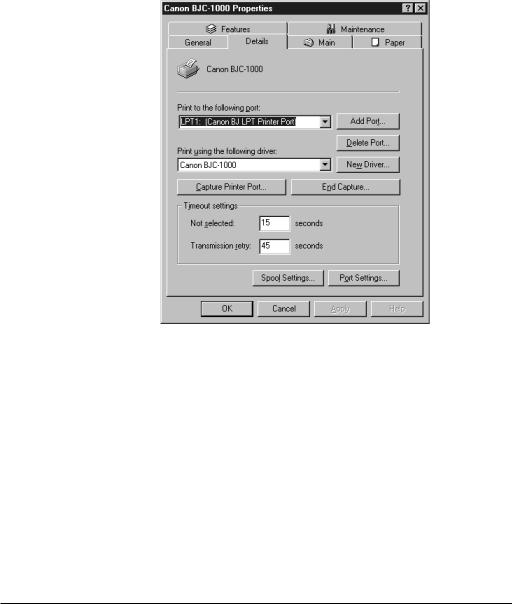
Details (Windows 98 and Windows 95 only)
This tab allows you to specify printer port settings, spool settings, and time-out settings. (You see this tab when you open the Properties dialog box from the Printers folder, not from within a Windows application.)
|
|
|
|
|
|
|
DEFINE THE |
|
|
|
|
|
|
||
|
|
|
|
|
|
|
PRINTER’S |
|
|
|
|
|
|
|
PORT |
|
|
|
|
|
|
|
SPECIFY THE |
|
|
|
|
|
|
|
|
|
|
|
|
|
|
|
PRINTER |
|
|
|
|
|
|
|
|
|
|
|
|
|
|
|
DRIVER |
|
|
|
|
|
|
|
SPECIFY |
|
|
|
|
|
|
|
|
|
|
|
|
|
|
|
TIMEOUT |
|
|
|
|
|
|
|
SETTINGS |
SPECIFY |
|
|
|
|
|
|
SPECIFY |
|
|
|
|
|
|||
|
|
|
|
||||
SPOOL |
|
|
|
|
|||
|
|
|
|
PORT |
|||
SETTINGS |
|
|
|
|
|||
|
|
|
|
SETTINGS |
|||
|
|
|
|
|
|
|
|
2-6 Using the Printer With Windows |
Chapter 2 |

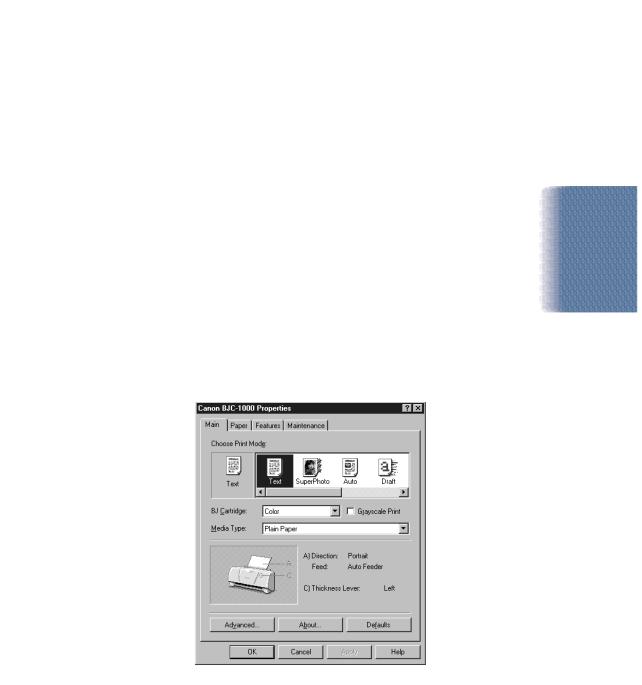
Main
This tab allows you to select your Print Mode. (The printing options on this tab are the same for Windows 98, Windows 95, and Windows 3.1.)
CLICK HERE TO CUSTOMIZE THE PRINT MODE SETTINGS
(SEE PAGE 2-13)
SELECT YOUR PRINT MODE,
WHICH INCLUDES PRINT QUALITY
AND COLOR SETTINGS
SPECIFY THE TYPE
OF BJ CARTRIDGE
INSTALLED
SELECT YOUR
MEDIA TYPE
ILLUSTRATES THE
CURRENT PAPER
SETTINGS
RESTORE
DEFAULT
SETTINGS
CLICK HERE TO
PRINT COLOR
DATA AS
GRAYSCALE
the Printer |
Windows |
Using |
With |
Chapter 2 |
Using the Printer With Windows 2-7 |
Paper
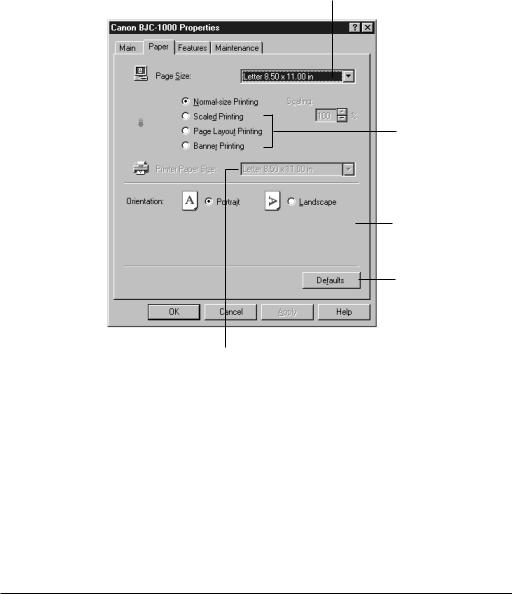
This tab allows you to specify paper size and page orientation. (The printing options on this tab are the same for Windows 98, Windows 95, and Windows 3.1.)
SPECIFY YOUR
PAPER SIZE
SPECIAL PRINTING FEATURES:
• SCALED—TURN ON
TO ENLARGE OR REDUCE PRINTING
• PAGE LAYOUT—TURN ON TO PRINT 2 OR 4 PAGES ON A SINGLE SHEET
• BANNER—TURN ON FOR BANNER PRINTING
SPECIFY PAGE
ORIENTATION (HOW
DOCUMENT PRINTS
ON A PAGE)
RESTORE DEFAULT
SETTINGS
FOR SCALED OR
PAGE LAYOUT
PRINTING, SPECIFY
SIZE OF PAPER IN
PRINTER
2-8 Using the Printer With Windows |
Chapter 2 |
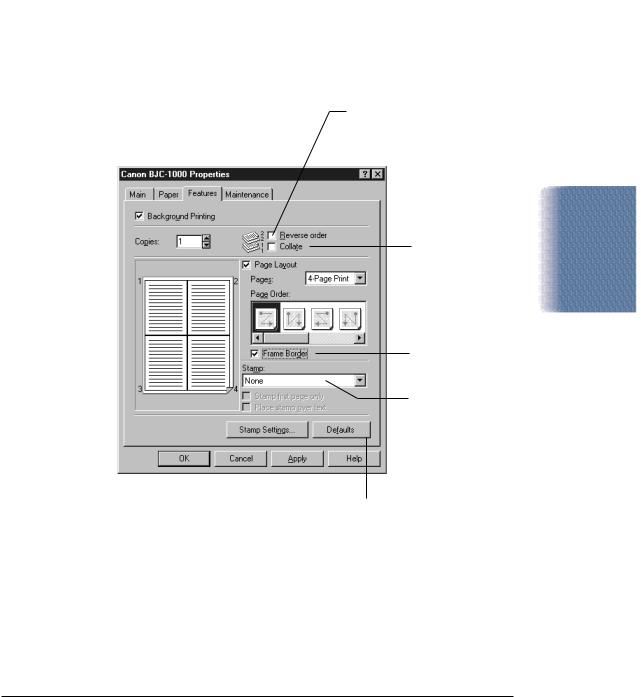
Features
This tab allows you to specify background printing features, which include multiple copies and page layout. (The printing options on this tab are the same for Windows 98, Windows 95, and Windows 3.1.)
ENABLE OR |
|
|
|
|
||
DISABLE |
|
SPECIFY NUMBER |
||||
BACKGROUND |
|
|||||
|
||||||
PRINTING |
|
OF COPIES TO PRINT |
||||
|
|
|
|
|
|
|
|
|
|
|
|
|
|
|
|
|
|
|
|
|
|
|
|
|
|
|
|
|
|
|
|
|
|
|
|
|
|
|
|
|
|
|
|
|
|
|
|
|
ENABLES PRINTING |
CLICK TO VIEW OR |
2 OR 4 PAGES ON |
CHANGE THE |
A SINGLE SHEET |
STAMP SETTINGS |
ENABLE PRINTING IN
REVERSE ORDER (LAST
PAGE TO FRONT PAGE)
ENABLE COLLATING
FOR MULTIPLE
COPIES
PRINT BORDERS TO
SEPARATE PAGES
SPECIFY A GRAPHIC
STAMP TO BE
PRINTED ON YOUR
DOCUMENT (SUCH
AS IMPORTANT,
CONFIDENTIAL,
STOP)
RESTORE DEFAULT
SETTINGS
the Printer |
Windows |
Using |
With |
Chapter 2 |
Using the Printer With Windows 2-9 |
Maintenance
This tab allows you to initiate print head cleaning, roller cleaning, and test prints. (The printing options on this tab are the same for Windows 98, Windows 95, and Windows 3.1.)
START PRINT HEAD
CLEANING
FEED A SHEET OF PAPER TO CLEAN ROLLERS (SEE PAGE 3-17)
PRINT THE NOZZLE CHECK PATTERN (SEE PAGE 4-5)
START THE BJ PRINTER STATUS MONITOR (SEE PAGE 2-14)
2-10 Using the Printer With Windows |
Chapter 2 |
Specifying Your Printing Options on the Windows Tabs
Be sure to use your online help to find out about the settings available for each printing option.
To move between the Windows tabs, click on any of the tabs.
To save the settings and exit, click the OK button.
To cancel your setting selections on a tab, click the Cancel button.
To save your settings without exiting, click the Apply button.
To access helpful information about the printer and the printer driver, click on the Help button.
To find out about a setting, click the question mark ? in the upper right corner. Move the larger question mark to the setting you are interested in and click again.
Recommended Print Mode Settings
The Print Mode you select optimizes the printer’s settings for print quality, media, paper feed method, and color adjustment.
the Printer |
Windows |
Using |
With |
|
|
|
|
|
|
Chapter 2 |
Using the Printer With Windows 2-11 |
|
Plain Paper Print Jobs
For most routine print jobs on plain paper, you will use the BC-05 Color BJ Cartridge and select Color for BJ Cartridge setting on the Main tab.
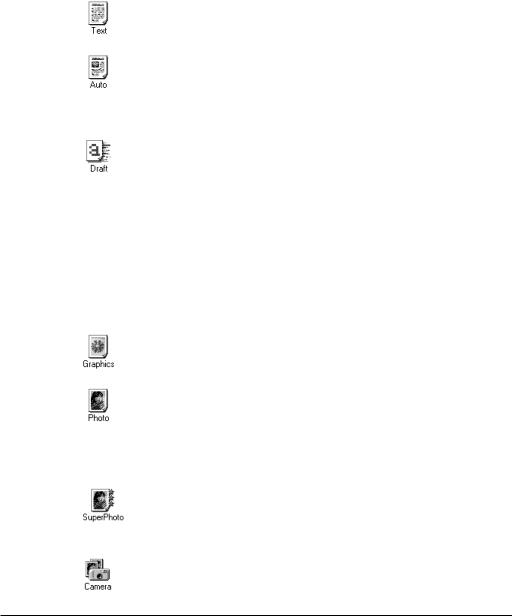
Text
Prints text documents created with a word processor with standard print quality.
Auto
Automatically detects photographs and graphic images and selects optimum print settings. This setting is ideal for documents that contain mixed objects like text, tables, charts, graphs, and photographs.
Draft
Sacrifices some quality for speed and prints lighter text, and also uses less ink. Use this setting to print a hard copy of a long document for proofreading and editing before you print the final copy.
High Resolution Paper Print Jobs
To print high quality illustrations and photographs with the BC-05 Color BJ Cartridge, select one of the icons below. Select Color for the BJ Cartridge setting.
Graphics
For graphs or computer graphics with sharp boundaries between colors.
Photo
For photographs or graphic images with fine gradations in tone.
To print illustrations that use natural images, such as photographs, use the BC-06 Photo BJ Cartridge and select one of the icons below. Select Photo for the BJ Cartridge setting.
SuperPhoto
Produces the best possible print quality for photographs and other graphic images with fine tone gradations. (Do not use with the BC-02, BC-05, or BC-09F BJ Cartridges.)
Camera
For images created with a digital camera. (Do not use with the
BC-02, BC-05, or BC-09F BJ Cartridges.)
2-12 Using the Printer With Windows |
Chapter 2 |
Customizing the Print Mode
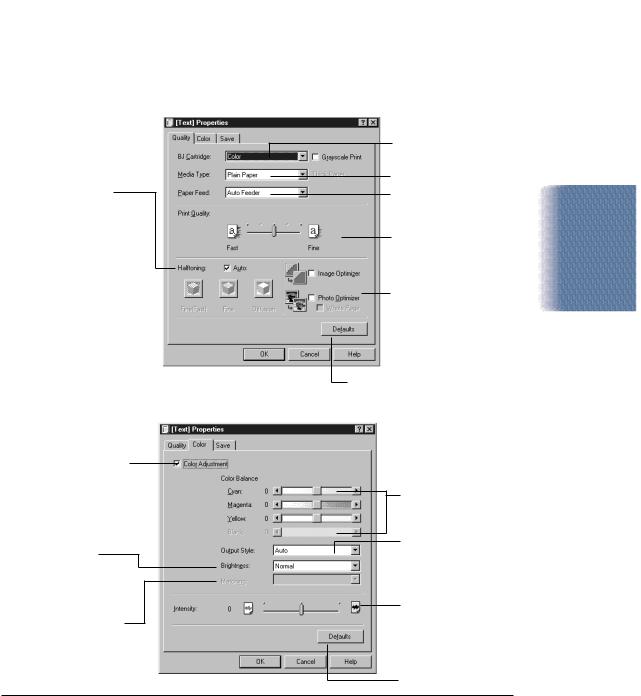
On the Main tab, you can click the Advanced button to customize the selected Print Mode. You see the following three tabs.
Quality tab
SPECIFY HALFTONING
•AUTO—ALLOWS THE PRINTER TO DETERMINE THE TYPE OF IMAGE DATA AND APPLY THE APPROPRIATE DITHERING METHOD
•FINE (FAST)—USE FOR HIGH SPEED PRINTING OF CHARACTERS OR TABLES
•FINE—USE FOR PRINTING GRAPHICS OR CHARTS WITH CLEARLY DEFINED COLOR BOUNDARIES
•DIFFUSION—USE FOR PRINTING NATURAL COLOR IMAGES SUCH AS PHOTOGRAPHS
Color tab
ENABLE OR DISABLE COLOR ADJUSTMENT (USING COLOR ADJUSTMENT REDUCES PRINTING SPEED)
ADJUSTS THE
CONTRAST AMONG
INTERMEDIATE TONES
THAT FALL BETWEEN
BLACK AND WHITE
SPECIFIES HOW TO
PROCESS COLOR
VALUES SO THEY
BEST APPROXIMATE
THE ORIGINAL
SELECT THE TYPE OF
CARTRIDGE INSTALLED
SPECIFY MEDIA TYPE
SPECIFIES PAPER FEED
METHOD OF AUTO FEED
SPECIFIES THE BALANCE
BETWEEN PRINT QUALITY
AND PRINT SPEED
ENABLES THE IMAGE
DATA CORRECTION
FEATURE TO SMOOTH
LOW-RESOLUTION IMAGE
DATA FOR PRINTING
RESTORES THE
DEFAULT SETTINGS
ADJUSTS THE
LUMINOSITY OF THE
FOUR COLOR INKS
SPECIFIES WHETHER
PRINTED OUTPUT
EMPHASIZES INTER-
MEDIATE TONES OR
BRIGHT, SHARP BASIC
COLORS
ADJUSTS THE PRINT
INTENSITY TO MAKE
THE OVERALL
PRINTED OUTPUT
DARKER OR LIGHTER
RESTORES THE
DEFAULT SETTINGS
the Printer |
Windows |
Using |
With |
169B.TIF
Chapter 2 |
Using the Printer With Windows 2-13 |
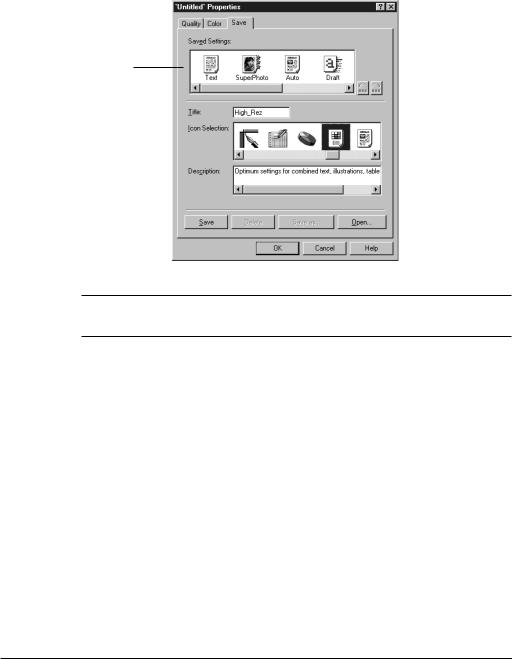
Save tab
DISPLAYS CURRENT
PRINT MODES
|
|
|
|
|
|
|
CHANGES THE |
|
|
|
|
|
|
|
|
|
|
|
|
|
|
|
ORDER OF THE |
SPECIFY A CUSTOM |
|
|
|
|
ICONS; MOVES |
||
|
|
||||||
|
|
|
|
THE SELECTED |
|||
NAME FOR THIS |
|
|
|
|
|||
|
|
|
|
ICON |
|||
PRINT MODE |
|
|
|
|
|||
|
|
|
|
|
|||
SPECIFY A NEW |
|
|
|
|
|
|
|
|
|
|
|
|
|
||
ICON FOR THIS |
|
|
|
|
DESCRIBES |
||
|
|
|
|
||||
PRINT MODE |
|
|
|
|
THE NEW |
||
|
|
|
|
|
|
|
PRINT MODE |
SAVE THE NEW |
|
|
|
|
|
|
|
|
|
|
|
|
|
||
PRINT MODES |
|
|
|
|
|
||
NYou cannot use the names of existing modes (Text, Auto, etc.) and the reserved name (Graph).
Executing a Print Job
After you start a print job, the following three features start up in sequence.
BJ Background Monitor
Displays the status of the print jobs in the background. Use the background monitor to change the order of the print jobs or cancel a print job.
BJ Backgrounder
Displays the transmission status of the current print job. Use the backgrounder to pause or cancel a print job.
BJ Status Monitor
Displays the printer status. If an error occurs, the status monitor will describe the error and provide a solution for the problem.
2-14 Using the Printer With Windows |
Chapter 2 |
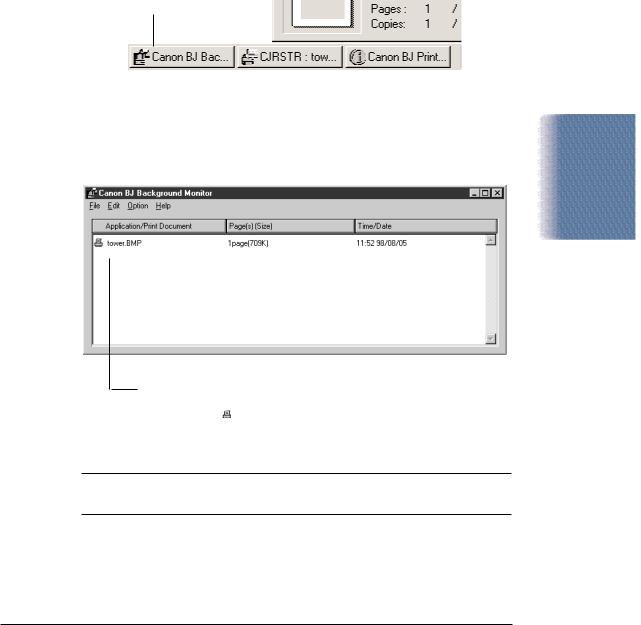
The BJ Background Monitor
To open the BJ Background Monitor, click its button on the Task Bar.
CLICK HERE
You see this screen:
NUMBER OF DOCUMENT |
|
|
|
DRAG THE COLUMN |
|
|
|
||
PAGES AND SIZE (BYTES) |
|
|
|
DIVIDER LEFT OR RIGHT |
|
|
|
|
TO RESIZE THE COLUMN |
|
|
|
|
|
NAMES OF DOCUMENT PRINTING |
|
TIME AND DATE |
|
||
AND DOCUMENTS QUEUED FOR |
|
DOCUMENT WAS |
PRINTING. THE ICON MARKS |
|
SENT TO THE |
|
PRINTER |
|
THE DOCUMENT CURRENTLY |
|
|
|
|
|
PRINTING. |
|
|
NFor more details about the BJ Background Monitor, select Help from the Help menu of the BJ Background Monitor.
the Printer |
Windows |
Using |
With |
Chapter 2 |
Using the Printer With Windows 2-15 |
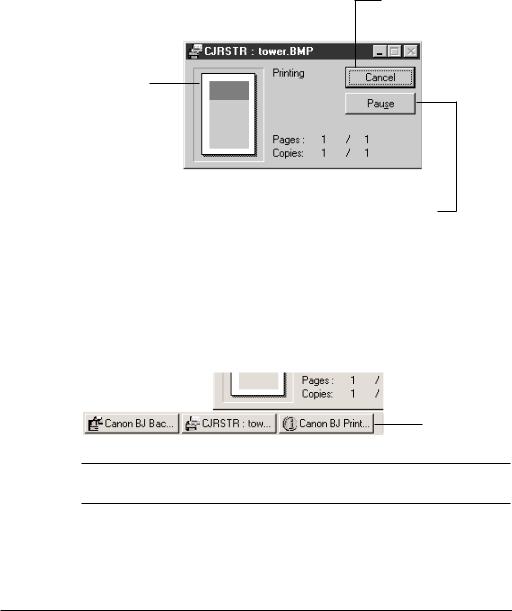
BJ Backgrounder
The BJ Backgrounder screen looks similar to this:
CANCELS THE PRINT JOB
SHOWS THE
FLOW OF
TRANSMISSION
DATA
SHOWS THE |
|
PAUSES THE PRINT JOB. |
|
||
PAGE AND |
|
AFTER PAUSING THE PRINT |
COPY PRINTING |
|
JOB, THIS BUTTON CHANGES |
|
|
TO RESUME. CLICK TO |
|
|
RESTART THE PRINT JOB |
|
|
AFTER PAUSING. |
BJ Status Monitor
To open the BJ Status Monitor during printing, click its button on the Task Bar.
CLICK HERE
NFor information about the BJ Status Monitor, click Help to pull down the Help menu and select Screen Topics.
2-16 Using the Printer With Windows |
Chapter 2 |
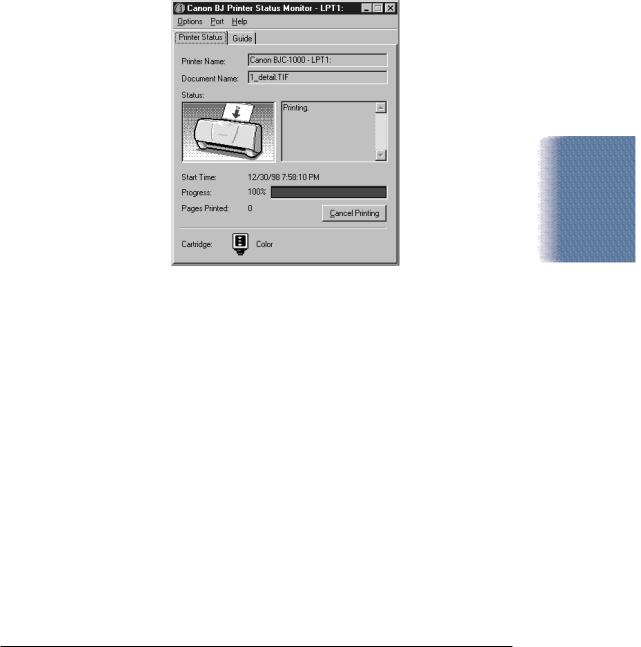
The BJ Status Monitor shows the printer status and the progress of documents printing in Windows. It looks similar to this:
OPENS |
|
|
|
|
|
|
|
|
|
CLICK TO |
|
|
|
|
|
|
|
||||
AUTOMATICALLY |
|
|
|
|
|
|
|
|
DISPLAY |
|
WHEN AN ERROR |
|
|
|
|
|
|
|
|
CORRECT |
|
OCCURS |
|
|
|
|
|
|
|
|
RESPONSE TO |
|
|
|
|
|
|
|
|
|
|
|
AN ERROR |
|
|
|
|
|
|
|
|
|
|
PICTURES AND |
|
|
|
|
|
|
|
|
|
||
|
|
|
|
|
|
|
|
|
|
TEXT DESCRIBE |
|
|
|
|
|
|
|
|
|
|
PRINTER |
|
|
|
|
|
|
|
|
|
|
STATUS AND |
|
|
|
|
|
|
|
|
|
|
PROGRESS OF |
|
|
|
|
|
|
|
|
|
|
THE PRINT JOB |
|
|
|
|
|
|
|
|
|
|
CLICK TO |
|
|
|
|
|
|
|
|
|
|
|
|
|
|
|
|
|
|
|
|
|
CANCEL |
DISPLAYS THE TYPE |
|
|
|
|
|
|
|
|
PRINTING |
|
|
|
|
|
|
|
|
|
|
||
|
|
|
|
|
|
|
|
|
||
OF BJ CARTRIDGE |
|
|
|
|
|
|
|
|
|
|
CURRENTLY MOUNTED |
|
|
|
|
|
|
|
|
|
|
IN THE PRINTER |
|
|
|
|
|
|
|
|
|
|
Printing Speed Versus Color
The BJC-1000 Series Printer Driver for Windows can interpret and translate the full spectrum of colors, up to 16.7 million colors. When printing in color, there is a significant increase in the amount of information that the driver has to interpret and translate. When printing with black ink only, the driver has only one color to interpret.
By decreasing the amount of colors that the printer driver has to interpret, you can significantly decrease the time needed to translate the information. This will speed up the overall printing process.
the Printer |
Windows |
Using |
With |
Chapter 2 |
Using the Printer With Windows 2-17 |

Ways to Improve Print Speed in Windows
To improve printing speed, you can try the following:
Turn off the Print Manager in the Windows Control Panel (Windows 3.1 only)
This avoids the extra step of sending the print file to the Print Manager and may increase your printing speed by as much as 25%, depending on the computer you are using.
Add a permanent swap file in Windows 3.1
Under the 386 Enhanced icon in the Windows Control Panel, add or create a permanent swap file that is from 4 MB to 9 MB. The computer will be able to prepare the print file faster. See your Windows documentation for instructions.
Avoid diffusion halftones
In the Quality tab, choose Diffusion for Halftoning only when printing final output or photographic images. Choosing a Halftoning setting of Fine/Fast allows documents to print as much as 20% faster because the computer does not need to compute to “best possible position” for each dot. To select a Halftoning setting, click the Main tab in the printer driver. Then double-click the Advanced button and click the Quality tab.
Avoid color adjustment
Disable the Color Adjustment option. This feature takes longer to process in the computer because it requires special information. To disable Color Adjustment, click the Main tab in the printer driver. Then double-click the Advanced button and click the Color tab.
2-18 Using the Printer With Windows |
Chapter 2 |

Paper Handling 3
This chapter describes how to use the printer for all your printing operations. It includes:
Selecting paper types
Setting the paper thickness lever
Summary of printer settings for various print media
Automatically loading paper
Printing on envelopes
Using Canon’s Specialty Papers
To ensure the best performance of your printer, you’ll want to select the best paper and load it correctly. You can stack paper in the sheet feeder to load it automatically, or you can manually feed one sheet at a time through the sheet feeder.
Paper Handling
Chapter 3 |
Paper Handling 3-1 |
 Loading...