


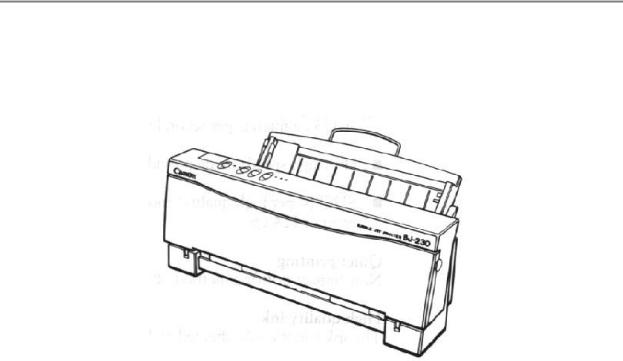
BJ-230
USER
MANUAL
Canon

Contents
Chapter 1 |
Introduction |
|
Features and Benefits |
|
Using This Manual |
|
Customer Support |
Chapter 2 |
Setting Up the Printer |
|
Unpacking the Printer |
|
Choosing a Location for Your Printer |
|
Examining the Printer |
|
Assembling the Printer |
Chapter 3 |
Loading Paper |
|
Automatically Feeding Paper |
|
Printing On Envelopes |
|
Manually Feeding Thick Paper or Transparencies |
|
Loading Paper in Landscape Orientation |
Chapter 4 |
Using the Operator Panel |
|
Turning On the Printer |
|
Pausing a Print Operation |
|
Feeding Paper |
|
Selecting a Print Mode |
|
Selecting Reduction Mode |
|
Printing the Test Prints |
|
Performing Automatic Line Feeds |
Chapter 5 |
Using the Printer With Your Software |
|
Setting Up Windows for Your Printer |
|
Setting Up Other Software Applications |
|
Software and Printer Compatibility |
Chapter 6 |
Maintaining the Printer |
|
Cautions |
|
Cleaning the Printer |
|
Replacing the Ink Cartridge |
|
Transporting the Printer |
Chapter 7 |
Troubleshooting |
|
Operational Problems |
|
Paper Loading Problems |
|
Print Quality Problems |
|
Printing Problems |
|
Windows Problems |
Chapter 8 |
Customizing the Printer |
|
Factory Default Settings |
|
DIP Switch Setting |
|
BJ-10 Mode |
|
Epson LQ Mode |
Appendix A |
Printer Specifications |
Appendix B Interface Specifications
Appendix C Printer Command Summaries and Character Set
BJ-10 Command Summary
BJ-10 Character Sets
Epson LQ Command Summary
Epson LQ Character Sets
Glossary
Index
editiing by Jason Plank and Cindy Cassat
Chapter 1
Introduction
Congratulations on your purchase of the Canon Bubble Jet Printer BJ230. We appreciate you choosing this printer to meet your printing needs. It offers exceptional print quality, flexible paper handling, fast printing speeds, and trouble-free operation.
This chapter introduces you to the features of your new printer and describes how to use this User's Manual.
Features and Benefits
The Bubble Jet Printer BJ-230 produces high-quality printing by incorporating many useful features.
Excellent print quality
High-performance print head offers 360X360 dots per inch (dpi) for high resolution graphics
Convenient paper handling
An automatic sheet feeder holds up to 100 sheets of letter or legal-size paper, 50 sheets of ledger-size paper, 10 envelopes, or 10 transparencies
Software Compatibility
Two resident printer control modes:
TBJ-10 mode emulates the IBM Proprinter X24E printer
TEpson LQ mode emulates the Epson LQ-510 printer
Three print modes/speeds
The print modes allow you to choose between print quality, speed, and
quietness:
THQ (high quality) mode provides high quality and high speed at 173 characters per second (cps)
THS (high speed) mode provides draft quality at 248 cps
TSHQ(super high quality) mode provides the highest quality print at 124 cps
Quiet printing
Non-impact printing method offer quiet operation
Simple maintenance
The replacement ink cartridge contains both the ink and the print head; when it runs out of ink, you simply replace it
Compact desktop design
Lightweight (7.7 1b/3.5 kg)
Using This Manual
This section describes the contents and conventions of this manual.
Contents
This manual includes all the information you need to set up and operate your printer in several easy-to-read chapters.
Chapter 1, Introduction
Introduces you to the features of the printer, and describes how this manual is organized.
Chapter 2, Setting Up the Printer
Describes how to select a location for your printer, and how to unpack and assemble it.
Chapter 3, Loading Paper
Describes how to select paper and how to load it in the printer. It also shows you how to print on envelopes and thick paper.
Chapter 4, Using the Operator Panel
Explains how to control your printer using the buttons on the operator panel.
Chapter 5, Using the Printer With Software
Describes how to install a printer driver and select a printer control mode. It also describes how to use the printer with Windows.
Chapter 6, Maintaining the Printer
Describes how to clean the printer and replace the ink cartridge.
Chapter 7, Troubleshooting
Provides procedures to help you solve problems that may occur with the printer.
Chapter 8, Customizing the Printer
Describes the printer's DIP switches and explains how you can customize the factory default settings of the printer by changing the DIP switches.
The appendices include printer specifications. interface specifications, and summary tables of the BJ-10 mode and Epson LQ mode printer commands and character sets.
The Canon Bubble Jet Printer BJ-200/BJ-230 Programmer's Manual is available for software designers, advanced programmers, and users interested in using a programming language to send commands to the printer. To obtain a copy of this manual, call the Canon Special Offers Group at 1-800-385-2155.
Conventions
This User's Manual uses the following conventions to help you operate the printer correctly and safely:
NOTE: Notes provide advice or suggestions regarding the use of the printer.
CAUTION: Cautions alert you to operations that could cause damage to your hardware or software.
Distinctive typefaces identify the printer buttons you press, the lights on the operator panel, and any commands you enter at your computer. For example, the buttons you press appear in this typeface: POWER. The lights you see appear in this typeface: HQ. When you type something on your computer, it appears in this typeface: DIR /P.
Customer Support
Canon provides customer support and service for all Canon printer products. If you have any questions regarding your new printer, call the Canon Computer Systems, Inc. (CCSI) help desk at 757-413-2848 (request Technical Support). This number is available Monday through

Friday from 8 am to 10 pm Eastern Standard Time(EST), except on holidays.
If you seem to have an operational problem, try to solve it by referring to the information in Chapter 7, Troubleshooting. If you cannot quickly resume normal operation, contact CCSI's experienced support personnel at the help desk.
Canon also provides a bulletin board service (BBS). Call the help desk to obtain the number for the BBS.
If you use CompuServe, you can access the Canon Peripherals Forum. Just type GO CANON at any CompuServe prompt.
Customer support for Canadian residents is available at 416-795-2083 from 9 am to 7 pm EST (except holidays). In other countries, please contact your Canon dealer.
Servicing the Printer
The Canon Bubble Jet Printer BJ-230 is designed with the latest technology to help you realize years of trouble-free operation. The blue warranty card that came with your printer describes CCSI's limited two year warranty for its Bubble Jet Printers. Be sure to read the warranty information and save the blue card. Also, save your original invoice or receipt to verify the date of purchase. If you feel your Bubble Jet Printer BJ-230 needs servicing, call the Canon referral service at 1-800-848- 4123 to locate the CCSI Authorized Service Facility (ASF) nearest you.
If you are interested in service after your CCSI warranty expires, contact the nearest CCSI Authorized Service Facility about the options it makes available to its customers.
Chapter 2
Setting Up the Printer
This chapter describes the steps you follow to unpack and set up your printer. It offers guidelines for finding a suitable location for the printer, explains how to install the ink cartridge, and describes how to connect the power and interface cable.
If you have already set up your printer using the Quick Start Guide, you may want to scan this chapter for the additional information it supplies.
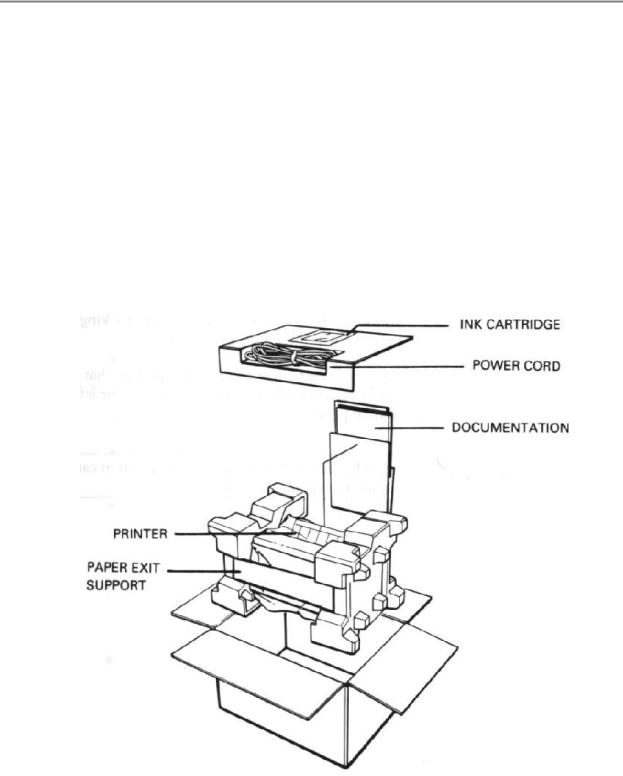
Unpacking the Printer
Carefully remove all items from the box. Ask someone to hold the box while you pull the printer and its protective packaging from the carton.
In addition to this User's Manual, you will find these items in the box:

T |
Canon Bubble Jet |
T |
Quick Start Guide |
|
Printer BJ-230 |
|
|
T |
BC-02 ink cartridge |
T |
Windows driver |
|
|
|
diskette |
|
|
|
(in envelope) |
T |
Paper exit support |
T |
Product Warranty |
|
|
|
card |
T |
AC power cord |
T |
Registration Card |
If your printer was damaged in shipping, or if any items are missing, notify your dealer immediately.
NOTE: In addition to the items shipped with your printer, you need a Centronic®-compatible, parallel interface cable, which you can purchase from your dealer.
As you unpack the printer, save the carton and packing materials in case you want to move or ship the printer in the future. Remove all the shipping tape and any Styrofoam packing material used to protect the printer during shipping.
Open the front cover and remove the tape that secures the ink cartridge holder. Make sure the paper thickness lever is to the left for printing on normal paper.
NOTE: Be sure to fill out your Registration card and send it to Canon Computer Systems, Inc.
Choosing a Location for Your Printer
Whether at home or in the office, you need to find a comfortable and convenient location for the printer. Follow the guidelines in this section to make sure the location is right for your printer.
TPlace the printer in a cool, dry, clean, well ventilated area. Avoid placing it in direct sunlight.
TSet the printer on a sturdy, level surface. Do not set the printer on an angled printer stand.
TPlace the printer where the temperature is stable and set for human comfort.
TLocate the printer near an electrical wall outlet that accepts a three-prong, grounded plug.
NOTE: Use only the power cord that came with your printer. Using a longer cord or an extension cord may result in reduced voltage or malfunctions.
TKeep the printer and your computer away from potential sources of electromagnetic interference such as loudspeakers or the base units of cordless telephones.
TMake sure there is enough room around the printer for storing and feeding paper.
TKeep the paper exit area clear from objects that may block paper from exiting the printer.
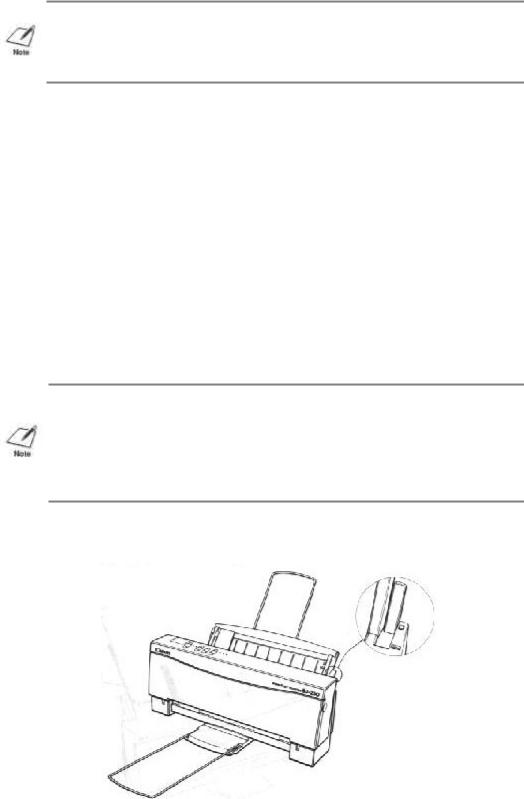
TMake sure there is enough room to fully extend the paper rest and use the paper exit support. The printer requires this much space:
Examining the Printer
Before setting up your printer, you should become familiar with its components and understand their functions.
From the Front
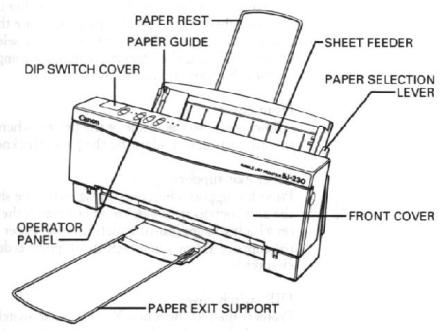
Sheet feeder
Stacks ups to 100 sheets of letteor- legal size paper or 50 sheets of ledger-size paper for automatic feeding. You can also manually feed a single sheet, such as a transparency or card stock.
Paper guide
Aligns paper in the sheet feeder. You can adjust the guide for paper widths of up to 11 inches (279 mm).
Paper rest
Keeps the paper straight in the sheet feeder and helps prevent misfeeds. Extend this support before loading a stack of paper in the sheet feeder.
Paper selection feeder
Selects the appropriate paper setting. For loading multiple sheets of normal-weight paper, set this lever to the back position. For envelopes or thick paper, set this lever to the front position. (Leave this lever in the back position when loading stacks of normal paper.)
Operator Panel
Controls the printer and defines basic printer operations. The various lights on the operator panel indicate statusof the prienter, and identify the print mode you've selected. See Chapter 4, Using the Operator Panel, for complete information on these buttons and lights.
Front cover
Allows access to the inside of the printer when you are installing the ink cartridge or adjusting the paper thickness lever.
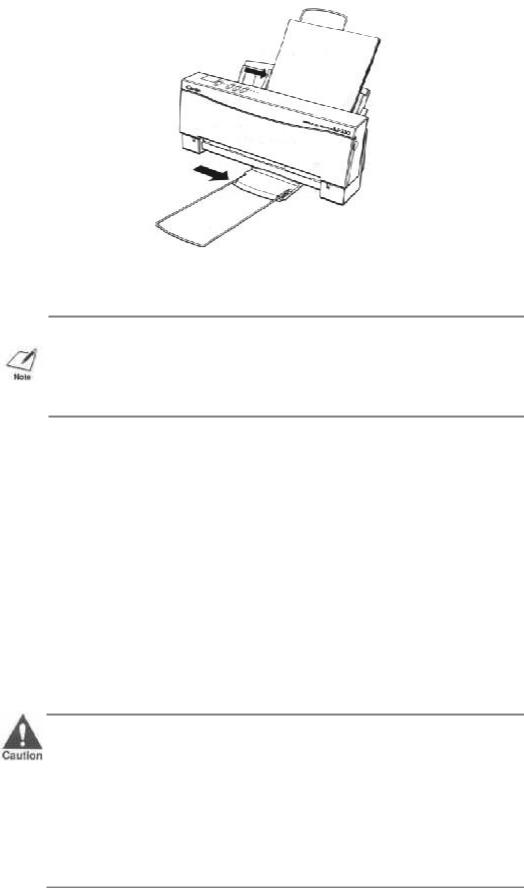
Paper exit support
Provides support when outputting letter-size sheets of paper. Slide the
exit support from side to side to match the width of the paper on which you are printing such that the paper will be centered on the support. (How you attach this support is describe later in this chapter.)
Dip switch cover
Protects the DIP switches. You use these switches to change the printer's factory default settings. For information about changing the default settings, see Chapter 8, Customizing the Printer.
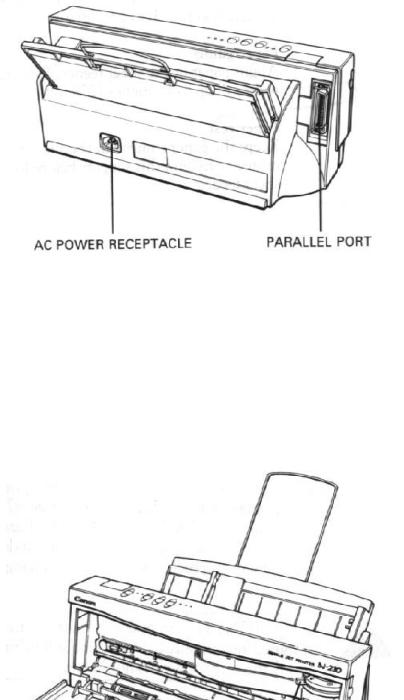
From the Back
Parallel interface port
Allows you to attach the printer's interface cable.
AC power receptacle
Allows you to attach the printer's power cord.
Inside the Printer
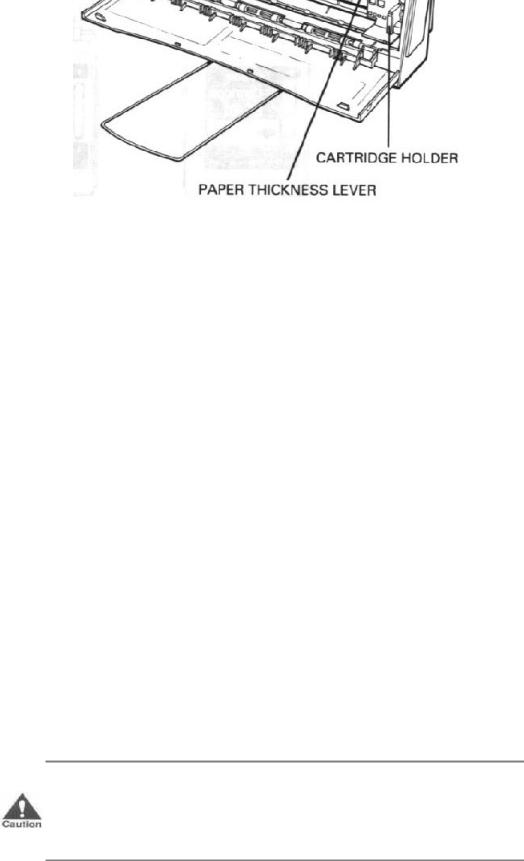
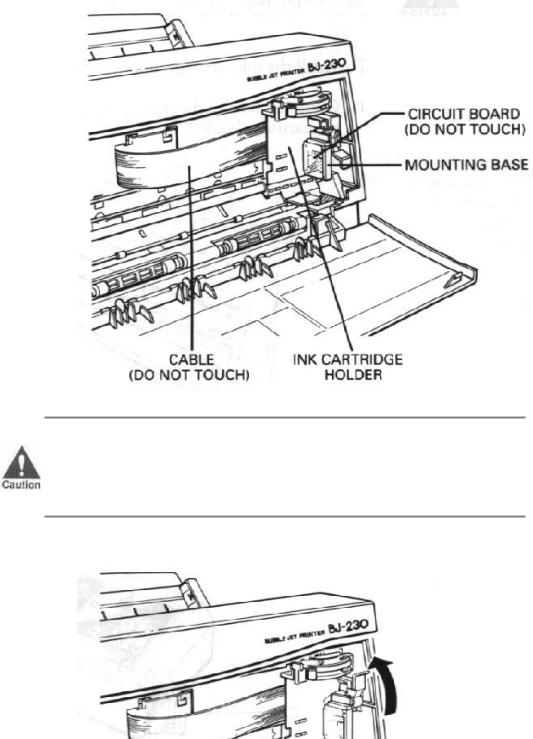
Ink cartridge holder
Allows you to install the ink cartridge (as described later in this chapter).
Paper thickness lever
Identifies the thickness of your paper. The setting you choose adjusts the distance between the print head and the paper. There are two settings: left for normal paper and right for thick paperor envelopes. (After you remove the tape that protects this lever during shipping, slide the lever to the left.)
Assembling the Printer
Now that you are familiar with the components of your printer, you are ready to install the printer and connect it to your computer. The first step is to install the ink cartridge.
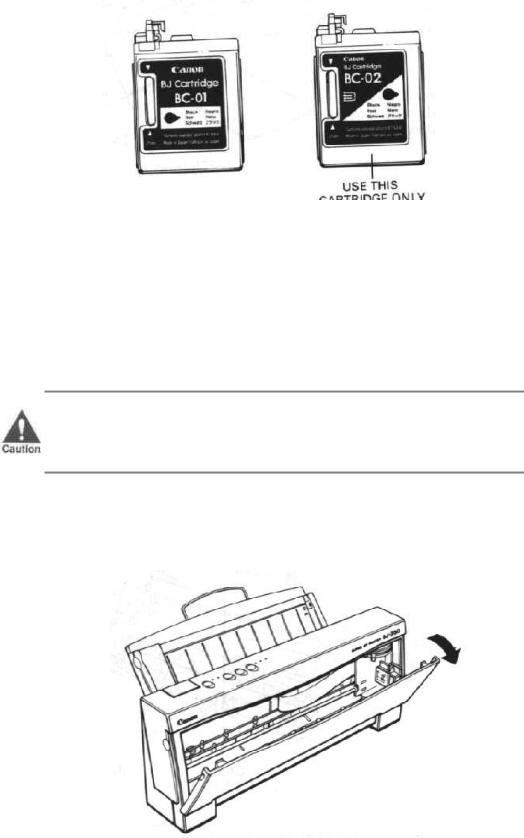
Installing the Ink Cartridge
You use the BC-02 ink cartridge with this printer. Each ink cartridge can print about 400 to 500 letter-size pages (700,000 characters) in HQ mode and 800 to 1000 pages (1,400,000 characters) in HS mode. The actual amount varies according to the print density of a page. If you print a lot of graphics, you may need to change cartridges more often.
CAUTION: Canon makes numerous ink cartridges; teh BC-02 is desginged specifically for the Bubble Jet Printers BJ-200 and BJ-230 and is the only one you should use.
To avoid spilling ink, follow these precautions:
TDo not touch the print head on the ink cartridge or the sharp edges around it.
TDo not hold the ink cartridge, or place it on your table, with the print head facing down, except when you are installing it.
TDo not attempt to disassemble the cartridge.
TDo not vigorously shake the ink cartridge while handling it.
CAUTION: Keep the ink cartridge out of children's reach; the ink contains isopropyl alcohol 67-63-0.
To install the ink cartridge, follow these steps:
1. Grasp the sides of the front cover and open it so you can access the cartridge holder.
2.Take the ink cartridge out of its protective packaging.
3.Slide off the orange protective cap from the print head and
remove the orange tape.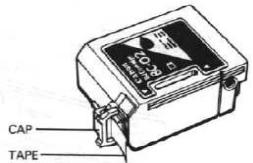 4. Locate the cartridge holder on the right side of the printer.
CAUTION: Avoid touching the yellow mounting base on which you place the cartridge -- especially the circuit board on the side of the mounting base and the film cable that extends from the cartridge holder.
5. Lift the green lock lever on the cartridge holder.

6.Fit the ink cartridge over the yellow mounting base with the print head facing down. (When installed correctly, the label on the cartridge will appear upside down.)
7. Push the lock lever down until it snaps into place.
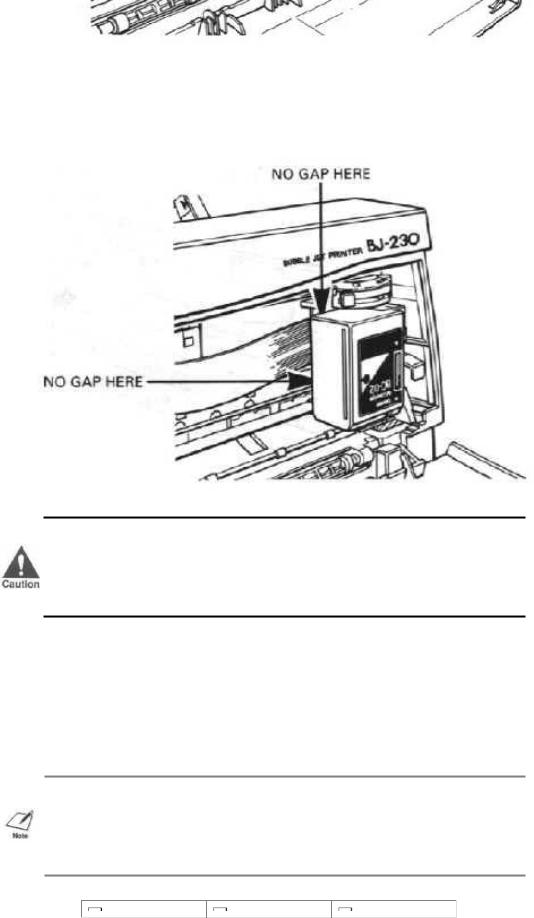
Make sure there is no resistance when you press on the lock lever, and be sure no gap exists between the ink cartridge and cartridge holder. When secure, the ink cartridge makes contact with the circuit board inside the cartridge holder.
CAUTION: Do not move the ink cartridge after installing it. Moving the ink cartridge to the left and leaving it there may uncap the print head and cause it to dry out.
8. Close the front cover.
When you turn off the printer, the ink cartridge moves to the home position on the right and caps itself to keep from drying out. If you unplug the printer while it is printing, or if you move the ink cartridge from the home position, the cartridge is not capped and may dry out.
NOTE: If, after installing a new ink cartridge, the printer seems to be printing but no ink appears, stop the print operation. Remove and replace the ink cartridge making sure it is secure.
Chapter 3
Loading Paper
This chapter descibes how to load paper, envelopes, thick paper, and transparencies in the printer. To ensure the best performance of your printer, you want to select the best paper and load it correctly.
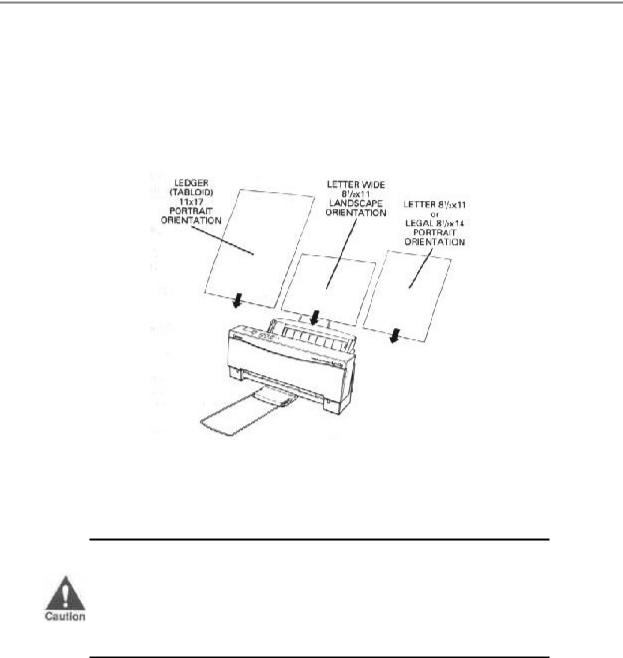
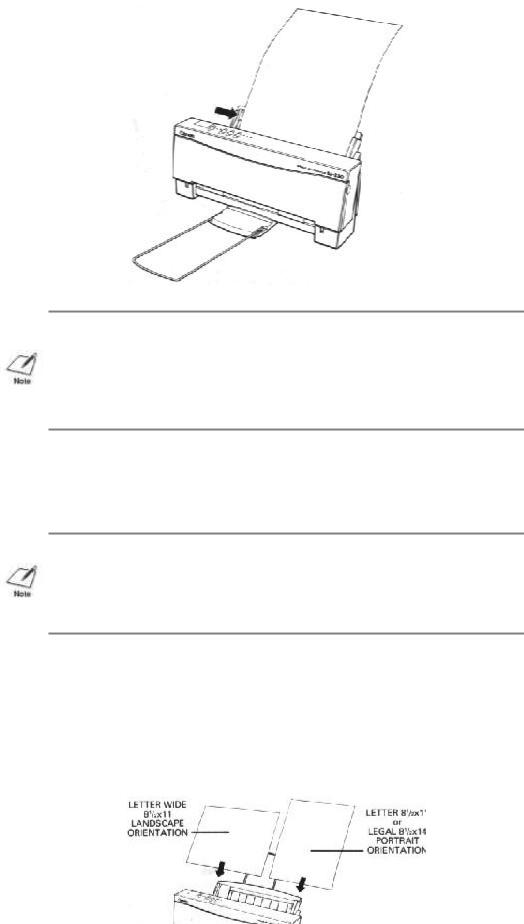
The wide-carriage capabilities of your printer allow you to load lettersize paper in either portrait or landscape orientation and legal-or ledgersize paper in portrait orientation.
You can stack paper in the sheet feeder to load it automatically, or you can manually feed one sheet at a time. The path that the paper travels through the printer is the same for automatic and manual feeding.
CAUTION: Make sure the width of the paper on which you are printing matches the width defined by your software so there is always paper between the print head and the platen. The print head may be damaged if it prints directly on the platen.
Automatically Feeding Paper
Your printer produces letter-quality print on most plain bond papers, including cotton bond papers and photocopying papers,. This printer does not require special ink-jet papers.
Purchase a small amount of paper and test it to see if it meets your printing requirements.
NOTE: Attempting to print on damp, curled, wrinkled, or torn paper can cause paper jams and poor print quality.
You can automatically feed single sheets of plain papers:
Size: Letter -- 8.5 x 11 inches (210 x 279 mm) Legal -- 8.5 x 14.0 inches(216 x 356 mm), portrait orientation only
Ledger -- 11 x 17 inches(279 x 420 mm), portrait orientation only
Thickness: Less than 0.008 inches (0.2 mm)
Weight: 17 to 24 lbs (64 to 90 g/m²)
You can stack up to 100 sheets of plain letter-size or legal-size paper (20lbs or 75 g/m), and up to 50 sheets of plain ledger-size paper (20lbs or 75 g/m), in in the sheet feeder.
NOTE: Make sure the paper size you select within your printer driver matches the orientation in which you load the paper in the printer. See Chapter 5, Using the Printer With Software, for information on printer drivers.
1. Set the paper selection lever to the back position.
NOTE: You set the paper selection lever to the front position only when loading envelopes or manually feeding paper. If it is set to the front position when you are automatically feeding stacks of normal paper, the printer may feed multiple sheets or jam.
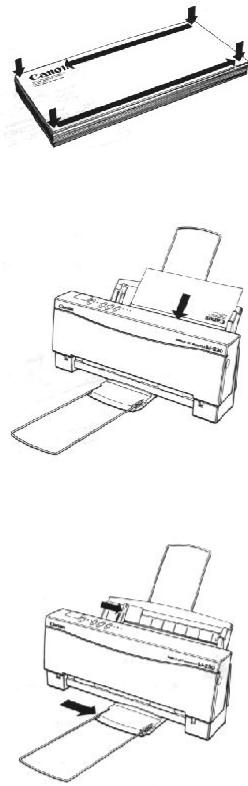
2. Fan the paper before stacking it in the sheet feeder.
3.Align the stack of paper with the right edge of the sheet feeder and slide in the stack until it stops. Do not force the paper into the printer. Make sure the stack of paper does not exceed the paper limit mark or the tab on the right side of the sheet feeder.
4.Insert the paper so that the side you want to print on is facing you. If you are using a preprinted stock, such as letterhead, insert the top of the paper into the sheet feeder first.
5.Adjust the paper guide to the stack of paper , and adjust the paper exit support to match the width of your paper so that the paper will be centered on the support.
6. Make sure the printer is on-line and start your print operation.
NOTE: Do not leave paper stacked in the printer for long periods os time; longer sheets of paper may become bent or curled over time. This may cause multiple sheets to feed or the paper may jam.
Remove paper from the paper exit support before the count reaches 20 sheets.
Printing On Envelopes
You can stack up to 10 envelopes in the sheet feeder. Before printing on envelopes, you need to turn on the envelope mode.
Use only commercial, number 10 envelopes, which are 9.5 x 4.1 inches (241 x 104 mm). (Other envelope sizes are not supported by this printer.)
CAUTION: Some envelopes are not recommended because they may cause jams or smears or may damage your printer:
TEnvelopes with windows, metal clasps, holes, perforations, cutouts, double flaps, or peel-off sealing strips.
TEnvelopes that are specially coated or deeply embossed.
TEnvelopes with letters enclosed.

When you are ready to load envelopes, follow these steps:
1.Make sure the printer is turned on and on-line.
2.Turn on the envelope mode by pressing and holding the LF/FF button, and then pressing the ON LINE button. The beeper sounds once and the indicator light for the current print mode blinks quickly. Press ON LINE to set the printer back on-line.
3.Set the green paper thickness lever on the inside of the printer to the right.
4.Set the paper selection lever to the forward position, and move the paper guide to the left to match the width of the envelopes.
5.Arrange the stack of envelopes on a firm surface and press down firmly on the edges to make the folds crisp. Press all the way around the envelopes to remove any curls and expel air from inside the envelopes.
6.Align the stack of envelopes with the right edge of the sheet feeder and slide in the stack until it stops.
7.Adjust the paper guide to the stack of envelopes, and adjust the paper exit support to match the width of the envelopes.
8. Start your print operation.

After printing on envelopes, follow these stepa before printing on normal paper again:
1.Set the paper selection lever (on the right side of the sheet feeder) to the back postion.
2.Set the green paper thickness lever (inside the printer) to the left position.
3.Disable the envelope mode: make sure the printer is on-line; then press and the hold the LF/FF button and press the ON LINE button.
Use the envelope mode only when you are loading envelopes; do not use this mode when loading regular or thick paper.
Manually Feeding Thick Paper or Transparencies
You use the manual feed feature when printing on paper that is a heavier weight (up to 28lb or 105 g/m²) or a transparency stock.
Use transparencies that are intended for use with ink jet printers. For best results, use Canon's BJ transparency film #Q07-0001-M1. You can also use 3M's CG3480 transparency film.
CAUTION:
TAlways feed transparencies manually.
TUse transparencies only in a normal operating environment. High temperatures may damage a transparency.
To manually feed a single sheet, follow these steps:
1.Make sure the printer is turned on and on-line.
2.Set the paper selection lever (on the right side of the sheet feeder) to the forward position.
3.If you are printing on thick paper, open the front cover and make sure the green paper thickness lever (inside the printer) is set to the right.
4.Align the sheet of paper or transparency with the right edge of the sheet feeder, and adjust the paper guide to the sheet.
NOTE: When printing on a transparency, insert the sheet so the transparency side is facing you and the backing is toward the sheet feeder. Insert the top of the transparency (where it is attached to its backing) into the sheet feeder first.
5.Slide in the sheet until it stops, and hold it for about two seconds. The printer will automatically load the paper into position.
6.Start your print operation.
NOTE: After printing on thick paper or envelopes, set the paper thickness lever (inside the printer) back to the left position before printing on normal paper.
Loading Paper in Landscape Orientation
You can stack up to 100 sheets of plain letter-size paper in landscape orientation in the sheet feeder.
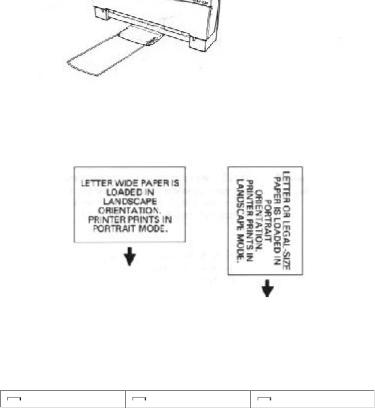
The printer prints faster on letter-size paper loaded in landscape orientation than it does when actually printing in landscape mode.
When you load paper in landscape orientation, you can use reduction mode to fit even more text on next page. (See Chapter 4, Using the Operator Panel, for details on using reduction mode.)
 Loading...