


Windsor Mk2
Instruction Book
This appliance must be installed in accordance with the regulations in force and only used in a well ventilated space.
Read these instructions before installing or using the appliance and retain them for future use.
The data badge is located below the oven door on the plinth panel.
Part no. 4866200052-04

|
CONTENTS |
|
|
PAGE |
|
|
|
|
Introduction |
3 |
|
For Your Safety |
4 |
|
Oven Timer Operation |
6 |
|
Hotplate |
12 |
|
Grill |
14 |
|
Oven |
15 |
|
Oven Cooking Chart |
17 |
|
The “E” Setting |
19 |
|
Care and Cleaning |
20 |
|
Something Wrong with your cooker? |
24 |
|
Installation Instructions |
26 |
|
Key Contacts |
Back Cover |
|
2
INTRODUCTION
To help you make the best use of your cooker, PLEASE READ THIS BOOKLET CAREFULLY.
Your new cooker is guaranteed and will give lasting service. The guarantee is only applicable if the cooker has been installed in accordance with the Installation Instructions.
The cooker is designed specifically for domestic use and responsibility will not be accepted for use in any other installation.
When first using the cooker ensure that the room is well ventilated (e.g. open a window or use an extractor fan) and that persons who may be sensitive to the odour avoid any fumes. It is suggested that any pets be removed from the room until the smell has ceased. This odour is due to any temporary finish and also any moisture absorbed by the insulation.
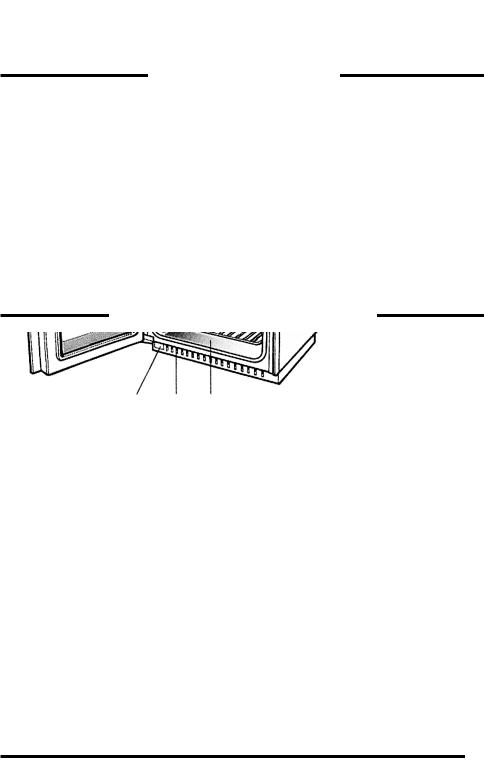
FEATURES
SIMMERING BURNERS |
GLASS LID WITH CUT OFF VALVE |
HIGH SPEED BURNERS |
VENTILATION SLOTS |
|
AUTOMATIC OVEN TIMER
GRILL
DATA BADGE
MAIN OVEN
VENTILATION SLOTS
3

FOR YOUR SAFETY
Please read the precautions below before using your cooker.
ALWAYS . . .
ALWAYS |
make sure you understand the controls before using the cooker. |
ALWAYS |
check that all controls on the cooker are turned off after use. |
ALWAYS |
stand back when opening an oven door to allow heat to disperse. |
ALWAYS |
use dry, good quality oven gloves when removing items from the ovens. |
ALWAYS |
take care when removing items from the top oven/grill when the main |
|
oven is on, as the contents may be hot. |
ALWAYS |
keep the oven and grill doors closed when the cooker is not in use. |
ALWAYS |
place pans centrally over the hotplate burners and position them so that |
|
the handles cannot accidentally be caught or knocked or become heated |
|
by other burners. |
ALWAYS |
keep the cooker clean, as a build up of grease or fat from cooking can |
|
cause a fire. |
ALWAYS |
allow the cooker to cool before cleaning. |
ALWAYS |
follow the basic principles of food handling and hygiene to prevent the |
|
possibility of bacterial growth. |
ALWAYS |
keep ventilation slots clear of obstructions. |
ALWAYS |
turn off the electricity supply before cleaning or replacing the oven |
|
lamp. |
ALWAYS |
refer servicing to CORGI registered appliance service engineers. |
4

|
|
FOR YOUR SAFETY |
|
|
|
|
|
NEVER . . . |
|||
NEVER |
leave children unsupervised where the cooker is installed as all surfaces |
||
|
will get hot during and after use. |
||
NEVER |
allow anyone to sit or stand on any part of the cooker. |
||
NEVER |
store items that children may attempt to reach above the cooker. |
||
NEVER |
heat up unopened food containers as pressure can build up causing |
||
|
the container to burst. |
||
NEVER |
store chemicals, food stuffs, pressurised containers in or on the cooker, |
||
|
or in cabinets immediately above or next to the cooker. |
||
NEVER |
fill a deep fat frying pan more than 1/3 full of oil, and never use a lid. |
||
|
DO NOT LEAVE UNATTENDED WHILE COOKING. |
||
NEVER |
place flammable or plastic items on or near the hotplate. |
||
NEVER |
use proprietary spillage collectors on the hotplate. |
||
NEVER |
use the cooker as a room heater. |
||
NEVER |
dry clothes or place other times over or near to the hotplate or oven/ |
||
|
grill doors. |
||
NEVER |
wear garments with long flowing sleeves whilst cooking. |
||
NOTE: The use of a gas cooking appliance results in the production of heat and moisture in the room in which it is installed. Always ensure that the kitchen is well ventilated; keep natural ventilation holes open or install a mechanical ventilation device (mechanical extractor hood).
In particular, when using the grill or more than one hotplate burner, open a window if a mechanical ventilation device is not operating.
5

OVEN TIMER OPERATION
The oven timer offers you the following features:
1.Time of Day
2.Automatic Cooking
3.Minute Minder
GUIDANCE ON AUTOMATIC COOKING
1.Select foods which will take the same time to cook.
2.Set the oven timer so that the food has just finished or is just about to finish cooking on your return to the oven. This will ensure the food has not cooled down and does not require reheating before serving.
3.Food should be as cold as possible when it goes into the oven, ideally straight from the refrigerator. Frozen meat and poultry should be thawed thoroughly before it is put in the oven.
4.Warm food should never be placed in the oven if there is to be a delay period. Stews prepared by frying the meat and vegetables should be cooked as soon as possible.
5.Dishes containing left-over cooked poultry or meat, for example Shepherds Pie, should not be cooked automatically if there is to be a delay period.
6.Stews and joints should be cooked by the long slow method, so that the delay period is kept to a minimum.
7.On warm days, to prevent harmful bacterial growth in certain foods (ie poultry, joints, etc) the delayed start should be kept to a minimum.
8.Wine or beer may ferment and cream may curdle during the delay period, so it is best to add these ingredients just before serving.
9.Foods which discolour should be protected by coating in fat or tossing in water to which lemon juice has been added, prior to placing food in the oven.
10.Dishes containing liquid should not be filled too full to prevent boiling over.
11.Food should be well sealed (but not airtight) in a container to prevent the loss of liquid during cooking. Aluminium foil gives a good seal.
12.Ensure food is cooked thoroughly before serving.
6
KNOW YOUR TIMER
CLOCKFACE
Minute Cook End
Minder Period Time Manual
A
U
T
O
O
Minute Cook End
Minder Period Time Manual
The timer incorporates a 24 hour clock.
Ensure the correct time of day is always set, before using you cooker. PLEASE NOTE THAT THE DISPLAY WILL DIM BETWEEN 22.00
HOURS AND 06.00 HOURS TO PREVENT GLARE.
However, should you operate the timer during these hours the display will return to normal brightness for a few seconds and then dim again.
SYMBOLS
 will light up when you select a Minute Minder Period and will remain lit for the period set. At the end of the Minute Minder Period, the timer will emit an audible tone for 2 minutes, the
  symbol will start to flash and will continue to flash until the Minute Minder function is cancelled.
This “Cookpot” symbol will light up either:–
–When you press the Cook Period Button and set a length of time for an Auto Cooking Programme. (It will go out again a few seconds after you release the timer buttons).
–During the actual Cook Period.
“AUTO” will light up:–
–When the timer is first turned on it will flash. (It will go out when a time of day is set).
–When an Auto Cooking Programme has been set.
The “Auto” symbol will flash at the end of an Auto Cooking programme to indicate that the programme has finished.
(When the “Auto” symbol is flashing, to return the oven to Manual operation, turn the oven controls off, ensure that the correct time of day is set, and press the “Manual” button twice – The “Auto” symbol will go out.
TIMER FUNCTION BUTTONS
Minute Minder |
Here you can set a time period of up to 23 hours 59 minutes, that will count down. |
Button |
When it reaches zero, the timer will emit an audible tone. |
|
For Example: If you set 20 minutes, the audible tone will occur 20 minutes later. |
AUTO COOKING PROGRAMME |
|
Cook Period Button |
Cook Period is the actual length of time for which, the timer will switch |
|
the oven on as part of an “Auto Cooking” programme. |
|
(e.g. If you set 2 hours, the food will be cooked for 2 hours). |
End Time Button |
The time of day at which you want an “Auto Cooking” programme to end. |
|
For Example: If you set a “Cook Period” for 2 hours, and “End Time” of 11:00. |
|
The timer will switch the oven on at 9:00 and turn the oven off at 11:00. You |
|
will hear a audible tone at 11:00, to indicate that the Auto Cooking Programme |
|
has finished. |
|
Notes: |
|
– When setting an Auto Cooking programme you will need to set the |
|
oven control to the required temperature when you set the timer. |
|
– If an Auto Cooking programme has been set the oven will only operate |
|
during the pre-programmed time. |
Manual Button |
Needs to be pressed to cancel an Auto Cooking programme and return the |
|
oven to Manual operation. |
“+” and “–” Buttons |
Used to adjust the various timer function settings. |
7

OVEN TIMER OPERATION
SETTING THE TIME OF DAY
A
U
T
O
Minute Cook End
Minder Period Time Manual
Minute Cook End
Minder Period Time Manual
Step 1 Make sure all oven controls are turned Off.
Step 2 Check the electricity supply to the cooker is turned on.
Step 3 When switched on the display will show 0.00 and Auto symbol will be flashing intermittently.
Step 4 Press & hold in both the “Minute Minder” & “Cook Period” button together.
Step 5 With the “Minute Minder” & “Cook Period” buttons still held in, press either the “+” or “–” buttons to set the correct time of day.
Step 6 Release all the buttons simultaneously.
THE TIME OF DAY IS NOW SET.
To change the time of day repeat Steps 4, 5 & 6 above.
Note: You cannot adjust the time of day if the timer has been set for an Auto Cooking Programme.
 Bell Symbol
Minute Cook End
Minder Period Time Manual
Minute Cook End
Minder Period Time Manual
SETTING THE MINUTE MINDER
Step 1 Ensure the time of day is set correctly.
Step 2 Press and hold the Minute Minder Button, a  symbol will light up.
Step 3 With the “Minute Minder” button held in, set the required Minute Minder time using the “+” and “–” buttons.
Release all buttons and the timer display will revert back to the time of day. Bell symbol will remain lit to signify that a Minute Minder period has been set.
At the end of the set time a bleeping sound will be heard, and the  symbol will flash for approximately 2 minutes.
After approximately 2 minutes the bleeping sound will stop and the  symbol will go out automatically.
Step 4 To cancel the bleeping sound within the two minutes press the Minute Minder button.
Note 1 When the Minute Minder has been set, the time remaining can be checked at any time by simply pressing the Minute Minder button.
Note 2 If necessary the Minute Minder can be cancelled before the tone sounds by pressing and holding the Minute Minder button and then at the same time pressing the “–” button until 0.00 appears in the display window.
8
OVEN TIMER OPERATION
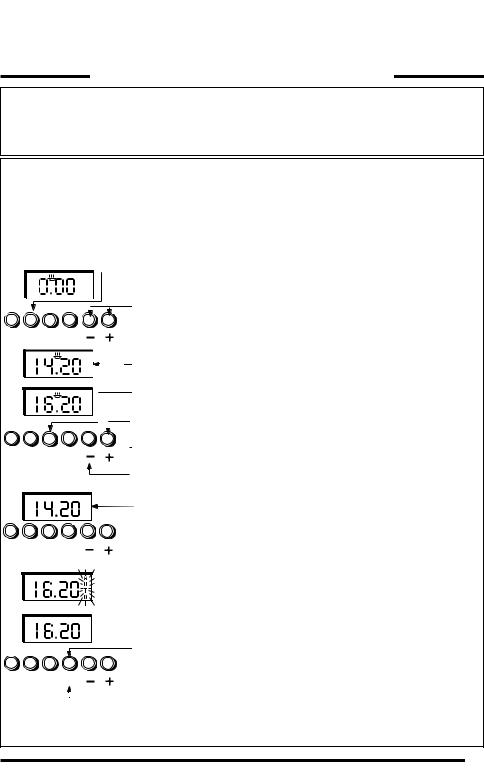
AUTO COOKING PROGRAMMES
There are two Auto Cooking programmes that can be selected using your timer:–
(a)To set the timer to switch the oven On and Off Automatically
(b)To set timer to switch on immediately and OFF automatically after a set cook period.
a) TO SET THE TIMER TO SWITCH THE OVEN ON AND OFF AUTOMATICALLY
This allows you to cook at a specified time for a chosen period before the oven switches off Automatically.
Step 1 Check that the correct time of day is set, if not follow instructions for setting the time of day.
Step 2 Place food onto the correct shelf position in the oven and close the oven door.
 Cooktop Symbol
Minute Cook End
Minder Period Time Manual
A
U
T
O
A
U
T
O
Minute Cook End
Minder Period Time Manual
A
U
T
O
Minute Cook End
Minder Period Time Manual
Minute Cook End
Minder Period Time Manual
Step 3 Press and hold in the Cook Period button.
The display will read 0.00 with the cookpot (  ) symbol lit.
Step 4 With the Cook Period button still held in, set the required Cook Period using the “+” and “–” buttons.
Release the buttons and the timer display will revert to the time of day with the Auto symbol and Cookpot ( ) symbol lit.
Step 5 Press and hold in the “End Time” button.
The display will read the earliest possible end time for the Cook Period that you have set above.
The Auto symbol and Cookpot (  ) symbol lit.
Step 6 With the End Time button still held in, use the “+” and “–” buttons to set the “End Time” (i.e. The time you require the oven to switch off).
Release all the buttons and the timer will revert back to the time of day.
The “Auto” symbol will remain lit to signify that an Auto Cooking Programme has been set. The ( ) symbol will go out.
Step 7 Turn the oven control to the required temperature, and if necessary select the appropriate oven function.
At the end of the Automatic Cook Period the Auto Symbol will flash and an intermittent bleeping sound will be heard.
The bleeping sound will continue for approximately 2 minutes unless cancelled. The “Auto” symbol will continue to flash until the timer is returned to Manual operation (see below).
Step 8 Press the Manual button to cancel the bleeping sound. (If 2 minutes has not elapsed).
Step 9 Turn the oven control to the OFF position.
Step 10 Press the manual button again to return the oven to Manual Operation. (The Auto symbol will go out)
9
OVEN TIMER OPERATION
Note 1 When cooking automatically the Cook Period can be checked at any time by simply pressing the Cook Period button.
Note 2 When cooking automatically the End Time can be checked at any time by simply pressing the End Time button.
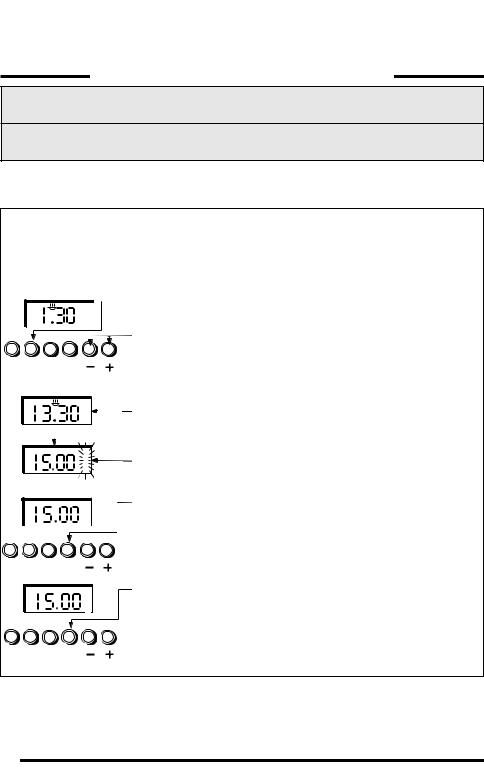
b)TO SET TIMER TO SWITCH ON IMMEDIATELY AND OFF AUTOMATICALLY AFTER A SET COOK PERIOD
Step 1 |
Check that the correct time of day is set, if not follow instructions for setting the time of day. |
Step 2 |
Place food onto the correct shelf position in the oven and close the oven door. |
Step 3 |
Turn the oven control to the required temperature, and if necessary select the appropriate |
|
oven function. |
 Cookpot Symbol
Minute Cook End
Minder Period Time Manual
A
U
T
O
Note: Cookpot symbol disappears
A
U
T
O
A
U
T
O
Minute Cook End
Minder Period Time Manual
A
U
T
O
Step 4 Press & hold in the “Cook Period” button, the display will read 0.00 and the cookpot (  ) symbol will light up.
With the Cook Period button still held set the required Cook Period using the “+” and “–” buttons. Example: 1hr 30 minutes (as shown).
Note: Cook Period is the length of time the food requires to cook.
Step 5 Release all buttons.
The timer display will revert to the time of day with the Auto symbol lit & Cookpot symbol remaining lit.
At the end of the Cook Period the “Auto” symbol will flash and an intermittent bleeping sound will be heard.
The bleeping sound will continue for approximately 2 minutes unless cancelled. The “Auto” symbol will continue to flash until the timer is returned to Manual operation (see below).
Step 6 Press the manual button to cancel the bleeping. (If 2 minutes has not elapsed)
Step 7 Turn the oven control to the OFF position.
Step 8 Press the “Manual” button again to return the oven to Manual operation. (The Auto symbol will go out).
Minute Cook End
Minder Period Time Manual
10
OVEN TIMER OPERATION
TO CANCEL AN AUTO COOKING PROGRAMME BEFORE THE COOK PERIOD HAS FINISHED.
Step 1 Turn the oven control to the OFF position.
Step 2 Press and hold in the “Cook Period” button.
Minute Cook End
Minder Period Time Manual
A
U
T
O
Minute Cook End
Minder Period Time Manual
Step 3 With the “Cook Period” button still held in, return the display to 0.00 by pressing the “–” button.
Step 4 Release the “Cook Period” and “–” buttons and the display will revert to the time of day and the “Auto” symbol will flash.
Step 5 Press the “Manual” button to return the oven to “Manual” operation. The “Auto” symbol will go out.
Note 1 When cooking automatically the Cook Period can be checked at any time by simply pressing the Cook Period button.
OTHER NOTES ON TIMER OPERATION
1.When cooking Automatically the Cook Period can be checked at any time simply by pressing the Cook Period button.
2.When cooking Automatically the End Time can be checked at any time by simply pressing the End Time button.
3.Having set a Cook Period and End Time an electronic device stores the information. The device within the timer will switch the oven(s) on and off at the required times.
4.When setting an Auto Cooking Programme and a mistake is made, to clear:–
(a)Press and hold in the “Cook Period” button.
(b)With the Cook Period button still held in, return the display to 
 by pressing the “–” button.
(c)Release the “Cook Period” & “–” buttons, and the display will revert to the time of day and the “Auto” symbol will flash.
(d)Press & release the “Manual” button.
(e)Start the sequence again.
5.If at any time the display shows three flashing zero’s 0.00. It is likely that the electricity supply to the oven has been interrupted. Reset the timer to the correct time of day.
Food in the oven may, therefore, not have been cooked, before serving check food is thoroughly heated and completely cooked.
6.To set each function always press and hold the required function button and at the same time press “+” or “–” buttons.
Note: Between the hours of 22.00 & 06.00 the display dims to prevent glare.
However, if you should operate a button during this period, the timer will return to normal brightness for a few seconds and then dim again.
11
 Loading...