


CAUTION:
READ THIS MANUAL CAREFULLY
BEFORE OPERATING YOUR NEW
CANNON® DOWNRIGGER.
RETAIN FOR FUTURE REFERENCE.
MAG 10HS
MAG 10TS
MAG 5HS
NOTE: Do not return your CANNON® Downrigger to your retailer. Your retailer is not authorized to repair or replace this unit. You may obtain service by:
•calling CANNON® at 1-800-227-6433;
•returning your downrigger to the Factory Service Center;
•sending or taking your downrigger to any CANNON® Authorized Service Center on enclosed list.
Please include proof of purchase, serial number and purchase date for warranty service with any of the above options.
OWNER’S MANUAL
Introduction to Downriggers |
|
pg. 2 |
Maintaining Your Downrigger |
|
pg. 11 |
||||||||||||
Mounting Your Downrigger |
|
|
pg. 2-6 |
Positive Ion Control |
|
|
pg. 12 |
||||||||||
Terminator & Line Release |
|
|
|
pg. 7 |
The Effects of Blowback |
|
pg. 12-13 |
||||||||||
Cannon Uni-Release |
|
|
|
|
pg. 7 |
Troubleshooting |
|
|
|
|
pg. 13 |
||||||
Attaching the Rod Holder |
|
|
pg. 8 |
Trolling Tips |
|
|
|
|
|
pg. 14 |
|||||||
Wiring Your Downrigger |
|
|
|
|
pg. 9 |
Warranty Information |
|
pg. 15 |
|||||||||
Operating Your Downrigger |
|
|
|
|
|
pg. 10-11 |
Cannon Service Policy |
|
|
|
pg. 15 |
||||||
The Short Stop System |
|
|
|
pg. 11 |
Authorized Service Centers |
|
|
See List |
|||||||||
downriggers to Introduction
Introduction to Controlled Depth Fishing
Undoubtedly there are many fishermen familiar with the methods and use of controlled depth fishing. During the mid 1960's the state of Michigan introduced Pacific salmon into the Great lakes in an attempt to revitalize its sport fishing industry. From this successful transplant, new fishing techniques and equipment were developed. One such method was controlled depth fishing which enabled fishermen to place a lure at a desired depth by utilizing downriggers.
Because of the varying factors (water temperature, thermocline, weather, tides, time of day, or time of year) it is necessary for successful fishing to maintain specific water depths that coincide with fish movements and feeding patterns.
One essential feature of the downrigger is the depth meter or gauge that indicates lure depth. This allows the angler to control as well as return to specific depths where fish have been caught.
Due to the success of controlled depth fishing, downriggers are now being used throughout the world to catch a wide variety of species in both fresh and salt water. Whether fishing for blues off Rhode Island, walleyes in Lake Erie, sailfish off the coast of Florida, or stripers in Tennessee, the use of downriggers will make your fishing more successful and more enjoyable.
|
|
|
Attach Line Release to |
|
|
|
Rear Hook on Weight |
|
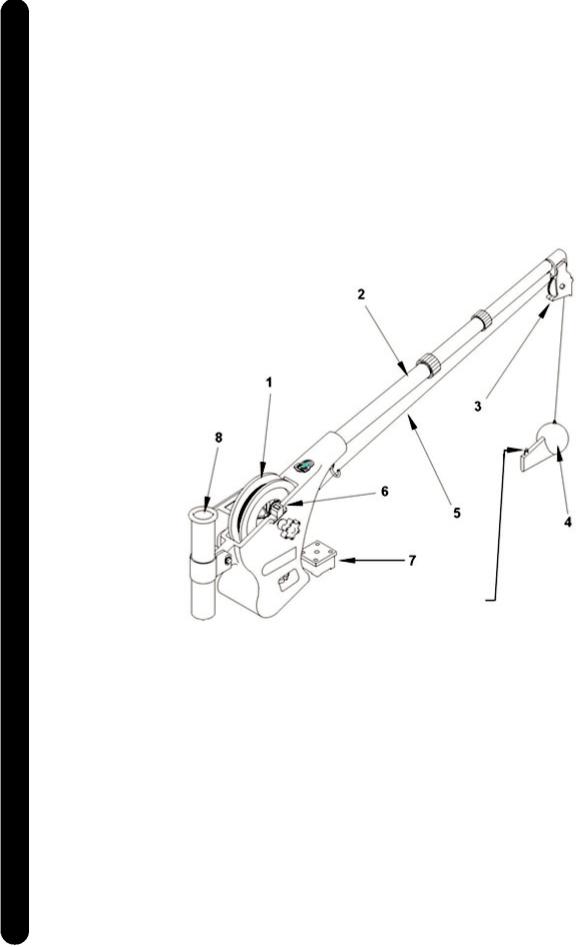
Parts Description |
|
|
|
1. |
Reel |
This is used to spool the cable, available in lengths ranging from 150 to 400 feet. |
|
2. |
Boom |
This is used to extend the weight out from the body of the downrigger and has a pulley fixed |
|
|
|
to its end. Boom lengths range from 24 to 53 inches. |
|
3. |
Swivel Head |
This relays the cable at the end of the boom to lower the weight. |
|
4. |
Weight |
This is used to maintain the depth at which you want to fish. Sizes of weights range from 4 to |
|
|
|
20 lbs. |
|
5. |
Cable |
This connects to the weight. Cable material is 150 lb. test stainless steel cable. |
|
6. |
Depth Meter |
This determines how much cable you have run out, enabling you to choose your trolling |
|
|
|
depth. |
|
7. |
Mounting Base This attaches to the boat, enabling you to place the downrigger where you choose. |
|
2 |
8. |
Rod Holder |
This holds your fishing rods while trolling and may also be used for storing rods. |
|
|||
Downrigger Mounting on Boats
A downrigger should be mounted where ever it is easy to operate and observe. You want to be able to see your fishing rod and to react quickly. So, choosing a good spot to mount your downrigger on your boat is 99% of the job.
Due to the great variety of boats available, mounting your downrigger can be a dilemma. Having proper mounting accessories is essential. Cannon has a complete line of mounting accessories to conveniently mount your downriggers on any boat.
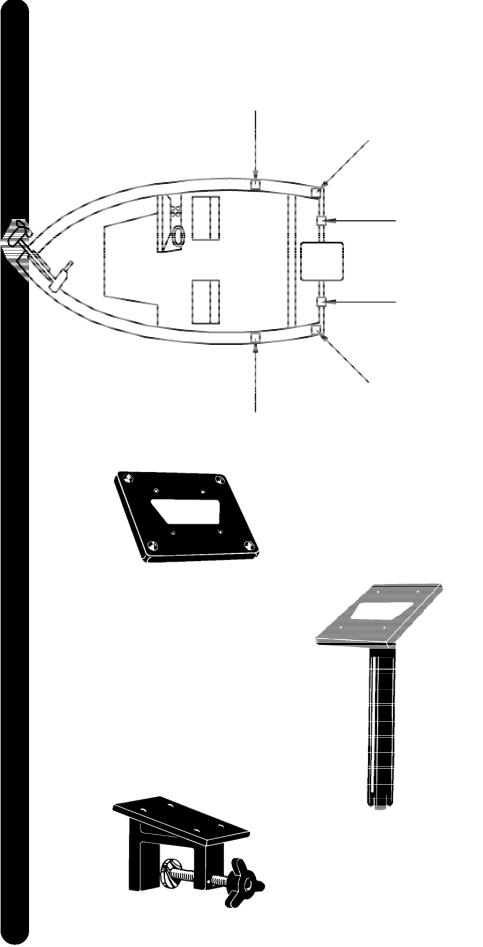
Mounting Accessories
Deck Plates are necessary when extra strength must be added to the base material of the boat and for attaching the downrigger to other mounting accessories.
Gimbal Mounts are designed to fit mediumsized flush mounted rod holders built into the gunwale of many larger fishing boats and cruisers. Only sturdy, high quality rod holders should be used for this temporary mounting system. Gimbal mounts are available in 9” or 12” post lengths.
Clamp Mounts can be mounted at the junction of two rail sections with the aid of two ¼" pieces of plywood. They will protect your rail from any marks from the clamp and provide a non-slip urface.
Arrows
Indicate
Mounting
Locations
Deck Plate
Gimbal Mount
Clamp Mount
SETUP & MOUNTING
3

SETUP & MOUNTING
Side Rail Mounting
Side/Rail mounts can be mounted to a welded T-section. It can also be used at the two rail section butt joint. In both installations it is recommended to use a non-slip material, such as rubber or a thin wood sheet, between metal surfaces.
You can also use these for mounting to a very narrow side gunwale. There is a plate provided for back-up with bolts and washers. If the gunwale compartment is foamed in, then wellnuts should be used. It is also recommended to install two additional flat head screws through the top plate for stabilization (you will need to drill and countersink).
NOTE: In no case should this mount be used on fiberglass ¼" thick or less unless it is foamed in.
Pedestal Mounting
Pedestals are used wherever additional height is needed for ease of operation or to clear obstructions, such as handrails.
Caution: When using a pedestal mount or side/rail mount, do not extend the telescopic boom on your Mag 10 HS \ Mag 10 TS. The increased leverage will cause excessive strain and possible failure of the mount.
Side/Rail on T-Section
Side/Rail on Gunwale
Pedestal for Additional Height
4
Installing the Base on Your Boat
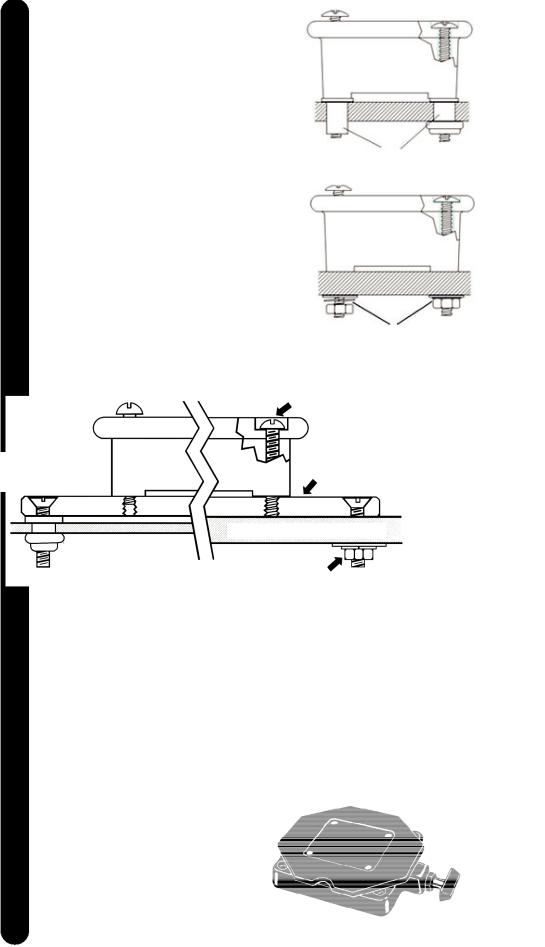
Decks up to 7/16" thick
Where access to the underside of the deck is not available, the mounting base can be mounted using wellnuts. Use the base as a template to mark locations and drill four 1/2" holes. Mount the base using four 1/4-20 x 4" truss head screws and four wellnuts. Tighten the screws so the wellnuts are firmly compressed as pictured.
Decks thicker than 7/16"
For decks thicker than 7/16", or where the underside of the deck is accessible, mount the base with screws, nuts, and washers. Use the base as a template to mark the locations and drill four 9/32" holes. Use four 1/4-20 x 4" truss head screws and four each flat washers, lock washers, and nuts. Fasten the base to the deck as pictured. NOTE: Wellnuts cannot be used on decks thicker than 7/16".
Decks thinner than 1/4"
Use a Cannon deck plate to prevent deflection and add stability to decks thinner than 1/4". Use the deck plate as a template to
mark the hole locations.
Deck Up to 7/16" Thick
Wellnut
Decks up to 7/16" Thick
Base
Wellnuts
Decks Thicker |
Base |
|
Than 7/16" Thick |
||
|
Washers, Lock Washers,
Screws, & Nuts
Screws
Deck Plate
Deck Thicker Than 7/16"
Washers, Lock
Washers, Screws,
& Nuts
If access to the underside of the deck is not available, the deck plate can be mounted using screws and wellnuts. Drill 1/2" holes. Use four 1/4- 20 x 2" flat head screws and four wellnuts to mount deck plate as pictured. Tighten the screws so the wellnuts are firmly compressed.
Where the underside is accessible, the deck plate can be mounted using screws, nuts, and washers. Drill 9/32" holes. Use four 1/4-20 x 2" flat head screws, nuts and washers (flat and lock). Fasten plate to deck as pictured. To secure the mounting base to the deckplate use four 1/4-20 x 2" truss head screws.
NOTE: When using the telescopic boom, we strongly recommend the use of a deck plate on all boats to provide adequate stability for the downrigger.
FOR MAG 10 HS and MAG 10 TS:
The Low-Profile Swivel Base mounting follows the same procedure as for the deck plate except that four 1/4”-20 x 2 1/2" truss head screws are used to fasten the mounting base and four additional 1/4”-20 x 2 1/2" truss head screws fix the swivel base to the boat deck.
Low-Profile Swivel Base
SETUP & MOUNTING
5
 Loading...