


EN |
User instructions |
CN 53.1/C |
ES |
Instrucciones para el uso |
|
|
|
|
ES
ENHORABUENA
Con la compra de este electrodoméstico Candy; usted ha demostrado no conformarse con cualquier cosa: usted quiero lo mejor.
Candy se complace en ofrecerle esta nueva lavadora, fruto de años de investigación y de experiencia en el marcado y del contacto directo con los Consumidores. Usted ha escogido la calidad, la duración y las enormes prestaciones que esta lavadora le ofrece.
Candy le ofreces además, una amplia gama de electrodomésticos: lavadoras, lavavajillas, lavadoras-secadoras, cocinas, microondas, hornos y encimeras, frigoríficos y congeladores.
Solicite a su vendedor el catálogo completo de la gama de productos Candy.
Le rogamos lea atentamente la información contenida en este manual ya que proporciona importantes instrucciones sobre seguridad en su instalación, uso, mantenimiento y algunos consejos prácticos para que ested saque el mejor provecho de su lavadora.
Conserve este manual para cualquier consulta posterior. Cuando se ponga en contacto con Candy o con sus centros de Asistencia mencione siempre el Modelo, el n° y el número G (si lo tiene).
Es decir todo lo que viene anotado en el recuadro.
EN
OUR COMPLIMENTS
With the purchase of this Candy household appliance, you have shown that you will not accept compromises: you want only the best.
Candy is happy to present their new washing machine, the result of years of research and market experience through direct contact with Consumers.You have chosen the quality, durability and high performance that this washing machine offers.
Candy is also able to offer a vast range of other household appliances: washing machines, dishwashers, washer-dryers, cookers, microwave ovens. Traditional ovens and hobs, refrigerators and freezers.
Ask your local retailer for the complete catalogue of Candy products.
Please read this booklet carefully as it provides important guide lines for safe installation, use and maintenance and some useful advise for best results when using your washing machine.
Keep this booklet in a safe place for further consultation.
When contacting Candy or a Customer Services Centre always refer to the
Model, No., and G number (if applicable of the appliance see panel).
ES |
|
EN |
|
CAPÍTULO |
|
|
|||
|
|
|
|
|
ÍNDICE CAPÍTULO |
|
INDEX |
|
CHAPTER |
|
|
|
||
Introduccíon |
|
Introduction |
|
|
Notas generales a la |
|
General points on delivery |
|
1 |
entrega |
|
|
|
|
Garantía |
|
Guarantee |
|
2 |
Normas de seguridad |
|
Safety Measures |
|
3 |
Datos técnicos |
|
Technical Data |
|
4 |
Puesta en funcionamiento |
|
Setting up and Installation |
|
5 |
instalación |
|
|
|
|
Descripción de los mandos |
|
Control Description |
|
6 |
Cubeta del detergente |
|
Detergent drawer |
|
7 |
Seleción/Consejos útiles |
|
Selection/Customer |
|
8 |
para el usuario |
|
Awareness |
|
|
El producto |
|
The Product |
|
9 |
Tabla de programas |
|
Table of Programmes |
|
10 |
Lavado |
|
Washing |
|
11 |
Limpieza y mantenimiento |
|
Cleaning and routine |
|
12 |
ordinario |
|
maintenance |
|
|
Causas de averías |
|
Faults Search |
|
13 |
|
|
|
|
|
2 |
3 |
ES
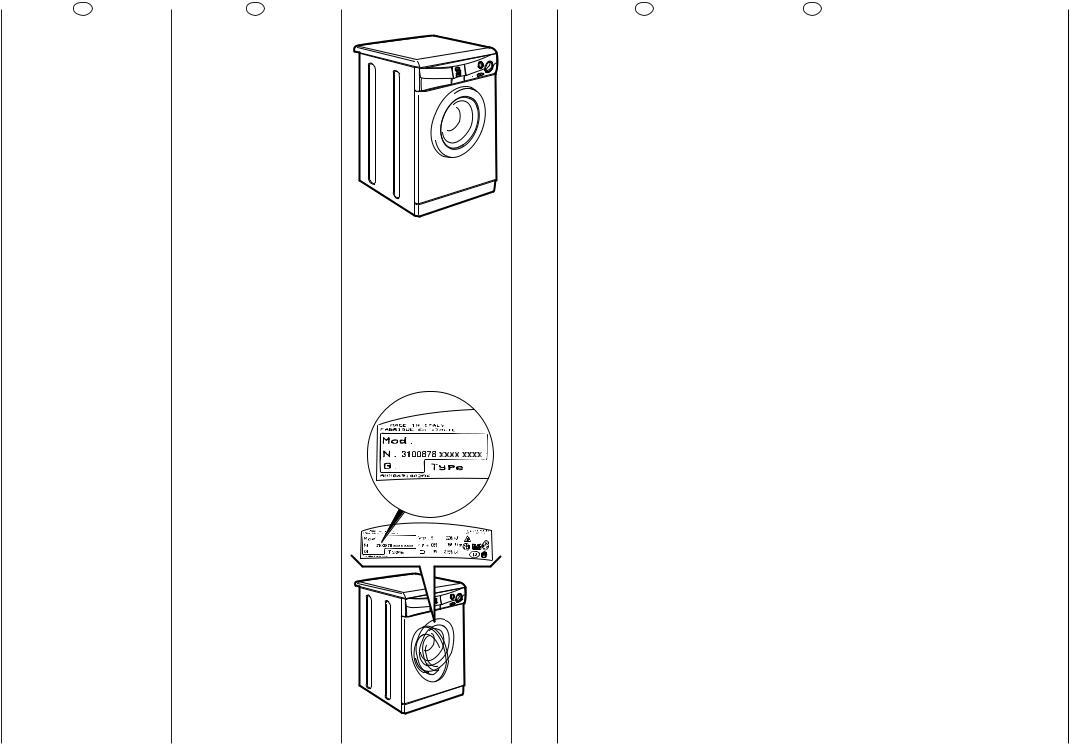
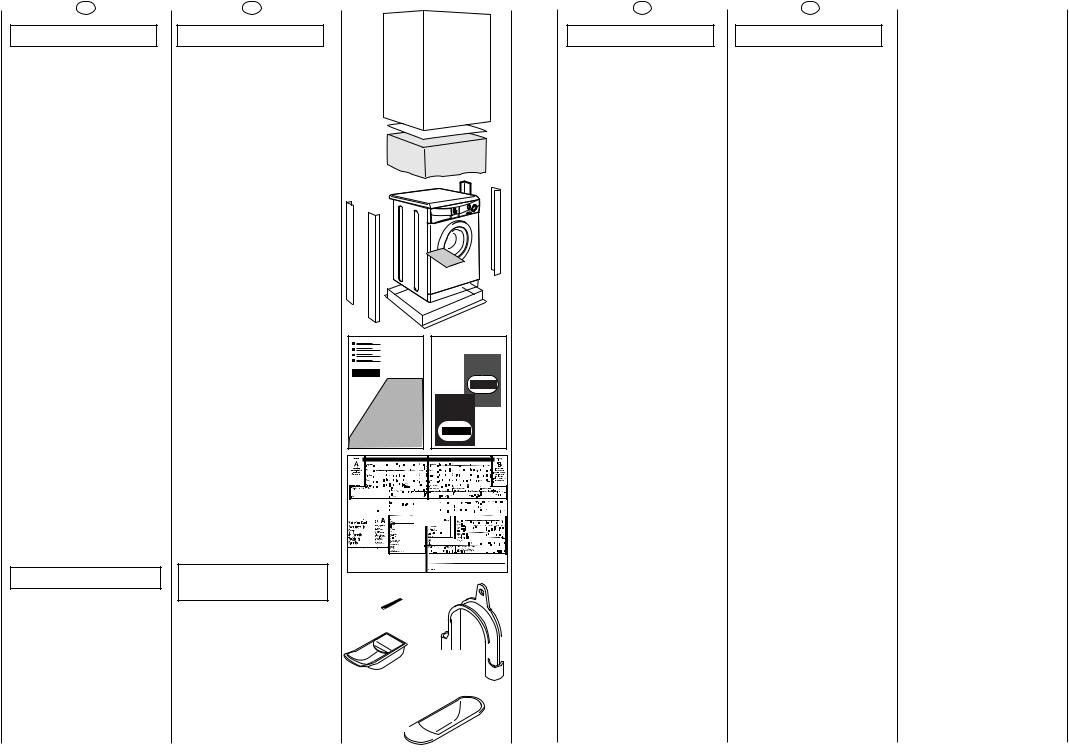
CAPÍTULO 1
NOTAS GENERALES DE ENTREGA
A la entrega compruebe que con la máquina estén:
A)MANUAL DE INSTRUCCIONES
B)DIRECCIONES DE ASISTENCIA TÉCNICA
C)CERTIFICADOS DE GARANTÍA
D)TAPONE
E)CURVAS PARA EL TUBO DE DESAGÜE
F)DEPÓSITO DETERGENTE LÍQUIDO
G)MEDIDOR PROGRAMA 32’
CONSÉRVELOS
y compruebe que no haya sufrido desperfectos durante el transporte, en caso contrario llame al centro Candy más cercano.
4
EN
CHAPTER 1
GENERAL POINTS ON DELIVERY
On delivery, check that the following are included with the machine:
A)INSTRUCTION MANUAL
B)CUSTOMER SERVICE ADDRESSES
C)GUARANTEE CERTIFICATES
D)CAP
E)BEND FOR OUTLET TUBE
F)LIQUID DETERGENT COMPARTMENT
G)32 MINUTE PROGRAMME DOSING SCOOP
KEEP THEM IN A SAFE PLACE
Check that the machine has not incurred damage during transport. If this is the case, contact your nearest Candy Centre.
|
EUROPE |
|
Dovunque |
|
tu sia. |
A |
B |
SPEDIRE |
TRATTENERE |
 C
C


D
 E
E 


F
G  32'
32' 
ES
CAPÍTULO 2
GARANTIA
El aparato va acompañado de un Certificado de Garantía.
EN
CHAPTER 2
GUARANTEE
The appliance is supplied with a guarantee certificate which allows free use of the Technical Assistance Service.
5

ES
CAPÍTULO 3
NORMAS DE
SEGURIDAD
ATENCION: PARA
CUALQUIER TRABAJO DE LIMPIEZA Y MANTENIMIENTO
●Desenchúfela.
●Cierre el grifo del agua.
●Candy provede a todas sus máquinas de toma de tierra.
Asegúrese de que la instalación electrica tenga toma de tierra, en caso contrario llame a un Servicio cualificado.
 Estos aparatos cumplen con las Directivas EEC 89/336, EEC 73/23 y modificaciónes siguientes.
●No toque el aparato con las manos, los pies mojados o húmedos.
●No use el aparato estando descalzo.
●No use, si no es con especial cuidado, alargos en cuartos de baño o aseos.
ATENCION:
DURANTE EL LAVADO EL AGUA PUEDE ALCANZAR LOS 60°C.
● Antes de abrir el ojo de buey, asegúrese de que no haya agua en el tambor.
6
EN
CHAPTER 3
SAFETY MEASURES
IMPORTANT:
FOR ALL CLEANING
AND MAINTENANCE
WORK
●Remove the plug
●Turn off the water inlet tap.
●All Candy appliances are earthed. Ensure that the main electricity circuit is earthed. Contact a qualified electrician if this is not the case.
 This appliance complies with Directives 89/336/EEC, 73/23/EEC and following changes.
●Do not touch the appliance with wet or damp hands or feet.
●Do not use the appliance when bare-footed.
●Extreme care should be taken if extension leads are used in bathrooms or shower rooms. Avoid this where possible.
WARNING: DURING THE WASHING CYCLE, THE WATER CAN REACH A TEMPERATURE OF 60°C.
● Before opening the washing machine door, ensure that there is no water in the drum.
60°C |
ES
●No use adaptadores o enchufes múltiples.
●No permita la manipulación del aparato a niños o incapacitados, sin vigilancia.
●No tire del cable de alimentación, ni del aparato, para desconectar la toma de corriente.
●No deje el aparato a la intemperie o expuesto a la acción de los agentes atmosfericos (lluvia, sol, etc..).
●En caso de traslado no la sujete nunca por los mandos ni por la cubeta de detergente.
●Durante su transporte no apoye el ojo de buey en la carretilla.
Importante!
Si se va a instalar el aparato sobre una alfombra o moqueta, es necesario tener cuidado para evitar que se obstruyan las rejillas de ventilación situadas en la base de la lavadora.
●Levántela ayudado por otra persona tal como aparece en la figura.
●En caso de avería y/o mal functionamiento del aparato, desconéctelo, cierre el grifo del agua y no manipule el electrodoméstico. Para su eventual reparación diríjase únicamente a un centro de Asistencia Técnica Candy y solicite el uso de recambios originales. El incumplimiento de estas sugerencias puede comprometer la seguridad del aparato.
●Si el cable de alimentación resultase dañado, tendrá que ser sustituido por un cable especiäl disponible en el servicio de asistencia técnica.
EN
● Do not use adaptors or multiple plugs.
● Do not allow the appliance to be used by children or the incompetent without due supervision.
●Do not pull the mains lead or the appliance itself to remove the plug from the socket.
●Do not leave the appliance exposed to atmospheric agents (rain, sun
etc.)
● In the case of removal, never lift the appliance by the knobs or detersive drawer.
● During transportation
do not lean the door against the trolley.
Important!
When the appliance location is on carpet floors, attention must be paid so as to ensure that there is no obstruction to the bottom vents.
● Lift the appliance in pairs as illustrated in the diagram.
● In the case of failure and/or incorrect operation, turn the washing machine off, close the water inlet tap and do not tamper with the appliance. Contact a Candy Technical Assistance Centre for any repairs and ask for original Candy spare parts. Avoidance of these norms may compromise the safety of the appliance.
● Should the supply cord (mains cable) be demaged, this is to be replaced by a specific cable available from the after sales service centre.
7
ES |
EN |
CAPÍTULO 4 |
CHAPTER 4 |
 52 cm
52 cm
85 cm
|
|
|
|
|
|
|
|
|
|
|
60 cm |
|
|
|
|
|
|
|
|
|
CAPACIDAD DE ROPA |
MAXIMUM WASH |
|
kg |
5 |
||
SECA |
LOAD DRY |
|
|
|
|
|
|
|
|
|
|
|
|
NIVEL NORMAL DE AGUA |
NORMAL WATER LEVEL |
|
l |
19 |
||
|
|
|
|
|
|
|
AGUA NIVEL ECONOMICO |
ECONOMIC WATER LEVEL |
|
l |
15 |
||
|
|
|
|
|
|
|
POTENCIA |
POWER INPUT |
|
W |
1700 |
||
ABSORBIDA |
|
|
|
|
||
|
|
|
|
|
|
|
|
|
|
|
|
|
|
CONSUMO DE ENERGÍA |
ENERGY CONSUMPTION |
|
kWh |
2,0 |
||
(PROG. 1) |
(PROG. 1) |
|
|
|
|
|
|
|
|
|
|
|
|
AMPERIOS DEL FUSIBLE |
POWER CURRENT FUSE |
|
A |
16 |
||
DE LA RED |
AMP |
|
|
|
|
|
|
|
|
|
|
|
|
REVOLUCIONES DE |
SPIN |
giri/min. |
500 |
|||
CENTRIFUGADO (Rev./min.) |
r.p.m. |
|
|
|
|
|
|
|
|
|
|
|
|
PRESIÓN EN EL CIRCUITO |
WATER PRESSURE |
|
MPa |
|
min. 0,05 |
|
HIDRÁULICO |
|
|
|
|
|
max. 0,8 |
|
|
|
|
|
|
|
TENSION |
SUPPLY |
|
V |
127 |
||
|
VOLTAGE |
|
Hz |
60 |
||
|
|
|
|
|
|
|
ES
CAPÍTULO 5
PUESTA EN FUNCIONAMIENTO INSTALACIÓN
Ponga la máquina cerca del lugar de uso sin la base del embalaje.
Corte las cintas del tubo.
Desenroscar el tornillo central (A); desenroscar los 4 tornillos laterales (B) y extraer el travesaño (C).
Inclinar la máquina hacia delante y sacar los sacos de plástico que contienen los dos protectores de plástico puestos sobre 2 lados, tirando hacia abajo.
Tapar un agujero utilizando el tapón que contiene la bolsa con las instrucciones.
ATENCIÓN:
NO DEJE AL ALCANCE DE LOS NIÑOS LOS ELEMENTOS DE EMBALAJE YA QUE PUEDEN SER PELIGROSOS.
EN
CHAPTER 5
SETTING UP
INSTALLATION
Move the machine near its permanent position without the packaging base.
Cut tube-holding straps.
Unscrew the central screw (A); unscrew the 4 lateral screws (B) and remove the cross piece (C).
Lean the machine forward and remove the plastic bags containing the two polystyrene blocks at the sides, pulling downwards.
Press the plug (to be found in the envelope with the instructions) into the hole.
WARNING:
DO NOT LEAVE THE PACKAGING IN THE REACH OF CHILDREN AS IT IS A POTENTIAL SOURCE OF DANGER.
8 |
9 |
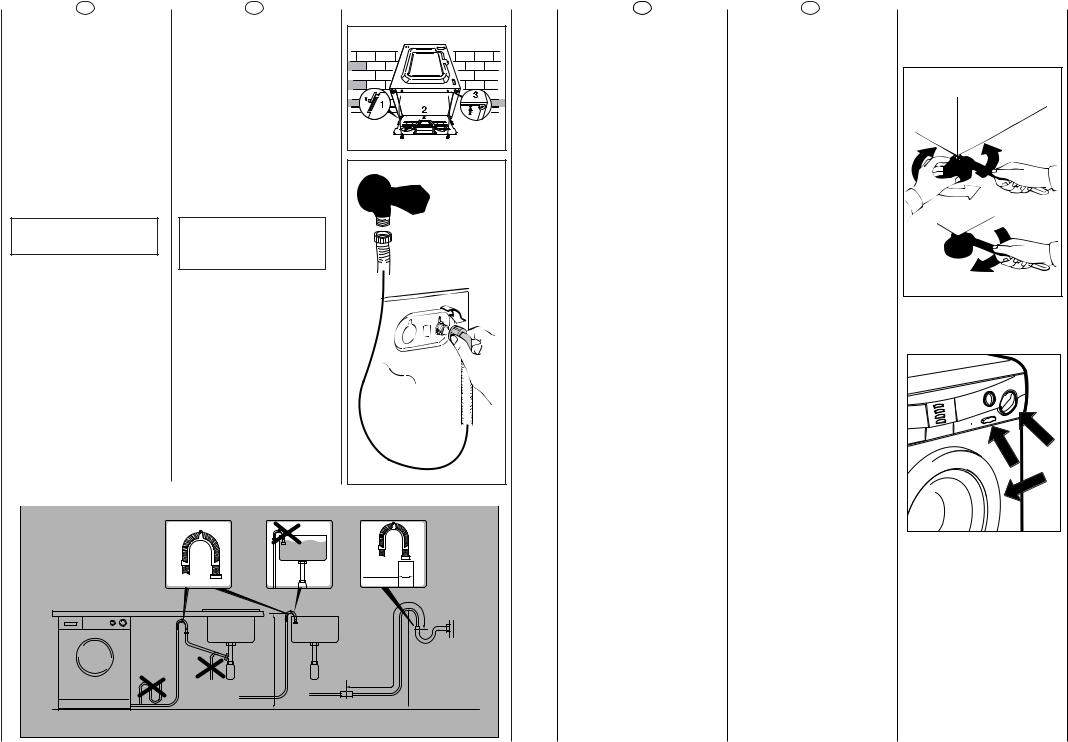
ES
Aplique la lamina de polionda como se muestra en la figura.
Conecte el tubo del agua al grifo.
El aparato debe ser conectado a la red hidraulica sólo con los nuevos tubos de carga disponibles en dotación. Los viejos tubos de carga no tienen que ser reutilizados.
ATENCIÓN:
NO ABRA EL GRIFO.
Acerque la lavadora a la pared procurando que no se formen curvas o estrangulamientos, fije el tubo desagüe al borde de la pila.
o mejor aún, a un desagüe fijo, con un diámetro mayor que el del tubo de la lavadora, a una altura mínima de 50 cm.
En caso necesario, utilice la curva rígida adjunta.
EN
Fix the sheet of corrugated material on the bottom as shown in picture.
Connect the fill hose to the tap.
The appliance must be connected to the water mains using new hose-sets. The old hose-sets should not be reused.
IMPORTANT:
DO NOT TURN THE TAP ON AT THIS TIME.
Position the washing machine next to the wall. Hook the outlet tube to the edge of the bath tub, paying attention that there are no bends or contractions along the tube.
It is better to connect the discharge hose to a fixed outlet of a diameter greater than that of the outlet tube and at a height of min. 50 cm. If is necessary to use the plastic sleeve supplied.
|
min 4 cm |
|
cm |
+2,6 mt max |
|
100 |
||
|
||
max |
min 50 cm |
|
max 85 cm |
ES
Nivele la máquina con las patas delantares
a)Girar la tuerca en el sentido de las agujas del reloj para desbloquear el tornillo del pie.
b)Girar el pie y hacerlo bajar o subir hasta conseguir su perfecta adherencia al suelo.
c)Bloquear el pie girando la tuerca en el sentido contrario a las agujas del reloj hasta que se adhiera al fondo de la lavadora.
Asegúrese de que el botón Marcha/Paro (C) no esté pulsado.
Asegúrese de que todos los mandos estén en posición “0” y que el ojo de buey esté cerrado.
Enchúfela.
El aparato tiene que ser colocado de forma que el enchufe sea accesible una vez instalado.
A continuación pulse el botón START (C) se encenderá el piloto de funcionamiento “conexión de corriente efectuada” (G) si no se enciende vea “ causas de averías”
EN
Use front feet to level the machine with the floor.
a)Turn the nut clockwise to release the screw adjuster of the foot.
b)Rotate foot to raise or lower it until it stands firmly on the ground.
c)Lock the foot in position by turning the nut anticlockwise until it comes up against the bottom of the machine.
Ensure that the Off/On button (C) is not pressed.
Ensure that all the knobs are on the “0” position and that the door is closed.
Insert the plug.
After installation, the appliance must be positioned so that the plug is accessible.
Press the START (C) button. The power on (G) light will light up.
If this does not light up see faults search.
A |
B |
C |
10 |
11 |

ES |
EN |
CAPÍTULO 6 |
CHAPTER 6 |
L
A D E G B C
CUADRO DE MANDOS
Cubeta del detergente
Botón de apertura del ojo de buey
Botón de puesta en marcha/paro
Botón exclusión de centrifugado
Botón media carga
Piloto luminoso de funcionamiento
Selector de programas de lavado
CONTROLS |
|
Detergent drawer |
A |
Door open button |
B |
Off/On button |
C |
No spin button |
D |
Reduced water level |
E |
Off/On indicator light |
G |
Timer knob for wash |
L |
programmes |
|
|
|
ES |
EN |
DESCRIPCIÓN DE |
DESCRIPTION OF |
LOS MANDOS |
CONTROL |
BOTÓN DE APERTURA DEL |
|
DOOR OPEN BUTTON |
B |
||
OJO DE BUEY |
|
|
|
|
|
|
|
|
|
|
|
|
|
|
|
|
|
ATENCIÓN: |
|
IMPORTANT: |
|
|
|
UN DISPOSITIVO DE |
|
A SPECIAL SAFETY |
|
2 min. |
|
SEGURIDAD ESPECIAL |
|
DEVICE PREVENTS THE |
|
||
IMPIDE LA APERTURA |
|
DOOR FROM OPENING |
|
||
INMEDIATA DEL OJO DE |
|
AT THE END OF THE |
|
|
|
BUEY AL FINALIZAR EL |
|
WASH/SPIN CYCLE. AT |
|
|
|
LAVADO. AL FINAL DE |
|
THE END OF THE SPIN |
|
|
|
LA FASE DE |
|
PHASE WAIT UP TO 2 |
|
|
|
CENTRIFUGADO, ESPERE |
|
MINUTES BEFORE |
|
|
|
2 MINUTOS ANTES DE |
|
OPENING THE DOOR. |
|
|
|
ABRIR EL OJO DE BUEY. |
|
|
|
|
|
|
|
|
|
|
|
|
|
|
|
|
|
|
|
|
|
|
BOTÓN DE PUESTA EN |
OFF/ON BUTTON |
C |
|
|
MARCHA/PARO |
|
|
|
|
|
|
|
|
|
ELIMINACIÓN DEL |
NO SPIN BUTTON |
D |
|
|
CENTRIFUGADO |
|
|
|
|
Pulsando esta tecla se |
By pressing this button it is |
|
|
|
consigue la eliminación de |
possible to eliminate the |
|
|
|
todos los centrifugados. |
spin-drying on all |
|
|
|
Dicha operación es muy útil |
programmes. This operation |
|
|
|
tanto en los programas a |
is suitable for programmes at |
|
|
|
60° como en los de a 40°, en |
60°C and at 40°C in case of |
|
|
|
el caso de lavado de trjidos |
special treated fabrics |
|
|
|
que presentan particulares |
(cottonova or permanent |
|
|
|
tratamientos de acabado |
press) or for mixed delicate |
|
|
|
(algodón nuevo, permanent |
fabrics. |
|
|
|
press) o para prendas |
|
|
|
|
delicadas de fibra mixta |
|
|
|
|
|
|
|
|
|
12 |
13 |
ES
BOTÓN DE MEDIA CARGA
Para las coladas de poco peso puede reducirse el nivel de agua a utilizar accionando la tecla 1/2 que le ahorrarà agua, detergente y energía eléctrica.
La dosis de detergente debe reducirse en proporciön a la carga.
ATENCION: no pulse la tecla “1/2” en el caso de PURA LANA VIRGEN y de tejidos muy delicados. Para conseguir los mejores resultados en el lavado, estos tejidos precisan una gran cantidad de agua.
EN |
|
REDUCED WATER LEVEL |
E |
|
The water level for a small wash may be reduced right through the wash from soaking to rinsing by pressing the 1/2 pushbutton, this way you will save electricity, detergent, and water too.
WARNING: NEVER press the 1/2 pushbutton when you are washing PURE NEW WOOL, since wool absorbs water and therefore needs all the water the machine will hold. DO NOT use it for delicate fabrics either, since they need the extra water to float them and protect them.
PILOTO LUMINOSO DE |
ON/OFF INDICATOR LIGHT |
G |
FUNCIONAMIENTO |
|
ES
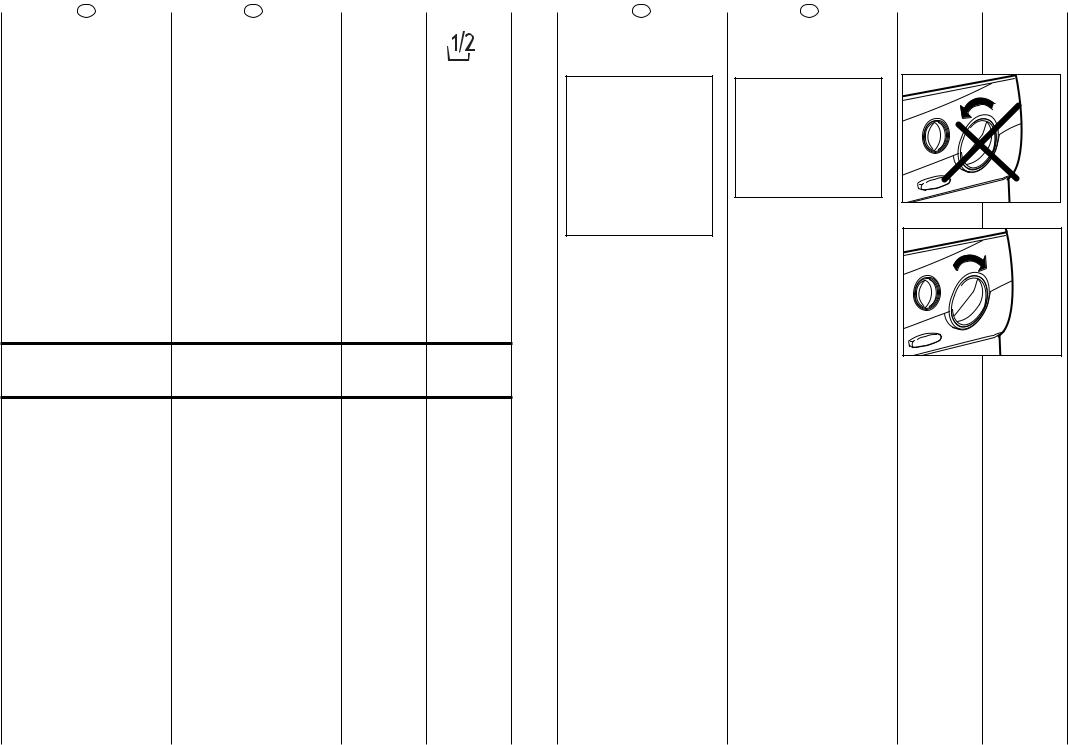
SELECTOR DE PROGRAMAS DE LAVADO
ATENCIÓN:
NO GIRE NUNCA EL PROGRAMADOR EN SENTIDO CONTRARIO A LAS MANECILLAS DEL RELOJ, SINO EN EL SENTIDO DE ÉSTAS Y NO PULSE EL BOTÓN DE PUESTA EN MARCHA
(C) ANTES DE LA
SELECCION DEL PROGRAMA.
Las tablas indican el programa de lavado en base al número o símbolo seleccionado.
EN
TIMER KNOB FOR WASH PROGRAMMES
IMPORTANT: ALWAYS ROTATE THE
KNOB IN A CLOCKWISE DIRECTION, NEVER IN AN ANTI-CLOCKWISE DIRECTION. DO NOT PRESS THE “ON” BUTTON
(C) BEFORE SELECTING THE PROGRAMME
The tables describe the washing programme on the basis of the number or symbol chosen.
L
OK
14 |
15 |
 Loading...