


CVMAAR
MULTIPOISE OIL FURNACE
INPUT CAPACITIES 70,000 ---154,000
Installation Instructions
THIS BOOKLET CONTAINS
IMPORTANT INFORMATION
INSTALLER: Use the information in this
booklet to install the appliance and affix this
booklet adjacent to the appliance after
installation.
A11540
USER: Keep this booklet of information for
future reference.
SERVICER: Use the information in this booklet
to service the appliance and affix the booklet
adjacent to the appliance after servicing.
Use of the AHRI Certified TM Mark indicates a
C US
Copyright 2012 CAC / BDP D 7310 W. Morris St. D Indianapolis, IN 46231 Printed i n U.S.A. Edition Date: 02/12
Manufacturer reserves the right to change, at any time, specifications and designs without notice and without obligations.
manufacturer’s participation in the program. For
verification of certification for individual products,
go to www.ahridirectory.org.
Catalog No: IM---CVM---03 / X40191 Rev. C
Replaces: IM --- CVM---02 / X40191 Rev. B

TABLE OF CONTENTS
1.0 SAFETY REGULATIONS---------------------------------------3
1.1 DANGER, WARNING AND CAUTION--------------------3
1.2 SAFETY INSTALLATION REQUIREMENTS------------3
2.0 INSTALLATION ---------------------------------------------------3
2.1 GENERAL -------------------------------------------------------3
2.2 SAFE INSTALLATION REQUIREMENTS----------------4
2.3 SAFETY RULES -----------------------------------------------4
2.3.1 Detector
2.3.2 Freezing temperatures and your building
2.4 LOCATION ------------------------------------------------------5
2.4.1 Air for combustion and ventilation
2.4.2 Duct recommendations
2.4.3 Venting instructions (chimney installation)
2.4.4 Draft Regulator
2.4.5 Blocked vent shut-off (BVSO) for chimney
venting
2.4.6 Oil burner
2.4.7 Electrical system
2.4.8 24V Wiring
2.4.9 Accessory installation
2.4.10 Air filter
2.4.11 Air Conditioner (or Heat Pump)
2.4.12 Horizontal or downflow installation
3.0 OPERATION-----------------------------------------------------11
3.1 SUPPLY AIR ADJUSTMENTS----------------------------11
3.2 OPERATIONAL CHECKLIST----------------------------- 11
3.3 PURGING THE OIL LINE----------------------------------12
3.4 COMBUSTION CHECK ------------------------------------12
3.5 SEQUENCE OF OPERATION---------------------------- 13
3.5.1 Oil fired heating mode
3.5.2 Cooling mode
3.5.3 Continuous Blower Mode
3.5.4 Heat Pump – Heating / Cooling Mode
3.5.5 Defrost Mode
3.6 LIMIT CONTROL CHECK----------------------------------14
--------------------------------------------------4
---------------------------------------------------7
-------------------------------------------------10
----------4
-------------------5
--------------------------------6
--------6
-----------------------------------------7
------------------------------------------------8
---------------------------------------9
---------------------------------------------10
-------------------------------10
--------------------11
----------------11
-------------------------------13
-----------------------------------------13
---------------------------13
------------13
------------------------------------------14
FIGURES
Figure 1 : Counterflow position, flue pipe protection ..................5
Figure 2 : Wiring diagram,BVSO................................................7
Figure 3 : BVSO device wiring, upflow installation with vertical
exhaut.......................................................................8
Figure 4 : BVSO device wiring, upflow installation with vertical
exhaust.....................................................................9
Figure 5 : BVSO device wiring, upflow installation with horizontal
exhaust.....................................................................9
Figure 6: BVSO device wiring, horizontal installation with
horizontal exhaust.....................................................9
Figure 7: BVSO device wiring, horizontal installation with vertical
exhaust.....................................................................9
Figure 8: BVSO device wiring, downflow installation..................9
Figure 9 : 24 VAC Oil Furnace Wiring with Air Conditioner......10
Figure 10 : 24 VAC Oil Furnace Wiring with Heat Pump..........10
Figure 11 : Model CVM Size 105.............................................19
Figure 12 : Model CVM Size 120.............................................20
Figure 13 : Wiring diagram CVM..............................................21
Figure 14 : Parts list CVMAAR036105.....................................22
Figure 15 : Parts list CVMAAR060120.....................................24
TABLES
Table 1 : Minimum dimensions required in ventilation openings 5
Table 2 : Filter rack flange dimensions for return air duct ........11
Table 3 : Supply air adjustments, heating mode......................11
Table 4 : Supply air adjustments, air conditioning mode..........11
Table 5 : CFM adjustments, all modes.....................................12
Table 6 : Delay adjustments, heating mode.............................12
Table 7 : Technical Specifications ...........................................16
Table 8 : Air Flow Data, Size 105.............................................17
Table 9 : Air Flow Data, Size 120.............................................18
Table 10 : Minimum clearances to combustible materials........19
Table 11 : Minimum clearances to combustible materials........20
Table 12 : Parts list CVMAAR036105......................................23
Table 13 : Parts list - CBMAAA060120....................................25
4.0 MAINTENANCE -------------------------------------------------14
4.1 HEAT EXCHANGER CLEANING ------------------------ 14
4.2 BLOWER REMOVAL----------------------------------------14
4.3 BLOCKED VENT SHUT OFF (BVSO) CLEANING----14
5.0 FURNACE INFORMATION----------------------------------- 15
2

1.0 SAFETY REGULATIONS
FOR YOUR SAFETY
DO NOT STORE OR USE GASOLINE OR OTHER
FLAMMABLE VAPOURS AND LIQUIDS IN THE VICINITY
OF THIS OR ANY OTHER APPLIANCE.
DO NOT ATTEMPT TO START THE BURNER WHEN
EXCESS OIL HAS ACCUMULATED, WHEN THE
FURNACE IS FULL OF VAPOUR OR WHEN THE
COMBUSTION CHAMBER IS VERY HOT.
1.1 DANGER, WARNING AND CAUTION
The words DANGER, WARNING and CAUTION are used to
identify the levels of seriousness of certain hazards. It is
important that you understand their meaning. You will notice
these words in the manual as follows:
DANGER
Immediate hazards which WILL result in death or
serious bodily and/or material damage.
WARNING
Hazards or unsafe practices which CAN result in death
or serious bodily and /or material damage.
CAUTION
Hazards or unsafe practices which CAN result in minor
bodily and /or material damage.
1.2 SAFETY INSTALLATION REQUIREMENTS
WARNING
For use with grade 2 fuel oil maximum. Do NOT use
gasoline, crankcase oil or any oil containing gasoline.
WARNING
Never burn garbage or paper in the heating system and
never leave rags or paper around the unit.
CAUTION
These instructions are intended for the sole use of
qualified personnel trained in installing this type of
furnace. Installation of this furnace by an unqualified
person can lead to hazardous conditions, resulting in
bodily harm and/or equipment damage.
IMPORTANT: All local and national code requirements
governing the installation of oil burning equipment, wiring
and flue connections must be followed. Some of the codes
that may be applicable are:
CSA B139 Installation Code for Oil Burning
Equipment
ANSI/NFPA 31 Installation of Oil Burning Equipment
ANSI/NFPA 90B Warm Air Heating and Air Conditioning
Systems
ANSI/NFPA 211 Chimneys, Fireplaces, Vents and Solid
Fuel Burning Appliances
ANSI/NFPA 70 National Electrical Code
CSA C22.2 No.3 Canadian Electrical Code
Only the latest issues of the above codes should be used,
and are available from either:
The National Fire Protection Agency
1 Batterymarch Park
Quincy, MA 02269
or
The Canadian Standards Association
178 Rexdale Blvd.
Rexdale, Ontario M9W 1R3
CAUTION
ENVIRONMENTAL HAZARD
Failure to follow this caution may result in
environmental pollution.
Remove and recycle all components or materials (i.e.
oil, electrical and electronic components, insulation,
etc.) before unit final disposal.
2.0 INSTALLATION
2.1 GENERAL
This central heating unit is a true multi-position unit, in that it
can operate in four different configurations, i.e., upflow,
counter flow (downflow), and horizontal (both left-to-right
and right-to-left airflow).
Very few modifications are required during installation, to
change the furnace from one configuration to another. The
furnace is shipped in the upflow configuration; however,
instructions on how to change to the other configurations are
included in this manual.
The furnace is shipped complete with burner and controls. It
requires a 115VAC line voltage connection to the control
panel, thermostat hook-up as shown on the wiring diagram,
one or more oil line connections, suitable ductwork and
connection to a properly sized vent.
The air handling capacity of this furnace is designed for
cooling as well. Please refer to Table 6 for the expected
airflow at various external static pressures.
3

2.2 SAFE INSTALLATION REQUIREMENTS
WARNING
Installation or repairs performed by unqualified persons
can result in hazards to them and others. Installation
MUST conform to local codes or, in the absence of
same, to codes of the country having jurisdiction.
The information contained in this manual is intended for
use by a qualified service technician familiar with safety
procedures and quipped with the proper tools and test
instruments.
Failure to carefully read and follow all instructions in
this manual can result in death, furnace malfunction
and/or property damage.
WARNING
FIRE HAZARD
The furnace must be installed in a level position, never
where it will slope toward the front. If the furnace is not
installed level, oil will drain into the furnace vestibule
and create a fire hazard.
NOTE: It is the personal responsibility and obligation of the
customer to contact a qualified installer to ensure that the
installation conforms to governing local and/or national
codes and ordinances
a. This furnace is NOT approved for installation in mobile
homes, trailers or recreational vehicles;
b. Do NOT use this furnace as a construction heater or to
heat a building under construction;
c. There must be a sufficient supply of fresh air for
combustion as well as ventilation in the area where the
furnace is located;
d. Use only the type of fuel oil approved for this furnace
(see section 1.2 of this manual). Overfiring will result in
heat exchanger failure and cause dangerous operating
conditions;
e. Visually check all oil line joints for signs of leakage;
f. Connect furnace to the chimney;
g. The points in Part 3 “Operation” are vital to the proper
and safe operation of the heating system. Take the time
to ensure that all steps were followed;
h. Follow the regulations of the NFPA No.31 (in the USA)
and CSA B-139 (in Canada) or local codes for placing
and installing the oil storage tank;
i. Follow a regular service and maintenance schedule for
efficient and safe operation;
j. Before servicing, allow furnace to cool down. Always
shut off electricity and fuel to furnace when servicing.
This will prevent electrical shock or burns;
k. Seal supply and return air ducts;
l. The vent system MUST be checked to determine that it
is the correct type and size;
m. Install correct filter type and size;
n. Unit MUST be installed so that electrical components
are protected from direct contact with water.
2.3 SAFETY RULES
Your unit is built to provide many years of safe and
dependable service, provided it is properly installed and
maintained. However, abuse and/or improper use can
shorten the life of the unit and create hazards for you, the
owner.
2.3.1 Detector
a. The U.S. Consumer Product Safety Commission
recommends that users of oil-burning appliances install
carbon monoxide detectors. There can be various
sources of carbon monoxide in a building or dwelling.
The sources could be gas-fired clothes dryers, gas
cooking stoves, water heaters, furnaces, gas-fired
fireplaces, wood fireplaces, and several other items.
Carbon monoxide can cause serious bodily injury
and/or death. Therefore, to help alert people to
potentially dangerous carbon monoxide levels, you
should have carbon monoxide detectors listed by a
nationally recognised agency (ex. Underwriters
Laboratories or International Approval Services)
installed and maintained in the building or dwelling (see
Note below).
b. There can be numerous sources of fire or smoke in a
building or dwelling. Fire or smoke can cause serious
bodily injury, death, and/or property damage. Therefore,
in order to alert people to potentially dangerous fire or
smoke, you should have fire and smoke detectors listed
by Underwriters Laboratories installed and maintained
in the building or dwelling (see Note below).
NOTE: The manufacturer of your furnace does not test any
detectors and makes no representations regarding any
brand or type of detector.
CAUTION
Ensure that the area around the combustion air intake is
free of snow, ice and debris.
2.3.2 Freezing temperatures and your building
WARNING
FREEZING TEMPERATURE WARNING
Turn off water supply.
If your heater remains shut off during cold weather, the
water pipes could freeze and burst, resulting in serious
water damage.
If the structure is unattended during cold weather you should
take the following precautions:
a. Turn off main water supply into the structure and drain
the water lines if possible. Open faucets in appropriate
areas;
b. Have someone check the structure frequently during
cold weather to make sure it is warm enough to prevent
pipes from freezing. Contact a qualified service agency,
if required.
4

2.4 LOCATION
KLADC0201DET
CAUTION
This furnace is not watertight and is not designed for
outdoor installation. This furnace shall be installed in
such a manner as to protect the electrical components
from water. Outdoor installation will lead to hazardous
electrical conditions and to premature furnace failure.
CAUTION
If this furnace is installed in an attic, it is important to
keep insulation at least 0.3 m (12") away from any
furnace openings. Some types of insulating material
may be combustible.
The unit must be installed in a location where the ambient
and return air temperature is over 15°C (60°F).
This furnace is approved for reduced clearances to
combustible construction. Therefore, it may be installed in a
closet or similar enclosure. As this unit may be installed as
an upflow, counter flow, or horizontal furnace, it may be
located in a basement, on the same level as the area to be
heated, suspended, or in a crawlspace. In any case, the unit
should always be installed level.
In a basement, or when installed on the floor (as in a
crawlspace), it is recommended that the unit be installed on
a concrete pad that is 2.5 cm to 5.0 cm (1" to 2") thick.
When installed in the counter flow position, this furnace
must not be installed on combustible flooring, unless the
approved sub-base is used (Model # KLASB0601DET).
Since the flue pipe is in counter flow position, be sure that
the clearances from the flue pipe to combustible
construction are maintained. Also, it is recommended to use
the flue pipe protection kit KLADC0101DET or
KLADC0201DET. Please refer to the Figure 1 and the
installation instructions included with the kit.
Figure 1 : Counterflow position, flue pipe protection
KLADC0101DET/
DNS-0278 Rev. A
When installed in an horizontal position, the furnace may be
suspended by using an angle iron frame, as long as the total
weight of both the furnace and the frame are included in the
calculations. Other methods of suspension are acceptable.
When installed in the horizontal position, this furnace must
not be installed on combustible flooring, unless the
approved sub-base is used (Model KLASB0701DET).
The required minimum clearances for this furnace in all
positions are specified in Tables 7 and 8.
The furnace should be located as closely as possible to the
chimney or vent in order to keep vent connections short and
direct. The furnace should also be located near the centre of
the air distribution system.
2.4.1 Air for combustion and ventilation
This furnace should be installed in a location in which the
facilities for ventilation permit satisfactory combustion of oil,
proper venting and the maintenance of ambient
temperatures at safe limits under normal conditions of use.
The location should not interfere with the proper circulation
of air within the confined space. Refer to the CAN/CSAB139 installation code for complete regulations, and for
guidance on retrofit applications.
When this furnace is installed in a closet or similar
enclosure, 2 ventilation openings are required for
combustion air. The openings should be located about 15.2
cm (6") from the top and the bottom of the enclosure at the
front of the furnace. Table 1 indicates the minimum
dimensions required for each of these two ventilation
openings.
Table 1 : Minimum dimensions required in ventilation
Input
(BTU/h)
openings
Width Height
75,000 – 105,000 45.72 cm (18") 20.32 cm (8")
120,000 – 155,000 50.80 cm (20") 25.40 cm (10")
WARNING
Do not block the combustion air openings in the
furnace. Any blockage will result in improper
combustion and may result in a fire hazard and/or cause
bodily harm.
The barometric draft regulator included with the furnace,
shall be installed in the same room or enclosure as the
furnace, in such a manner as to prevent any difference in
pressure between the regulator and the combustion air
supply.
Air requirements for the operation of exhaust fans, kitchen
ventilation systems, clothes dryers, and fireplaces shall be
considered in determining the adequacy of the space to
provide combustion air requirements.
In unconfined spaces, in buildings of conventional frame,
brick or stone construction, infiltration may be adequate to
provide air for combustion, ventilation and dilution of flue
gases. This determination must be made on an individual
installation basis and must take into consideration the
overall volume of the unconfined space, the number of
windows and ventilation openings, the number of doors to
5

the outside, internal doors which can close off the
unconfined space and the overall air tightness of the
building construction.
Many new buildings and homes (and older ones that have
been weatherized must be considered as being tight
construction and, therefore, infiltration will not be sufficient to
supply the necessary air for combustion and ventilation.
A building can be considered as being of tight construction
when:
a. Walls and ceilings exposed to the outside have a
continuous water vapour retarder with a rating of one
perm or less, openings have gaskets or are sealed
and/or;
b. Weather-stripping has been added on operable
windows and doors, and/or;
c. Caulking or sealant has been applied to areas such as
joints around window and doorframes, between sole
plates and floors, between wall-ceiling joints, between
wall panels, at penetrations for plumbing, electrical and
fuel lines and at other openings.
2.4.2 Duct recommendations
WARNING
When ducting supplies air to a space other than where
the furnace is located, the return air must be sealed and
also be directed to the space other than where the
furnace is located. Incorrect ductwork termination and
sealing will create a hazardous condition that can lead
to bodily harm.
CAUTION
Return air grilles and warm air registers must not be
obstructed.
IMPORTANT: The dampers should be adequate to prevent
cooled air from entering the furnace, and if manually
operated, must be equipped with the means to prevent
operation of either the cooling unit or the furnace, unless the
damper is in the full cool or heat position.
NOTE: The back should not be cut out for return air
ducting.
The proper sizing of warm air ducts is necessary to ensure
satisfactory furnace operation. Ductwork should be in
accordance with the latest editions of NFPA-90A
(Installation of Air Conditioning and Ventilating Systems)
and NFPA-90B (Warm Air Heating and Air Conditioning
Systems) or Canadian equivalent.
The supply ductwork should be attached to the flanged
opening provided at the discharge end of the furnace. See
Figures 10 and 11, for the dimensions of this opening.
Knockouts are provided on both sides of the furnace to cut
the required size of opening for the installation of the return
air ductwork. This can be done on either the right or the left
side of the furnace. See Table 2 for location and
dimensions.
Also, there is provision on this furnace for a bottom return air
duct. Knockouts are provided in the floor of the furnace to
facilitate the cut-out requirement for the air filter rack and
return ductwork. (We recommend the use of this opening for
horizontal and counterflow installations).
The following recommendations should be followed when
installing ductwork:
a. Install locking type dampers in all branches of the
individual ducts to facilitate balancing the system.
Dampers should be adjusted such a way as to ensure
the proper static pressure at the outlet of the furnace;
b. A flexible duct connector of non-combustible material
should be installed at the unit on both the supply and
return air side. In applications where an extremely quiet
operation is necessary, the first 3 m (10') of supply and
return ducts should be internally lined with acoustical
material (if possible);
c. In cases where the return air grille is located close to
the fan inlet, there should be at least one 90o turn
between fan inlet and grille. Further reduction in sound
level can be accomplished by installing acoustical
turning vanes or lining the duct as described in item b.
above;
d. When a single air grille is used, the duct between grille
and furnace must be the same size as the return air
opening in the furnace.
When installing the furnace with cooling equipment for year
round operation, the following recommendations must be
followed for tandem or parallel air flow:
WARNING
POISONOUS CARBON MONOXIDE GAS HAZARD
Install the evaporator coil on the supply side of the
furnace ducting ONLY.
An evaporator coil installed on the return air side of the
ducting can cause condensation to form inside the heat
exchanger, resulting in heat exchanger failure. This in
turn can result in death, bodily injury.
a. On tandem airflow applications, the coil is mounted
after the furnace in an enclosure in the supply air
stream. The furnace blower is used for both heating and
cooling airflow;
b. On parallel airflow installation, dampers must be
provided to direct air over the furnace heat exchanger
when heat is desired and over the cooling coil when
cooling is desired.
2.4.3 Venting instructions (chimney installation)
The furnace must be vented to the outside, in accordance
with local codes and other authorities having jurisdiction.
CAUTION
Oil fired appliances must be connected to flues having
sufficient draft at all times to ensure safe and proper
combustion.
For additional venting information please refer to
ANSI/NFPA 211 Chimneys, Fireplaces, Vents and Solid
Fuel Burning Appliances and/or the CSA B139 Installation
Code.
6

This furnace is certified for use with a Type “L” vent
(maximum flue gas temperature 302°C (575°F)). The f lue
pipe clearance knockout in the front top or side panel should
be removed. Install the flue elbow so that it exits the furnace
cabinet through that opening.
Pre-installation vent system inspection
Before this furnace is installed, it is strongly recommended
that any existing vent system be completely inspected.
On any chimney or vent, this should include the following:
a. Inspection for any deterioration in the chimney or vent.
If deterioration is discovered, the chimney must be
repaired or the vent replaced;
b. Inspection to ascertain that the vent system is clear and
free of obstructions. Any blockages must be removed
before installing this furnace;
c. Cleaning the chimney or vent if previously used for
venting a solid fuel burning appliance or fireplace;
d. Confirming that all unused chimney or vent connections
are properly sealed;
e. Verification that the chimney is properly lined and sized
per the applicable codes. (Please refer to list of codes
in Part 1.2)
Masonry Chimneys
This furnace may be vented into an existing masonry
chimney. However, it must not be vented into a chimney
servicing a solid fuel-burning appliance. Before venting this
furnace into a chimney, the chimney must be checked for
deterioration and repaired if necessary. The chimney must
be properly lined and sized per local and/or national codes.
The chimney must be of sufficient area to accommodate the
total flue products of all appliances vented into the chimney.
The following requirements are provided for a safe venting
system:
a. Ensure that the chimney flue is clear of any dirt or
debris;
b. Ensure that the chimney is not servicing an open
fireplace;
c. Never reduce the pipe size below the outlet size of the
furnace;
d. All pipes should be supported, using the proper clamps
and/or straps. These supports should be installed at
least every 4 feet;
e. All horizontal runs of pipe should have at least 20 mm
of upward slope per 1 m (1/4” per 1');
f. All runs of pipe should be as short as possible with as
few turns as possible;
g. Seams should be tightly joined and checked for leaks;
h. The flue pipe must not extend into the chimney but be
flush with the inside wall;
i. The chimney must extend 0.9 m (3') above the highest
point where it passes through a roof of a building and at
least 0.6 m (2') higher than any portion of a building
within a horizontal distance of 3 m (10'). It shall also be
extended at least 1.5 m (5') above the highest
connected equipment flue collar;
j. Check local codes for any variances.
Factory Built Chimneys
Approved factory built chimneys may be used. Refer to
chimney manufacturer’s instructions for proper installation.
2.4.4 Draft Regulator
The draft regulator supplied with the furnace must be used
for proper functioning. Installation instructions are included
with the control.
2.4.5 Blocked vent shut-off (BVSO)
For chimney venting
All oil furnaces installed in Canada must have a blocked
vent shut-off.
WARNING
It is imperative that this device be installed by a
qualified agency.
This device is designed to detect the insufficient evacuation
of combustion gases in the event of a vent blockage. In such
a case the thermal switch will shut down the oil burner. The
device will then need to be re-armed MANUALLY.
Please refer to Figures 2 to 8, the wiring diagrams, Figures
12 and 13, and the detailed instructions supplied with the
BVSO for the installation and wiring procedures. The length
of wires supplied with the unit is such that the safety device
must be installed between the flue outlet of the appliance
and the draft regulator, as indicated in the instructions.
Figure 2 : Wiring diagram,BVSO
For more details, refer to the instructions supplied with the
device itself, as well as section 3 of this manual.
7
DNS-01340 Rev A

Electrical kit supplied.
electrical kit.
WARNING
FIRE, CARBON MONOXIDE POISONINC HAZARD
Failure to follow this warning could result in personal
injury, death, and/or property damage.
DO NOT reset the device or restart the furnace unless
the cause of the interruption has been identified and
corrected by a qualified agency. Ensure that the blocked
vent shut-off has been cleaned by a qualified agency
before placing into service. Annual inspection and
cleaning of the blocked vent shut-off by a qualified
agency is required.
WARNING
FIRE, CARBON MONOXIDE POISONINC HAZARD
Failure to follow this warning could result in personal
injury, death, and/or property damage.
The blocked vent shut-off MUST be inspected and
maintained annually by a qualified agency.
Figure 3 : Blocked vent shut-off device wiring, upflow installation with vertical exhaut
The position of the hole
in the vent is subject to
the length of the
2.4.6 Oil burner
This furnace is supplied with a high pressure atomizing
retention head type Riello burner for use with not heavier
than grade 2 Fuel Oil. Refer to the Technical Specifications,
Table 5 for the insertion length.
Oil Connections
Complete instructions for installation of the fuel oil piping will
be found in the oil burner installation instructions included
with the furnace.
Connect the green
ground wire to a
cabinet screw.
It is also essential that the BVSO be maintained annually.
For more details please refer to the instructions supplied
with the device itself, as well as Section 4 of this Manual.
WARNING
ELECTRICAL SHOCK HAZARD
Failure to follow this warning could result in personal
injury or death.
Disconnect electrical power supply to the furnace
before wiring the blocked vent shut-off.
CAUTION
CUT HAZARD
Failure to follow this caution may result in personal
injury.
Sheet metal parts may have sharp edges or burrs. Use
care and wear appropriate protective clothing, safety
glasses, and gloves when handling parts and servicing
furnaces.
Blocked Vent Shut-Off
device BVSO.
Use the three wire
fasteners. The wires
must not come in
contact with the flue and
cleaning pipes.
Connect the wires to
the free Limit Control
terminals.
DNS-1043 Rev. A
Oil line entry holes are located in the side panels. Two holes
are provided on each side, so that a two-pipe system can be
used if desired.
A 10-micron (or finer) oil filter should be used with all oil
burners, installed as closely as possible to the burner.
8

Figure 4 : Blocked vent shut-off device wiring, upflow
contacts (See Figure 2)
installation with vertical exhaust
Connection to
high limit contacts
DNS-1043 Rev A
Figure 5 : Blocked vent shut-off device wiring, upflow
installation with horizontal exhaust
Figure 7: Blocked vent shut-off device wiring, horizontal
installation with vertical exhaust
DNS-1043 Rev A
Connection to
high limit contacts
Figure 8: Blocked vent shut-off device wiring, downflow
installation
Connection to
high limit contacts
DNS-1043 Rev A
Figure 6: Blocked vent shut-off device wiring, horizontal
installation with horizontal exhaust
Connection to
high limit contacts
DNS-1043 Rev A
DNS-1043 Rev A
Connection to high limit
DNS-1043 Rev A
2.4.7 Electrical system
WARNING
The unit cabinet must have an uninterrupted or
unbroken electrical ground to minimize personal injury
if an electrical fault should occur. A green ground screw
is provided in the control box for this connection.
The appliance must be installed in accordance with the
current ANSI/NFPA 70 National Electrical Code, CSA C22.1
Canadian Electrical Code Part 1 and/or local codes.
The control system depends on the correct polarity of the
power supply. Connect “HOT” wire (H) and “NEUTRAL” wire
(N) as shown in Figures 12 and 13.
9
A separate line voltage supply should be used with fused
disconnect switch or circuit breaker between the main power
panel and the unit.
Use only copper wire for 115V supply service to the unit.
Metallic conduit (where required/used) may terminate at the
side panel of the unit. It is not necessary to extend the
conduit inside the unit from the side panel to the control box.
When replacing any original furnace wiring, use only 105oC,
16 AWG copper wire.
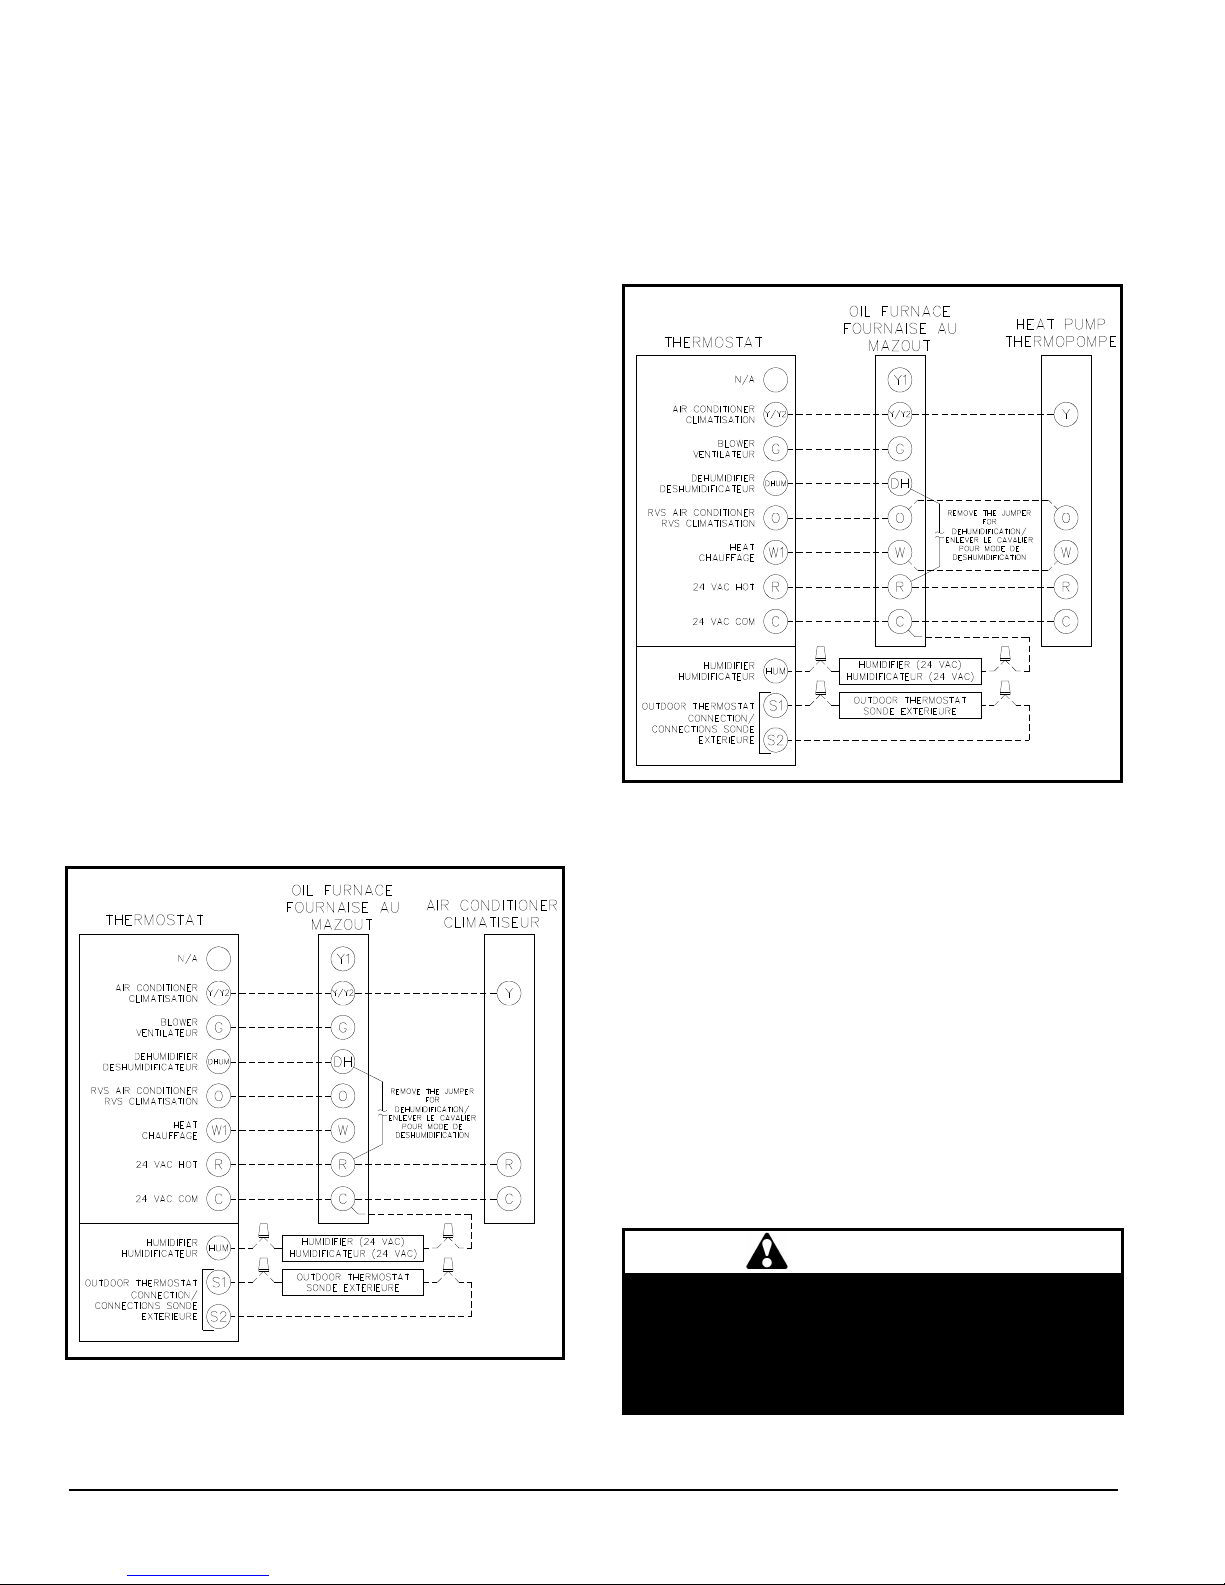
2.4.3 24V Wiring
Instructions for wiring thermostat (field supplied) are packed
in the thermostat box. Make thermostat connections as
shown in Figures 9 and 10. Thermostat wire connections at
R and W are the minimum required for oil heating operation.
2.4.4 Accessory installation
General
When installing optional accessories on this appliance,
follow manufacturer’s Installation Instructions included with
accessory.
Auxiliary terminals
The HUM 120 VAC terminals on the electronic control board
are tied directly to the #8 pin of the 9-pin connector and
provide a 120 VAC signal whenever the burner is energized,
see Figure 13. The 120 VAC and neutral terminals can be
used for accessory wiring. See Electronic Air Cleaner and
Humidifier sections for further information.
Figure 9 : 24 VAC Oil Furnace Wiring with Air
Conditioner
constant 120 VAC power, the airflow sensor turns on the
electronic air cleaner when the furnace blower is operating.
Humidifier / Humidistat
A 24 VAC signal can be connected, sourced from the W and
C terminals on the electronic control board or a 120 VAC
signal from the HUM 120 VAC or N terminals, when a heat
source must be used.
Figure 10 : 24 VAC Oil Furnace Wiring with Heat Pump
DNS-1025 Rev D
Dehumidification capability with standard Humidistat
Dehumidification on systems using a variable speed motor
is better than on most other systems. If this feature is
required, the terminals on the electronic control board permit
the wiring of a standard humidistat. Refer to Figures 9 and
10 for wiring instructions.
A furnace equipped with a variable speed motor will detect
the opening of the humidistat contact and reduce the airflow
to 85% of nominal cooling airflow. This will increase its
capacity to dehumidify up to the point where the humidistat
detects an acceptable level of humidity in the air. At that
point the unit return to 100% of its cooling airflow.
To activate this mode, remove the jumper between DH
and R of the electronic board and wire in a standard
humidistat on these terminals.
2.4.8 Air filter
Electronic Air Cleaner
When adding an electronic air cleaner to this unit, use an
Airflow Sensor kit. As the air cleaner is connected to
DNS-1024 Rev D
DANGER
Do not use this furnace as a construction heater. Use of
this furnace as a construction heater exposes it to
abnormal conditions, contaminated combustion air and
the lack of air filters. Failure to follow this warning can
lead to premature furnace failure and/or vent failure that
could result in a fire hazard and/or bodily harm.
An external filter rack is provided as standard equipment
with this furnace. The filter rack can be installed on the right
10

or left side panel, or on the bottom of the furnace to
accommodate the return air ductwork. A sufficient clearance
should be provided for air filter access. Please refer to Table
2 for filter rack flange dimensions for return air duct.
Table 2 : Filter rack flange dimensions for return air duct
Model Air Filter Size Flange Opening
CBM SIZE 105
CBM SIZE 120
16" x 24" 15" x 23"
40.64 x 60.96 cm 38.10 X 58.42 cm
20" x 30" 17" x 29"
45.72 X 76.20 cm 43.18 X 73.66 cm
2.4.9 Air Conditioner (or Heat Pump)
An air conditioning coil may be installed on the supply air
side ONLY.
WARNING
POISONOUS CARBON MONOXIDE GAS HAZARD
Install the evaporator coil on the supply side of the
furnace ducting ONLY.
An evaporator coil installed on the return air side of the
ducting can cause condensation to form inside the heat
exchanger, resulting in heat exchanger failure. This in
turn can result in death, bodily injury.
No minimum clearance is required between the bottom of
the coil drain pan and the top of the heat exchanger. If a
heat pump is installed, a “dual-energy” thermostat, or other
control is required, in order to prevent the simultaneous
operation of the furnace and the heat pump. It also prevents
a direct transition from heating by way of the heat pump to
heating with oil. Refer to the thermostat instructions or those
of another control used for the proper wiring.
If a coil blower compartment is used, install air tight,
motorized and automatic air dampers. Cold air coming from
the coil and passing across the furnace can cause
condensation and shorten the life of the heat exchanger.
2.4.10 Horizontal or downflow installation
1. On horizontal installations, determine which “side” will
become the “top”, when the unit is laid down. Remove
the flue pipe clearance knockout from the top front of
that side panel. Install the flue elbow so that it exits the
cabinet of the furnace through that opening;
2. On counterflow Installations, the flue pipe must exit the
cabinet through one of the side panel openings (as
above), then extended up the side of the furnace.
Ensure that adequate clearances to combustibles are
observed. It may be necessary to install a sheet-metal
shield on an adjacent wall to prevent any possibility of a
fire hazard;
3. Remove the burner by unscrewing the mounting nuts.
Avoid putting undue strain on burner wiring. It may be
necessary to disconnect the burner wiring in some
cases. Reinstall the burner in the proper position.
IMPORTANT: The burner must always be installed in the
upright position with the ignition control on top.
3.0 OPERATION
3.1 SUPPLY AIR ADJUSTMENTS
This furnace is equipped with an ECM variable speed motor.
The blower is adjusted at the factory to deliver the required
oil heating airflow at 0.75 USGPH and 3.0 tons of cooling on
models with a maximum input of 105,000 BTU/H. The same
applies to units with 0.85 USGPH input, 5 tons of cooling
and a maximum input of 154,000 BTUH.
Refer to Tables 3 to 6 for information on how to adjust the
DIP switches for other blower speeds for heating and
cooling.
Table 3 : Supply air adjustments, heating mode
CVM 105
SW1 – HEAT
DIP Switch Positions
1 2 POSITION
Output
USGPH
OFF OFF A 0.75
ON OFF B 0.65
OFF ON C 0.50
ON ON D ALL
CVM 120
SW1 – HEAT
DIP Switch Positions
1 2 POSITION
Output
USGPH
OFF OFF A 0.85
ON OFF B 1.00
OFF ON C 1.10
ON ON D N/A
3.2 OPERATIONAL CHECKLIST
Before starting up the unit, be sure to check that the
following items are in compliance:
1. The electrical installation, the oil supply system, the
venting system, combustion air supply and ventilation;
2. The blower access door is in place and the blower rail
locking screws are well tightened;
3. The Blocked Vent Shut-Off (BVSO) is installed
according to instructions (for chimney venting);
4. The oil supply valve is open;
Table 4 : Supply air adjustments, air conditioning mode
CVM 105
SW2 – COOL
DIP Switch Positions
Output
1 2 POSITION
OFF OFF A 3.0
ON OFF B 2.5
OFF ON C 2.0
ON ON D 1.5
CVM 120
SW2 – COOL
Output
DIP Switch Positions
1 2 POSITION
OFF OFF A 5.0
ON OFF B 4.0
OFF ON C 3.5
ON ON D 3.0
11
Tons
Tons

Table 5 : CFM adjustments, all modes
CVM 105
SW3 – ADJ (Adjustment)
DIP Switch Positions
1 2 POSITION
CFM HTG.
% increase
or decrease
CFM A/C
% increase
or decrease
OFF OFF A 0% 0%
ON OFF B +10% +10%
OFF ON C -10% -10%
ON ON D N/A 0%
CVM 120
SW3 – ADJ (Adjustment)
DIP Switch Positions
1 2 POSITION
CFM HTG.
% increase
or decrease
CFM A/C
% increase
or decrease
OFF OFF A 0% 0%
ON OFF B +10% +10%
OFF ON C -10% -10%
ON ON D N/A 0%
Table 6 : Delay adjustments, heating mode
CVM 105
SW4 – Delay
DIP Switch Positions
1 2 POSITION
Output
USGPH
OFF OFF A 0.75
ON OFF B 0.65
OFF ON C 0.50
ON ON D ALL
CVM 120
SW4 – Delay
DIP Switch Positions
1 2 POSITION
Output
USGPH
OFF OFF A 0.85
ON OFF B 1.00
OFF ON C 1.10
ON ON D N/A
5. The flame observation door and the two clean-out
access doors (located at the front of the unit) or well
closed;
6. The burner ‘’Reset’’ button is well pushed in or rearmed;
7. The preliminary air adjustments on the burner comply
with the technical specifications in this manual;
8. The blower adjustments are appropriate and according
to the specifications in this manual;
9. The thermostat of the room is in the heating mode and
is set higher than the ambient temperature.
To start the unit, turn the main electrical switch on.
CAUTION
Do not tamper with the unit or its controls. Call a
qualified service technician.
3.3 PURGING THE OIL LINE
1. A 10-micron (or less) oil filter should be installed as
closely to the burner as possible with all oil burners, but
it is essential for burners with a low firing rate. We
recommend the use of a low pressure drop oil filter with
a capacity greater than that of the fuel pump;
2. On a new installation, the air trapped in the oil line
leading from the tank to the nozzle must be thoroughly
purged in order to prevent excessive after drip. The oil
pump is equipped with a special fitting that facilitates
the purging of any air between it and the tank. The
proper procedure for performing this operation is as
follows:
a. Place a piece of 1/4” diameter clear plastic tubing
over the purge fitting on the oil pump;
b. Start the oil burner, then open the purge fitting and
allow the burner to run until the purge tube is
completely free of air bubbles;
c. At this point tighten the purge fitting, which will
allow the oil to run to the nozzle and fire the burner.
If the purging takes longer than 15 seconds and no
flame has been established the burner will stop.
Push the reset button on top of the Primary Control
to restart the burner.
For detailed information on the operation of the Primary
Control please refer to the instructions included with the
furnace or the burner.
3.4 COMBUSTION CHECK
IMPORTANT: The combustion check verification MUST be
performed after the nozzle replacement or the burner
cleaning. After these manipulations, the combustion
parameters are necessarily modified. Refer also to the
burner instruction manual.
IMPORTANT: The heat exchanger metal surfaces may
have oil and the baffle insulation also contains binders.
These products will burn or evaporate when the unit
operates for the first time. Because of this, the smoke
reading may be inexact during the first minutes of operation.
Therefore, the unit must operate during at least 60 minutes
before taking any readings to adjust the combustion quality.
Let the unit cool down before making any adjustments.
In order to obtain optimum performance from the oil burner,
the following set-up procedures must be followed by
referring to the Technical Specifications, Table 5 in this
manual:
1. A test kit to measure the smoke, flue draft and over-fire
pressure should be used in order to obtain the proper
air band setting. Although all of the above
measurements are required for optimum set up and
efficiency, the most important reading that must be
taken is the smoke number in the flue pipe, downstream
from the regulator;
2. The proper smoke number, as established by way of
engineering tests, is between 0 and 1. This degree of
smoke emission is commonly referred to as a “trace”. It
is recommended that a Bacharach True Spot Smoke
Test kit or equivalent be used;
3. Follow the next steps to do the combustion check
verification:
a. Drill a minimum proper diameter (about 9/32”) test
hole in the flue pipe, approximately 18 inches from
the furnace breech;
b. From a cold start, let the unit operate for about 5
minutes;
c. Set the burner air setting until you have between 0
and 1 on the Bacharach Scale (or a “trace”);
12

d. Take a CO2 sample at the same test location where
the smoke reading was taken and make note of it;
e. Adjust the burner air setting to obtain a CO2 reading
1.5% lower (or a O2 reading 2.0% higher) than the
reading associated with the “trace” of smoke;
f. This method of adjusting the burner will result in
clean combustion (Bacharach smoke scale
between 0 and a trace) and ensure the proper
functioning of the system.
4. A barometric draft regulator, supplied with the furnace,
must be installed, in order to ensure proper draft
through the furnace. The barometric damper must be
mounted with the hinge pins in a horizontal position and
the face of the damper vertical for proper functioning,
(see instructions included with damper). After the
furnace has been firing for at least five minutes, the
draft regulator should be set to between -0.025" W.C.
and -0.035" W.C.;
5. The over fire pressure that is taken through the
observation door located in the centre of the front panel
above the burner is a measurement that is necessary to
determine if there is a blockage in the heat exchanger
or the flue pipe. Please refer to the Technical
Specifications in this manual for over fire pressure
values. A high pressure condition may be caused by
excessive combustion air due to the air band being too
wide open or a lack of flue draft (chimney effect) or
some other blockage, such as soot in the secondary
section of the heat exchanger or the use of an oversize
nozzle input or high pressure pump;
6. After all the set up procedures mentioned above have
been completed, the burner should be fired and an
inspection mirror should be used to observe the flame
pattern at the tip of the nozzle. Any irregularities such
as burning to one side or pulsating flame patterns
should be corrected by changing the nozzle.
3.5 SEQUENCE OF OPERATION
Using schematic diagram in Figure 13, follow the sequences
of operation through the different modes.
NOTE: ECM variable speed motors deliver infinitely variable
CFMs. At start-up the motor increases its speed gradually,
in order to lower noise perception. ECM motors ramp down
in the same gradual fashion as they do on start-up. ECMs
are energized by 120V, whenever power is available to the
furnace control. However, they operate only when 24V
motor control signals are received.
3.5.1 Oil fired heating mode
1. The thermostat closes R to W.
2. Burner motor fan pre-purges the combustion chamber
for 10 to 15 seconds, establishing the combustion air
pattern. During this time a spark is also established.
The fan starts at 13% of nominal heating for a period
equivalent to the “Pre-Run Delay”. Refer to Tables 8
and 9 ;
3. The solenoid valve opens and a flame is established. A
short time after that, the ignition transformer ceases
sparking.
4. After the “Pre-Run Delay” the blower slightly increases
its speed for a period of time equivalent to the “ShortRun Delay”. Refer to Tables 8 and 9.
5. After the “Short-Run Delay” the blower increases its
speed in order to reach the CFMs indicated in Tables 8
and 9.
6. The call for heat is satisfied.
7. The solenoid valve closes, the burner motor stops and
the flame extinguishes.
8. The blower slows down gradually to 38% of nominal
CFMs for a period of 3 minutes and then stops.
3.5.2 Cooling mode
NOTE: On units using a 2-stage compressor, the terminal
Y1 must be used. Once the Y1 terminal on the electronic
control receives a 24 V signal, the airflow is reduced by 20%
percent. If a single stage compressor is used, do not use the
Y1 terminal.
1. The R - G-and R - Y/Y2 thermostat contacts close. The
R-Y/Y2 circuit starts the outdoor unit, and the R - G
circuit starts the blower at cooling speed. Refer to
Tables 8 and 9.
2. When the call for cooling is satisfied, the R - G and R Y/Y2 thermostat contacts open. The cooling unit stops
and furnace blower stops after a period of 3 minutes.
3.5.3 Continuous Blower Mode
1. When the R – G thermostat contacts close, the blower
functions at 64%, 75% or 86% of cooling airflow,
depending on the adjustment of the DIP switches. Refer
to Tables 8 and 9.
2. 2. When the R – G thermostat contacts open, the
blower stops immediately.
3.5.4 Heat Pump – Heating / Cooling Mode
NOTE 1: On units using 2-stage compressors, terminal Y1
must be used. When Y1 on the electronic control board
receives a 24 V signal, the airflow is cut by 20%. If a single
stage compressor is used, do NOT use terminal Y1.
NOTE 2: A dual-fuel thermostat is required when a variable
speed furnace is used with a heat pump. See dual-fuel
thermostat Installation Instructions for interface connections.
The interface prevents simultaneous operation of both the
furnace and heat pump and prevents direct transition from
heat pump to furnace operation.
Cooling Mode
1. The thermostat contacts R - G, R - Y/Y2 and R - O
close. The R - Y/Y2 circuit starts-up the outdoor cooling
unit, the R - O maintains the reversing valve in the
cooling mode and the R - G circuit starts-up the blower
at cooling speed. Refer to Tables 8 and 9.
2. When the call for cooling is satisfied, the R - G, R Y/Y2 and R - O contacts open. The cooling unit stops
and the furnace blower stops after for a period of 3
minutes.
Heating Mode Thermo Pump
1. The thermostat contacts R - G and R - Y/Y2 close. The
R - G circuit starts-up the blower at heating speed by
way of the Thermo Pump. Refer to Tables 8 and 9.
13

2. When the call for heat is satisfied, the thermostat
contacts open and the furnace blower stop after a
period of 3 minutes.
3.5.5 Defrost Mode
When the R - W and R - Y/Y2 circuits are closed by the
thermostat and the heat pump, the electronic control startsup the burner and the blower in the oil heating mode during
defrosts.
3.6 LIMIT CONTROL CHECK
After the furnace has been in operation for at least 15
minutes, restrict the return air supply by blocking the filters
or closing the return registers and allow the furnace to shut
down on High Limit. The burner will shut OFF but the main
blower should continue to run.
Remove the restriction and the burner should come back on
in a few minutes.
4.0 MAINTENANCE
WARNING
Before performing any service functions, make sure that
all utilities are turned ‘’OFF’’ upstream from the
appliance, unless operations specifically require the
power to be on. Failure to comply with this warning will
cause a fire hazard and/or bodily harm.
This furnace should never be operated without an air filter.
Disposable filters should be replaced at least once a year. If
equipped to provide cooling, filters should be replaced at a
minimum of twice a year.
To avoid personal injury, make sure the power is “OFF”
before servicing.
ALWAYS KEEP THE OIL VALVE CLOSED IF THE
BURNER IS SHUT DOWN FOR AN EXTENDED PERIOD
OF TIME.
For optimum performance, the oil burner nozzle should be
replaced at least once a year.
The procedure for the installation and/or replacement of a
nozzle is outlined in the oil burner instruction manual which
is supplied with the furnace.
After replacing the nozzle, the burner should be adjusted in
accordance with the “COMBUSTION CHECK” section of this
manual.
4.1 HEAT EXCHANGER CLEANING
Normally, it is not necessary to clean the heat exchanger or
flue pipe every year, but it is advisable to have a qualified
service technician check the unit before each heating
season to determine whether cleaning or replacement of
parts is required.
If cleaning is necessary, the following steps should be taken:
1. Turn “OFF” all utilities upstream from the furnace;
2. Disconnect the flue pipe (only with chimney venting and
rigid flue pipe);
3. Remove the breech plate;
4. Remove the radiator baffle;
5. Disconnect the oil line and remove the oil burner from
the furnace;
6. Open the two cleanout doors located in the upper part
of the front panel of the furnace;
7. Clean the secondary tubes and the primary cylinder
with a stiff brush and a vacuum cleaner;
8. Before reassembly, the heat exchanger and combustion
chamber should be inspected to determine if
replacement is required;
9. After cleaning, replace the radiator baffle, flue collar
plate, oil burner and close the two clean out access
doors. Reconnect the flue pipe and oil line;
10. Readjust burner for proper operation.
4.2 BLOWER REMOVAL
To remove the blower from the furnace:
1. Turn “OFF” all utilities upstream from the furnace;
2. Remove the burner access door and blower door;
3. Remove the blower retaining screw (on the blower
partition panel);
4. Remove the control box cover and disconnect the
thermostat and power wires from the board;
5. Slide the blower on the rails toward the front of the unit;
6. Reverse the above steps to reinstall the blower. Please
refer to the wiring diagram, Figure 13 in this manual, or
the diagram located on the inside of the blower door to
properly rewire the unit.
CAUTION
Be sure that the blower is adequately supported when
sliding it off the mounting rails, especially in the
horizontal or counter flow positions, in order to prevent
dropping it and injuring yourself or damaging the
blower.
4.3 BLOCKED VENT SHUT OFF (BVSO) CLEANING
For continued safe operation, the Blocked Vent Shut-Off
System (BVSO) needs to be inspected and maintained
annually by a qualified service technician.
WARNING
ELECTRICAL SHOCK HAZARD
Failure to follow this warning could result in personal
injury or death.
Disconnect electrical power supply to the furnace
before servicing the blocked vent shut-off.
1. Remove the two screws holding down the BVSO
assembly cover;
14

2. Remove the cover;
3. Remove the two screws holding the control box to the
heat transfer tube assembly. Sliding the control box in the
appropriate direction will unlock it form the heat transfer
tube assembly;
4. Carefully remove any build-up from the thermal switch
surface;
CAUTION
Do not dent or scratch the surface of the thermal
switch. If the thermal switch is damaged, it must be
replaced.
5.0 FURNACE INFORMATION
Model:
Furnace installation date:
Service telephone #-Day:
Dealer name and address:
START-UP RESULTS
Nozzle:
Burner adjustments:
CO2 :
Gross stack temperature:
Ambient temperature:
Chimney draft :
Overfire draft :
Test performed by:
Primary air
Fine air
Drawer Assembly
% Smoke
scale:
5. Clear and remove any build-up or obstruction inside the
heat transfer tube;
6. Re-mount, lock and fasten the control box with the 2
screws removed in step 3;
7. Re-attach the assembly cover with the screws removed in
step 1;
8. Re-establish power to the appliance.
Serial number:
Night:
Pressure:
(Bacharach)
°F
°F
" W.C.
" W.C.
lb/po2
15

Table 7 : Technical Specifications
Adjust fan speed for air temperature rise of 55 to 85 F.
X
** Dip switches on the electronic board must be adjusted according to heat input and cooling capacity.
Model: CVM 75 90 105 120 140 155
RATING AND PERFORMANCE
Firing rate (USGPH)* 0.5 0.65 0.75 0.85 1.00 1.10
Input (BTU/h)* 70 000 91 000 105 000 119 000 140 000 154 000
Heating capacity (BTU/h)* 56 000 72 000 85 000 100 000 117 000 127 000
Heating temperature rise*
Flue draft with chimney (inch of w .c.)
Overfire pressure w ith chimney (inch of w .c.)
RIELLO BURNER; 40-F (chimney vent)
Burner tube insertion length
30 - 47°C (55 - 85°F) 30 - 47°C (55 - 85°F)
-0.06" to -0.025" -0.06" to -0.025"
max +0.025" max +0.025"
F3 head with VSBT F5 head with VSBT
3 9/16 ''
3 9/16 ''
Nozzle (Delavan) 0.40 - 70A 0.50 - 70W 0.65 - 70W 0.75 - 70B 0.85 - 70W 1.00 - 70W
Pump pressure (PSIG)* 155 170 135 130 140 125
Combustion air adjustment (turbulator/damper) 0 / 3 0 / 3.5 0 / 4 0 / 3 0 / 3.5 0 / 4
AFUE % (From CSA B212 standard and Canadian regulation) 82.9 82.4 81.8 ▲85.1 83.8 83.0
AFUE % max. (From ASHRAE 103 stadard and US regulation) 82.0 81.6 82.3 ▲85.7 84.9 84.3
ELECTRICAL SYSTEM
Volts - Hertz - Phase
Rated current (Amps)
Minimum ampacity for wire sizing
Max. w ire lenght (ft.)
Max. fuse size (Amps)
Control transformer
External control power available Heating
Cooling
115 - 60 - 1 115 - 60 - 1
12.2 15.7
13.7 18.1
26 26
15 20
40 VA 40 VA
40 VA 40 VA
30 VA 30 VA
BLOWER DATA
Motor (HP)
Blow er w heel size (in.)
Filter quantity and size
1/2 HP ECM 1.0 HP ECM
10" X 10"
12" X 10"
(1X) 16" X 24" (1X) 20" X 30"
GENERAL INFORMATION
Overall dimensions (w idth x depth x height)
Supply air opening (width x depth)
Return air opening (depth x height, with factory filter rack)
Filter size
Shipping weight
Air conditioning, maximum output (tons) at 0.5 SP
20" x 35" x 48¾" 20" x 39½" x 53"
18.625" x 20" 19" x 24"
15" x 23" 17" x 29"
16" x 24" 20" x 30"
100 kg / 221 lbs 122 kg / 270 lbs
3 tons 5 tons
* INPUT & OUTPUT ADJUSTMENT (see information below )
=
Pump pressure can be increased up to 180 PSIG (200 PSIG with Beckett burner at 1.10 USGPH)
Adjust flue gas temperature between 400 and 575 F.
Refer to air flow tables of the instruction manual.
16
 Loading...