


BUSH
Model: FSAT+500
Cat No: 226/7470
LET’S GET
STARTED
YOUR USER GUIDE

WELCOME TO FREESAT
We are so pleased you bought this 500GB Bush Freesat+ HD recorder.
Now you can enjoy:
•Quality state-of-the-art satellite TV receiver
•Over 200 of your favourite channels
•Picture perfect High Definition (selected channels)
•BBC iPlayer, ITV Player
•Pause, Record and Rewind at the touch of a button
•Easy plug and play set up
•Expert customer support - visit Freesat.co.uk or call 0333 321 3200
Not included:
•Monthly subscriptions (It’s free)
•Lengthy contracts (It’s free forever)
•Baffling, complicated technology (It’s simple)
IMPORTANT - Please read these instructions fully before installing or using.
These instructions contain important information which will help you get the best from your appliance and ensure safe and correct installation, use and maintenance.
For any help concerning set up and use of your Digital Set Top Box please call the Freesat Helpline: 0333 321 3200
Manufactured under license from Dolby Laboratories. Dolby and the double-D symbol are trademarks of Dolby Laboratories.
2 Helpline: 0333 321 3200

Safety Information
IMPORTANT - Please read these instructions fully before installation
1.Read these instructions.
2.Keep these instructions.
3.Heed all warnings.
4.Follow all instructions.
5.Do not use this apparatus near water.
6.Clean only with a dry cloth.
7.Do not block any ventilation openings; install in accordance with the instructions.
8.Do not install near any heat sources such as radiators, heat registers, stoves, or other apparatus (including amplifiers) that produce heat.
9.Do not defeat the safety purpose of the polarized plug. If the provided plug does not fit into your outlet, consult an electrician for replacement of the obsolete outlet.
10.Protect the power cord from being walked on or pinched, particularly at the plugs, convenience receptacles, and the point where they exit from the apparatus.
11.Only use attachments/accessories specified by the manufacturer.
12.Unplug this apparatus during lightning storms or when unused for long periods of time.
13.Refer all servicing to qualified service personnel. Servicing is required when the apparatus has been damaged in any way, such as the power-supply cord or plug is damaged, liquid has been spilled or objects have fallen into the apparatus, the apparatus has been exposed to rain or moisture, does not operate normally, or has been dropped.
14.Mains plug is used as the disconnect device; the disconnect device shall remain readily operable.
15.The ventilation should not be impeded by covering the ventilation openings with items, such as newspapers, table-cloth, curtains,etc.
16.No naked flame sources, such as lighted candles, should be placed on the apparatus.
17.Attention should be drawn to the environmental aspects of battery disposal.
18.The use of apparatus in moderate climate.
19.The apparatus shall not be exposed to dripping or splashing and objects filled with liquids, such as vases, shall not be placed on the apparatus.
WARNING: To reduce the risk of fire or electric shock, do not expose this apparatus to rain or moisture.
WARNING: The batteries shall not be exposed to excessive heat such as sunshine, fire or the like.
 This symbol indicates that dangerous voltages constituting a risk of electric shock are present within this unit.
 This symbol indicates that there are important operating and maintenance instructions in the literature accompanying this unit.


 This symbol indicates that this product incorporates double insulation between hazardous mains voltage and user accessible parts. When servicing use only identical replacement parts.
 CAUTION: Under the influence of electrostatic phenomenon, the product may malfunction and require the user to reset the power.
 This marking indicates that this product should not be disposed with other household waste throughout the EU. To prevent possible harm to the environment or human health from uncontrolled waste disposal, recycle it responsibly to promote the sustainable reuse of material resources. To return your used device, please use the return and collection systems or contact the retailer where the product was purchased. They can take this product for environmentally safe recycling.
Do not throw batteries in the bin or on a fire. Make sure that you dispose of batteries safely at a local recycling centre. You can also recycle batteries at many supermarkets.
Helpline: 0333 321 3200 |
3 |

ELECTRICAL SAFETY
Your receiver is supplied with an external 100V - 240V AC, 50Hz power supply that connects by 12V DC plug to the receiver and by UK mains plug adapter to the mains. Always connect the 12V DC plug to the receiver before connecting the mains plug.
If the mains plug breaks or becomes damaged, do not use it. Do not cut or open the adapter, as this will expose you to dangerous high voltages present inside. The adapter is non-serviceable and does not have any replaceable parts inside. If the power supply is damaged, it must be replaced by the manufacturer, its service agent, or suitably qualified persons in order to avoid a hazard.
To reduce the risk of electric shock, do not remove screws from the receiver or open it as it contains no userserviceable parts. Please leave all maintenance work to qualified personnel.
4 Helpline: 0333 321 3200

CONTENTS |
|
In The Box |
7 |
Your receiver |
8 |
1Remote control |
10 |
Preparation |
12 |
The satellite dish |
12 |
2 Connecting your receiver |
12 |
Switching on |
14 |
Tuning in |
14 |
Everyday Use |
17 |
Turning on the receiver |
17 |
3 Changing channels |
17 |
Changing the volume |
18 |
Browsing bar |
18 |
Subtitles and Audio Description (AD) |
19 |
Using the channel list |
20 |
Regional channels |
20 |
Using the programme guide |
21 |
Interactive TV services |
23 |
Pausing live TV |
23 |
Recording a programme |
25 |
Using the library |
26 |
Playing a recorded programme |
28 |
Advanced Use |
29 |
The lock PIN |
29 |
4Display mode |
30 |
TV/DTV |
30 |
Changing the channel list |
30 |
Using the favourite channel lists |
31 |
Manual timer recording |
31 |
Using the menu system |
32 |
Setup menu |
33 |
General menu section |
33 |
- Subtitles |
33 |
- Subtitle language |
33 |
- Auto standby |
33 |
- HDCP |
33 |
Picture menu section |
34 |
- Screen type |
34 |
- Display mode |
34 |
- HDMI resolution |
34 |
- Scart mode |
34 |
Sound menu section |
35 |
- Audio language |
35 |
- Audio description |
35 |
- Dolby digital |
35 |
- Lip-sync delay |
35 |
|
continued... |
Helpline: 0333 321 3200 |
5 |

CONTENTS
Advanced Use (continued...)
4 |
Record menu section |
35 |
- Default rec mode |
36 |
|
|
- Add to start of rec |
36 |
|
- Add to end of rec |
36 |
|
- Live pause length |
36 |
|
- Skip forwards time |
36 |
|
- Skip backwards time |
36 |
|
- Auto disk management |
37 |
|
- Format hard disk drive |
37 |
|
System menu section |
37 |
|
- Freesat installation |
37 |
|
- Add non-Freesat channels |
37 |
|
- Network configuration |
37 |
|
- Parental guidance |
37 |
|
- Hide adult channels |
38 |
|
- Lock online content |
38 |
|
- Change parental pin |
38 |
|
- Software update via oad |
38 |
|
- Software update via usb |
38 |
|
- Check for software update |
38 |
|
- Restore factory default |
38 |
|
Information menu |
38 |
On Demand TV |
39 |
Setting up for On Demand TV |
39 |
5 Watching On Demand TV |
40 |
Non-Freesat Channels |
41 |
Tuning in non-Freesat channels |
41 |
6 Watching non-Freesat channels |
42 |
Pausing and recording non-Freesat channels 43 |
|
Appendix A Troubleshooting |
44 |
Appendix B Specifications |
46 |
6 Helpline: 0333 321 3200
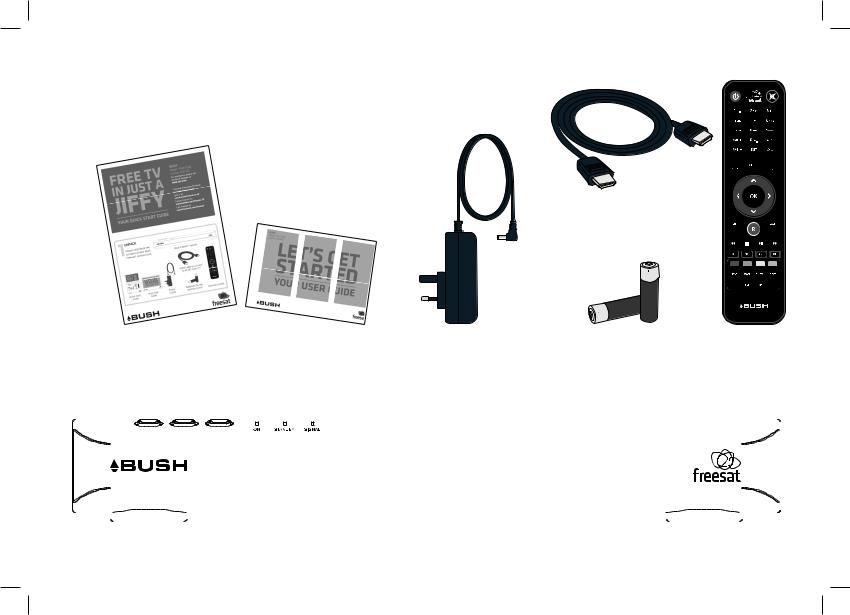
1In The Box
In your Bush Freesat+ receiver pack you should find the following items:
HDMI cable to connect to an HD-ready TV
|
|
|
Quick Start Guide |
Main User Guide |
Power supply |
Batteries for the |
|
|
Remote control |
||||||||
|
|
|
|
|
|
|
|
|
remote control |
|
|
|
|
|
|
|
|
|
|
|
|
|
|
|
|
|
|
|
|
|
|
|
|
|
|
|
|
|
|
|
|
|
|
|
|
|
|
|
|
|
|
|
|
|
|
|
|
|
|
|
|
|
|
|
|
|
|
|
|
|
|
|
|
|
|
|
|
|
|
|
|
|
|
|
|
|
|
|
|
|
|
|
|
|
|
|
|
|
|
|
|
|
|
|
|
|
|
|
|
|
|
|
|
|
|
|
|
|
|
|
|
|
|
|
|
|
|
|
|
|
|
|
|
|
|
|
|
|
|
|
|
|
|
|
|
|
|
|
|
|
|
|
|
|
|
|
|
|
|
|
|
|
|
|
|
|
|
|
|
|
|
|
|
|
|
|
|
|
|
Bush Freesat+ receiver
Helpline: 0333 321 3200 |
7 |
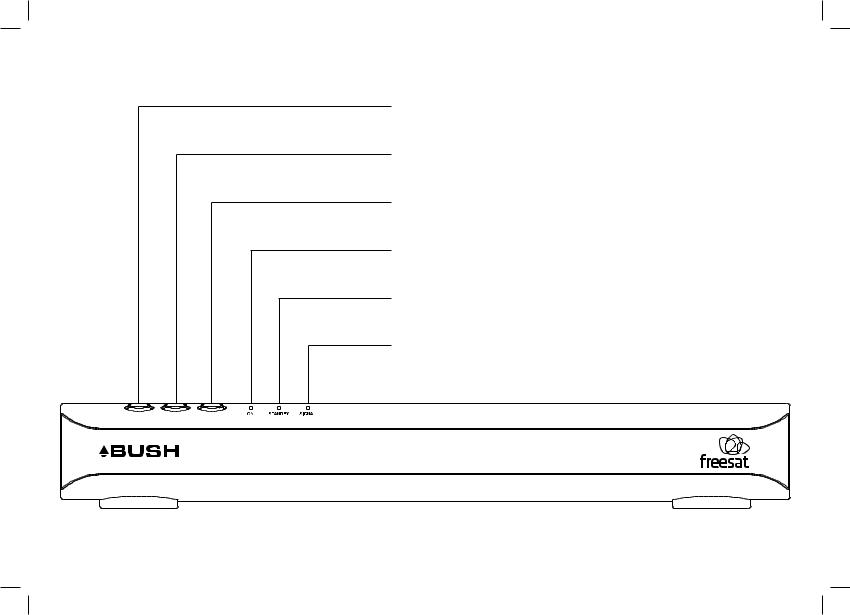
YOUR RECEIVER
POWER
Switch the receiver on and off
Front
DOWN
Switches to the previous channel
UP
Switches to the next channel
ON
Blue light indicates the receiver is on
STANDBY
Red light indicates the receiver is in standby
SIGNAL
Green light indicates valid signal
8 Helpline: 0333 321 3200
|
|
|
|
|
|
|
|
|
|
|
|
|
|
|
|
|
|
|
|
|
|
|
|
|
|
|
|
|
|
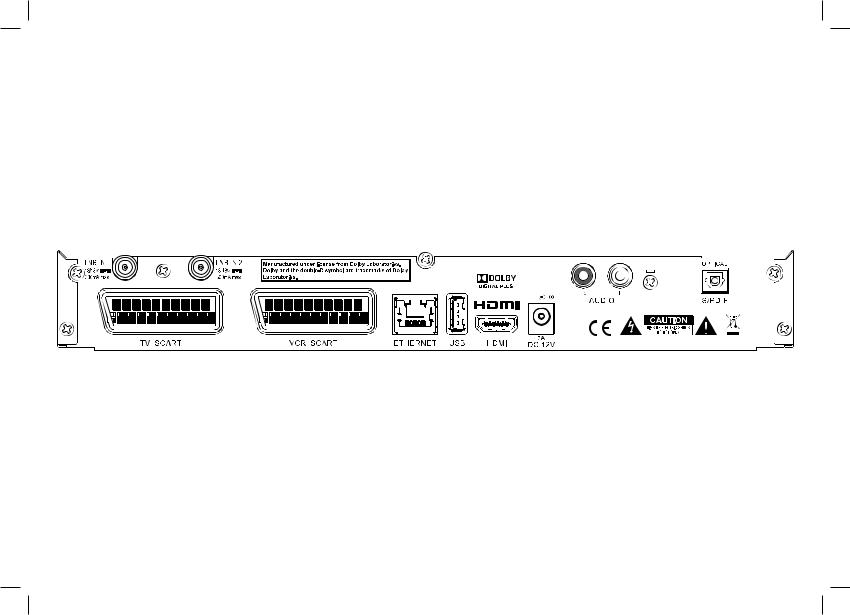
L and R AUDIO |
|||||
Rear |
|
|
|
|
|
|
|
|
|
|
|
|
|
|
|
|
|
|
|
|
|
|
|
|
Stereo audio output for |
||||||||||
|
|
|
|
|
|
|
|
|
|
|
|
|
|
|
|
|
|
|
|
|
|
|
|
connection to an analogue |
|||||||||||
|
|
|
|
|
|
|
|
|
|
|
|
|
|
|
|
|
|
|
|
|
|
|
|
|
|
|
|
|
|
audio system |
|||||
LNB IN 1, LNB IN 2 |
|
|
|
|
|
|
|
|
|
|
|
|
|
|
|
|
|
|
|
|
|
|
|
|
S/PDIF |
||||||||||
Two inputs for connection to |
|
|
|
|
|
|
|
|
|
|
|
|
|
|
|
|
|
|
|
|
|
|
|
|
Optical audio output for |
||||||||||
the satellite dish |
|
|
|
|
|
|
|
|
|
|
|
|
|
|
|
|
|
|
|
|
|
|
|
|
connection to a digital audio |
||||||||||
|
|
|
|
|
|
|
|
|
|
|
|
|
|
|
|
|
|
|
|
|
|
|
|
|
|
|
|
|
|
system |
|||||
|
|
|
|
|
|
|
|
|
|
|
|
|
|
|
|
|
|
|
|
|
|
|
|
|
|
|
|
|
|
|
|
|
|
|
|
|
|
|
|
|
|
|
|
|
|
|
|
|
|
|
|
|
|
|
|
|
|
|
|
|
|
|
|
|
|
|
|
|
|
|
|
|
|
|
|
|
|
|
|
|
|
|
|
|
|
|
|
|
|
|
|
|
|
|
|
|
|
|
|
|
|
|
|
|
|
|
|
|
|
|
|
|
|
|
|
|
|
|
|
|
|
|
|
|
|
|
|
|
|
|
|
|
|
|
|
|
|
|
|
|
|
|
|
|
|
|
|
|
|
|
|
|
|
|
|
|
|
|
|
|
|
|
|
|
|
|
|
|
|
|
|
|
|
|
|
|
|
|
|
|
|
|
|
|
|
|
|
|
|
|
|
|
|
|
|
|
|
|
|
|
|
|
|
|
|
|
|
|
|
|
|
|
|
|
|
|
|
|
|
|
|
|
|
|
|
|
|
|
|
|
|
|
DC 12v |
||
|
|
|
|
|
|
|
Connection for the power supply unit |
||
TV SCART |
VCR SCART |
||||||||
|
|
|
|
|
|||||
Output for connection to a |
Output/input for connection to |
|
|
|
HDMI |
||||
|
|
|
|||||||
non-HD television |
video recorder or DVD recorder |
|
|
|
Output for connection to an HD-ready television |
||||
|
|
|
|
|
|
|
USB |
||
|
|
|
|
|
|
|
Socket for upgrading the receiver’s software |
||
|
|
|
|
|
|
|
ETHERNET |
||
|
|
|
|
|
|
|
Network socket for connecting to the Internet |
||
Helpline: 0333 321 3200 |
9 |
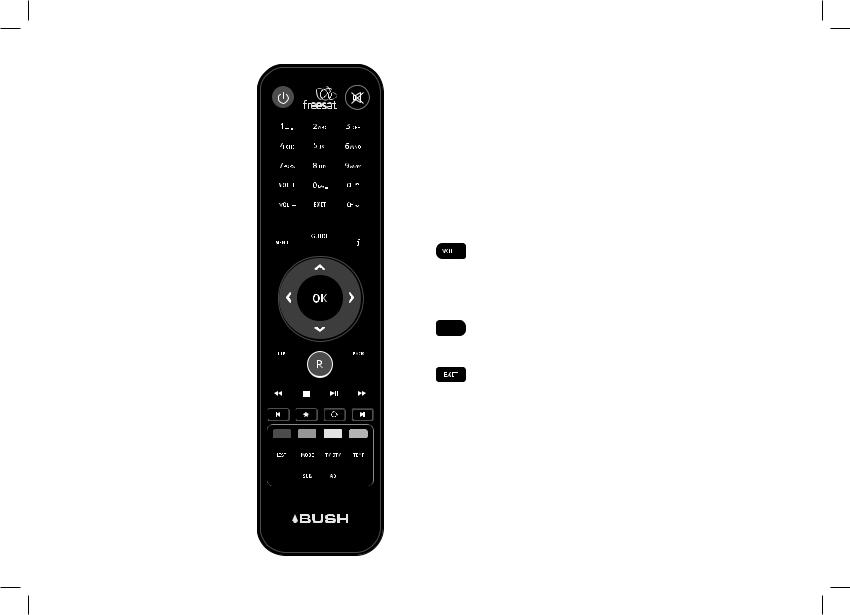
REMOTE CONTROL
Use the remote control within a maximum distance from the front of the receiver of 5m and within an angle of 60°. Ensure there is a clear line of sight between the remote control and the receiver. The operating distance may vary depending on the brightness of the room.
 Power - switches the receiver on and off.
 Mute - silences the receiver’s sound.
 0, 1 … 9 - enter channel numbers, numeric values in the set-up menus or a jump point in playback. Also enters your postcode during the installation process.
 Turns the volume up and down.
 Switches to the next or previous channel. Moves one page
  up or down in the channel list and programme guide.
Exits a menu and returns to normal TV viewing.


 Red, green, yellow, blue –Chooses options within menus.
 Displays the programme guide.
 Displays channel and programme information.
10 Helpline: 0333 321 3200
Up, down, left, right - move the highlight bar in menus and in the programme guide, and allow you to browse the
channels and programmes.
 Selects the highlighted option in a menu.
 Displays the list of programmes already recorded and set to be recorded.
 Exits a menu and returns to the previous menu.

 Winds backwards or forwards through a recording being played. Moves through the programme guide in 2 hour steps.
 Stops playback of a recorded programme. Returns to live TV from paused live TV.
 Pauses live TV. Starts and stops playback of a recorded programme or paused live TV.

 Jumps backwards or forwards through a recording being played. Moves through the programme guide in 24 hour steps.
 Records the selected programme.
 Displays the main menu screen.
 Selects favourite channels sequentially whilst watching TV and adds favourite channels to the channel list.
 Displays the channel list.
Switches between available screen display modes.
Switches back to the last channel watched.
 Switches the TV SCART output between Freesat and the TV’s tuner.
 Displays the available audio menu used to change between different soundtracks ( such as languages and audio description ).
 Displays the subtitles menu used to select subtitles.
 Displays interactive and digital text services (where available).
Helpline: 0333 321 3200 11
2Preparation
This section explains how to set up your Bush receiver to receive Freesat channels.
THE SATELLITE DISH
CONNECTING YOUR RECEIVER
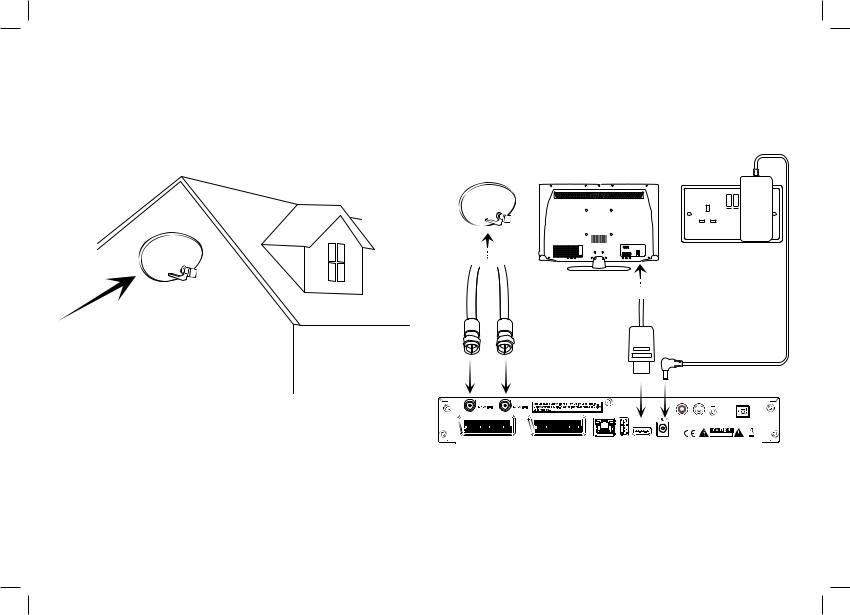
Place your receiver on a firm, level surface close to the television, a mains electricity socket, and the cables from the dish. (See page 3 – Safety.)
To receive Freesat, you must connect your receiver to an appropriate satellite dish, fixed in position and accurately pointed at the 28.2° East satellite position.
For safety reasons and to provide reliable reception, we strongly recommend that you have your dish installed by a professional. You may be able to use a satellite dish already installed at your home. If you have any questions about the dish, please consult your installer.
LNB IN 1 |
LNB IN 2 |
|
|
|
|
OPTICAL |
300mA max |
300mA max |
|
|
|
|
|
|
|
|
|
|
R |
L |
|
|
|
|
|
AUDIO |
S/PDIF |
|
|
|
|
|
|
RISK OF ELECTRIC SHOCK |
|
|
|
|
|
|
DO NOT OPEN |
TV SCART |
VCR SCART |
ETHERNET |
USB |
HDMI |
3A |
|
DC 13V |
|
Connect the two cables (or one double cable) from your dish to the LNB IN 1 and LNB IN 2 sockets at the back of the receiver (if the dish cables are fitted with a wall socket inside your home, you will need connecting cables, which you can get from your installer). It does not matter which of the two cables from the dish is connected to which LNB IN socket.
12 Helpline: 0333 321 3200

HINT: Each “F-connector” used for the satellite dish cable connections has a central wire that is inserted into the hole in the LNB IN socket while the collar is screwed onto the socket. When screwing on the collar, make sure that the central wire goes into the socket hole and is not bent to one side.
Turn off your television at its mains socket and connect the HDMI cable supplied between the HDMI socket at the back of your receiver and an HDMI socket on your television. There may be more than one HDMI socket on your television. If you are not sure which to use, check the television’s manual.
HINT: If your television has no HDMI socket, then it must be connected to the receiver by SCART cable, and you will not be able to watch Freesat channels in High Definition.
Connect the +12V DC connector to the 3A DC 12V connector at the back of the receiver. Then connect the Power Supply Unit (unit with 3 pin mains plug) to an available mains socket that is turned off.
You may have other equipment, such as a DVD recorder or surround sound system, to connect to the receiver.
A video recorder or DVD recorder may be connected to your receiver to make permanent archive recordings of Freesat programmes.
You will need to connect a SCART cable between the VCR SCART socket on the back of the receiver and a SCART socket on the video
or DVD recorder. Check the recorder’s manual for guidance.
You can listen to the sound from your Bush receiver through a stereo or surround sound system. For digital sound, connect an optical lead from the sound system’s S/PDIF socket to the one on the receiver. For analogue sound, connect a suitable lead between the receiver’s L and R AUDIO sockets and the L and R audio inputs on the sound system.
To watch On Demand TV services including BBC iPlayer and ITV Player, the receiver must be connected to your internet router or hub using an ethernet cable (not supplied). Plug one end of the ethernet cable into the ETHERNET socket at the back of the receiver, and the other into your hub or router. Make sure the connections are fully pushed in - you’ll hear a click as they lock into place. Consult your router or hub’s documentation for further guidance.
If your receiver is not located near your hub or router, you could use HomePlug powerline adapters to extend your home network using the ring main of your house. Another option is to use a Wireless Ethernet Bridge to bridge the Ethernet socket of the Bush receiver to wi-fi, enabling it to connect wirelessly to your home network. For more information, please consult with your installer or retailer. If you require support for these devices, you will need to contact the manufacturer. The receiver does not support USB Wi-Fi dongles.
Helpline: 0333 321 3200 13
SWITCHING ON
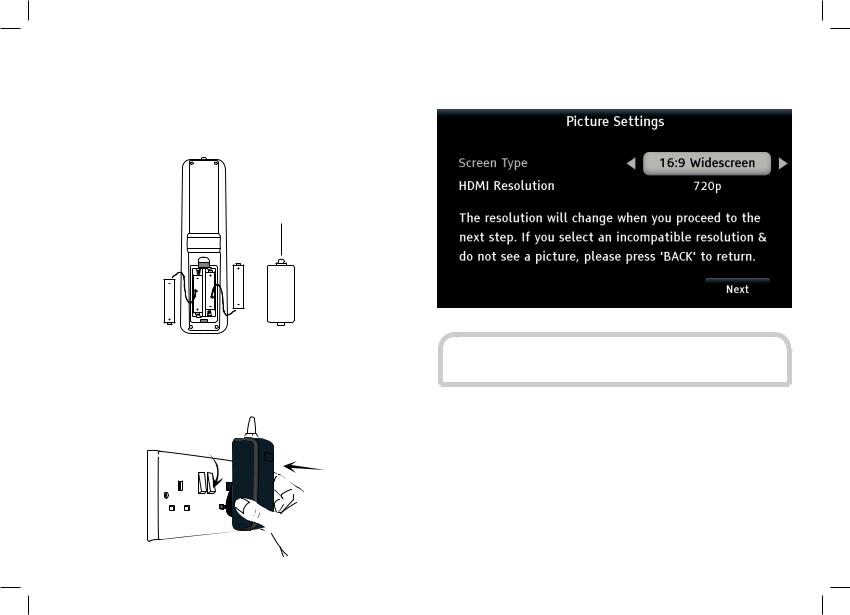
Remove the battery compartment cover from the back of the remote control by lifting the cover catch. Insert the two AAA batteries supplied, as shown on the inside of the compartment. Replace the compartment cover.
Cover catch
After a few seconds, the receiver’s first Freesat installation screen will appear on the television screen:
Turn on your television at its mains socket, then if necessary bring it out of standby and choose the HDMI input (see your television’s manual for guidance). Switch on the mains socket that the receiver is connected to. 
HINT: If you do not see this screen on your television, see ‘Troubleshooting’ on page 44.
TUNING IN
When the first installation screen is displayed, use the or
or buttons to select between 16:9 Widescreen or the squarer 4:3 Traditional as the screen format of your television. Then press the
  button or the
  button to highlight the HDMI Resolution selection box, and use the
 or
or buttons to select the correct resolution for your television. You should set the HDMI resolution to the highest that your television can display (see your television’s manual). If in doubt, set the resolution to 720p.
14 Helpline: 0333 321 3200

Press  or
or  to highlight the “Next” box and then press
  to display the next installation screen. If after doing this you lose the picture on your screen press
  to return to the first installation screen using the default resolution of 720p (supported by all HDTVs).
The signal check screen shows the strength and quality of the Freesat signal received from your satellite dish. The signal lock is successful if both LNB inputs are receiving a valid signal. If the second input is not receiving a valid signal, you will be able to proceed with installation but recording functions of the receiver will not work correctly and a warning message will display. If the first input is not receiving a valid signal, the signal lock will fail and you will not be able to proceed. Check the satellite dish connections at the back of the receiver (switch the receiver off and reconnect the cables if necessary). If the connections are OK, consult your retailer or installer.
When the signal lock shows “Successful”, you can continue to tune in the receiver. Press to proceed.
Enter your postcode using the number buttons on the remote control. You do not need to enter a space. Press the  button when you have entered your postcode, and then press
 again to proceed.
HINT: Enter your postcode with the number buttons by pressing the correct button on the remote a number of times to produce the required letter (printed on each button), or number, in the same way as ‘texting’ with a mobile phone. For example, for an ‘S’, you would press the  button four times. If you make a mistake, the
  button deletes the last character entered.
Helpline: 0333 321 3200 15
 Loading...