


BD1508A
Instruction manual
BD1508A

section of these instructions, or online at www.bush-support.com If you still require further assistance, call one of our experts on 0345 600 3021.
If you require any technical guidance or find that your product is not operating as intended, a simple solution can often be found in the
Troubleshooting
You’ll soon be enjoying your new DAB Alarm Clock Radio.
It all begins here, with your instructions. Don’t worry, there’s
nothing too technical coming up. Just simple, step-by-step
guidance to get you up and running quickly. Sound good? Then
let’s get started.
Contents
Safety information
1
General safety information 8
Power source 8
Positioning the DAB Alarm Clock Radio 9
Moisture and water 9
Ventilation 9
Heat sources and flames 9
Getting to know your DAB Alarm Clock Radio
2
Your DAB Alarm Clock Radio 12
Connection 14
Initial set-up 14
Adjusting the volume 15
Time and date 15
Change the mode 16
USB charging socket 16
Help and Guidance
We’re here to help you get the most from your DAB Alarm Clock Radio. Should you
require any guidance, a simple solution can often be found online at:
www.bush-support.com
If you still require further assistance, call one of our experts on 0345 600 3021.
Using your DAB Alarm Clock Radio
3
Telescopic aerial 20
DAB Radio mode 20
Changing DAB stations 20
Scanning for DAB stations 20
Prune DAB stations 21
Storing a DAB station preset 21
Tune to a DAB preset station 22
DAB display information 22
Dynamic range control (DRC) 23
3

section of these instructions, or online at www.bush-support.com If you still require further assistance, call one of our experts on 0345 600 3021.
If you require any technical guidance or find that your product is not operating as intended, a simple solution can often be found in the
Troubleshooting
Contents
FM Radio mode 24
Telescopic aerial 24
Tuning to an FM station 24
Changing the Scan setting 25
Audio mode 25
Storing an FM station preset 26
Tune to an FM preset station 26
FM display information 27
Setting the alarm 27
Stop the Alarm 29
Snooze 29
Turn off the Alarm 29
Sleep timer 29
Cancel the Sleep timer 30
Display backlight timeout 30
Display language 31
This page is left intentionally blank
Other information
4
Software version 34
Factory reset 34
Technical specification 35
Product support
5
Troubleshooting 38
Help and assistance 39
Disposal 40
Your Bush Guarantee 41
4
5

This page is left intentionally blank
1Safety information
Safety information
Important - Please read these instructions fully before
installing or operating
Safety information
Important - Please read these instructions fully before
installing or operating
Safety information
Safety information
section of these instructions, or online at www.bush-support.com If you still require further assistance, call one of our experts on 0345 600 3021.
If you require any technical guidance or find that your product is not operating as intended, a simple solution can often be found in the
Troubleshooting
General safety information
Keep the product and all its parts out of reach of small children.
This product is not intended for use by persons (including children) with reduced physical,
sensory or mental capabilities, or lack of experience and knowledge, unless they have
been given supervision or instruction concerning the use of the appliance by a person
responsible for their safety.
• Do not attempt to open the product. This product does not contain any user
serviceable parts. Unauthorised handling of the device may damage it and will void
your warranty.
• Do not use your Radio near emergency/intensive care medical equipment; if you have
a pacemaker fitted or during an electrical storm.
To avoid possible hearing damage, do not listen to this radio at high volume
levels for long periods of time. Always keep the volume within reasonable
limits.
Power source
• Only use the power supply that came with the product. Using an unauthorised power
supply will invalidate your guarantee and may irrecoverably damage the product.
• Disconnect your Radio from the mains power supply during thunderstorms.
• Always check that you have completely switched off your Radio, before you change
or disconnect the power supply.
• Where the mains power plug or an appliance coupler is used as the disconnect
device, the disconnect device shall remain readily operable.
• If the Radio will not be used for a long period of time, make sure that the mains power
is unplugged.
Positioning the DAB Alarm Clock Radio
It is important that you consider carefully in advance where your Radio will be situated and
make sure that it is:
• on a flat and stable surface
• within 1.4 metres of a power socket. Please ensure that the mains power lead is not a
trip hazard.
• at least 1 metre away from other electrical appliances to avoid interference
• where you can fully extend the telescopic aerial
• Never place your Radio directly onto antique or polished surfaces.
Moisture and water
• Keep it dry. Avoid exposure to precipitation, humidity and liquids which could all affect
the product circuitry.
• Do not leave it in low temperatures as moisture can form inside the product, which
may damage the circuit board.
Ventilation
• Do not block or cover slots, holes or openings on the product by placing on soft
furnishings such as carpets, rugs or beds as these are provided for functionality and/or
ventilation to ensure safe operation of the product
Heat sources and flames
• Do not leave it in high temperatures as electronic devices and plastic parts may warp
in heat.
• Keep it away from bright sunlight or heat sources, such as a radiator.
8
9

This page is left intentionally blank
Getting to know your DAB Alarm
Clock Radio
2
Getting to know your DAB Alarm Clock Radio
You’ll be up and running in no time
Getting to know your DAB Alarm Clock Radio
You’ll be up and running in no time
Getting to know your DAB Alarm Clock Radio
Getting to know your DAB Alarm Clock Radio
section of these instructions, or online at www.bush-support.com If you still require further assistance, call one of our experts on 0345 600 3021.
If you require any technical guidance or find that your product is not operating as intended, a simple solution can often be found in the
Troubleshooting
Ready? Let’s begin...
Please read these instructions carefully. They contain important information which will
help you get the best from your product and ensure safe and correct installation and
operation.
If you require any further assistance, our technical experts are happy to help. For full
details, refer to the product support section at the end of these instructions.
Fig 1.
USB Out DC-In 5V 1.5A
1 2 5 6 7 8 9 10 11
Fig 3.
3 4
Fig 2.
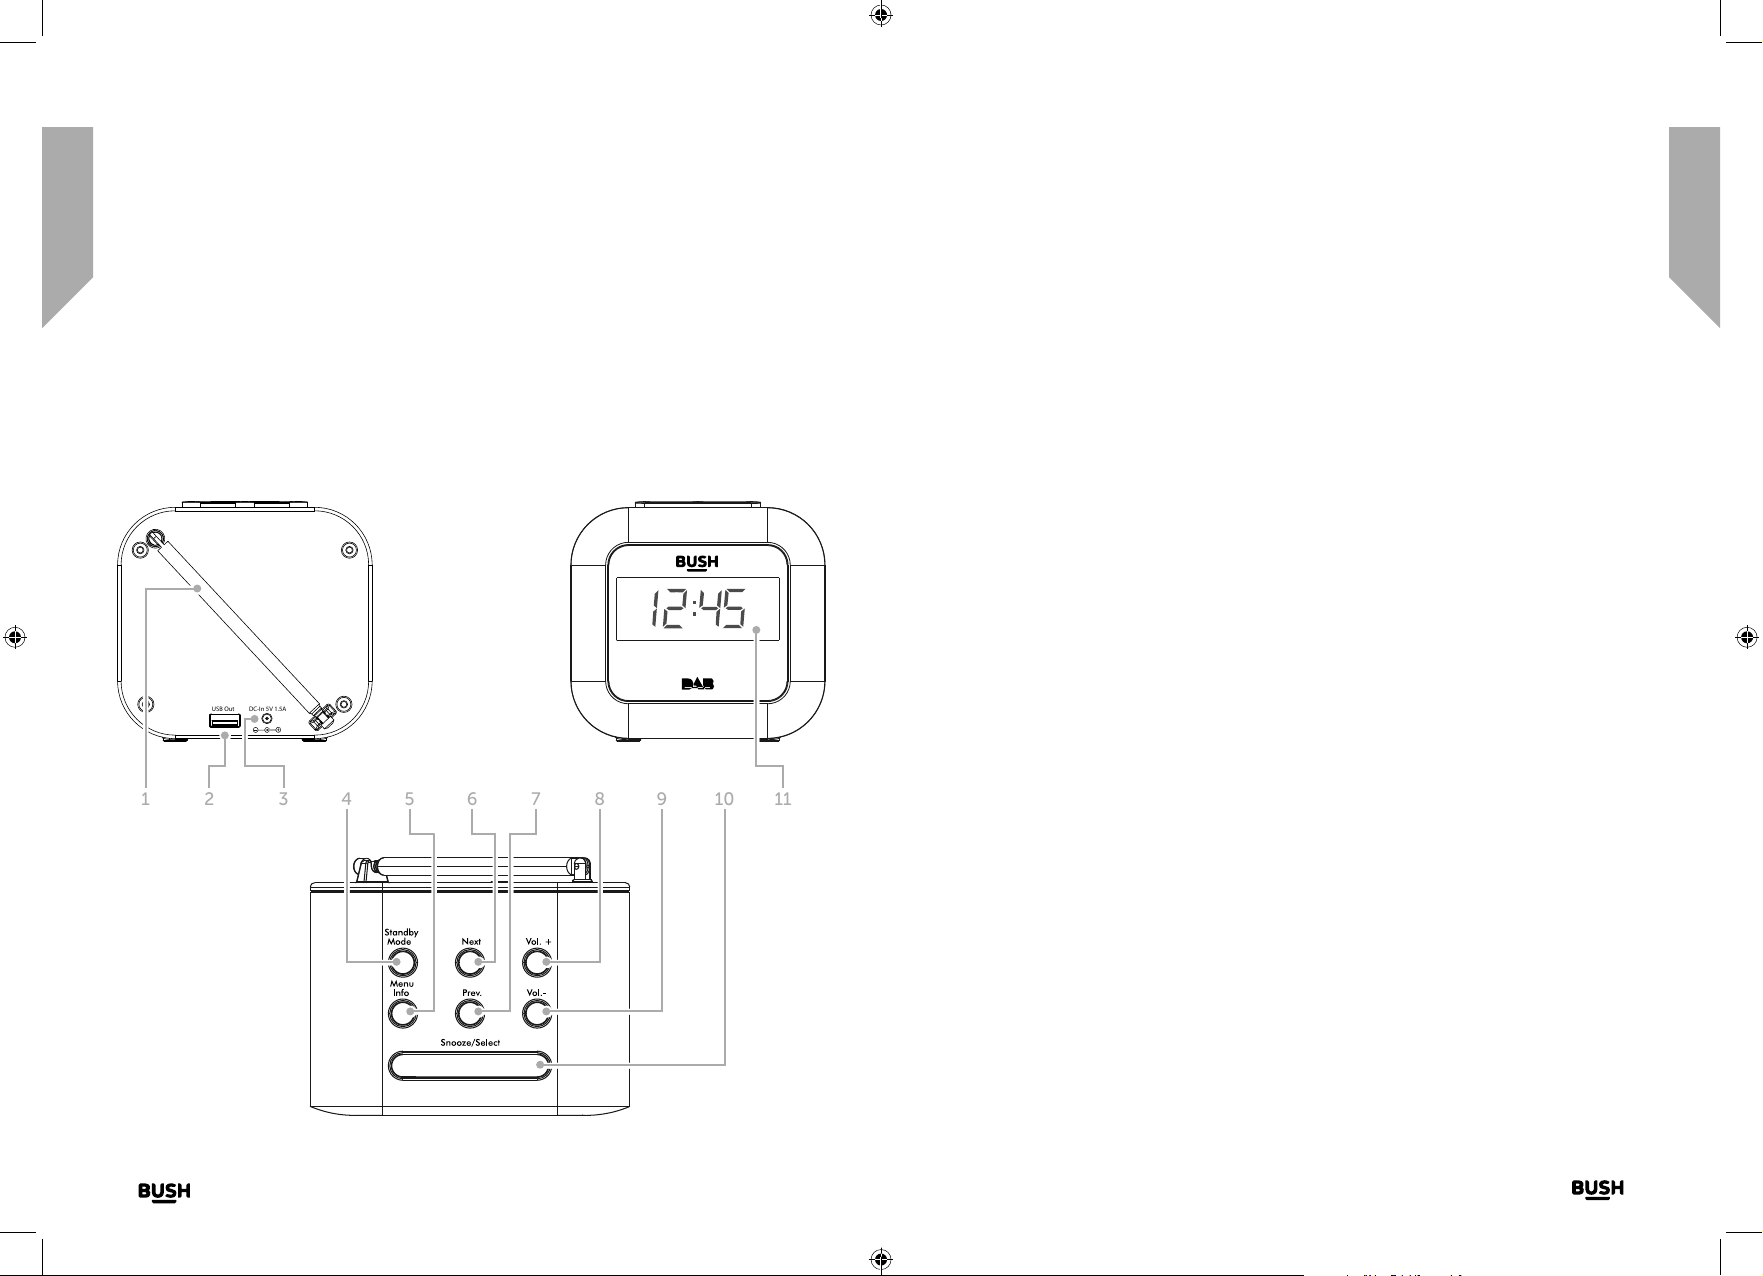
1. Telescopic aerial
2. USB charge socket (for mobile devices)
3. Power socket
4. Standby/Mode
• Short press: Power on/Change the
Mode
• Long press: Standby
5. Menu/Info
• Short press: Station information
• Long press: Enter the Menu
• In the menu: Short press to step
back and exit the Menu.
6. Next
• Short press:
• In DAB mode: Move up the
DAB station list
• In FM mode: Move up the
frequency band by 0.05MHz
• In the Menu: Move through the
Menu options
• Long press:
• In FM mode: Scan up the
frequency band
7. Prev
• Short press:
• In DAB mode: Move down the
DAB station list
• In FM mode: Move down the
frequency band by 0.05MHz
• In the Menu: Move through the
Menu options
• Long press:
• In FM mode: Scan down the
frequency band
8. Vol. +
• Increase the volume
• Press and release in Standby mode
to set the Alarm
9. Vol. –
• Decrease the volume
• Press and release in Standby mode
to set the Clock Time
10. Snooze/Select
• Press to Snooze when the alarm
sounds
• Press to Select a displayed radio
station or menu option
11. Backlit display
12
13
 Loading...