

Bury and Co KG PAG BTBH User Manual

Dear Owner,
in this operating manual you will learn about the
various functions of the PCM (Porsche
Communication Management) and the control
options. Get acquainted with the operation of your
PCM while the vehicle is at rest. In order to take
advantage of its expanded scope of features, your
full concentration is required during this learning
process. In addition, attempting to drive while
learning these functions will draw your attention
away from the road, thus putting yourself and
others at risk of an accident.
On-board literature
Keep the on-board literature in the vehicle at all
times and if you ever come to sell your vehicle,
please hand it over to the new owner.
Suggestions
Do you have any questions, suggestions, or ideas
about your vehicle or the on-board literature?
Please write to us:
Dr. Ing. h.c. F. Porsche AG
Vertrieb Customer Relations
Porschestraße 15-19
71634 Ludwigsburg Germany
Orientation aids in the operating manual
This operating manual contains four orientation
aids to help you quickly locate the information you
require. They are each shown against a yellow
background.
The master table of contents offers you an
overview of the structure of the entire manual.
In the section table of contents you will find
detailed listings of the individual topics.
The index enables you to find the various topics
with the help of keywords.
At the back of the operating manual you will also
find a glossary, where the terms and
abbreviations used are explained.
Equipment
There may be some differences in equipment and
technology with respect to the illustrations and
descriptions due to the ongoing further
development of the systems and the different laws
in individual countries.
The equipment versions shown are not always
included as standard. Some of the functions
described in this operating manual are optional
equipment and may not be available in your PCM.
If this is the case, the relevant menu items will not
be available to you.
WARNING!
For your own protection and longer service life
of your car, please follow all operating
instructions and special warnings. These
special warnings use the alert symbol,
followed by the words Danger, Warning,
Caution, & Notice. These special warnings
contain important messages regarding your
safety and/or the potential damage to your
Porsche. Ignoring them could result in serious
mechanical failure, serious personal injury or
death.

WKD 952 221 09 04/08
"Dr. Ing. h.c. F. Porsche AG is the owner of
numerous trademarks, both registered and
unregistered, including without limitation the
Porsche Crest
Cayenne
®
PCM
distinctive shapes of Porsche's automobiles such
as, the federally registered 911 automobile. The
third party trademarks contained herein are the
properties of their respective owners. Porsche
Cars North America, Inc. believes the
specifications to be correct at the time of printing.
However, specifications, standard equipment and
options are subject to change without notice.
Some options may be unavailable when a car is
built. Some vehicles may be shown with non-U.S.
equipment. Please ask your dealer for advice
concerning the current availability of options and
verify the optional equipment that you ordered."
Printed in Germany.
Reprinting (including excerpts) as well as all forms
of reproduction is prohibited without the written
permission of Dr. Ing. h.c. F. Porsche AG.
© Dr. Ing. h.c. F. Porsche AG
Porscheplatz 1
70435 Stuttgart Germany
®
, Porsche®, Boxster®, Carrera®,
®
, Cayman™, Tiptronic®, VarioCam®,
, 911®, 4S®, and the model numbers and
2

Table of Contents
PCM Controls ...................................... 5
Important information on operation
and road safety .............................................. 6
Introduction to operation ................................. 7
PCM Basic functions ..................................... 14
Making personal settings............................... 15
TUNER............................................... 21
Radio ........................................................... 22
Making settings for radio mode...................... 25
Satellite radio ...............................................27
DISC ................................................. 32
CD-Audio/DVD-Audio/DVD-Video .....................33
iPod* mobile digital device ............................39
USB.............................................................42
External audio source.................................... 46
PHONE .............................................. 47
Bluetooth®................................................... 49
Operating the Bluetooth hands-free unit
(Bluetooth Mobile phone preparation) .............52
Ringtone settings
(Bluetooth Mobile phone preparation) .............60
Bluetooth settings
(Bluetooth Mobile phone preparation) .............61
Phonebook settings
(Bluetooth Mobile phone preparation)..............63
Operating the PCM telephone.........................64
Text messages (SMS)
(with PCM telephone only) ..............................74
Cordless handset
(with PCM telephone only) ..............................80
Telephone settings
(PCM telephone)............................................88
Call settings
(PCM telephone)............................................89
Bluetooth settings
(PCM telephone)............................................92
SIM settings
(PCM telephone)............................................94
Settings for messages and data
(PCM telephone)............................................95
INFO ................................................. 97
Information ...................................................98
Displaying traffic messages
(XM NavTraffic)...........................................98
Displaying sections of the route .................100
Displaying information about
the location.............................................. 100
Displaying detailed information
about the active audio source....................100
Individual vehicle settings
(only available for sports cars)..................... 101
Rear view camera
(only available for the Cayenne) ................... 104
TRIP................................................ 106
Trip computer (trip data display) .................. 107
Logbook.................................................... 108
The Sport display
(only available for sports cars)..................... 115
NAVI ............................................... 121
General operation....................................... 122
Entering an address ................................... 124
Starting and stopping route guidance .......... 125
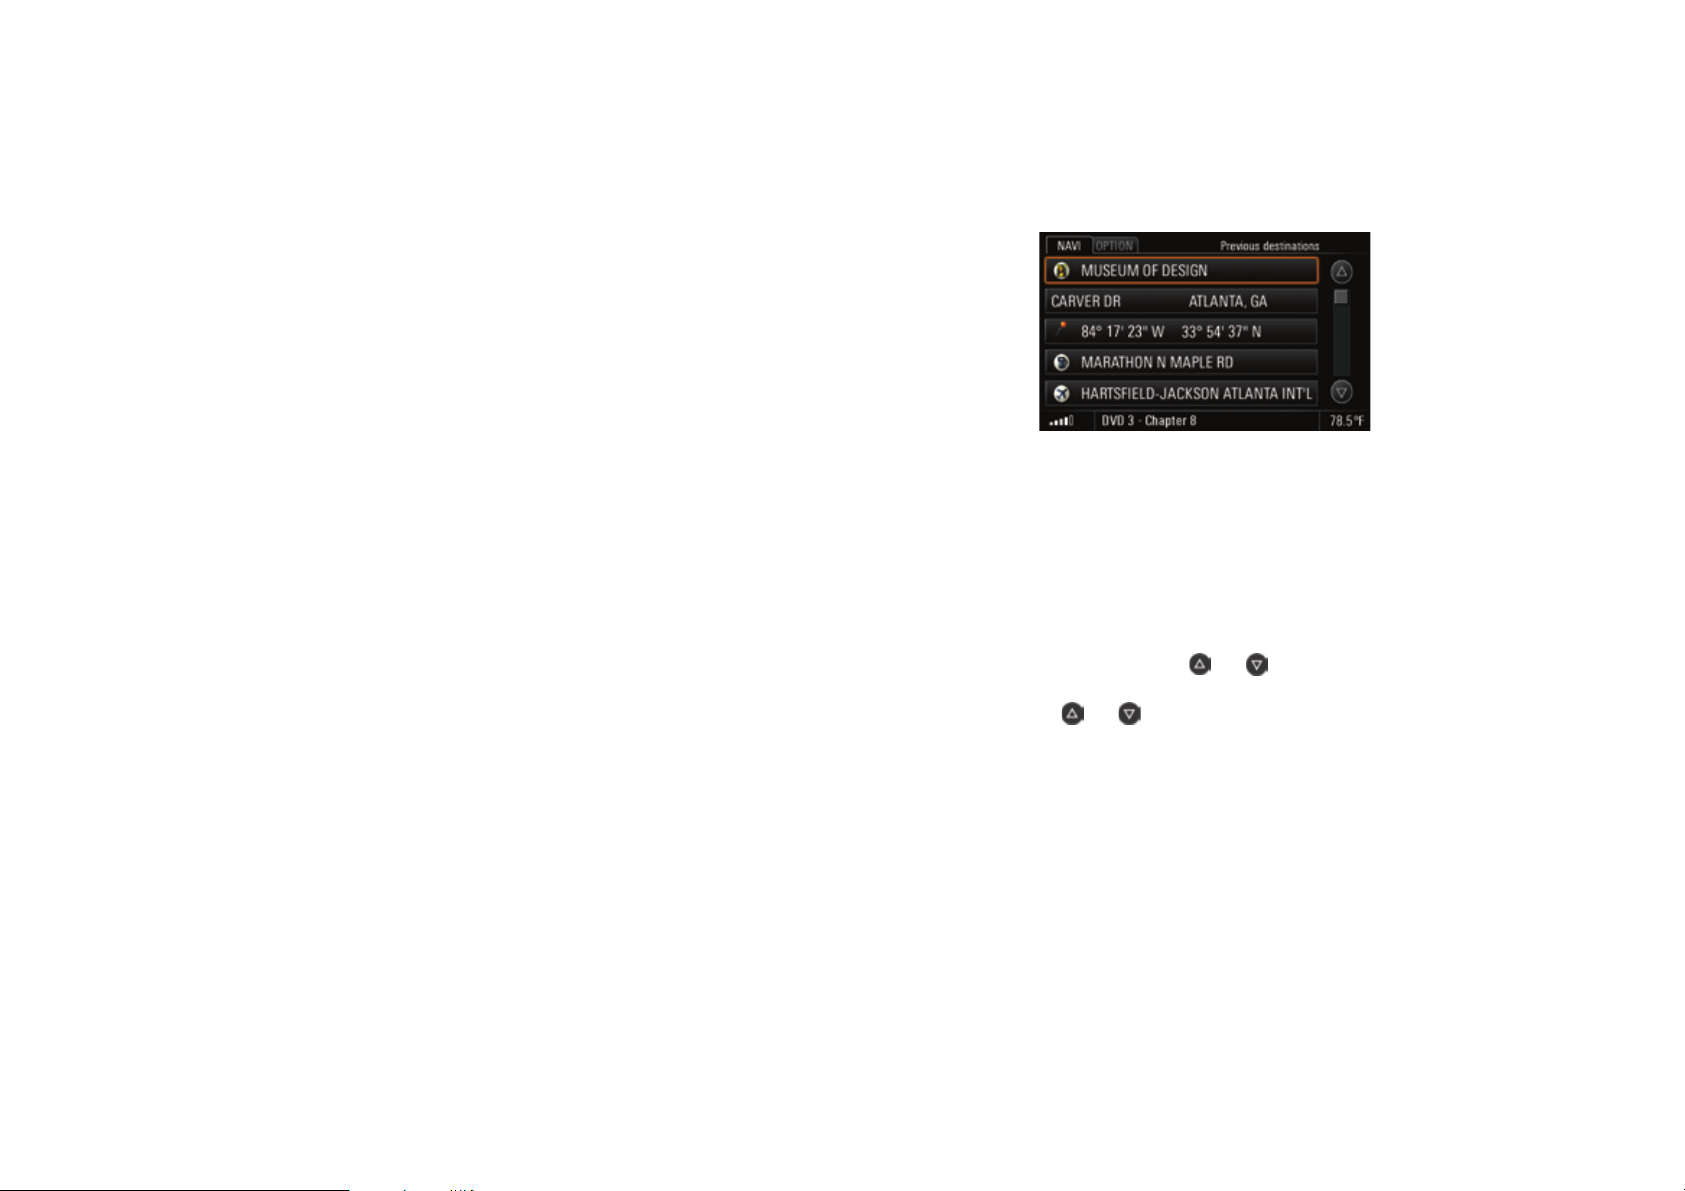
List of previous destinations........................ 126
Personal destination memory ...................... 128
Points of interest........................................ 131
Changing options for route guidance ........... 133
Stopovers (tour) ......................................... 136
Destination input using
geographical coordinates ........................... 138
Off-road navigation ..................................... 139
Storing ...................................................... 144
MAP................................................ 145
Map display ............................................... 146
Table of contents 3

Voice Control ...................................150
Learning about voice control........................ 151
Basic functions of the
voice control system................................... 154
Operating examples ....................................158
Technical Data.................................170
Radio frequency ranges............................... 171
Tuning steps for
automatic station search .............................171
Regional codes for Video-DVDs ....................171
Glossary ..........................................172
Index...............................................175
4 Table of contents

PCM Controls
Important information on operation
and road safety............................................. 6
Introduction to operation................................ 7
Operating functions using
the touchscreen .......................................... 7
Operating functions using
the right rotary knob
Controls and their functions .......................... 8
Operating menus ....................................... 11
Operating lists ........................................... 11
Operating selection boxes (checkboxes)...... 12
Operating radio buttons.............................. 12
Operating input menus ............................... 13
PCM Basic functions.................................... 14
Switching the PCM on and off ..................... 14
Setting the volume ..................................... 14
Making personal settings ............................. 15
Selecting the audio source ......................... 15
Configuring the PCM display ....................... 15
Making display settings .............................. 17
Making sound settings ............................... 18
Resetting personal settings ........................ 20
Displaying the system version ......................... 2
s............................... 7
PCM Controls 5
Important information on
operation and road safety
The PCM (Porsche Communication
Management) is the central control unit for the
radio, disc mode (CD/DVD, USB, iPod, and an
external audio source), sound settings, on-board
computer, navigation system, and telephone.
To avoid danger or injury to yourself and others
while using your PCM, you must take the following
into consideration:
WARNING!
Accident hazard. The distraction could result
in you losing control of the vehicle.
û Operate your PCM only if you are safely in
control of your vehicle and when the traffic
conditions permit. If in doubt, stop the car
and operate the PCM while the vehicle is
parked.
WARNING!
Injury hazard. Opening the housing or a
damaged housing represents a hazard due to
invisible laser radiation.
û The PCM is a Class 1 laser product. Do not
open the housing.
The PCM does not contain any userserviceable parts. Any maintenance work
must be performed exclusively by qualified
service personnel.
WARNING!
Accident hazard. The navigation system
serves only to assist the driver and provide a
suggestion for the route of the journey. This
does not release you from complete
responsibility for your correct conduct in
traffic according to the Road Traffic
Regulations or other relevant regulations.
As the driver, you must assess the particular
traffic situation. You alone bear the full
responsibility for road safety.
û Continue to pay attention to the traffic
situation.
WARNING!
Serious personal injury or death. The
telephone must not be used near explosives or
flammable materials (e.g. at a gas station) or
near operations involving explosives.
Cell phones must be switched off in certain
hazardous areas such as near gas stations,
fuel depots, chemical plants, and demolition
work in progress using explosives, for
example. The electric spark from the cell
phone could ignite chemical vapors near these
hazardous areas, which could result in serious
personal injury or death.
û Follow corresponding instructions.
û Observe statutory regulations and local
restrictions when using the telephone.
6 PCM Controls

Introduction to operation
Operating functions using the
touchscreen
The display of the PCM is a color touchscreen for
easy and user-friendly operation of the menus.
You can operate all menu functions, list entries,
and text input fields as well as the arrow symbols
and scrollbars by lightly touching the
corresponding location on the display.
Touchscreen disabled
If the menu functions cannot be operated by
touching the display, it is because the touchscreen
is disabled.
Proceed as follows to enable the touchscreen:
1. Press the d button.
2. Press the i button or touch the tab of
the same name in the header.
3. Select "
4. Select "
SET PCM system"
>"
Display"
>"
Display".
Touchscreen off" to enable ( ) or
disable ( ) the function.
Operating functions using the right rotary
knob s
In parallel with operation on the display, you can
also operate all menu functions, list entries, and
text input fields using the right rotary knob
– Turn the right rotary knob
to highlight a menu item
– Press the right rotary knob
to select a menu item
q:
r:
NOTICE
Risk of damage. The PCM contains high-
quality electronic components which require
special care with regard to maintenance.
The following should be noted:
– The display scratches easily.
– The device must not be sprayed with
liquids. Entrance of liquids into the unit can
result in the destruction of the equipment.
û Carefully clean your PCM periodically using
a dry, clean, and soft cloth (micro-fiber
cloth) or a cleaning brush.
s:
>>>
û Do not exert excessive pressure on the
surface when cleaning.
û Under no circumstances use solvents such
as methylated spirits, thinners, gasoline,
acetone as well as alcohol (ethanol,
methanol, or isopropyl alcohol) or scouring
agents of any type.
û Clean fingerprints using a slightly damp
cloth or a mild cleaning agent.
û Never spray cleaning agents or other
liquids directly onto the display. Moisten a
cloth and then carefully wipe the display.
û If faults occur, do not open the PCM
equipment yourself under any
circumstances. Always have defective units
repaired by a qualified specialist workshop.
We recommend that this work be
performed by an authorized Porsche
dealership, as these have trained workshop
personnel as well as the necessary parts
and tools.
At particularly low temperatures, the maximum
brightness of the display is only reached after
a few minutes.
PCM Controls 7
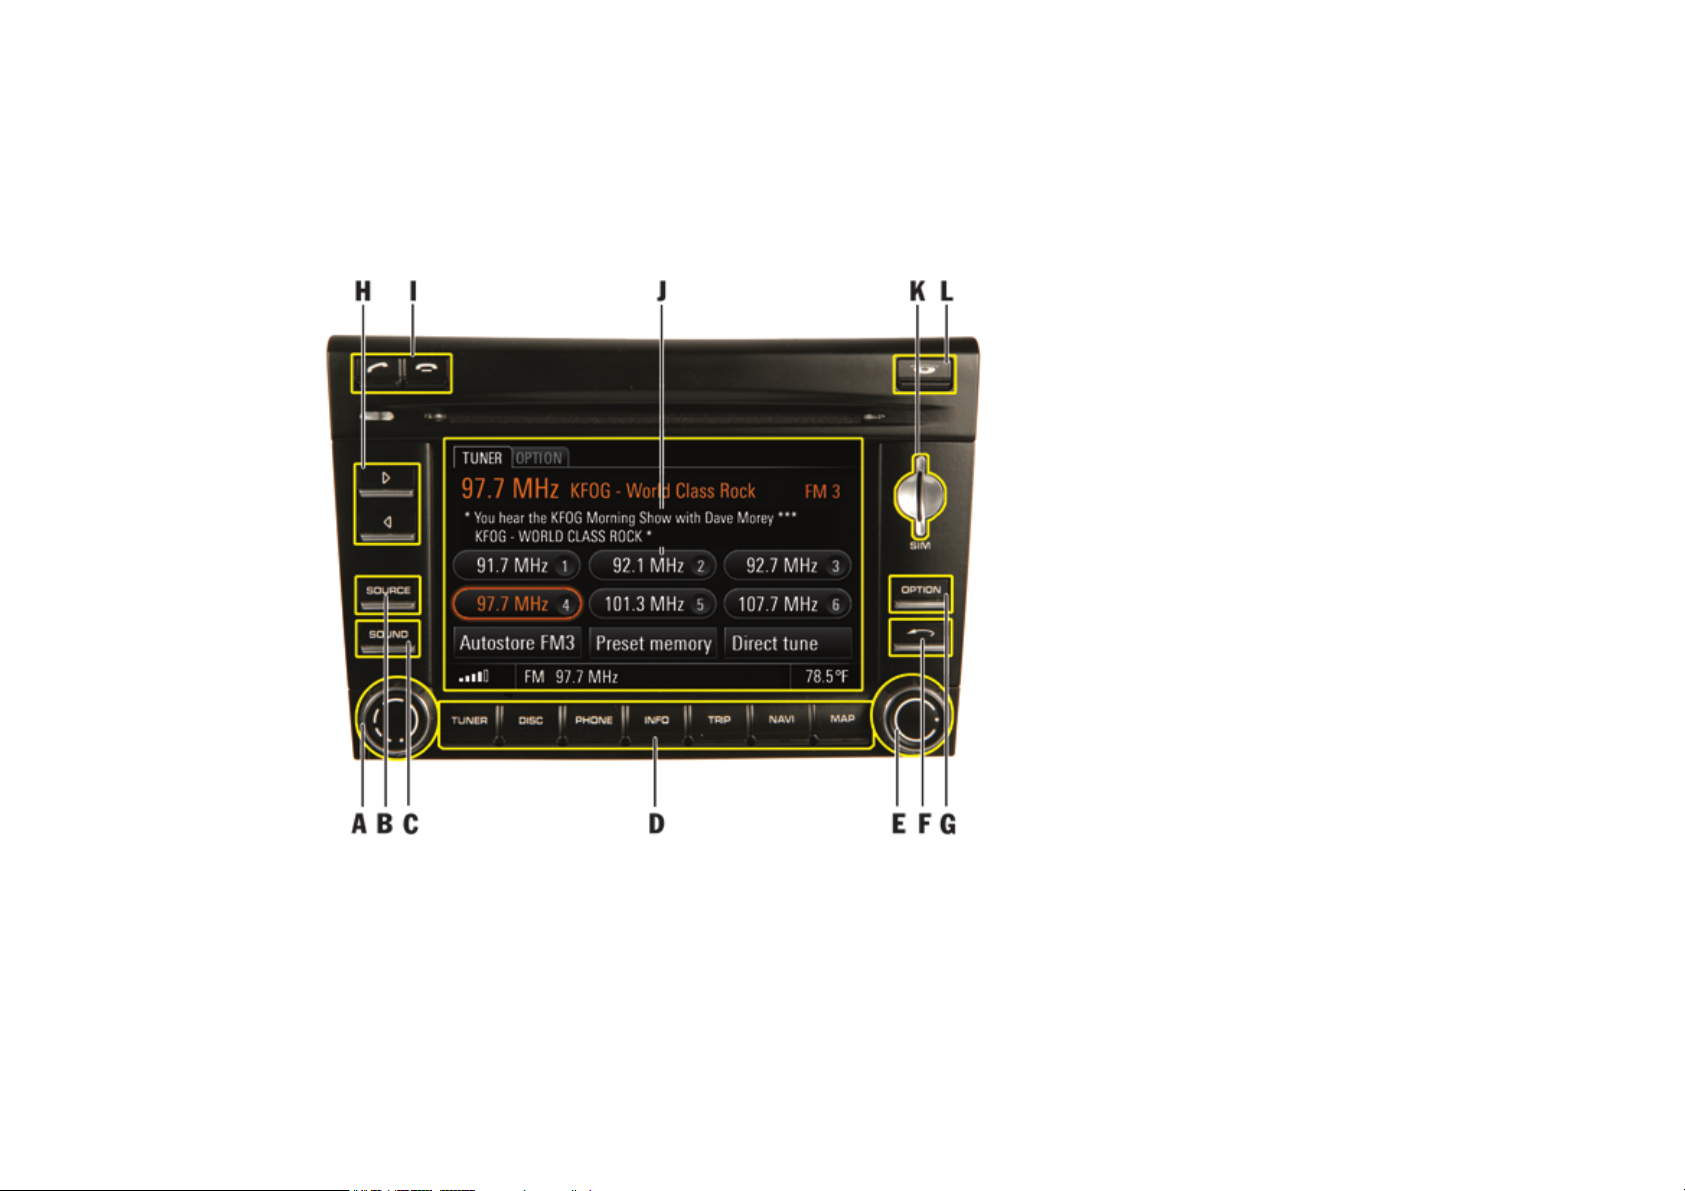
Controls and their functions
The controls of the PCM are arranged around the
display as well as around the CD/DVD slot.
A Left rotary knob
v
t: Sets the volume
u (short): Switches on or mutes the device
u (long): Switches the device on and off
B a button
C b button
D m, n, c, d,
e, f, and g main menu buttons
E Right rotary knob
: Highlights a menu item
q
s
r: Selects the highlighted menu item
F Back button h
G i button
H Arrow buttons
I Lift receiver button
End call button
J Touchscreen
KSlot for SIM card
L Eject/retract button for CDs and DVDs
j
p and o
l and
k
8 PCM Controls

A - Left rotary knob v
By pressing and holding the left rotary knob u,
you switch the device on or off.
By turning the left rotary knob
the following settings:
– volume of the active audio source,
– volume of a driving recommendation
announcement,
– volume of a traffic announcement,
– volume of a voice control announcement,
– volume when in hands-free mode during a
telephone call,
– ring volume of the telephone during an
incoming call,
– cancellation of the mute function (turning the
rotary knob to the right).
By briefly pressing the left rotary knob
execute the following functions:
– cancel navigation and traffic announcements,
– reject an incoming telephone call,
–mute the device,
– switch the system on.
t, you change
u, you
B - a button
By pressing the a button, you open a
window where you can set the current audio
source.
The window closes again:
– once you have selected an audio source,
– if a few seconds pass without any input from
you.
C - b button
By pressing the b button, you open a
menu where you can make the sound settings for
the PCM.
D-Main menu buttons
Under the display are the so-called main menu
buttons. You use these buttons to call up the
following main menus:
– m: radio main menu,
– n: disc main menu,
– c: phone main menu,
– d: information menu,
– e: trip data display,
– f: navigation main menu,
– g: map display.
You can switch from one main menu to another at
any time.
If you return to a main menu, you return to the
function you were using before you exited that
menu. If you wish to return to the top level of a
main menu, you must press the relevant main
menu button twice.
E-Right rotary knob s
Apart from the touchscreen, the right rotary knob
is the central control. By turning the rotary knob
q, you highlight the desired menu item. By
pressing
r, you select a highlighted menu item.
PCM Controls 9

F - Back button h
By pressing the Back button h, you can
execute various functions:
Briefly press the button:
– undo a selection from the menu,
– cancel a list selection.
Press and hold the button:
– delete all characters already entered in an
input menu.
G - i button
Since not all control options for a main menu can
be shown on one display, the i menu
combines various control options for the main
menus. You call up these control options by
pressing the i button.
Instead of pressing the button you can also touch
the tab of the same name on the display.
H - p and o arrow buttons
By briefly pressing the arrow buttons you can:
– start a search upwards or downwards in radio
mode,
– skip a track in CD/DVD, USB, or iPod mode.
You start the fast forward or reverse by pressing
the arrow buttons for several seconds in CD/DVD
mode.
I - Lift receiver button l and
End call button k
By pressing the Lift receiver button l you can:
– accept an incoming call or
– call up the quick dial function.
By pressing the End call button k you can:
– reject an incoming call or
– end an active call.
If your vehicle is not equipped with a telephone
and you press either of these two buttons, an
appropriate message will be displayed in the
bottom line.
J -Touchscreen
By briefly touching the display, you can operate all
controllable elements such as menu items, list
entries, arrow symbols, etc.
K - Slot for the optional telephone SIM card
To use the internal telephone, you must push the
SIM card into the slot provided.
Alternatively, the SIM card of a cell phone with the
Bluetooth
®
SIM Access Profile can be used.
10 PCM Controls
L - Eject button j
By pressing the j button, you execute the
following functions depending on the equipment of
your PCM:
PCM without CD/DVD changer
– A CD or DVD inserted in the drive is ejected
and can be removed.
PCM with CD/DVD changer
– The CD/DVD changer menu is opened. By
pressing the button again, the highlighted CD
or DVD is ejected and can be removed.
– If you press the button for a number of
seconds and there are no CDs/DVDs in the
changer compartments yet, you will be
prompted to fill the individual compartments
one after the other.
– If you press the button for several seconds and
the magazine compartments are at least
partially filled, all CDs or DVDs will be ejected
one after the other.
Operating menus
The menu is operated using the touchscreen or
using the right rotary knob
the h button.
Activating/selecting a menu item
û Touch the menu item on the display.
- or -
û Highlight the menu item by turning the right
rotary knob
pressing the rotary knob
The process of highlighting
q and then activate it by
s as well as
r.
q and activating
r using the right rotary knob or touching the
menu item on the display is referred to below as
"selecting".
Exiting a menu
û Press the h button to get to the next
higher level in the menu.
- or -
û Press a main menu button to return to a main
menu.
Operating lists
Selecting certain menu items calls up lists.
Depending on the context, individual or multiple
entries in these lists can be selected.
Navigating in lists
The following control options are available to you
for selecting a list entry:
û touch the symbols and on the display,
û touch the scrollbar between the two symbols
and ,
û turn the right rotary knob
Highlighted list entries are framed in orange.
q.
PCM Controls 11
Showing the first letter of the list entries
You can show the first letter of list entries to make
it easier to find your way in long lists.
This function is available with the following lists:
– the phonebook,
– the list for the music search in the iPod or in
USB mode, or
– the track list in iPod, USB, and MP3 mode.
Only letters with corresponding entries in the list
will be displayed.
û Touch one of the two symbols and for
several seconds.
- or -
û Quickly turn the right rotary knob
q.
12 PCM Controls
Operating selection boxes (checkboxes)
Some menu items have a box. These menu items
represent a function that you can activate or
deactivate by selecting (checking) the box.
: Function switched on/activated
: Function switched off/deactivated
Operating radio buttons
If a menu item has a circle instead of a box, this is
what is called a radio button.
In contrast to the functions of checkboxes which
can be freely combined, radio buttons can only
activate one menu item at a time.
Like checkboxes, radio buttons are activated or
deactivated by selecting them.
You can tell an activated radio button by the solid
circle.
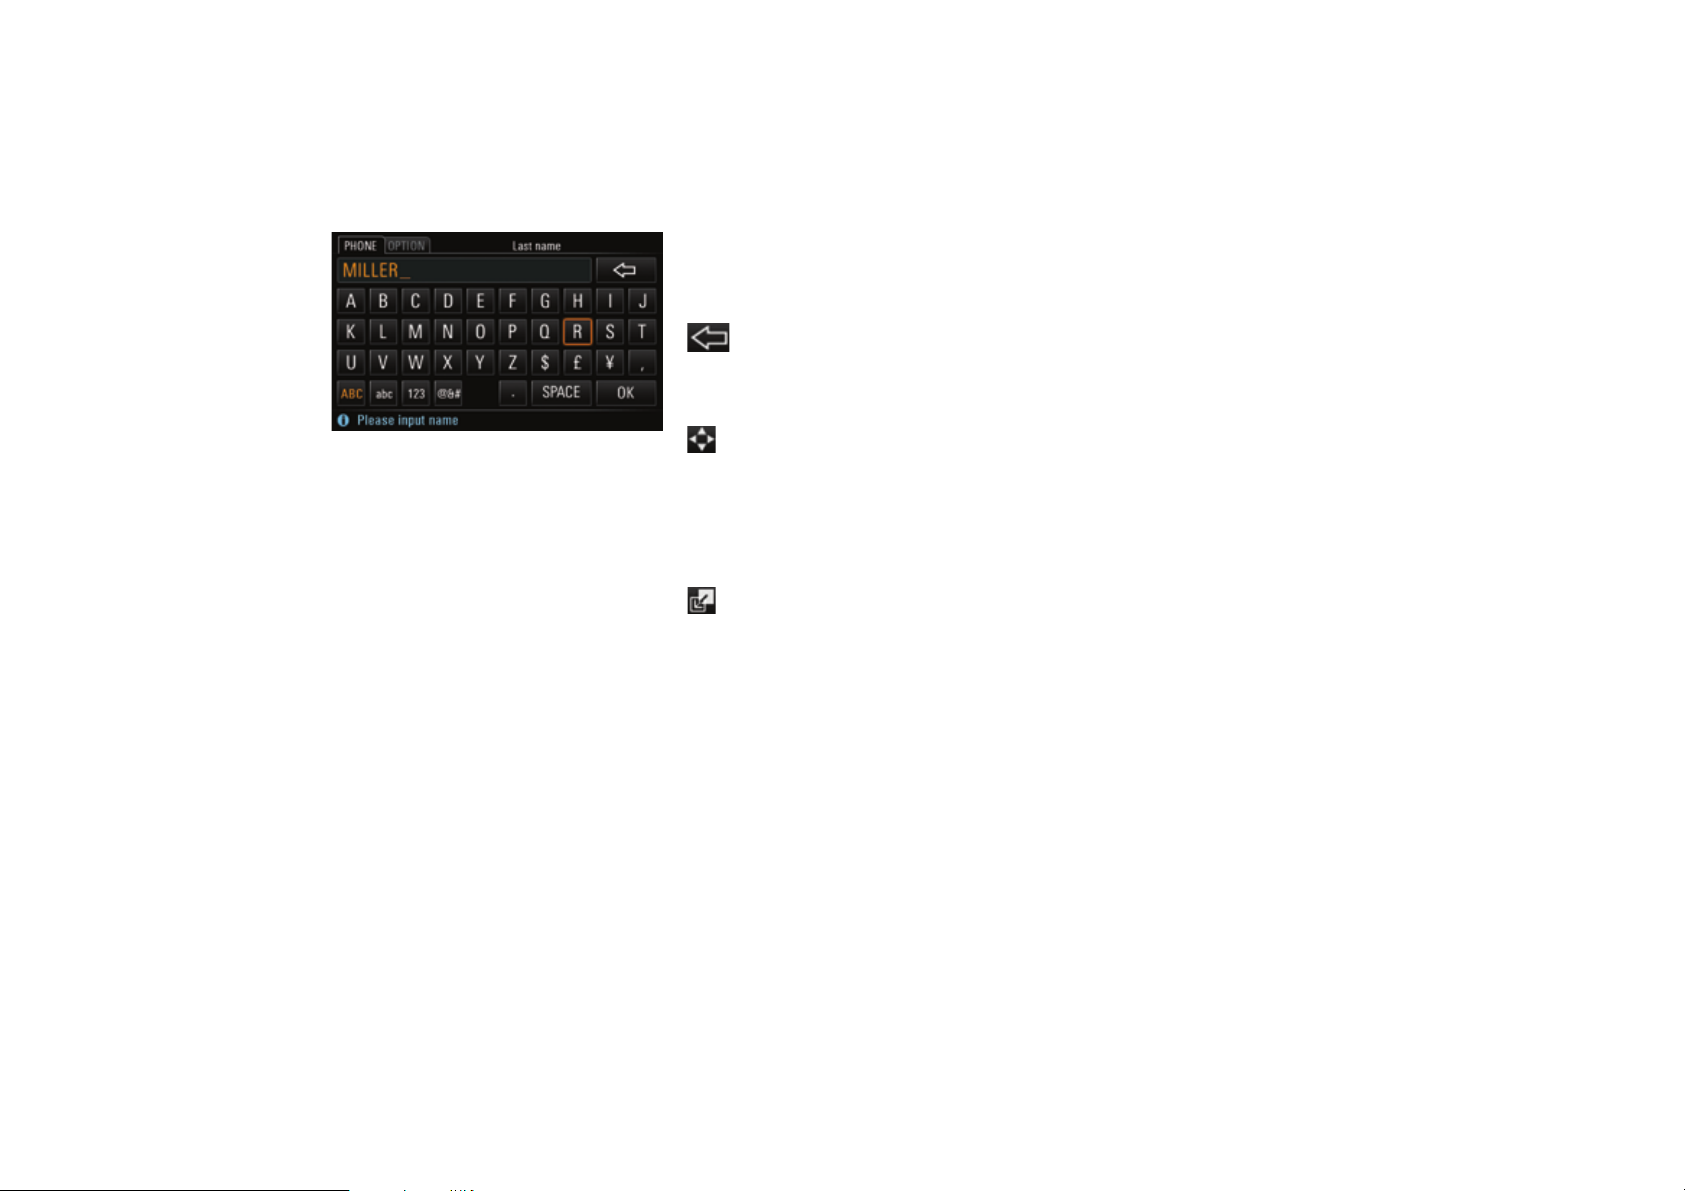
Operating input menus
Many functions require you to enter data into the
PCM. These functions include: SMS text, a
telephone number, a telephone number, or a
navigation destination, for example. The various
input menus are adapted to the respective
operating situation.
û To enter data in an input menu, lightly touch the
characters on the display.
- or -
û Highlight the characters by turning the right
rotary knob
right rotary knob
û Select the
entered data.
q and insert by pressing the
r.
OK field to confirm and accept the
In addition to the letter fields, the input menus also
provide a number of function fields for changing
the character set displayed and for moving the
cursor.
Deletes the last character entered
(if the button is selected briefly)
- or deletes all entered characters
(if the button is selected and held)
Switches to positioning mode
Switches to uppercase letters
ABC
Switches to lowercase letters
abc
Switches to numbers and punctuation
123
marks
Switches to special symbols
@&#
Switches to insertion mode when
composing a text message
Inserts a space
SPACE
Deletes all entries in the input field
CLEAR
Calls up a stored list, for example when
LIST
entering addresses for the navigation
system
Confirms the entry and closes the
OK
input menu
Characters shown in gray cannot be selected.
Arranging letter fields in the input menu
The letter fields in the input menu can either be
arranged alphabetically or in accordance with a
computer keyboard. To find out more, please refer
to the section "Setting the layout for the input
menu keyboard" on page 17.
PCM Controls 13

PCM Basic functions
Switching the PCM on and off
Switching on and off via the ignition
û Switch on the ignition.
The PCM is permanently active.
If the PCM was previously switched off using the
left rotary knob (volume control), this knob must
be pressed again after the ignition is switched on.
Switching on and off via the left rotary knob
û Press the left rotary knob (volume control) for
a few seconds.
Battery discharge protection
You can switch the PCM on and off via the left
rotary knob even when the ignition is off.
If the ignition is switched off, the PCM will
automatically switch itself off after a factory-set
time.
Setting the volume
Changing the volume
û Turn the left rotary knob
Depending on the situation, you can change the
volume
– of the active audio source,
– of a driving recommendation announcement,
– of a traffic announcement,
– of a voice control announcement,
– when in hands-free mode during a telephone
call,
– of the telephone ringtone during an incoming
call.
t.
Muting the device
û Briefly press the left rotary knob
The active audio source is muted. The mute icon
can be seen in the bottom line.
Navigation recommendations, telephone calls,
and traffic program announcements are still
audible.
û To cancel muting, briefly press the left rotary
knob
u again.
û To interrupt a navigation or traffic
announcement, press the left rotary knob
during the announcement.
u.
u
14 PCM Controls

Making personal settings
Selecting the audio source
By pressing the a button, you open a
window where you can set the current audio
source.
The window closes again:
– once you have selected an audio source,
– if a few seconds pass without any input from
you.
1. Press the a button.
2. Select the desired audio source on the display.
1. Press the n button.
2. Press the i button or touch the tab of
the same name in the header.
3. Select "
SET DISC / AUX".
You will only be able to access the "
SET DISC /
AUX" menu if there is at least one CD/DVD
inserted or at least one audio source activated
() in the menu.
4. Select the appropriate audio source to activate
( ) or deactivate ( ) its display.
Configuring the PCM display
You can set various units, the date and time, the
welcome display as well as the operating
language of the PCM in the "
menu.
Setting the language
1. Press the d button.
2. Press the i button or touch the tab of
the same name in the header.
3. Select "
4. Select the desired language.
SET PCM system"
>"
Regional settings"
>"
Language".
Regional settings"
Always displaying all audio sources in the
window
The audio sources "iPod" and "USB" are only
displayed if there is a corresponding device
connected to the interface. If both of these audio
sources are always to be displayed (even if there
is no device connected to the PCM), you must
activate their display in the SET menu.
You can also activate or deactivate the audio
source "AUX" (external audio source) in the SET
menu.
Setting the date
(can only be set if the PCM is not equipped
with a navigation system)
1. Press the d button.
2. Press the i button or touch the tab of
the same name in the header.
3. Select "
4. Set the date by selecting the corresponding
SET PCM system"
>"
Date & time"
>"
Date".
numerical fields.
PCM Controls 15

Setting the display format for the date
1. Press the d button.
2. Press the i button or touch the tab of
the same name in the header.
3. Select "
4. Select the desired display format.
SET PCM system"
>"
Date & time"
>"
Date format".
Setting the time
1. Press the d button.
2. Press the i button or touch the tab of
the same name in the header.
3. Select "
4. Set the time by selecting the corresponding
SET PCM system"
>"
Date & time"
>"
Time".
numerical fields.
Setting daylight saving time
1. Press the d button.
2. Press the i button or touch the tab of
the same name in the header.
3. Select "
4. Select
SET PCM system"
>"
Date & time".
"Daylgt. saving time" to activate ( ) or
deactivate ( ) the function.
Setting the time zone
1. Press the d button.
2. Press the i button or touch the tab of
the same name in the header.
3. Select "
4. Select the desired time zone.
SET PCM system"
>"
Date & time"
>"
Time zone".
16 PCM Controls
Setting the display format for the time
1. Press the d button.
2. Press the i button or touch the tab of
the same name in the header.
3. Select "
4. Select the desired display format.
SET PCM system"
>"
Date & time"
>"
12h / 24h".
Setting the unit for distances
1. Press the d button.
2. Press the i button or touch the tab of
the same name in the header.
3. Select "
4. Select one of the two options "
SET PCM system"
>"
Regional settings"
>"
Distance".
km" or "mls".

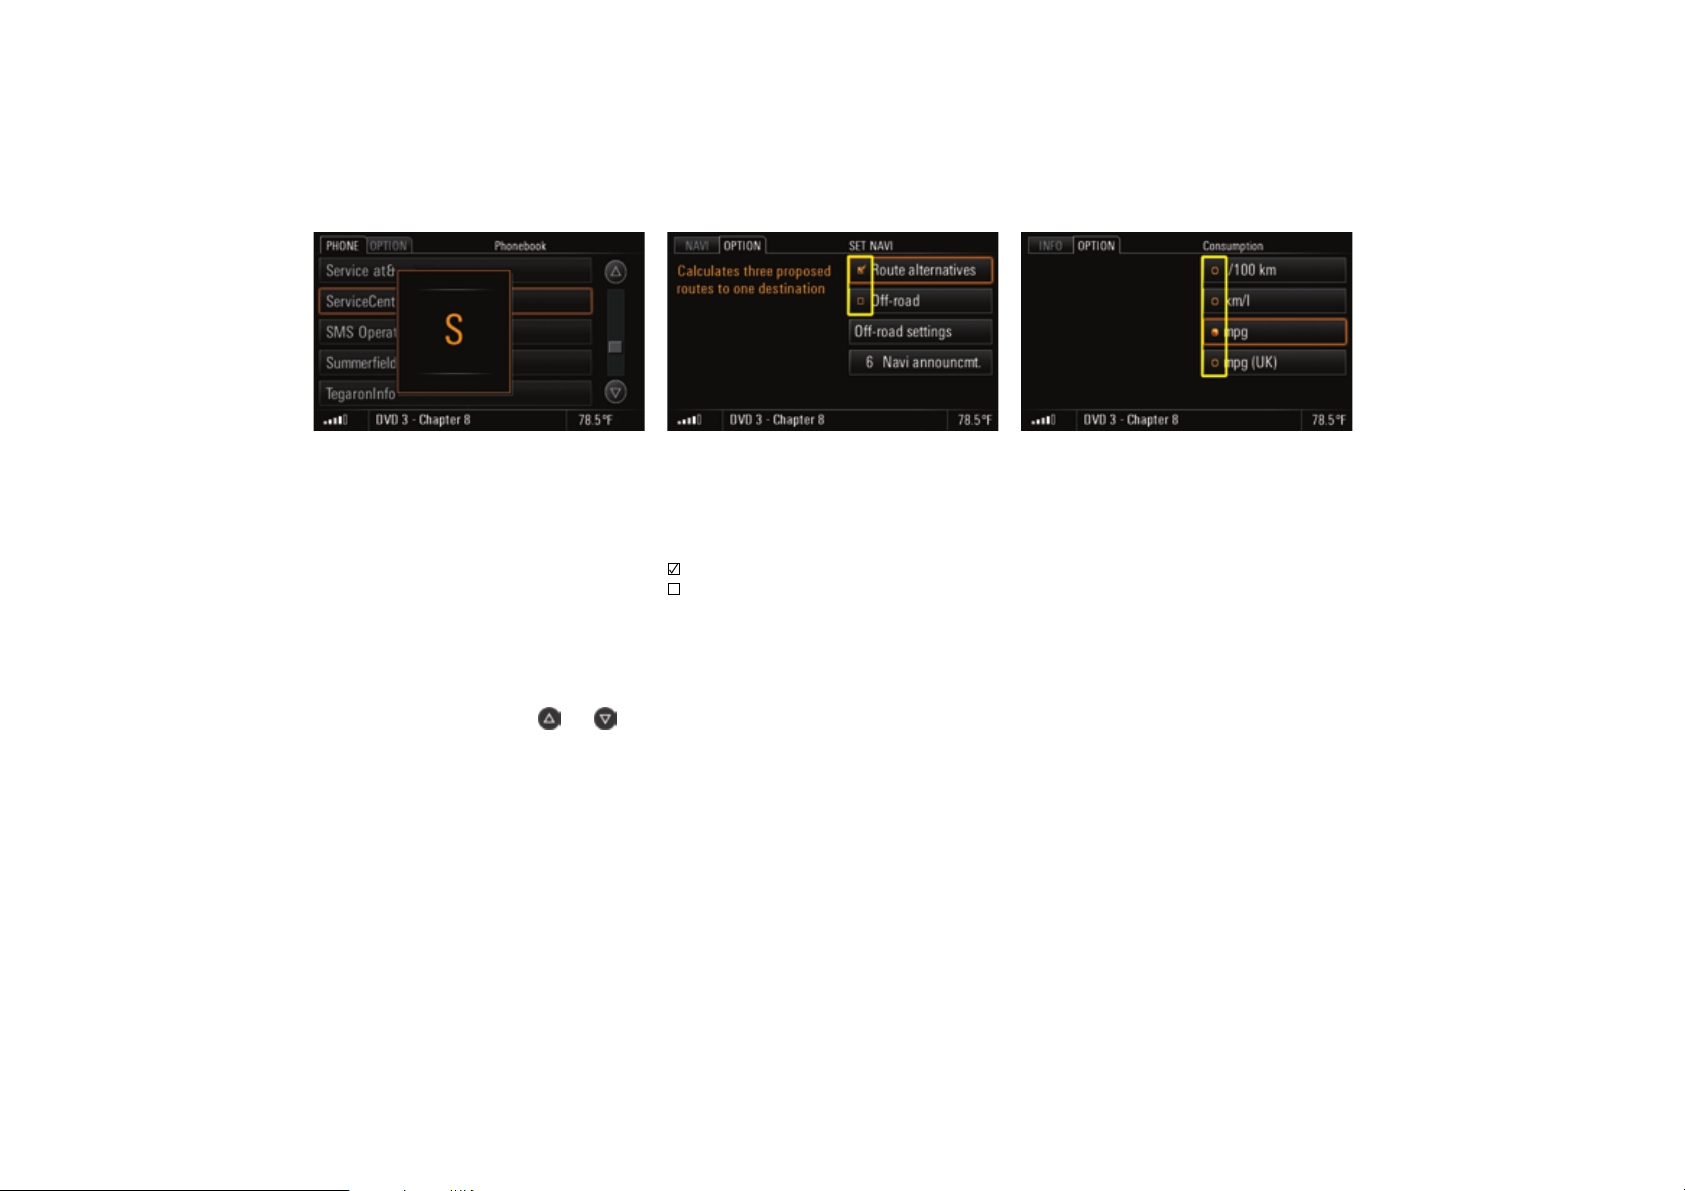
Setting the unit for consumption
1. Press the d button.
2. Press the i button or touch the tab of
the same name in the header.
3. Select "
4. Select one of the following units:
Setting the display unit for temperatures
1. Press the d button.
2. Press the i button or touch the tab of
3. Select "
4. Select one of the two units "
SET PCM system"
>"
Regional settings"
>"
Consumpt.".
–"
l/100km",
–"
km/l",
–"
mpg", or
–"
mpg (UK)".
the same name in the header.
SET PCM system"
>"
Regional settings"
>"
Temperature".
°C (Celsius)" or "°F
(Fahrenheit)".
Setting the layout for the input menu
keyboard
1. Press the d button.
2. Press the i button or touch the tab of
the same name in the header.
3. Select "
4. Select one of the two options:
SET PCM system"
>"
Display"
>"
Keyboard layout".
–"
ABC":
The letter fields are arranged alphabetically.
–"
QWERTY/QWERZ":
The letter fields are arranged like a
computer keyboard.
The chosen keyboard layout is set.
Making display settings
Switching the display off
You can switch off or darken the display using the
"
Switch off display" menu.
1. Press the d button.
2. Press the i button or touch the tab of
the same name in the header.
3. Select "
4. Select "
5. Confirm the prompt that appears.
Switching the display back on
You can switch a display that is off back on at any
time (if the touchscreen is active) by touching it.
û Touch your finger anywhere on the display.
- or -
û Press any button.
SET PCM system"
>"
Display"
>"
Display".
Switch off display".
PCM Controls 17

Choosing the colors for the map display
(day/night design)
1. Press the d button.
2. Press the i button or touch the tab of
the same name in the header.
3. Select "
4. Select "
5. Set the desired option by selecting it.
SET PCM system"
>"
Display".
Day/night switchover".
The following options are then available for you
to select:
–"
Automatic"
Your PCM automatically switches from day
design to night design as a function of the
vehicle lighting.
–"
Day"
Your PCM always remains set to the day
design colors. This means the display colors
are optimized for legibility.
–"
Night"
Your PCM always remains set to the night
design colors. The display colors are shown
dimmed to prevent any dazzle effect.
Choosing the brightness of the display
1. Press the d button.
2. Press the i button or touch the tab of
the same name in the header.
3. Select "
4. You can set the brightness by selecting the two
Switching the touchscreen on and off
1. Press the d button.
2. Press the i button or touch the tab of
3. Select "
4. Select "
SET PCM system"
>"
Display"
>"
Display"
>"
Brightness".
symbols and .
the same name in the header.
SET PCM system"
>"
Display"
>"
Display".
Touchscreen off" to activate ( ) or
deactivate ( ) the function.
Making sound settings
You can define the sound of your PCM for each
audio source using the sound settings in the
Sound menu. As soon as an audio source is
selected, your sound settings are automatically
set.
The scope of the display and functions for the
sound settings depends on the vehicle model and
the respective equipment. In some cases,
therefore, not all the functions described here will
be available.
Setting the bass
1. Press the b button.
2. Select "
3. Make the desired setting by selecting the two
Setting the treble
1. Press the b button.
2. Select "
3. Make the desired setting by selecting the two
Bass".
symbols and .
Treble".
symbols and .
18 PCM Controls

Setting the balance
You set the volume distribution between the left
and right speakers using the Balance setting.
1. Press the b button.
2. Select "
3. Make the desired setting by selecting the
Setting the fader
You set the volume distribution between the front
and rear speakers using the Fader setting.
1. Press the b button.
2. Select "
3. Make the desired setting by selecting the
Balance".
symbols , , , and .
Fader".
symbols , , , and .
Setting the loudness
Loudness" increases the sound volume by
"
increasing the bass.
This setting is especially suitable for low-volume
settings and guarantees full bass reproduction.
1. Press the b button.
2. Select "
SDV (speed-dependent volume)
The "
playback volume as a function of the vehicle's
speed.
You can set the adaptation of the volume to the
vehicle's speed on a scale from 0 (no increase in
volume) to 5 (large increase in volume).
1. Press the b button.
2. Press the i button or touch the tab of
3. Select "
4. Make the desired setting by selecting the
Loudness" to activate ( ) or
deactivate ( ) the function.
SDV" function automatically adapts the audio
the same name in the header.
SDV".
symbols and .
Surround
(with Bose
Activating "
with greater spatiality.
This permits the creation of a so-called virtual
surround sound with conventional stereo sources
such as CDs, ra dio, or MP3 formats, for example.
The function can be set separately for the
individual audio sources.
The "
multi-channel sources such as 5.1 DVDs, for
example.
It cannot be activated with the "AM" source.
1. Press the b button.
2. Press the i button or touch the tab of
3. Select "
®
sound system)
Surround" achieves a sound setting
Surround" function is generally activated with
the same name in the header.
Surround" to activate ( ) or
deactivate ( ) the function.
PCM Controls 19

Linear
(with Bose
Selecting "
setting with a heavy bass (linear off) to a more
neutral sound setup (linear on).
1. Press the b button.
2. Press the i button or touch the tab of
3. Select "
AudioPilot
(with Bose
If the "
noise level in the interior of the vehicle is
monitored. Background noise is analyzed using a
filter and playback of the music is automatically
adapted not just in terms of volume, but also in
terms of the dynamics of the overall frequency
spectrum.
Vehicles with convertible tops are additionally
equipped with extended sound control. This
adjusts the playback of the music according to the
special requirements when driving with the top
down.
®
sound system)
Linear" switches the PCM from a sound
the same name in the header.
Linear" to activate ( ) or
deactivate ( ) the function.
®
sound system)
AudioPilot" function is switched on, the
1. Press the b button.
2. Press the i button or touch the tab of
the same name in the header.
3. Select "
AudioPilot" to activate ( ) or
deactivate ( ) the function.
Resetting personal settings
This menu item allows you to reset settings you
have previously made.
1. Press the d button.
2. Press the i button or touch the tab of
the same name in the header.
3. Select "
4. Select one of the following options:
5. Confirm the relevant prompt by selecting "
SET PCM system"
>"
Reset".
Factory settings"
–"
Resets all settings to predefined values. Any
data you entered (addresses, destinations,
and telephone numbers) is, however,
retained.
–"
Vehicle handover"
Resets all settings to predefined values and
deletes the data you entered (addresses,
destinations, and telephone numbers).
Yes".
Displaying the system version
This menu item allows you to view the system
version of your PCM.
1. Press the d button.
2. Press the i button or touch the tab of
the same name in the header.
3. Select "
SET PCM system"
>"
Display"
> "
System version".
The system version is displayed.
20 PCM Controls

TUNER
Radio ......................................................... 22
Calling up the main menu
for radio mode .......................................... 22
Tuning to stations ...................................... 22
Storing stations on station buttons
in the preset memories .............................. 23
Traffic program ......................................... 24
Making settings for radio mode .................... 25
Switching RBDS on and off ......................... 25
Switching RDS radio text on and off ............ 25
Setting sort criteria for the
FM station list............................................ 25
Satellite radio.............................................. 27
Setting the mode in radio mode .................. 28
Tuning to channels..................................... 28
Storing channels on the
station buttons in the preset memories........ 29
Searching for music................................... 30
Selecting categories for the
music search............................................. 30
Storing favorite songs................................ 30
Configuring the display of the icon
for your favorite songs ............................... 31
Switching information about
the program on and off .............................. 31
TUNER 21
Radio
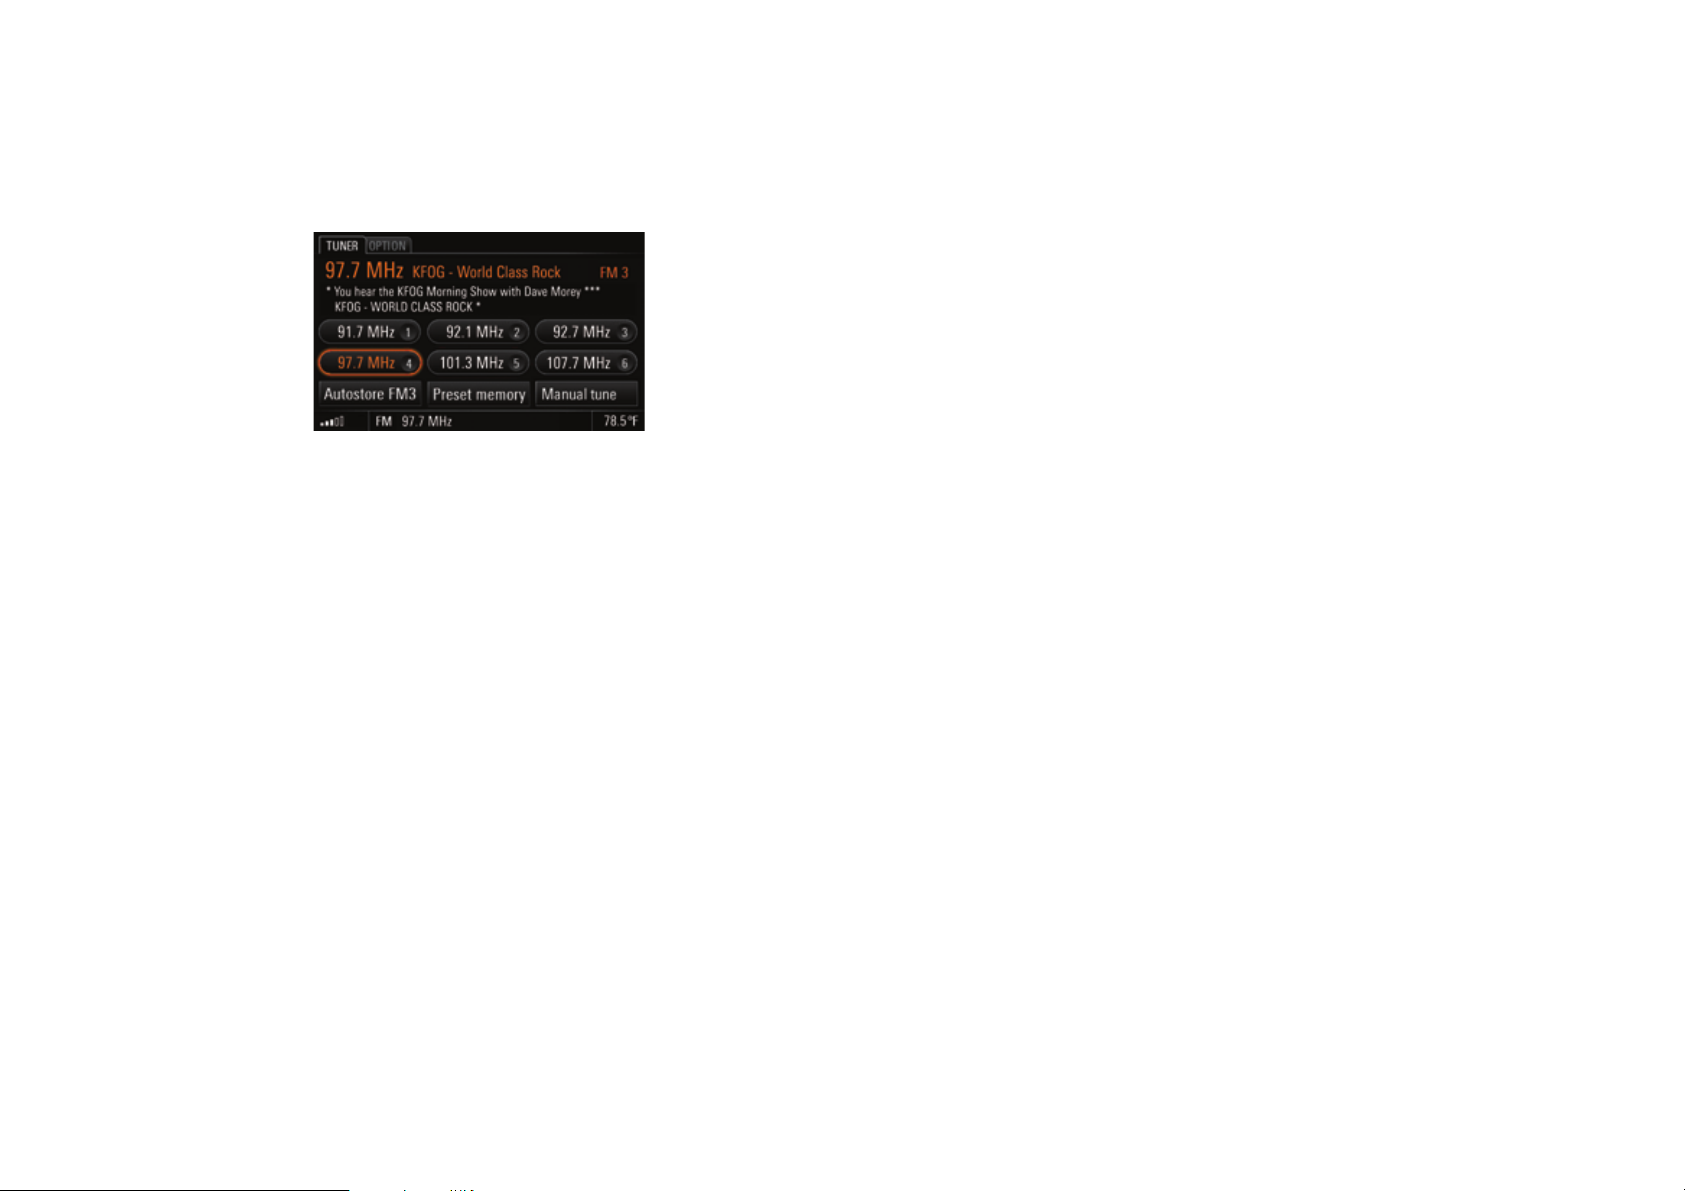
Calling up the main menu for radio mode
û Keep pressing the m button until the
desired mode (AM - FM - SAT) is highlighted in
the bottom line.
You will see the main menu for the chosen mode
together with the station buttons. If there are
already stations stored on the station buttons, the
names or frequencies of these stations are
displayed.
If the station tuned to is broadcasting RDS signals
(RDS = Radio Data System) in FM mode, you will
see the information contained in these signals
(e.g. station name, program type, and radio text)
above the station buttons.
To find out more, please refer to the sections
"Switching RBDS on and off" on page 25 and
"Switching RDS radio text on and off" on page 25.
Tuning to stations
You have the following options for tuning to a
station:
– using the station buttons,
– using the station list,
– using a station search, or
– by entering the frequency directly.
Tuning to stations using the station buttons
To be able to tune to a station using the station
buttons, there must already be a station stored on
a station button. To find out more, please refer to
the section "Storing stations on station buttons in
the preset memories" on page 23.
1. Keep pressing the m button until the
desired mode is highlighted.
2. Briefly press the station button.
The station stored on the station button is
tuned to.
Tuning to stations using the station list
The station list contains all the stations that can
currently be received. It is only available in FM
mode.
1. Keep pressing the m button until "
is highlighted.
2. Press the i button or touch the tab
of the same name in the header.
3. Select "
4. Select a station.
Tuning to stations using the station search
û Start a search by pressing the arrow buttons
Station list".
The station list is opened. In addition to the
station names, it also contains the respective
program types.
The station currently tuned to is highlighted in
color.
- or Tune to the next station from the station list by
pressing the arrow buttons
and
o.
The search stops at the next station in the
waveband.
p and o.
FM"
p
22 TUNER
Tuning to stations by scanning
If you activate this function, every station found in
the frequency range is played for approx. 5
seconds.
1. Keep pressing the m button until the
desired mode is highlighted.
2. Press the i button or touch the tab of
the same name in the header.
3. Select "
4. Select "
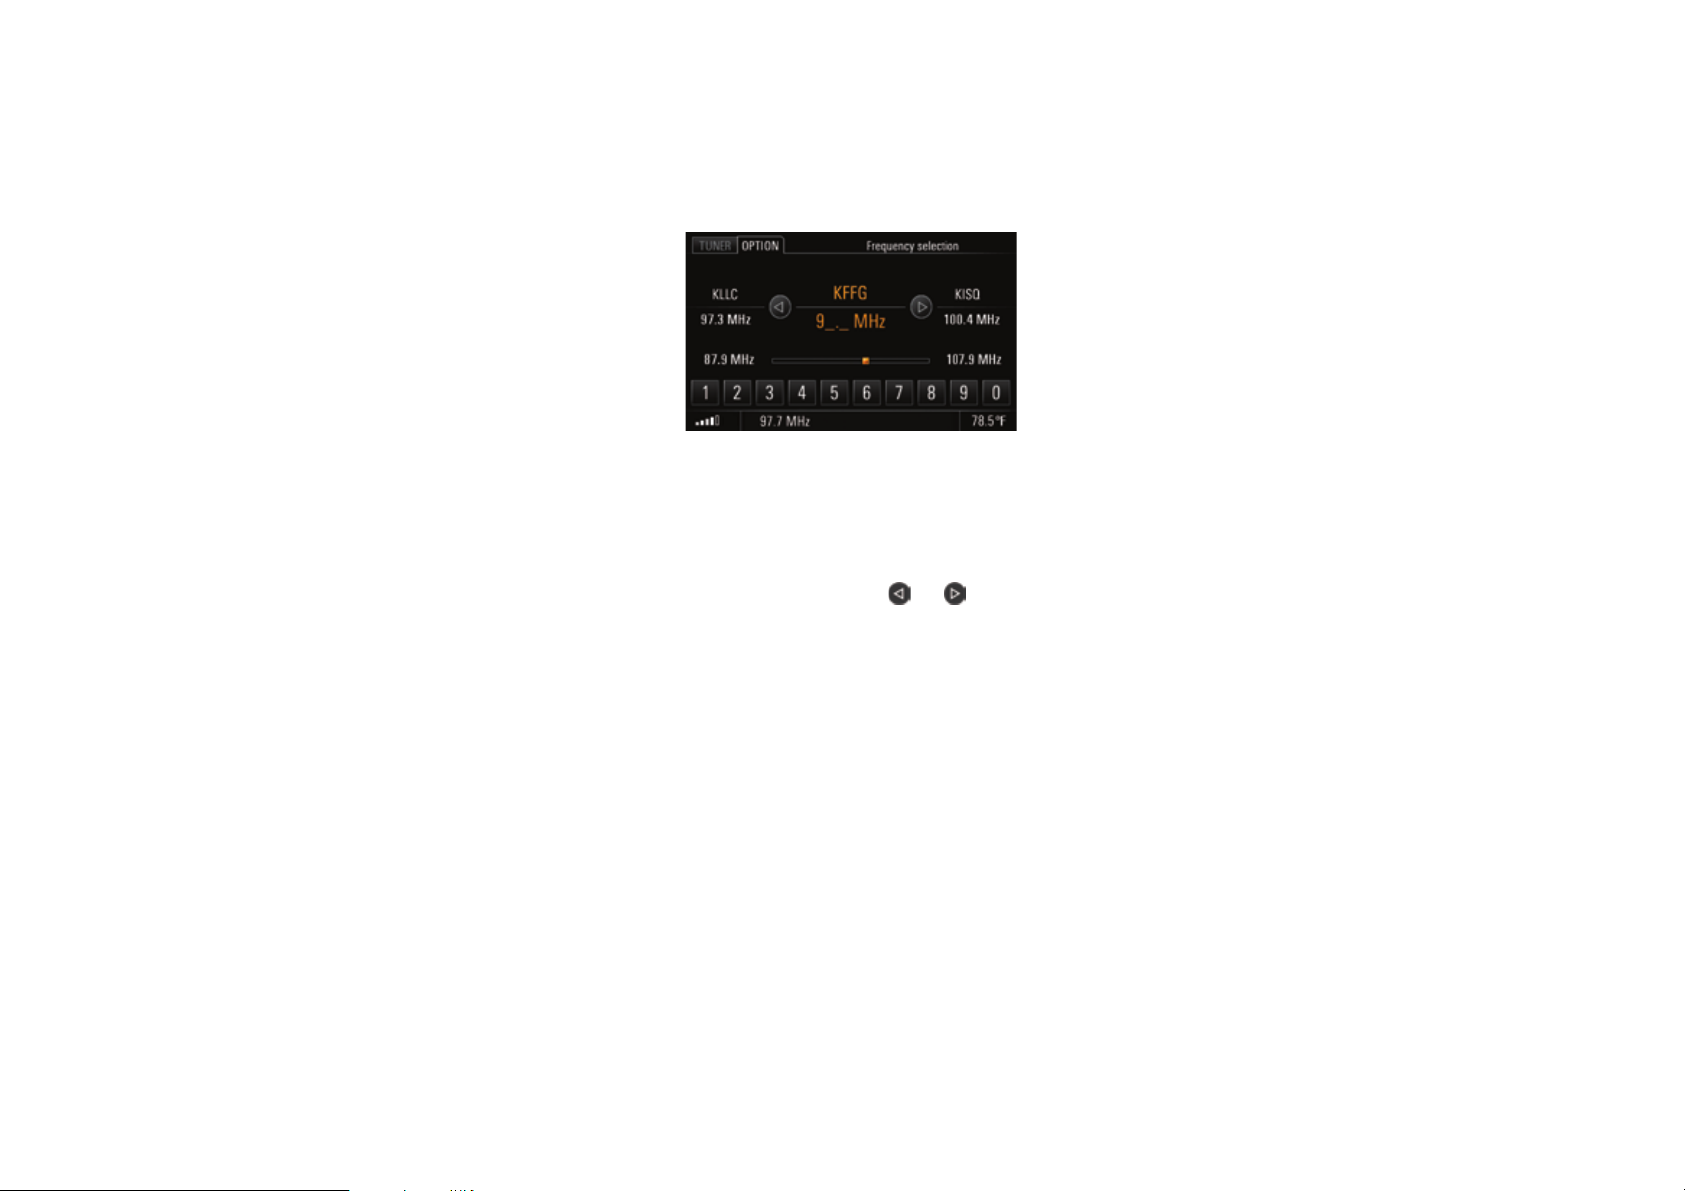
Tuning to stations by entering the frequency
directly
1. Keep pressing the m button until "
2. Select "
Start scan".
Each station in the frequency range is played
for approx. 5 seconds.
Stop scan" to tune to a scanned station.
FM"
is highlighted.
Manual tune".
The input menu is opened. The frequency of
the current station is displayed.
3. Tune to the frequency using one of the
following options:
– entering it directly by selecting the number
buttons
- or -
– tuning to the next station from the station list
by touching the symbols and on the
display
- or -
– turning the rotary knob
frequency upwards or downwards.
A valid frequency is tuned to as soon as it is input.
q to change the
Storing stations on station buttons in the
preset memories
Setting the preset memory
There are six memory locations available in each
of the preset memories. The preset memories for
radio mode are:
– In FM mode:
FM 1, FM 2, FM 3, BEST FM, and MIXED
–In AM mode:
AM 1, AM 2, and MIXED
In contrast to all other preset memories, in the
MIXED preset memory you can store stations and
channels in different modes. This means you can
store stations from FM mode and AM mode as well
as stations from TV mode here.
The PCM automatically fills the station buttons for
the Best FM preset memory with the stations with
the strongest reception at regular intervals.
TUNER 23

1. Keep pressing the m button until the
desired mode is highlighted.
2. Select "
3. Select the desired preset memory.
4. Touc h t he m tab in the header again.
Choosing a station in the station list and
storing it
1. Keep pressing the m button until "
2. Press the i button or touch the tab
3. Select "
4. Select the desired station entry by pressing it
5. To store the station on a station button, select
Preset memory".
The available preset memories are listed.
FM"
is highlighted.
of the same name in the header.
Station list".
for a few seconds.
The station buttons are displayed and the
station previously chosen is shown in the
information window.
the desired station button.
The station list is displayed once more.
Storing via an automatic station search
(autostore)
The automatic station search function is only
available for the preset memories FM 1, FM 2, FM
3 as well as AM 1 and AM 2.
1. Keep pressing the m button until the
desired mode is highlighted.
2. Set the preset memory if applicable
(> page 23).
3. Select the "
The search starts. It stores the six stations
with the strongest signals and tunes to the one
with the strongest signal.
Manually storing stations
1. Keep pressing the m button until the
desired mode is highlighted.
2. Tune to the station (> page 22).
3. Set the preset memory if applicable
(> page 23).
4. Press and hold the station button for a few
seconds.
As soon as the station is stored on the station
button, the station name or the station
frequency is displayed on the button and you
hear an audible signal.
Autostore" menu item.
Traffic program
Various FM radio stations broadcast traffic
messages in addition to their radio program.
The broadcasting stations are responsible for the
quality of these traffic messages. For that reason,
no liability can be accepted for the completeness
and correctness of the information.
Traffic messages are part of the RBDS signals and
are not available everywhere. To find out more,
please refer to the sections "Switching RBDS on
and off" on page 25.
Turning the traffic program on
1. Keep pressing the m button until
highlighted.
2. Press the i button or touch the tab
of the same name in the header.
3. Select "
Traffic prog." to switch the function on
( ) or off ( ) .
When the traffic program is switched on, you
will hear the traffic messages regardless of the
audio source playing at the time.
FM is
24 TUNER

Setting the Traffic prog. volume
The traffic program volume refers to the volume at
which the traffic program announcements are
output.
It specifies the minimum volume as a function of
the volume of the currently selected audio source.
1. Press the b button.
2. Press the i button or touch the tab of
the same name in the header.
3. Select "
4. Make the desired setting on the scale by
Traffic prog.".
selecting the two symbols and .
Making settings for radio mode
Switching RBDS on and off
The PCM is capable of receiving and evaluating
RBDS signals (RBDS = Radio Broadcast Data
System) in FM mode. It supports the following
functions:
– station name,
– program type (PTY),
–traffic program,
– radio text as well as
– detection of alternative frequencies.
(Radio stations transmit programs with the
same program content on different
frequencies in different regions.)
You can switch tracking of these alternative
frequencies on and off in the Set menu.
1. Keep pressing the m button until
highlighted.
2. Press the i button or touch the tab of
the same name in the header.
3. Select "
4. Select
SET FM".
"RBDS" to switch the function on ( ) or
off ( ).
FM is
Switching RDS radio text on and off
1. Keep pressing the m button until FM is
highlighted.
2. Press the i button or touch the tab of
the same name in the header.
3. Select "
4. Select "
SET FM".
Radio text" to switch the function on ( )
or off ( ).
Setting sort criteria for the FM station list
The FM station list can be sorted according to
different criteria. You can set the sorting as
follows:
1. Keep pressing the m button until
highlighted.
2. Press the i button or touch the tab of
the same name in the header.
3. Select "
4. Select "
SET FM".
Sort criteria".
You can then select various radio buttons:
–
Station strength: The station list is displayed
sorted according to field strength. Stations
with good reception are shown at the top of
the list.
FM is
TUNER 25

–
Last stations: The station list shows the last
stations listened to. The last station listened
to is shown at the top of the list.
–
Frequency: The station list is displayed
sorted according to the order of the stations
in the frequency band.
5. Set the desired sorting option by selecting it.
26 TUNER

Satellite radio
Satellite radio offers the reception of a multitude
of stations - all in digital (CD) quality. The provider
XM Satellite Radio offers a wide range of
programs - music, sports, news, and
entertainment, some without the interruption of
advertisements. XM Satellite Radio offers over
170 channels from coast to coast.
Dr. Ing. h.c. F. Porsche AG is not responsible
for the content offered by the broadcasters.
The number of satellites and their location in orbit
ensures broad coverage and reception 24 hours a
day, seven days a week.
When reception is blocked by buildings or
lanes with many overhanging trees, the
receiver may be muted occasionally.
There may also be problems with reception if
you have mounted a roof-top carrier or similar
object on your car.
To make it easier to find that one program you
want without having to sift through them all, the
various stations are divided into what are known
as categories. These categories make it possible
to select a station by the category of program that
it is broadcasting.
If you are not already receiving XM service:
– Obtain your 8-digit XM Radio ID from your PCM
(see next chapter)
– Contact XM by calling 1-800-XMRADIO (1-800-
967-2346) to request activation
– Begin enjoying the complimentary trial period.
To use the service described above, you must
sign up with the provider XM Satellite Radio.
When selecting a service for the first time, you
must request that the provider enable it.
The description of the individual menu items
reflects the information available at the time this
manual was prepared.
Enabling the system to receive the service
To have your system enabled to receive the
service, you must supply the provider with your
system's ID number, which you will find in the SAT
Settings menu.
1. Set "
SAT" mode.
2. Press the i button or touch the tab
of the same name in the header.
3. Select "
Once the device is enabled by the provider, you
will be able to use the service after a short loading
time.
XM Satellite Radio may request payment of an
SET XM"
> "
Radio ID".
The radio ID number is displayed.
additional fee to enable certain channels. If
you select one of these channels, a message
will be displayed with a telephone number
which you must call if you wish to have the
channel enabled.
TUNER 27

Setting the mode in radio mode
û Keep pressing the m button until the
audio source SAT is highlighted in the bottom
line.
The station buttons for satellite radio mode are
displayed once you have set "
are already channels stored on the station
buttons, the names of these channels are
displayed there.
The last channel tuned to is highlighted and is
playing.
SAT" mode. If there
Tuning to channels
You can tune to the desired channel using
the station buttons, the channel list, a search,
or by entering the channel directly.
Tuning to channels using the station buttons
1. Set "
SAT" mode.
2. Briefly press the station button.
The channel is tuned to.
To be able to tune to a channel using the
station buttons, there must already be
channels stored on the station buttons. To find
out more, please refer to the section "Storing
channels on the station buttons in the preset
memories" on page 29.
Tuning to channels by manually entering the
channel number
1. Set "
SAT" mode.
2. Select "
3. Tune to the channel number using one of the
Tuning to channels by searching
û Start a search by pressing the arrow buttons
Direct tune".
The input menu is opened. The channel
number of the channel currently tuned to
is displayed.
following options:
– entering it directly by selecting the number
buttons,
– tuning to the next channel from the channel
list by touching the symbols and on
the display,
– turning the rotary knob
channel number upwards or downwards.
As soon as a valid channel number is input,
it is tuned to.
and
o.
The search stops at the next available channel.
q to change the
p
28 TUNER

Choosing channels from the channel list and
tuning to them
The channel list contains the channels from
various categories that can currently be received.
It is sorted by channel numbers and in addition to
the channel names, also contains the categories
to which the channels belong.
The satellite radio channels are divided into
various categories. These categories allow
the channels to be divided into genres such
as "Decades", "Rock", or "Sports".
By selecting specific categories, you can
determine the composition of the channel list
yourself and make the list easier to search.
To find out more about selecting individual
categories, please refer to the section
"Selecting categories for the music search"
on page 30.
1. Set "
SAT" mode.
2. Press the i button or touch the tab
of the same name in the header.
3. Select "
4. Select the desired channel.
Channel list".
The channel list is opened. The channel
currently tuned to is highlighted in color.
Storing channels on the station buttons
in the preset memories
In each of the following preset memories there are
six memory locations available where you can
store stations:
–
SAT 1, SAT 2, SAT 3 and MIXED.
In contrast to all other preset memories, in
MIXED preset memory you can store
the
stations and channels in different modes. This
means you can store stations from FM mode
and AM mode as well as channels from
mode here.
1. Select "
2. Select the desired preset memory.
Preset memory".
The available preset memories are listed.
SAT
Manually storing channels
1. Set "
SAT" mode.
2. Tune to the channel.
3. Set the preset memory if applicable.
4. Press and hold the station button for
a few seconds.
As soon as the channel is stored on the station
button, the name of the channel is displayed
on the button.
Storing channels from the channel list
1. Set "
SAT" mode.
2. Press the i button or touch the tab
of the same name in the header.
3. Select "
4. Select the desired channel by holding it for
5. Select a station button to store the channel
Channel list".
a few seconds.
The station buttons are displayed and the
channel previously selected is shown in the
information window.
on it.
TUNER 29

Searching for music
If you have already selected specific categories,
the music search will be restricted to channels in
these categories.
To find out more about selecting individual
categories, please refer to the section "Selecting
categories for the music search" on this page.
Searching for music by title
1. Set "
SAT" mode.
2. Press the i button or touch the tab
of the same name in the header.
3. Select "
4. Select the desired title.
Searching for music by artist
1. Set "
2. Press the i button or touch the tab
3. Select "
4. Select the desired artist.
Search by title".
You will then see a list of all titles currently
being played in the channels in the selected
categories.
The channel is tuned to and the title played.
SAT" mode.
of the same name in the header.
Search by artist".
You will then see a list of all artists currently
being played in the channels in the selected
categories.
The channel is tuned to and the corresponding
title played.
Selecting categories for the music search
1. Set "SAT" mode.
2. Press the i button or touch the tab
of the same name in the header.
3. Select "
4. Select the desired categories.
Category list".
The list of categories is opened.
Storing favorite songs
In the "Favorite" list you have the option of storing
50 of your favorite songs. If one of these songs is
played on any channel, the icon will be
displayed beside the "
If this happens, you can open the list of your
favorite songs by selecting the menu item.
The songs currently being played in one of the
channels are identified with the icon. Selecting
the song tunes to the corresponding channel.
Favorite" menu item.
Displaying the favorite list
1. Set "
SAT" mode.
2. Press the i button or touch the tab
of the same name in the header.
3. Select "
1. Select "
Storing titles to the favorite list
1. While satellite radio is playing, press
2. Select "
1. While satellite radio is playing, select and hold
SET XM"
> "
Favorite"
> "
Favorite list".
The list of stored favorite songs is opened.
- or -
Favorite" if the icon is displayed
in satellite radio mode.
the i button or touch the tab
of the same name in the header.
SET XM"
> "
Favorite"
> "
Store as favorite".
- or -
the "
Favorite" menu item for a few seconds.
30 TUNER
 Loading...