


 Loading...
Network Attached Storage
TeraStation User Manual
www.buffalotech.com
35011187 ver.02

Contents |
|
Chapter 1 Diagrams and Layout.................................................................... |
5 |
TeraNavigator Setup...................................................................................................................................... |
5 |
Diagrams and Layout.................................................................................................................................... |
10 |
Auto Power Mode........................................................................................................................................... |
12 |
Chapter 2 Using your TeraStation.................................................................. |
13 |
Opening a Shared Folder............................................................................................................................. |
13 |
Opening a Shared Folder from a Second PC........................................................................................ |
14 |
Adding Additional TeraStations................................................................................................................ |
15 |
Opening the Web Admin interface.......................................................................................................... |
16 |
Chapter 3 Changing RAID Modes................................................................... |
18 |
RAID Arrays....................................................................................................................................................... |
18 |
Using Normal mode...................................................................................................................................... |
20 |
Using RAID 5 mode (4 hard drives).......................................................................................................... |
21 |
Using RAID 5 mode (3 hard drives).......................................................................................................... |
22 |
Using RAID 10 mode..................................................................................................................................... |
23 |
Using RAID 1 mode........................................................................................................................................ |
24 |
Using RAID 0 mode........................................................................................................................................ |
25 |
Configuring a Hot Spare.............................................................................................................................. |
26 |
Chapter 4 Adding an External Hard Drive..................................................... |
27 |
Connect an External Drive........................................................................................................................... |
27 |
Formatting the External Drive................................................................................................................... |
28 |
Set Access Restrictions on the External Drive...................................................................................... |
29 |
Chapter 5 Removing External Hard Drives................................................... |
30 |
Dismounting with the Function button................................................................................................. |
30 |
Dismounting from the Web Admin interface....................................................................................... |
31 |
TeraStation User Manual |
1 |

Chapter 6 Backup............................................................................................ |
32 |
Backup Data from your Windows PC....................................................................................................... |
32 |
Backup Data on the TeraStation................................................................................................................ |
32 |
Replication........................................................................................................................................................ |
37 |
Time Machine.................................................................................................................................................. |
39 |
Chapter 7 Configuring Access Restrictions................................................... |
42 |
Adding a Shared Folder................................................................................................................................ |
43 |
Adding Users.................................................................................................................................................... |
47 |
Adding Groups................................................................................................................................................ |
49 |
Access Restrictions......................................................................................................................................... |
50 |
Access Restrictions on NT Domain........................................................................................................... |
52 |
Access Restrictions on Active Directory................................................................................................. |
54 |
Access Restrictions through Delegate Authority to External SMB Server................................. |
56 |
Chapter 8 Managing your TeraStation.......................................................... |
59 |
Name, Date and Time.................................................................................................................................... |
59 |
RAID Scanning................................................................................................................................................. |
61 |
Disk Check......................................................................................................................................................... |
62 |
Encrypt Hard Drives on the TeraStation................................................................................................. |
62 |
Formatting Disks............................................................................................................................................. |
63 |
E-mail Notification.......................................................................................................................................... |
64 |
UPS Settings..................................................................................................................................................... |
66 |
Beep Alerts........................................................................................................................................................ |
67 |
LCD Display Settings..................................................................................................................................... |
67 |
Changing the Admin Username and Password................................................................................... |
68 |
Erase Data on the TeraStation Completely............................................................................................ |
69 |
Initialization...................................................................................................................................................... |
70 |
Changing the IP Address............................................................................................................................. |
72 |
Network............................................................................................................................................................. |
73 |
Port Trunking.................................................................................................................................................... |
75 |
Chapter 9 Extensions...................................................................................... |
77 |
Using WebAccess............................................................................................................................................ |
77 |
Direct Copy....................................................................................................................................................... |
78 |
PrintServer........................................................................................................................................................ |
80 |
Sleep Timer....................................................................................................................................................... |
84 |
TeraStation User Manual |
2 |

Disk Quotas....................................................................................................................................................... |
86 |
TeraSearch......................................................................................................................................................... |
91 |
Offline Files....................................................................................................................................................... |
93 |
DFS (Distributed File System)..................................................................................................................... |
96 |
FTP Server.......................................................................................................................................................... |
98 |
Accessing from a NFS Client....................................................................................................................... |
100 |
Encrypting Data Transmission................................................................................................................... |
103 |
Wake on LAN.................................................................................................................................................... |
105 |
Chapter 10 NAS Navigator2........................................................................... |
106 |
Mac OS X 10.3.9 or later ............................................................................................................................... |
110 |
Chapter 11 Software....................................................................................... |
111 |
NAS Navigator2............................................................................................................................................... |
111 |
File Security Tool............................................................................................................................................. |
111 |
NS-SHFT............................................................................................................................................................. |
112 |
EXT3 Reader...................................................................................................................................................... |
113 |
Chapter 12 List of Settings in the Web Admin interface.............................. |
114 |
Common items (left side of the screen)................................................................................................. |
114 |
Shared Folders................................................................................................................................................. |
114 |
Users/Groups.................................................................................................................................................... |
117 |
Network............................................................................................................................................................. |
119 |
System................................................................................................................................................................ |
123 |
Extensions......................................................................................................................................................... |
137 |
Appendix ............................................................................................ |
139 |
Assign as Network Drive (Windows)........................................................................................................ |
139 |
Mount as a Network Drive (Mac OS X 10.3.9 or later)........................................................................ |
140 |
Specifications................................................................................................................................................... |
141 |
Factory Defaults.............................................................................................................................................. |
142 |
Software............................................................................................................................................................. |
143 |
Info Folder......................................................................................................................................................... |
145 |
LCD Display ...................................................................................................................................................... |
146 |
Troubleshooting............................................................................................................................................. |
150 |
TeraStation User Manual |
3 |

Data Backup..................................................................................................................................................... |
151 |
GPL Information.............................................................................................................................................. |
151 |
Update the TeraStation’s Firmware.......................................................................................................... |
152 |
Glossary.............................................................................................................................................................. |
153 |
Compliance Information.............................................................................................................................. |
155 |
TeraStation User Manual |
4 |
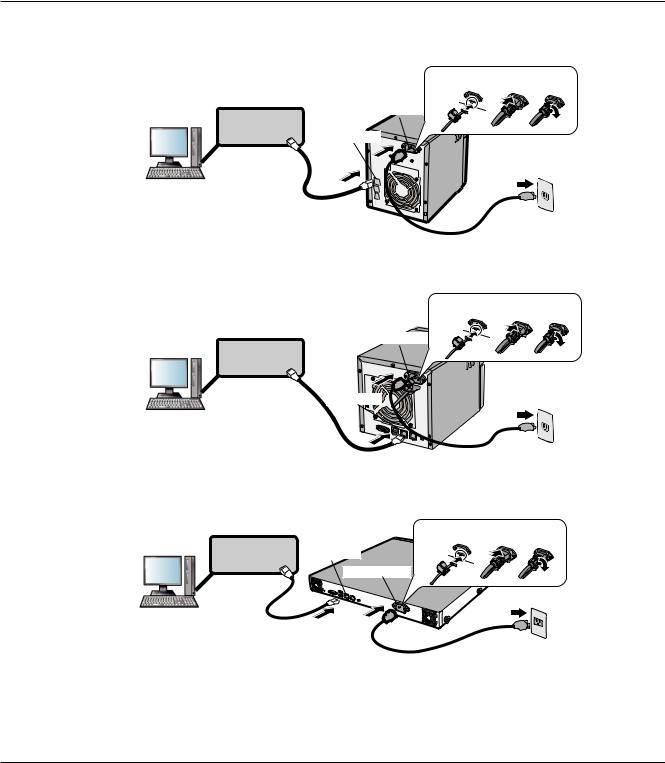
Chapter 1
Diagrams and Layout
TeraNavigator Setup
To configure your TeraStation, insert the TeraNavigator CD into a Windows computer on the network and follow the directions, or use the following procedure.
1 |
Connect cables |
|
Fasten the plug with the clamp.* |
||
|
TS-XL, TS-XEL |
|
|||
|
|
1 |
2 |
3 |
|
|
|
Power Connector |
|||
|
Network |
|
|
|
|
|
|
|
|
|
|
|
(Hub or Router) |
LAN Port 1 |
|
* TS-XL TeraStations Only |
|
|
|
|
|||
|
|
|
|
||
|
Ethernet Cable |
|
|
|
|
|
|
|
|
|
Power Outlet |
|
|
|
AC Cable |
|
|
|
TS-WXL/R1, TS-WXL/1D |
|
|
|
|
|
|
|
Fasten the plug with the clamp. |
||
|
|
Power Connector |
1 |
2 |
3 |
|
Network |
|
|
|
|
|
|
|
|
|
|
|
(Hub or Router) |
|
|
|
|
|
|
LAN Port 1 |
|
|
|
|
Ethernet Cable |
AC Cable |
Power Outlet |
||
|
|
|
|
||
|
TS-RXL |
|
|
|
|
|
|
Fasten the plug with the clamp. |
|||
|
Network |
LAN Port 1 |
1 |
2 |
3 |
|
(Hub or Router) |
||||
|
Power Connector |
|
|
|
|
|
|
|
|
|
|
Ethernet Cable
Power Outlet
AC Cable
Note:
Use LAN Port 1 for initial setup. After setup, you may connect a second cable to LAN Port 2. If used, configure the IP address of LAN Port 2 at [Network] - [Setting] - [IP Address Settings] in the Web Admin interface or NAS Navigator2.
TeraStation User Manual |
5 |
2 |
Hold down the power button on the TeraStation for three seconds to turn it on. |
|
3 |
Wait until the green power LED changes from flashing to lit. In the TS-RXL TeraStations, the LED is |
|
|
not illuminated. Continue to Step 4. |
|
4 |
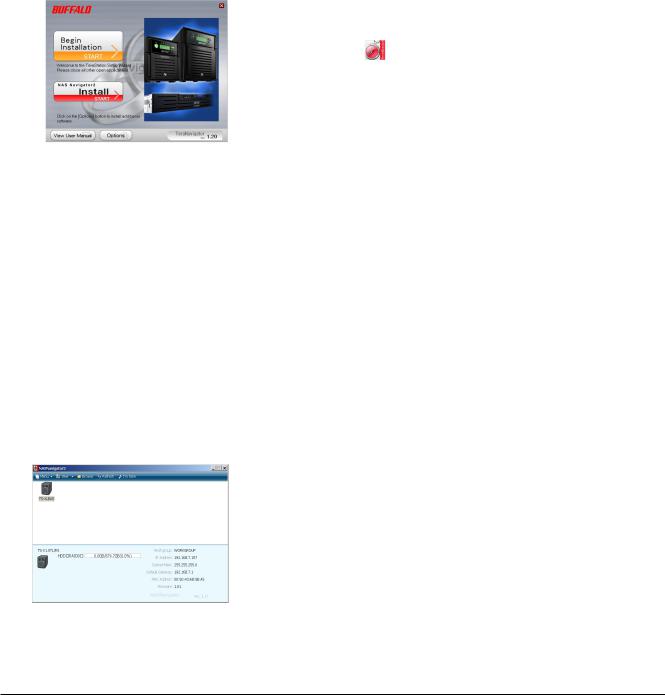
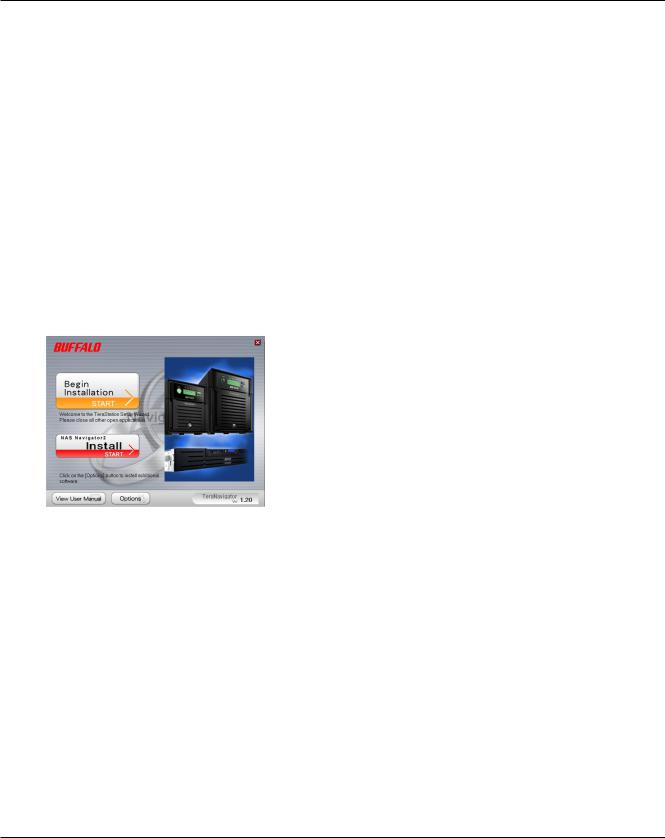
Insert the TeraNavigator software CD into your computer. The TeraNavigator wizard will launch. |
|
|
Click [Begin Installation]. |
|
|
Note: |
|
|
If the wizard doesn’t open automatically, navigate to the TeraNavigator CD |
|
|
and double-click the |
icon (TSNavi.exe). |
|
Step through the wizard to connect cables and install software. |
|
Notes:
5
6
•For Windows Vista, click [Run TSNavi.exe] when the auto-play screen is displayed. When “A program needs your permission to continue” is displayed, click [Continue].
•For Mac OS, open the CD and double click on the [TeraNavigator] icon.
•Disable your anti-virus software and firewall before continuing. You may not be able to install the software if anti-virus software or a software firewall are enabled. After you’ve finished setup, re-enable your firewall and antivirus software.
When the message [Completed] is displayed, click [Launch NAS Navigator2]. NAS Navigator2 will launch.
Note: Alternately, you can click [Next] to display more information about the Power Mode Switch, which can turn the TeraStation ON and OFF automatically.
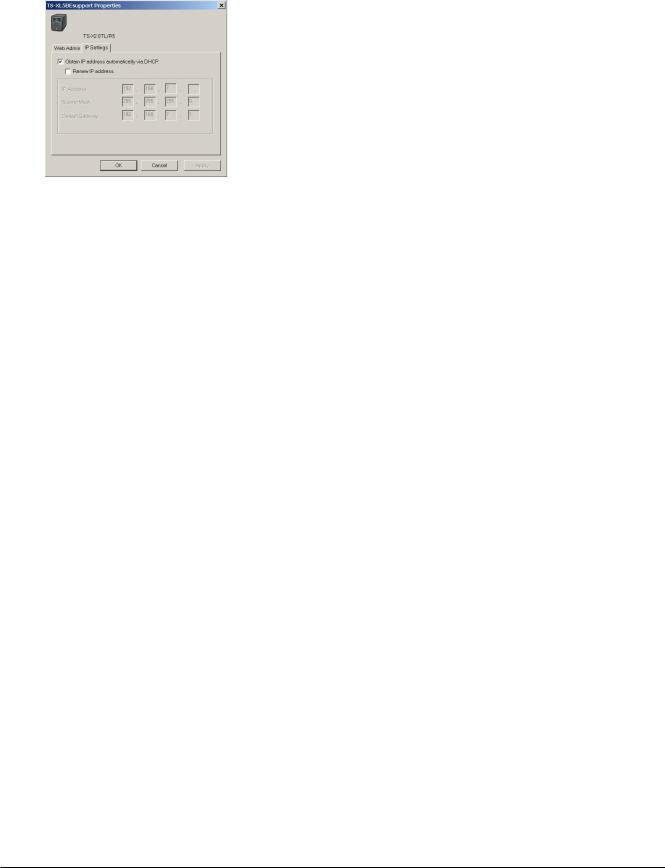
Right-click on your TeraStation’s icon, and choose [Properties] - [IP Settings].
Note:
For Mac OS, hold the Control key, click on the TeraStation icon, then click [Configure] - [IP Address].
TeraStation User Manual |
6 |
7
Continue to set the TeraStation's Clock.
1 Enter the desired [IP Address], [Subnet Mask], and [Default Gateway].
Note:
If you don’t know how to configure these settings, click [Obtain IP address automatically via DHCP] to check the box. For Mac OS, click [Use DHCP].
2 Click [OK].
Note:
If you are prompted to enter the administrator’s password, enter the
TeraStation’s password (it is set to “password” by factory default).
8
9
Right-Click on the TeraStation icon in NAS Navigator2 and choose [Open Web setting].
Notes:
•For Mac OS, hold the Control key, click the TeraStation icon, and click [Open Web setting].
•TheWeb Admin interface requires Firefox 1.5 or later, Internet Explore 6.0 Service Pack 2 or later, or Safari 3 or later.
Enter the administrator name and password, and click [Login].
Notes:
• The following settings are set by factory default.
Username: admin Password: password
•The default language for the Web Admin interface is English. To change the display language,
click [System] - [Settings] - [Language] - [Modify Settings], select [Display Language], and click [Save].
10 Click [System] - [Settings] - [Date and Time].
11 Click [Modify Settings].
TeraStation User Manual |
7 |
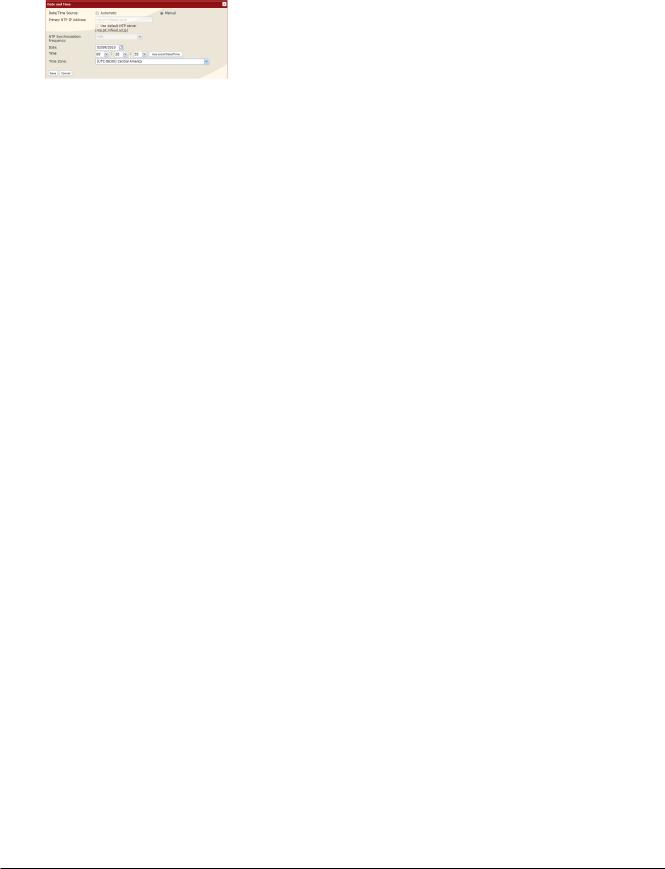
12
Notes:
1 To manually configure the date and time, click [Manual] for [Date/Time
Source] and adjust [Date], [Time], and [Time Zone].
Note: Click [Use Local Date/Time] to use your computer's time (or Time Zone) for the TeraStation's time.
2 Click [Save].
•By default, the TeraStation will attempt to use an NTP server to set the time.
•NTP may not be usable in some network environments.
•Please read the terms of use for Internet Multifeed Co. at www.jst.mfeed.ad.jp. Internet Multifeed Co. is the group that manages the NTP Server at www.jst.mfeed.ad.jp. Internet Multifeed Co. is not responsible for any loss or damages caused by this service.
•BUFFALO is not responsible for any loss or damage caused by using of this service, stopping the service, or missing service.
•If your TeraStation fails to automatically obtain the time from NTP Server, verify the settings for the DNS server address of the TeraStation. You must set a primary DNS server address to specify an NTP server by host name. Otherwise you will have to specify the DNS server by IP address. You can change the DNS server settings at
[Network] - [Settings] - [IP Address Settings] in the Web Admin interface.
13 The following settings changes are recommended.
Change your administration password
We recommend that you change the default password to a secure password.
1Click [Users/Groups] - [Local Users] in the Web Admin interface.
2Select [admin] from the user list and click [Edit User].
3-1 Enter a new password (twice). -2 Click [Save].
Your administrator password is now changed.
Configure RAID Scanning
RAID Scanning checks your RAID 1, 5 or 10 arrays for problems and automatically fixes any errors it can. To configure:
1Click [System] - [Storage] - [RAID Scanning] - [Modify Settings].
2Click [Enable] for [RAID Scanning].
3Select the schedule to perform RAID Scanning.
Note: With [Immediate] checked, RAID Scanning will run immediately. 4 Click [Save].
You have completed the settings for RAID Scanning.
TeraStation User Manual |
8 |

14
15
Double-click on your TeraStation’s icon.
The TeraStation’s shared folders are displayed.
Note:
For Mac OS, TeraStation is mounted as a drive icon on the desktop, or displayed in the sidebar of the [Finder].
Setup is now complete. You can now use the TeraStation's shared folders to save files just like other hard drives.
Note:
Keep the TeraStation updated with the latest firmware. You can download the latest firmware from www.buffalotech.com. The currently installed firmware version is displayed on the main screen of NAS Navigator2.
TeraStation User Manual |
9 |

Diagrams and Layout
TS-XL, TS-XEL
1 2 3 4 5 6
Front View |
|
7 |
|
|
|
10 |
|
|
|
8 |
|
|
|
11 |
|
|
|
|
|
|
9 |
|
12 |
|
|
|
TS-WXL
Front View |
1 |
2 3 4 |
5 |
6 |
|
|
|
|
7
8 10
11
9
12
TS-RXL
with cover attached
Rear View
TS-XL TS-XEL
±³ ±·

±´  ±´
±´  ±µ
±µ  ±µ
±µ  ±
±¶  ±
±¶ 
±·
Rear View
18
19 20
13 14 15 16 17
9
±¸
±¹
²°
11 |
12 |
14 |
11 |
21 |
2 |
3 |
4 |
5 |
1 |
6 |
7 |
11 |
8 |
10 |
11 |
|
|
|||||||||||||||||
|
|
|
|
|
|
|
|
|
|
|
|
|
|
|
|
|
|
|
|
|
|
|
|
|
|
|
|
|
|
|
|
|
|
|
|
|
|
|
|
|
|
|
|
|
|
|
|
|
|
|
|
|
|
|
|
|
|
|
|
|
|
|
|
|
|
|
|
|
|
|
|
|
|
|
|
|
|
|
|
|
|
|
|
|
|
|
|
|
|
|
|
|
|
|
|
|
|
|
|
|
|
|
|
|
|
|
|
|
|
|
|
|
|
|
|
|
|
|
|
|
|
|
|
|
|
|
|
|
|
|
|
|
|
|
|
|
|
|
|
|
|
|
|
|
|
|
|
|
|
|
|
|
|
|
|
|
|
|
|
|
|
|
|
|
|
|
|
|
|
|
|
|
|
|
|
|
|
|
|
|
|
|
|
|
|
|
|
|
|
|
|
|
|
|
|
|
|
|
|
|
|
|
|
|
|
|
|
|
|
|
|
|
|
|
|
|
|
|
|
|
|
|
|
|
|
|
|
|
|
|
|
|
|
|
|
|
|
|
|
|
|
|
|
|
|
|
|
|
|
|
|
|
|
|
|
|
|
|
|
|
|
|
|
|
|
|
|
|
|
|
|
|
|
|
|
|
|
|
|
|
|
|
|
|
|
|
|
|
|
|
|
|
|
|
|
|
|
|
|
|
|
|
|
|
|
|
|
|
|
|
|
|
|
|
with cover removed
RearView
19 |
21 |
13 |
14 |
15 |
16 |
17 |
20 |
18 |
19 |
TeraStation User Manual |
10 |

1 Power Button
Power ON/OFF: Press and hold the Power Button for 3 seconds until it beeps.
Note: To power on, connect the AC cable and wait for 10 seconds. Then press the Power Button.
2 Info LED
If there is a message about the current status, the amber info LED is illuminated. Check the LCD display for current status.
3 Error LED
The red error LED is illuminated when an error occurs. Check the LCD display for more information.
4 LAN1 LED
When the LAN Port 1 is connected to a network, it is illuminated in green (the light next to the LAN Port 1 will be illuminated as well).
5 LAN2 LED
When the LAN Port 2 is connected to a network, it is illuminated in green (the light next to the LAN Port 2 will be illuminated as well).
6 LCD Display
Displays the status of the TeraStation.
7 Display Button
Switches between the different display modes.
8 Function Button
Use this button to perform the following operations:
•DirectCopy
•Removal of USB devices
•Rebuild RAID after replacing hard drives
9 Drive Lock
Open the front panel with the key to replace hard drives or press the Reset Button.
10 Reset Button
With the TeraStation powered on, hold down this button until it beeps (about 5 seconds) to reset the TeraStation’s IP address and password to the factory defaults. The password will not be reset if this functionality has been disabled from within the Web Admin interface.
Note: To access the TS-RXL series’ reset button, insert the tip of an unfolded paper clip.
11 Status LEDs 1 - 4
LEDs 1 through 4 will be illuminated in green when the corresponding hard drives are accessed. If an error occurs on a hard drive, the corresponding LED will be illuminated or flash in red or amber.
12 Factory Use Only
TS-XEL TeraStations do not have this port.
13 UPS Port
Connect a UPS (Uninterruptible Power Supply). TS-XEL TeraStations do not have this port.
14 USB Connector (USB 2.0/1.1 Series A)
Compatible Buffalo USB hard drives, USB flash drives, and digital cameras can be connected. USB hubs are not supported.
15 LAN Port 1
Connect to a router, hub, or switch on your Ethernet network.
16 LAN Port 2
Use this second Ethernet port for redundancy or backup. For backup, a second TeraStation may be connected directly.
17 Power Mode Switch
Switches between AUTO and MANUAL power modes (page 12).
18 Power Connector
Use the included AC cable to connect to an UPS, surge protector, or outlet.
19 Fan
Do not block the fan when installing the unit.
20 Anti-Theft Security Slot
You can also secure it using an off-the-shelf wire lock.
21 UID Button
The blue LED next to the UID button will be illuminated or turned off every time you push this button on the front or back.
TeraStation User Manual |
11 |
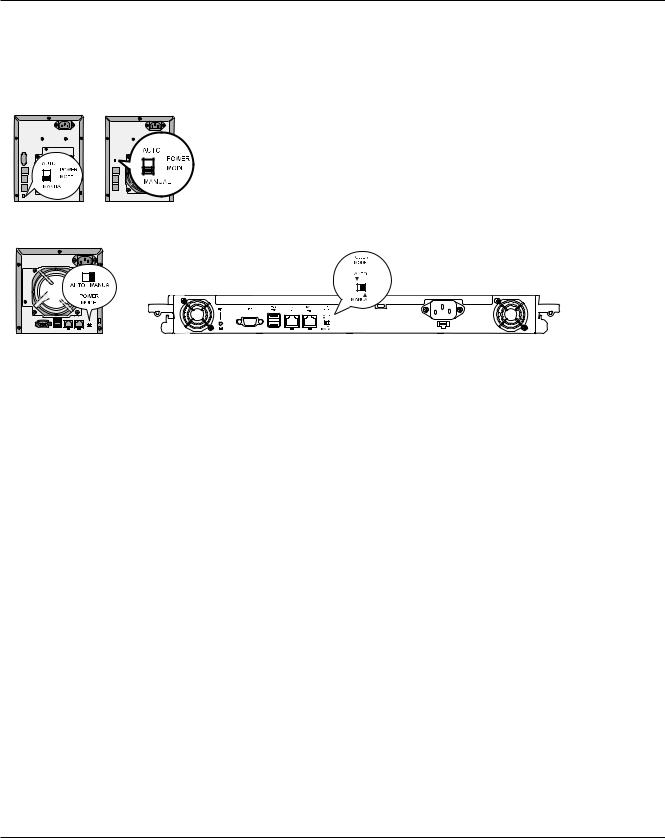
Auto Power Mode
The TeraStation can be configured to automatically turn on and off with your computer. To use this feature, install NAS Navigator2 on your computer(s) and then set the Power Mode Switch on the back of your TeraStation to AUTO.
TS-XL |
TS-XEL |
Manual (default): |
|
|
In this position, the power button on the front of the TeraStation turns it on |
|
|
and off. It is not affected by the power state of connected computers. |
Auto:
In this position, if all connected computers are turned off, the TeraStation
will turn off too. If a connected computer is powered on, the TeraStation will power on too.
TS-WXL
TS-RXL
Notes:
•After you turn off your computer, it may take several minutes for the TeraStation to shut down.
•When the Power Mode Switch is changed from Auto to Manual or vice-versa, it takes about five minutes for the change to take effect.
•Power on the TeraStation before moving the switch to the Auto position.
•Auto Power Mode doesn’t work if port trunking is enabled or if NasNavi detection is disabled.
•Install NAS Navigator2 on all computers that will be accessing the TeraStation before switching to Auto Power
Mode.
•Some networks may not support the Auto Power Mode. If you have problems with it, just use Manual Power
Mode.
TeraStation User Manual |
12 |

Chapter 2
Using your TeraStation
Opening a Shared Folder
1 |
Launch NAS Navigator2. |
|
Notes: |
2
3
•For Windows, double-click the [Buffalo NAS Navigator2] icon on your desktop.
•For a Mac, double-click on the [NAS Navigator2] icon in the Dock.
Double-click on the TeraStation icon.
Note:
This example shows a TS-XL series TeraStation.
Your icon may be different.
The TeraStation’s Shared folders are displayed.
Note:
With a Mac, the TeraStation is mounted as a drive icon on the desktop, and displayed in the sidebar of the [Finder].
You can now use the TeraStation's shared folders to save files just like other hard drives.
TeraStation User Manual |
13 |
Opening a Shared Folder from a Second PC
Once you’ve connected the first computer to the TeraStation, you don’t have to run the setup program again to connect additional computers. Just install NAS Navigator2 on each additional computer and use it to open the TeraStation’s shared folder as necessary.
1 Insert the TeraNavigator CD into your computer. TeraNavigator will launch.
Notes:
• For Windows 7/Vista, click [Run TSNavi.exe] when the auto-play screen is displayed.
• If [A program needs your permission to continue] is displayed, click [Continue].
• For Mac OS, double-click on the [TeraNavigator] icon in the utility CD.
2 |
Click [Install NAS Navigator]. |
Note:
If this screen doesn’t open, open the CD and double-click on the  icon (TSNavi.exe).
3
4
Step through the wizard to install NAS Navigator2.
After NAS Navigator2 is installed, click the  in the right top right corner of the window to close the installer. Then, use NAS Navigator2 to open the TeraStation’s shared folder.
TeraStation User Manual |
14 |

5 |
Launch NAS Navigator2. |
|
Note: |
|
• For Windows computers, double-click the [Buffalo NAS Navigator2] icon on the Desktop. |
|
• For a Mac, double-click the [NAS Navigator2] icon in the Dock. |
6 |
Double-click on the TeraStation icon. |
Note:
This example shows a TS-XL series TeraStation.
Your icon may be different.
7 The TeraStation’s Shared folders are displayed.
Note:
With a Mac, the TeraStation is mounted as a drive icon on the desktop, and displayed in the sidebar of the [Finder].
You can now use the TeraStation’s shared folders to save files just like other hard drives.
Adding Additional TeraStations
Run the TeraNavigator installation program from the CD for each TeraStation that you add to the network. You cannot set up multiple TeraStations at the same time.
TeraStation User Manual |
15 |
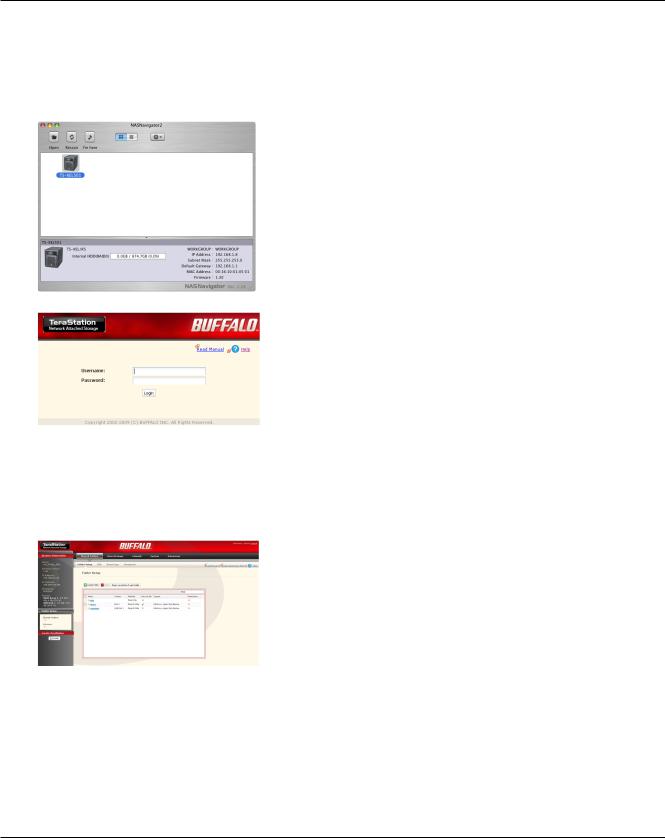
Opening the Web Admin interface
To configure your TeraStation, use the Web Admin interface from a browser on a computer connected to the same network.
1 Launch NAS Navigator2. For Windows, click on the [BUFFALO NAS Navigator2] icon on your desktop. For Mac OS X, double-click on the [NAS Navigator2] icon in the Dock.
2
3
Note:
Right-click on the TeraStation icon (on Mac OS X, click the icon while holding down the control key) and select [Open Web setting] from the menu.
Notes:
•If multiple TeraStations and TeraStations are connected to the network, multiple icons will be displayed. Click on the correct TeraStation.
•Record the TeraStation’s IP address from the bottom right of the NAS Navigator2 window.
1Enter your username and password, and click [Login]. Initially, use the default username and password: Username: admin
Password: password
2After you log in, change the password for security.
• To login as a guest, type “guest”for the Username, leave the password blank, and click [OK]. Guests can check the
TeraStation’s name, IP address, workgroup, and disk status. Regular users can change their login passwords as well as check the TeraStation name, IP Address, workgroup, and disk status. Administrator user, “admin”by default, can configure all options.
This is the Web Admin interface. This page displays the 4 TeraStation’s current status, including name, IP address,
workgroup, and hard disk settings.
Notes:
•TheWeb Admin interface supports Firefox 1.5 or later, Internet Explorer 6.0 with SP2 or later, and Safari 3 or later. It may not display properly in other browsers.
•TheWeb Admin interface may not display correctly in Internet Explorer due to your browser security settings. If this happens, navigate to [Tools] - [Internet Options] - [Security] on Internet Explorer, and set the Security Settings to [Local intranet].
TeraStation User Manual |
16 |
The Web Admin interface is organized by tabs across the top. The following tabs are available.
•[Shared Folders]
Add or delete Shared Folders; configure Access Restrictions, DirectCopy, DFS and TeraSearch.
•[Users/Groups]
Add, delete, and configure Users and Groups.
•[Network]
Configure Network, Workgroup, and NFS settings.
•[System]
Configure Name, Date and Time, RAID setup, RAID Scanning, Check Disk/Format Disk, Backup, Replication, Email Notification, Sleep Timer, UPS Settings, Restore/Erase.
•[Extensions]
Configure Web Access, Print Server, and Time Machine.
Notes:
•To open the Web Admin interface from a different computer, refer to Quick Setup Guide and install NAS Navigator2. After the installation, follow Chapter 2, or, you may type the IP address of TeraStation on a web browser.
•You may also open theWeb Admin interface by typing the IP address that you wrote down in step 2 into the address field of your browser. Press the <Enter> key and bookmark this page in your browser so that you can return to it easily.
•With Mac OS X 10.4 or later, you can open theWeb Admin interface from within Safari with Bonjour.
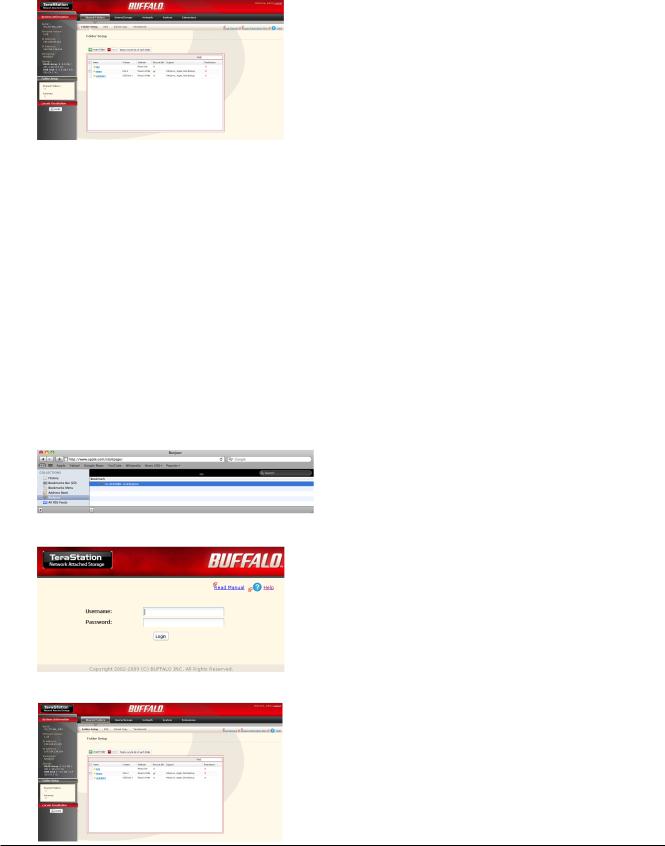
1
2
3
4
Launch Safari.
Select [View] - [Show Bookmarks Bar] from Safari’s menu.
Select [Bonjour] from the left-side menu, then click on your
TeraStation in the bookmark list.
1Enter your username and password.
2Click [Login].
Note: To log in as a guest, type “guest” as the username and leave the password blank.
5 |
The Web Admin interface opens. |
|
The TeraStation’s name, IP address and disk information are |
|
displayed on the left. |
TeraStation User Manual |
17 |

Chapter 3
Changing RAID Modes
RAID Arrays
TS-XL, TS-XEL and TS-RXL series TeraStations default to RAID 5 mode (4 hard drives), TS-WXL/R1 series default to RAID 1 mode, and TS-WXL/1D series default to Normal mode. The characteristics of each type of RAID are described below. If you change the RAID mode, all of the data on the hard drive is deleted. Always back up any important data before changing the RAID mode.
Note:
•In this document, “recovery” means putting the TeraStation back to the state it was in before the malfunction happened. It does not mean reading data from failed hard drives.
•RAID 5 mode (4 hard drives) (Default for TS-XL, TS-XEL and TS-RXL)
Note:
TS-WXL/R1 and TS-WXL/1D TeraStations don’t support this mode, as they don’t have 4 hard drives.
Uses 4 hard drives as one array. It generates parity during writes, so access speeds are slower than other RAID modes. Usable space is the sum of 3 hard drives’ space. If one hard drive in the array is damaged, you can recover data by replacing the hard drive. You cannot recover data if 2 or more drives are damaged.
• RAID 5 mode (3 hard drives)
Note:
TS-WXL/R1 and TS-WXL/1D TeraStations don’t support this mode, as they don’t have 3 hard drives.
Uses 3 hard drives as one array. It generates parity during writes, so access speeds are slower than other RAID modes. Usable space is the sum of 2 hard drives’ space. You can designate a 4th drive as a hot spare, which will boot automatically if one of the drives in the array fails. If one hard drive in the array is damaged, you can recover data by replacing the hard drive. You cannot recover data if 2 or more drives are damaged.
• RAID 10 mode
Note:
TS-WXL/R1 and TS-WXL/1D TeraStations don’t support this mode, as they don’t have 4 hard drives
RAID 10 combines 4 hard drives into a single array. Usable space is the sum of the capacity of 2 hard drives. Data is written quickly and access speed is faster than other RAID modes except for RAID 0. Since the same data is written to 2 hard drives at the same time, if drive in a pair (1-2 or 3-4) is damaged, data can be recovered by replacing the damaged hard drive. If both 1-2 or 3-4 hard drives are damaged, you cannot recover data.
TeraStation User Manual |
18 |

• RAID 1 mode (Default for TS-WXL/R1)
Uses 2 hard drives as one array. You can use up to 2 arrays on TS-XL, TS-XEL and TS-RXL Series. The space you can use is 1 hard drive’s space for each array. The same data is written to 2 drives at once. If a drive is damaged, data can be recovered by replacing the damaged hard disk. If both drives in an array are damaged, data cannot be restored. You can create an array and designate another drive as a hot spare (which will boot automatically when one of the hard drive fails) in TS-XL and TS-RXL TeraStations. You can use 2 drives to create a RAID 1 array, use anther drive as a hot spare, and use another as a regular drive, all at once.
• RAID 0 mode
This mode uses multiple hard drives as a single array. The disk space you can use is the total space of all hard drives used. This is the fastest of the TeraStation’s RAID modes. If any hard disks are damaged, you cannot recover data.
• Normal Mode (Default for TS-WXL/1D)
This mode uses the hard drives inside the TeraStation as individual hard disks. It is sometimes referred to as JBOD. The disk space you can use is the total space of all hard drives in the TeraStation. If a hard disk is damaged, you cannot recover data from that drive.
Note:
During a recovery, the TeraStation’s front LED display shows “RAID ARRAY* Resyncing” and file transfer speeds are slower than usual until the RAID array is rebuilt.
TeraStation User Manual |
19 |
Using Normal mode
1
2 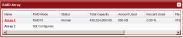
Click [System] - [Storage] - [RAID Array] in the Web Admin interface.
Select the array you want to configure.
3
4
5
Click [Delete RAID Array].
When the [RAID Array operation] window opens, click [Apply].
The [Confirm Operation] screen will appear.
Enter the number shown in the [Confirmation Number] field within 60 seconds, and click [Apply].
6 Follow the instructions displayed on the screen.
You have now set up Normal mode. Refer to page 43 to create a shared folder.
[Confirm Operation] screen
When you perform any of the following tasks, a [Confirm Operation] screen is displayed . To continue, enter the displayed number within 60 seconds and click [Apply].
• Changing structures of RAID array (Create/Delete) |
• Format Array or Disk |
||
• |
Delete Folder |
• |
Remove Disk |
• TeraStation’s Restore Factory Defaults |
• |
Rebuild RAID array |
|
• |
Format TeraStation |
• |
Configure hot spare |
• Empty recycle bin of each folder |
• |
Configure normal mode |
|
[Confirm Operation]
Screen
TeraStation User Manual |
20 |
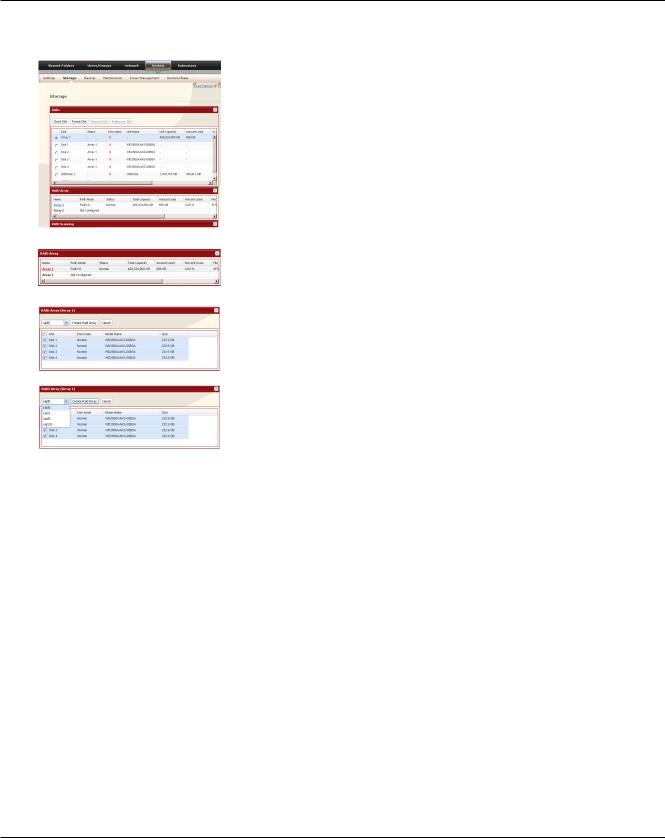
Using RAID 5 mode (4 hard drives)
1
2
Change system to normal mode (previous page).
Click [System] - [Storage] - [RAID Array] in the Web Admin interface.
3 |
Click the array you want to configure. |
|
4
5
6
7
Select hard disks (all 4 of them) to use in RAID5.
1Select [RAID5].
2Click [Create Raid Array].
Note:
After the RAID array is changed, the TeraStation will perfom a RAID check that will take about 5 hours per TB. File transfers will be slower during this period. While the “RAID ARRAY x Resyncing” message is displayed on the LCD screen, do not turn off the TeraStation. If you turn it off, the RAID check will start over.
The [Confirm Operation] screen will appear.
Enter the number shown in the [Confirmation Number] field within 60 seconds, and click [Apply].
Follow the instructions displayed on the screen.
You have now set up a RAID 5 array. Turn to page 43 to create a shared folder.
TeraStation User Manual |
21 |
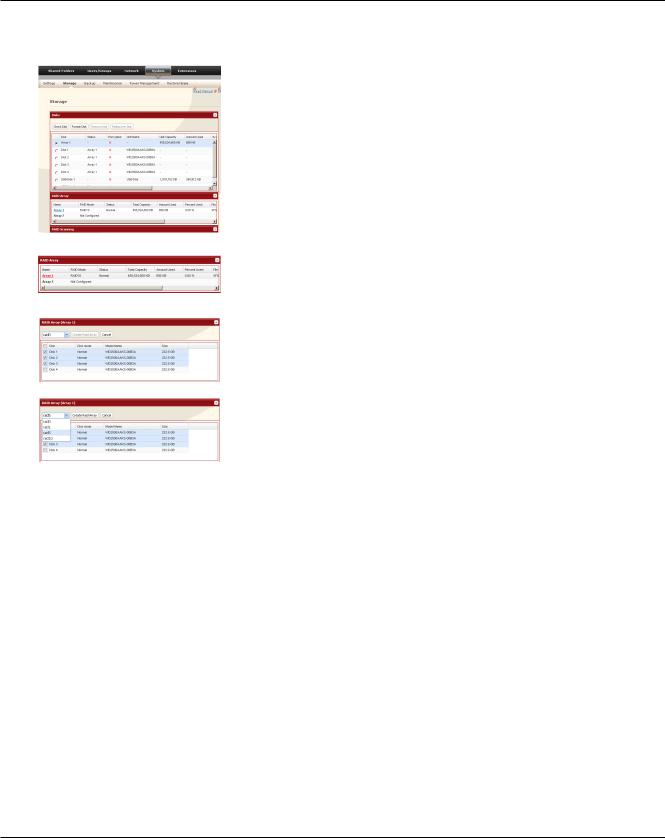
Using RAID 5 mode (3 hard drives)
1
2
Change system to normal mode (page 20).
Click [System] - [Storage] - [RAID Array] in the Web Admin interface.
3 |
Click the array you want to configure. |
4
5
6
7
Select hard disks (3 of them) to use in RAID5.
1Select [RAID5].
2Click [Create Raid Array].
Note:
After the RAID array is changed, the TeraStation will perfom a RAID check that will take about 5 hours per TB. File transfers will be slower during this period. While the “RAID ARRAY x Resyncing” message is displayed on the LCD screen, do not turn off the TeraStation. If you turn it off, the RAID check will start over.
The [Confirm Operation] screen will appear. Enter the number shown in the [Confirmation Number] field within 60 seconds, and click [Apply].
Follow the instructions displayed on the screen.
You have now set up a RAID 5 array. Refer to page 26 to configure a hot spare with the remaining drive. Turn to page
43 to create a shared folder.
TeraStation User Manual |
22 |
Using RAID 10 mode
1
2
Change system to normal mode (page 20).
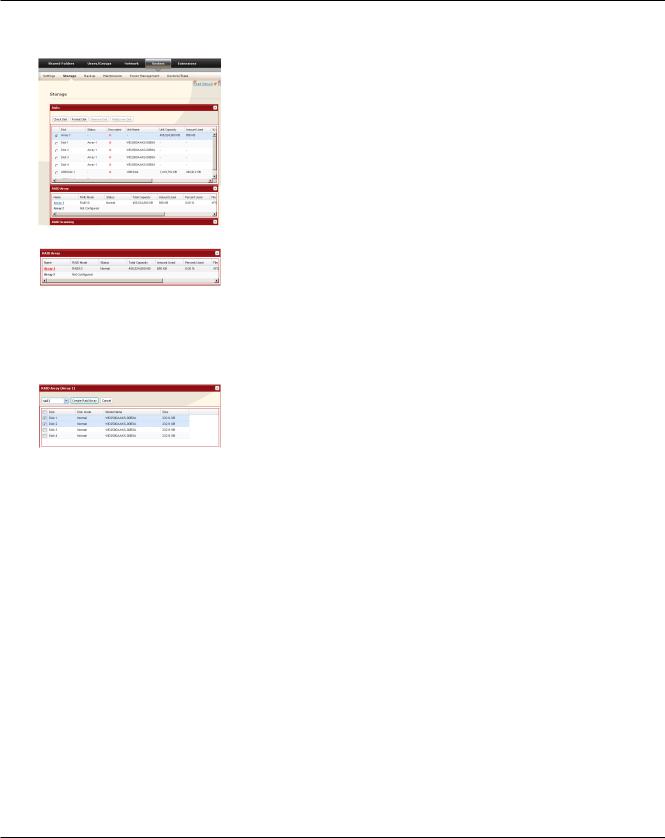
Click [System] - [Storage] - [RAID Array] in the Web Admin interface.
3 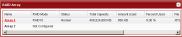
4 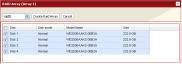
5 
Click the array you want to configure.
Select hard drives (all 4 of them) to use in RAID10.
1Select [RAID 10].
2Click [Create Raid Array].
Note:
After the RAID array is changed, the TeraStation will perfom a RAID check that will take about 5 hours per TB. File transfers will be slower during this period. While the “RAID ARRAY x Resyncing” message is displayed on the LCD screen, do not turn off the TeraStation. If you turn it off, the RAID check will start over.
6 The [Confirm Operation] screen will appear.
Enter the number shown in the [Confirmation Number] field within 60 seconds, and click [Apply].
7 Follow the instructions displayed on the screen.
You have now set up a RAID 10 array. Turn to page 43 to create a shared folder.
TeraStation User Manual |
23 |
Using RAID 1 mode
1
2
Change system to normal mode (page 20).
Click [System] - [Storage] - [RAID Array] in the Web Admin interface.
3
4 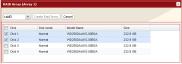
Click the array you want to set.
Click hard disks (Disk 1 and Disk 2, or Disk 3 and Disk 4) in RAID1.
5 |
1 |
Select [RAID 1]. |
|
2 |
Click [Create Raid Array]. |
6
7
Note:
After the RAID array is changed, the TeraStation will perfom a RAID check that will take about 5 hours per TB. File transfers will be slower during this period. While the “RAID ARRAY x Resyncing” message is displayed on the LCD screen, do not turn off the TeraStation. If you turn it off, the RAID check will start over.
The [Confirm Operation] screen will appear. Enter the number shown in the [Confirmation Number] field within 60 seconds, and click [Apply].
Follow the instructions displayed on the screen.
You have set up a RAID 1 array. Repeat the steps to create a second RAID 1 array with the other two drives, or refer to page 26 to configure a hot spare with one of the remaining drives. Turn to page 43 to create a shared folder.
TeraStation User Manual |
24 |
Using RAID 0 mode
1
2
Change system to normal mode (page 20).
Click [System] - [Storage] - [RAID Array] in the Web Admin interface.
3 
4
5
Click the array you want to configure.
Select all available hard drives.
1Select [RAID 0].
2Click [Create Raid Array].
6 The [Confirm Operation] screen will appear. Enter the number shown in the [Confirmation Number] field within 60 seconds, then click [Apply].
7 Follow the instructions displayed on the screen.
You have set up a RAID 0 array. Turn to page 43 to create a shared folder.
TeraStation User Manual |
25 |
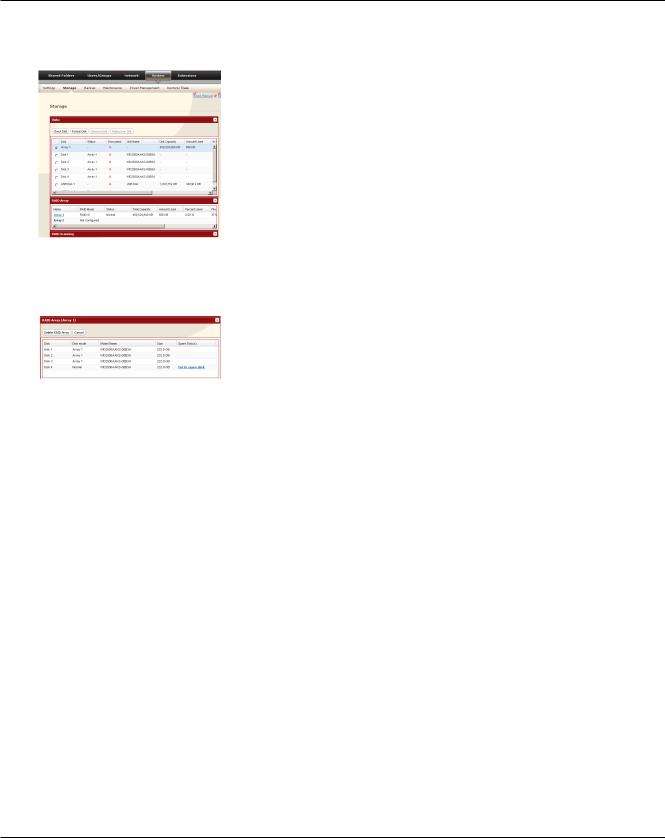
Configuring a Hot Spare
If you have 3 drives in a RAID 5 array, or 2 drives in a RAID 1 array, then you can configure another drive as a hot spare. If one of the drives in the array fails, the TeraStation will switch over to the hot spare immediately.
1 |
Click [System] - [Storage] - [RAID Array] in the Web Admin interface. |
2 
3
Choose a RAID 5 or RAID1 array.
Click [Set to spare-disk].
4
5
Note:
If a hot spare is configured, click [Set to normal disk] to change the hot spare to a normal disk.
The [Confirm Operation] screen will appear. Enter the number shown in the [Confirmation Number] field within 60 seconds and click [Apply].
Follow the instructions displayed on the screen.
You have now configured a hot spare.
Note:
All data in the hot spare drive will be deleted when it is configured as a hot spare and again when it changes over from a spare to a drive in the array.
TeraStation User Manual |
26 |
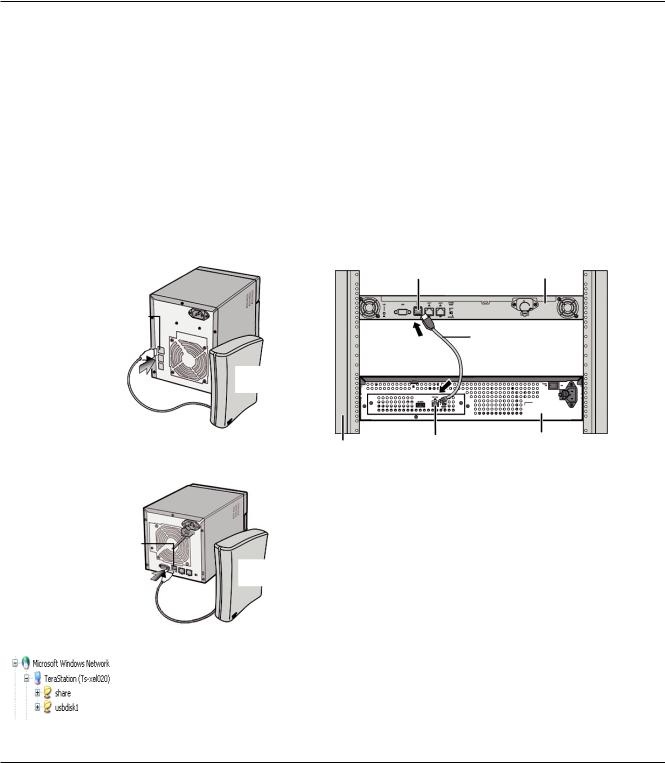
Chapter 4
Adding an External Hard Drive
Connect an External Drive
Your TeraStation includes 2 USB connectors (3 if it’s a TS-RXL). You can connect a Buffalo external hard drive to it for backup or extra storage.
Connect the external drive as shown below. If the hard drive is already formatted, it will be detected automatically. If it is not formatted, format it from within the Web Admin interface (page 28).
One external hard drive may be connected to each USB port on the TeraStation. USB hubs are not supported.
Warning! Do not unplug the drive from the TeraStation without dismounting it first. Turn to page 30 for directions on dismounting a connected drive.
TS-XL, TS-XEL |
TS-RXL |
|
|
|
|
USB Connector |
|
|
|
(Series A) |
TS-RXL Series |
USB Connector |
|
|
|
|
|
|
USB Cable |
|
|
|
(not included) |
|
Buffalo External |
|
|
|
Hard Drive |
|
|
|
(not included) |
|
|
USB Cable |
|
|
|
(not included) |
|
|
|
|
Rack |
USB Connector |
Buffalo External |
|
Hard Drive |
||
|
(Series B) |
||
TS-WXL |
(not included) |
|
(not included) |
|
|
|
USB Connector
Buffalo External Hard Drive (not included)
A third hard drive can be connected to the USB connector on the front panel of the TS-RXL TeraStation if the front panel is removed.
USB Cable (not included)
If the drive properly connected, usbdiskX is added to the TeraStation’s shares on the network, where X is the # of the drive.
•Note: Files that are automatically created by Mac OS X cannot be backed up to a FAT 32 drive because they contain characters that are not allowed in FAT 32.
TeraStation User Manual |
27 |
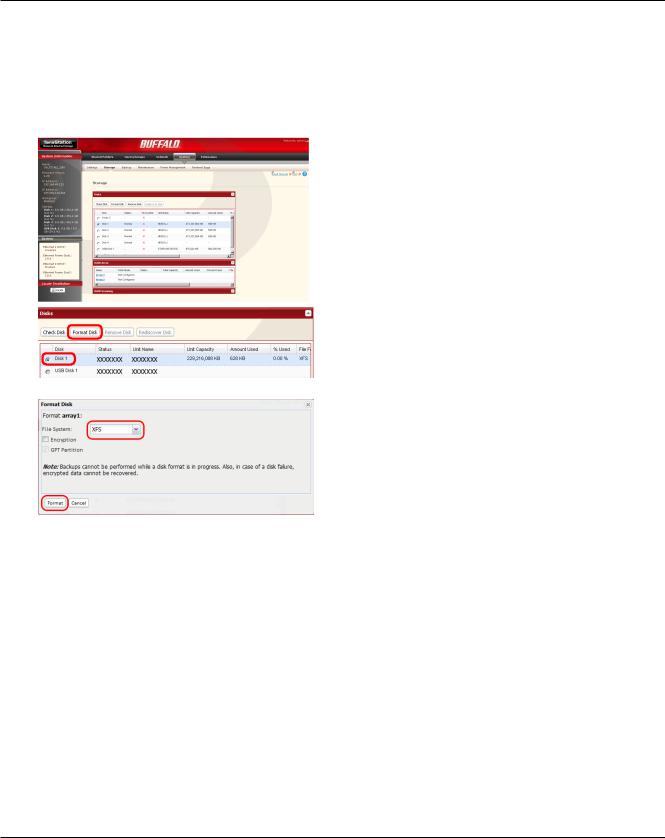
Formatting the External Drive
•A format deletes all data from a hard drive. Be careful! Back up any important data on a drive before formatting it. It will take a several minutes to format a drive.
•Shared folders cannot be accessed during formatting.
•Do not turn off or disconnect power to the TeraStation while formatting a hard drive.
•If Power Mode Switch is set to AUTO, then the TeraStation will turn off when the format is finished.
•To erase all data on a disk, choose [System] - [Restore/Erase].
1 |
In the Web Admin interface, navigate to [System] - |
|
[Storage] - [Disks]. |
2
3
4
5
1 Select the drive to format. Make sure that you have the right drive!
2 Click [Format Disk].
1 Select [File System].
Note:
Refer to page 125 for more on format type.
2 Click [Format].
The [Confirm Operation] screen will be displayed. Type the displayed number into the [Confirmation Number] field within 60 seconds, then click [Apply].
Follow the instructions displayed on the screen.
Notes:
•The time needed to format a hard drive varies based on the hard drive’s size and format type (a few seconds to several minutes).
•The Info LED on the front of the TeraStation will flash during formatting. The TeraStation’s shared folders cannot be accessed until the disk format is complete.
•If the hard drive is connected to the USB connector, partitions will be recreated.
TeraStation User Manual |
28 |

Set Access Restrictions on the External Drive
You can set the access restrictions on the new drive. Use the procedure on page 42 to set the access restrictions.
Note:
Even if a shared folder is not visible, you can still format the drive, run a disk check, and back up to the new drive.
Restrictions
•The TeraStation supports many types of USB devices including USB storage devices, card readers, digital cameras, and USB printers. Other devices are not supported, such as USB hubs, card readers that recognize multiple memory cards, and USB mice and keyboards.
•You can connect up to 2 hard drives to a TeraStation via its USB connectors (3 for a TS-RXL). Only Buffalo drives are supported.
*The TeraStation may not recognize a hard drive whose power mode is set to AUTO. Set the power mode to MANUAL for drives connected to the TeraStation.
*Direct Copy doesn’t work with the HD-DU2 series DriveStation unless it has been reformatted.
*The TeraStation can supply bus power to a single external drive only. For multiple drives, or if you experience power problems, connect an AC adapter to each hard drive.
•Only the primary partition of the hard drive connected via USB connector will be recognized. Secondary and other partitions will not be recognized.
TeraStation User Manual |
29 |
Loading...