


Brother XL-6063, XL-6042, XL-6053, XL-6062, XL-6060 User Manual
...yyyyyyyyyyyyyyyААААААААААААААА@@@@@@@@@@@@@@@;;;;;;;;;;;;;;; yÀ@; yyyyyyyyyyyyyyyААААААААААААААА@@@@@@@@@@@@@@@;;;;;;;;;;;;;;; yÀ@; yyyyyyyyyyyyyyyААААААААААААААА@@@@@@@@@@@@@@@;;;;;;;;;;;;;;; yÀ@;
;;;;;;;;;;;;;;;@@@@@@@@@@@@@@@АААААААААААААААyyyyyyyyyyyyyyyInstruction Manual ;@Ày
;;;;;;;;;;;;;;;@@@@@@@@@@@@@@@АААААААААААААААyyyyyyyyyyyyyyy ;@Ày
Manual de instrucciones
;;;;;;;;;;;;;;;@@@@@@@@@@@@@@@АААААААААААААААyyyyyyyyyyyyyyy ;@Ày
;;;;;;;;;;;;;;;@@@@@@@@@@@@@@@АААААААААААААААyyyyyyyyyyyyyyyManuale d'istruzione ;@Ày
;;;;;;;;;;;;;;;@@@@@@@@@@@@@@@АААААААААААААААyyyyyyyyyyyyyyy ;@Ày
;;;;;;;;;;;;;;;@@@@@@@@@@@@@@@АААААААААААААААyyyyyyyyyyyyyyy ;@Ày
;;;;;;;;;;;;;;;@@@@@@@@@@@@@@@АААААААААААААААyyyyyyyyyyyyyyy ;@Ày
;;;;;;;;;;;;;;;@@@@@@@@@@@@@@@АААААААААААААААyyyyyyyyyyyyyyy ;@Ày
;;;;;;;;;;;;;;;@@@@@@@@@@@@@@@АААААААААААААААyyyyyyyyyyyyyyy ;@Ày
;;;;;;;;;;;;;;;@@@@@@@@@@@@@@@АААААААААААААААyyyyyyyyyyyyyyy ;@Ày
;;;;;;;;;;;;;;;@@@@@@@@@@@@@@@АААААААААААААААyyyyyyyyyyyyyyy ;@Ày
;;;;;;;;;;;;;;;@@@@@@@@@@@@@@@АААААААААААААААyyyyyyyyyyyyyyy ;@Ày
;;;;;;;;;;;;;;;@@@@@@@@@@@@@@@АААААААААААААААyyyyyyyyyyyyyyy ;@Ày
;;;;;;;;;;;;;;;@@@@@@@@@@@@@@@АААААААААААААААyyyyyyyyyyyyyyy ;@Ày
;;;;;;;;;;;;;;;@@@@@@@@@@@@@@@АААААААААААААААyyyyyyyyyyyyyyy ;@Ày
;;;;;;;;;;;;;;;@@@@@@@@@@@@@@@АААААААААААААААyyyyyyyyyyyyyyy ;@Ày
;;;;;;;;;;;;;;;@@@@@@@@@@@@@@@АААААААААААААААyyyyyyyyyyyyyyy ;@Ày
;;;;;;;;;;;;;;;@@@@@@@@@@@@@@@АААААААААААААААyyyyyyyyyyyyyyy ;@Ày
;;;;;;;;;;;;;;;@@@@@@@@@@@@@@@АААААААААААААААyyyyyyyyyyyyyyy ;@Ày
@@@@@@@@@@@@@@@@АААААААААААААААА;;;;;;;;yyyyyyyyyyyyyyyy;;;;;;;;
"IMPORTANT SAFETY INSTRUCTIONS"
When using this machine, basic safety precautions should always be taken , including the following:
"Read all instructions before using." DANGER – To reduce the risk of electric shock:
1.The machine should never be left unattended when plugged in. Always unplug this machine from the electrical outlet immediately after using and before cleaning.
2.Always unplug before changing the light bulb. Replace bulb with same type rated 15 watts.
WARNING – To reduce the risk of burns, fire, electric shock, or injury to persons:
1.Do not allow this machine to be used as a toy. Close attention is necessary when the machine is used by or near children.
2.Use this machine only for its intended use as described in this manual. Use only accessories recommended by the manufacturer as contained in this manual.
3.Never operate this machine if it has a damaged cord or plug, if it is not working properly, if it has been dropped or damaged, or dropped into water. Return the machine to the nearest authorized dealer or service center for examination, repair, electrical or mechanical adjustment.
4.Never operate the machine with any air openings blocked. Keep ventilation openings of the machine and foot control free from the accumulation of lint, dust, and loose cloth.
5.Never drop or insert any object into any opening.
6.Do not use outdoors.
7.Do not operate where aerosol (spray) products are being used or where oxygen is being administered.
8.To disconnect, turn the main switch to the symbol “O” position which represents off, then remove plug from outlet.
9.Do not unplug by pulling on cord. To unplug, grasp the plug, not the cord.
10.Keep fingers away from all moving parts. Special care is required around the machine needle.
11.Always use the proper needle plate. The wrong plate can cause the needle to break.
12.Do not use bent needles.
13.Do not pull or push fabric while stitching. It may deflect the needle causing it to break.
14.Switch the machine to the symbol “O” position when making any adjustments in the needle area, such as threading needle, changing needle, threading bobbin, or changing the presser foot, and the like.
15.Always unplug the machine from the electrical outlet when removing covers, lubricating, or when making any of the user service adjustments mentioned in the instruction manual.
16.The machine is not intended for use by young children or infirm persons without supervision.
17.Young children should be supervised to ensure that do not play with this machine.
"SAVE THESE INSTRUCTIONS" "This machine is intended for household use."
“IMPORTANTES INSTRUCCIONES DE
SEGURIDAD”
Cuando se usa una máquina de coser, debe seguirse unas precauciones básicas y que vienen incluidas a continuación.
“Leer las instrucciones antes de usar” PELIGRO – Para reducir el riesgo de una descarga eléctrica.
1.La máquina no debe dejarse nunca desatendida mientras esté conectada. Desconectar la máquina de la red eléctrica inmediatamente después de su uso y antes de limpiarla.
2.Antes de cambiar la bombilla, asegúrese siempre de que la máquina de coser está apagada. Cambie la bombilla por otra del mismo tipo de 15 W.
CUIDADO – Para reducir el riesgo de quemaduras, fuego, descargas eléctricas o causar daños a personas.
1.No usar la máquina como un juguete. Prestar atención si fuese necesario cuando la máquina está siendo usada por niños o cerca de ellos.
2.Usar la máquina de coser solamente como se describe en este manual. Usar únicamente los accesorios recomendados por el fabricante y que vienen especificados en este manual.
3.Nunca haga funcionar la máquina de coser si el cordón de alimentación o la clavija están deteriorados, si no funciona correctamente, si se ha caído o si estuvo mojada. Entregar la máquina de coser al centro de servicio autorizado más cercano para que la examinen, la reparen o hagan los ajustes eléctricos o mecánicos que correspondan.
4.No usar la máquina con los orificios de ventilación bloqueados. Mantener los orificios de ventilación de la máquina de coser y el pedal sin acumulacíon de povo. Suciedad y restos de tejido.
5.No introducir no insertar objetos en los orificios de ventilación.
6.No usar al, aire libre.
7.No usar mientras se estén utilizando productos aerosoles (spray) o en lugares donde se esté administrando oxígeno.
8.Para desconectar, girar el interruptor hasta la posición del símbolo “O” que representa off, luego desconectar el enchufe de la red.
9.Nunca desconectar el enchufe tirando del cable. Para desconectar la máquina, tirar de la clavija y no del cable.
10.Mantener los dedos alejados de todas las partes movibles de la máquina. Tener un cuidado especial con la aguja.
11.Usar siempre la placa de agujas apropiada. Una placa de agujas impropia puede producir la rotura de la aguja.
12.No usar agujas torcidas.
13.No presionar ni tirar del tejido mientras se está cosiendo. Esto podría doblar la aguja y romperla.
14.Apagar la máquina de coser, poniendo el interruptor principal en la posición cerrada (en “O”) cuando quiera realizar algún ajuste en el área de la aguja tal como enhebrar la aguja, cambiarla, bobinar la canilla, cambiar el prensatelas y operaciones similares.
15.Desconectar siempre la máquina de la red eléctrica cuando se retiren las tapas, para lubricar, o cuando quiera realizar algún tipo de ajuste mecánico tal como mencionado en el manual de instrucciones.
16.La máquina de coser no está pensada para el uso de los niños o personas enfermas sin supervisión.
17.Evite que los niños jueguen con la máquina de coser.
“CONSERVE ESTE MANUAL DE INSTRUCCIONES” “Esta máquina de coser es para uso doméstico”
“IMPORTANTI ISTRUZIONI DI SICUREZZA”
Quando usate la macchina per cucire, rispettate sempre le precauzioni di sicurezza, incluso quanto qui di seguito specificato.
“Leggete tutte le istruzioni prima dell’uso.” PERICOLO – Per ridurre il rischio di shock elettrico.
1.La macchina per cucire non deve essere mai lasciata abbandonata quando la spina è inserita. Rimuovete sempre la spina della macchina per cucire subito dopo avere finito di lavorare e prima di procedere alla sua pulizia.
2.Staccare sempre la spina della macchina per cucire prima di procedere alla sostituzione della lampadina. Utilizzare una lampadina dello stesso tipo da 15 watt.
ATTENZIONE – Per ridurre il rischio di bruciature, incendi, shock elettrico o danni alle persone.
1.Non permettete che venga usata come un giocattolo.
Fare molta attenzione quando la macchina viene usata vicino a bambini.
2.Usate questa macchina per cucire solo per l’uso cui è destinata, come descritto all’interno del manuale. Usare solo accessori consigliati dal produttore, come specificato qui di seguito.
3.Non usate mai questa macchina da cucire nel caso la spina o il cavo di alimentazione risultassero danneggiati, oppure nel caso non funzionasse correttamente, fosse caduta o si fosse danneggiata, o fosse caduta nell’acqua. Riportate la macchina da cucire al più vicino rivenditore o centro di assistenza autorizzato per far eseguire un controllo, interventi di riparazione o regolazioni elettriche o meccaniche.
4.Non usate la macchina per cucire con le aperture dell’aria bloccate. Mantenere le aperture di ventilazione della macchina per cucire ed il reostato privi di fili, polvere o stoffa.
5.Non far cadere né inserire alcun oggetto in nessuna delle aperture.
6.Non usate la macchina all’aperto.
7.Non fate funzionare la macchina nel caso vengano usati prodotti aerosol (spray) o ossigeno.
8.Per scollegare, girate l’interruttore principale in posizione “O” (che significa OFF = spento), quindi toglieri la spina dalla presa di corrente.
9.Non scollegate la spina tirandola dal cavo. Togliete la spina impugnando la spina stessa e non il cavo di alimentazione.
10.Tenete le dita lontano da tutte le parti in movimento, specialmente attorno all’ago della macchina per cucire.
11.Usate sempre la placca appropriata all’ago in uso. Una placca sbagliata potrebbe provocare la rottura dell’ago.
12.Non usate aghi piegati.
13.Non tirate o spingete il tessuto mentre cucite, poiché ciò potrebbe far piegare l’ago e quindi romperlo.
14.Spegnete la macchina da cucire spostando l’interruttore sulla posizione “O” quando eseguite qualsiasi operazione in prossimità dell’ago, come ad esempio l’infilatura o la sostituzione dell’ago, l’infilatura della spolina o la sostituzione del piedino premistoffa ed altre simili operazioni.
15.Disinserite sempre la spina di alimentazione della macchina da cucire dalla presa elettrica quando togliete i coperchi, lubrificate la macchina, oppure quando effettuate una qualunque delle operazioni di manutenzione citate nel manuale d’istruzioni.
16.La macchina da cucire non deve essere utilizzata dai ragazzi o dalle persone invalide senza controllo.
17.I ragazzi devono essere sorvegliati per evitare che giochino con la macchina da cucire.
“CONSERVATE QUESTE ISTRUZIONI”
“La presente macchina per cucire è destinata all’uso domestico.”

FOR USERS IN UK, EIRE, MALTA AND CYPRUS ONLY.
If this machine is fitted with a 3 pin non-rewireable BS plug then please read the following.
IMPORTANT (in the United Kingdom)
Main supply (AC 230/240V~, 50Hz)
DO NOT cut off the main plug from equipment. If the plug fitted is not suitable for the power point in your home or the cable is too short to reach a power point, then obtain an appropriate safety approved extension lead or consult your dealer.
Always replace the fuse cover. Never use plugs with the fuse cover omitted.
WARNING: DO NOT CONNECT EITHER WIRE TO THE EARTH TERMINAL WHICH IS MARKED WITH
THE LETTER ‘E’, BY THE EARTH SYMBOL  OR COLOURED GREEN OR YELLOW.
The wires in this main lead are coloured in accordance with the following code:
BE SURE to replace the fuse only with an identical approved type, as originally fitted and to replace the fuse cover.
If none the less the main plug is cut off be sure to remove the fuse and dispose of the plug immediately, to avoid a possible shock hazard by inadvertent connection to the main supply.
IMPORTANT (in the other countries)
If the available socket outlet is not suitable for the plug supplied with this equipment, it should be cut off and an appropriate three pin plug fitted. With alternative plugs an approved fuse must be fitted in the plug.
NOTE: The plug severed from the main leads must be destroyed as a plug with bared flexible cords is hazardous if engaged in a live socket outlet. In the event of replacing the plug fuse, use a fuse approved by ASTA to BS 1362, i.e. carrying the ASA mark, rating as marked on plug.
Blue |
Neutral |
Brown |
Live |
As the colours of the wiring in the main lead of this appliance may not correspond with the coloured markings identifying the terminals in your plug, proceed as follows:
The wire which is coloured blue must be connected to the terminal which is marked with the letter ‘N’ or coloured black or blue.
The wire which is coloured brown must be connected to the terminal which is marked with the letter ‘L’ or coloured red or brown.
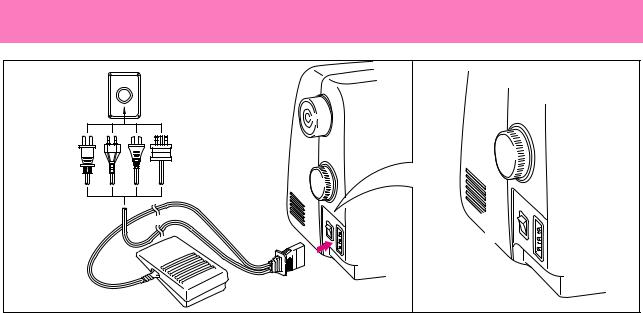
Connecting Plugs and Main Power / Sewing Light Switch
2
1
1.Connect the three-prong plug into the machine.
2.Connect the electrical supply plug into a wall outlet.
-When leaving the machine unattended, the main switch of the machine should be switched off or the plug must be removed from the socket outlet.
Turn on or off the switch for the main power and sew-light.
1 Turn on
2 Turn off
-When servicing the machine, or when removing covers or changing bulbs, the machine or the electrical set must unplugged.
PLEASE READ BEFORE USING THIS MACHINE
For safe operation
1.Be sure to keep your eye on the needle while sewing. Do not touch the balance wheel, thread take-up, needle, or other moving parts.
2.Remember to turn off the power switch and unplug the cord when:
•Operation is completed
•Replacing or removing the needle or any other parts
•A power failure occurs during use
•Maintaining the machine
•Leaving the machine unattended.
3.Do not store anything on the foot controller.
4.Plug the machine directly into the wall. Do not use extension cords.
For a longer service life
1.When storing this machine, avoid direct sunlight and high humidity locations. Do not use or store the machine near a space heater, iron, halogen lamp, or other hot objects.
2.Use only neutral soaps or detergents to clean the case. Benzene, thinner, and scouring powders can damage the case and machine, and should never be used.
3.Do not drop or hit the machine.
4.Always consult the operation manual when replacing or installing any assemblies, the presser feet, needle, or other parts to assure correct installation.
For repair or adjustment
In the event a malfunction occurs or adjustment is required, first follow the troubleshooting table in the back of the operation manual to inspect and adjust the machine yourself. If the problem persists, please consult your local authorized dealer.
LEA ESTE MANUAL ANTES DE USAR ESTA MÁQUINA
Para un funcionamiento seguro
1.Esté siempre atento a la aguja cuando cosa. No toque la polea, el tirahilo, la aguja u otras piezas móviles.
2.Acuérdese de apagar la máquina y desenchufarla de la corriente cuando:
•Termine la labor
•Recambie o retire la aguja y otras piezas
•Ocurra un fallo eléctrico durante la costura
•Realice tareas de mantenimiento
•Deje la máquina desatendida
3.No deje ningún objeto encima del pedal.
4.Enchufe la máquina directamente a la toma de contacto de la pared. No utilice alargos.
Para un servicio más duradero
1.Evite exponer la máquina a la luz directa del sol y no la guarde en sitios húmedos. No utilice o guarde la máquina cerca de una fuente de calor, plancha, lámpara halógena u otros objetos candentes.
2.Utilice sólo detergentes o jabones neutros para limpiar la carcasa. Gasolina, diluyentes y polvos de limpieza pueden dañar la carcasa y la máquina; no los utilice nunca.
3.No deje caer o golpee la máquina.
4.Consulte siempre el manual de funcionamiento cuando tenga que reponer o instalar cualquier pieza, como el pie prensatela o la aguja. Así, asegurará una adecuada instalación.
Para reparaciones o ajustes
En el caso de que ocurra una malfunción o se requiera un reajuste, consulte primero la tabla de solución de problemas al final del manual de funcionamiento para inspeccionar y ajustar usted mismo la máquina. Si el problema continúa, recurra a su distribuidor autorizado local.
LEGGERE PRIMA DELL’USO DI QUESTA MACCHINA
Per un funzionamento sicuro
1.Mentre si cuce guardare sempre l’ago. Non toccare il volantino, il tendifilo, l’ago o le altre parti mobili.
2.Ricordarsi di spegnere l’interruttore generale e di staccare il cavo quando:
•si è completata un’operazione
•si sostituisce o si toglie l’ago o qualsiasi altro componente
•si verifica un black-out durante l’uso
•si esegue la manutenzione della macchina
•si lascia la macchina incustodita
3.Non depositare oggetti sul comando a pedale.
4.Collegare la macchina direttamente a una presa a parete. Non impiegare prolunghe.
Per una maggiore durata
1.Riporre la macchina per cucire evitando luoghi esposti alla luce diretta del sole e con umidità elevata. Non utilizzarla o collocarla accanto a termosifoni, ferri da stiro, lampade alogene o altri oggetti caldi.
2.Per pulire la custodia, impiegare soltanto saponi o detergenti neutri. Benzene, solventi e polveri abrasive possono danneggiare sia la macchina che la custodia e vanno quindi evitati.
3.Fare attenzione a non far cadere la macchina.
4.Consultare sempre il presente manuale d’istruzione per sostituire o riparare i vari gruppi, il piedino premistoffa, l’ago o altre parti, in modo da garantire un’installazione corretta.
Per riparazioni o regolazioni
In caso di cattivo funzionamento o qualora si renda necessaria la regolazione di alcuni elementi, in primo luogo controllare e regolare la macchina autonomamente seguendo la tabella di identificazione guasti riportata sul retro del manuale d’istruzione. Se il problema non viene risolto, contattare il più vicino centro di assistenza autorizzato.

TABLE OF CONTENTS
KNOWING YOUR SEWING MACHINE |
|
PRINCIPAL PARTS ......................................................... |
1 |
ACCESSORIES ............................................................... |
3 |
Optional Accessories .............................................. |
3 |
OPERATING YOUR SEWING MACHINE ....................... |
5 |
Connecting Plugs ................................................... |
5 |
Main Power/Sewing Light Switch ........................... |
7 |
Foot Controller ........................................................ |
8 |
Checking the Needle .............................................. |
9 |
Replacing the Needle ............................................. |
9 |
Changing the Presser Foot .................................. |
11 |
Flat Bed Attachment ............................................. |
12 |
VARIOUS CONTROLS .................................................. |
13 |
Pattern Selection Dial ........................................... |
13 |
Recommended Lengths for Stitches .................... |
15 |
Stitch Length Dial ................................................. |
24 |
Reverse Sewing Lever ......................................... |
26 |
Converting to Free-arm Style ............................... |
27 |
THREADING THE MACHINE ........................................ |
28 |
Winding the Bobbin .............................................. |
28 |
Lower Threading ................................................... |
31 |
Upper Threading ................................................... |
33 |
Drawing Up Lower Thread .................................... |
35 |
Twin Needle Sewing ............................................. |
36 |
Thread Tension .................................................... |
38 |
FABRIC/THREAD/NEEDLE COMBINATIONS .............. |
39 |
STRAIGHT AND ZIGZAG STITCHING |
|
PLEASE READ BEFORE SEWING ............................... |
41 |
Straight Stitching .................................................. |
42 |
Zigzag Stitching .................................................... |
45 |
BUILT-IN STITCHES |
|
Blind Hem Stitching .............................................. |
46 |
Shell Tuck Stitching .............................................. |
47 |
Elastic Stitching .................................................... |
48 |
Double Action Stitching ........................................ |
49 |
Scallop Stitching ................................................... |
50 |
Decorative Stitching .............................................. |
51 |
Patchwork ............................................................. |
52 |
Overedge Stitching ............................................... |
53 |
Feather Stitching .................................................. |
54 |
Triple Zigzag Stretch Stitching .............................. |
54 |
BUTTONHOLE AND BUTTON SEWING |
|
Making a Buttonhole (For 1-step BH Type) .......... |
55 |
Odd-shaped buttons that do not fit into the button |
|
holder plate ........................................................... |
57 |
Making a Buttonhole (For 4-step BH Type ) ......... |
58 |
Buttonhole Fine Adjustment ................................. |
61 |
Button Sewing ...................................................... |
64 |
USING ATTACHMENTS AND APPLICATIONS |
|
Zipper Insertion ..................................................... |
65 |
Gathering .............................................................. |
65 |
Darning ................................................................. |
67 |
Appliqués .............................................................. |
68 |
Monogramming and Embroidering ....................... |
69 |
OPTIONAL ACCESSORIES |
|
Using the Walking Foot ........................................ |
71 |
Using the Spring-action Quilting Foot ................... |
73 |
Using the 1/4-Inch Quilting Foot ........................... |
75 |
MAINTENANCE |
|
Changing the Light Bulb ....................................... |
77 |
Cleaning ............................................................... |
79 |
Performance Check List ....................................... |
81 |
Repacking the Machine ........................................ |
87 |
INDEX |
|
CONTENIDO
CONOZCA SU MÁQUINA DE COSER |
|
ELEMENTOS PRINCIPALES ................................................. |
2 |
ACCESORIOS .......................................................................... |
4 |
Accesorios opcionales ..................................................... |
4 |
FUNCIONAMIENTO DE LA MÁQUINA DE COSER .......... |
6 |
Conexión de los enchufes ............................................... |
6 |
Interruptor principal/luz de cosido .................................. |
7 |
Pedal ............................................................................... |
8 |
Verificación de la aguja ................................................ |
10 |
Cambio de la aguja ....................................................... |
10 |
Cambio del prensatelas ................................................. |
11 |
Plataforma ..................................................................... |
12 |
DISTINTOS MANDOS .......................................................... |
14 |
Selector de puntadas ..................................................... |
14 |
Largo recomendado para cada puntada ........................ |
18 |
Selector de largo de puntada ......................................... |
25 |
Pulsador de retroceso .................................................... |
26 |
Conversión en modalidad de brazo libre ...................... |
27 |
ENHEBRADO DE LA MÁQUINA ....................................... |
28 |
Bobinado de la canilla ................................................... |
28 |
Enhebrado inferior ........................................................ |
32 |
Enhebrado superior ....................................................... |
34 |
Levantar el hilo inferior ................................................ |
35 |
Costura con aguja doble ................................................ |
36 |
Tensión de los hilos ...................................................... |
38 |
COMBINACIONES DE TEJIDO/HILO/AGUJA .................. |
39 |
PUNTADAS RECTAS Y ZIGZAG |
|
LEA ESTO POR FAVOR ANTES DE COSER ..................... |
41 |
Puntadas rectas .............................................................. |
42 |
Puntadas zigzag ............................................................ |
45 |
PUNTADAS INCORPORADAS |
|
Puntadas invisibles ........................................................ |
46 |
Puntada ondas ............................................................... |
47 |
Puntada elástica ............................................................. |
48 |
Puntada de acción doble ............................................... |
49 |
Puntada festón ............................................................... |
50 |
Puntadas decorativas ..................................................... |
51 |
Patchwork ..................................................................... |
52 |
Puntada por encima de la orilla ..................................... |
53 |
Puntada pluma .............................................................. |
54 |
Triple puntada zigzag elástica ....................................... |
54 |
OJALES Y COSTURA DE BOTONES |
|
Para coser ojales (Para tipo BH en una operación) ....... |
56 |
Botones con formas extrañas que no caben en |
|
el soporte del botón ....................................................... |
57 |
Para coser ojales (Para tipo BH en cuatro operaciones) 58 |
|
Ajuste fino de los ojales ................................................ |
62 |
Costura de botones ........................................................ |
64 |
USO DE ACCESORIOS Y APLICACIONES |
|
Inserción de cremalleras ............................................... |
66 |
Fruncido ........................................................................ |
66 |
Zurcido .......................................................................... |
67 |
Aplicaciones ................................................................. |
68 |
Monogramas y bordados ............................................... |
70 |
ACCESORIOS OPCIONALES |
|
Utilización del pie caminante ....................................... |
72 |
Utilización del prensatelas |
|
enguatador accionado por muelle ................................. |
74 |
Utilización del prensatela para pespunte 1/4 ................ |
76 |
MANTENIMIENTO |
|
Cambio de la bombilla .................................................. |
78 |
Limpieza ....................................................................... |
80 |
Listado de posibles incidencias ..................................... |
83 |
Embalaje de la máquina ................................................ |
87 |
ÍNDICE |
|

INDICE DEGLI ARGOMENTI
CONOSCERE LA MACCHINA DA CUCIRE |
|
PARTI PRINCIPALI ............................................................ |
2 |
ACCESSORI ...................................................................... |
4 |
Accessori opzionali ................................................. |
4 |
FUNZIONAMENTO DELLA MACCHINA DA CUCIRE ...... |
6 |
Collegamento elettrico ............................................ |
6 |
Interruttore principale/luce area di lavoro ................ |
7 |
Reostato a pedale .................................................... |
8 |
Controllo dell’ago .................................................. |
10 |
Sostituzione dell’ago ............................................. |
10 |
Sostituzione del piedino premistoffa ...................... |
11 |
Scomparto piano ................................................... |
12 |
DISPOSITIVI DI CONTROLLO ........................................ |
14 |
Selettore dei punti ................................................. |
14 |
Lunghezze dei punti consigliate ............................ |
21 |
Selettore della lunghezza del punto ....................... |
25 |
Leva di cucitura di ritorno ..................................... |
26 |
Cucitura a braccio libero ....................................... |
27 |
PROCEDURE DI INFILATURA ........................................ |
28 |
Avvolgimento del rocchetto ................................... |
28 |
Infilatura inferiore .................................................. |
32 |
Infilatura superiore ................................................ |
34 |
Tiraggio del filo inferiore ....................................... |
35 |
Cucitura con ago gemello ...................................... |
36 |
Tensione del filo .................................................... |
38 |
COMBINAZIONE TESSUTO/FILO/AGO ......................... |
40 |
CUCITURA CON PUNTO DIRITTO E ZIG-ZAG |
|
LEGGERE PRIMA DI CUCIRE .......................................... |
41 |
Punto diritto .......................................................... |
42 |
Punto zigzag .......................................................... |
45 |
PUNTI INCORPORATI |
|
OCCHIELLI E BOTTONI |
|
Esecuzione di un occhiello |
|
(per il tipo BH a 1 operazione) .............................. |
56 |
Bottoni di forma strana che non si adattano nella |
|
placca per bottoni ................................................. |
57 |
Esecuzione di un occhiello |
|
(per il tipo BH a 4 operazioni) ............................... |
58 |
Regolazione della densità dei punti dell’ |
|
occhiello ............................................................... |
62 |
Cucitura di bottoni ................................................ |
64 |
GUARNIZIONI E APPLICAZIONI |
|
Applicazione di cerniere ....................................... |
66 |
Arricciature ........................................................... |
66 |
Rammendo ............................................................ |
67 |
Applicazioni .......................................................... |
68 |
Monogrammi e ricami ........................................... |
70 |
ACCESSORI OPZIONALI |
|
Utilizzazione del piedino semovente .................... |
72 |
Utilizzazione del piedino per trapunte |
|
azionato a molla .................................................... |
74 |
Utilizzazione del piedino per patchwork ............... |
76 |
MANUTENZIONE |
|
Sostituzione della lampadina ................................. |
78 |
Pulizia ................................................................... |
80 |
Tabella di controllo del funzionamento ................. |
85 |
Imballaggio della macchina ................................... |
87 |
INDICE |
|
Punto orlo invisibile .............................................. |
46 |
Punto conchiglia ................................................... |
47 |
Punto elastico ........................................................ |
48 |
Punto doppio ........................................................ |
49 |
Punto smerlo ......................................................... |
50 |
Punto decorativo ................................................... |
51 |
Lavori di patchwork ............................................... |
52 |
Rifinitura a sopraggitto ........................................... |
53 |
Punto piuma .......................................................... |
54 |
Punto zigzag triplo ................................................. |
54 |

4 3 2
1
YOUR KNOWINGSU CONOZCALA CONOSCERE
MACCHINA M ÁQUINA SEWING DA DE *5 CUCIRE COSER MACHINE
9
6 8
7
0
A
B E F
C D
G
PRINCIPAL PARTS
1BOBBIN WINDER (Page 28)
Winds the thread onto the bobbin to be used for the lower thread.
2STITCH LENGTH DIAL (Page 13, 24)
Controls the length of the stitches.
3 SPOOL PIN AND SPOOL CAP (Page 28, 33)
4UPPER TENSION CONTROL DIAL (Page 38)
Controls the tension of the upper thread.
5 BUTTONHOLE LEVER (Page 55)
*Not available on models XL-6040, XL-6041, XL-6042, and XL6043.
6FLAT BED ATTACHMENT WITH ACCESSORY COMPARTMENT (Page 12, 27)
7 ZIGZAG PRESSER FOOT (Page 3, 11)
8REVERSE SEWING LEVER (Page 26)
Push for stitching in the reverse direction.
9PATTERN INDICATION WINDOW (Page 13)
Shows the stitch number to be performed.
:HOLE FOR VERTICAL SPOOL PIN (Page 37)
Used to hold a second spool of thread for twin needle sewing.
A BALANCE WHEEL
BPATTERN SELECTION DIAL (Page 13)
Turn in either direction to select the desired stitch.
CMAIN POWER/SEWING LIGHT SWITCH (Page 7)
Turn on/off the main power/sewing light switch.
DFOOT CONTROLLER JACK (Page 5)
Insert the foot controller plug for operation and connect the machine to the power supply.
E BUTTONHOLE FINE ADJUSTMENT SCREW (Page 61)
F PRESSER FOOT LEVER (Page 33)
GFOOT CONTROLLER (Page 8)
Used to control sewing speed/start and stop.
1

ELEMENTOS PRINCIPALES
1DISPOSITIVO DE BOBINADO DE LA CANILLA (Página 28)
Hace bobina para la canilla que va a ser utilizada como hilo inferior.
2SELECTOR DE LARGO DE PUNTADA (Página 14, 25)
Controla el largo de las puntadas.
3 EJE DEL CARRETE Y PORTA CARRETES (Página 28, 34)
4DISCO DE CONTROL DE LA TENSIÓN SUPERIOR (Página 38)
Controla la tensión del hilo superior.
5 PALANCA DE OJALES (Página 56)
*No disponible en los modelos XL-6040, XL-6041, XL-6042, and XL6043.
6PLATAFORMA CON COMPARTIMENTO DE ACCESORIOS (Página 12, 27)
7 PRENSATELAS ZIGZAG (Página 4, 11)
8PULSADOR DE RETROCESO (Página 26)
Apriete el pulsador para coser hacia atrás.
9INDICADOR DE PUNTADA (Página 14)
Muestra el número de puntada que se debe realizar.
0ORIFICIO PARA EL PORTABOBINAS VERTICAL (Página 37)
Sirve para poner un segundo carrete de hilo para coser con una aguja doble.
A RUEDA MANUAL/POLEA
BSELECTOR DE PUNTADAS (Página 14)
Gírelo en cualquier sentido para seleccionar la puntada deseada.
CINTERRUPTOR PRINCIPAL/LUZ DE COSIDO (Página 7)
Encienda/apague el interruptor principal/luz de cosido.
DRECEPTÁCULO DEL PEDAL (Página 6)
Inserte la clavija del pedal para que éste funcione y enchufe la máquina a la fuente de alimentación.
E TORNILLO DE AJUSTE FINO DE LOS OJALES (Página 62)
F PALANCA DEL PRENSATELAS (Página 34)
GPEDAL (Página 8)
Se utiliza para controlar la velocidad, el inicio y el final del cosido.
PARTI PRINCIPALI
1DISPOSITIVO DI AVVOLGIMENTO SPOLINA (Pagina 28)
Per avvolgere il rocchetto con il filo da utilizzare inferiormente.
2SELETTORE DELLA LUNGHEZZA DEL PUNTO (Pagina 14, 25)
Permette di regolare la lunghezza dei punti.
3 PORTAROCCHETTO E FERMAROCCHETTO (Pagina 28, 34)
4REGOLATORE DI TENSIONE SUPERIORE (Pagina 38)
Consente di regolare la tensione del filo superiore.
5 LEVA DELL'OCCHIELLO (Pagina 56)
* Non disponibile sui modelli XL-6040, XL-6041, XL-6042 e XL6043.
6 SCOMPARTO PIANO CON ACCESSORI (Pagina 12, 27)
7 PIEDINO PREMISTOFFA A ZIGZAG (Pagina 4, 11)
8LEVA DI CUCITURA DI RITORNO (Pagina 26)
Premerlo per eseguire cuciture a marcia indietro.
9FINESTRELLA INDICATORE PUNTO (Pagina 14)
Mostra il numero del punto da eseguire.
:FORO PER PORTAROCCHETTO VERTICALE (Pagina 37)
Sostiene un secondo rocchetto di filo per cuciture con ago gemello.
A VOLANTINO
BSELETTORE DEI PUNTI (Pagina 14)
Ruotarlo in entrambe le direzioni per selezionare il punto desiderato.
CINTERRUTTORE PRINCIPALE/LUCE AREA DI LAVORO (Pagina 7)
Per accendere e spegnere la macchina da cucire e allo stesso tempo la luce dell'area di lavoro.
DPRESA DEL REOSTATO A PEDALE (Pagina 6)
Inserirvi la spina del reostato per mettere in funzione la macchina da cucire e collegare la macchina alla presa di corrente.
E VITE DELL'EQUILIBRATORE DELL'OCCHIELLO (Pagina 62)
F LEVA DEL PIEDINO PREMISTOFFA (Pagina 34)
GREOSTATO A PEDALE (Pagina 8)
Utilizzato per controllare la velocità, l'avviamento e l'arresto della macchina per cucire.
KNOWING YOUR SEWING MACHINE CONOZCA SU MÁQUINA DE COSER CONOSCERE LA MACCHINA DA CUCIRE
2
YOUR KNOWINGSU CONOZCALA CONOSCERE
MMACCHINA SEWINGQUINAÁ
MACHINECOSER DECUCIRE DA
1 X59370-051 2 SA156 XA5539-051
3 X57117-051 |
4 X57521-001 |
5 XA4911-151 |
X59369-251 |
(XL-6060, XL-6061, XL-6062, |
(XL-6040, XL-6041, |
XL-6063, XL-6050, XL-6051, |
XL-6042, XL-6043) |
XL-6052, XL-6053) |
|
6 130012-054 |
7 130013-054 |
8 X59476-051 |
9 130920-051 |
: X55467-051 |
|
A X54243-001 |
||
|
|
|
|
|
|
|
|
|
|
|
|
|
|
|
B XA3442-151 |
C X53984-054 |
1 SA107 |
2 SA129 |
XA8319-002 |
X81021-002 |
3SA125
X80980-002
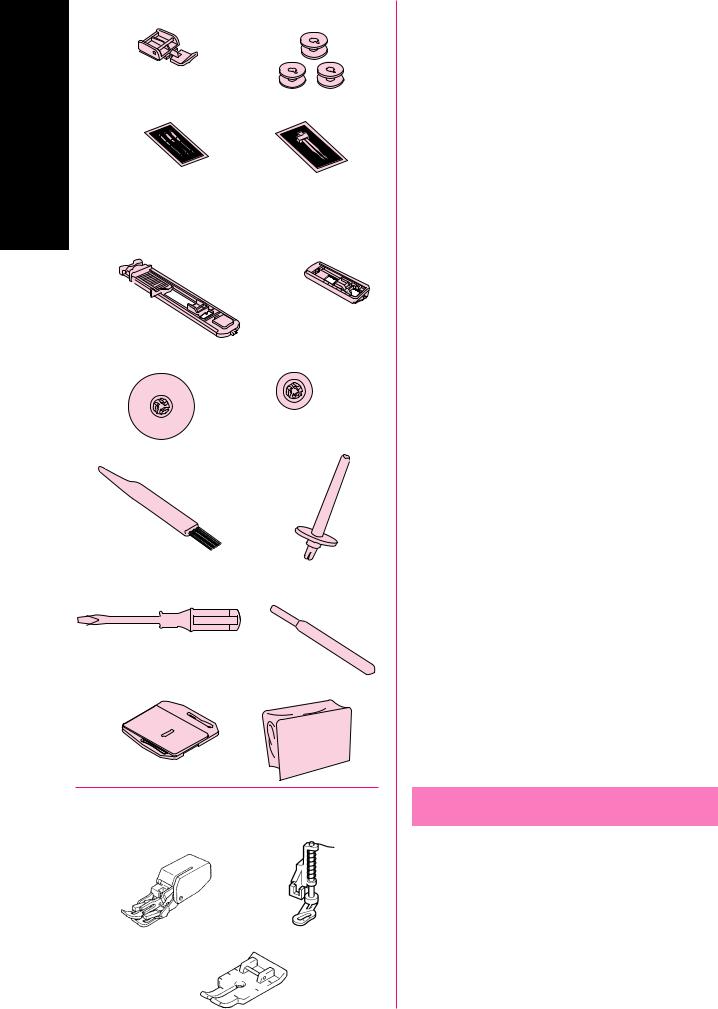
ACCESSORIES
1 Zipper Foot (1 pc.)
2 Bobbin (3 pcs.) |
SA156 (For U.S.A) |
|
XA5539-051 (For other countries) |
|
Replacements (10-piece set) |
3 Needle Pack (Regular Single Needle No. 14) (3 pcs.)
4 Twin Needle (1 pc.)
5 Buttonhole Foot (1 pc.)
6 Spool Cap (Large) (1 pc.)
7 Spool Cap (Small) (1 pc.)
8 Cleaning Brush (1 pc.)
9 Extra Spool Pin (1 pc.)
: Screwdriver (1 pc.)
A Seam Ripper (1 pc.)
B Darning Plate (1pc.)
C Dust Cover (1pc.)
Parts Code for Zigzag Presser Foot: X51953-051 Parts Code for Spool Cap (Medium): X55260-153
Foot Controller: Model N |
|
Parts Code: J00360-051 |
(110/120V Area) |
XA6400-051 |
(220/240V Area) |
XA6402-051 |
(U.K.) |
XA6404-051 (Australia, New Zealand) |
|
XA6434-051 |
(110/220V Dual Ara) |
NOTE (For U.S.A. only):
Foot Controller: Model N
Parts Code: J00360-051 (110/120V Area)
This foot controller can be used for Model XL-6060, XL-6061, XL-
6062, XL-6063, XL-6050, XL-6051, XL-6052, XL-6053, XL-6040,
XL-6041, XL-6042, XL-6043.
The above accessories are stored in the flat bed attachment. These accessories have been designed to help complete most sewing tasks.
Optional Accessories
1 Walking Foot SA107 (For U.S.A)
XA8319-002 (For other countries) 2 Springaction Quilting Foot
SA129 (For U.S.A)
X81021-002 (For other countries)
3 1/4-Inch Quilting Foot
SA125 (For U.S.A)
X80980-002 (For other countries)
NOTE:
The content of accessories depends on model.
3

ACCESORIOS
1 Pata de cremalleras (1 pza)
2 Canilla (3 pzas) SA156 (para EE UU)
XA5539-051 (para otros países)
Recambios (paquete de 10 piezas)
3 Paquete de agujas (agujas simples normales No 14) (3 pzas)
4 Aguja doble (1 pza)
5 Prensatelas para ojales (1 pza)
6 Tope para carretes (grande) (1 pza)
7 Tope para carretes (pequeño) (1 pza)
8 Cepillo (1 pza)
9 Porta carretes extra (1 pza)
0 Destornillador (1 pza)
A Cortador para abrir costuras (1 pza)
B Placa de zurcir (1 pza)
C Funda guardapolvo (1 pza)
Código del prensatelas para la puntada zigzag: X51953-051 Código del prensatelas para la tope para carretes (mediana):
X55260-153
Pedal: Modelo N
Códigos: J00360-051 (110/120 V Área)
XA6400-051 (220/240 V Área)
XA6402-051 (RU)
XA6404-051 (Australia y Nueva Zelanda)
XA6434-051 (110/220 V Área Dual)
NOTA (sólo para EE UU):
Pedal: modelo N
Código: J00360-051 (110/120 V Área)
Este pedal puede utilizarse para el modelo de máquina de coser XL-6060, XL-6061, XL-6062, XL-6063, XL-6050, XL-6051, XL-6052, XL-6053, XL-6040, XL-6041, XL-6042, XL-6043.
Los accesorios anteriores están almacenados en la mesa extensible. Han sido diseñados para ayudar en la realización de la mayoría de tareas de cosido.
Accesorios opcionales
1 Pie caminante SA107 (para EE UU) XA8319-002 (para otros países)
2 Prensatelas enguatador
SA129 (para EE UU) X81021-002 (para otros países)
3 Prensatela para pespunte 1/4
SA125 (para EE UU) X80980-002 (para otros países)
NOTA:
El contenido de los accesorios depende del modelo.
ACCESSORI
|
SEWINGYOURKNOWINGMACHINE |
QUINAÁMSUCONOZCADECOSER MACCHINALACONOSCEREDACUCIRE |
1 Piedino per cerniere (1 pz.) |
|
|
2 Spoline (3 pz.) |
SA156 (Per USA) |
|
|
XA5539-051 (Per gli paesi) |
|
|
Sostituzioni (set di 10 pezzi) |
|
3 Confezione di aghi (ago singolo normale N° 14) (3 pz.) 4 Ago gemello (1 pz.)
5 Piedino per occhielli (1 pz.)
6 Fermarocchetto (grande) (1 pz.)
7 Fermarocchetto (piccolo) (1 pz.)
8 Spazzolino (1 pz.)
9 Portarocchetto ausiliario (1 pz.)
0 Cacciavite (1 pz.) A Taglia-asole (1 pz.)
B Placca di rammendo (1 pz.) C Copertura antipolvere (1 pz.)
Codice parte per il piedino per cerniere: X51953-051
Codice parte per il Fermarocchetto (medio): X55260-153
Reostato a pedale: Modello N |
|
Codice parte: J00360-051 |
(paesi con corrente elettrica a 110/120V) |
XA6400-051 |
(paesi con corrente elettrica a 220/240V) |
XA6402-051 |
(Regno Unito) |
XA6404-051 (Australia, Nuova Zelanda) |
|
XA6434-051 |
(paesi con doppia corrente elettrica a 110/220V) |
NOTA (Solo USA):
Reostato a pedale: modello N
Codice parte: J00360-051 (paesi con corrente elettrica a 110/120V) Questo reostato a pedale può essere utilizzato per macchina da cucire modello XL-6060, XL-6061, XL-6062, XL-6063, XL-6050, XL6051, XL-6052, XL-6053, XL-6040, XL-6041, XL-6042, XL-6043.
Gli accessori a corredo della macchina si trovano nell'apposito contenitore posto all'interno del piano di lavoro. Questi accessori sono stati studiati per aiutare chi cuce ad eseguire una vasta gamma di lavori.
Accessori opzionali
1 Piedino semovente SA107 (Per USA)
XA8319-002 (Per gli paesi) 2 Piedino per trapunte azionato a molla
SA129 (Per USA) X81021-002 (Per gli paesi)
3 Piedino per patchwork
SA125 (Per USA) X80980-002 (Per gli paesi)
NOTA:
Il contenuto degli accessori dipende dai modelli.
4

YOUR KNOWINGSU CONOZCALA CONOSCERE
MMACCHINA SEWINGQUINAÁ
MACHINECOSER DECUCIRE DA
OPERATING YOUR
SEWING MACHINE
Connecting Plugs
1.Connect the power cord plug into the machine.
2.Connect the power supply plug into a wall outlet.
CAUTION
1.When leaving the machine unattended, the main switch of the machine should be switched off or the plug must be removed from the socket-outlet.
2.When servicing the machine, or when removing covers or changing bulbs, the machine or the electrical set must be unplugged.
3.For U.S.A. only
This appliance has a polarized plug (one blade wider than the other). To reduce the risk of electric shock, this plug is intended to fit in a polarized outlet only one way. If the plug does not fit fully in the outlet, reverse the plug.
If it still does not fit, contact a qualified electrician to install the proper outlet. Do not modify the plug in any way.
 WARNING
•Use only regular household electricity for the power source. Using other power sources may result in fire, electric shock, or damage to the machine.
•Turn off the main power and remove the plug in the following circumstances:
-When you are away from the machine
-After using the machine
-When the power fails during use
-When the machine does not operate correctly due to a bad connection or a disconnection
-During electrical storms
 CAUTION
•Do not use extension cords or multi-plug adapters with many other appliances plugged in to them. Fire or electric shock may result.
•Do not touch the plug with wet hands. Electric shock may result.
•When unplugging the machine, always turn off the main power first. Always grasp the plug to remove it from the outlet. Pulling on the cord may damage the cord, or lead to fire or electric shock.
•Do not allow the power cord to be cut, damaged, modified, forcefully bent, pulled, twisted, or bundled. Do not place heavy objects on the cord. Do not subject the cord to heat. These things may damage the cord and cause fire or electric shock. If the cord or plug is damaged, take the machine to your authorized dealer for repairs before continuing use.
•Unplug the power cord if the machine is not to be used for a long period of time. Otherwise a fire may result.
5

FUNCIONAMIENTO DE LA MÁQUINA DE COSER
Conexión de los enchufes
1.Conecte la clavija del cordón de alimentación a la máquina.
2.Conecte el enchufe de alimentación a una toma de corriente.
PRECAUCIÓN:
1.Si deja la máquina desatendida, debe apagar el interruptor principal de la corriente o desenchufar el cable de la toma de corriente.
2.Cuando repare la máquina, retire tapas o cambie la bombilla, desenchufe la máquina de la corriente.
3.Sólo para EE UU
Esta máquina está provista de un enchufe polarizado (un borne más ancho que el otro). Como medida de seguridad, existe una sola manera de introducir el enchufe en la toma de corriente. Si no puede introducir el enchufe a fondo en la toma de corriente, cambie de lado el enchufe. Si sigue sin poderlo introducir, póngase en contacto con un electricista cualificado para que le instale una toma de corriente adecuada. No intente modificar el enchufe.
 AVISO
AVISO
•Utilice sólo la corriente de casa normal para la alimentación de la máquina. El uso de otras fuentes de alimentación puede provocar incendio, descarga eléctrica o averías en la máquina.
•Apague la máquina y desenchufe el cable de la corriente en la siguientes situaciones:
-Cuando esté alejado de la máquina
-Después de usar la máquina
-Cuando la alimentación se corta durante el funcionamiento
-Si la máquina no funciona correctamente debido a una mala conexión o a una desconexión
-Durante tormentas con relámpagos
 PRECAUCIÓN
•No utilice cables de alargo ni adaptadores con demasiados aparatos conectados. Podría producirse un incendio o una descarga eléctrica.
•No toque el enchufe con las manos mojadas. Podría recibir una descarga eléctrica.
•Desenchufe siempre la máquina antes de desmontarla. Sujete siempre el enchufe para sacarlo de la toma de corriente. Si tira del cable, podría dañarlo o provocar un incendio o una descarga eléctrica.
•No corte, estropee, cambie, fuerce, doble, estire, tuerza o enrolle el cable. No apoye objetos pesados sobre el cable. No exponga el cable al calor. Todo esto podría estropear el cable y causar un incendio o una descarga eléctrica. Si el cable está estropeado, lleve la máquina a su distribuidor autorizado para que la repare antes de utilizarla de nuevo.
•Desenchufe el cable de la corriente si no va a utilizar la máquina durante un largo período de tiempo. De otra manera, podría producirse un incendio.
|
FUNZIONAMENTO DELLA |
|
|
|
MACCHINA DA CUCIRE |
YOURKNOWINGSEWINGMACHINE MSUCONOZCAÁQUINADECOSER MACCHINALACONOSCEREDACUCIRE |
|
|
|
||
2. |
Quando si eseguono interventi di assistenza sulla macchina o |
|
|
|
Collegamento elettrico |
|
|
1. |
Inserire il connettore del cavo di alimentazione nella macchina da |
|
|
|
cucire. |
|
|
2. |
Inserire la spina di alimentazione in una presa elettrica a muro. |
|
|
ATTENZIONE |
|
||
1. |
Quando si lascia la macchina incustodita, spegnere l’interruttore |
|
|
|
generale della macchina o scollegare la spina dalla presa a |
|
|
|
parete. |
|
|
|
quando si rimuovono le coperture o si sostituiscono le lampadi- |
|
|
|
ne, scollegare la macchina da cucire dalla presa o togliere |
|
|
|
l’alimentazione elettrica alla macchina. |
|
|
3. |
Solo per USA |
|
|
|
Questa macchina è corredata di una spina di alimentazione |
|
|
polarizzata per corrente alternata (una spina dotata di uno spinotto più largo dell'altro). Come misura di sicurezza, questa spina può essere inserita nella presa in un solo senso. Se non si riesce ad inserire la spina fino in fondo, provare girando la spina. Se anche in questo caso la spina non entra nella presa, rivolgersi ad un elettricista per sostituire la presa con una adatta. Non smontare la spina polarizzata rendendo inefficace il dispositivo di sicurezza.
 AVVERTENZA
•Utilizzare soltanto corrente derivante da una presa normale per uso domestico. L’uso di sorgenti di alimentazione diverse può provocare rischi di incendio, scossa elettrica o danni alla macchina.
•Spegnere la macchina e scollegare la spina nelle seguenti situazioni:
-Quando si lascia incustodita la macchina
-Dopo aver utilizzato la macchina
-Se si verifica un’interruzione di corrente durante l’uso
-Quando la macchina non funziona in modo corretto a causa di un collegamento errato o di un avvenuto scollegamento
-Durante temporali con scariche elettriche
 ATTENZIONE
•Non utilizzare cavi di prolunga o adattatori multi-presa con molteplici apparecchiature collegate contemporaneamente. Vi sono rischi di incendio o di scossa elettrica.
•Non toccare la spina con le mani umide. Vi sono rischi di scossa elettrica.
•Prima di scollegare la macchina dalla presa di corrente, spegnere sempre l’interruttore generale della macchina. Per scollegare il cavo, afferrare sempre la spina. Se si scollega il cavo agendo su di esso, possono verificarsi rischi di incendio o di scossa elettrica.
•Fare attenzione a non tagliare, danneggiare, modificare, piegare eccessivamente, tirare, attorcigliare o ingarbugliare il cavo. Non collocare oggetti pesanti sul cavo. Non esporre il cavo a sorgenti di calore. Tali condizioni possono danneggiare il cavo e causare rischi di incendio o di scossa elettrica. Se il cavo o la spina è danneggiato, portare la macchina presso un rivenditore autorizzato prima di continuare ad utilizzarla.
•Se la macchina da cucire deve restare a lungo inutilizzata, scollegare il cavo dalla presa di corrente. In caso contrario, vi sono rischi di incendio.
6
YOUR KNOWINGSU CONOZCALA CONOSCERE
MMACCHINA SEWINGQUINAÁ
MACHINECOSER DECUCIRE DA
1
2
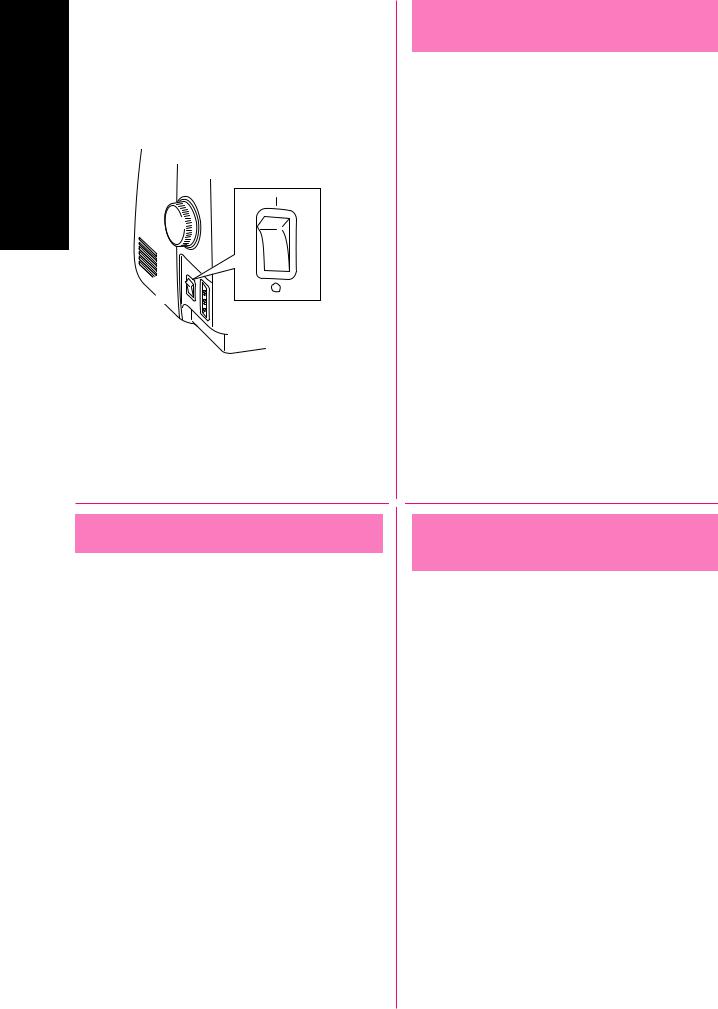
Main Power/Sewing
Light Switch
This switch turns the main power/sewing light on or off.
1 Turn on (toward the “I” mark)
2 Turn off (toward the “O” mark)
Interruptor principal/luz de cosido
Este interruptor permite apagar y encender la máquina y la luz.
1 Encender (hacia la marca “I”)
2 Apagar (hacia la marca “O”)
Interruttore principale/luce area di lavoro
Questo interruttore accende e spegne sia la macchina che la luce dell’area di lavoro.
1 Acceso (verso il simbolo “I”)
2 Spento (verso il simbolo “O”)
7
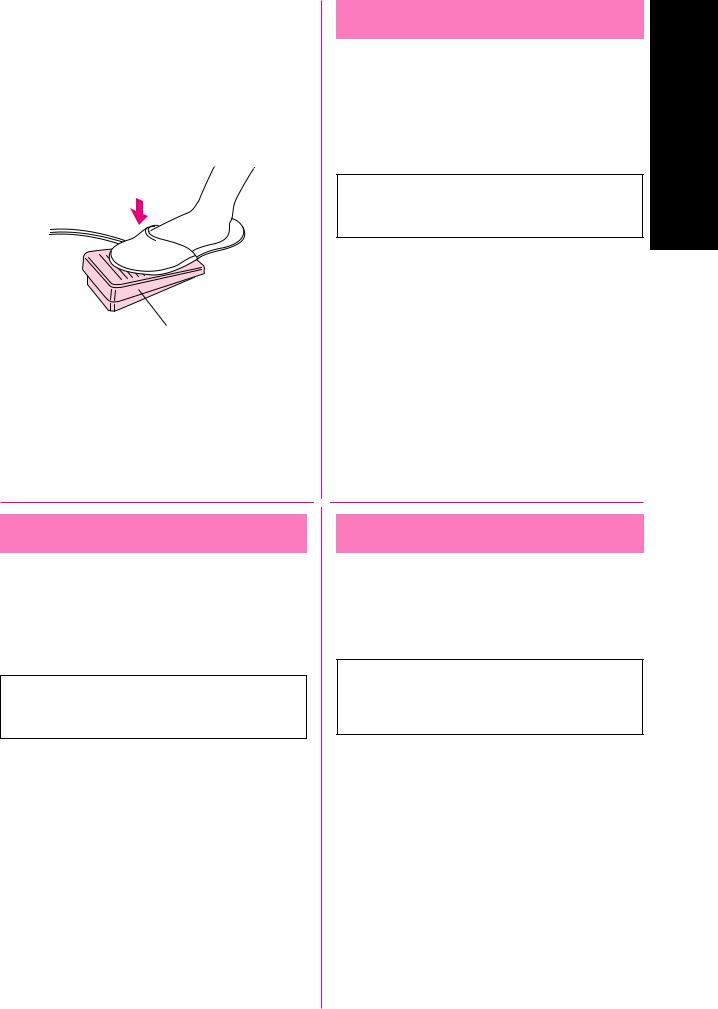
Foot Controller
When the foot controller is depressed lightly, the machine will run at a low speed. When the pressure on the foot controller is increased, the machine’s speed will increase. When pressure on the foot controller is released, the machine will stop. Care should be taken that nothing is placed on the foot controller when the machine is not in use.
1 Foot controller
 CAUTION
Do not allow fabric pieces and dust to collect in the foot controller. Doing so could cause a fire or an electric shock.
NOTE (For U.S.A. only):
Foot Controller: Model N
This foot controller can be used for Model XL-6060, XL-6061, XL-
6062, XL-6063, XL-6050, XL-6051, XL-6052, XL-6053, XL-6040,
XL-6041, XL-6042, XL-6043.
1
KNOWING YOUR SEWING MACHINE CONOZCA SU MÁQUINA DE COSER CONOSCERE LA MACCHINA DA CUCIRE
Pedal
Al presionar ligeramente el pedal, la máquina funcionará a baja velocidad. Al aumentar la presión, se incrementa también la velocidad de la máquina. Al soltar el pedal, la máquina se para. Asegúrese siempre de no poner ningún objeto sobre el pedal cuando la máquina no esté utilizada.
1 Pedal
 PRECAUCIÓN
Evite que trozos de tela y polvo entren en el pedal. De lo contrario, podría producirse un incendio o una descarga eléctrica.
NOTA (sólo para EE UU):
Pedal: modelo N
Este pedal puede utilizarse para el modelo de máquina de coser XL-6060, XL-6061, XL-6062, XL-6063, XL-6050, XL-6051, XL-6052, XL-6053, XL-6040, XL-6041, XL-6042, XL-6043.
Reostato a pedale
Premendo leggermente sul reostato, la macchina funzionerà a bassa velocità. Aumentando la pressione sul reostato, la velocità della macchina aumenterà. Sollevando il piede dal reostato, la macchina si fermerà. Si raccomanda di non appoggiare nessun oggetto sul reostato quando la macchina è inattiva.
1 Reostato a pedale
 ATTENZIONE
Non lasciare che ritagli di stoffa e accumuli di polvere si depositino nel comando a pedale. In caso contrario, potrebbero verificarsi rischi di incendio o di scossa elettrica.
NOTA (Solo per USA):
Reostato a pedale: modello N
Questo reostato a pedale può essere utilizzato per macchina da cucire modello XL-6060, XL-6061, XL-6062, XL-6063, XL-6050, XL6051, XL-6052, XL-6053, XL-6040, XL-6041, XL-6042, XL-6043.
8
YOUR KNOWINGSU CONOZCALA CONOSCERE
MMACCHINA SEWINGQUINAÁ
MACHINECOSER DECUCIRE DA
|
Checking the Needle |
|
|
The sewing needle must always be straight and sharp for smooth |
|
|
sewing. |
|
|
To Check the Needle Correctly: |
|
|
To check the needle, place the flat side of the needle on a flat |
|
|
surface. Check the needle from the top and the sides. Throw away |
|
|
any bent needles. |
|
|
1 Parallel space |
|
1 |
2 Level surface (bobbin cover, glass, etc.) |
|
|
||
2 |
* Place a level surface under the needle. |
|
Replacing the Needle |
||
CAUTION |
||
• Turn the main power switch to OFF before changing the |
||
needle. If the main power is left on and foot controller is |
||
stepped on, the machine will start and injury may result. |
||
• Use only sewing machine needles for home use. Other |
||
needles may bend or break and cause injury. |
||
• Never sew with a bent needle. A bent needle will easily |
||
break and cause injury. |
||
1 |
1. Remove the power supply plug from the outlet. |
|
|
||
|
2. Raise the needle bar to its highest position. |
|
|
3. Lower the presser foot. |
|
|
4. Remove the needle by loosening the needle clamp screw. |
|
2 |
1 Presser foot lever |
|
|
||
|
CAUTION |
|
|
Do not loosen or tighten the needle clamp screw with a strong |
|
|
force, otherwise it may be damaged. |
|
3 |
5. With the flat side of the needle facing the back, insert the new |
|
needle all the way to the top of the needle stopper (viewing |
||
|
||
4 |
window) in the needle clamp. Use a screwdriver to securely |
|
tighten the needle clamp screw. |
||
|
2 Needle stopper |
|
|
3 Hole for setting needle |
|
|
4 Flat side of needle |
|
|
CAUTION |
|
|
Be sure to push in the needle until it touches the stopper, |
|
|
and securely tighten the needle clamp screw with a screw- |
|
|
driver. If the needle is not completely inserted or the needle |
|
|
clamp screw is loose, the needle may break or the machine |
|
|
may be damaged. |
9
Verificación de la aguja
La aguja de costura siempre debe estar bien recta y afilada para una buena costura.
Para comprobar la aguja:
Para revisar la aguja, coloque la parte plana de la aguja sobre una superficie plana. Compruebe la aguja por la parte superior y los laterales. Tire las agujas que estén dobladas.
1 Espacio paralelo
2Superficie plana (tapa de la bobina, cristal, etc.)
*Coloque la superficie plana debajo de la aguja.
Cambio de la aguja
 PRECAUCIÓN
• Desenchufe la máquina de coser de la alimentación antes de cambiar la aguja. Si deja la máquina enchufada a la corriente y pisa el pedal, la máquina se pondrá en marcha y podría causar lesiones.)
• Utilice sólo agujas de máquina de coser para uso doméstico. Otras agujas podrían doblarse o romperse y causar lesiones.
• Nunca cosa con una aguja doblada. Una aguja doblada se rompe fácilmente y podría hacerle daño.
1. Retire el enchufe de alimentación de la toma de corriente. 2. Levante la barra de la aguja a su posición más alta.
3. Baje el prensatelas.
4. Retire la aguja, aflojando la abrazadera de la aguja.
1 Palanca del prensatelas
PRECAUCIÓN
No apriete el tornillo de la presilla de la aguja. De lo contrario, podría estropear la aguja o la máquina.
5.Con la parte plana de la aguja mirando hacia la parte trasera de la máquina, inserte la nueva aguja hasta el final de la cavidad (mirilla) en la presilla de la aguja. Utilice el destornillador para apretar bien el tornillo de la presilla de la aguja.
2 Cavidad
3 Orificio para la aguja
4 Parte plana de la aguja
 PRECAUCIÓN
Asegúrese de empujar la aguja hasta que llegue al tope de la cavidad y apriete fuertemente el tornillo de la presilla de la aguja con un destornillador. Si la aguja no está completamente insertada o el tornillo de la presilla de la aguja está suelto, la aguja podría romperse o la máquina podría estropearse.
Controllo dell’ago
Per ottenere una cucitura scorrevole, l’ago utilizzato deve essere sempre ben diritto ed appuntito.
Per verificare che l’ago non sia piegato:
Per verificare l’ago, posizionare la parte piana dell’ago su una superficie piana. Osservare attentamente l’ago dalla parte superiore e sui lati. Gettare gli aghi che risultano piegati.
1 Spazio parallelo
2 Superficie piana (sportello spolina, vetro, ecc.) * Posizionare l’ago su una superficie piana.
CONOSCERE LA MACCHINA DA CUCIRE
CONOZCA SU MÁQUINA DE COSER
KNOWING YOUR SEWING MACHINE
Sostituzione dell’ago
 ATTENZIONE
• Prima di sostituire l’ago, spegnere la macchina portando l’interruttore su OFF. Se la macchina è accesa e viene premuto inavvertitamente il reostato a pedale la macchina inizierà a operare con possibili rischi di lesioni personali.
• Utilizzare esclusivamente aghi da macchina da cucire per uso domestico. Gli altri tipi di ago possono piegarsi o rompersi e provocare lesioni personali.
• Non cucire con un ago piegato. Gli aghi piegati possono rompersi facilmente e causare lesioni personali.
1. Disinserire la spina di alimentazione dalla presa di corrente. 2. Far salire la barra dell’ago fino alla sua posizione più alta. 3. Abbassare il piedino premistoffa.
4. Togliere l'ago allentando il morsetto dell'ago.
1 Leva del piedino premistoffa
ATTENZIONE
Non applicare pressione sulla vite della ghiera di serraggio ago. In caso contrario, l’ago o la macchina potrebbe danneggiarsi.
5.Con il lato piatto dell’ago rivolto verso la parte posteriore della macchina, inserire completamente il nuovo ago sulla parte superiore dell’arresto per ago (finestra di visione) della ghiera di serraggio ago. Utilizzare un cacciavite per serrare saldamente la vite della ghiera di serraggio ago.
2 Arresto per ago
3 Foro per inserimento ago
4 Lato piatto dell’ago
 ATTENZIONE
Assicurarsi di spingere l’ago fino a farlo toccare l’arresto e serrare saldamente la vite con un cacciavite. Se l’ago non è completamente inserito o la vite della ghiera di serraggio ago è allentata, l’ago potrebbe rompersi o la macchina potrebbe danneggiarsi.
10
YOUR KNOWINGSU CONOZCALA CONOSCERE
MMACCHINA SEWINGQUINAÁ
MACHINECOSER DECUCIRE DA
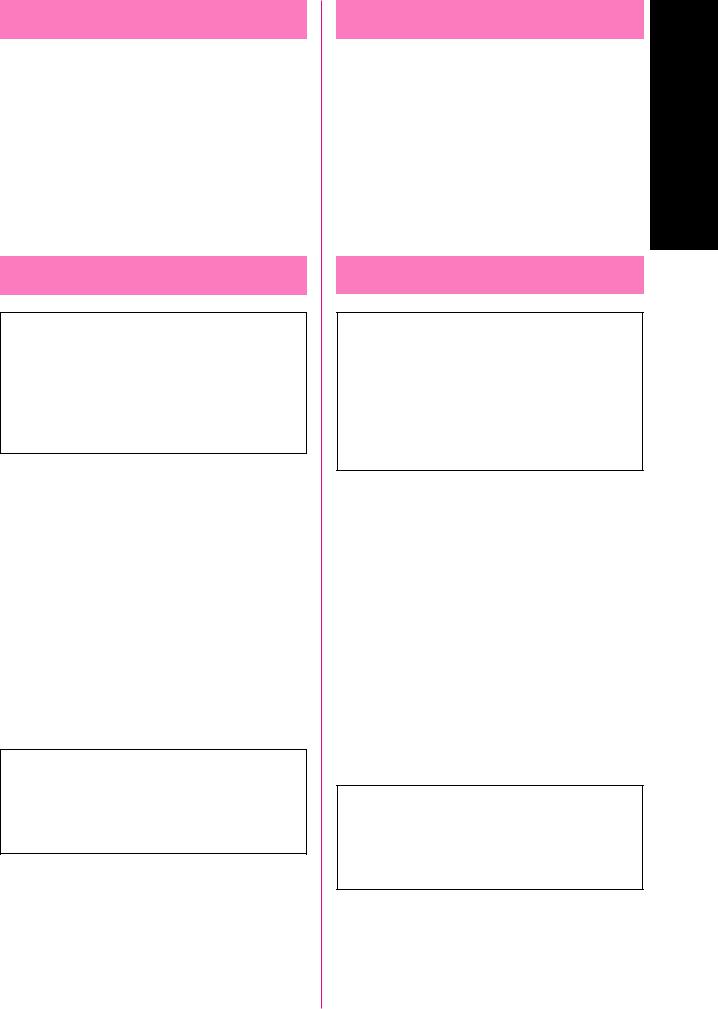
Changing the Presser Foot
 CAUTION
•Always turn off the power before changing the presser foot. If the power is on and controller is stepped on, the machine will start and may cause injury.
•Always use the correct presser foot for the selected stitch pattern. If the wrong presser foot is used, the needle may strike the presser foot and bend or break, and may cause injury.
•Only use presser feet for this machine. Using other presser feet may lead to accident or injury.
It may be necessary to change the presser foot according to your sewing needs.
SNAP-ON TYPE
1.Raise the needle to its highest position by turning the balance wheel toward you (counter clockwise) and raise the presser foot lever.
2.Release the foot by raising the lever located at the back of the holder.
3.Place a different presser foot on the needle plate so that the bar on the presser foot is in line with the slot on the shank.
4.Lower the presser foot lever and fix the presser foot onto the shank. If the presser foot is in the correct location, the bar should snap in.
Cambio del prensatelas
 PRECAUCIÓN
•Desenchufe siempre la máquina de la alimentación antes de cambiar el pie prensatela. Si la máquina de coser está enchufada a la corriente y pisa el pedal, la máquina se pondrá en funcionamiento y podría hacerse daño.
•Utilice siempre el pie prensatela adecuado para el pespunte seleccionado. Si utiliza un pie prensatela inadecuado, la aguja podría chocar contra el pie prensatela y doblarse o romperse, lo que puede causar lesiones.
•Use el pie prensatela sólo para esta máquina de coser. Si usa otro pie prensatela, podría causar una avería o hacerse daño.
Según sus necesidades de costura, puede ser necesario cambiar el prensatelas.
TIPO DE ENGANCHE DE GOLPE
1.Levante la aguja a su posición más alta, girando la ruedecilla hacia usted (en el sentido contrario al de las manecillas de un reloj) y levante la palanca del prensatelas.
2.Suelte el prensatelas levantando la palanca que hay en la parte trasera del soporte.
3.Coloque otro prensatelas en la placa de agujas de tal forma que la barra del prensatelas quede alineada con la ranura del soporte.
4.Baje la palanca del prensatelas y fije el prensatelas en el soporte. Si el prensatelas está bien colocado, la barra debe engancharse de golpe.
Sostituzione del piedino premistoffa
 ATTENZIONE
•Prima di sostituire il piedino premistoffa, spegnere sempre la macchina. Se la macchina è accesa e si preme inavvertitamente il reostato a pedale la macchina inizierà a operare con rischi di lesioni personali.
•Utilizzare sempre il piedino premistoffa appropriato per il motivo di punto selezionato. Se si utilizza un piedino premistoffa errato, l’ago potrebbe colpire il piedino e piegarsi o rompersi, con rischi di lesioni personali.
•Utilizzare esclusivamente piedini premistoffa studiati per questa macchina. L’uso di altri tipi di piedino può provocare danni o lesioni personali.
In base alle esigenze del lavoro da eseguire, può rendersi necessario sostituire il piedino premistoffa.
PIEDINO DI TIPO A SCATTO
1.Far salire l’ago fino alla sua posizione più alta girando il volantino verso se stessi (in senso antiorario) e sollevare la leva del piedino premistoffa.
2.Staccare il piedino sollevando la levetta situata dietro il gambo.
3.Posizionare il nuovo piedino sulla placca dell’ago in modo che il perno del piedino sia allineato rispetto alla scanalatura del gambo.
4.Abbassare la leva del piedino in modo che il piedino si innesti nel gambo. Se il piedino è nella posizione corretta, il perno scatterà in posizione.
11
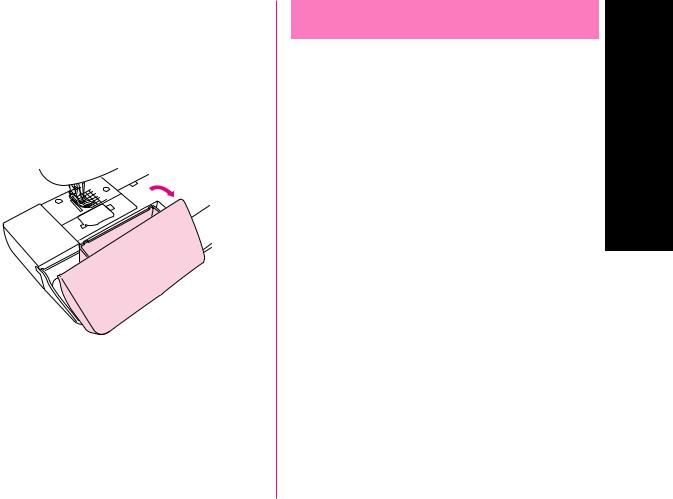
Flat Bed Attachment
The accessories are stored in a compartment under the flat bed attachment cover, which can be opened by flipping it toward you.
KNOWING YOUR SEWING MACHINE CONOZCA SU MÁQUINA DE COSER CONOSCERE LA MACCHINA DA CUCIRE
|
|
|
|
|
|
|
|
|
|
|
|
|
|
|
|
|
|
Plataforma |
|
|
|
|
Scomparto piano |
|
|
|
|
|
|
Los accesorios están almacenados en un compartimiento situado debajo |
|
|
Gli accessori si trovano nello scomparto sotto il coperchio del |
||
de la tapa de la platafoma. Para abrir la tapa, tire de ella hacia usted. |
|
|
scomparto piano, che può essere aperto tirandolo verso sé stessi. |
||
|
|
|
|
|
|
12
YOUR KNOWINGSU CONOZCALA CONOSCERE
MMACCHINA SEWINGQUINAÁ
MACHINECOSER DECUCIRE DA
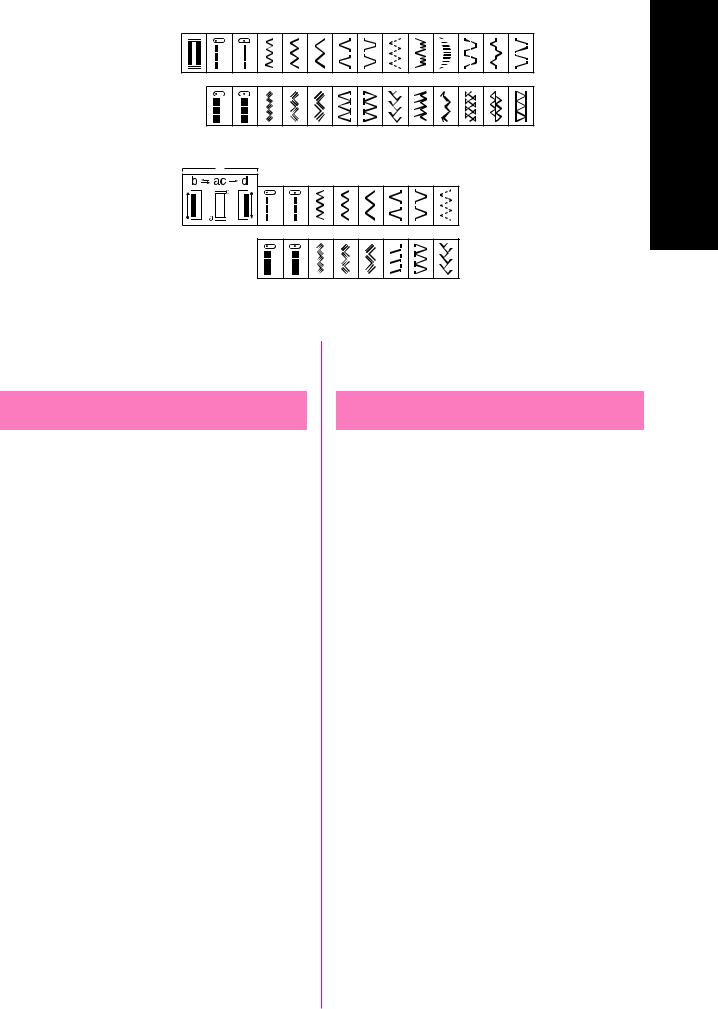
1 2 3 4 5 6 7 8 9 10 11 12 13 14 15 16 17 18 19
XL-6060
XL-6061
XL-6062
XL-6063 20 21 22 23 24 25 26 27 28 29 30 31 32 33 34 35 36 37
3
2
· |
3 |
· |
2 |
· |
|
|
|
||
|
|
|
|
|
4 |
|
|
|
|
SS
3
1
F
3
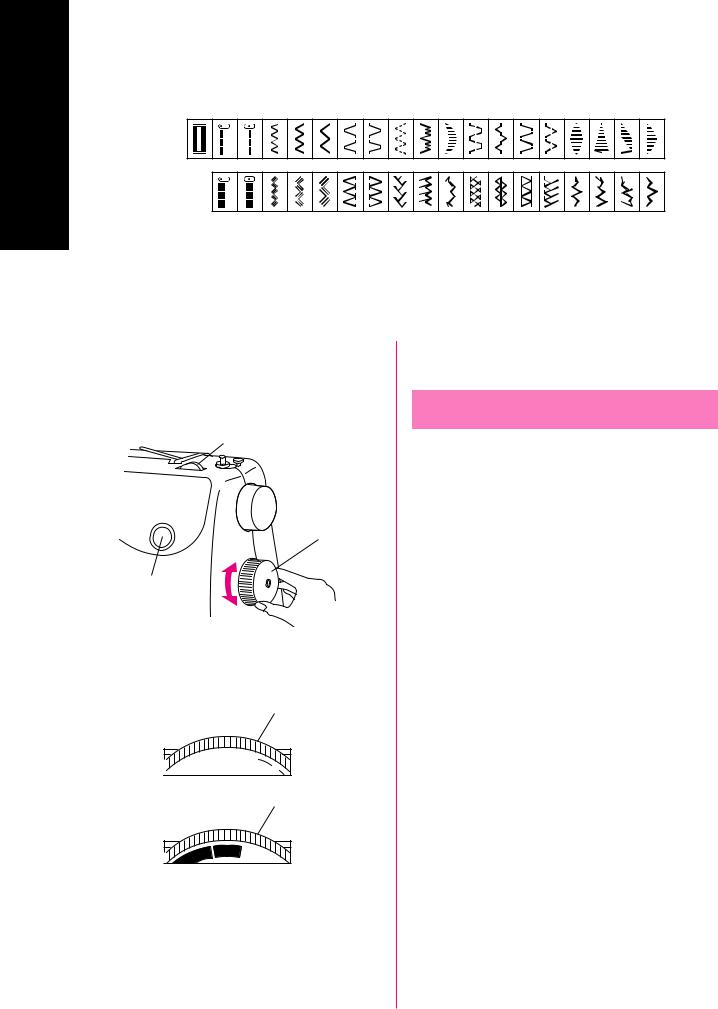
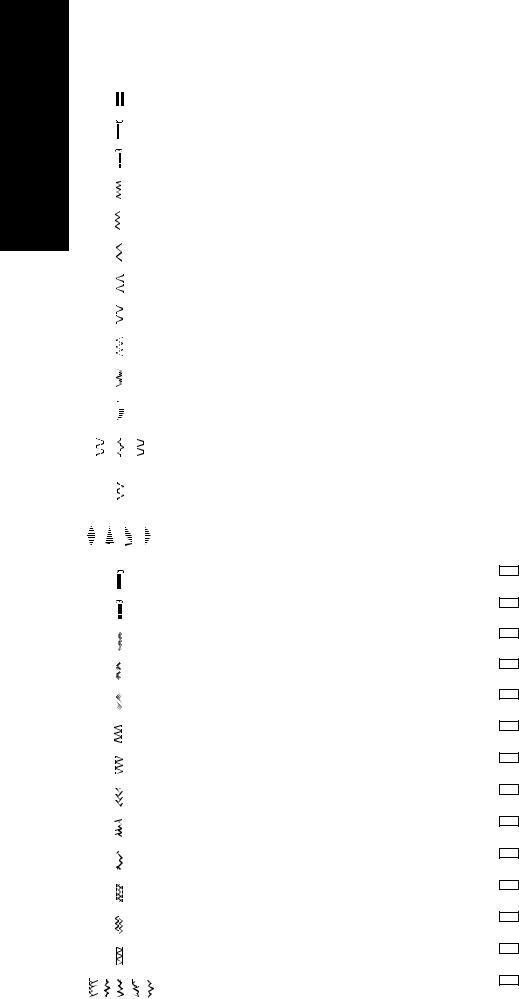
VARIOUS CONTROLS
Pattern Selection Dial
CAUTION
When you use the Pattern Selection Dial to select a pattern, turn the balance wheel to the front (counter-clockwise) by hand to set the needle in the highest position before selecting the pattern. If the needle is in the down position when the Pattern Selection Dial is turned, the needle, presser foot, or
fabric may be damaged.
1
To select a stitch, simply turn the Pattern Selection Dial, located on the right side of the machine. The Pattern Selection Dial may be turned in either direction. The recommended lengths and the preset widths for each stitch are shown on the following page.
1 Pattern selection dial
2 Pattern number
The stitches that are available depend on the Stitch Length Dial setting. If the Stitch Length Dial is set between 0 and 4, any of the stitches in the top row can be selected. If the Stitch Length Dial is set to SS, any of the stitches in the bottom row can be selected.
3 Stitch length dial
(Model XL-6060, XL-6061, XL-6062, XL-6063, XL-6050, XL-
6051, XL-6052, XL-6053)
NOTE:
Since the Pattern Selection Dial is not a continuous dial, it cannot be turned directly from the last stitch to the first one or from the first stitch to the last one. To select the first stitch when the last one is displayed or to select the last stitch when the first one is displayed, turn the Pattern Selection Dial in the opposite direction until the desired stitch is displayed.
13
1 2 3 4 5 6 7 8 9 10 11 12 13 14
XL-6050
XL-6051
XL-6052
XL-6053 15 16 17 18 19 20 21 22 23 24 25 26 27
|
1 |
3 |
4 |
5 |
6 |
7 |
8 |
9 |
|
2 |
|||||||
XL-6040 |
|
|
|
|
|
|
|
|
XL-6041 |
|
|
|
|
|
|
|
|
XL-6042 |
|
|
|
|
|
|
|
|
XL-6043 |
10 |
11 |
12 |
13 |
14 |
15 |
16 |
17 |
KNOWING YOUR SEWING MACHINE CONOZCA SU MÁQUINA DE COSER CONOSCERE LA MACCHINA DA CUCIRE
DISTINTOS MANDOS
Selector de puntadas
PRECAUCIÓN
Cuando utilice el selector de puntadas, antes de seleccionar la puntada gire la ruedecilla hacia delante (hacia la izquierda) con la mano para poner la aguja en la posición más alta. Si gira el selector de puntada con la aguja en la poción bajada, la aguja, el prénsatelas o el tejido podrían dañarse.
Para seleccionar una puntada, sólo hace falta girar el selector de puntadas, situado en la derecha de la máquina. Este selector se puede girar en cualquier sentido. Las longitudes recomendadas y la anchura predeterminada para cada puntada se muestran en la página siguiente.
1 Selector de puntadas
2 Número de puntada
Las puntadas disponibles dependen de la posición del selector de largo de puntada. Si está situado entre 0 y 4, pueden seleccionarse todas las puntadas que aparecen en la fila superior. Si está situado en SS, pueden seleccionarse todas las puntadas que aparecen en la fila inferior.
3 Selector de largo de puntada
(Modelo XL-6060, XL-6061, XL-6062, XL-6063, XL-6050, XL-6051,
XL-6052, XL-6053)
NOTA:
El selector de puntada no es un selector continuo, y, por tanto, no puede girarse directamente desde la última puntada hasta la primera o viceversa. Para seleccionar la primera puntada cuando está seleccionada la última, o viceversa, gire el selector de puntada en sentido opuesto hasta que aparezca la puntada deseada.
DISPOSITIVI DI CONTROLLO
Selettore dei punti
ATTENZIONE
Quando si usa il selettore dei punti per selezionare un punto, girare il volantino verso il davanti (senso antiorario) con la mano per portare l’ago alla posizione più alta prima di selezionare il punto. Se l’ago si trova nella posizione abbassata quando si gira il selettore dei punti, l’ago, il piedino premistoffa o il tessuto possono essere danneggiati.
Per selezionare un determinato punto, ruotare verso sinistra o destra il selettore dei punti situato sul fianco destro della macchina. Le lunghezze consigliate e la larghezza preimpostata per ciascun punto sono indicate alla prossima pagina.
1 Selettore dei punti
2 Numero dei punti
I punti disponibili dipendono dalla regolazione della manopola della lunghezza del punto. Se la manopola è regolata tra 0 e 4, si può selezionare qualsiasi punto della fila superiore. Se la manopola è regolata su SS, si può selezionare qualsiasi punto della fila inferiore.
3 Manopola della lunghezza del punto
(Modello XL-6060, XL-6061, XL-6062, XL-6063, XL-6050, XL-6051,
XL-6052, XL-6053)
NOTA:
Dato che il selettore dei punti non funziona in modo continuo, non può essere girato direttamente dall'ultimo punto al primo o dal primo punto all'ultimo. Per selezionare il primo punto quando è visualizzato l'ultimo, o per selezionare l'ultimo punto quando è visualizzato il primo, girare il selettore dei punti nella direzione opposta fino a quando non viene visualizzato il punto desiderato.
14
YOUR KNOWINGSU CONOZCALA CONOSCERE
MMACCHINA SEWINGQUINAÁ
MACHINECOSER DECUCIRE DA
RECOMMENDED LENGTHS FOR STITCHES
(Model XL-6060, XL-6061, XL-6062, XL-6063)
PATTERN |
STITCH NAME |
PRESET WIDTH |
RECOMMENDED |
INSTRUCTION |
|||
[mm(inch)] |
LENGTH [mm(inch)] |
MANUAL PAGE |
|||||
|
|
|
|
||||
|
|
|
|
|
|
|
|
|
|
|
1-STEP AUTOMATIC |
5 |
F-1.5 |
55 |
|
|
|
|
|||||
|
|
|
BUTTONHOLE |
(3/16) |
(1/64-1/16) |
||
|
|
|
|
||||
|
|
|
|
|
|
|
|
|
|
|
STRAIGHT STITCH |
— |
1-4 |
42, 65, 67 |
|
|
|
|
(Left Needle Position) |
(1/16-3/16) |
|||
|
|
|
|
|
|||
|
|
|
STRAIGHT STITCH |
— |
1-4 |
42, 65, 67 |
|
|
|
|
(Center Needle Position) |
(1/16-3/16) |
|||
|
|
|
|
|
|||
|
|
|
ZIGZAG STITCH |
1.5 |
F-4 |
45, 64, 68, 69 |
|
|
|
|
(1/16) |
(1/64-3/16) |
|||
|
|
|
|
|
|||
|
|
|
ZIGZAG STITCH |
3.5 |
F-4 |
45, 64, 68, 69 |
|
|
|
|
(1/8) |
(1/64-3/16) |
|||
|
|
|
|
|
|||
|
|
|
|
|
|
|
|
|
|
|
ZIGZAG STITCH |
5 |
F-4 |
45, 64, 68, 69 |
|
|
|
|
(3/16) |
(1/64-3/16) |
|||
|
|
|
|
|
|||
|
|
|
BLIND HEM STITCH |
3 |
F-2 |
46 |
|
|
|
|
(1/8) |
(1/64-1/16) |
|||
|
|
|
|
|
|||
|
|
|
|
|
|
|
|
|
|
|
SHELL TUCK STITCH |
5 |
F-3 |
47 |
|
|
|
|
(3/16) |
(1/64-1/8) |
|||
|
|
|
|
|
|||
|
|
|
ELASTIC STITCH |
5 |
F-2.5 |
48 |
|
|
|
|
(3/16) |
(1/64-3/32) |
|||
|
|
|
|
|
|||
|
|
|
|
|
|
|
|
|
|
|
STRETCH BLIND HEM STITCH |
4 |
F-1.5 |
46 |
|
|
|
|
(3/16) |
(1/64-1/16) |
|||
|
|
|
|
|
|||
|
|
|
SCALLOP STITCH |
5 |
F-1.5 |
50 |
|
|
|
|
(3/16) |
(1/64-1/16) |
|||
|
|
|
|
|
|||
|
|
|
|
|
|
|
|
|
|
|
DOUBLE ACTION STITCH |
5 |
F-3 |
|
|
|
|
|
BRIDGING STITCH |
49 |
|||
|
|
|
(3/16) |
(1/64-1/8) |
|||
|
|
|
RAMPART STITCH |
|
|||
|
|
|
|
|
|
||
|
|
|
ELASTIC SHELL TUCK STITCH |
5 |
F-3 |
53 |
|
|
|
|
(3/16) |
(1/64-1/8) |
|||
|
|
|
|
|
|||
|
|
|
|
|
|
|
|
|
|
|
BEAD STITCH |
|
|
|
|
|
|
|
ARROWHEAD STITCH |
5 |
F-1 |
51 |
|
|
|
|
PARALLELOGRAM STITCH |
(3/16) |
(1/64-1/16) |
||
|
|
|
|
||||
|
|
|
TRIANGLE STITCH |
|
|
|
|
|
|
|
TRIPLE STRETCH STITCH |
— |
SS Fixed |
42 |
|
|
|
|
(Left Needle Position) |
2.5 (3/32) |
|||
|
|
|
|
|
|||
|
|
|
|
|
|
|
|
|
|
|
TRIPLE STRETCH STITCH |
— |
SS Fixed |
42 |
|
|
|
|
(Center Needle Position) |
2.5 (3/32) |
|||
|
|
|
|
|
|||
|
|
|
TRIPLE ZIGZAG |
1.5 |
SS Fixed |
54 |
|
|
|
|
STRETCH STITCH |
(1/16) |
2.5 (3/32) |
||
|
|
|
|
||||
|
|
|
TRIPLE ZIGZAG |
3.5 |
SS Fixed |
54 |
|
|
|
|
STRETCH STITCH |
(1/8) |
2.5 (3/32) |
||
|
|
|
|
||||
|
|
|
TRIPLE ZIGZAG |
5 |
SS Fixed |
54 |
|
|
|
|
STRETCH STITCH |
(3/16) |
2.5 (3/32) |
||
|
|
|
|
||||
|
|
|
|
|
|
|
|
|
|
|
ELASTIC OVERLOCK STITCH |
3 |
SS Fixed |
53 |
|
|
|
|
(1/8) |
2.5 (3/32) |
|||
|
|
|
|
|
|||
|
|
|
ELASTIC OVERLOCK STITCH |
5 |
SS Fixed |
53 |
|
|
|
|
(3/16) |
2.5 (3/32) |
|||
|
|
|
|
|
|||
|
|
|
|
|
|
|
|
|
|
|
FEATHER STITCH |
5 |
SS Fixed |
54 |
|
|
|
|
(3/16) |
2.5 (3/32) |
|||
|
|
|
|
|
|||
|
|
|
COMB STITCH |
4 |
SS Fixed |
53 |
|
|
|
|
(3/16) |
2.5 (3/32) |
|||
|
|
|
|
|
|||
|
|
|
|
|
|
|
|
|
|
|
DECORATIVE STITCH |
5 |
SS Fixed |
51 |
|
|
|
|
(3/16) |
2.5 (3/32) |
|||
|
|
|
|
|
|||
|
|
|
FAGOTING STITCH |
5 |
SS Fixed |
52 |
|
|
|
|
(3/16) |
2.5 (3/32) |
|||
|
|
|
|
|
|||
|
|
|
|
|
|
|
|
|
|
|
DECORATIVE STITCH |
5 |
SS Fixed |
51 |
|
|
|
|
(3/16) |
2.5 (3/32) |
|||
|
|
|
|
|
|||
|
|
|
DECORATIVE HEM STITCH |
5 |
SS Fixed |
49 |
|
|
|
|
(3/16) |
2.5 (3/32) |
|||
|
|
|
|
|
|||
|
|
|
|
|
|
|
|
|
|
|
DECORATIVE STITCH |
5 |
SS Fixed |
51 |
|
|
|
|
(3/16) |
2.5 (3/32) |
|||
|
|
|
|
|
|||
|
|
|
|
|
|
|
|
15
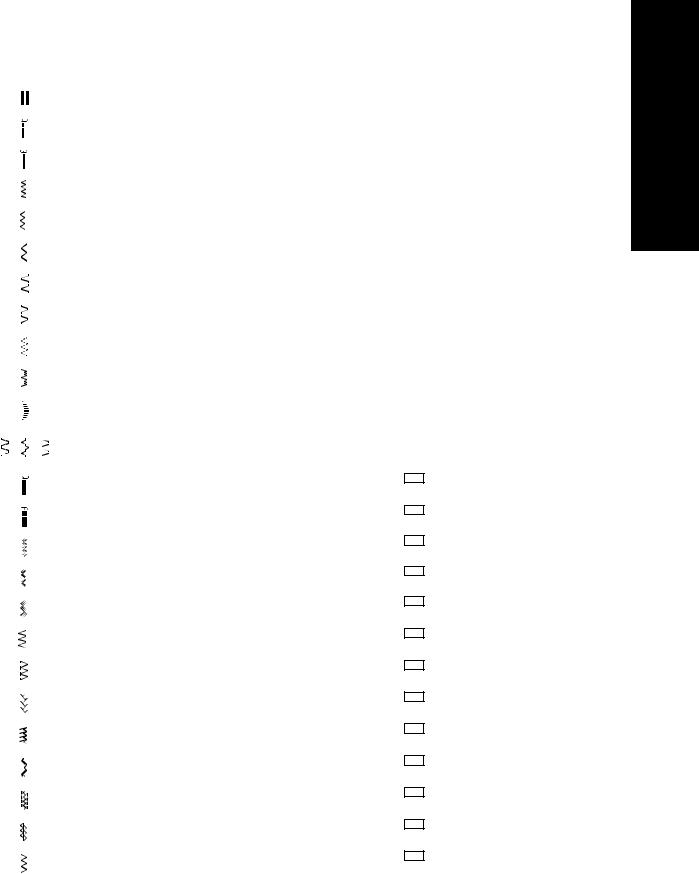
RECOMMENDED LENGTHS FOR STITCHES
(Model XL-6050, XL-6051, XL-6052, XL-6053)
PATTERN |
STITCH NAME |
PRESET WIDTH |
RECOMMENDED |
INSTRUCTION |
|||
[mm(inch)] |
LENGTH [mm(inch)] |
MANUAL PAGE |
|||||
|
|
|
|
||||
|
|
|
|
|
|
|
|
|
|
|
1-STEP AUTOMATIC |
5 |
F-1.5 |
55 |
|
|
|
|
|||||
|
|
|
BUTTONHOLE |
(3/16) |
(1/64-1/16) |
||
|
|
|
|
||||
|
|
|
|
|
|
|
|
|
|
|
STRAIGHT STITCH |
— |
1-4 |
42, 65, 67 |
|
|
|
|
(Left Needle Position) |
(1/16-3/16) |
|||
|
|
|
|
|
|||
|
|
|
STRAIGHT STITCH |
— |
1-4 |
42, 65, 67 |
|
|
|
|
(Center Needle Position) |
(1/16-3/16) |
|||
|
|
|
|
|
|||
|
|
|
ZIGZAG STITCH |
1.5 |
F-4 |
45, 64, 68, 69 |
|
|
|
|
(1/16) |
(1/64-3/16) |
|||
|
|
|
|
|
|||
|
|
|
ZIGZAG STITCH |
3.5 |
F-4 |
45, 64, 68, 69 |
|
|
|
|
(1/8) |
(1/64-3/16) |
|||
|
|
|
|
|
|||
|
|
|
|
|
|
|
|
|
|
|
ZIGZAG STITCH |
5 |
F-4 |
45, 64, 68, 69 |
|
|
|
|
(3/16) |
(1/64-3/16) |
|||
|
|
|
|
|
|||
|
|
|
BLIND HEM STITCH |
3 |
F-2 |
46 |
|
|
|
|
(1/8) |
(1/64-1/16) |
|||
|
|
|
|
|
|||
|
|
|
|
|
|
|
|
|
|
|
SHELL TUCK STITCH |
5 |
F-3 |
47 |
|
|
|
|
(3/16) |
(1/64-1/8) |
|||
|
|
|
|
|
|||
|
|
|
ELASTIC STITCH |
5 |
F-2.5 |
48 |
|
|
|
|
(3/16) |
(1/64-3/32) |
|||
|
|
|
|
|
|||
|
|
|
|
|
|
|
|
|
|
|
STRETCH BLIND HEM STITCH |
4 |
F-1.5 |
46 |
|
|
|
|
(3/16) |
(1/64-1/16) |
|||
|
|
|
|
|
|||
|
|
|
SCALLOP STITCH |
5 |
F-1.5 |
50 |
|
|
|
|
(3/16) |
(1/64-1/16) |
|||
|
|
|
|
|
|||
|
|
|
|
|
|
|
|
|
|
|
DOUBLE ACTION STITCH |
5 |
F-3 |
|
|
|
|
|
BRIDGING STITCH |
49 |
|||
|
|
|
(3/16) |
(1/64-1/8) |
|||
|
|
|
RAMPART STITCH |
|
|||
|
|
|
|
|
|
||
|
|
|
TRIPLE STRETCH STITCH |
— |
SS Fixed |
42 |
|
|
|
|
(Left Needle Position) |
2.5 (3/32) |
|||
|
|
|
|
|
|||
|
|
|
|
|
|
|
|
|
|
|
TRIPLE STRETCH STITCH |
— |
SS Fixed |
42 |
|
|
|
|
(Center Needle Position) |
2.5 (3/32) |
|||
|
|
|
|
|
|||
|
|
|
TRIPLE ZIGZAG |
1.5 |
SS Fixed |
54 |
|
|
|
|
STRETCH STITCH |
(1/16) |
2.5 (3/32) |
||
|
|
|
|
||||
|
|
|
TRIPLE ZIGZAG |
3.5 |
SS Fixed |
54 |
|
|
|
|
STRETCH STITCH |
(1/8) |
2.5 (3/32) |
||
|
|
|
|
||||
|
|
|
TRIPLE ZIGZAG |
5 |
SS Fixed |
54 |
|
|
|
|
STRETCH STITCH |
(3/16) |
2.5 (3/32) |
||
|
|
|
|
||||
|
|
|
|
|
|
|
|
|
|
|
ELASTIC OVERLOCK STITCH |
3 |
SS Fixed |
53 |
|
|
|
|
(1/8) |
2.5 (3/32) |
|||
|
|
|
|
|
|||
|
|
|
ELASTIC OVERLOCK STITCH |
5 |
SS Fixed |
53 |
|
|
|
|
(3/16) |
2.5 (3/32) |
|||
|
|
|
|
|
|||
|
|
|
|
|
|
|
|
|
|
|
FEATHER STITCH |
5 |
SS Fixed |
54 |
|
|
|
|
(3/16) |
2.5 (3/32) |
|||
|
|
|
|
|
|||
|
|
|
COMB STITCH |
4 |
SS Fixed |
53 |
|
|
|
|
(3/16) |
2.5 (3/32) |
|||
|
|
|
|
|
|||
|
|
|
|
|
|
|
|
|
|
|
DECORATIVE STITCH |
5 |
SS Fixed |
51 |
|
|
|
|
(3/16) |
2.5 (3/32) |
|||
|
|
|
|
|
|||
|
|
|
FAGOTING STITCH |
5 |
SS Fixed |
52 |
|
|
|
|
(3/16) |
2.5 (3/32) |
|||
|
|
|
|
|
|||
|
|
|
|
|
|
|
|
|
|
|
DECORATIVE STITCH |
5 |
SS Fixed |
51 |
|
|
|
|
(3/16) |
2.5 (3/32) |
|||
|
|
|
|
|
|||
|
|
|
DECORATIVE HEM STITCH |
5 |
SS Fixed |
49 |
|
|
|
|
(3/16) |
2.5 (3/32) |
|||
|
|
|
|
|
|||
|
|
|
|
|
|
|
|
KNOWING YOUR SEWING MACHINE CONOZCA SU MÁQUINA DE COSER CONOSCERE LA MACCHINA DA CUCIRE
16
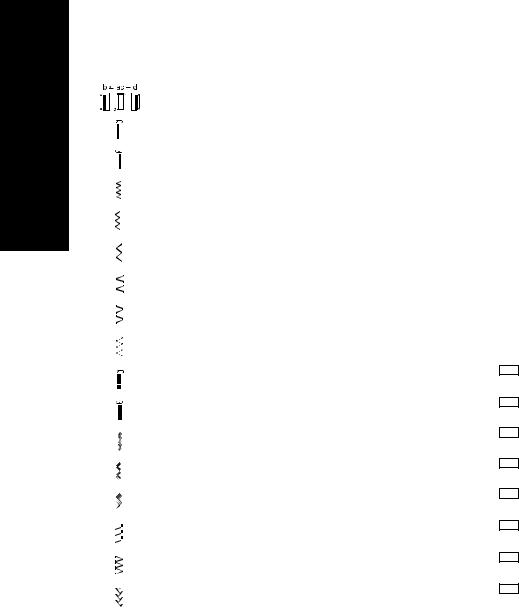
YOUR KNOWINGSU CONOZCALA CONOSCERE
MMACCHINA SEWINGQUINAÁ
MACHINECOSER DECUCIRE DA
RECOMMENDED LENGTHS FOR STITCHES
(Model XL-6040, XL-6041, XL-6042, XL-6043)
PATTERN |
STITCH NAME |
PRESET WIDTH |
RECOMMENDED |
INSTRUCTION |
|||
[mm(inch)] |
LENGTH [mm(inch)] |
MANUAL PAGE |
|||||
|
|
|
|
||||
|
|
|
|
|
|
|
|
|
|
|
4-STEP AUTOMATIC |
5 |
F-1.5 |
58 |
|
|
|
|
BUTTONHOLE |
(3/16) |
(1/64-1/16) |
||
|
|
|
|
||||
|
|
|
|
|
|
|
|
|
|
|
STRAIGHT STITCH |
— |
1-4 |
42, 65, 67 |
|
|
|
|
(Left Needle Position) |
(1/16-3/16) |
|||
|
|
|
|
|
|||
|
|
|
STRAIGHT STITCH |
— |
1-4 |
42, 65, 67 |
|
|
|
|
(Center Needle Position) |
(1/16-3/16) |
|||
|
|
|
|
|
|||
|
|
|
ZIGZAG STITCH |
1.5 |
F-4 |
45, 64, 68, 69 |
|
|
|
|
(1/16) |
(1/64-3/16) |
|||
|
|
|
|
|
|||
|
|
|
ZIGZAG STITCH |
3.5 |
F-4 |
45, 64, 68, 69 |
|
|
|
|
(1/8) |
(1/64-3/16) |
|||
|
|
|
|
|
|||
|
|
|
|
|
|
|
|
|
|
|
ZIGZAG STITCH |
5 |
F-4 |
45, 64, 68, 69 |
|
|
|
|
(3/16) |
(1/64-3/16) |
|||
|
|
|
|
|
|||
|
|
|
BLIND HEM STITCH |
3 |
F-2 |
46 |
|
|
|
|
(1/8) |
(1/64-1/16) |
|||
|
|
|
|
|
|||
|
|
|
|
|
|
|
|
|
|
|
SHELL TUCK STITCH |
5 |
F-3 |
47 |
|
|
|
|
(3/16) |
(1/64-1/8) |
|||
|
|
|
|
|
|||
|
|
|
ELASTIC STITCH |
5 |
F-2.5 |
48 |
|
|
|
|
(3/16) |
(1/64-3/32) |
|||
|
|
|
|
|
|||
|
|
|
|
|
|
|
|
|
|
|
TRIPLE STRETCH STITCH |
— |
SS Fixed |
42 |
|
|
|
|
(Left Needle Position) |
2.5 (3/32) |
|||
|
|
|
|
|
|||
|
|
|
TRIPLE STRETCH STITCH |
— |
SS Fixed |
42 |
|
|
|
|
(Center Needle Position) |
2.5 (3/32) |
|||
|
|
|
|
|
|||
|
|
|
|
|
|
|
|
|
|
|
TRIPLE ZIGZAG |
1.5 |
SS Fixed |
54 |
|
|
|
|
STRETCH STITCH |
(1/16) |
2.5 (3/32) |
||
|
|
|
|
||||
|
|
|
TRIPLE ZIGZAG |
3.5 |
SS Fixed |
54 |
|
|
|
|
STRETCH STITCH |
(1/8) |
2.5 (3/32) |
||
|
|
|
|
||||
|
|
|
|
|
|
|
|
|
|
|
TRIPLE ZIGZAG |
5 |
SS Fixed |
54 |
|
|
|
|
STRETCH STITCH |
(3/16) |
2.5 (3/32) |
||
|
|
|
|
||||
|
|
|
SLANT OVERLOCK STITCH |
3 |
SS Fixed |
53 |
|
|
|
|
(1/8) |
2.5 (3/32) |
|||
|
|
|
|
|
|||
|
|
|
|
|
|
|
|
|
|
|
ELASTIC OVERLOCK STITCH |
5 |
SS Fixed |
53 |
|
|
|
|
(3/16) |
2.5 (3/32) |
|||
|
|
|
|
|
|||
|
|
|
FEATHER STITCH |
5 |
SS Fixed |
54 |
|
|
|
|
(3/16) |
2.5 (3/32) |
|||
|
|
|
|
|
|||
|
|
|
|
|
|
|
|
17
LARGO RECOMENDADO PARA CADA PUNTADA
(Modelo XL-6060, XL-6061, XL-6062, XL-6063)
PUNTADA |
NOMBRE |
ANCHO PRE-PROGRAMADO |
LARGO RECOMENDADO |
PÁGINA DEL |
|||
EN [mm (pulgadas)] |
EN [mm (pulgadas)] |
MANUAL |
|||||
|
|
|
|
||||
|
|
|
|
|
|
|
|
|
|
|
OJAL AUTOMÁTICO |
5 |
F-1,5 |
56 |
|
|
|
|
|||||
|
|
|
DE 1 PASO |
(3/16) |
(1/64-1/16) |
||
|
|
|
|
||||
|
|
|
|
|
|
|
|
|
|
|
PUNTADA RECTA |
— |
1-4 |
42, 66, 67 |
|
|
|
|
(Aguja a la izquierda) |
(1/16-3/16) |
|||
|
|
|
|
|
|||
|
|
|
PUNTADA RECTA |
— |
1-4 |
42, 66, 67 |
|
|
|
|
(Aguja en el centro) |
(1/16-3/16) |
|||
|
|
|
|
|
|||
|
|
|
|
|
|
|
|
|
|
|
PUNTADA ZIGZAG |
1,5 |
F-4 |
45, 64, 68, 70 |
|
|
|
|
(1/16) |
(1/64-3/16) |
|||
|
|
|
|
|
|||
|
|
|
PUNTADA ZIGZAG |
3,5 |
F-4 |
45, 64, 68, 70 |
|
|
|
|
(1/8) |
(1/64-3/16) |
|||
|
|
|
|
|
|||
|
|
|
|
|
|
|
|
|
|
|
PUNTADA ZIGZAG |
5 |
F-4 |
45, 64, 68, 70 |
|
|
|
|
(3/16) |
(1/64-3/16) |
|||
|
|
|
|
|
|||
|
|
|
PUNTADA INVISIBLE |
3 |
F-2 |
46 |
|
|
|
|
(1/8) |
(1/64-1/16) |
|||
|
|
|
|
|
|||
|
|
|
|
|
|
|
|
|
|
|
PUNTADA ONDAS |
5 |
F-3 |
47 |
|
|
|
|
(3/16) |
(1/64-1/8) |
|||
|
|
|
|
|
|||
|
|
|
PUNTADA ELÁSTICA |
5 |
F-2,5 |
48 |
|
|
|
|
(3/16) |
(1/64-3/32) |
|||
|
|
|
|
|
|||
|
|
|
|
|
|
|
|
|
|
|
PUNTADA INVISIBLE |
4 |
F-1,5 |
46 |
|
|
|
|
ELÁSTICA |
(3/16) |
(1/64-1/16) |
||
|
|
|
|
||||
|
|
|
PUNTADA FESTÓN |
5 |
F-1,5 |
50 |
|
|
|
|
(3/16) |
(1/64-1/16) |
|||
|
|
|
|
|
|||
|
|
|
|
|
|
|
|
|
|
|
PUNTADA DE ACCIÓN DOBLE |
5 |
F-3 |
|
|
|
|
|
PUNTADA PUENTE |
49 |
|||
|
|
|
(3/16) |
(1/64-1/8) |
|||
|
|
|
PUNTADA ONDAS ABIERTAS |
|
|||
|
|
|
|
|
|
||
|
|
|
PUNTADA ONDAS |
5 |
F-3 |
53 |
|
|
|
|
ELÁSTICAS |
(3/16) |
(1/64-1/8) |
||
|
|
|
|
||||
|
|
|
|
|
|
|
|
|
|
|
PUNTADA FESTÓN DOBLE |
|
|
|
|
|
|
|
PUNTADA FLECHA |
5 |
F-1 |
51 |
|
|
|
|
PUNTADA PARALELOGRAMO |
(3/16) |
(1/64-1/16) |
||
|
|
|
|
||||
|
|
|
PUNTADA TRIÁNGULO |
|
|
|
|
|
|
|
TRIPLE PUNTADA PESPUNTO |
— |
SS Fija |
42 |
|
|
|
|
(Aguja a la izquierda) |
2,5 (3/32) |
|||
|
|
|
|
|
|||
|
|
|
|
|
|
|
|
|
|
|
TRIPLE PUNTADA PESPUNTO |
— |
SS Fija |
42 |
|
|
|
|
(Aguja en el centro) |
2,5 (3/32) |
|||
|
|
|
|
|
|||
|
|
|
TRIPLE PUNTADA |
1,5 |
SS Fija |
54 |
|
|
|
|
ZIGZAG ELÁSTICA |
(1/16) |
2,5 (3/32) |
||
|
|
|
|
||||
|
|
|
|
|
|
|
|
|
|
|
TRIPLE PUNTADA |
3,5 |
SS Fija |
54 |
|
|
|
|
ZIGZAG ELÁSTICA |
(1/8) |
2,5 (3/32) |
||
|
|
|
|
||||
|
|
|
TRIPLE PUNTADA |
5 |
SS Fija |
54 |
|
|
|
|
ZIGZAG ELÁSTICA |
(3/16) |
2,5 (3/32) |
||
|
|
|
|
||||
|
|
|
|
|
|
|
|
|
|
|
PUNTADA OVERLOCK |
3 |
SS Fija |
53 |
|
|
|
|
ELÁSTICA |
(1/8) |
2,5 (3/32) |
||
|
|
|
|
||||
|
|
|
PUNTADA OVERLOCK |
5 |
SS Fija |
53 |
|
|
|
|
ELÁSTICA |
(3/16) |
2,5 (3/32) |
||
|
|
|
|
||||
|
|
|
|
|
|
|
|
|
|
|
PUNTADA PLUMA |
5 |
SS Fija |
54 |
|
|
|
|
(3/16) |
2,5 (3/32) |
|||
|
|
|
|
|
|||
|
|
|
PUNTADA PEINE |
4 |
SS Fija |
53 |
|
|
|
|
(3/16) |
2,5 (3/32) |
|||
|
|
|
|
|
|||
|
|
|
|
|
|
|
|
|
|
|
PUNTADA DECORATIVA |
5 |
SS Fija |
51 |
|
|
|
|
(3/16) |
2,5 (3/32) |
|||
|
|
|
|
|
|||
|
|
|
PUNTADA FAGOTING |
5 |
SS Fija |
52 |
|
|
|
|
(3/16) |
2,5 (3/32) |
|||
|
|
|
|
|
|||
|
|
|
|
|
|
|
|
|
|
|
PUNTADA DECORATIVA |
5 |
SS Fija |
51 |
|
|
|
|
(3/16) |
2,5 (3/32) |
|||
|
|
|
|
|
|||
|
|
|
PUNTADA DECORATIVA |
5 |
SS Fija |
49 |
|
|
|
|
INVISIBLE |
(3/16) |
2,5 (3/32) |
||
|
|
|
|
||||
|
|
|
|
|
|
|
|
|
|
|
PUNTADA DECORATIVA |
5 |
SS Fija |
51 |
|
|
|
|
(3/16) |
2,5 (3/32) |
|||
|
|
|
|
|
|||
|
|
|
|
|
|
|
|
KNOWING YOUR SEWING MACHINE CONOZCA SU MÁQUINA DE COSER CONOSCERE LA MACCHINA DA CUCIRE
18
 Loading...