


2600/2610
USER’S GUIDE
GUÍA DE USUARIO
•Read this User’s Guide before you start using your P-touch.
•Keep this User’s Guide in a handy place for future reference.
•Antes de usar su equipo por primera vez, lea cuidadosamente esta guía de usuario.
•Guarde esta guía de usuario para futuras referencias.

INTRODUCTION
Thank you for purchasing the P-touch 2600/2610!
Your new P-touch will allow you to create labels and stamps for any need. Its versatility enables you to design custom labels by choosing from a variety of frame designs and from many character sizes and styles. TZ tapes in five different widths (1/4″ (6 mm), 3/8″ (9 mm), 1/2″ (12 mm), 3/4″ (18 mm) and 1″ (24 mm)) and a variety of colors allow you to print personalized labels, useful for color-coded labelling. In addition, three types of AV label cassettes can be used to create easy-to-peel-off, pre-sized address and filing labels (AV2067: 3/4″ × 2 5/8″ (20 mm × 67 mm) address labels, AV1957: 3/4″ × 2 1/4″ (19 mm × 57 mm) return address labels and AV1789: 5/8″ × 3 1/2″ (17 mm × 89 mm) file folder labels).
You no longer have to worry about urgent tasks that require professional printing. In the office, the factory, the lab and the home, the quality and performance of the P-touch 2600/2610 makes it an extremely practical machine. Finally, as you may want to occasionally refer to this User’s Guide, we suggest that you keep it in a handy place. (The PT-2600 and the PT-2610 models are equipped with the same functions; however, the PT-2610 includes a carrying case and additional tape.)
Federal Communications Commission (FCC) Declaration of Conformity (For USA Only)
Responsible Party |
: Brother International Corporation |
|
100 Somerset Corporate Boulevard |
|
Bridgewater, NJ 08807-0911 USA |
|
TEL : (908) 704-1700 |
declares that the product |
|
Product Name |
: Brother Label Printer P-touch 2600/2610 |
Model Number |
: PT-2600/2610 |
complies with Part 15 of the FCC Rules. Operation is subject to the following two conditions: (1) thisdevice may not cause harmful interference, and (2) this device must accept any interference received,including interference that may cause undesired operation.
This equipment has been tested and found to comply with the limits for a Class B digital device, pursuant to Part 15 of the FCC Rules. These limits are designed to provide reasonable protection against harmful interference in a residential installation. This equipment generates, uses, and can radiate radio frequency energy and, if not installed and used in accordance with the instructions, may cause harmful interference to radio communications. However, there is no guarantee that interference will not occur in a particular installation. If this equipment does cause harmful interference to radio or television reception, which can be determined by turning the equipment off and on, the user is encouraged to try to correct the interference by one or more of the following measures:
-Reorient or relocate the receiving antenna
-Increase the separation between the equipment and receiver.
-Connect the equipment into an outlet on a circuit different from that to which the receiver is connected.
-Consult the dealer or an experienced radio/TV technician for help.
-Changes or modifications not expressly approved by Brother Industries, Ltd. could void the user’s authority to operate the equipment.
Patent numbers and patent publication numbers which are related to this product are as below:
USP4839742 |
USP4976558 |
USP5009530 |
USP5120147 |
USP4927278 |
USP4983058 |
USP5069557 |
|

CONTENTS |
|
Brother® 90 Days/One Year Limited Warranty and Replacement Service |
|
(For USA Only) .................................................................................................. |
iii |
Important Information ......................................................................................... |
v |
Getting Started |
|
GENERAL DESCRIPTION .................................................................................... |
1 |
GENERAL PRECAUTIONS................................................................................... |
3 |
BATTERIES .......................................................................................................... |
3 |
OPTIONAL AC ADAPTER ................................................................................... |
4 |
TAPE CASSETTE .................................................................................................. |
5 |
CONNECTING THE P-TOUCH TO A COMPUTER ............................................. |
6 |
INSTALLING THE SOFTWARE AND PRINTER DRIVER....................................... |
7 |
READING THE USER’S GUIDE.......................................................................... |
29 |
USING P-TOUCH EDITOR 3.2 ......................................................................... |
30 |
USING THE P-TOUCH QUICK EDITOR ........................................................... |
33 |
UNINSTALLING THE SOFTWARE & PRINTER DRIVER..................................... |
38 |
ATTACHING LABELS ........................................................................................ |
41 |
PRINT HEAD & ROLLERS.................................................................................. |
42 |
For Your Information |
|
POWER KEY...................................................................................................... |
43 |
CURSOR KEYS .................................................................................................. |
43 |
CODE, ALT & SHIFT KEYS ................................................................................ |
44 |
SPACE KEY ........................................................................................................ |
47 |
RETURN KEY..................................................................................................... |
47 |
NEW BLOCK KEY.............................................................................................. |
49 |
TAB FUNCTION ............................................................................................... |
50 |
DELETE KEY ...................................................................................................... |
52 |
LINE OUT FUNCTION...................................................................................... |
52 |
CLEAR FUNCTION ........................................................................................... |
53 |
ACCENT FUNCTION ........................................................................................ |
55 |
SYMBOL FUNCTION........................................................................................ |
57 |
AUTO FORMAT FUNCTION ............................................................................ |
59 |
i
STAMP FUNCTION........................................................................................... |
71 |
LOCAL FORMAT FUNCTION ........................................................................... |
74 |
FONT FUNCTION ............................................................................................ |
75 |
SIZE & WIDTH FUNCTIONS............................................................................. |
76 |
STYLE FUNCTION ............................................................................................ |
79 |
UNDERLINE FUNCTION .................................................................................. |
81 |
FRAME FUNCTION........................................................................................... |
82 |
TAPE MARGIN FUNCTION .............................................................................. |
84 |
HORIZONTAL ALIGNMENT FUNCTION ......................................................... |
85 |
MIRROR PRINTING FUNCTION....................................................................... |
86 |
LENGTH FUNCTION ........................................................................................ |
87 |
BARCODE FUNCTION ..................................................................................... |
88 |
TZ CUT FUNCTION.......................................................................................... |
92 |
PRINT KEY ........................................................................................................ |
93 |
FEED & CUT FUNCTION .................................................................................. |
93 |
NUMBERING FUNCTION ................................................................................ |
94 |
REPEAT PRINTING FUNCTION ........................................................................ |
97 |
MEMORY FUNCTIONS..................................................................................... |
99 |
TROUBLESHOOTING..................................................................................... |
107 |
ERROR MESSAGE LIST .................................................................................... |
108 |
SPECIFICATIONS ............................................................................................ |
113 |
ACCESSORIES (For USA Only) ........................................................................ |
115 |
INDEX ............................................................................................................. |
118 |
PT-2600/2610 CONTACT INFORMATION (For USA Only) ........................... |
120 |
ii
Brother® 90 Days/One Year Limited Warranty and Replacement Service
(For USA Only)
Who is covered: |
Consumable and Accessory Items); |
•This limited warranty (“warranty”) is given only to the original end-use/retail purchaser (referred to in this warranty as “Original Purchaser”) of the accompanying product, consumables and accessories (collectively referred to in this warranty as “this Product”).
•If you purchased a product from someone other than an authorized Brother reseller in the United States or if the product was used (including but not limited to floor models or refurbished product), prior to your purchase you are not the Original Purchaser and the product that you purchased is not covered by this warranty.
What is covered:
•This Product includes a Machine and Consumable and Accessory Items. Consumable and Accessory Items include but are not limited to label cassettes, cutters, stamps, power adapters, cases and batteries.
•Except as otherwise provided herein, Brother warrants that the Machine and the accompanying Consumable and Accessory Items will be free from defects in materials and workmanship, when used under normal conditions.
•This warranty applies only to products purchased and used in the United States. For products purchased in, but used outside, the United States, this warranty covers only warranty service within the United States (and does not include shipping outside the United States).
What is the length of the Warranty Period(s):
•Machines have a two-stage warranty: 90 days from the original purchase date and an additional warranty up to one year from the original purchase date.
•Consumable and Accessories Items accompanying the Machine have a one-stage warranty: 90 Days from the original purchase date.
What is NOT covered:
This warranty does not cover: (1)Physical damage to this Product;
(2)Damage caused by improper installation, improper or abnormal use, misuse, neglect or accident (including but not limited to transporting this Product without the proper preparation and/or packaging);
(3)Damage caused by another device or software used with this Product (including
but not limited to damage resulting from use of non Brother®-brand parts and
(4)Consumable and Accessory Items that expired in accordance with a rated life; and,
(5)Problems arising from other than defects in materials or workmanship.
This limited warranty is VOID if this Product has been altered or modified in any way (including but not limited to attempted warranty repair without authorization from Brother and/or alteration/removal of the serial number).
What to do if you think your Product is eligible for warranty service:
Report your issue to either our Customer Service Hotline at 1-877-478-6824 or a Brother Authorized Service Center within the applicable warranty period. Supply Brother or the Brother Authorized Service Center with a copy of your dated bill of sale showing that this Product was purchased within the U.S. For the name of local Brother Authorized Service Center(s), call 1-800-521-2846.
What Brother will ask you to do:
After contacting Brother or a Brother Authorized Service Center, you may be required to deliver (by hand if you prefer) or send the Product properly packaged, freight prepaid, to the Authorized Service Center together with a photocopy of your bill of sale.
You are responsible for the cost of shipping, packing product, and insurance (if you desire). You are also responsible for loss or damage to this Product in shipping.
What Brother will do:
First 90 Days: If the problem reported concerning your Machine and/or accompanying Consumable and Accessory Item(s) is covered by this warranty and if you first reported the problem to Brother or an Authorized Service Center within 90 days from the date of original purchase, Brother or its Authorized Service Center will repair or replace the Machine and/ or accompanying Consumable and Accessory Item(s) at no charge to you for parts or labor. The decision as to whether to repair or replace the Machine and/or accompanying Consumable and Accessory Item(s) is made by Brother in its sole discretion. Brother reserves the right to supply a refurbished or remanufactured replacement Machine and/or accompanying Consumable and Accessory Item(s) and use refurbished parts provided such replacement products conform to the manufacturer’s specifications for new product/parts. The repaired or replacement Machine and/or accompanying Consumable and Accessory Item(s) will be returned to you freight prepaid or made available for you to pick up at a conveniently located Authorized Service Center.
iii

Brother® 90 Days/One Year Limited Warranty and Replacement Service
(For USA Only)
91st day to 1 year:
If the problem reported concerning your Machine is covered by this warranty and if you first reported the problem after 90 days, but before 1 year from the date
of original purchase, Brother will furnish, free of charge (excluding labor charges), replacement part(s) for those part(s) of the Machine determined by Brother or its
Authorized Service Center to be defective.
You will be responsible for all labor charges associated with repairs made after the first 90 days from original purchase. After 90 days from the original purchase date, accompanying Consumable and Accessory Items are no longer covered by this warranty. If the Machine and/or accompanying Consumable and Accessory Item(s) are not covered by this warranty (either stage), you will be charged for shipping the Machine and/or accompanying Consumable and Accessory Item(s) back to you.
The foregoing are your sole (i.e., only) and exclusive remedies under this warranty.
What happens when Brother elects to replace your Machine:
If you have delivered the Machine to an
Authorized Service Center, the Authorized
Service Center will provide you with a replacement Machine after receiving one from
Brother. If you are dealing directly with Brother, Brother will send to you a replacement Machine with the understanding that you will, after receipt of the replacement Machine, supply the required proof of purchase information, together with the
Machine that Brother agreed to replace. You are then expected to pack the Machine that Brother agreed to replace in the package from the replacement Machine and return it to Brother using the air bill supplied by Brother in accordance with the instructions provided by Brother. Since you will be in possession of two machines, Brother will require that you provide a valid major credit card number. Brother will issue a hold against the credit card account number that you provide until Brother receives your original Product and determines that your original Product is entitled to warranty coverage.
Your credit card will be charged up to the cost of a new Product
only if: (i) you do not return your original
Product to Brother within five (5) business days; (ii) the problems of your original Product are not covered by the limited warranty; (iii) the proper packaging instructions are not followed and has caused damage to the product; or (iv) the warranty
period on your original Product has expired or has not been sufficiently validated with a copy of the proof of purchase (bill of sale).
The replacement Machine you receive (even if refurbished or remanufactured) will be covered by the balance of the limited warranty period remaining on the original
Product, plus an additional thirty (30) days.
You will keep the replacement Machine that is sent to you and your original Machine shall become the property of Brother. Retain your original accessory items and a copy of the return air bill, signed by the courier.
Limitations:
Brother is not responsible for damage to or loss of any equipment, media, programs or data related to the use of this Product.
Except for that repair or replacement as described above, Brother shall not be liable for any direct, indirect, incidental or consequential damages or specific relief.
Because some states do not allow the exclusion or limitation of consequential or incidental damages, the above limitation may not apply to you.
THIS WARRANTY IS GIVEN IN LIEU OF
ALL OTHER WARRANTIES, WRITTEN OR ORAL, WHETHER EXPRESSED BY
AFFIRMATION, PROMISE, DESCRIPTION,
DRAWING, MODEL OR SAMPLE. ANY AND
ALL WARRANTIES OTHER THAN THIS
ONE, WHETHER EXPRESS OR IMPLIED,
INCLUDING IMPLIED WARRANTIES OF MERCHANTABILITY AND FITNESS FOR A PARTICULAR PURPOSE, ARE HEREBY DISCLAIMED.
•This Limited Warranty is the only warranty that Brother is giving for this Product. It is the final expression and the exclusive and only statement of Brother’s obligations to you. It replaces all other agreements and understandings that you may have with Brother or its representatives.
•This warranty gives you certain rights and you may also have other rights that may vary from state to state.
•This Limited Warranty (and Brother’s obligation to you) may not be changed in any way unless you and Brother sign the same piece of paper in which we (1) refer to this Product and your bill of sale date,
(2)describe the change to this warranty and (3) agree to make that change.
Important: We recommend that you keep all original packing materials, in the event that you ship this product.
iv

Important Information
Should you have questions, or need information about your Brother Product, we have a variety of support options for you to choose from:
USA-Customer Service:
Customer Service 877-478-6824 (voice)
Customer Service 901-379-1210 (fax)
Automated Faxback 800-521-2846
World Wide Web
www.brother.com
Supplies / Accessories www.brothermall.com or 888-879-3232
BROTHER INTERNATIONAL CORPORATION 100 SOMERSET CORPORATE BLVD. BRIDGEWATER, NEW JERSEY 08807-0911
Please record your model and serial number and your date and location of Purchase below for your records. Keep this information with your proof of purchase (bill of sale) in case your Product requires service.
Model #
Serial #
Date of purchase:
Store where purchased:
Location of store:
Important: We recommend that you keep all original packing materials, in the event you ship this product.
v

 Getting Started
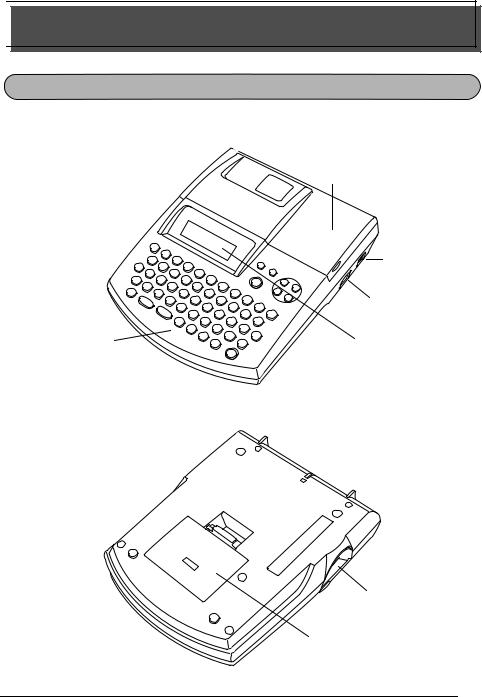
GENERAL DESCRIPTION
TOP VIEW
Tape compartment cover
AC adapter connector
USB port
LCD display
Keyboard
BOTTOM VIEW
Tape exit slot
Battery compartment cover
1

KEYBOARD & LCD DISPLAY
Delete key
Return key |
Cursor keys |
Power key |
2

GENERAL PRECAUTIONS
●To avoid injuries, do not touch the cutter’s edge.
●Use only Brother TZ tapes or Brother/Avery AV labels with this machine to avoid damage.
Do not use tapes that do not have the 
 or
or  mark. Brother/Avery cannot be held responsible for trouble or damage by the use of unauthorized supplies.
●Do not pull on the tape being fed from the P-touch. This may damage the tape cassette.
●Do not use the machine in dusty places, and keep it out of both direct sunlight and rain.
●Do not expose the machine to high temperatures or high humidity. Never leave it on the dashboard or in the back of your car.
●Do not leave any rubber or vinyl on the machine for an extended period of time. Doing so may cause staining.
●Do not clean the machine with alcohol or other organic solvents. Use a soft, dry cloth only.
●Do not put any foreign objects into or anything on the machine.
●Use only the AC adapter (option: model AD-60) designed exclusively for this machine. Use of any other adapter may void the warranty.
●Do not try to disassemble the AC adapter.
●When the machine is not being used for a long period of time and it is not necessary to keep the text files stored in the memory, disconnect the AC adapter, and remove the batteries to prevent them from leaking and damaging the machine.
●When the AC adapter is connected, unplugging the adapter from the electrical outlet before unplugging it from the machine can delete all text files in the memory, even if batteries are installed.
●Use eight AA alkaline batteries in this machine.
●If the batteries are not installed with their positive and negative poles pointing in the correct direction, the batteries may leak, overheat or burst, or the print head may overheat.
●Use only the enclosed USB interface cable. Use of any other cable will void the warranty.
●Avery® is a registered trademark of AVERY DENNISON CORPORATION.
●IBM® and PC-DOS® are trademarks of International Business Machines, Inc.
●Microsoft® and Microsoft Windows® are registered trademarks of Microsoft Corp. in the US and other countries.
●Macintosh is a registered trademark of Apple Computer, Inc.
●All other software and product names mentioned are trademarks of registered trademarks of their respective companies.
●Portions of graphics filter software are based in part on the work of the Independent JPEG group.
BATTERIES
This portable machine can be used anywhere by installing eight (8) AA alkaline batteries. When you change the batteries, always replace all eight at the same time.
To change the batteries:
1Remove the battery compartment cover on the back of the machine.
3
2If batteries are already installed, remove them.
3Insert eight new AA alkaline batteries, making sure that their poles point in the correct direction.
4Attach the battery compartment cover.
Be sure to insert the new batteries within five minutes of removing the old ones, otherwise the text shown in the display and any text files stored in the memory will be lost (unless the machine is plugged into an AC outlet with the AC adapter).
Remove the batteries and disconnect the AC adapter if you do not intend to use this machine for an extended period of time. When the power is disconnected, all text shown in the display and stored in the memory will be lost.
If the batteries are not installed with their positive and negative poles pointing in the correct direction, the batteries may leak, overheat or burst, or the print head may overheat.
OPTIONAL AC ADAPTER
The AC adapter (model AD-60) allows you to use this machine wherever there is an electrical outlet.
To connect the optional AC adapter:
1Insert the plug on the adapter cord into the connector marked DC IN 9.5V on the right side of the machine.
2Insert the plug on the adapter into the nearest standard electrical outlet.
Only use the AC adapter designed exclusively for this machine.
Remove the batteries and disconnect the AC adapter if you do not intend to use this machine for an extended period of time. When the power is disconnected, all text shown in the display and stored in the memory will be lost.
When the AC adapter is connected, unplugging the adapter from the electrical outlet before unplugging it from the machine can delete all text files in the memory, even if batteries are installed.
4

DC IN 9.5V
TAPE CASSETTE
TZ tape cassettes are available for this machine in a wide variety of types, colors and sizes, enabling you to make distinctive color-coded labels and stylized stamps. AV label cassettes are also available for expanded addressing and filing capabilities. This machine has been designed to allow you to change cassettes quickly and easily.
To change the tape cassette:
1Lift open the tape compartment cover. The installed cassette is also released.
2If a tape cassette is already installed, remove it by pulling it straight up.
3If the ink ribbon in the tape cassette to be installed is loose, use your finger to wind the toothed wheel in the direction of the arrow on the cassette until there is no slack in the ribbon. Also, make sure that the end of the tape feeds under the tape guides (for TZ tape only).
For stamp and AV label cassettes, the tightening of the ink ribbon does not apply, since they are not equipped with ink ribbons.
If you are using a new tape cassette provided with a stopper, be sure to remove the stopper.
4Insert the tape cassette firmly into the tape compartment, making sure that the entire back of the cassette touches the bottom of the compartment.
When inserting the tape cassette, make sure that the inner ribbon does not catch on the corner of the metal guide (for TZ tape only).
5Close the compartment cover, and then turn on the machine, if it is off.
6Hold down cand press ronce to advance the tape and remove any slack (for TZ tape only).
Skip this step if an AV label cassette is being installed.
5
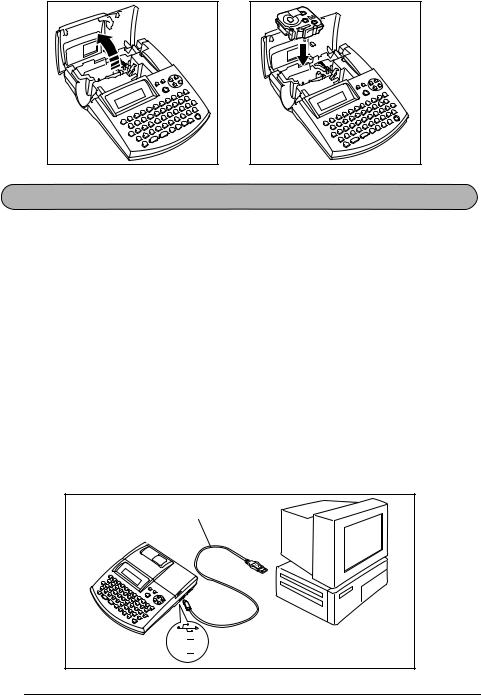
CONNECTING THE P-TOUCH TO A COMPUTER
This machine is equipped with a USB port, allowing you to connect the P-touch to your IBM PC-compat- ible or Macintosh computer, and print labels and stamps created using the P-touch Editor software.
The P-touch Editor software and the printer driver must be installed before the P-touch is connected to the computer or turned on. Follow the installation procedure on pages 7 through 40 to install the P-touch Editor software and the printer driver, and connect the P-touch to the computer when you are instructed to do so.
Only use the enclosed USB interface cable to connect the PT-2600/2610 to the computer.
To connect the P-touch to the computer:
1Insert the flat (A) connector on the USB cable into the USB port on the computer.
2Insert the square (B) connector on the USB cable into the USB port on the right side of the P-touch.
3Turn on the P-touch.
When making a USB connection through a hub, a proper connection may not be possible due to the type of hub used. If printing is not possible with a hub connection, try connecting the PT-2600/2610 directly to the computer using the USB interface cable.
USB interface cable
 USB port
6

INSTALLING THE SOFTWARE AND PRINTER DRIVER
In order to provide even more illustration and layout features to the label-making possibilities available with your P-touch 2600/2610, two applications are available on the enclosed CDROM: P-touch Editor 3.2 and P-touch Quick Editor. With either application, the printer driver must also be installed in order to print labels from the P-touch 2600/2610.
On an IBM PC-Compatible Computer
BEFORE INSTALLATION
Check that your system configuration meets the following requirements. Computer: IBM PC or compatible
Operating system: Pre-installed with Microsoft® Windows® 98, 98 SE, Me, 2000 Professional or XP
For installation on Windows® 2000, administrator privileges are required. In addition,
printing requires power user or administrator privileges. This software cannot be operated in Users groups. In addition, this software is not compatible with the Windows® 2000 Server operating system.
With Windows® XP, printing and installation is only possible from an account with administrator privileges. These operations cannot be performed from an account with limited privileges.
Hard disk free space: At least 20 MB (100 MB to install full option)
Up to 100 MB of hard disk free space may be needed when printing long labels or large amounts of data.
Memory: At least 64 MB
Monitor: VGA or higher graphics card
USB port
CD-ROM drive
INSTALLING THE P-TOUCH EDITOR 3.2 SOFTWARE
The P-touch Editor 3.2 software includes a variety of more complex functions for printing barcodes and images, enabling you to design just about any label that you can image. Install the P-touch Editor 3.2 software onto a PC as described below.
Do not connect the P-touch 2600/2610 to the computer before installing the software, otherwise it may not be installed correctly. Be sure to connect the P-touch 2600/2610 only when you are instructed to do so.
7
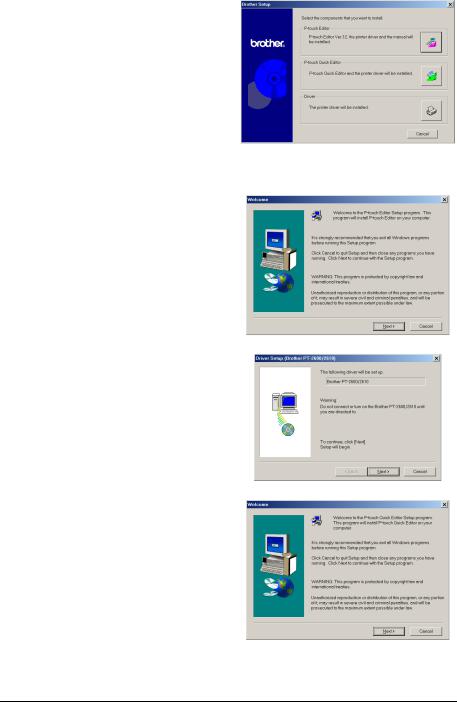
1Insert the enclosed CD-ROM into the computer’s CD-ROM drive. A dialog box automatically appears, allowing you to select what to install.
If the dialog box does not automatically appear, double-click “My Computer” on the desktop, and then double-click the
CD-ROM drive containing the CD-ROM. (For Windows® XP, click “My Computer” in the Start menu, and then double-click the CD-ROM drive containing the CD-ROM.)
Next, double-click “Setup.exe” to display the dialog box.
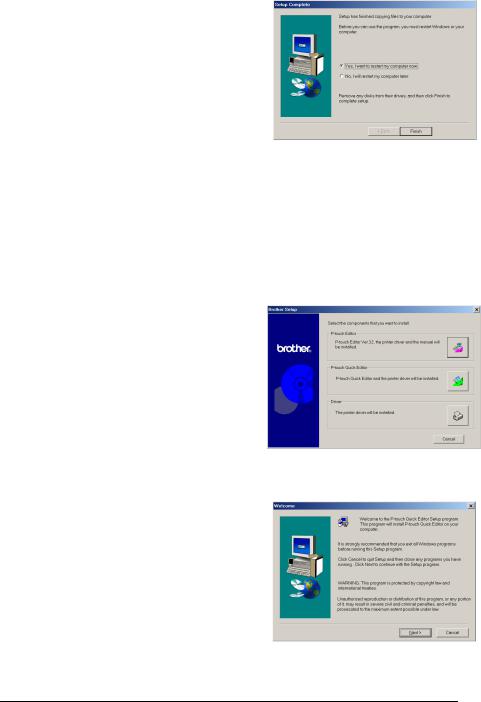
2Click the upper button (P-touch Editor). The InstallShield® Wizard for installing the P-touch Editor software starts up, and then the Welcome dialog box appears.
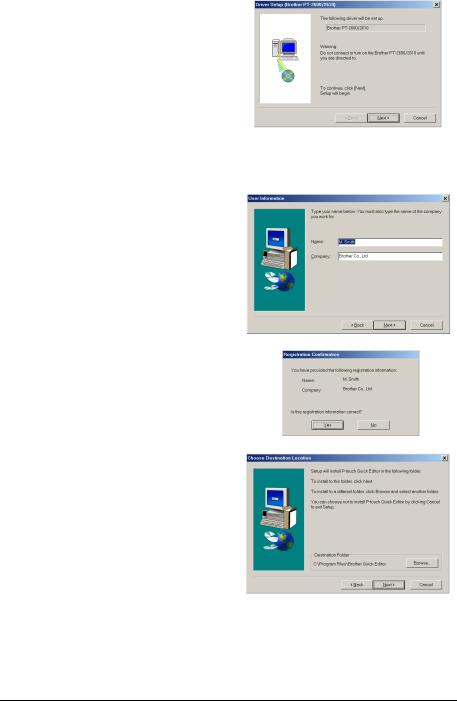
To install just the printer driver, click the lower button (Driver). The first
Driver Setup dialog box appears, informing you that the PT-2600/2610 printer driver will be installed. Continue with the procedure in INSTALLING THE PRINTER DRIVER on page 13.
To install the P-touch Quick Editor software, click the middle button (P- touch Quick Editor). Continue with the procedure in INSTALLING THE P- TOUCH QUICK EDITOR SOFTWARE on page 11.
8
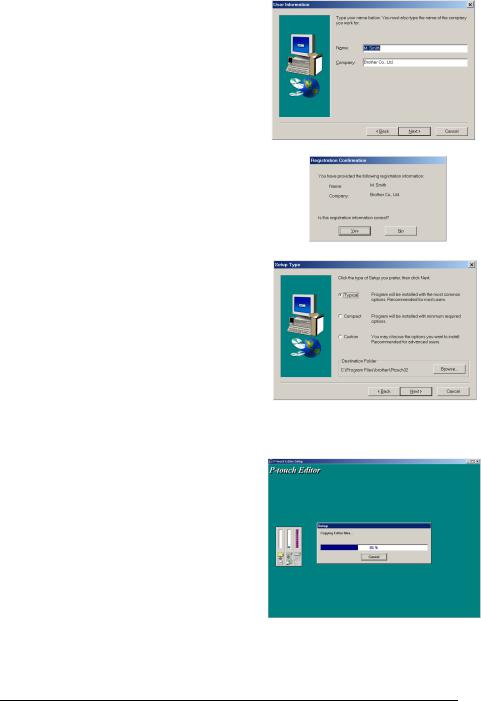
3Carefully read the contents of the Welcome dialog box, and then click the Next button to continue. The User Information dialog box appears.
4Type the necessary information into the
appropriate boxes (If the information has already been registered in Windows®, it will automatically appear.), and then click the Next button. A dialog box appears, asking for confirmation of the entered information.
5Click the Yes button to register the entered information.
To change the registration information, click the No button, and then return to step 4.
The Setup Type dialog box appears.
6Select the installation method, and then click the Next button.
•For a Typical or Compact installation
Selecting “Typical” or “Compact”, then clicking the Next button immediately starts installation.
Typical: All of the basic options (P-touch Editor 3.2, Clip art, Auto Format templates, Help and fonts) are installed.
Compact: Only P-touch Editor 3.2 is installed.
9
•For a Custom installation
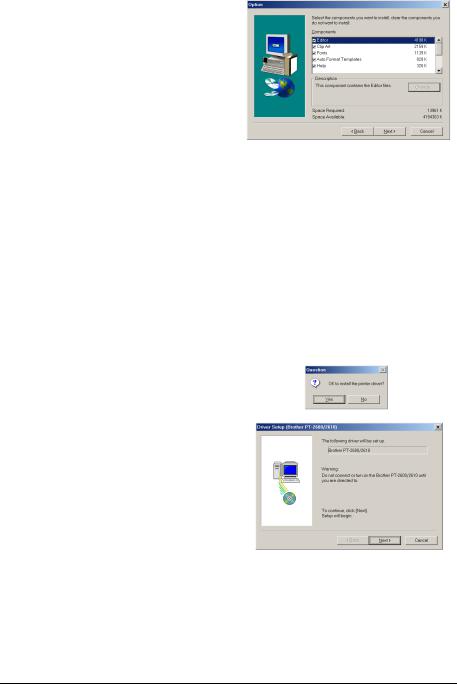
Selecting “Custom”, then clicking the Next button displays a dialog box that allows you to select which options to install. Only the options with a check mark beside them will be installed. In addition to the basic options listed for a Typical installation, the User’s Guide can also be installed.
1)Select which options to install. Editor: P-touch Editor 3.2 software
Clip Art: Illustrations for the P-touch Editor 3.2 Clip Art function
Fonts
Auto Format Templates: Templates for the Auto Format function Help: Help files for P-touch Editor 3.2
User’s Guide: HTML User’s Guide for the P-touch Editor 3.2 (The User’s Guide can also be viewed from the CD-ROM.)
If the Change button can be clicked while an option is selected, sub-components can be selected. Click the Change button to display the Select Sub-components dialog box, and then select the sub-components that you wish to install by putting a check mark beside them. If certain options or sub-components are not installed, some P- touch Editor functions may not be available. After selecting the desired sub-compo- nents, click the Continue button.
2)Click the Next button to begin installation.
7After P-touch Editor is installed, a dialog box appears, allowing you to select whether or not to install the printer driver.
To install the printer driver, click the Yes button. The first Driver Setup dialog box appears, informing you that the PT-2600/ 2610 printer driver will be installed.
Continue with the procedure in INSTALLING THE PRINTER DRIVER on page 13.
10
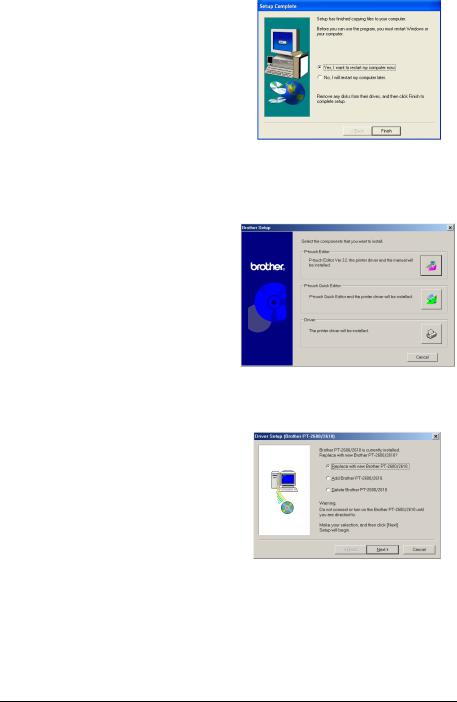
If the printer driver is already installed, click the No button. A dialog box appears explaining that installation is finished. Select “Yes, I want to restart my computer now.”, click the Finish button to restart the computer, and then remove the CD-ROM from the CD-ROM drive.
INSTALLING THE P-TOUCH QUICK EDITOR SOFTWARE
The P-touch Quick Editor software provides quick access to the more simple label-designing features for easy text input and instant printing of labels. Install the P-touch Quick Editor software onto a PC as described below.
Do not connect the P-touch 2600/2610 to the computer before installing the software, otherwise it may not be installed correctly. Be sure to connect the P-touch 2600/2610 only when you are instructed to do so.
1Insert the enclosed CD-ROM into the computer’s CD-ROM drive. A dialog box automatically appears, allowing you to select what to install.
If the dialog box does not automatically appear, double-click “My Computer” on the desktop, and then double-click the
CD-ROM drive containing the CD-ROM. (For Windows® XP, click “My Computer” in the Start menu, and then double-click the CD-ROM drive containing the CD-ROM.)
Next, double-click “Setup.exe” to display the dialog box.
2Click the middle button (P-touch Quick Editor). The InstallShield® Wizard for installing the P-touch Quick Editor software starts up, and then the Welcome dialog box appears.
11
To install just the printer driver, click the lower button (Driver). The first Driver Setup dialog box appears, informing you that the PT-2600/2610 printer driver will be installed. Con-
tinue with the procedure in INSTALLING THE PRINTER DRIVER on page 13.
To install the P-touch Editor 3.2 software, click the upper button (P-touch Editor). Continue with the procedure in
INSTALLING THE P-TOUCH EDITOR 3.2 SOFTWARE on page 7.
3Carefully read the contents of the Welcome dialog box, and then click the Next button to continue. The User Information dialog box appears.
4Type the necessary information into the
appropriate boxes (If the information has already been registered in Windows®, it will automatically appear.), and then click the Next button. A dialog box appears, asking for confirmation of the entered information.
5Click the Yes button to register the entered information.
To change the registration information, click the No button, and then return to step 4.
The Choose Destination Location dialog box appears.
12
6Click the Next button to begin installation.
To change the location where P-touch Quick Editor will be installed, click the Browse button, and then select the installation folder in the Choose Folder dialog box that appears. Then, click the OK button.
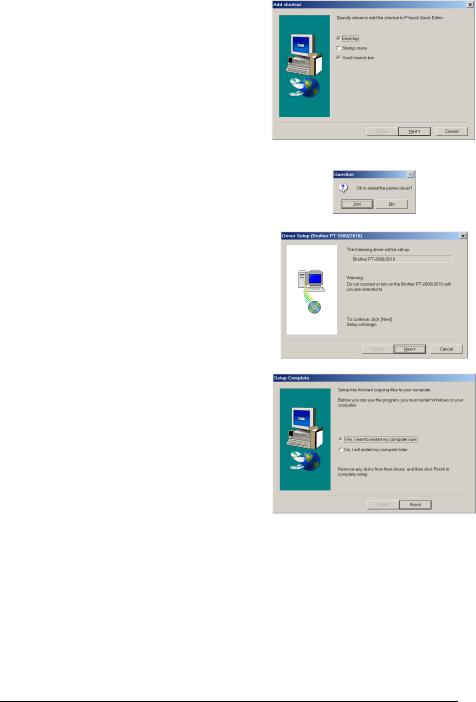
After P-touch Quick Editor is installed, a dialog box appears, allowing you to select where shortcuts to P-touch Quick Editor will be added.
7Select the desired locations for the shortcuts, and then click the Next button. A dialog box appears, allowing you to select whether or not to install the printer driver.
To install the printer driver, click the Yes button. The first Driver Setup dialog box appears, informing you that the PT-2600/ 2610 printer driver will be installed.
Continue with the procedure in INSTALLING THE PRINTER DRIVER on page 13.
If the printer driver is already installed, click the No button. A dialog box appears explaining that installation is finished. Select “Yes, I want to restart my computer now.”, click the Finish button to restart the computer, and then remove the CD-ROM from the CD-ROM drive.
INSTALLING THE PRINTER DRIVER
With Plug-and-Play, new devices connected to the system are detected, and their drivers are automatically installed. If the P-touch 2600/2610 is to be connected through the USB port, its driver will be installed with Plug-and-Play. Be sure to read the installation instructions described below before installing the printer driver supplied on the CD-ROM.
Do not connect the P-touch 2600/2610 to the computer until you are instructed to do so, otherwise the PT-2600/2610 printer driver may not be installed correctly.
13
With Windows® 98, 98 SE, Me or 2000:
1In the dialog box that appears, informing you that the PT-2600/2610 printer driver will be installed, click the Next button. A dialog box appears, instructing you to connect the P-touch 2600/2610 to the computer.
2Connect the P-touch 2600/2610 to the computer using the enclosed USB interface cable as described on page 6, and then turn on the P-touch 2600/2610. A dialog box appears, indicating that the printer driver has been installed.
3Click the Finish button. A dialog box appears, indicating that the installation is finished.
4Select “Yes, I want to restart my computer now.”, click the Finish button to restart the computer, and then remove the CD-ROM from the computer.
With Windows® XP:
1In the dialog box that appears, informing you that the PT-2600/2610 printer driver will be installed, click the Next button. A dialog box appears, instructing you to connect the P-touch 2600/2610 to the computer.
14
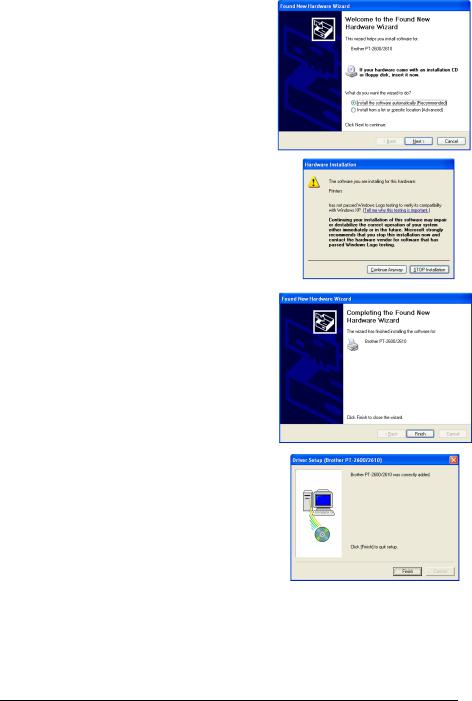
2Connect the P-touch 2600/2610 to the computer using the enclosed USB interface cable as described on page 6, and then turn on the P-touch 2600/2610. The first Found New Hardware Wizard dialog box appears.
3Select “Install the software automatically (Recommended)”, and then click the Next button. A dialog box appears, warning that the software has not passed Windows Logo testing.
4Click the Continue Anyway button to continue with the installation. A Found New Hardware Wizard dialog box appears, indicating that the Found New Hardware Wizard has finished installing the software for the PT-2600/2610.
5Click the Finish button. A Driver Setup dialog box appears, indicating that the printer driver has been installed.
15
6Click the Finish button. A dialog box appears, indicating that the installation is finished.
7Select “Yes, I want to restart my computer now.” (or “Yes, restart immediately” if the printer driver was installed separately), click the Finish button to restart the computer, and then remove the CD-ROM from the computer.
REPLACING OR ADDING THE PRINTER DRIVER
1Turn off the P-touch 2600/2610, and then disconnect it from the computer.
2Insert the enclosed CD-ROM into the computer’s CD-ROM drive. A dialog box automatically appears, allowing you to select what to install.
If the dialog box does not automatically appear, double-click “My Computer” on the desktop, and then double-click the
CD-ROM drive containing the CD-ROM. (For Windows® XP, click “My Computer” in the Start menu, and then double-click the CD-ROM drive containing the CDROM.)
Next, double-click “Setup.exe” to display the dialog box.
3Click the lower button (Driver). A Driver Setup dialog box appears, allowing you to select whether to replace, add or delete the PT-2600/2610 printer driver.
4Select either “Replace with new Brother PT-2600/2610.” or “Add Brother PT-2600/ 2610.”, and then click the Next button.
16
If “Replace with new Brother PT-2600/2610” is selected, the previously installed printer driver is deleted, and replaced with a new one. Select this option when upgrading the printer driver, or when running Windows 2000 or XP and changing to a P-touch 2600/2610 with a different serial number.
If “Add Brother PT-2600/2610” is selected, a new printer driver is added. With a USB connection on Windows® 98 or Me, only a port is added without adding it as a new printer. Select this option when connecting and using multiple P-touch 2600/2610s with the same computer.
To delete the printer driver, follow with the procedure in UNINSTALLING THE PRINTER DRIVER on page 38.
With Windows® 98, 98 SE, Me or 2000:
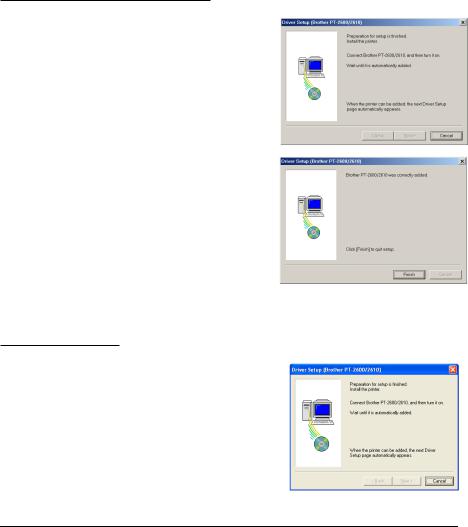
5A dialog box appears, instructing you to connect the P-touch 2600/2610 to the computer.
6Connect the P-touch 2600/2610 to the computer using a USB interface cable as described on page 6, and then turn on the P-touch 2600/2610. A dialog box appears, indicating that the printer driver has been installed.
7Click the Finish button.
If a dialog box appears, explaining that the computer should be restarted, select the option for restarting the computer, and then click the Finish button.
With Windows® XP:
5A dialog box appears, instructing you to connect the P-touch 2600/2610 to the computer.
17

6Connect the P-touch 2600/2610 to the computer using the enclosed USB interface cable as described on page 6, and then turn on the P-touch 2600/2610. The first Found New Hardware Wizard dialog box appears.
7Select “Install the software automatically (Recommended)”, and then click the Next button. A dialog box appears, warning that the software has not passed Windows Logo testing.
8Click the Continue Anyway button to continue with the installation. A Found New Hardware Wizard dialog box appears, indicating that the Found New Hardware Wizard has finished installing the software for the PT-2600/2610.
9Click the Finish button. A Driver Setup dialog box appears, indicating that the printer driver has been installed.
0Select “Yes, restart immediately.”, click the Finish button to restart the computer, and then remove the CD-ROM from the computer.
18
On a Macintosh Computer
The Mac version of the software is for a Macintosh with an English operating system. If the software is installed on a Macintosh with an operating system in a different language, the software may not run properly.
BEFORE INSTALLATION
Check that your system configuration meets the following requirements. Computer: Macintosh with a Power PC processor
Operating system: Mac OS 8.6 or later or OS X 10.1 or later
Hard disk free space: At least 20 MB (100 MB to install full option)
Up to 100 MB of hard disk free space may be needed when printing long labels or large amounts of data.
Memory: At least 32 MB of available RAM
USB port (installed as standard equipment)
CD-ROM drive
*The application is supplied on a CD-ROM; therefore, the computer should be equipped with a CD-ROM drive.
INSTALLING THE P-TOUCH EDITOR 3.2 SOFTWARE
The P-touch Editor 3.2 software includes a variety of more complex functions for printing barcodes and images, enabling you to design just about any label that you can image. Install the P-touch Editor 3.2 software onto a Macintosh as described below.
With a Mac OS before OS X:
1With the P-touch 2600/2610 and the Macintosh turned off, connect the P-touch to the computer using the enclosed USB interface cable as described on page 6. Be sure to leave the P-touch turned off.
2Turn on the Macintosh.
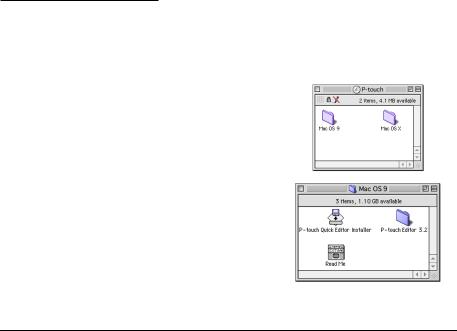
3Insert the enclosed CD-ROM into the computer’s CD-ROM drive.
4Double-click the Mac OS 9 folder to open it.
19
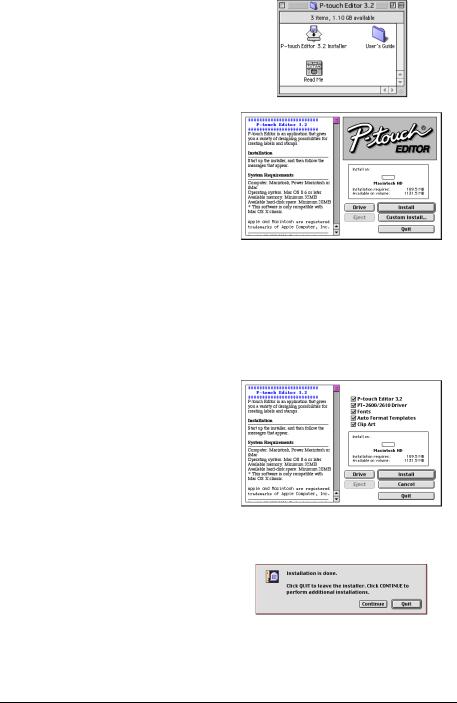
5Double-click the P-touch Editor 3.2 folder to open it.
6Double-click the P-touch Editor 3.2 Installer icon in the folder that appears. The installer starts up.
7Select the installation method.
•For a basic installation
Clicking the Install button immediately starts installing the all options.
About 20 MB of available hard-disk space is needed to begin installation. In order to install all options, about 100 MB of available hard-disk space is needed. If enough hard-disk space is available, click the Install button.
•For a custom installation
Clicking the Custom Install button displays a dialog box that allows you to select which options to install.
Only the options with a check mark beside them are installed. Select the options that you wish to install, and then click the Install button.
In order to print from the P-touch 2600/2610, “PT-2600/2610 Driver” must be selected for installation.
If certain options are not installed,
some P-touch Editor functions may not be available.
8When the dialog box appears, indicating that the installation is finished, click the Quit button.
20
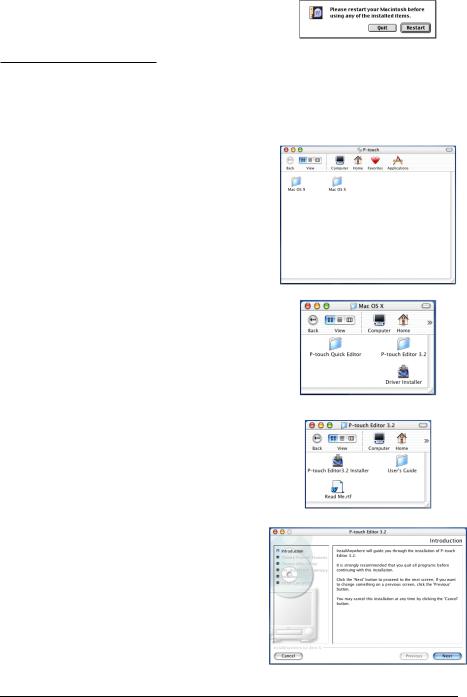
9When the dialog box appears, asking if you wish to restart the computer, click the Restart button to restart the computer.
With Mac OS X 10.1 or later:
1With the P-touch 2600/2610 and the Macintosh turned off, connect the P-touch to the computer using the enclosed USB interface cable as described on page 6. Be sure to leave the P-touch turned off.
2Turn on the Macintosh.
3Insert the enclosed CD-ROM into the computer’s CD-ROM drive.
4Double-click the Mac OS X folder to open it.
5Double-click the P-touch Editor 3.2 folder to open it.
6Double-click the P-touch Editor 3.2 Installer icon in the folder that appears. The installer starts up, and then the Introduction dialog box appears.
21
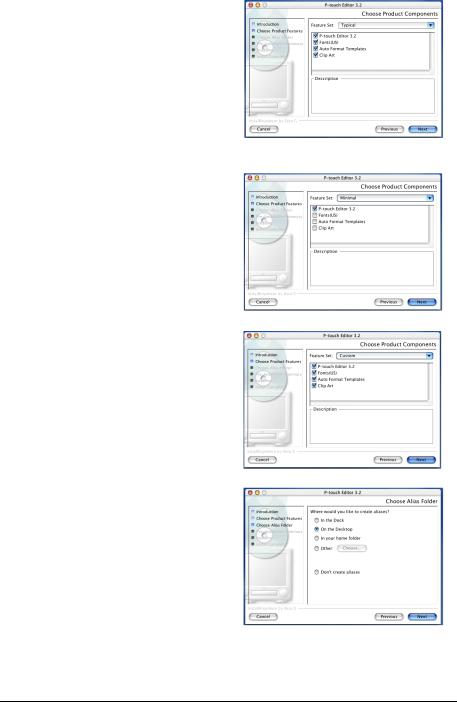
7Click the Next button. The Choose Product Components dialog box appears.
8Select the installation method.
•For a typical installation
Click the Next button to immediately start installing all options.
About 20 MB of available hard-disk space is needed to begin installation. In order to install all options, about 100 MB of available hard-disk space is needed.
•For a minimal installation
Select “Minimal” from the Feature Set list, and then click the Next button to start installing just the P-touch Editor 3.2 application.
If certain options (such as the Auto Format Templates and the Clip Art) are not installed, some P-touch Editor functions may not be available.
•For a custom installation
Select “Custom” from the Feature Set list to display the list of options that can be selected for installation.
Only the options with a check mark beside them are installed. Select the options that you wish to install, and then click the Next button.
The Choose Alias Folder dialog box appears, allowing you to select where an alias to P-touch Editor 3.2 will be added.
22
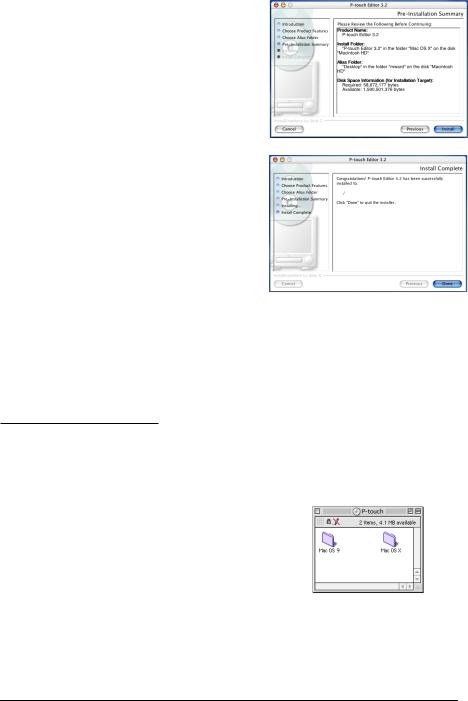
9Select the desired location for the alias, and then click the Next button. A dialog box appears, allowing you to check the installation.
0Check that the installation will be performed as desired, and then click the Install button. After P-touch Editor is installed, a dialog box appears, indicating that the installation is finished.
AClick the Done button, and then restart the computer.
INSTALLING THE P-TOUCH QUICK EDITOR SOFTWARE
The P-touch Quick Editor software provides quick access to the more simple label-designing features for easy text input and instant printing of labels. Install the P-touch Quick Editor software onto a Macintosh as described below.
With a Mac OS before OS X:
1With the P-touch 2600/2610 and the Macintosh turned off, connect the P-touch to the computer using the enclosed USB interface cable as described on page 6. Be sure to leave the P-touch turned off.
2Turn on the Macintosh.
3Insert the enclosed CD-ROM into the computer’s CD-ROM drive.
23
 Loading...