


 GETTING READY
 SEWING BASICS
 UTILITY STITCHES
 APPENDIX
Operation Manual
Computerized Sewing Machine

IMPORTANT SAFETY INSTRUCTIONS
Please read these safety instructions before attempting to use the machine.
DANGER - To reduce the risk of electric shock:
1Always unplug the machine from the electrical outlet immediately after using, when cleaning, when making any user servicing adjustments mentioned in this manual, or if you are leaving the machine unattended.
WARNING - To reduce the risk of burns, fire, electric shock, or injury to persons.
2Always unplug the machine from the electrical outlet when removing covers, lubricating, or when making any adjustments mentioned in the instruction manual:
•To unplug the machine, switch the machine to the symbol “O” position to turn it off, then grasp the plug and pull it out of the electrical outlet. Do not pull on the cord.
•Plug the machine directly into the electrical outlet. Do not use an extension cord.
•Always unplug your machine if the power is cut.
3 Never operate this machine if it has a damaged cord or plug, if it is not working properly, if it has been dropped or damaged, or water is spilled on the unit. Return the machine to the nearest authorized dealer or service center for examination, repair, electrical or mechanical adjustment. While the machine is stored or in use if you notice anything unusual, such as an odor, heat, discoloration or deformation, stop using the machine immediately and unplug the power cord. When transporting the sewing machine, be sure to carry it by its handle. Lifting the sewing machine by any other part may damage the machine or result in the machine falling, which could cause injuries.
When lifting the sewing machine, be careful not to make any sudden or careless movements, otherwise you may injure your back or knees.
1

4 Always keep your work area clear:
•Never operate the machine with any air openings blocked. Keep ventilation openings of the sewing machine and foot control free from the build up of lint, dust, and loose cloth.
•Do not store objects on the foot controller.
•Do not use extension cords. Plug the machine directly into the electrical outlet.
•Never drop or insert any object into any opening.
•Do not operate where aerosol (spray) products are being used or where oxygen is being administered.
•Do not use the machine near a heat source, such as a stove or iron; otherwise, the machine, power cord or garment being sewn may ignite, resulting in fire or an electric shock.
•Do not place this sewing machine on an unstable surface, such as an unsteady or slanted table, otherwise the sewing machine may fall, resulting in injuries.
5 Special care is required when sewing:
•Always pay close attention to the needle. Do not use bent or damaged needles.
•Keep fingers away from all moving parts. Special care is required around the machine needle.
•Switch the sewing machine to the symbol “O” position to turn it off when making any adjustments in the needle area.
•Do not use a damaged or incorrect needle plate, as it could cause the needle to break.
•Do not push or pull the fabric when sewing, and follow careful instruction when freehand stitching so that you do not deflect the needle and cause it to break.
6 This machine is not a toy:
•Your close attention is necessary when the machine is used by or near children.
•The plastic bag that this sewing machine was supplied in should be kept out of the reach of children or disposed of. Never allow children to play with the bag due to the danger of suffocation.
•Do not use outdoors.
7 For a longer service life:
•When storing this machine, avoid direct sunlight and high humidity locations. Do not use or store the machine near a space heater, iron, halogen lamp, or other hot objects.
•Use only neutral soaps or detergents to clean the case. Benzene, thinner, and scouring powders can damage the case and machine, and should never be used.
•Always consult the operation manual when replacing or installing any assemblies, the presser feet, needle, or other parts to assure correct installation.
2

8 For repair or adjustment:
•If the Light unit (light-emitting diode) is damaged, it must be replaced by authorized dealer.
•In the event a malfunction occurs or adjustment is required, first follow the troubleshooting table in the back of the operation manual to inspect and adjust the machine yourself. If the problem persists, please consult your local authorized Brother dealer.
Use this machine only for its intended use as described in this manual.
Use accessories recommended by the manufacturer as contained in this manual.
The contents of this manual and specifications of this product are subject to change without notice. For additional product information, visit our web site at www.brother.com
SAVE THESE INSTRUCTIONS.
This machine is intended for household use.
3

FOR USERS IN THE UK, EIRE, MALTA AND CYPRUS ONLY
IMPORTANT
•In the event of replacing the plug fuse, use a fuse approved by ASTA to BS 1362, i.e. carrying the
 mark, rating as marked on plug.
•Always replace the fuse cover. Never use plugs with the fuse cover omitted.
•If the available electrical outlet is not suitable for the plug supplied with this equipment, you should contact your authorized dealer to obtain the correct lead.
FOR USERS IN AC INPUT 220-240V COUNTRIES AND MEXICO
This appliance is not intended for use by persons (including children) with reduced physical, sensory or mental capabilities, or lack of experience and knowledge, unless they have been given supervision or instruction concerning use of the appliance by a person responsible for their safety. Children should be supervised to ensure that they do not play with the appliance.
4

5

—
Contents |
|
Important Safety Instructions .............................................................................................. |
1 |
Contents .............................................................................................................................. |
6 |
Introduction ........................................................................................................................ |
8 |
Names of Machine Parts and Their Functions ..................................................................... |
8 |
Machine ............................................................................................................................................................ |
8 |
Needle and presser foot section ...................................................................................................................... |
9 |
Operation buttons ............................................................................................................................................. |
9 |
Operation panel .............................................................................................................................................. |
10 |
Flat bed attachment ....................................................................................................................................... |
10 |
Accessories ........................................................................................................................ |
11 |
Included accessories ...................................................................................................................................... |
11 |
Optional accessories ...................................................................................................................................... |
12 |
1. GETTING READY .......................................................................................... |
13 |
Turning the Machine On/Off ............................................................................................. |
13 |
Power supply precautions .............................................................................................................................. |
13 |
Turning on the machine ................................................................................................................................. |
14 |
Turning off the machine ................................................................................................................................. |
14 |
Preparing for Upper and Lower Threading ........................................................................ |
15 |
Winding the bobbin ........................................................................................................................................ |
15 |
Installing the bobbin ....................................................................................................................................... |
18 |
Threading the upper thread ............................................................................................................................ |
20 |
Using the twin needle ..................................................................................................................................... |
25 |
Replacing the Needle ........................................................................................................ |
27 |
Needle precautions ........................................................................................................................................ |
27 |
Needle types and their uses ........................................................................................................................... |
28 |
Checking the needle ...................................................................................................................................... |
29 |
Replacing the needle ..................................................................................................................................... |
29 |
Replacing the Presser Foot ................................................................................................ |
31 |
Presser foot precautions ................................................................................................................................ |
31 |
Replacing the presser foot ............................................................................................................................. |
31 |
Removing the presser foot holder .................................................................................................................. |
32 |
Using the optional walking foot ...................................................................................................................... |
33 |
Useful Functions ................................................................................................................ |
35 |
Changing the needle stop position ................................................................................................................. |
35 |
Changing the initial needle position ............................................................................................................... |
36 |
Sewing Cylindrical or Large Pieces .................................................................................... |
37 |
Stitching cylindrical pieces ............................................................................................................................. |
37 |
Sewing large pieces of fabric ......................................................................................................................... |
37 |
2. SEWING BASICS ........................................................................................... |
39 |
Starting to Sew .................................................................................................................. |
39 |
Sewing procedure .......................................................................................................................................... |
39 |
Selecting a stitch ............................................................................................................................................ |
40 |
Adjusting the stitch length and width .............................................................................................................. |
40 |
Positioning the fabric ...................................................................................................................................... |
41 |
Starting to sew ............................................................................................................................................... |
42 |
Securing the stitching ..................................................................................................................................... |
44 |
Cutting the thread ........................................................................................................................................... |
46 |
Automatically sewing reverse/reinforcement stitches .................................................................................... |
46 |
Adjusting the thread tension ........................................................................................................................... |
47 |
6

Useful Sewing Tips ............................................................................................................ |
48 |
Trial sewing .................................................................................................................................................... |
48 |
Changing the sewing direction ....................................................................................................................... |
48 |
Sewing curves ................................................................................................................................................ |
48 |
Sewing thick fabrics ....................................................................................................................................... |
48 |
Sewing thin fabrics ......................................................................................................................................... |
49 |
Sewing stretch fabrics .................................................................................................................................... |
49 |
Pulling up the bobbin thread .......................................................................................................................... |
50 |
3. UTILITY STITCHES ........................................................................................ |
51 |
Overcasting ....................................................................................................................... |
51 |
Sewing overcasting stitches using zigzag foot “J” .......................................................................................... |
52 |
Sewing overcasting stitches using overcasting foot “G” ................................................................................. |
52 |
Basic Stitching ................................................................................................................... |
53 |
Blind Hem Stitching .......................................................................................................... |
54 |
Buttonhole Stitching .......................................................................................................... |
56 |
Button sewing ................................................................................................................................................. |
61 |
Zipper Insertion ................................................................................................................. |
63 |
Inserting a centered zipper ............................................................................................................................. |
63 |
Inserting a side zipper .................................................................................................................................... |
64 |
Sewing Stretch Fabrics and Elastic Tape ............................................................................ |
67 |
Stretch stitching .............................................................................................................................................. |
67 |
Elastic attaching ............................................................................................................................................. |
67 |
Appliqué, Patchwork and Quilt Stitching .......................................................................... |
69 |
Appliqué stitching ........................................................................................................................................... |
70 |
Patchwork (crazy quilt) stitching ..................................................................................................................... |
70 |
Piecing ........................................................................................................................................................... |
71 |
Quilting ........................................................................................................................................................... |
71 |
Free-motion quilting ....................................................................................................................................... |
72 |
Reinforcement Stitching .................................................................................................... |
74 |
Triple stretch stitching .................................................................................................................................... |
74 |
Bar tack stitching ............................................................................................................................................ |
75 |
Decorative stitching .......................................................................................................... |
77 |
Fagoting ......................................................................................................................................................... |
78 |
Scallop stitching ............................................................................................................................................. |
78 |
Smocking ....................................................................................................................................................... |
79 |
Shell tuck stitching ......................................................................................................................................... |
79 |
Joining ............................................................................................................................................................ |
80 |
Heirloom stitching ........................................................................................................................................... |
80 |
Using the side cutter (optional) ...................................................................................................................... |
83 |
4. APPENDIX ..................................................................................................... |
87 |
Stitch settings .................................................................................................................... |
87 |
Utility stitches ................................................................................................................................................. |
87 |
Maintenance ...................................................................................................................... |
91 |
Cleaning the machine surface ........................................................................................................................ |
91 |
Cleaning the race ........................................................................................................................................... |
91 |
Removing the needle plate ............................................................................................................................ |
92 |
Troubleshooting ................................................................................................................ |
93 |
Error messages ................................................................................................................... |
97 |
Operation beep ................................................................................................................. |
98 |
Canceling the operation beep ........................................................................................................................ |
98 |
Index ................................................................................................................................. |
99 |
7
Introduction
Thank you for choosing this product.
Before using this sewing machine, carefully read “Important Safety Instructions”, and then study this manual for the correct operation of the various functions.
In addition, after you have finished reading this manual, store it where it can quickly be accessed for future reference.
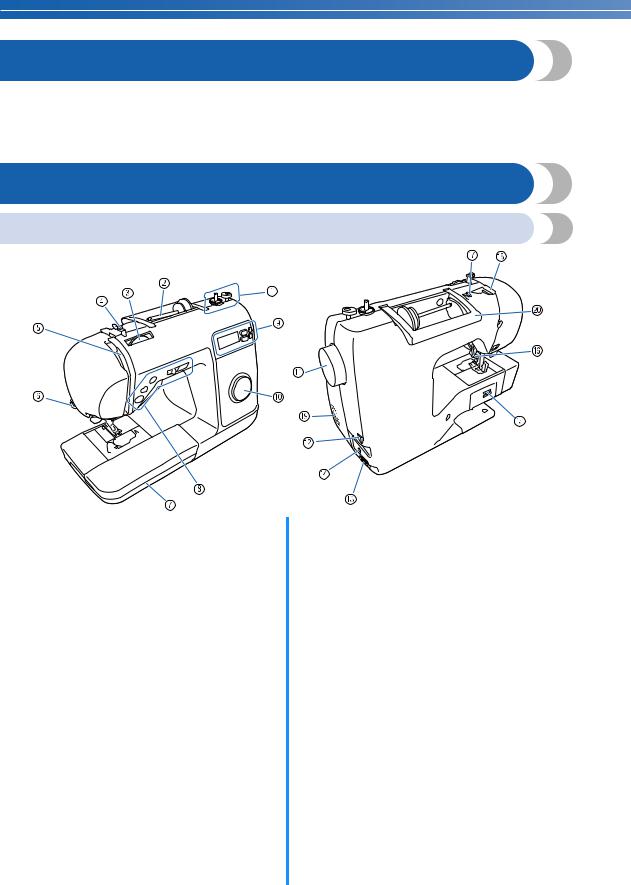
Names of Machine Parts and Their Functions
Machine
aBobbin winder (page 15)
Use the bobbin winder when winding the bobbin.
bSpool pin (page 15, 20)
Place a spool of thread on the spool pin.
cThread tension dial (page 47)
Use the thread tension dial to adjust the tension of the upper thread.
dBobbin-winding thread guide and pretension disc (page 15)
Pass the thread under this thread guide and around the pretension disc when winding the bobbin thread.
eThread take-up lever (page 23)
Slide the thread into the thread take-up lever from the right side of slot to the left side of slot.
fThread cutter (page 46)
Pass the threads through the thread cutter to cut them.
gFlat bed attachment (page 10, 11, 37)
Store presser feet and bobbins in the flat bed attachment. Remove the flat bed attachment when sewing cylindrical pieces such as sleeve cuffs.
hOperation buttons and sewing speed controller (page 9)
Use these buttons and the slide to operate the sewing machine.
iOperation panel (page 10)
Use to select stitches and various other stitch settings.
jPattern selection dial (page 40)
Use to select the pattern to sew.
kHandwheel
Turn the handwheel toward you to sew one stitch or to raise or lower the needle.
lMain power switch (page 14)
Use this switch to turn the sewing machine on and off.
mPower supply jack (page 14)
Insert the plug on the power cord into the power supply jack.
nFoot controller jack (page 43)
Insert the plug on the end of the foot controller cable into the foot controller jack.
oFeed dog position switch (page 73)
Use this switch to lower the feed dogs.
pPresser foot lever (page 20)
Raise and lower this lever to raise and lower the presser foot.
qThread guide (page 16)
Pass the thread under this thread guide when winding the bobbin thread and threading the machine.
rThread guide cover (page 16)
Pass the thread under this thread guide when winding the bobbin thread and threading the machine.
sAir vent
This vent allows the air surrounding the motor to circulate.
tHandle
Carry the sewing machine by its handle when transporting the machine.
8
Needle and presser foot section
aNeedle threader lever
Use the needle threader to thread the needle.
bButtonhole lever
Lower the buttonhole lever when sewing buttonholes and bar tacks.
cPresser foot holder
The presser foot is attached to the presser foot holder.
dPresser foot holder screw
Use the presser foot holder screw to hold the presser foot holder in place.
ePresser foot
The presser foot applies pressure to the fabric during sewing. Attach the appropriate presser foot for the selected stitch.
fNeedle plate cover
Remove the needle plate cover to clean the bobbin case and race.
gFeed dogs
The feed dogs feed the fabric.
hQuick-set bobbin
Begin sewing without pulling up the bobbin thread.
iBobbin cover
Remove the bobbin cover and then insert the bobbin into the bobbin case.
jNeedle plate
The needle plate is marked with guides to help sew straight seams.
kNeedle bar thread guide
Pass the upper thread through the needle bar thread guide.
lPresser foot lever
Raise and lower this lever to raise and lower the presser foot.
mNeedle clamp screw
Use the needle clamp screw to hold the needle in place.
Operation buttons
The operation buttons help you to easily perform various basic sewing machine operations.
aStart/stop button 
Press the start/stop button to start or stop sewing. The machine sews at a low speed at the beginning of sewing while the button is continuously pressed. When sewing is stopped, the needle is lowered into the fabric. For details, refer to “Starting to sew” (page 42).
bReverse/reinforcement stitch button 
Press the reverse/reinforcement stitch button to sew reverse stitches or reinforcement stitches. Reverse stitches are sewn by keeping the button pressed down to sew in the opposite direction. Reinforcement stitches are sewn by sewing 3 to 5 stitches on top of each other. For details, refer to“Securing the stitching” (page 44).
cNeedle position button 
Press the needle position button to raise or lower the needle. Pressing the button twice sews one stitch.
dSewing speed controller
Slide the sewing speed controller to the left or right to adjust the sewing speed.
Slide the sewing speed controller to the left to reduce the sewing speed, or slide the speed controller to the right to increase the sewing speed.
9
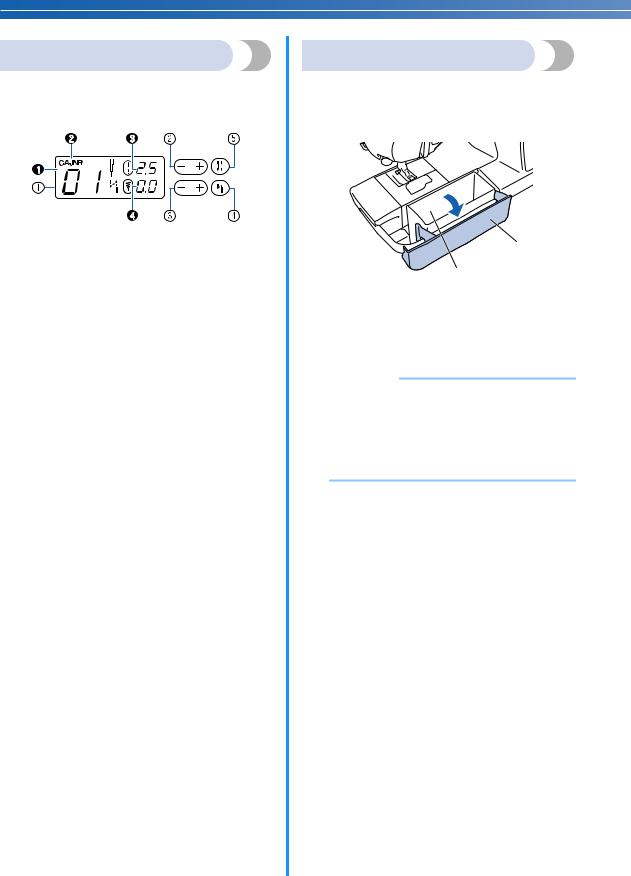
Operation panel
The operation panel, located on the front of the sewing machine, allows you to select a stitch and specify how the stitch will be sewn.
aLCD (liquid crystal display)
The number of the selected stitch (1), the presser foot to be used (2), the stitch length (mm) (3), and the stitch width (mm) (4) are displayed here.
bStitch length key (page 40)
Use to adjust the length of the stitch. (Press the “–” side for a shorter stitch length, or press the “+” side for a longer stitch length.)
cStitch width key (page 41)
Use to adjust the width of the stitch. (Press the “–” side for a more narrow stitch width, or press the “+” side for a wider stitch width.)
dAutomatic reverse/reinforcement stitch key (page 46)
The sewing machine can be set to automatically sew reverse or reinforcement stitches at the beginning and end of the stitching.
eNeedle mode selection key (single/twin) (page 25)
Press this key to select the twin needle sewing setting. Each time this key is pressed, the setting switches between that for single needle sewing and for twin needle sewing.
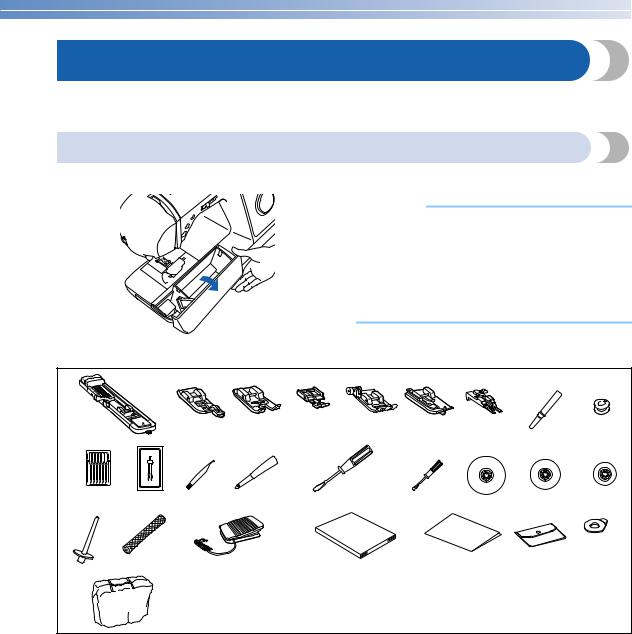
Flat bed attachment
The accessories are stored in the storage space in the flat bed attachment.
aSwing the lid of the flat bed attachment toward you to open the storage space.
a
b
aFlat bed attachment
bAccessory compartment
XThe bag of accessories is in the storage space.
 Note
Note
●Place the accessories in the bag before storing them in the flat bed attachment. If the accessories are not placed in the accessory bag when stored in the flat bed attachment, accessories may fall out and be lost or damaged.
10
Accessories
After opening the box, check that the following accessories are included. If any item is missing or damaged, contact your dealer.
Included accessories
The following items should also be included in the box.
 Note
Note
(For U.S.A. only)
● Foot controller: Model T
This foot controller can be used on this machine model NS40.
● The screw for the presser foot holder is available
through your authorized dealer. (Part code: XA4813-051)
1. |
|
2. |
3. |
4. |
5. |
6. |
7. |
8. |
9. |
10.* |
11. |
12. |
13. |
14. |
|
15. |
16. |
17. |
18. |
19. |
20. |
21. |
|
22. |
|
23. |
|
24. |
25. |
26.
*75/11 2 needles 90/14 2 needles
90/14 2 needles: Ball point needle (gold colored)
No. |
Part Name |
|
|
Part Code |
No. |
Part Name |
|
|
Part Code |
U.S.A./ |
|
Others |
U.S.A./ |
|
Others |
||||
|
|
Canada |
|
|
|
Canada |
|
||
|
|
|
|
|
|
|
|
||
1 |
Buttonhole foot “A” |
|
|
XC2691-033 |
15 |
Screwdriver (small) |
|
|
X55468-021 |
2 |
Overcasting foot “G” |
|
XC3098-031 |
16 |
Spool cap (large) |
|
130012-054 |
||
3 |
Monogramming foot “N” |
|
XD0810-031 |
17 |
Spool cap (medium) |
|
XE1372-001 |
||
4 |
Zipper foot “I” |
|
X59370-021 |
18 |
Spool cap (small) |
|
130013-154 |
||
5 |
Zigzag foot “J” (on machine) |
|
XC3021-051 |
19 |
Extra spool pin |
|
XE2241-001 |
||
6 |
Blind stitch foot “R” |
|
X56409-051 |
20 |
Spool net |
|
XA5523-020 |
||
7 |
Button fitting foot “M” |
|
130489-001 |
21 |
Foot controller |
XD0501-021 (EU area) |
|||
8 |
Seam ripper |
|
X54243-051 |
XC8816-021 (other areas) |
|||||
|
|
|
|||||||
9 |
Bobbin (4) |
SA156 |
SFB (XA5539-151) |
22 |
Operation manual |
|
XE2426-101 |
||
10 |
Needle set |
|
|
X58358-021 |
23 |
Quick reference guide |
|
XE2429-001 |
|
11 |
Twin needle |
|
X59296-121 |
24 |
Accessory bag |
|
XC4487-021 |
||
12 |
Cleaning brush |
|
X59476-021 |
25 |
Disc-shaped screwdriver |
|
XC1074-051 |
||
13 |
Eyelet punch |
|
135793-001 |
26 |
Soft cover |
|
XC1103-022 |
||
14 |
Screwdriver (large) |
|
XC8349-051 |
|
|
|
|
|
|
11
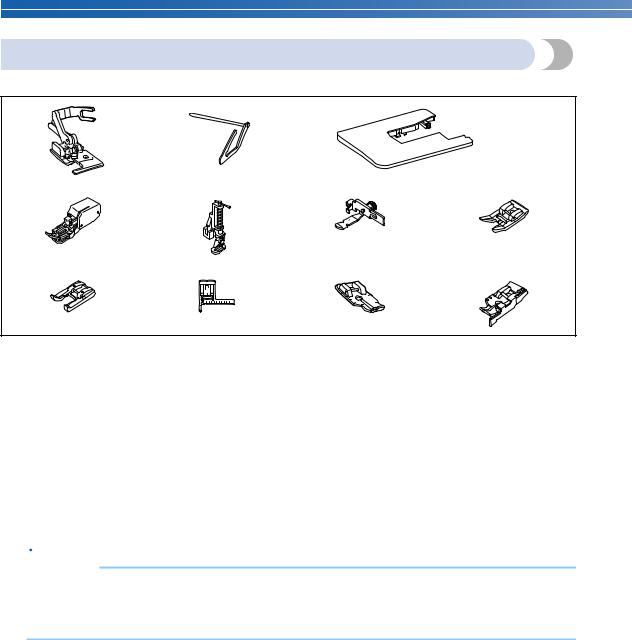
Optional accessories
The following are available as optional accessories.
1. |
2. |
3. |
4. |
5. |
6. |
7. |
8. |
9. |
10. |
11. |
|
|
|
|
|
|
|
|
|
|
|
No. |
Part Name |
|
Part Code |
|
No. |
Part Name |
|
Part Code |
U.S.A./ |
Others |
|
U.S.A./ |
Others |
||||
|
|
Canada |
|
|
|
Canada |
||
|
|
|
|
|
|
|
||
1 |
Side cutter |
SA177 |
F054 |
7 |
Non stick foot |
SA114 |
F007N |
|
|
|
|
(XC3879-002) |
|
|
|
|
(XC1949-002) |
2 |
Quilting guide |
SA132 |
F016N |
8 |
Open toe foot |
SA147 |
F027N |
|
(XC2215-002) |
(XC1964-002) |
|||||||
3 |
Wide table |
SA552 |
WT8 |
9 |
Stitch guide foot “P” |
SA160 |
F035N |
|
(XE2472-001) |
(XC1969-002) |
|||||||
4 |
Walking foot |
SA140 |
F033N |
10 |
1/4 inch quilting foot |
SA125 |
F001N |
|
(XC2214-002) |
(XC1944-052) |
|||||||
5 |
Quilting foot |
SA129 |
F005N |
11 |
1/4 inch quilting foot with |
SA185 |
F057 |
|
|
|
|
(XC1948-002) |
|
|
guide |
|
(XC7416-252) |
6 |
Adjustable zipper/piping foot |
SA161 |
F036N |
|
|
|
|
|
|
|
|
(XC1970-002) |
|
|
|
|
|
 Memo
Memo
●To obtain optional accessories or parts, contact the nearest authorized dealership.
●All specifications are correct at the time of printing. The part codes are subject to change without notice.
●Visit your Brother dealer for a complete listing of optional accessories available for your machine.
12

1 |
GETTING READY |
1
Turning the Machine On/Off
This section explains how to turn the sewing machine on and off.
Power supply precautions
Be sure to observe the following precautions concerning the power supply.
WARNING 
●Use only regular household electricity for the power source. Using other power sources may result in fire, electric shock, or damage to the machine.
●Make sure that the plugs on the power cord are firmly inserted into the electrical outlet and the power supply jack on the machine.
●Do not insert the plug on the power cord into an electrical outlet that is in poor condition.
●Turn off the main power and remove the plug in the following circumstances:
•When you are away from the machine
•After using the machine
•When the power fails during use
•When the machine does not operate correctly due to a bad connection or a disconnection
•During electrical storms
CAUTION
●Use only the power cord included with this machine.
●Do not use extension cords or multi-plug adapters with many other appliances plugged in to them. Fire or electric shock may result.
●Do not touch the plug with wet hands. Electric shock may result.
●When unplugging the machine, always turn off the main power first. Always grasp the plug to remove it from the outlet. Pulling on the cord may damage the cord, or lead to fire or electric shock.
●Do not allow the power cord to be cut, damaged, modified, forcefully bent, pulled, twisted, or bundled. Do not place heavy objects on the cord. Do not subject the cord to heat. These things may damage the cord and cause fire or electric shock. If the cord or plug is damaged, take the machine to your authorized dealer for repairs before continuing use.
●Unplug the power cord if the machine is not to be used for a long period of time. Otherwise a fire may result.
13
GETTING READY—————————————————————————————————————————————————————————————————————————————————————————————————————
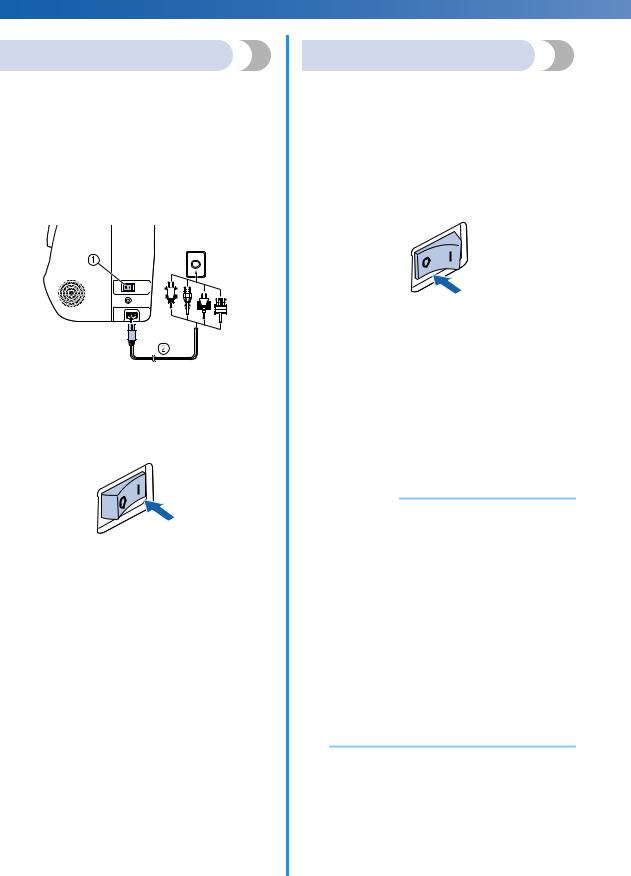
Turning on the machine
Prepare the included power cord.
aMake sure that the sewing machine is turned off (the main power switch is set to “ ”), and then plug the power cord into the power supply jack on the right side of the machine.
bInsert the plug of the power cord into a household electrical outlet.
aMain power switch
bPower cord
cPress the right side of the main power switch on the right side of the machine (set it to “|”).
XThe sewing lamp and the LCD come on when the machine is turned on.
Turning off the machine
When you are finished using the sewing machine, turn it off. In addition, before transporting the sewing machine to another location, be sure to turn it off.
aMake sure that the machine is not sewing.
bPress the left side of the main power switch on the right side of the machine (set it to “ ”).
”).
XThe sewing lamp and the LCD go off when the machine is turned off.
cUnplugoutlet. the power cord from the electrical
Grasp the plug when unplugging the power cord.
dUnplugsupply jack.the power cord from the power
 Note
Note
●If a power outage occurs while the sewing machine is being operated, turn off the sewing machine and unplug the power cord. When restarting the sewing machine, follow the necessary procedure to correctly operate the machine.
(For U.S.A. only)
●This appliance has a polarized plug (one blade wider than the other). To reduce the risk of electrical shock, this plug is intended to fit in a polarized outlet only one way. If the plug does not fit fully in the outlet, reverse the plug. If it still does not fit, contact a qualified electrician to install the proper outlet. Do not modify the plug in any way.
14
Preparing for Upper and Lower Threading
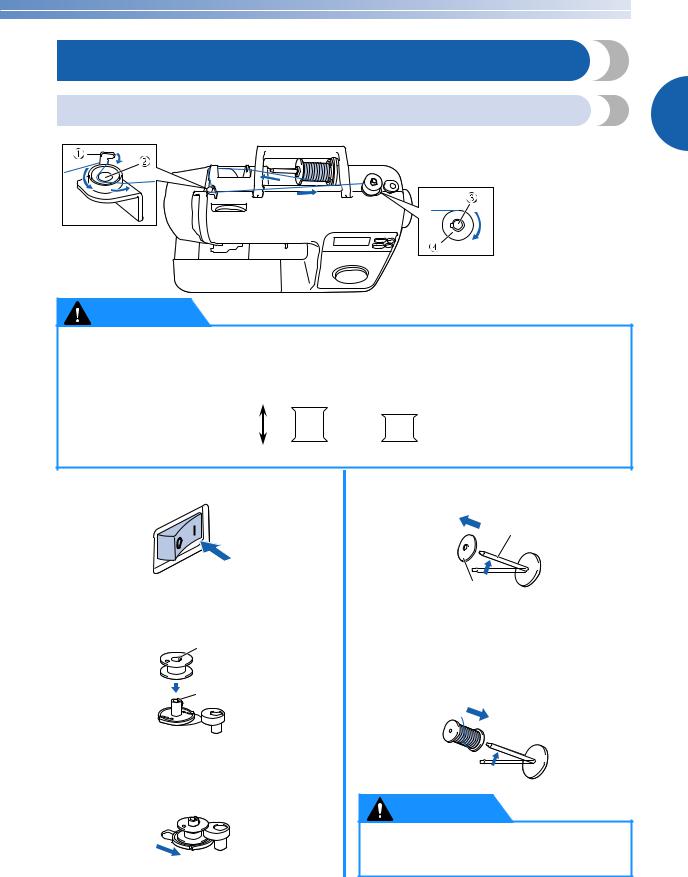
Winding the bobbin
Wind the thread onto the bobbin.
1
aHook of the bobbin-winding thread guide
bPretention disk
cBobbin winder shaft
dBobbin
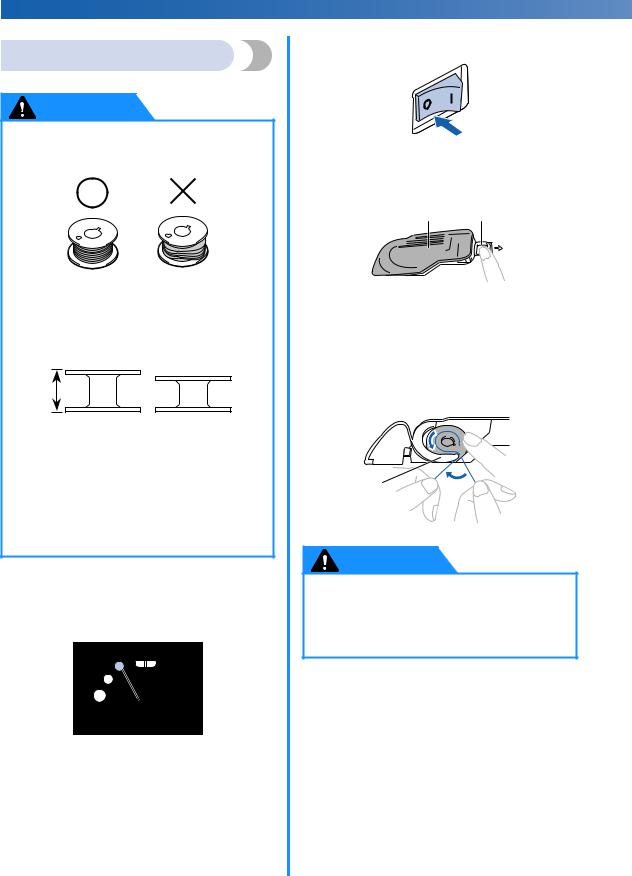
CAUTION
●Only use the bobbin (part code: SA156, SFB(XA5539-151)) designed specifically for this sewing machine. Use of any other bobbin may result in injuries or damage to the machine.
●The included bobbin was designed specifically for this sewing machine. If bobbins from other models are used, the machine will not operate correctly. Use only the included bobbin or bobbins of the same type (part code: SA156, SFB(XA5539-151)).
|
|
|
|
|
|
|
|
|
|
a This model |
c |
|
|
|
|
|
b Other model |
||||
|
|
|
|
|
|
|
|
|
|
c 11.5 mm (7/16 inch) |
|
|
|
|
a |
|
|
|
b |
(actual size) |
|
aTurn on the sewing machine.
bPlace the bobbin on the bobbin winder shaft so that the spring on the shaft fits into the notch in the bobbin.
a
b
aNotch
bBobbin winder shaft spring
cSlide the bobbin winder shaft to the right until it snaps into place.
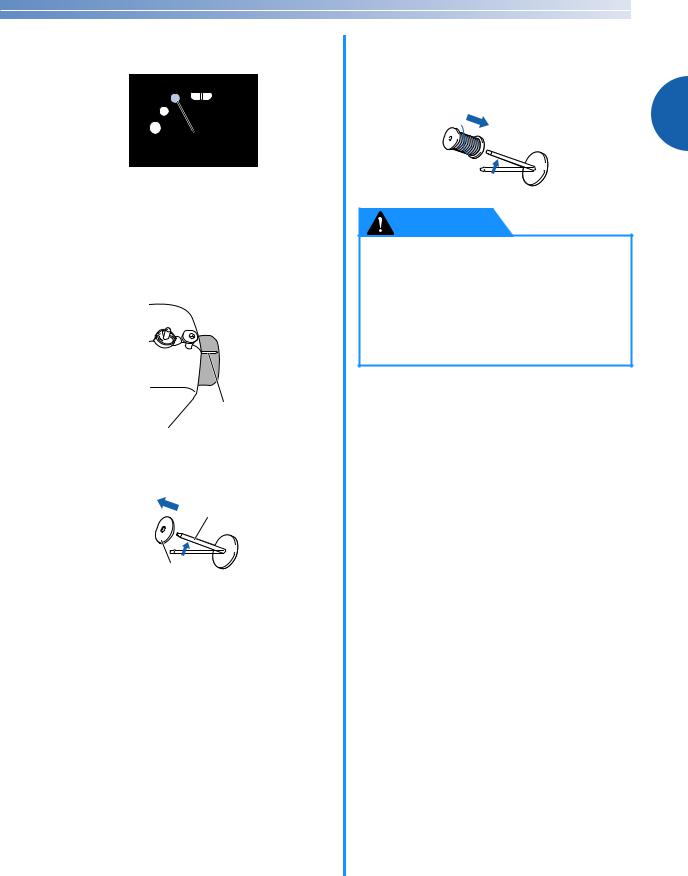
dSwing up the spool pin, and then remove the spool cap.
a
b
aSpool pin
bSpool cap
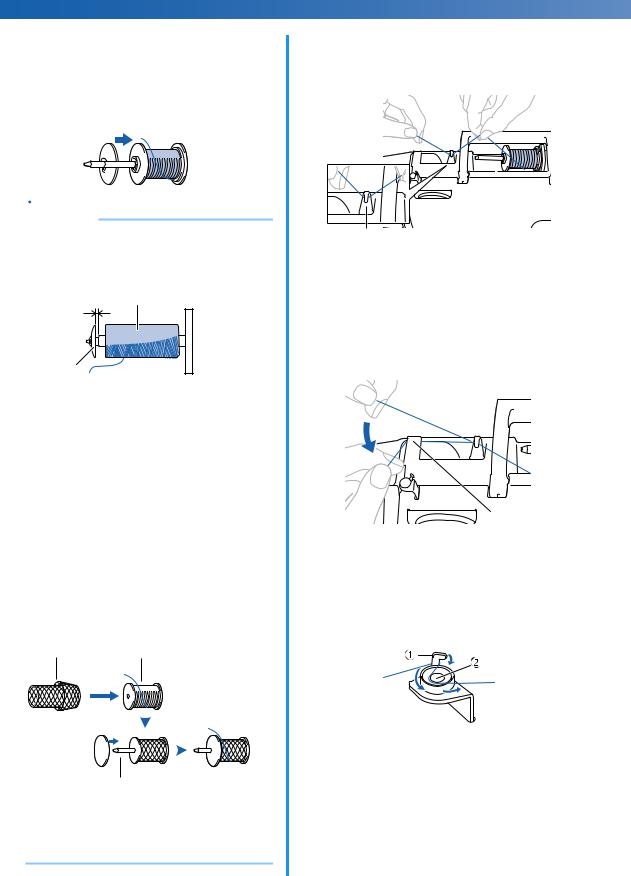
eFully insert the spool of thread for the bobbin onto the spool pin.
Slide the spool onto the pin so that the spool is horizontal and the thread unwinds to the front at the bottom.
CAUTION
●If the spool is not positioned so that the thread unwinds correctly, the thread may become tangled around the spool pin.
15
GETTING READY—————————————————————————————————————————————————————————————————————————————————————————————————————
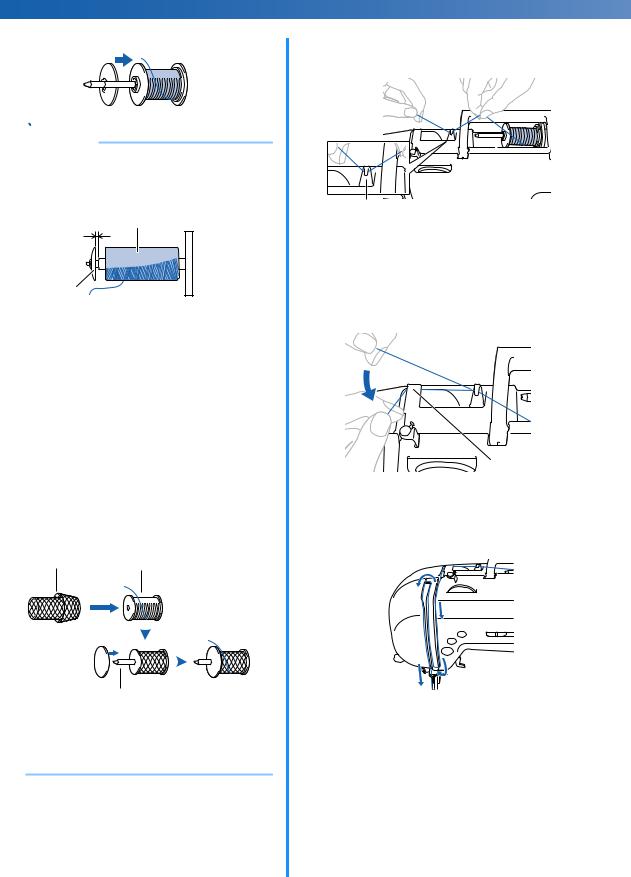
fSlide the spool cap onto the spool pin.
With the slightly rounded side of the spool cap positioned toward the left, slide the spool cap onto the spool pin as far as possible to the right so that the spool is moved to the right end of the spool pin.
 Memo
Memo
●When sewing with fine, cross-wound thread, use the small spool cap, and leave a small space between the cap and the spool.
c b
a
aSpool cap (small)
bSpool (cross-wound thread)
cSpace
● When using thread that winds off quickly, such as transparent nylon thread or metallic thread, place the spool net over the spool before placing the spool of thread onto the spool pin.
If the spool net is too long, fold it to fit the size of the spool.
When the spool net is used, the tension of the upper thread will slightly increase. Be sure to check the thread tension. For details, refer to “Adjusting the thread tension” (page 47).
1 2
3

4
aSpool net
bSpool
cSpool cap
dSpool pin
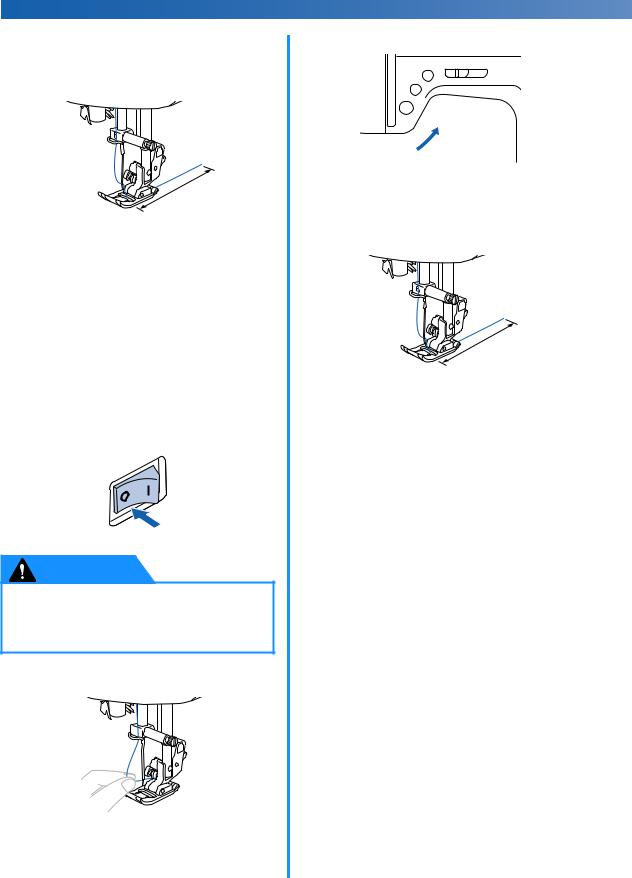
gWhile holding the spool with your right hand, and then pass the thread under the thread guide.
1
a Thread guide
hPass the thread under the thread guide cover from the back to the front.
Hold the thread with your right hand so that there is no slack in the thread that is pulled out, and then pass the thread under the thread guide cover with your left hand.
a
a Thread guide cover
iPull the thread to the right, pass it under the hook of the bobbin-winding thread guide, and then wind the thread counterclockwise between the discs, pulling it in as far as possible.
aHook of the bobbin-winding thread guide
bPretension disk
16
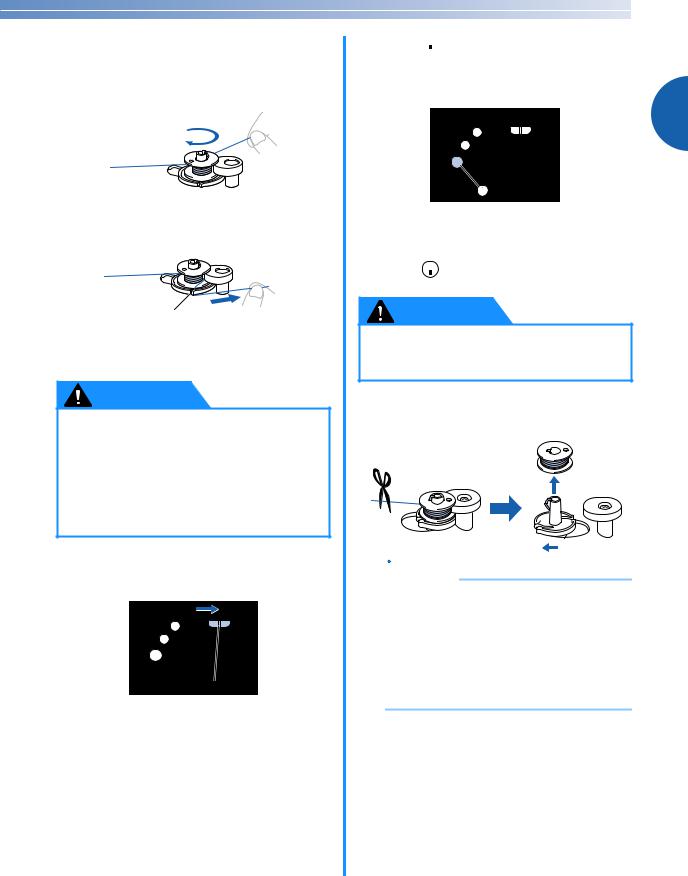
jWhile using your left hand to hold the thread that was passed through the bobbin-winding thread guide, use your right hand to wind the end of the thread clockwise around the bobbin five or six times.
kPass the end of the thread through the slit in the bobbin winder seat, and then pull the thread to the right to cut it.
a
aSlit in bobbin winder seat (with built-in cutter)
X The thread is cut to a suitable length.
CAUTION
●Be sure to cut the thread as described. If the bobbin is wound without cutting the thread using the cutter built into the slit in the bobbin winder seat, the bobbin may not be wound correctly. In addition, the thread may become tangled in the bobbin or the needle may bend or break when the bobbin thread starts to run out.
lSlide the sewing speed controller to the right to increase the bobbin winding speed and slide to left to decrease.
a Sewing speed controller
mPress  (start/stop button) once.
XThe bobbin starts spinning and the thread is wound around the bobbin.
1
a Start/stop button
nWhen the bobbin winding becomes slow, press  (start/stop button) once to stop the machine.
CAUTION
●When the bobbin winding becomes slow, stop the machine, otherwise the sewing machine may be damaged.
oCut the thread, slide the bobbin winder shaft to the left, and then remove the bobbin from the shaft.
 Memo
Memo
●When the sewing machine is started or the handwheel is turned after winding the thread around the bobbin, the machine will make a clicking sound; this is not a malfunction.
●The needle cannot move (sewing is not possible) while the bobbin winder shaft is moved to the right.
17
GETTING READY—————————————————————————————————————————————————————————————————————————————————————————————————————
Installing the bobbin
Install the bobbin wound with thread.
CAUTION
●Use a bobbin that has been correctly wound, otherwise the needle may break or the thread tension will be incorrect.
●The bobbin was designed specifically for this sewing machine. If bobbins from other models are used, the machine will not operate correctly. Use only the included bobbin or bobbins of the same type (part code: SA156, SFB (XA5539-151)).
c
a b
aThis model
bOther model
c11.5 mm (7/16 inch) (actual size)
●Before installing the bobbin or replacing the needle, be sure to turn off the sewing machine, otherwise injuries may occur if the start/stop button is accidentally pressed and the machine starts sewing.
aPress  (needle position button) once or twice to raise the needle, and then raise the presser foot lever.
bTurn off the sewing machine (set it to “ ”).
”).
cSlide the latch on the right side of the bobbin cover to the right, and then remove the bobbin cover.
a b
aBobbin cover
bLatch
dInsert the bobbin with your right hand so that the thread unwinds to the left side, and then pull the thread firmly under the tab with your left hand.
a
a Tab
CAUTION
●Be sure to hold down the bobbin with your finger and install the bobbin so that the thread unwinds in the correct direction, otherwise the needle may break or the thread tension will be incorrect.
a Needle position button
18
eLightly hold down the bobbin with your right hand, and guide the thread through the slot, and then pull it toward you to cut it with the cutter.
a
b

aSlot
bCutter
X The cutter cuts the thread.
•Make sure that the thread is correctly passed through the flat spring of the bobbin case. If it is not inserted correctly, reinstall the bobbin.
a
a Flat spring
 Memo
Memo
●The direction for feeding the bobbin thread is indicated by marks around the needle plate cover. Be sure to thread the machine as indicated.
fReattach the bobbin cover.
Insert the tab in the lower-left corner of the bobbin cover (A), and then press down on the right side (B).
B |
1 |
|
 A
A
 Memo
Memo
●You can begin sewing without pulling up the bobbin thread. If you wish to pull up the bobbin thread before starting to sew, finish threading the machine, and then pull up the thread according to the procedure in “Pulling up the bobbin thread” (page 50).
19
GETTING READY—————————————————————————————————————————————————————————————————————————————————————————————————————
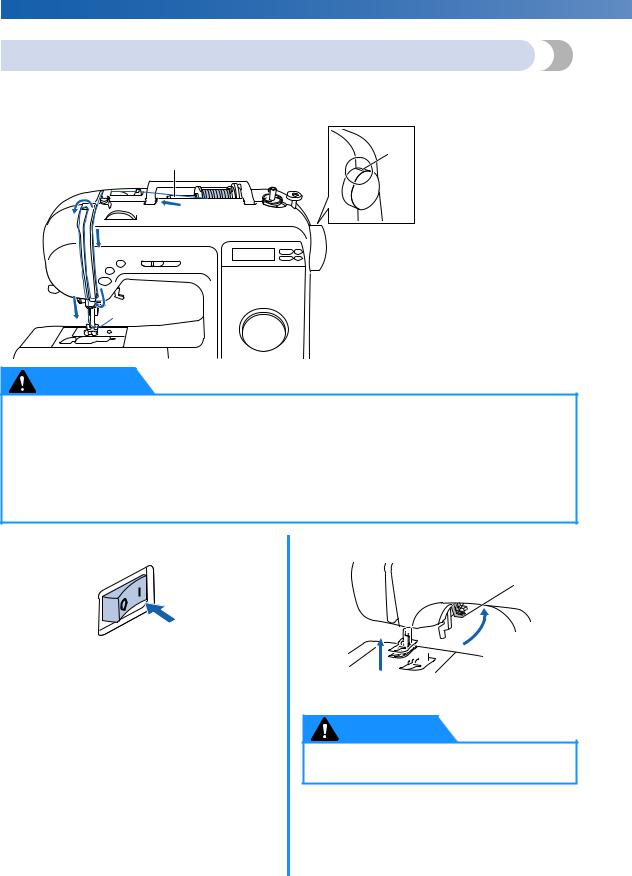
Threading the upper thread
In this section, the procedures for installing the spool for the upper thread and threading the needle are described.
b |
a Spool pin |
a |
b Mark on handwheel |
CAUTION
●When threading the machine, carefully follow the instructions. If the upper threading is not performed correctly, the thread may become tangled and the needle may bend or break.
●The needle threader can be used with sewing machine needles 75/11 through 100/16.
●Use appropriate thread and needle combinations. For details on appropriate needle and thread combinations, refer to “Needle types and their uses” (page 28).
●Thread with a thickness of 130/20 or thicker cannot be used with the needle threader.
●The needle threader cannot be used with the wing needle or the twin needle.
●If the needle threader cannot be used, refer to “Manually threading the needle” (page 24).
aTurn on the sewing machine. |
bRaise the presser foot lever. |
a
a Presser foot lever
CAUTION
●If the presser foot is not raised, the sewing machine cannot be threaded correctly.
20
cPress  (needle position button) once or twice to raise the needle.
a Needle position button
•If the needle is not at the correct height, the sewing machine cannot be threaded. Check that the mark on the handwheel points up as shown in the illustration below. If the handwheel is not in this position, be sure to press the needle position button to raise the needle before continuing the procedure.
a
a Mark on handwheel
dSwing up the spool pin, and then remove the spool cap.
a
b
aSpool pin
bSpool cap
eFully insert the spool for the upper thread onto the spool pin
Slide the spool onto the pin so that the spool is horizontal and the thread unwinds to the front
at the bottom.
1
CAUTION
●If the spool is not positioned so that the thread unwinds correctly, the thread may become tangled around the spool pin and the thread or needle may break.
●If the spool cap that is used is smaller than the spool, the thread may catch, for example, on the notch in the spool, or the needle may break.
21
GETTING READY—————————————————————————————————————————————————————————————————————————————————————————————————————
fSlide the spool cap onto the spool pin.
 Memo
Memo
●When sewing with fine, cross-wound thread, use the small spool cap, and leave a small space between the cap and the spool.
c b
a
aSpool cap (small)
bSpool (cross-wound thread)
cSpace
● When using thread that winds off quickly, such as transparent nylon thread or metallic thread, place the spool net over the spool before placing the spool of thread onto the spool pin.
If the spool net is too long, fold it to fit the size of the spool.
When the spool net is used, the tension of the upper thread will slightly increase. Be sure to check the thread tension. For details, refer to “Adjusting the thread tension” (page 47).
1 2
3

4
aSpool net
bSpool
cSpool cap
dSpool pin
gWhile holding the spool with your right hand, and then pass the thread under the thread guide.
1
a Thread guide
hPass the thread under the thread guide cover from the back to the front.
Hold the thread with your right hand so that there is no slack in the thread that is pulled out, and then pass the thread under the thread guide cover with your left hand.
a
a Thread guide cover
iThread the machine by guiding the thread along the path indicated by the number on the machine.
22

jSlide the thread into the thread take-up lever from the right to the left.
a
a Thread take-up lever
 Memo
Memo
●If the needle is not raised, the thread takeup lever cannot be threaded. Be sure to press the needle position button to raise the needle before threading the thread take-up lever.
kPassguide.the thread behind the needle bar thread
The thread can easily be passed behind the needle bar thread guide by holding the thread in your left hand, and pulling the thread into the guide from right to left.
a
a Needle bar thread guide
lLower the presser foot lever.
a
a Presser foot lever
mWhile lowering the needle threader lever, hook the thread onto the guide.
1
aNeedle threader
bThread
cGuide
nCatch the thread on the hook as shown below.
a
a Needle threader lever
oRaise the needle threader lever, and then pull the end of the thread which passed through the eye of the needle.
CAUTION
●Be careful not to pull on the thread with force or it may bend the needle.
23
GETTING READY—————————————————————————————————————————————————————————————————————————————————————————————————————
pRaise the presser foot lever, pass the end of the thread through the presser foot, and then pull out about 5 cm (2 inches) of thread toward the rear of the machine.
a
a 5 cm (2 inches)
XThe upper threading is finished.
■Manually threading the needle
If the needle threader cannot be used, thread the needle as described below.
aThread the machine to the needle bar thread guide, as described in steps a through k of
“Threading the upper thread”, and then lower the presser foot lever.
bTurn off the sewing machine.
CAUTION
●Be sure to turn off the sewing machine, otherwise injuries may occur if the start/stop button is accidentally pressed and the machine starts sewing.
cManually pass the thread through the eye of the needle from front to back.
dRaise the presser foot lever.

 a
a
a Presser foot lever
ePass the end of the thread through the presser foot, and then pull out about 5 cm (2 inches) of thread toward the rear of the machine.
a
a 5 cm (2 inches)
24
Using the twin needle
With the twin needle, you can sew two parallel lines of the same stitch with two different threads. Both upper threads should have the same thickness and quality. Be sure to use the twin needle and the extra spool pin.
For details on the stitches that can be sewn with the twin needle, refer to “Stitch settings” (page 87).
a |
b |
aTwin needle
bExtra spool pin
CAUTION
●Only use the twin needle (part code: X59296121). Use of any other needle may bend the needle or damage the machine.
●Never use bent needles. Bent needles can easily break, possibly resulting in injuries.
●The needle threader cannot be used with the twin needle. If the needle threader is used with the twin needle, the sewing machine may be damaged.
aInstall the twin needle.
•For details on installing a needle, refer to “Replacing the needle” (page 29).
bThread the upper thread for the left needle.
•For details, refer to steps a through j of “Threading the upper thread” (page 20).
cManually thread the left needle with the upper thread.
Pass the thread through the eye of the needle from the front to the back.
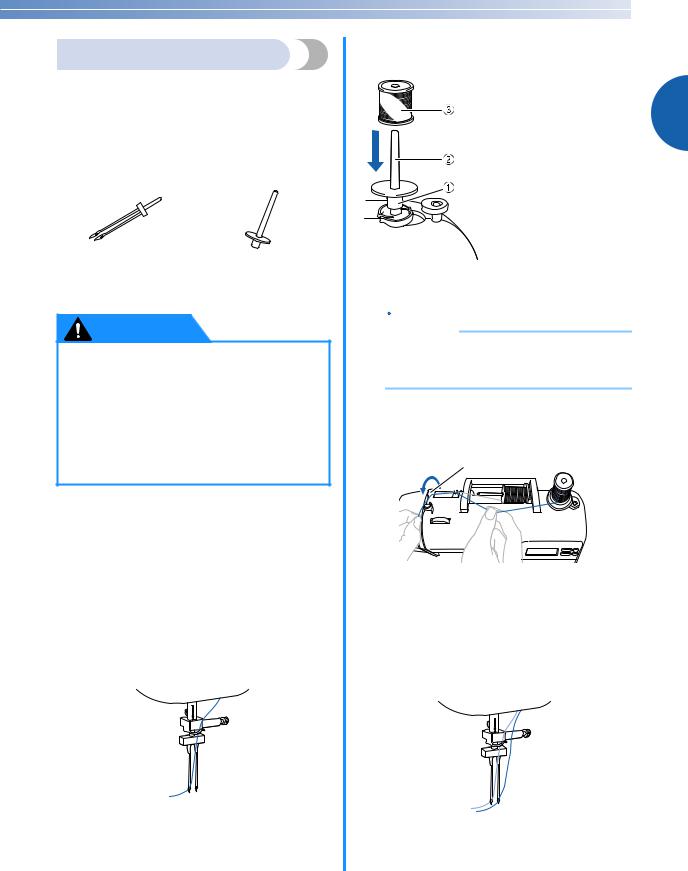
dInsert the extra spool pin onto the end of the bobbin winder shaft.
aBobbin winder shaft
bExtra spool pin
c Thread spool |
1 |
|
eInstallthread.the thread spool and thread the upper
 Memo
Memo
●When setting the thread spool, set it so that the thread winds off from the front of the spool.
fThread the upper thread for the right side in the same way that the upper thread for the left side was threaded.
1
a Thread guide cover
•For details, refer to step a through j of “Threading the upper thread” (page 20).
gWithout passing the thread through the needle bar thread guide, manually thread the right needle.
Pass the thread through the eye of the needle from the front to the back.
25
GETTING READY—————————————————————————————————————————————————————————————————————————————————————————————————————
hAttach zigzag foot “J”.
•For details on changing the presser foot, refer to “Replacing the presser foot” (page 31).
CAUTION
●When using the twin needle, be sure to attach zigzag foot “J”, otherwise the needle may break or the machine may be damaged.
iTurn on the sewing machine.
X The LCD comes on.
jSelect a stitch.
•For details on selecting a stitch, refer to “Selecting a stitch” (page 40).
•For details on the stitches that can be sewn with the twin needle, refer to “Stitch settings” (page 87).
CAUTION
●After adjusting the stitch width, slowly turn the handwheel toward you (counterclockwise) and check that the needle does not touch the presser foot. If the needle hits the presser foot, the needle may bend or break.
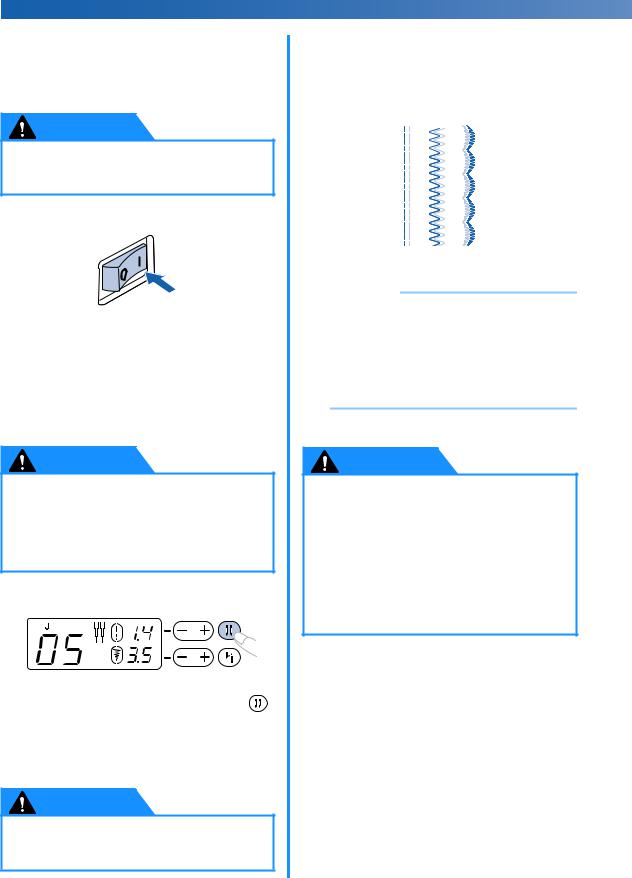
kPress  (Needle mode selection key).
X The twin needle can now be used.
• To return to single needle sewing, press (Needle mode selection key).
•Even after the sewing machine is turned off, the twin needle setting is not cancelled.
CAUTION
●When using the twin needle, be sure to select the twin needle setting, otherwise the needle may break or the machine may be damaged.
lStart• Forsewing.details on starting to sew, refer to “Starting to sew” (page 42).
XTwo lines of stitching are sewn parallel to each other.
 Note
Note
●When using the twin needle, the stitches may become bunched together, depending on the types of thread and fabric that are used. If this occurs, increase the stitch length. For details on adjusting the stitch length, refer to “Adjusting the stitch length and width” (page 40).
CAUTION
● When changing the sewing direction, press
 (needle position button) to raise the needle from the fabric, and then raise the presser foot lever and turn the fabric.
Otherwise the needle may break or the machine may be damaged.
●Do not try turning the fabric with the twin needle left down in the fabric, otherwise the needle may break or the machine may be damaged.
26

Replacing the Needle
This section provides information on sewing machine needles.
1
Needle precautions
Be sure to observe the following precautions concerning the handling of the needle. Failure to observe these precautions is extremely dangerous, for example, if the needle breaks and fragments are dispersed. Be sure to read and carefully follow the instructions below.
CAUTION
●Only use home sewing machine needles. Use of any other needle may bend the needle or damage the machine.
●Never use bent needles. Bent needles can easily break, possibly resulting in injuries.
27

GETTING READY—————————————————————————————————————————————————————————————————————————————————————————————————————
Needle types and their uses
The sewing machine needle that should be used depends on the fabric and thread thickness. Refer to the following table when choosing the thread and needle appropriate for the fabric that you wish to sew.
Fabric Type/Application |
Thread |
|
Size of Needle |
||
|
|
|
|||
Type |
|
Weight |
|||
|
|
|
|
||
|
|
|
|
|
|
|
Broadcloth |
Cotton thread |
|
60–80 |
|
Medium |
|
|
|
|
|
Taffeta |
Synthetic thread |
|
|
||
|
|
|
|||
weight |
|
|
75/11–90/14 |
||
|
|
|
|
||
fabrics |
Flannel, |
Silk thread |
|
50 |
|
|
|
|
|||
|
Gabardine |
|
|
||
|
|
|
|
|
|
|
|
|
|
|
|
|
Lawn |
Cotton thread |
|
60–80 |
|
|
|
|
|
|
|
Thin fabrics |
Georgette |
Synthetic thread |
|
65/9–75/11 |
|
|
|
||||
|
|
|
|
|
|
|
Challis, Satin |
Silk thread |
|
50 |
|
|
|
|
|
|
|
|
Denim |
Cotton thread |
|
30–50 |
|
Thick |
|
|
|
|
|
Corduroy |
Synthetic thread |
|
|
90/14–100/16 |
|
fabrics |
|
50–60 |
|||
|
|
|
|
||
|
Tweed |
Silk thread |
|
|
|
|
|
|
|
||
|
|
|
|
|
|
Stretch |
Jersey |
|
|
|
Ball point needle |
|
Thread for knits |
|
50–60 |
(golden colored) |
|
fabrics |
Tricot |
|
|||
|
|
|
75/11–90/14 |
||
|
|
|
|
||
|
|
|
|
|
|
|
|
Cotton thread |
|
50–80 |
|
Easily frayed fabrics |
|
|
|
||
Synthetic thread |
|
65/9–90/14 |
|||
|
|
||||
|
|
|
|
|
|
|
|
Silk thread |
|
50 |
|
|
|
|
|
|
|
For top-stitching |
Synthetic thread |
|
50–60 |
90/14–100/16 |
|
|
|
||||
Silk thread |
|
||||
|
|
|
|
|
|
|
|
|
|
|
|
 Memo
Memo
●The lower the thread number, the thicker the thread, and the higher the needle number, the thicker the needle.
●Use the ball point needle when sewing on stretch fabrics or fabrics where skipped stitches easily occur.
●Use a 90/14 to 100/16 needle with transparent nylon threads, regardless of the fabric being sewn.
CAUTION
●The appropriate fabric, thread and needle combinations are shown in the table above. If the combination of the fabric, thread and needle is not correct, particularly when sewing thick fabrics (such as denim) with thin needles (such as 65/9 to 75/11), the needle may bend or break. In addition, the stitching may be uneven or puckered or there may be skipped stitches.
28
 Loading...