


 Loading...
Brother MFC-J430W, DCP-J725DW, DCP-J925DW, MFC-J835DW, MFC-J825DW User Manual 2
...
Multi-Protocol On-board Ethernet Multi-function Print Server and Wireless Ethernet Multi-function Print Server
NETWORK
USER’S GUIDE
This Network User's Guide provides useful information of wired and wireless network settings using your Brother machine. You can also find supported protocol information and detailed troubleshooting tips.
To find basic information about network and advanced network features of your Brother machine, see the Network Glossary.
To download the latest manual, please visit the Brother Solutions Center at (http://solutions.brother.com/). You can also download the latest drivers and utilities for your machine, read FAQs and troubleshooting tips or learn about special printing solutions from the Brother Solutions Center.
Version 0
ENG

Applicable models
This User’s Guide applies to the following models. MFC-J280W/J430W/J432W/J625DW/J825DW/J835DW and DCP-J725DW/J925DW
Definitions of notes
We use the following icons throughout this User’s Guide:
IMPORTANT |
IMPORTANT indicates a potentially hazardous situation which, if not |
|
avoided, may result in damage to property or loss of product functionality. |
||
|
||
|
|
|
Note |
Notes tell you how you should respond to a situation that may arise or give |
|
tips about how the operation works with other features. |
||
|
||
|
|
Compilation and publication notice
Under the supervision of Brother Industries, Ltd., this manual has been compiled and published, covering the latest product’s descriptions and specifications.
The contents of this manual and the specifications of this product are subject to change without notice.
Brother reserves the right to make changes without notice in the specifications and materials contained herein and shall not be responsible for any damages (including consequential) caused by reliance on the materials presented, including but not limited to typographical and other errors relating to the publication.
©2011 Brother Industries, Ltd.
IMPORTANT NOTE
This product is approved for use in the country of purchase only. Do not use this product outside the country of purchase as it may violate the wireless telecommunication and power regulations of that country.
Windows® XP in this document represents Windows® XP Professional, Windows® XP Professional x64 Edition and Windows® XP Home Edition.
Windows Server® 2003 in this document represents Windows Server® 2003, Windows Server® 2003 x64 Edition, Windows Server® 2003 R2 and Windows Server® 2003 R2 x64 Edition.
Windows Server® 2008 in this document represents Windows Server® 2008 and Windows Server® 2008 R2.
Not all models are available in all countries.
In this manual, the LCD messages of the MFC-J825DW are used if not specified.
i

Table of Contents |
|
|
1 |
Introduction |
1 |
|
Network features........................................................................................................................................ |
1 |
|
Other Network features ....................................................................................................................... |
3 |
2 |
Changing your machine’s network settings |
4 |
|
How to change your machine’s network settings (IP address, Subnet mask and Gateway)..................... |
4 |
|
Using the control panel........................................................................................................................ |
4 |
|
Using the BRAdmin Light utility ........................................................................................................... |
4 |
|
Other Management Utilities ....................................................................................................................... |
7 |
|
BRAdmin Professional 3 utility (Windows®) ........................................................................................ |
7 |
3 |
Configuring your machine for a wireless network |
8 |
|
Overview.................................................................................................................................................... |
8 |
|
Confirm your network environment............................................................................................................ |
9 |
|
Connected to a computer with a WLAN access point/router in the network (Infrastructure mode) ..... |
9 |
|
Connected to a wireless capable computer without a WLAN access point/router in the network |
|
|
(Ad-hoc mode)............................................................................................................................... |
10 |
|
Wireless configuration temporarily using a USB cable ............................................................................ |
11 |
|
For Windows® users (Recommended) .............................................................................................. |
11 |
|
For Macintosh users .......................................................................................................................... |
12 |
|
Wireless configuration temporarily using an Ethernet cable (For MFC-J825DW/J835DW and |
|
|
DCP-J925DW) ...................................................................................................................................... |
14 |
|
One push configuration using Wi-Fi Protected Setup or AOSS™ ........................................................... |
17 |
|
One-push configuration using WPS (Wi-Fi Protected Setup) or AOSS™ ......................................... |
17 |
|
Configuration using the PIN Method of Wi-Fi Protected Setup ......................................................... |
19 |
|
Configuration using the machine’s control panel Setup Wizard .............................................................. |
23 |
|
Manual configuration from the control panel ..................................................................................... |
23 |
|
Configuring your machine when the SSID is not broadcast .............................................................. |
26 |
|
Configuration in Ad-hoc Mode ................................................................................................................. |
30 |
|
Configure the wireless settings.......................................................................................................... |
30 |
4 |
Control panel setup |
34 |
|
Network menu.......................................................................................................................................... |
34 |
|
TCP/IP............................................................................................................................................... |
34 |
|
Setup Wizard ..................................................................................................................................... |
36 |
|
WPS/AOSS™.................................................................................................................................... |
36 |
|
WPS w/PIN Code .............................................................................................................................. |
36 |
|
WLAN Status ..................................................................................................................................... |
37 |
|
Ethernet (For MFC-J825DW/J835DW and DCP-J925DW) ............................................................... |
37 |
|
MAC Address .................................................................................................................................... |
37 |
|
Network I/F (For MFC-J825DW/J835DW and DCP-J925DW) .......................................................... |
37 |
|
Restoring the network settings to factory default..................................................................................... |
38 |
|
Printing the Network Configuration Report .............................................................................................. |
39 |
|
Printing the WLAN Report ....................................................................................................................... |
40 |
|
Function table and default factory settings .............................................................................................. |
41 |
|
|
ii |

5 |
Web Based Management |
46 |
|
IMPORTANT............................................................................................................................................ |
46 |
|
Overview.................................................................................................................................................. |
46 |
|
How to configure the machine settings using Web Based Management (web browser)......................... |
47 |
|
Secure Function Lock 2.0 ........................................................................................................................ |
49 |
|
How to configure the Secure Function Lock 2.0 settings using Web Based Management (web |
|
|
browser)......................................................................................................................................... |
49 |
|
Changing the Scan to FTP configuration using a web browser............................................................... |
52 |
|
Changing the Scan to Network configuration using a web browser ........................................................ |
53 |
6 |
Internet fax |
54 |
|
IMPORTANT............................................................................................................................................ |
54 |
|
Internet fax Overview............................................................................................................................... |
54 |
|
Important information on Internet fax................................................................................................. |
55 |
|
How to Internet fax................................................................................................................................... |
56 |
|
Sending an Internet fax ..................................................................................................................... |
56 |
|
Receiving E-mail or Internet fax ........................................................................................................ |
57 |
|
Additional Internet Fax options ................................................................................................................ |
59 |
|
Forwarding received E-mail and fax messages................................................................................. |
59 |
|
Relay broadcasting............................................................................................................................ |
59 |
|
TX Verification Mail............................................................................................................................ |
61 |
|
Error mail ........................................................................................................................................... |
62 |
7 |
Security features |
63 |
|
IMPORTANT............................................................................................................................................ |
63 |
|
Overview.................................................................................................................................................. |
63 |
|
Sending an E-mail securely..................................................................................................................... |
64 |
|
Configuration using Web Based Management (web browser) .......................................................... |
64 |
|
Sending an E-mail with user authentication ...................................................................................... |
65 |
|
Secure Management using BRAdmin Professional 3 (Windows®).......................................................... |
66 |
|
To use the BRAdmin Professional 3 utility securely, you need to follow the points below ................ |
66 |
8 |
Troubleshooting |
67 |
|
Overview.................................................................................................................................................. |
67 |
A |
Appendix A |
73 |
|
Supported protocols and security features .............................................................................................. |
73 |
B |
Index |
74 |
iii

 1 Introduction
1
Network features
Your Brother machine can be shared on a 10/100 MB wired 1 or IEEE 802.11b/g/n wireless Ethernet network using the internal network print server. The print server supports various functions and methods of connection depending on the operating system you are running on a network supporting TCP/IP. The following chart shows what network features and connections are supported by each operating system.
 Note
Note
Although the Brother machine can be used in both a wired 1 and wireless network, only one connection method can be used at a time.
1 A wired network interface is available on the MFC-J825DW/J835DW and DCP-J925DW.
1

Introduction
Operating Systems |
Windows® XP |
Windows Server® |
Mac OS X |
1 |
|
Windows Vista® |
2003/2008 |
10.4.11 - 10.5.x - 10.6.x |
|
|
|
|||
|
|
|
|
|
|
Windows® 7 |
|
|
|
Printing |
r |
r |
r |
|
Scanning |
r |
|
r |
|
See Software User’s Guide. |
|
|
||
|
|
|
|
|
|
|
|
|
|
PC Fax Send 1 |
r |
|
r |
|
See Software User’s Guide. |
|
|
||
|
|
|
|
|
|
|
|
|
|
PC Fax Receive 1 |
r |
|
|
|
See Software User’s Guide. |
|
|
|
|
|
|
|
|
|
|
|
|
|
|
Network Photo Capture 2 |
r |
|
r |
|
See Software User’s Guide. |
|
|
||
|
|
|
|
|
|
|
|
|
|
BRAdmin Light |
r |
r |
r |
|
See page 4. |
|
|||
|
|
|
|
|
|
|
|
|
|
BRAdmin Professional 3 3 |
r |
r |
|
|
See page 7. |
|
|
||
|
|
|
|
|
|
|
|
|
|
Remote Setup |
r |
|
r |
|
See Software User’s Guide. |
|
|
||
|
|
|
|
|
|
|
|
|
|
Status Monitor |
r |
|
r |
|
See Software User’s Guide. |
|
|
||
|
|
|
|
|
|
|
|
|
|
Driver Deployment Wizard |
r |
r |
|
|
|
|
|
|
|
Vertical Pairing |
r 4 |
|
|
|
See Network Glossary. |
|
|
|
|
|
|
|
|
|
|
|
|
|
|
1Black and White only. Not available for DCP models.
2Not available for MFC-J280W/J430W/J432W.
3BRAdmin Professional 3 is available as a download from http://solutions.brother.com/.
4Windows® 7 only.
2

Introduction
Other Network features
1
Brother Web Connect (MFC-J825DW/J835DW USA only)
Brother Web Connect allows you to download and print images and also to upload files by accessing services on the internet directly from your machine. For details, please refer to the Web Connect Guide located on the Manual download page for your model on the Brother Solutions Center (http://solutions.brother.com/).
3

 2 Changingsettings your machine’s network
How to change your machine’s network settings |
2 |
(IP address, Subnet mask and Gateway) |
Using the control panel
You can configure your machine for a network using the control panel Network menu. (See Control panel setup uu page 34.)
Using the BRAdmin Light utility
The BRAdmin Light utility is designed for initial setup of Brother network connected devices. It also can search for Brother products in a TCP/IP environment, view the status and configure basic network settings, such as IP address.
Installing BRAdmin Light
Windows®
a Please make sure that your machine is ON.
b Turn on your computer. Close any running applications before configuration.
c Put the supplied CD-ROM into your CD-ROM drive. The opening screen will appear automatically. If the model name screen appears, choose your machine. If the language screen appears, choose your language.
d The CD-ROM main menu will appear. Click Advanced, and then Network Utilities. e Click BRAdmin Light and follow the on-screen instructions.
Macintosh
The BRAdmin Light software will be installed automatically when you install the printer driver. If you have already installed the printer driver, you do not have to install BRAdmin Light again.
4

Changing your machine’s network settings
Setting the IP address, Subnet Mask and Gateway using BRAdmin Light
|
Note |
|
|
|
|
|
|
• |
You can download the latest Brother BRAdmin Light utility version from http://solutions.brother.com/. |
2 |
|
• |
If you require more advanced printer management, use the latest Brother BRAdmin Professional 3 utility |
||
that is available as a download from http://solutions.brother.com/. This utility is only available for Windows® users.
•If you are using a firewall function of anti-spyware or antivirus applications, temporarily disable them. Once you are sure that you can print, re-enable the application.
•Node Name: The Node Name appears in the current BRAdmin Light window. The default Node Name of the print server in the machine is “BRNxxxxxxxxxxxx” or “BRWxxxxxxxxxxxx”. (“xxxxxxxxxxxx” is your machine’s MAC Address / Ethernet Address.)
a
b c
Start the BRAdmin Light utility.
Windows®
Click Start / All Programs / Brother / BRAdmin Light / BRAdmin Light.
Macintosh
Double-click Macintosh HD (Startup Disk) / Library / Printers / Brother / Utilities / BRAdmin Light.jar file.
BRAdmin Light will search for new devices automatically.
Double-click the unconfigured device.
Windows® |
Macintosh |
5
Changing your machine’s network settings
 Note
Note
•If the print server is set to its factory default settings (if you don’t use a DHCP/BOOTP/RARP server), the device will appear as Unconfigured in the BRAdmin Light utility screen.
• You can find the Node Name and MAC Address (Ethernet Address) by printing the Network Configuration 2 Report. (See Printing the Network Configuration Report uu page 39 for information on how to print the Network Configuration Report on your print server.) You can also find the Node Name and MAC Address from the control panel. (See Control panel setup uu page 34.)
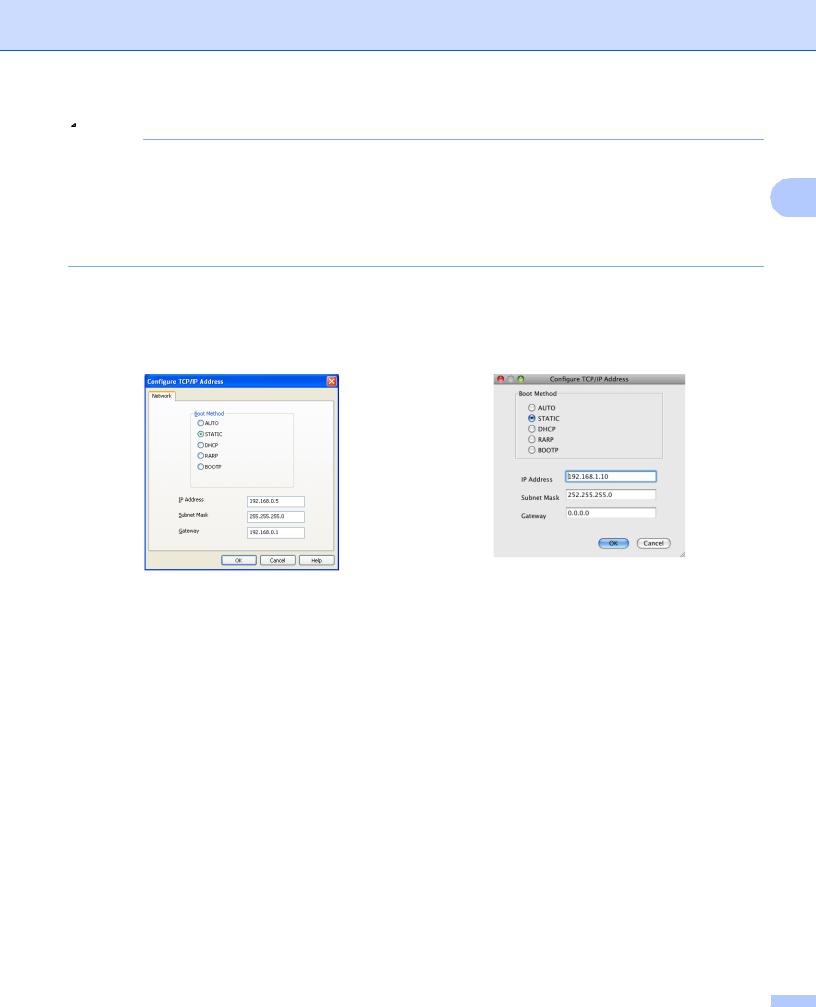
d Choose STATIC from Boot Method. Enter the IP Address, Subnet Mask and Gateway (if needed) of
your print server. |
|
Windows® |
Macintosh |
e f
Click OK.
With the correctly programmed IP address, you will see the Brother print server in the device list.
6
Changing your machine’s network settings
Other Management Utilities
Your Brother machine has the following management utilities in addition to the BRAdmin Light utility. You can |
|
change your network settings using these utilities. |
2 |
|
BRAdmin Professional 3 utility (Windows®)
BRAdmin Professional 3 is a utility for a more advanced management of network connected Brother devices. This utility can search for Brother products on your network and view the device status from an easy to read Explorer style window that changes color identifying the status of each device. You can configure network
and device settings along with the ability to update device firmware from a Windows® computer on your LAN. BRAdmin Professional 3 can also log activity of Brother devices on your network and export the log data in an HTML, CSV, TXT or SQL format.
For more information and downloading, visit us at http://solutions.brother.com/.
 Note
Note
•Please use the latest version of the BRAdmin Professional 3 utility that is available as a download from http://solutions.brother.com/. This utility is only available for Windows® users.
•If you are using a firewall function of anti-spyware or antivirus applications, temporarily disable them. Once you are sure that you can print, re-enable the application.
•Node name: The node name appears in the current BRAdmin Professional 3 window. The default Node name is “BRNxxxxxxxxxxxx” or “BRWxxxxxxxxxxxx”. (“xxxxxxxxxxxx” is your MAC Address / Ethernet Address.)
7

 3 Configuringnetwork your machine for a wireless
Overview
To connect your machine to your wireless network, you need to follow the steps in the Quick Setup Guide.
Configuration using the CD-ROM installer and a USB cable is a recommended way for Windows® users. By |
3 |
using this method, you can easily connect your machine to your wireless network. Macintosh users should |
choose their preferred configuration method from the choices covered in the Quick Setup Guide.
For additional wireless configuration methods please read this chapter for more details on how to configure the wireless network settings. For information on TCP/IP settings, see How to change your machine’s network settings (IP address, Subnet mask and Gateway) uu page 4.
 Note
Note
• To achieve optimum results with normal every day document printing, place the Brother machine as close to the WLAN access point/router as possible with minimal obstructions. Large objects and walls between the two devices as well as interference from other electronic devices can affect the data transfer speed of your documents.
Due to these factors, wireless may not be the best method of connection for all types of documents and applications. If you are printing large files, such as multi-page documents with mixed text and large
graphics, you may want to consider choosing wired Ethernet for a faster data transfer 1, or USB for the fastest throughput speed.
• Although the Brother machine can be used in both a wired 1 and wireless network, only one connection method can be used at a time.
• Before configuring wireless settings, you will need to know your SSID and Network Key.
1 |
A wired network interface is available on the MFC-J825DW/J835DW and DCP-J925DW. |
|
8

Configuring your machine for a wireless network
Confirm your network environment
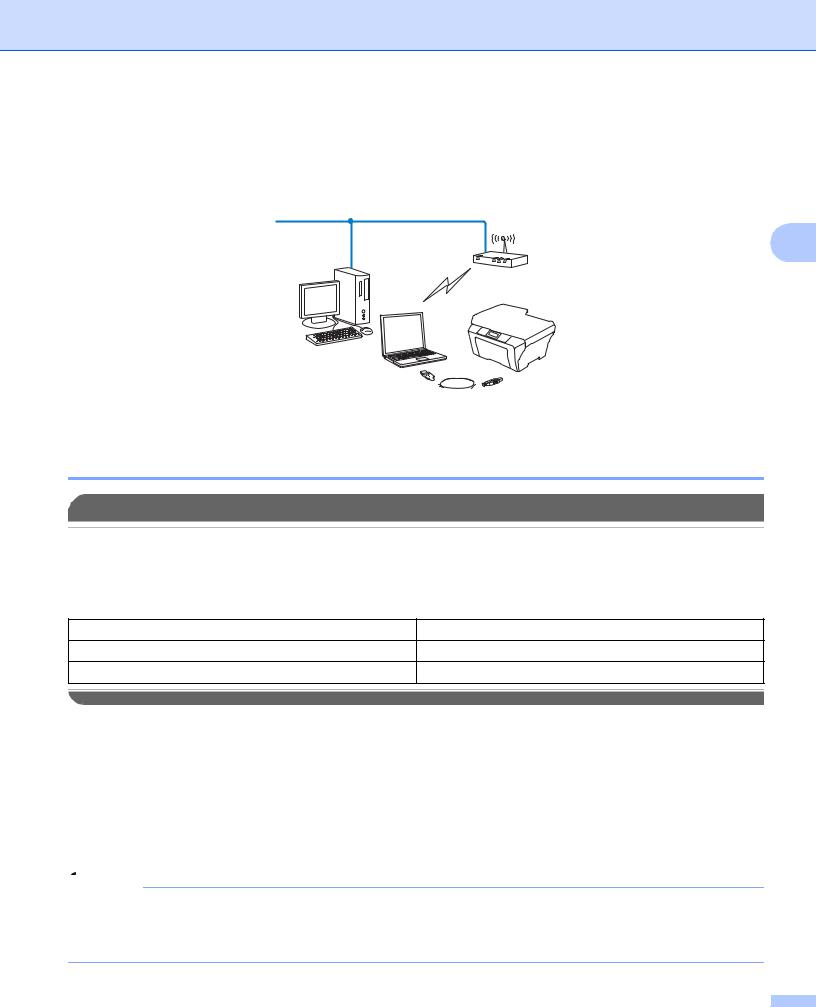
Connected to a computer with a WLAN access point/router in the network (Infrastructure mode)
1 3
4 
 2
2
3
1WLAN access point/router 1
1If your computer supports Intel® My WiFi Technology (Intel® MWT), you can use your computer as a Wi-Fi Protected Setup supported access point.
2Wireless network machine (your machine)
3Wireless capable computer connected to the WLAN access point/router
4Wired computer (which is not wireless capable) connected to the WLAN access point/router with an Ethernet cable
Install method
The following instructions will offer four methods for installing your Brother machine in a wireless network environment. Choose the method you prefer for your environment.
Wireless configuration temporarily using a USB cable (Recommended for Windows® users) See Wireless configuration temporarily using a USB cable uu page 11.
Wireless configuration temporarily using an Ethernet cable
See Wireless configuration temporarily using an Ethernet cable (For MFC-J825DW/J835DW and DCP-J925DW) uu page 14.
One push wireless configuration using WPS or AOSS™
See One push configuration using Wi-Fi Protected Setup or AOSS™ uu page 17.
Wireless configuration using the Setup Wizard from the control panel
See Configuration using the machine’s control panel Setup Wizard uu page 23.
9
Configuring your machine for a wireless network
Connected to a wireless capable computer without a WLAN access point/router in the network (Ad-hoc mode)
This type of network does not have a central WLAN access point/router. Each wireless client communicates directly with each other. When the Brother wireless machine (your machine) is part of this network, it receives all print jobs directly from the computer sending the print data.
3
1
2
1Wireless network machine (your machine)
2Wireless capable computer
We do not guarantee the wireless network connection with Windows Server® products in Ad-hoc mode. To set up your machine in Ad-hoc mode, see Configuration in Ad-hoc Mode uu page 30.
10
Configuring your machine for a wireless network
Wireless configuration temporarily using a USB cable
It is recommended that you use a PC wirelessly connected to your network for this method.
You can remotely configure the machine from the computer on the network using a USB cable (A) 1.
3
A 
 1 You can configure the wireless settings of the machine using a USB cable temporarily connected to a wired or wireless computer.
For Windows® users (Recommended)
 IMPORTANT
•You need to temporarily use a USB cable during configuration (cable not included).
•If you are using Windows® XP, or using a network cable to configure your machine to connect with your wireless access point/router, you need to know the SSID and Network Key of your access point/router. Write them down in the area below, as they are required when configuring the machine’s wireless settings.
Item |
Record the current wireless network settings |
SSID (Network Name):
Network Key
a b
Turn on your computer.
Start the Brother installer application.
1Put the supplied CD-ROM into your CD-ROM drive. The opening screen will appear automatically. If the model name screen appears, choose your machine. If the language screen appears, choose your language.
2The CD-ROM main menu will appear.
 Note
Note
•If the Brother screen does not appear automatically, go to My Computer (Computer), double-click the CD-ROM icon, and then double-click start.exe.
•The screen on your machine may vary depending on your region.
11

Configuring your machine for a wireless network
3Click Install MFL-Pro Suite and click Yes if you accept the license agreements. Follow the onscreen instructions.
c Choose Wireless Network Connection, and then click Next.
d Choose Change the Firewall port settings to enable network connection and continue with the installation. (Recommended) and click Next.
3
e Choose Use your computer or the control panel directly. and click Next. f Choose Temporarily use a USB cable (Recommended) and click Next. g Follow the on-screen instructions to configure the wireless settings.
 Note
Note
When the Available Wireless Networks screen appears, if your access point is set to not broadcast the SSID you can manually add it by clicking the Advanced button. Follow the on-screen instructions for entering the Name (SSID).
(Windows®)
You have completed the wireless network setup. If you would like to continue installing drivers and software necessary for operating your device, please choose Install MFL-Pro Suite from the CD-ROM menu.
For Macintosh users
 IMPORTANT
•The following instructions will install your Brother machine in a network environment using the Brother installer application found on the CD-ROM we have provided with the machine.
•If you have previously configured the wireless settings of the machine, you must reset the LAN settings before you can configure the wireless settings again.
To reset the LAN settings, see Restoring the network settings to factory default uu page 38.
•If you are using a firewall function of anti-spyware or antivirus applications, temporarily disable them. Once you are sure that you can print please re-enable your firewall.
•You need to temporarily use a USB cable (not included) during configuration.
•You must know your wireless network settings before you proceed with this installation.
If you are going to connect your Brother machine to your network, we recommend that you contact your system administrator prior to installation.
•If your router uses WEP encryption, enter the key used as the first WEP key. Your Brother machine supports the use of the first WEP key only.
12

Configuring your machine for a wireless network
a Before configuring your machine we recommend you write down the SSID and Network Key (if required) for your wireless network. You will need this information before you continue with the configuration.
Item |
Record the current wireless network settings |
|
SSID (Network Name): |
|
|
|
|
|
Network Key |
|
3 |
|
|
|
b Turn on your computer. |
|
|
|
|
|
c Start the Brother installer application. |
||
1Put the supplied CD-ROM into your CD-ROM drive. Double-click the MFL_PRO Suite icon on your desktop.
2Double-click Utilities.
3Double-click the Wireless Device Setup Wizard.
d Choose Use your computer or the control panel directly. and then click Next.
e Read the Important Notice. Check the box after you confirm the SSID and Network Key, and then click
Next.
f Choose Temporarily use a USB cable (Recommended) and then click Next. g Follow the on-screen instructions to configure the wireless settings.
 Note
Note
When the Available Wireless Networks screen appears, if your access point is set to not broadcast the SSID you can manually add it by clicking the Advanced button. Follow the on-screen instructions for entering the Name (SSID).
(Macintosh)
You have completed the wireless network setup. If you would like to continue installing drivers and software necessary for operating your device, please double-click Start Here OSX in the CD-ROM.
 Note
Note
If your wireless settings fail, the Wireless Device Setup Wizard will appear during the installation of MFL-Pro Suite. Confirm your settings by following the on-screen instructions.
13
Configuring your machine for a wireless network
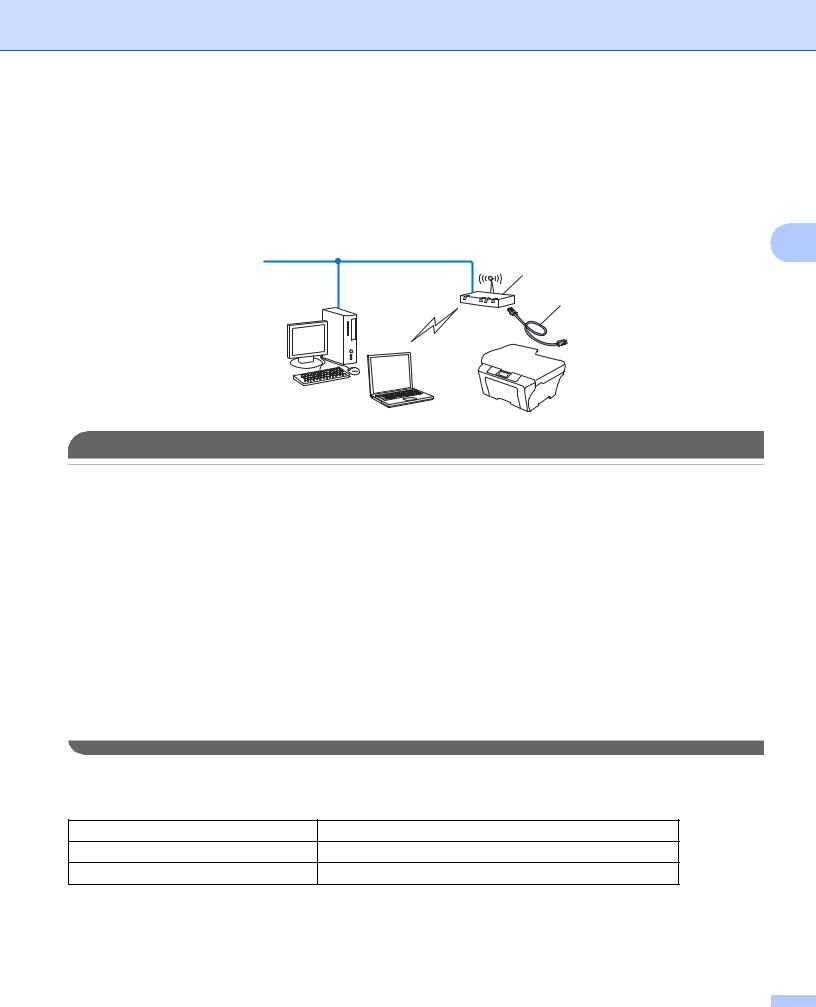
Wireless configuration temporarily using an Ethernet cable (For MFC-J825DW/J835DW and DCP-J925DW)
If there is an Ethernet Hub or Router in the same network as the WLAN access point (A) of your machine, you can temporarily connect the Hub or Router to the machine using a network cable (B). You can then
remotely configure the machine from a computer on the network.
3
A
B
 IMPORTANT
•The following instructions will install your Brother machine in a network environment using the Brother installer application found on the CD-ROM we have provided with the machine.
•If you have previously configured the wireless settings of the machine, you must reset the LAN settings before you can configure the wireless settings again.
To reset the LAN settings, see Restoring the network settings to factory default uu page 38.
•If you are using a firewall function of anti-spyware or antivirus applications, temporarily disable them. Once you are sure that you can print please re-enable your firewall.
•You need to temporarily use an Ethernet cable (not included) during configuration.
•You must know your wireless network settings before you proceed with this installation.
If you are going to connect your Brother machine to your network, we recommend that you contact your system administrator prior to installation.
•If your router uses WEP encryption, enter the key used as the first WEP key. Your Brother machine supports the use of the first WEP key only.
a Before configuring your machine we recommend you write down the SSID and Network Key (if required) for your wireless network. You will need this information before you continue with the configuration.
Item |
Record the current wireless network settings |
SSID (Network Name):
Network Key
b Turn on your computer.
14

Configuring your machine for a wireless network
c Start the Brother installer application.
Windows®
1Put the supplied CD-ROM into your CD-ROM drive. The opening screen will appear automatically. If the model name screen appears, choose your machine. If the language screen appears, choose your language.
2 |
The CD-ROM main menu will appear. Click Advanced. |
3 |
|
 Note
Note
•If the Brother screen does not appear automatically, go to My Computer (Computer), double-click the CD-ROM icon, and then double-click start.exe.
•The screen on your machine may vary depending on your region.
3Click Wireless LAN Setup Wizard.
Macintosh
1Put the supplied CD-ROM into your CD-ROM drive. Double-click the MFL_PRO Suite icon on your desktop.
2Double-click Utilities.
3Double-click the Wireless Device Setup Wizard.
d Choose Use your computer or the control panel directly. and then click Next.
e Choose Temporarily use an Ethernet (LAN) cable and then click Next.
When the Important Notice screen appears, read the notice, check the box after you confirm the wireless setting is enabled and then click Next.
f Follow the on-screen instructions to configure the wireless settings.
 Note
Note
When the Available Wireless Networks screen appears, if your access point is set to not broadcast the SSID you can manually add it by clicking the Advanced button. Follow the on-screen instructions for entering the Name (SSID).
15

Configuring your machine for a wireless network
(Windows®)
You have completed the wireless network setup. If you would like to continue installing drivers and software necessary for operating your device, please choose Install MFL-Pro Suite from the CD-ROM menu.
(Macintosh)
You have completed the wireless network setup. If you would like to continue installing drivers 3 and software necessary for operating your device, please double-click Start Here OSX in the CD-ROM.
 Note
Note
If your wireless settings fail, the Wireless Device Setup Wizard will appear during the installation of MFL-Pro Suite. Confirm your settings by following the on-screen instructions.
16
Configuring your machine for a wireless network
One push configuration using Wi-Fi Protected Setup or AOSS™
You can use WPS or AOSS™ from the control panel menu to configure your wireless network settings if your WLAN access point/router (A) supports either Wi-Fi Protected Setup (PBC 1) or AOSS™.
3
A
1 Push Button Configuration
 IMPORTANT
•If you are going to connect your Brother machine to your network, we recommend that you contact your system administrator prior to installation. You must know your wireless network settings before you proceed with this installation.
•If you have previously configured the wireless settings of the machine, you must reset the LAN settings before you can configure the wireless settings again.
To reset the LAN settings, see Restoring the network settings to factory default uu page 38.
One-push configuration using WPS (Wi-Fi Protected Setup) or AOSS™
For MFC-J430W/J432W
a Press Menu.
b Press a or b to choose Network. Press OK.
c Press a or b to choose WPS/AOSS. Press OK.
d When Enable WLAN? is displayed, press OK to accept. This will start the wireless setup wizard.
To cancel, press Stop/Exit.
17

Configuring your machine for a wireless network
e When the LCD shows Start WPS or AOSS, press the WPS or AOSS™ button on your wireless access point/router. See the user's guide for your wireless access point/router for instructions. Then press OK and your machine will now automatically detect which mode (WPS or AOSS™) your wireless access point/router uses and try to connect to your wireless network.
f A connection result message appears for 60 seconds on the LCD and a wireless LAN report will |
|
automatically be printed. If the connection failed, check the error code on the printed report. |
3 |
uuQuick Setup Guide: Troubleshooting |
(Windows®)
You have completed the wireless network setup. If you would like to continue installing drivers and software necessary for operating your device, please choose Install MFL-Pro Suite from the CD-ROM menu.
(Macintosh)
You have completed the wireless network setup. If you would like to continue installing drivers and software necessary for operating your device, please double-click Start Here OSX in the CD-ROM.
For MFC-J280W/J625DW/J825DW/J835DW and DCP-J725DW/J925DW
a b c
d e
Press Menu.
Press Network.
(MFC-J825DW/J835DW and DCP-J925DW only) Press WLAN.
Press a or b to display WPS/AOSS, and press WPS/AOSS.
When Enable WLAN? or Switch Network interface to wireless? is displayed, press Yes to accept.
This will start the wireless setup wizard. To cancel, press Stop/Exit.
f When the LCD shows Start WPS or AOSS, press the WPS or AOSS™ button on your wireless access point/router. See the user's guide for your wireless access point/router for instructions. Then press OK and your machine will now automatically detect which mode (WPS or AOSS™) your wireless access point/router uses and try to connect to your wireless network.
g A connection result message appears for 60 seconds on the LCD and a wireless LAN report will automatically be printed. If the connection failed, check the error code on the printed report. uuQuick Setup Guide: Troubleshooting
18

Configuring your machine for a wireless network
(Windows®)
You have completed the wireless network setup. If you would like to continue installing drivers and software necessary for operating your device, please choose Install MFL-Pro Suite from the CD-ROM menu.
(Macintosh)
You have completed the wireless network setup. If you would like to continue installing drivers 3 and software necessary for operating your device, please double-click Start Here OSX in the CD-ROM.
Configuration using the PIN Method of Wi-Fi Protected Setup
If your WLAN access point/router (A) supports Wi-Fi Protected Setup, you can also configure using the PIN Method of Wi-Fi Protected Setup. The PIN (Personal Identification Number) Method is one of the
connection methods developed by the Wi-Fi Alliance®. By inputting a PIN which is created by an Enrollee (your machine) to the Registrar (a device that manages the wireless LAN), you can setup the wireless network and security settings. See the user’s guide for your WLAN access point/router for instructions on how to access the Wi-Fi Protected Setup mode.
Connection when the WLAN access point/router (A) doubles as a Registrar 1.
A
Connection when another device (C), such as a computer is used as a Registrar 1.
A
C
1 The Registrar is a device that manages the wireless LAN.
19

Configuring your machine for a wireless network
 Note
Note
Routers or access points that support Wi-Fi Protected Setup have a symbol as shown below.
3
For MFC-J430W/J432W
a Press Menu.
b Press a or b to choose Network. Press OK.
c Press a or b to choose WPS w/PIN Code. Press OK.
d When Enable WLAN? is displayed, press OK to accept. This will start the wireless setup wizard.
To cancel, press Stop/Exit.
e The LCD will show an 8 digit PIN and the machine begins searching for a WLAN access point/router for up to 5 minutes.
f Using a computer that is on the network, type “http://access point’s IP address/” into your browser. (Where “access point’s IP address” is the IP address of the device that is used as the Registrar 1.) Go to the WPS (Wi-Fi Protected Setup) setting page and input the PIN which the LCD shows in e to the Registrar and follow the on-screen instructions.
1 The Registrar is normally the WLAN access point/router.
 Note
Note
The setting page is different, depending on the brand of WLAN access point/router. See the instruction manual that came with your WLAN access point/router.
If you are using your Windows Vista® or Windows® 7 computer as a Registrar, perform the following instructions.
 Note
Note
To use a Windows Vista® or Windows® 7 computer as a Registrar, you need to register it to your network in advance. See the instruction manual that came with your WLAN access point/router.
20
Loading...